An excellent harvest with minimal cost - high beds. DIY brick beds DIY metal profile beds
We will send the material to you by e-mail
A dacha is not just a plot for growing and harvesting. For many, this is a favorite place to relax and implement ideas for. Often the disembarkation method vegetable crops relegated to the background, but this is not correct, because from their interesting location and attractive appearance largely depends on the appearance of the entire landscape. This article tells you the easiest way to make beds for the lazy at the dacha. Photos and descriptions of the most good ideas, as well as ways to implement them, should help make your site comfortable and well-groomed.
Tall structures made of boards for planting crops will be the highlight of any site
A garden bed is most often a fenced plot of land intended for growing a certain type of plant.

- Slate.
Usually this material is used only if it is available (for example, left after the repair of the roof).

- Plastic.
The main feature of plastic is that it can be given any shape, so it is great for round or other curved fit options. In addition, it is not affected by rain and low temperatures, so it will last a long time without losing its original attractiveness.

An expensive and durable option.

- A natural stone.
It produces the most spectacular bumpers that will serve for many years. Unlike bricks, stones have an irregular shape, which will allow you to make landscape design in an eco-style. Disadvantages of stone walls: high price and gradual withdrawal into the soil under the influence of its own weight, so such a side must be periodically checked and corrected.

Qualitatively made with your own hands from improvised materials will serve for many years, but for a good harvest, its correct location is also necessary.
Placing beds in the garden: how to arrange, photos, tips
The quality and quantity of the crop depends on the proper location of the beds in the summer cottage, so this issue should be given special attention. First of all, you need to know the following:
- Beds located on the cardinal points (from north to south) - good decision only for low plants on a flat horizontal area.
- If the site has a slope that cannot be leveled, the beds should be across it regardless of orientation.
- It is desirable to make rows of one plant of the same size. This will make it easier to calculate the amount of fertilizer, the degree of irrigation and planting.
- If the site has multidirectional slopes, choose the south side (the crop will ripen faster on it).

On the small areas often there is a lack of free horizontal areas for planting. If this is your case, try one of the following ideas:
- Create vertical designs.

- Use unused items for planting plants (for example, a wheelbarrow, a barrel, and so on).
- Attach the bed to the recreation area.
How best to make beds in the garden - options
The beds are classified according to design features, while the following types are distinguished:
- Traditional (flush with the rest of the site, dimensions make it easy to reach the center from any side (right or left)).

- High (30-40 cm above ground level, contribute to the most rapid maturation harvest).

- Deep (during the device, a trench is dug 20-30 cm deep, due to which the earth most often does not freeze through, and the landing can be carried out earlier).
- Narrow (for example, according to the Mittlider method, described in detail in the next chapter).
- Vertical ( perfect solution for small plots, but not all plants can be planted in this way).
Related article:
How to make beds from boards with your own hands
Now let's look at how to properly make beds in a garden made of wood. This material is the most common when arranging beds. Board structures have the following advantages:
- Reliability.
The tree perfectly retains moisture inside the row, and also does not deform for a long time.
- Low cost.
This material often remains after construction. If it was not there, you can buy boards at a fairly low price.
- Ease of installation.
The main thing is high-quality wood processing, if this is not done, insects and moisture will quickly destroy the structure.
- Attractive appearance.
Wood is a material ideal for eco-style beds.
The only drawback of board structures is their fragility (in comparison, for example, with plastic or brick). However, the ability to change them quickly and at the lowest cost more than covers it.

How to make a bed of boards with your own hands: photos, dimensions, installation sequence
If you decide to make a wooden structure, first of all you need to choose the type of wood:
- Oak or ash- hardwoods, the boards of which are perfect in this case, but their price is quite high.
- Pine- cheap, but short-lived. You can extend the life of such a fence with the help of periodic chemical treatment.
- Cedar or larch– the best price-quality ratio. Due to the presence of resin in the data conifers, there is no need to process them.
- Acacia- also a great option for arranging beds.
What are the optimal sizes of the beds from the boards? First you need to decide on the height of the structure, which depends on the following factors:
- Features of the planted culture.
Some vegetables require a certain depth (for example, for potatoes, the planting depth must be at least 40 cm).
- Soil fertility.
If the soil is fertile, the sides can be made 10-15 cm high. If fertile soil is required to be backfilled, 30 cm or more.
- Bed type.
For example, for warm temperatures, a height of 50 cm or more is typical.
The length of the row can be any, but it is not recommended to make it too long for two reasons: it will be an obstacle to moving around the garden, the wooden structure will have to be further strengthened with oblique or vertical pegs.
Most important parameter when arranging beds in the country - their width, since ease of use largely depends on it. If you make it too wide, it will be problematic to reach its center. Therefore, the maximum value of the width is considered to be 100 cm.
In most cases (if the planned structure does not have too much complex shape) it will not be difficult to make a bed of boards with your own hands. The size of the boards depends on the size of the future beds, but if you only have material of insufficient length, it does not matter, several boards can always be spliced in length.
The procedure for the construction of a wooden structure:
- Territory preparation.
At this stage, it is necessary to level and dig the site for the structure.
For a rectangular structure, it is necessary to connect 4 boards and attach support bars to them, which should be 20-30 cm longer than future sides. They need to be slightly sharpened with an ax from the free side (to simplify entry into the ground).

- Construction installation.
We hammer the structure into the ground, while it is important to use the level to achieve maximum evenness of the structure.
- Surface treatment of boards.
First of all, the surface is primed (to protect against moisture and pests), then covered oil paint(optional, you can leave the color of the tree).
- Backfill.
The composition depends on the type of construction and the selected culture. But in all cases, the first layer should be drainage.
Most often, they try to plant only one crop in one area, but sometimes they practice joint planting of vegetables in the garden. However, it is worth remembering that not all plants get along with each other. Therefore, the following is a table of compatibility of vegetables in the beds.
Related article:
Interesting ideas come to the mind of many summer residents and owners of private houses. In the article, we will consider original photo examples and several instructions for creating such beauty.
Mixed planting of vegetables in the garden: examples, photos
More and more summer residents are interested in obtaining not only a large harvest, but also an environmentally friendly one. Therefore, the question arises, how to achieve a quality crop without resorting to chemicals?
An excellent solution is a mixed planting of vegetables. After all, some cultures have a beneficial effect on each other. However, in this matter it is worth being extremely careful, since not all plants like any kind of neighborhood at all.

Thanks to the science of "allelopathy", a table of the neighborhood of vegetables in the garden has been compiled, using which you can significantly reduce the use of chemicals for pest control and fertilizer.
Neighborhood of vegetables in the beds - compatibility table
The table below reflects the compatibility of vegetables in the garden. Planting using this information will ensure a quality crop with minimum investment funds.

Mixed planting vegetables in the garden: examples with photos and tips
Each benevolent or unfriendly neighborhood of vegetables in the garden has its own rationale. For example, strawberries and onions are great neighbors. Onions protect the berry from rot and disease, and if parsley is also planted nearby, it eliminates the appearance of slugs.

Onions are also a great companion for most garden crops, as they keep pests away. The most interesting neighborhood this plant- with carrots. Both cultures have their own pest - the onion and carrot fly, and the first one cannot stand the smell of carrots, and the second - onions.

Garlic is excellent for pest control, making it a good companion for most crops. However, it is not recommended to plant it next to plants of the legume family, since the latter are leaders in the fence. nutrients, and garlic needs quite a lot of them.
Joint cultivation of crops in the garden can be detrimental to other vegetables. For example, tomatoes should not be planted with cucumbers, as they require varying degrees of watering. Thus, the proximity of these two crops will create difficulties in processing (there will be a need for spot irrigation, which will take much more time and effort).
In addition to the properties of plants, it is necessary to pay attention to their size. For example, when alternating cabbage and radish, the second crop will receive insufficient sunlight, causing the quality of the crop to deteriorate significantly.
So, you have developed an ideal layout for all the vegetables in your summer cottage, but every year the harvest is getting worse. What to do? It is necessary to ensure crop rotation.
Table of crop rotation of vegetables in the beds
Crop rotation is the organization of crop rotation in the garden. Ideally this process must be continuous and annual. However, in real conditions, this is very difficult to achieve for the following reasons:
- There is not enough information about the contamination of the soil and the presence of pests in it.
- There is no time for precise calculations of the ideal landing option.
Why is crop rotation essential for a good harvest? Every culture has unique features in terms of obtaining nutrients. Someone is looking for them in the surface layers of the soil (for example, a cucumber), someone, in search of water, lowers the roots several meters deep (for example, a watermelon). In addition, the growth of each plant requires (to a greater extent) different elements (for example, for a tomato - phosphorus, for cabbage - nitrogen).
Now imagine that from year to year a certain layer of soil is depleted, and the content of precisely those substances that are necessary for this crop decreases.To make it easier for you to decide how to rotate vegetables, below is a table of vegetable crop rotation in the garden.

Important! The main thing is that the culture does not return to its original place within 3-4 years. During this time, the soil will have time to recover and accumulate required amount nutrients.
How to make a garden bed for cucumbers in the open field: photos, methods
Cucumbers are a rather capricious crop that requires special care. Many believe that it can only be planted in seedlings, however, thanks to many years of selection, there are currently several varieties that can be planted immediately in open ground.

First of all, it is necessary to prepare beds for cucumbers in the spring:
- Correctly choose the direction of the rows - from north to south.
- Fertilize the soil (the best solutions are cow dung or chicken manure, if they are not available, any mineral fertilizer will do).
- Put the sides (preferably at least 25 cm).
The main secrets of growing cucumbers in the open field are choosing the right planting time (from May to mid-June, depending on the region) and choosing the right variety.
How to make beds for cucumbers - common features
In the case when seedlings are not used, grow a quality crop in the usual way(on standard beds) will not work. You must use one of the other ways to grow cucumbers in open ground:
- The device beds with a bookmark.
- Installation of a warm bed (including a raised structure).

These methods are non-standard, therefore, they are described in detail below to prevent errors during the arrangement.
How to make beds for cucumbers with a bookmark in the garden
To arrange a bed for growing cucumbers with a bookmark, it is necessary to dig a trench 30 cm deep and successively fill it with the following layers:
- No water stagnation.
Warm beds for cucumbers in the open field
How to make a warm bed for cucumbers on the surface of the earth? To do this, it is necessary to build a box (for example, from boards or bricks) and fill it with the following layers:
- Sand.
- Organic waste (leaves, bark, etc.).
- Straw.
- Fertilizer (manure is best).
- Earth and humus.
The main thing is to carefully compact each layer, otherwise the soil will turn out to be too loose, and you should not expect a good harvest.

Advantages warm beds for cucumbers:
- Lack of dirt from the beds due to the presence of bumpers.
- High yield.
- Aesthetic appearance (you can make beautiful identical beds).
Raised beds for cucumbers in the open field
In an unfavorable climate, it is advisable to arrange raised (or high) beds 40-50 cm high (for convenience, you can make it higher). At the same time, the sequence of layers remains the same as in conventional warm structures on the surface of the earth. Such structures have the following advantages:
- Even faster warming of the soil, which means that the harvest will appear earlier.
- Convenience (no need to bend over to care for cucumbers).

Save Time: Featured Articles Every Week by Mail
We will send the material to you by e-mail
Working in the garden takes a lot of time and effort, so every summer resident tries to simplify the process of planting and caring for the crop. The main problem is the need to be in a bent position for a long time, which causes back pain and may begin headache. But this can be avoided by organizing high beds in the country with your own hands. Photo and detailed description technologies, the devices given in this article will help determine the type of beds and the material from which they are best constructed.
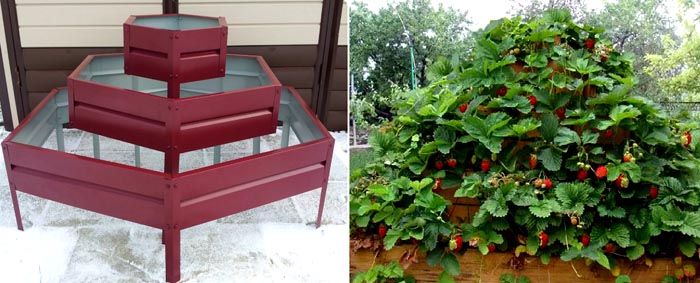
The original high multi-level design will be the highlight of your landscape
Raised vegetable gardens are gaining popularity more and more rapidly; they are used not only for growing vegetables, but also for planting flowers (). Due to the use of various materials for the construction of the borders for the beds (or flower beds), some options have a very attractive appearance, due to which they are increasingly used on open areas vegetable garden. However, in order to properly arrange high beds with sides, you need to know some of the features of such an organization of space in the garden.

Advice! Do not arrange high beds in the southern regions. In them, the earth already warms up enough, and with such a planting, the roots of plants can burn.
Features of the device of high beds
First of all, you should follow the recommendations on the size of such beds:
- Height.
Of course, the main thing is that it is convenient to work with a new bed, the arrangement at the waist level is considered optimal, but in each case everything is individual, so be guided by your feelings.
In addition, the height depends on the degree of soil fertility. So for fertile soil the minimum value is 15 cm, for infertile - 30 cm.
- Lenght and width.
The length of the structure can be any (as far as your garden allows), the main thing is to further strengthen the extended sections with retaining posts. Width should be given special attention. It is advisable to plant no more than two rows of plants in a 90-120 cm wide bed, so they will receive enough sunlight, and you can easily reach each one.
Next, you need to choose a place to install a high bed. At the same time, the quality of the soil of a particular site is not of particular importance, since it will not participate in the life support of the plant. The main thing is to check whether a sufficient amount of light enters this area of the garden, it is desirable that the sun's rays illuminate the plants for at least 5 hours a day.

On high beds, you can grow almost everything: from vegetables to berries. However, too tall plants(for example, corn) should not be planted in them because of the complexity of their subsequent care.
Pros and cons of high beds
Many summer residents continue to use ordinary beds, despite their inconvenience. Compared to traditional way devices, high structures have the following advantages:
- The soil under such beds can be any.
Here we are talking about both its quality (fertility, the presence of sand and stones), and the features of the landscape (high beds can be arranged even on a slope without harming the crop).

- Ease of installation.
When arranging such beds, it is not required to use technically complex tools and materials, there will be enough improvised means, and what is left of the construction site (for example, slate, boards, and so on).
- Ease of operation.
Planting, watering, harvesting - everything will be easier and faster than with a traditional device. This is especially important when working with undersized crops, for example, high beds for strawberries will be a salvation for any summer resident, because the search for this berry takes a lot of time.
- The erosion of the soil during irrigation is excluded (provided that the sides of sufficient strength and height are properly organized).
- Fewer weeds.
Due to the lack of direct contact with the rest of the garden. In addition, the soil in high beds is easier to fertilize and renew for maximum quality.
- Increased disease resistance is characteristic of plants grown in such beds.
- Possibility of earlier boarding.
When the ground has not yet thawed and even in greenhouses they do not start planting, high beds are already ready, since the working soil layer is above ground level, which means it warms up much earlier.
- There is no need to tie plants (eg cucumbers and tomatoes), you can leave them hanging down.
- Instead of hilling, you can loosen the ground shallowly, which reduces the time and effort spent on caring for the crop.
- The earth does not trample down from walking, so it stays loose longer, supplying enough oxygen to the root system.
- Attractive appearance.
There are many materials suitable for arranging high beds, so you can choose perfect option, which will be the highlight of your site.

Nothing is perfect, so beds of this type also have disadvantages:
- Rapid drying of the soil.
Main drawback this method arrangement of the territory, because of which it often becomes impractical (especially in elevated areas). You can correct the situation by frequent watering, the best way is to install a drip irrigation system (then the soil will be evenly wetted throughout its entire thickness without your participation).
- Installation takes a lot of effort and money.
This disadvantage is debatable, since the forces spent on arranging such a garden bed are nothing compared to the forces that will be required to process a traditional garden bed. As for money, their investment can be avoided if improvised materials are used.
- Soil freezing in winter.
Due to the small volume, the soil freezes faster and harder than with traditional planting, which can be detrimental to perennial crops.
Advice! To simplify crop care, install a drip irrigation system in advance. So the plants will receive the same and sufficient amount of nutrients without your participation.
Related article:
This article tells you the easiest way to do it in the country. Photos and descriptions of the most successful ideas, as well as ways to implement them, should help make your site comfortable and well-groomed.
How to make a high bed in the country with your own hands: types, materials
If you want to make a non-standard garden bed with your own hands, first you need to understand the types of such structures. Summer residents distinguish beds by design features and the way the side is organized.
According to the design of the beds are:
- High.

- Multilevel.
The most common case is the construction of a multi-tiered bed for strawberries, it is not difficult to do it with your own hands, and the harvest time will be significantly reduced.

- Vertical.

In addition to the shape of the beds, it is necessary to choose the material of the sides. Improvised means are usually used, but to achieve best result it is desirable to approach the choice responsibly. In fact, the sides can be made from anything, but the most famous and convenient are:
- Wood.
You can buy boards for high beds quite inexpensively, so the tree is often used in this case. However, this material has a significant drawback - ants and other insects often start up in it, which affects the quality of the crop. If this happens, you need to replace the sides.

- Slate.

- Plastic.
Durable and unpretentious material, however, it is worth paying special attention to its quality, especially environmental safety.

- Brick.
Durability and attractive appearance are the main advantages of this material. The disadvantage is the price, but if there are bricks from the construction site, this solution will be an excellent choice. ohm.

- Plastic pipes.
Great for vertical beds, as they are very easy to mount.

What is the design of the high bed? For its installation, it is necessary to install the sides of the selected material, then sequentially lay the following layers:
- Geofabric to prevent quick care nutrients to the soil during irrigation, as well as to protect against pests and weeds.
- Drainage (it can be rubble, brick fragments, and so on).
- Grass and peat.
- Priming.
Related article:
What are their advantages, examples creative solutions, average prices, consumer reviews, how to properly assemble a garden bed from panels with your own hands. Read about this and much more in our review.
Do-it-yourself vertical gardening: photo, technology overview
Vertical beds - one of the varieties of high, more precisely - an extreme degree. They are an ideal solution for small areas, as they help to make the most efficient use of free space.

Vertical beds have the same advantages and disadvantages as simply high ones, only to a greater extent (for example, tillage is required even less, and the lack of moisture is even more pronounced), but there are other advantages of such an arrangement:
- Significant space savings.
Such a structure can even be attached to the wall of a building, the main thing is that a sufficient amount of sunlight falls on it.
- Mobility.
Any vertical bed can be equipped with wheels for quick movement to another place. But even without them, some designs are very light weight, so moving does not take much time and effort.
Vertical beds can be constructed from almost any material, as long as it is durable, strong and environmentally friendly. The most high-quality designs that have already been used by a large number of summer residents:
- Pyramid bed.
- Bed made of plastic pipes.
- Vertical mesh bed.
- Using pots.
- From tires.
Not every summer resident is ready to spend time and effort building a vertical bed for strawberries and other undersized crops, so many resort to buying this design.
How to buy a vertical bed for strawberries and other undersized crops
Thanks to their unique design, vertical beds bought in specialized stores are very popular. When buying, it is important to pay attention to the following points:
- Check if the material of construction complies with environmental and fire safety standards.
- Compare the dimensions with the available area.
- Specify the possibilities of watering plants (some modern models of vertical beds are equipped with channels for efficient watering).
- Find out which plants are suitable for this system(each plant has its own planting depth, it is necessary to resolve this issue before buying in order to avoid subsequent problems).
There are a large number of both expensive and modern, as well as budget models of vertical beds on the market. However, if you do not want to spend money, you can make a good system yourself from improvised means.
Do-it-yourself step-by-step production of a pyramid-bed for strawberries: dimensions, features
Self-construction of a pyramidal bed for strawberries is a rather complicated and lengthy process. To get started, stock up the following tools and materials:
- Wooden boards cut according to the drawings.
They must be covered with drying oil and varnish to increase the service life. At the same time, it is forbidden to use chemicals that are quickly absorbed into the ground and affect the safety and taste of the berries.
- Nails.
They are selected depending on the thickness of the wood used.
- Hand tools (hammer, planer).
- Plastic pipe with holes along the entire length.
- Soil and humus to fill the frame.
- Net.
First of all, we prepare the base for the pyramid and lay the grid on it. Then we install the lower tier of the structure on it and fill it with soil (about 150 mm).Now you need to install a plastic pipe in the center for irrigation, while tightly closing the bottom hole. Next, the humus is laid.
All layers are repeated in the above order until the desired height is reached. At the same time, it is important to reduce the size of each subsequent bed frame with a pyramidal structure for maximum illumination of the lower layers, as well as ensuring optimal load on them.

Step-by-step production of vertical beds from plastic pipes for strawberries, greens or flowers
Among vertical beds, structures made of plastic pipes are very popular due to their low cost and ease of installation and maintenance. In the manufacture of vertical beds from plastic pipes, one or two pipes can be used. Let's consider the first option.
It is necessary to take a sewer pipe with a length of 2.5 m and a diameter of, say, 110 mm. During installation, a third of the pipe is buried in the ground to ensure the stability of the structure, in the rest it is necessary to make holes with a diameter of 3-4 cm for planting plants in them.
After the pipes are securely fixed, we fill the holes with pre-prepared soil. In this case, it is not necessary to buy a specialized mixture, if the site has fertile land, you can use it. Seeds of strawberries (or other plants) can be mixed directly into the soil or added later to existing holes (which is the best option).Watering the system is carried out from above, while the water does not flow to the plants quite evenly, so it is better to make a two-pipe system.

Feature of the installation of two-pipe beds from pvc pipes do-it-yourself consists in inserting a pipe of a smaller diameter into a large one. Watering will be carried out through a narrow pipeline in which small holes must be made to distribute water. In this case, the space between the pipes is filled with soil.

The main advantage of such systems is the ability to pull them out of the ground, put them and cover them on winter period(which is especially important for strawberries).
Using a construction grid for arranging vertical beds with your own hands
Use metal mesh There are two ways to create high beds:
- as a supporting structure.
In this case, it is necessary to use a thick, reliable mesh that will be able to withstand a decent weight. In this case, the mesh is stretched between supporting pillars(or corners of the house), sinks a little into the ground and is securely fixed. Now you can insert pots or bottles with plants into it. This option is great for growing seedlings or other plants that will later need to be transplanted.
- Mesh + polyethylene.
First, the mesh is stretched, then a plastic film is attached to it, and soil with humus is already poured between them. This design is suitable for growing greens, onions and other small plants. It is not durable, so the best way to attach it is to the wall of the house. But even then it will not last more than 3-4 years.

In this case, a vertical bed is attached to the usual one (for cucumbers, grapes, and so on). This method is much more convenient than the standard tying to sticks.
How to make a do-it-yourself vertical bed for strawberries or other undersized plants from a flower pot?
A planter bed is able to decorate your landscape, as this design is original solution, moreover, opening up opportunities for the manifestation of fantasy. To create such a vertical bed you need:
- Several pots.
It is not necessary to look for pots of the same size, different ones will also be an interesting solution.
- Bar or pipe.
For fastening and ensuring the stability of the structure.
- Soil and seedlings.
- Paint (optional).
If you are using ceramic pots, which are quite heavy, the pipe can be omitted for structural stability. The main thing is to reduce the size of the planter as you move up and not make the design too high.

If you have light plastic pots, you need to pass a pipe (or timber) through the water hole, which will become the basis for the system. The cache-pot can be arranged randomly, painted in different colors, decorated - it all depends on your imagination.
Important! For the stability of the structure, it is necessary to deepen the pipe (or beam) into the ground. Otherwise, the pots will be fixed only to each other, which will not prevent the structure from tipping over under external influence.
Making your own hands a vertical bed of tires for strawberries: photos, features
Making beds or flower beds from tires is a fairly well-known method. However, most summer residents use tires only to enclose a flower bed, that is, creating only one level.
There are several ways to use car tires to create vertical beds:
- Installation of several tires in a checkerboard pattern.
You can also color them different colors, thereby creating sunny mood In any weather.
- Installation of tires of different diameters in the form of a pyramid.
You can also cut slots in the tires, then the vegetation will be not only on horizontal surfaces, but throughout the entire volume of the structure.

- Creating a high bed using several tires.
Article
Gardening has always taken a lot of time and effort. Needs to be processed large plot land, although a significant part of it is not even used for growing vegetables. Regular digging, weeding and protection from underground pests - these regular problems are a chore for an ordinary gardener. However, as an alternative, high beds are used, which save the owner from these problems.

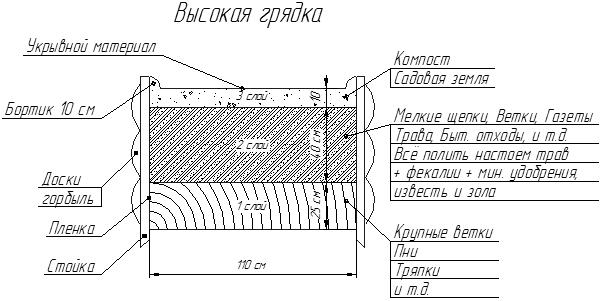
The structure consists of several layers, which is why it is sometimes called lasagna. As you can see in the photo, among them only a few are used for plant nutrition. There are five layers in total:
- wood chocks;
- Branches and bark of trees;
- Paper;
- Leaves and grass;
- Earth.
Another layer is also noted - a metal network, but it does not play any role in plant nutrition and is necessary only for protection. The presence of the grid prevents the access of various pests to the ground, protecting the roots.

Fertile land is used only for the top filling of the beds. The plant itself sits in it, which further develops, increases in size and takes layers of roots into the next layer. The combination of leaves and grass is the nutrient layer needed to supply the roots of the plant with useful substances. Next come midfield components like bark, chocks, and paper scraps. They are necessary for the exchange of substances with the surrounding earth, as well as for moisture filtration.

All these components of the beds are limited on the sides of brick or wooden frame. This design provides the plant with a full range of nutrients and contributes to its accelerated growth. And the safety here is extremely high, which will allow the use of high beds with an abundance of pests.
The benefits of this garden
The ease of use of the beds has made them a very popular solution. They are practical, simple and reliable, and maintenance is minimal. Although the process of creating them is extremely simple, it saves a lot of effort and money that could later be spent on caring for a conventional garden.

Among the main advantages of high beds it is worth noting:
On a high bed, it is much more convenient to remove various weeds. The reason for this is not only the high location, but also loose earth. To do this, there is no need to use special tools, just take gloves and work with your hands.

Navigation and marking is greatly simplified, because the plantations are already divided into blocks. This allows plants to be planted in different season, easy to share and tag them. In addition, the design provides for the possibility of covering with a tarpaulin or other material. This allows you to shelter young plants from too strong sun or create an impromptu greenhouse during the cold season.

It is also worth noting that such planting can be done even where the land is completely unsuitable for growing plants. The installation of this design does not depend on the main soil, and for further work, you can use the purchased soil. This allows you not to worry about the composition of the earth, the presence of stones and other debris.
Interesting ! Since the soil can be purchased, it is allowed to use different types of it for different beds. This will allow you to choose suitable option for a specific crop.
Weeding for such areas is also not required. Easily loosening the soil can easily replace it. The same applies to pre-digging. Therefore, such regular procedures are no longer needed, which saves a lot of time and effort. In addition, if necessary, a high bed can be dismantled by returning to original form vegetable garden.
Disadvantages of high beds
However, there are also disadvantages to this planting method. It is not used everywhere, because in certain situations it is extremely inconvenient. Among the main disadvantages it is worth noting:
- drying out of the soil;
- The need for regular feeding;
- Favorable conditions for the development of microflora harmful to plants;
- Building beds takes time and effort;
- Not recommended for growing cold hardy crops.
The first drawback is the drying of the soil. Since the structure is located at a height and has drainage holes for ventilation, the soil dries and weathers quickly. This results in the need for regular watering as well as more frequent fertilization of the plants.

Fertilizer is another drawback. Plants are not able to draw nutrients from the surrounding land, so they are forced to limit themselves only to the nutrient layer of a high bed. This leads to the fact that for further growth they need additional feeding.
Advice ! Watering and fertilizing can be automated through special systems.
This greatly simplifies the care of a high bed, so it is recommended everywhere. Also, these problems can be dealt with by deepening the beds into the soil.
Since the remains of trees, leaves and grass are used for the beds, such conditions are quite suitable for the development of various fungi. This can destroy the plant from the root, completely removing the entire crop. Therefore, such a nuance should also be monitored, focusing on the health of the seedlings.
Another problem when using this kind of beds is the rapid heating of the soil. Although he contributes better development many plants, it is harmful to cold-resistant crops. If such a culture is subjected to overheating, it can shoot itself.
These were the main disadvantages of high beds. There may be problems with them during the construction process, however, all the previously mentioned advantages more than cover such disadvantages. And yet it is better to evaluate the feasibility of such beds in your garden.
What materials are used for high beds
For high beds can be used various materials. Their diversity is not limited to brick or wood, it is not so important. After all, they are used only as a fence, so they can also play a purely decorative role.
Among the most common options for such beds:
- Wood;
- Vine;
- Brick and stone;
- Metal;
- Plastic;
- Slate;
- Concrete.

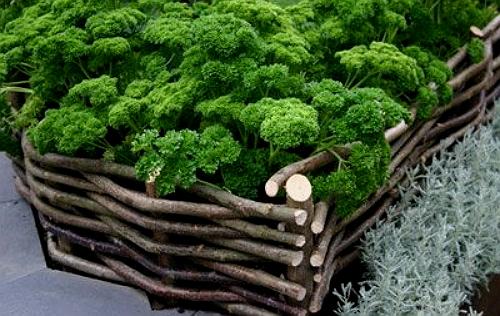
Vine could be an alternative. It has a pleasant appearance, while it can be easily replaced as it ages. The disadvantage is the extremely short life of the beds, often not exceeding one year.

Next comes brick and stone. These durable materials more commonly used for ornamental plants, but they can also be placed in the garden. They are durable and reliable, while not changing their appearance during operation. However, their construction requires special skills, a lot of time and effort. In addition, the further dismantling of the high beds is significantly complicated.

Metal is a good option for a high bed. It is comfortable, simple and durable. If necessary, it can be easily moved to another place, because thin layer metal is light. But it also has disadvantages, including the need for welding, as well as surface treatment from corrosion.

Plastic - a good option to replace wood or metal. It is lightweight, comfortable, and its strength is quite high. A particular advantage is that plastic is practically indestructible chemically, so it can serve for a long time.
Important ! When choosing plastic, you should pay attention to its appearance. Some types of this material may be unsafe, releasing harmful substances into the soil.
Concrete and slate are the simplest and most practical solutions for garden beds. They are reliable, require low costs, and their service life is calculated in years. However, slate is quite fragile, and concrete requires a long time for installation.
All these materials are used for arranging high beds. They are practical, but each has its own advantages and disadvantages. This should be taken into account when choosing further.
How to make raised beds
The process of building high beds is quite simple. It is only necessary to understand the general idea of \u200b\u200bthe design and act in accordance with it. For example, a wooden garden bed will be disassembled, because it is much easier to work with wood.
The following elements are required for operation:
- Shovel;
- Drill;
- Roulette;
- Saw;
- Level;
- self-tapping screws;
- Primer;
- Construction grid.
Wood will need two types. These are boards 50x200 mm, as well as timber 50x50 mm. The work is carried out in several stages, including:
- Wood processing.
- Site selection and preparation.
- Frame assembly.
- Installation.
- Filling.
The first step is to process the wood. Having previously cut it, work is carried out on impregnation, as well as drying the material. Wood should be cut in accordance with the future size of the high bed.
Advice ! Sizes are selected individually.
Having cut the boards in accordance with the preliminary marking, you need to prescribe them with an antiseptic. Particular attention should be paid to the side that will be in contact with the ground. After that, the material must be dried.
The plot for the garden should be light enough and not contain perennials. It is recommended to dig up the earth so that it passes water better. In the process, various debris such as stones and branches are removed.
Next, the process of assembling a high bed begins. The boards are knocked into the walls, connected by means of a beam. After completion of the work, it is recommended to prime the structure again. Then it is installed in the future place and fixed by means of wooden stakes. Fixation is needed only now, in the future the frame will adhere to the ground.
- wood shavings;
- Small branches and leaves;
- Paper scraps;
- Fertilizer layer;
- Fertile land.
Instead of branches and shavings, some additional layer of plant fertilizer can be placed, but it is important to install a protective barrier for the bed. It can be both a natural component and geotextiles.
Important ! The thickness of each layer is approximately 10 cm.
As a result, it remains only to plant the plants in the garden and grow them. It is necessary to remember about regular care and watering, because such structures are especially demanding on this.
These tips will make it easy to make a good high bed for the garden. Plants in them will develop rapidly and give good harvest. And for a better understanding of the design of high beds, it is recommended to watch the following video:
You will be surprised at your past doubts - whether to make high beds in the country ... Your back will be grateful to you - you just bend down a little to care for the garden. Your knees will thank you - you can just sit on the edge of the garden and work on your garden.
Your plants will thank you - no more competition from weeds or nearby fruit trees. Your land will be grateful to you - you do not trample it down and ennoble it with humus. Your high-bed garden can look beautiful, comfortable, and reward you with a generous harvest.
How to make high beds with your own hands.
1. First we must mark out the place for the beds. The usual width of the beds is 1.2 m, the length can be any. Laying out rectangles right size sand on the ground.
2. We collect high beds. The high bed has no bottom and consists of posts with grooves on all four sides and boards with corresponding grooves. You can buy ready-made garden fences or make your own. For fencing it is better to take wood hardwood, because conifers emit resin, which can have an unnecessary effect on soil composition. We check the horizontal installation of the garden box with a level.
3. We lengthen the high beds. Because Our beds are modular, we can extend our beds from any side with another module.
4. How to protect a high bed from rodents. Even if you have not encountered moles and other underground garden pests in your summer cottage, it is better to provide protection for your garden right now than to unsuccessfully fight these rodents later. At the bottom of each box we put a metal mesh so that it goes a little to the edges of the fences.
5. How to protect the soil on a high bed from being washed out into the main soil. To do this, we use ordinary packing cardboard in two layers so that it covers the entire bottom of our garden box. If there are not enough whole pieces, we use cardboard scraps - we fasten them with a stapler with the main piece so that the cardboard at the bottom of the box does not move when the soil is poured.
6. The soil for high beds should be light, crumbly and "fluffy". You can easily check its quality by poking your finger into the ground - if it sinks to the third joint - this is the norm. To improve the composition of the soil, you can add peat or compost. We pour the soil into the garden box, check its horizontal level, water it to compact it a little. During the season, we will need to add a little soil.
7. Irrigation system for high beds. Along the contour of the high beds, it is planned to fix a garden hose with watering nozzles: we need 90 and 180 degree splitters.
8. Trellis for high beds. Because the ground in the high bed is loose, then it will not be possible to install a trellis in it, so we fix the trellis from pvc pipes into the ground next to the garden box. We stretch nets on the trellises for climbing plants- cucumbers and beans. For tomatoes, we install light supports made of steel rod.
What you need to know when arranging a high bed.
1. Try to protect high beds from strong winds and heat by creating partial shade with flower trellises or tall shrubs.
2. The long side of the bed should face south - so the plants will be evenly lit, otherwise, taller plants will obscure the others.
3. Planting density on a high bed is twice as high as on a regular bed. So plants fight weeds and create a humid microclimate with foliage.
4. High beds with sides will make it possible for older people or people with back problems to take care of the garden.
5. A high bed is a warm bed. Such a bed warms up faster in the spring, and if you make a mini greenhouse on its basis, it will surprise you with an early and generous harvest.
6. Divide a long high bed with cross braces into square segments - this way you will reduce the pressure of the soil on side walls beds.
Fences for high beds.
1. Most often, wooden fences are used for understandable beds. There are a few points here - do not use used wood, especially sleepers, which can contain harmful chemicals. Do not treat fresh wood with wood preservatives unless you are sure they are completely environmentally friendly.
2. Wattle as a fence for a high bed. For all its environmental friendliness, such a fence has three significant drawbacks - the soil in the bed dries quickly from the wind, proper thermal insulation of the bed is not provided, the soil can spill out through the cracks. Everything is fixable - use a layer of double cardboard around the inner perimeter of the fence. Eco-friendly air layer between the sheets serves as thermal insulation, the earth no longer spills out.
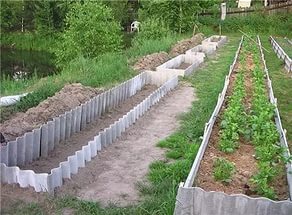
3. As a fence for a high bed, you can use a metal profile, including from old roof or a fence.
5. You can make fences for a high bed with your own hands from brick or concrete. This is a very good option, but keep in mind that concrete will affect the acidity of the soil in the garden for 2-3 years.
6. The best fences for high beds - plastic. They do not emit anything of their own into the soil, excellent thermal insulation, long service life and the ability to set any shape of the beds, unlike standard rectangles of beds with wooden fences.
7. Fences for high beds from improvised materials. You can make the sides of the beds from bottles laid like bricks on a concrete mortar.
Why do we need high beds.
High beds allow you to increase the area under the garden. you can use inconvenient slopes or poor or weedy soil. Raised beds provide an environmentally friendly way to deal with weeds and soil erosion.
Such beds warm up faster and give an earlier harvest. They allow more economical use of moisture for irrigation.
Various types of high beds.
In addition to the traditional raised bed with high sides, there are several other types of raised beds.
1. Circular high bed. It consists of a round frame, in which there is a path to the center of the garden. This form of high beds is also called the "keyhole".
Branches, roots, paper, compost are placed at the bottom of the beds. In the middle of the bed there is a tunnel for fresh organic waste and water.
For irrigation of bulk high beds, an irrigation irrigation system is used when water comes from a ditch between the beds - a good option for vegetable gardens flooded in the spring, or you can use drip option irrigation, when water enters the garden from mini terraces.
The paths between the beds are covered with straw or large sawdust. Never step on the ground in a high bed - this will compact it, and it will be more difficult for plants to receive moisture and nutrients.
Spare no space for paths between high beds - so you can always drive there with a garden wheelbarrow both for harvesting and with a new portion of humus. Have pity on your back - use a wheelbarrow.
If your raised beds are located next to fruit trees, you may need to install a root barrier before laying out the beds - dig a trench, cut the root on the way to the beds, install a metal sheet into the trench, which will prevent the root from growing in that direction and cover the trench with soil.
Learn more about raised beds through your own experience. There are many interesting finds, experiments and new discoveries in this topic for every gardener.
This article discusses beds for the lazy: photos of the easiest structures to manufacture for those who want to get a neat garden with a minimum of effort, the most common materials and technologies for creating structures based on them. The reader will learn how to combine vegetable crops in one garden and prepare the soil for planting cucumbers. The article contains practical recommendations for beginner gardeners.
Design right beds in the garden will be a solution to many problems and open up new opportunities for the owner suburban area:
- protection against soil erosion in the garden when falling out a large number precipitation or watering plants. The bed borders will keep the nutrient soil in place, preventing it from washing out onto the paths. In addition, the passages between the structures themselves will remain clean, no dirty puddles and streaks;

- the possibility of forming the basis for the creation of a temporary greenhouse on spring period. By installing high sides as fences, inside the structure you can organize a multi-layered garden bed, which can be used as a greenhouse. To do this, it is enough to install special arcs and stretch the film. The result is a neat greenhouse house;
- improving the appearance of the garden due to orderly and even plantings with a beautiful frame;
- creating borders that prevent the spread of weeds.

Making do-it-yourself beds from boards and other materials allows you to clearly limit the landing area, thanks to which weeds and harmful plants unable to spread widely. If the garden fence is dug in to a great depth, the level of protection increases and perennial weeds that are unable to overcome this barrier can no longer penetrate into the garden bed.
Note! With the help of beds with well-buried fences, the spread of plants such as reeds and couch grass is effectively blocked. Their root system is capable of covering large distances underground if left unchecked.

Photos of interesting designs of beds, recommendations for their creation. Tips for designing unusual landscape design on the site.
The best place is the area where the sun is present throughout the day. It is allowed to install beds where the shadow is present in the morning or in the afternoon. If the proposed construction zone is dark throughout the day, you should not use this place for arranging a garden.
How best to make beds in the garden: choosing the optimal design
The choice of the design of the beds is carried out at an early stage of planning, when a place for the garden has already been selected.
Each type of beds has certain advantages:
- raised or - the most efficient designs that are best suited for growing vegetable crops. Building materials for their creation are not expensive, while the soil does not need to be dug up. The width and height of the structures determine how much effort and time it will take to build them. Most often, summer residents prefer wooden beds made of planks. On the network you can find photos bulk beds with their own hands, such structures do not have a fence. They are also categorized as elevated structures;

- container beds - will be beneficial in cases where the space of the site is limited. For organizing such beds, pots of small, large and medium sizes are suitable. Garlic, peppers, lettuce and greens feel especially good in containers. Mobility is another advantage of container beds, which, if desired, can be rearranged to any place;
- open ground beds are the oldest way to grow crops that are planted directly into the ground. In such conditions, it is more difficult to get a good harvest, so technology is often used joint landing vegetables in the garden.

Helpful advice! If it is planned to plant crops in open ground, it is recommended to determine the quality of the soil, fertilize it and check the compatibility of vegetables in the garden according to the table.
How to make beds from boards with your own hands: useful tips
Most often, raised beds are made of wood. This material in comparison with others is considered the most practical and environmentally friendly. Similar designs look very aesthetically pleasing in the photo. Do-it-yourself beds from boards have other advantages:
- a simple maintenance system that involves easy weeding, harvesting and watering plants;
- the possibility of growing vegetable crops even where the soil is completely unsuitable for these purposes. On the basis of the boards, a frame is made, which is subsequently filled with fertile soil bought in a store, so there is no connection to the quality of the earth and its composition. Thanks to this, plants can be grown even in areas with a rocky surface;

- box structures allow you to keep the soil inside the beds. In addition, the presence of sides simplifies the process of mounting arcs to form a greenhouse. It is much easier to fix these elements on the fence than to dig them into the soil;
- even without knowing how to properly make beds in the garden, any summer resident will cope with the manufacture of wooden structures-boxes. The boards are easy to process, and the construction and assembly of the frame does not require an expensive tool;
- there is no chance that plants planted near the sides will get burned in the summer heat. Wood, unlike metal, is not prone to overheating.

Note! The ecological purity of the material allows you not to worry that harmful substances will get into the soil. Wood is much safer than asbestos-cement sheets (slate). The exception is boards treated chemicals designed to double the life of the material.
Making practical beds from boards: how to make the right choice of material
Summer residents most often create wooden structures on the basis of blanks that are found on the farm. For the manufacture of beds, timber, round timber, slab, lining can be used.
When it comes to purchasing boards in a store, you should pay special attention to the type of wood from which they are made:
- a board made of ash or oak will last a very long time. Although the cost of such products is quite high;
- pine remains the most favorable in terms of price and processing. But this type of wood is highly susceptible to decay while in the ground, so its service life is short. Due to impregnations and antiseptic agents, the life of a pine tree can be extended for a couple of years;
- boards made of cedar and larch wood are considered the most suitable material for making boxes. Larch has a natural impregnation with resin, thanks to which the product will retain its novelty for many years without the use of additional impregnations. Cedar wood is characterized by a lower resin content, but it is not inferior to larch in terms of durability and at the same time has an affordable price;

- boards made on the basis of acacia feel good in the ground. It is worth noting that this type of wood is durable and has a solid structure, so the process of processing it will be more difficult. To work with acacia, you need a powerful electric tool.
Helpful advice! It is not recommended to save on the quality of the material. Boards made of bad wood are prone to rapid decay. After a few years, holes will appear on the fences of the beds, through which fertile soil will be washed out during rains and watering plants.

Making beds from boards with your own hands: photos, dimensions of structures
The beds-boxes have rectangular shape and made from boards. The simplest design does not require special knowledge and skills, so any novice summer resident will cope with its manufacture. The main thing at the same time is to correctly calculate the dimensions of the boxes.

- height- many summer residents strive to create the highest possible sides. However, this approach is erroneous if it is not planned to build a warm bed for cucumbers or other types of crops, where a fence height of up to 0.7 m is welcome. The manufacturing technology of such structures requires the laying of a multilayer insulation. For ordinary beds, such high fences are not required, it is enough to limit yourself to 0.15-0.2 m. In addition, wood is susceptible to deformation changes under the influence of moisture, so there is a risk that over time, high fences will swell and lose their attractive shape;

- width – experienced gardeners it is recommended to choose a width equal to half the height of the person who will take care of the beds. Most often, this parameter is in the range of 0.9-1.2 m, because in the process of work, a person should be able to reach the middle of the structure from the side of the side rail;
- length- this parameter is practically unlimited. Although unnecessarily long structures reduce the level of rigidity of the side rails, it is therefore recommended to choose a length in the range of 4-6 m.
Helpful advice! When choosing dimensional parameters for wooden beds it should be taken into account that between them it is necessary to organize passages with a width of 0.4-0.6 m. Only after that is the layout of the structures on the site considered.
Creating mixed plantings of vegetables in the garden: photo examples and optimal schemes
The method of combining cultures in practice is very effective if the companion plants are chosen well. Therefore, site owners calculate according to a special table of the neighborhood of vegetables in the beds before planting. Some types of vegetables have a depressing effect on each other, others can improve the growth and development of neighbors, provide them with protection from pests.

The correct neighborhood of vegetables in the beds: compatibility table
Many gardeners note that due to the proximity of beans as a compaction for the beds where potatoes are grown, the amount colorado potato beetle. Marigolds effectively protect cabbage from white butterflies. Despite this, a certain balance must be maintained. After all, an excessive amount of marigolds in the garden can drown out the growth of cabbage.
Table of neighboring vegetables in the garden, creating a successful tandem:
| The name of the vegetable crop | Plants for a successful combination |
| strawberry | beans, spinach, marigolds, garlic, lettuce |
| kohlrabi | cucumber, lettuce, onion, beetroot |
| peas | carrot, corn, cucumber, calendula, eggplant |
| onion | tomato, celery, beetroot, savory, carrot |
| beans | potato, cucumber, tomato, strawberry, eggplant |
| cucumber | radish, pepper, peas, cabbage, beans |
| carrot | lettuce, onion, sage, tomato, peas |
| salad | strawberry, cucumber, carrot, radish |
| pepper | lettuce, cucumber, beans |
| tomato | calendula, basil, beans, nasturtium, parsley |
The following pairs of plants are characterized by poor compatibility of planting vegetables in the garden:
- cabbage and strawberries;
- onions and beans;
- carrots and celery, dill, parsley;
- cucumbers and potatoes.

Helpful advice! In the garden, in addition to the main crops, it is recommended to plant spicy and ornamental herbs pointwise. Thus, the garden will be not only beautiful, but also useful.
Examples of mixed planting vegetables in the garden: popular schemes
A good example of the compatibility of vegetables in the garden is the combination of onions and carrots. As an independent crop, onions are able to produce about 2.5 kg of yield from 1 m² of beds. Carrots on the same area gives about 6 kg of crop. With the joint cultivation of these crops with 1 m², you can get 9 kg of vegetables. These plants create protective barriers for each other against pests, so the efficiency of the used area increases.

Of course, when planning co-growing crops in the garden, you need to group the plants according to their height so that none of them blocks the light for the other. This is necessary because vegetables can not only have different height, but also grow with different speed. It is desirable that compactors that are planted additionally be lower in height than the main vegetables. The principle of a multi-tiered neighborhood of vegetables in the beds allows you to create favorable conditions for the root system of crops, and also contributes to the rational use of solar energy.
High yields are collected from the beds where beets and late cabbage are planted. To do this, beets (9 plants) and cabbage (4 bushes) should be planted on an area of \u200b\u200b0.8x0.8 m, while not forgetting to fertilize the holes with a glass of compost and a handful of eggshells (pre-grind).

To get an excellent result when planting beans and tomatoes, it is recommended to place the plants in a row with a step of 0.3 m. Along the row with bush beans, it is installed so that each plant is at the dropper. Tomatoes are planted in the central part of the garden. As a result, bean and tomato bushes should be staggered.
Helpful advice! It is better to cut the stems of tomatoes for the winter, and as low as possible. And the beans, on the contrary, are recommended to be left untouched.

Table of crop rotation of vegetables in the beds by crop groups
Crop rotation can also affect the yield of beds. If the annual change of crops grown in the same garden is carried out in the correct order, the garden will produce good yields.
Advantages correct construction crop rotation:
- the probability of soil fatigue on the site is excluded, since the same vegetable every year absorbs the same set of nutrients from the soil and does it from the same depth;
- the spread of diseases and pests that infect plants of the same family is prevented;
- it becomes possible to rationally use fertilizers.

The most primitive way of organizing crop rotation in the garden involves planting plants from different families on the same area every year. It is easiest to break cultures into four groups:
- Leafy crops - these include various types of cabbage, green onions, leafy lettuces, as well as spinach.
- Fruit vegetables - cucumbers, tomatoes, eggplant, peppers, pumpkin.
- Legumes - beans, chickpeas, peas.
- Root crops - potatoes, beets, radishes, carrots.
Table of the simplest crop rotation in the garden:
| Order of disembarkation by year | Recommended crops for planting | |||
| 1st bed | 2nd bed | 3rd bed | 4th bed | |
| 1 year | fruit | roots | legumes | leafy |
| 2 year | roots | legumes | leafy | fruit |
| 3 year | legumes | leafy | fruit | roots |
Arrangement of beds for cucumbers in the open field: photos and recommendations
For growing cucumbers in open ground, the beds are usually prepared in the fall. This should be done before the onset of rain and temperature drops. The planting area must be carefully dug up and saturated with organic fertilizers. Cucumbers like fertile, light soil that has a good level of air and water permeability. If the soil in the area is heavy, sawdust, peat or sand can be added to the ground to facilitate loosening.

Helpful advice! To get a rich harvest, it is recommended to add a tablespoon of superphosphate and a glass of ash per 1 m² of area. Instead of ash, you can use dolomite flour.
The process of preparing the beds for cucumbers in the spring includes the procedure for disinfecting the soil. For this, the place of the future garden is spilled with potassium permanganate. The solution should be hot and strong. In addition, soil fertility can be improved by adding chicken manure or manure. This procedure is carried out locally, that is, the fertilizer is placed directly in the trench or hole. After that, the bed is covered with a small layer of soil, where the seeds are then planted.

How to make a bed for cucumbers: agricultural secrets
To get a rich harvest of cucumbers from the garden, you must adhere to the basic rules:
- Near the beds should not be canals for irrigation, streams and flowing reservoirs.
- If the planting area does not have protection, the garden is best placed in a quiet place where there are no drafts.
- Procedures such as watering and loosening the soil should be performed on a regular basis. Otherwise, a hard crust will form on the surface, and the bed will dry out a lot.
- Cucumbers grown in open ground need to be fed much more often than plantings growing in closed beds.
- During harvesting, it is not recommended to change the position of the lashes of the plant or turn them over.
- Weeding plants in open beds need to be done more often than it is done indoors.
- It is recommended to cover the entire surface of the bed with a black film.

Cucumbers need a rich biological composition of the soil. Therefore, it is recommended to fertilize the land with organic matter, for example, grass, humus, branches, rotted manure, food waste. In the process of their decomposition, not only the fertility of the soil increases, but also heat is released, warming the soil. To prevent high temperatures from damaging root system cucumbers, experienced summer residents are advised to carry out abundant watering.
Interesting fact! Sometimes the decomposition of organic fertilizers is so active that the soil in the garden warms up to 80 ° C. Under the influence of such a high temperature, many pests, viruses and pathogenic fungi contained in the earth die. The result is a natural sterilization of the soil.

There are several ways to grow cucumbers outdoors. For these purposes, you can form a long ridge bed, a hole, dig a ditch, or build a high structure.
How to make beds for cucumbers with a bookmark in the garden
To form a bed with a bookmark, you will need to dig a trench. The depth of the ditch should be equal to two shovels. Then branches are laid out across and sawdust is poured. The next layer consists of straw and garden waste. You can add autumn leaves, cardboard or newspapers, compost. The thickness of the fertilizer layer should be within 5-7 cm. The bookmark is poured warm water and covered with a mixture of compost and earth.
A bed with a bookmark can effectively serve for 5 years. In the second year of operation, it will not be necessary to add to upper layer compost, because during the decomposition of organic components, the bed itself will produce nutrients.

Advantages of a bed for growing cucumbers with a bookmark:
- convenient irrigation system;
- water stagnation is excluded;
- in the spring you do not need to dig up the soil, it is enough to loosen the soil.
On such a nutrient basis, plants can be planted much earlier than is customary to do on ordinary beds. It is not recommended to use beds with a bookmark in low-lying areas and areas where water stagnates.

Warm surface beds for cucumbers in the open field
This type of warm beds for growing cucumbers is built on the surface of the prepared soil. This technology will become the best option for areas that are located in the lowlands. In order to enhance the heating process, the bed is covered with a film. As a result, a greenhouse effect is formed, which has a positive effect on the growth of cucumbers and their yield.
Surface beds also include structures in the form of boxes made of brick, slate or boards. The bottom of these containers is covered with sand, then wood waste. Next comes a layer of organic waste and straw. After laying each component, the contents are carefully compacted and filled with liquid manure. Finally, the bed is covered with a mixture consisting of and soil.

Helpful advice! As organic waste, skins of vegetables and fruits, fallen leaves, eggshell(ground to powder).
Cucumbers are planted in two rows. Plants are placed along the edges of the bed-box, which ensures a sufficient level of illumination. If you plan to plant cucumbers in early spring, structures can be converted into greenhouses. To do this, you need to install plastic arcs and pull on them polyethylene film. Thus, heating is enhanced and it becomes possible to get an early harvest. Moreover, the result is completely independent of weather conditions.

Raised beds for cucumbers in the open field
Warm raised beds are used when the site is located in a region with a cold and humid climate. Due to this, there is a full warming up of the soil, which allows to achieve a crop on early dates. If they come too close to the garden ground water, the bed rises high, due to which the plantings do not get wet on soil supersaturated with moisture. Planted in the same way stone fruit trees, whose roots are severely affected by groundwater.
Various materials are used as borders for these structures. The most popular of them are slate and wood. In rare cases, metal is used. This type of beds can be installed even in the middle of the lawn. If you make a frame in the form of paving stones or tiles, a raised garden with cucumbers will become a worthy decoration of your summer cottage.

As an alternative solution, it is possible to build an artificial mound on the territory that does not have a fence. You can take any length for such a bed, the optimal width parameter is 1 m. You should not raise the decorative garden to a height of more than 1 m. The air that remains in the voids formed between the elements of large organic matter provides good ventilation and contributes to the rapid heating of the soil.
To speed up the process of decomposition of fertilizers, the soil is spilled with a solution saturated with special bacteria. The procedure is carried out twice a year. The first time the soil is watered with bacteria in the spring. Before planting plants after processing the beds, you should wait at least a week. The second time the soil is spilled in the fall after the crop is harvested. When the earth has already been treated with the composition, it should be loosened so that the soil is saturated with oxygen, and the preparation itself is evenly distributed.