Extension of a brick bath to a brick house. How to attach a veranda to the bath: recommendations from an experienced summer resident
If the size of the site does not allow the construction of a separately located steam room with its own communications and functional area, then it is worth stopping the choice on the project of a bath-attachment to the house. With the right, rational approach to design, you can get a comfortable complex that is beneficial from an economic and practical point of view.
As already mentioned, a steam room attached to the house will save space on the site. In addition, such a solution is beneficial in terms of comfort in the winter, when you do not need to go out into the cold to visit the bath, but simply open the door and go to another room.
Another advantage of the attached structure is the possibility of increasing the usable area of an existing bath. For example, a steam room without a rest room was originally built, but over time, the owners decided to make it more comfortable and connect it to a nearby residential building.
If the location of the buildings does not allow them to be connected to each other in the traditional way, the use of an L-shaped bath project will help solve the problem.
Beginning of work
Attaching a bath to a residential building is organized in various options:
- The design has one common and three separate walls with the house;
- A full-fledged structure erected right next to the house;
- A small distance (1-1.5 meters) was left between the bathhouse and the residential building, and the buildings were connected by a warm corridor. The latter can be used as a dressing room or a rest room.
Potential difficulties
Adding a bath to the house is a task that can be completely solved. However, it requires special attention and responsibility. Otherwise, there is a possibility of structural damage and a decrease in its strength characteristics.
The first thing a builder may encounter is the particular difficulty of organizing a tight connection between two walls. In this regard, most projects involve the installation of a small connecting insert between the two structures, which should hide the contrast of the junction.
The second thing you should pay close attention to is the quality of the bath foundation. Its depth must necessarily correspond to the depth of the foundation of the house. This is necessary in order to reduce the likelihood of detachment of the extension during shrinkage and operation.
Third, is the need to organize a separate pipe and sewer. Draining water into a common system is highly unwise, as this will significantly increase the load.
When creating a bath, you need to take care of its fire safety. I must say that it is the likelihood of ignition that stops many developers from adding a steam room to a residential building.
Design
The design of an attached bath is distinguished by certain features. This stage should be very thoughtful, since the comfort and practicality of the future structure depends on it.
The first thing you need to decide is the shape of the building and its location. Will the bath have a common wall with the house, or will a small vestibule separate 2 buildings.
Finished projects
If the owner's plans do not include the construction of a non-standard structure, then a factory-made structure can be installed in a separate room. It does not need wood fuel, but is heated by an electric boiler.
Self-design
Independent drafting of the project requires a thorough study of construction technology. These norms cannot be violated even in an effort to increase comfort.
It is recommended to take into account the specific conditions of construction, plan the number and size of rooms, their location and the transition between buildings. The design of the base depends on how the extension will be made.
Foundation
The foundation for the bath is organized as a separate tape array or joined to the base of the house. The first option is considered more preferable, as it will ensure uniform shrinkage of the extension.
When choosing the second option, the docking of the two foundations is carried out using iron brackets. The connecting seam is filled with mounting foam and covered with mineral wool.
Walls and roof
It is desirable that the bath and the house were built from the same material. The use of heterogeneous options threatens with uneven shrinkage, and hence the formation of cracks in the joints.
Fulfillment of this requirement can cause difficulty if the bath is attached to an old house that has already experienced shrinkage. Then you can take into work not only wood, but also foam blocks, bricks, etc.
The roof is made single-pitched. At the same time, its highest point should adjoin the wall of the house, going under the main roof.
Conclusion
To add a bath to the house requires attention and the development of the right project. At the end of the work, it is recommended to invite a specialist who can check the quality of the erected structure.
As one of the possible options for placing a bath on a personal plot, its extension to the main residential building is often considered. This approach has a number of indisputable advantages, the main of which are the reduction in the volume of construction work, as well as saving space allocated for auxiliary buildings. But before attaching a bath to the house, it is advisable to familiarize yourself with all the intricacies of the operations performed in this case, as well as with the existing types of bath outbuildings.
Choice of design and material
According to the method of forming load-bearing wall structures, bath extensions to the main building are divided into the following types:
- structures with three load-bearing and one common with the house walls;
- full-fledged buildings placed close to the house;
- bath buildings, spaced from the house at a distance of about 1.0–1.5 meters and connected to it by a small heated corridor of the “tambour” type, which is most often used as a dressing room.
The first two types of extensions, as a rule, have a common roof with the house, while for the third option an independent roof should be provided. In addition, the choice of foundation for it will also depend on the type of construction of the bath extension, which is included in the project at the stage of its preparation.

When choosing the material used to make the extension, preference should be given to wood that gives minimal shrinkage during the operational period. These requirements are fully met by such well-known materials as chamber-drying profiled or glued beams, for example. For the outer cladding of the facades of the extension, it is desirable to select the same decorative material that was used in the decoration of the main building.

Before designing an extension, you should correctly calculate its dimensions, taking into account the number of people visiting the bathhouse at the same time. Depending on the number of visitors, the dimensions of the steam room, washing department and dressing room should be planned. All these data must be coordinated with the area allotted for future construction, as well as with the estimated costs.
Site preparation and foundation

Work operations for the manufacture of a small bath extension, as a rule, are performed in the following sequence:
- First of all, the area adjacent to the house, used for the building, is cleared.
- Then, at the prepared site, the marking of the future foundation is carried out, which in its design should not differ from the main one.
- The most suitable option is a lightweight tape base tied to the foundation of a residential building, although a columnar structure is often used for these purposes.
- When arranging the foundation, prepared using standard procedures, its depth is selected with a margin, excluding the possibility of distortion relative to the base of the house due to shrinkage.
- Upon completion of the pouring work, the surface of the finished foundation base is treated with bituminous mastic, and then covered with a layer of roofing material.
Note that the base to be equipped should be located close to the existing foundation (i.e., without gaps). To obtain a single rigid structure, you can use segments of reinforcing bars that connect the main and attached parts. For bathing extensions to a small country house, it is allowed to use small fragments of broken reinforced concrete piles (slabs) laid around the perimeter of the building as a foundation.
Making a log house and roofing
We also note that the deformation gap formed during the construction of an extension to the house can be sealed with any plastic material with low thermal conductivity (glass wool, for example). From the outer and inner sides of the building, the gap is protected by a membrane sealant and a layer of vapor barrier, on which wooden linings (the so-called “flashings”) are stuffed on top.
Safety
When making a bath extension yourself, it is advisable to adhere to the following rules, taking into account the safety of its operation:
- In accordance with safety requirements, the chimney in the bath must be securely insulated and removed from the side of the building opposite the passage to the house.
- In order to protect the roof of the building from accidental ignition, a special spark catcher is mounted at the outlet of the bath chimney (on its pipe), which you can buy or make yourself.
- Chimney laying areas through wooden floors must be protected with heat-resistant and non-toxic material (asbestos, for example).
When choosing a place for an extension, areas with gas pipes located on them should be avoided.
Video
Similarly, you can make a frame extension for a bath:
Bath projects attached to the house are of interest to homeowners who love comfort. Additionally, this option saves space on the site. Different design options provide for the connection of buildings with an adjacent wall, erection under a common roof. Such a layout additionally helps to save building material.
Bath as an extension to the house
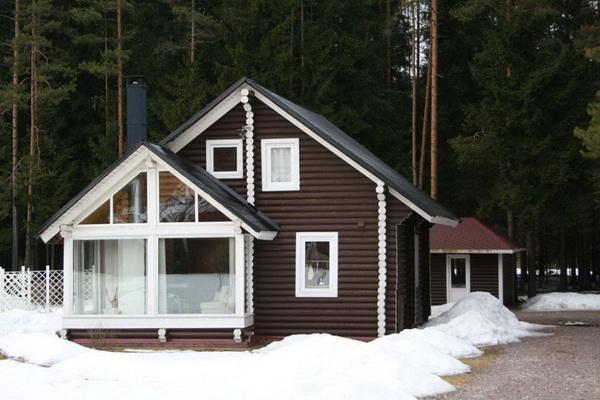
The main advantage of combining two buildings with different purposes is to achieve maximum comfort. It is not very pleasant to run across in severe frosts from the bathhouse to the house. Frequent walking with the transfer of things cools the room, increasing energy costs. These reasons are already enough to start looking for projects with a photo of an attached bath to the house and enjoy a comfortable bath.
Is it possible to attach a bath to the house
In fact, there is nothing illegal in building a bathhouse attached to a residential building. The owner has the right to use the premises at his discretion. The difficult question is to create the right project. Attached baths are erected on a new, not well-established foundation. Over time, the foundation gives a drawdown. A strong gap in adjacent buildings leads to the appearance of large gaps at the junction of the walls. There is even a threat of tearing the roofing if the attached bath is under the same roof as a residential building.
There are 3 common projects for an attached bath:
- The house and the bathhouse are separate buildings with their own walls and roofs. Entrance doors are located opposite each other. The passage between the entrances of buildings 1-1.5 m long is connected by a corridor.
- The attached bathhouse and the house have one adjacent wall. The complex is completely located under a common roof.
- The house and the bath are separate buildings with 4 walls, only attached close to each other. The complex similarly has a common roof.
The safest is the first project of an attached bath. Both buildings can sag, "play" on the heaving ground, but they will not create any destruction. The disadvantage is the increased consumption of building materials.
The second project is a budget one. An adjacent wall and a common roof allow you to save a lot on building materials, but a violation of construction technology will lead to the destruction of the complex.
The third project can not be called safe or budgetary. It will be possible to save only on a common roof, and the walls will have to be erected for each building separately. As for safety, a residential building or an attached bathhouse is not immune from subsidence. A strong drop will lead to a rupture or deformation of the roof.
Important! Regardless of the type of project, it is advisable to build a house and a bath from the same material, for example, brick or a log house, in order to reduce the likelihood of subsidence.
The bath is considered a room for a specific purpose, where all structural elements are protected by waterproofing from steam. A similar protection is needed at home. So that steam from the attached bath does not destroy the brick, foam block or wooden wall of the house, they equip reinforced waterproofing. The procedure can be abandoned if the walls of the house are made of reinforced concrete or expanded clay concrete.
If the attached bath is combined with a wooden wall, they additionally take care of fire safety. In addition to waterproofing, refractory insulation is laid, for example, basalt wool slabs. The material is fastened to the adjacent wall of the bath, the vapor barrier is laid with the top layer.

When arranging an adjacent extension, 3 difficulties arise:
- The unification of the walls violates the aesthetics of the architectural ensemble. The problem is solved by installing a connecting insert at the junction.
- Heterogeneous foundations will necessarily lead to a rupture of adjacent walls. Under the attached bath, they make exactly the same base as at home. It is optimal to put two buildings at once on one foundation.
- The sewerage of the house will not cope with the effluent from the bath. The attached building is equipped with a separate drain branch and its own drainage well.
In addition to the three points of emerging difficulties, the fourth difficulty is separately distinguished - ensuring fire safety. A wood-burning stove is used to heat the water and the steam room. In the event of a fire, the fire must not spread to the house.
The video talks about a safe bath:
Bath attached to the house: photo


Bath extension project
They start creating a project by determining how the bath will be attached: with a common wall, two adjoining walls or at a distance from each other. In the latter version, the device of the connecting corridor is considered.
The next step is planning. Determine the number of rooms, area, purpose. On the plan, a place is chosen for the stove so that all compartments of the bath are heated. The diagram indicates the location of the wiring, ventilation ducts, sewer system.
The foundation of the attached bath is made similar to that of the house, most often tape. It is optimal to build both structures on the same foundation. If the extension is placed to the finished house, then it is better to fill in a separate concrete tape. More economical version of the adjacent foundation. 3 sides of the concrete tape are poured and joined to the base of the house with steel brackets. The method is economical, but due to uneven shrinkage, cracks will appear on the base and wall at the combination point.
The walls and roof are designed from the same material for both buildings. In addition to aesthetics, a house with an attached bath will sag equally with a minimum of gaps. An extension can be erected from another material near an old building that has experienced shrinkage for several years. The roof of the attached structure is made single-pitched, adjoining the house at the top and going under the roofing.
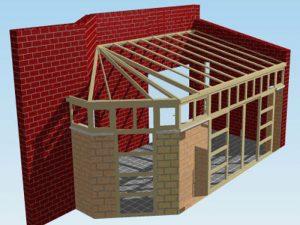
How to attach a bath to a brick house
Since the house is brick, the bath is also built from a similar material. If you are sure that the old building has gone through all the stages of shrinkage, you can risk building walls from gas blocks, cinder blocks or timber. The combination will be ugly. The entire complex will have to be lined with siding or other material.

Construction begins with the attached foundation of the bath. Dig a trench under the tape base. The bottom is covered with a pillow of sand and gravel. A reinforcing frame in the form of a box is connected from the reinforcement. The formwork is erected at such a height that the attached tape coincides in level with the foundation of the house.
Advice! The attached bath is lighter from the main building. You can increase the stability by reinforcing the concrete tape with reinforced concrete piles or slabs.
Pouring with concrete is carried out at a time to get a monolithic structure. The formwork is removed after the mortar has set. The walls of the bath are laid out no earlier than a month later. It is optimal to let the foundation stand for a year, and start construction next season.
When erecting walls, a through passage is simultaneously equipped. The door of the attached bath should open into the dressing room, and from there into the living quarters. If two buildings are distant from each other, a connecting vestibule is erected along with the walls. In the future, it is convenient to take it under the locker room.
When the walls are ready, a Mauerlat is laid around the perimeter, and the rafters of a shed roof are attached. The roof is made warm. Thermal insulation is protected by hydro- and vapor barrier. Insulation will reduce heat loss, reduce the likelihood of condensation under the roof.
The fire safety of an attached bath should come first. The chimney is supplied with a spark arrester. From the combustion of firewood, sparks fly out through the chimney. Without a spark arrester, they can be carried by the wind into the attic of the house and cause a fire. If there are cracks at the joints of the walls, they are blown out with foam, covered with bituminous mastic. Doors, windows of the dressing room and vestibule are installed opening outwards. Inside the chimney is insulated with foil insulation. Asbestos can be used outside.
Attention! It is impossible to attach a bath in the place where the gas pipeline enters the house.
How to attach a bath to a wooden house
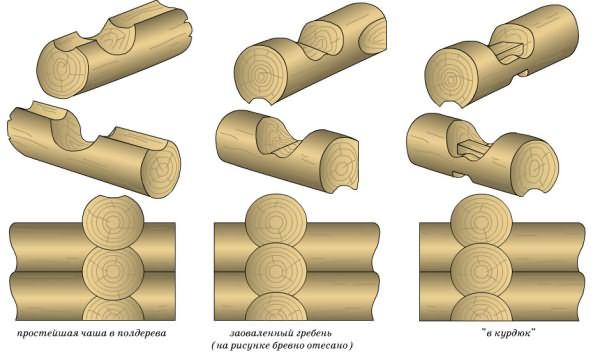
Observing the homogeneity of materials, a structure made of timber or logs is usually attached to a wooden house. The process differs only in the construction of walls. The log house is installed on the foundation, having previously rolled out two layers of roofing material for waterproofing. The lower crowns are made from the thickest logs. Corner connection is performed in three ways: a bowl in half a tree, a littered comb or in a fat tail. The docking principle is shown in the photo:
At the end of the construction of the walls, the upper crowns are adjusted to the roofing system. If two buildings are under a common roof, the height of the walls is made at the same level. For an attached free-standing bath with its own roof, the height of the walls is reduced by a couple of crowns. The deformation gaps between the two buildings are closed with a plastic seal. After the erection of the walls of the log house, proceed to the construction of the roof.
Moving from home to bathroom

The vestibule connecting the buildings regulates the heat transfer between them. However, along with the heat from the bath, steam can enter the house. The issue is resolved by the arrangement of existing ventilation in the transition.
The transition device depends on the location of the attached building. If the bath with the house has a common wall or two combined walls, the passage is made through. Through the doorway from the house they immediately enter the rest room or locker room.
When the attached building is 1 m away, the passage is connected with a vestibule. A small corridor can be used instead of a dressing room. The transition must be insulated, reducing the heat loss of both buildings.
Conclusion
Projects of a bath attached to the house can be drawn up independently, taking into account the design features of the main building. If there is no experience, it is better to contact specialists for advice.
When building a new bathhouse on the site, the question arises sharply - where to place it, so that it is not only convenient, but also safe. Some believe that the best solution would be to attach it to the house, others that it is risky, as an accidental fire can occur. In addition, it is believed that a bath attached to the house will become a source of excess moisture, which will cause a fungus to appear, and the walls will rot and begin to collapse. In more detail, the option of adding a bath to the house, all its pros and cons, will be discussed below.
Before attaching a bath to the house, you should carefully consider all the details of the project so that later you do not have to redo the shortcomings. A construction plan that satisfies all modern requirements provides for:
- heating;
- water supply (hot and cold water);
- sewerage.
The first big advantage, given that the house itself already contains all the necessary communications, is the savings. In this case, it will not be necessary to re-lay everything, which will save you from unnecessary costs. And if you place a bath next to the boiler room, then the costs will be halved.
The second significant advantage will be the ability to get into the bathhouse immediately from home, with the equipment of a direct passage from it. Also a good solution would be a door located next to the main entrance.
In the bath attached to the house, you can equip a laundry area. This will get rid of unnecessary noise and clutter. It can accommodate a washing machine, clothes dryers and ironing accessories.
The last but no less important advantage will be the opportunity to arrange a joint terrace, which will be convenient both for relaxing after the bath and for simple evening gatherings.
Disadvantages and solutions
Along with the advantages, there are a number of disadvantages of adding a bath to the house, which, if desired, can be avoided if you think over its arrangement in advance.
The main concern of opponents of such a project is that the bathhouse is an object of increased fire danger. And it is not without foundation if a wood-burning boiler is installed, and the pipe is not equipped with a spark arrester.
Modern technologies offer safer options for heating a bath and heating water:
- electric heater;
- steam generator (hammam);
- infrared sauna.
Each of them has different characteristics and you can choose the most suitable for yourself.
Also, in order to protect the house from fire, especially if it is made of wood, fireproof insulation should be laid on the adjacent wall.
The second disadvantage of the location of the bath close to the house, some consider the unpleasant smell of dampness and noise, which often happens during gatherings in the rest room.
To prevent bath fumes and odors from entering the house, it is best to make a separate passage to the bath. You can do it either through the boiler room, or through a common vestibule.
A good solution to protect the house from excess moisture is to sheathe the adjacent walls with materials that repel moisture. Additional treatment of walls with special refractory compounds and antiseptics is recommended.
Also, next to the recreation area, it is worth installing a toilet, and in the room itself - a small kitchen, with a minimum of necessary appliances.
Many fear that the house sewer will not cope with the extra load. In fact, this is not such a big problem, since you can equip a separate drain in the bath.
The extension of the bath to the house has a large number of advantages, as well as disadvantages that can be easily eliminated with proper construction planning and arrangement of the premises.
An annex to the bathhouse is being built with your own hands if it is time to expand this necessary structure. It often happens like this: a bath is quickly built, based on financial capabilities. Over time, the family grows, new friends appear, in a word, there is a desire to expand the bathhouse. There comes a time when the old bath is no longer satisfied, and an extension on the garden plot with your own hands becomes an excellent option to correct the situation.
What can be extensions
An extension to the bath can have a different purpose, and its variety depends on what the main bath building consists of. If the original version was a minimal set - a steam room and a dressing room, then there is a need to build a washing room with. The question of how to attach a new dressing room to the bathhouse with your own hands arises when the room somehow accommodates 2 people, and there is no place to place firewood to maintain the firebox.
The question most often arises, or a closed-type rest room. As a rule, it is the recreation area that is postponed until better times, and therefore it often becomes the goal of a bath extension. An interesting and original option: add a summer kitchen to the bath with your own hands. In principle, such a statement of the problem is quite natural. After all, the bath contains an oven, which is used only in the preparation and conduct of the washing procedure. It is quite logical to set the task of using it at other times as well. Attaching a summer kitchen will eliminate downtime of the heat source.
By location relative to the bath, extensions can be divided into several types. They can become a continuation of any bath room with a major restructuring of the structure, removal of part or all of the old wall. So you can expand the steam room, dressing room or make a sink. Another option is extension without violating the integrity of the previously constructed structure, but with a reliable connection of the extension to the main wall.
Finally, one more method should be noted - the manufacture of a new room in close proximity to the bathhouse, functionally related to it, but not structurally connected into a single system. Example: a gazebo attached to the bath with their own hands. Such a building is erected at a distance of 0.5-3 m from the bath wall, but plays the role of a rest room.
 In addition, extensions may differ in location relative to the entrance. The most common structures erected in the form of a vestibule to the bath, i.e. after their construction, a new entrance appears, and the old one is transferred deeper. The second type is not connected with the main entrance, and after the extension is made, an independent entrance is formed in it. In this case, inside such an additional room, a passage to a bath room may be made, or there may be no direct connection to the interior rooms.
Simple extension
The simplest extension is a vestibule, a canopy or a porch with a canopy in front of the front door, which allows you to insulate the dressing room. In this case, a concrete platform is poured in front of the entrance with an area of \u200b\u200babout 1.5x1.5 m. Two beams measuring at least 10x10 cm are installed vertically. A roof is installed above the extension in the form of a small slope from the wall outwards or a gable type with a slight slope and a ridge in the transverse direction. The roof frame is made of a wooden beam with a crate for attaching roofing material waterproofing and roofing.
The sides of the extension can be made in the form of a railing (open porch) or a wooden wall. With a closed type of extension, a crate is mounted, and a new door frame is installed on the front wall. The walls are sheathed with a board or clapboard. Mineral wool insulation is applied. A closed annex forms a vestibule, which significantly insulates the dressing room. With an increase in the area of \u200b\u200bthe vestibule, it can be used as a temporary storage of firewood and bath equipment.
Features of the construction of the veranda
A fairly simple type of extension to the bath is considered an open summer veranda. Usually it is erected along the entire length of the facade bath wall. The width of the room depends on the wishes of the owner, but, most often, it is 1.6-2.2 m. The basis of the veranda is vertical bars measuring at least 12x12 cm. They are installed necessarily at the corners of the building (4 pieces) and to form the entrance (2 pieces ). If the length of the veranda is significant, then intermediate supports are placed in increments of 2-2.5 m.
 Vertical bars are installed on a columnar concrete foundation with a depth of about 40-50 cm. A wall is not erected on an open veranda. Instead, railings are provided along the entire outer border. One of the attractive elements is considered to be a decorative crate, along which climbing plants are launched.
The roof of the veranda is usually made in the form of a slope of no more than 10-12 0, which will allow you to mount any roofing material. First, the upper ends of the supports are connected to each other with a Mauerlat (a bar measuring at least 12x12 cm). A truss system is attached to this beam, which is joined to the bearing wall of the bath with the help of anchors. For reliable fastening, the height of the veranda is selected 20-25 cm below the bath wall. The junction of the roof with the wall is sealed and closed with a wooden or metal profile.
The floor on the veranda is made in the form of wooden flooring from boards or chipboard sheets.
The basis for the flooring is formed in the form of a compacted cushion of sand and gravel, as well as a crate of timber.
Features of the construction of closed outbuildings
A closed insulated extension can be made from different materials. The most widespread are wood, brick and cinder blocks. As a rule, a material similar to that from which the walls of the bath are made is used. However, the tree is in harmony with the brick, which means that a wooden extension can be safely erected near a brick bath.
 The capital extension to the bathhouse is being built on the foundation. Most often, the type of foundation used in the construction of the main building is chosen - tape or columnar. During its construction, they try to ensure a connection with the base base, and for this, a new reinforcing belt is inserted into the existing support using steel reinforcement bars. The depth of the new concrete tape is selected 10-15 cm more than the base foundation. Waterproofing is applied to the side walls of the concrete pour by coating with bitumen or laying roofing material.
The most common wall option is log cabins or beams.. Widely used profiled and rounded timber. During construction, it should be borne in mind that new wood will shrink within 1-1.5 years, which means that there is no “dead” fastening of the walls of the extension and the bath - a technological gap is provided, which at the end of shrinkage can reach 3-5 cm. This gap must be reliably sealed with waterproofing and heat-insulating material.
Brickwork is also widely used. When using it, a tape-type foundation is most often erected. In brick construction, new and base walls are held together securely. To do this, after the first row of bricks, reinforcing bars with a diameter of 12-14 mm are laid, the ends of which are inserted into a hole drilled in the bath wall. A similar rod connection is carried out every 3-4 rows of masonry. The joint of the walls is sealed with sealant and putty on top. Similarly, construction is carried out using foamed concrete blocks.
 The roof of the extension can be combined with the bath roof or made separately. The common roof involves the dismantling of the existing roof and the installation of a new common truss system. An individual roof is erected, usually in a shed version. Its installation is carried out on a truss system, which is located slightly below the main roof and is not connected to it. The seam is sealed and closed with a special profiled overlay.
When building an extension to the bath with your own hands, you will need the following tool:
- Bulgarian;
- perforator;
- electric drill;
- screwdriver;
- shovels, crowbar, pickaxe;
- a circular saw
- planer, hacksaw;
- hammer;
- vibrator;
- chisel;
- tape measure, plumb line, building level.
If there is a need to expand the bath space, then you can attach an additional room for various purposes. It is quite possible to carry out such an event with your own hands.