How to make a greenhouse from plastic pipes with your own hands. Do-it-yourself greenhouses from plastic and pvc pipes Make a greenhouse from pvc pipes with your own hands
In order to grow healthy and environmentally friendly vegetables, as well as create a favorable environment for them, you need to make a lot of effort. An excellent solution to this problem is to independently grow some crops in a greenhouse throughout the year. This article will discuss how to make a practical greenhouse from polypropylene pipes with your own hands without significant financial investments.
If you decide to make a greenhouse out of plastic pipes with your own hands, and not to purchase a ready-made structure, you should decide on the type of future greenhouse. Depending on the shape of the frame, the following types of frames are distinguished:
- arched;

An example of a neat arch-type construction using a special one - agrospan
- rectangular, which in turn are divided into two types: for single-pitched and gable roofs;
- combined: consisting of several sections;
- rectangular structures with arched roofs.
For a better understanding of the varieties of structures, it is recommended to look at a photo of greenhouses made of PVC pipes with your own hands. You should also read the reviews of experienced summer residents who use different types of greenhouses to learn about the advantages and disadvantages of a particular design.
Which of the options to give preference depends solely on your desires and preferences. There are also some recommendations of experts on this issue. So, for personal use (in the event that you do not plan to grow vegetables for sale in large volumes), it is recommended to install small or medium greenhouses, the length of which is in the range of 4-12 m, the width is not more than 3 m, and the height is about 2 -2.4 m.
Helpful advice! For each bed, 80 to 100 cm should be allotted to provide the plants with enough space for comfortable growth, as well as the possibility of convenient care for them. It is necessary to be guided by this indicator in the course of calculations.

As for the materials suitable for creating a greenhouse frame from plastic pipes, the best are PVC plumbing pipes, the diameter of which ranges from 16-110 mm. Any pipes can be used along the length, as a rule, from 2 to 5 m.
Sometimes you can find on sale plastic pipes that have a layer of fiberglass with polypropylene or aluminum. Their strength index is much higher, although the cost of such pipes is quite high. You can meet the assertion that such investments are not justified, so this choice should be made taking into account your own financial capabilities.
For different parts of the structure, it is preferable to use pipes of different diameters: from 25 to 32 mm for arched elements, 50 mm or more for elements that perform a supporting function, especially when it comes to rectangular structures.

Do-it-yourself greenhouse made of polypropylene pipes: characteristics
Plastic pipes, despite their lightness and relatively low cost, have a lot of positive characteristics. The ease of installation and the resistance of the material to external factors make it popular among gardeners. Let's take a look at some of the benefits of using it:
- high wear resistance: the service life of PVC pipes can reach up to 10 years;
- not exposed to moisture and decay processes;
- fire resistant;
- environmentally friendly, do not emit hazardous substances;
- do not deform even under severe mechanical stress, withstand strong winds;
- resistant to chemical and biological influences.
- due to the flexibility of the material, it can be easily given any shape by bending it into an arc of the desired radius.
These characteristics make the use of plastic pipes in self-construction of greenhouses convenient and justified. If you correctly make all the preliminary calculations and purchase the material according to your needs, then you can avoid unnecessary expenses, as well as create a high-quality and reliable greenhouse with minimal financial investment.

Do-it-yourself greenhouse made of plastic pipes: design features
In order to make a greenhouse out of PVC pipes with your own hands, you will need a drawing, or at least a sketch. The easiest way is to find a suitable scheme on the Internet, however, many people prefer to draw it on their own, creating the necessary design, ideally suited in size and location in the garden or local area.
Having decided to prepare a drawing of a greenhouse made of polypropylene pipes with your own hands, you need to think in advance what the shape of the frame will be, what size the structure should be, and most importantly, how many connecting nodes it will have. This is important because they are more expensive than all other elements. Other important aspects that you need to consider before you start building a greenhouse from HDPE pipes with your own hands include:
- the type of foundation you want to use as a base;
- the choice of materials that are planned to be used for the construction and covering of the greenhouse;
- placement and shape of the main nodes;
- the distance at which the load-bearing elements of the structure are located;
- method of attaching parts to each other and their docking.
Helpful advice! To connect plastic pipes to each other, you can use several different methods, for example, you can fasten them with self-tapping screws, glue, solder, or use special connecting fittings.

The easiest and most affordable option for self-manufacturing a greenhouse is an arched frame made of polypropylene pipes, as a covering material, for which a film is used. Rectangular structures are more difficult to erect and require the most accurate calculations, as well as the presence of additional ribs for structural rigidity.
Another important aspect that you should definitely take into account before giving preference to one or another type of structure is the number of docking nodes that weaken the structure. The more of them, the less resistant the greenhouse is to various influences, including atmospheric loads.
Do-it-yourself greenhouse made of polypropylene pipes: photo instruction
The complete installation of a greenhouse structure made of polypropylene pipes takes only a few hours and even one person can handle it. Although, working together is much easier and more convenient. It is necessary to carry out the assembly on a previously prepared, flat area.
Preparing the area for the installation of a greenhouse includes clearing the site of grass and debris, as well as laying the foundation. Perfect for a greenhouse, but you can also lay out a site with bricks, stone or blocks. Even easier is to use timber or boards 50 × 100 mm or 50 × 150 mm in size for this purpose, depending on the size of the greenhouse.

To create a full-fledged foundation, you should adhere to the following algorithm:
- The site is marked according to the drawing.
- Pegs are hammered in the corners, and a rope is pulled around the perimeter of the site.
- The top layer of soil is best removed. It will be enough to remove about 30-50 cm of soil.
- It is advisable to dig a trench along the perimeter, the depth of which will be 30-70 cm, and the width - 30-40 cm.
- It is necessary to level the bottom as much as possible and fill the trench with crushed stone with a layer of 10-20 cm and sandstone on top - 10-20 cm. Next, the layers must be tamped.
- After that, one, and preferably two, layers of roofing material are laid.
- The timber or boards that are planned to be used must be treated with antiseptic impregnation and smeared with liquid bitumen.
- After drying, they can be laid out in a trench. At this stage, it is worth checking the geometry so that the diagonals and angles are equal;
- Finally, galvanized corners are attached and fixed with long self-tapping screws.
Helpful advice! If it is necessary to strengthen the base, then you can cut the end parts of the timber in half and put one into the other. To fix it, it is enough to drill through both beams and tighten them with bolts.

To provide additional waterproofing, a roofing material is laid at the top and along the sides of the foundation. Only after that you can proceed to backfilling the soil.
Helpful advice! For a better understanding of the construction process, it is useful to see step-by-step instructions with a photo of greenhouses made of plastic pipes with your own hands. In addition, a lot of visual advice can be obtained by watching a video of PVC pipe greenhouses with your own hands.
How to assemble a greenhouse frame from plastic pipes with your own hands
To make a greenhouse frame, you will need to cut pre-prepared pipes according to the dimensions, as indicated in the drawing. For this purpose, you can use a grinder or a hacksaw for metal. In this case, the ends must be cleaned with a file.
It's worth starting with the assembly of the fronts. It is most convenient to do this on the ground, and then install and fasten ready-made elements to the foundation.

Particular attention should be paid to the doors, as its convenience is directly related to the comfort of your use. In order to assemble the doors, you will need 2 vertical and 3 horizontal parts, as well as 4 corners and 2 tees, which will serve to connect all the elements.
Two vertical posts, approximately 2-2.1 m high, will be used to create an opening, on one side of which hinges will be fixed. At this stage, one of the transverse elements, 50-70 cm wide, will also be required.
Then we take a PVC pipe, the length of which corresponds to the length of the arch, and we put on it all the available tees so that the distance between them corresponds to the width of the opening. We fix the opening on the tees.
Helpful advice! Using tees, you can significantly strengthen the strength of the structure. To do this, it is enough to put 2-3 pieces on the front arch and fix additional horizontal stiffeners on them.

In order for the greenhouse to stand firmly, reinforcing bars are driven into the ground, the thickness of which is 8-12 mm. This should be done from the outside of the foundation, hammering them to a depth of 30 to 70 cm. At the same time, at least 50-80 cm of the rod should remain outside. The distance to be observed in this case should not exceed 1 m. Usually it is from 60 to 90 cm.
Related article:
Advantages and disadvantages of the design. How to make and sheathe a frame with your own hands. Prices and features of finished structures.

Having cut all the pipes to a suitable size, we put one of its ends on a rod and bend it in such a way that the second end can be put on the second rod located on the opposite side of the foundation. On the second side, this procedure must be repeated.
Helpful advice! To ensure the strength of the fastening, you can use wide polymer clamps or special galvanized brackets that will help securely attach the arcs to the foundation. The same method can be used to fasten the gables of the greenhouse.

After that, it remains only to give the frame a solid shape, fastening it with the help of transverse elements. To do this, PVC pipes are cut so that their size corresponds to the length of the greenhouse, and then they are fixed with plastic clamps. It is imperative that one such arc be located in the central, uppermost part of the arc. Also, additional side rails on each side will not be superfluous.
According to the same principle by which the doors were made, they also make vents designed for ventilation. After that, it remains only to cover the frame of the greenhouse from HDPE pipes with a film or sheathe it with polycarbonate.
Which covering material for greenhouses is better: fastening features
As a covering material for greenhouses and hotbeds, either polyethylene film or polycarbonate can be used. These two materials differ significantly from each other in characteristics, fastening methods and service life. However, each of them occupies its own niche in modern greenhouse construction, and has some advantages. Consider how to choose a covering material for a greenhouse.

Which film is best for a greenhouse, and how to attach it to the frame
There are several ways to attach a plastic film to the greenhouse frame, among which it is worth noting the simplest and most convenient: the film is cut into pieces, 5-10 cm in size, and a quarter is cut along the length to make staples. The film is stretched over the greenhouse, and with the help of the obtained brackets it is fixed to the longitudinal and vertical posts.
Other options for attaching the film include fixing with ropes, mesh around the entire frame, using double-sided tape, and even ordinary self-tapping screws. For the latter method, you will need small pieces of linoleum that will protect the film from damage. You can buy clips for a film on a greenhouse, which are sold in specialized stores and not only ensure reliable fastening of the coating, but also greatly simplify the work.
The main advantage of this method is the low price of the film for greenhouses and greenhouses. Such a coating does not last longer than one or two seasons, however, there are no problems with its replacement. By purchasing a roll of film for a greenhouse with a width of 6 meters, you can be sure that it will last for several seasons of use.

You can fix it on the greenhouse using stationery binders, double-sided tape or pipe clamps
Helpful advice! In order not to encounter drafts in the greenhouse during operation, it is recommended to make the film longer than the frame so that approximately 10-20 cm remains on the ground. In this case, the edges can be sprinkled with earth or put on top of the boards to provide the structure with greater tightness.
Most often, acrylic film for greenhouses is used as a covering material. The indicator of its strength is higher than that of polyethylene, and therefore its service life will be noticeably longer. Although, it is worth noting that the price of acrylic film for a greenhouse is slightly higher.
How to choose polycarbonate for a greenhouse: mounting methods
Polycarbonate is another covering material for a greenhouse, which you can buy at any hardware store. Before buying, you need to think about which sheets are needed, and how to properly dock the materials together. For example, in order to attach polycarbonate to the frame, the frame must be made of polypropylene pipes with a diameter of at least 32 mm.

It is believed that cellular polycarbonate, the thickness of which is in the range of 4-6 mm, has ideal technical characteristics for greenhouse cladding. It does not make sense to purchase a thinner coating, since it will not be able to cope with external loads.
Polycarbonate is attached to a greenhouse made of PVC pipes as follows:
- Using self-tapping screws and washers 3.2 × 25 mm, the material is attached to the frame.
- With a sharp knife, the excess is cut off in an arc.
- Each next sheet is attached with an overlap of 100 mm to the previous one.
- To strengthen the structure, a special detachable docking profile is used, which is fastened with self-tapping screws. Polycarbonate sheets are inserted into it.
- The joints are closed with plugs.
You can make a hinge for a greenhouse from PVC pipes with your own hands. To do this, cut two pieces of 10 mm from a pipe of larger diameter and connect them together with glue. Polycarbonate sheets are inserted into them and fixed using the same self-tapping screws. This is very convenient for creating vents and door elements.
Do-it-yourself greenhouse made of polypropylene pipes: video instruction
It is quite simple to make a greenhouse from polypropylene pipes on your own. By adhering to all the recommendations and instructions, you can create a solid and beautiful structure that will be an excellent addition to the site and will allow you to grow seedlings, vegetables and herbs. The main thing is to choose all the materials correctly and ensure their reliable fastening to each other.
For today I want to offer you a great idea to create a greenhouse from PVC pipes with your own hands. This simple design struck me right in the heart with its simplicity and accessibility. Materials for the manufacture of such a greenhouse will require a mere trifle, and the benefits of it are incredible. Let's see and judge for yourself.
So, in order to make a greenhouse out of PVC pipes with your own hands, you will need materials such as:
- PVC pipes in the amount of six pieces, with a diameter of 1.3 centimeters and a length of about 3 meters;
- two boards with proportions of 5/15/240 centimeters;
- one board with proportions of 5/15/180 centimeters (it will be cut in half);
- one wooden block measuring 5/5/240 centimeters;
- four metal corners, those that are attached to the screws;
- ten, and preferably twenty pipe clamps, always with screws;
- galvanized screws and nails;
- a hammer;
- a screwdriver or a special construction stapler, who has what;
- covering material, in our case it is a dense transparent film;
- thick black plastic film for the substrate.
Now we need to choose a place for our greenhouse. By the way, using black film, you can kill two birds with one stone with one shot. First of all, the greenhouse will be protected from weeds. In the second place, after the greenhouse is removed, a magnificent, clean bed will form in its place, since all the weeds will die under this very black film.
The process of making a greenhouse from PVC pipes with your own hands
1. To begin with, we will cut our lonely board 5/15/180 centimeters, exactly in half and get the end fences of our future garden.
3. We mark the box for pipes. Two pipes should be located at the edges, and the remaining three at regular intervals.
4. We make installation of pipes in a box. By themselves, PVC pipes are strong enough and our goal is to carefully bend them into an arc, put them in a box and fasten them to it with a half clamp. For greater reliability, you can fasten the pipe with two halves of the clamp - one slightly lower, the other slightly higher.

5. Initially, we had six pipes, but we only used five. So, the sixth pipe will play the role of the upper crossbar, which should be fixed with plastic clips.

6. The top tube will be somewhat longer than the greenhouse, so it must first be adjusted in size. The remaining scraps can be used as film clips. To do this, you simply need to cut them on one side. By the way, if there is an old tight hose, then it is better to make such clamps from it.

7. Now let's make the greenhouse presentable and start by tucking the edges of the black film neatly under the garden bed.

8. We take a transparent film and cut it to the size of our greenhouse. It is fastened with a stapler, but so that the metal staples do not tear the film and it lasts as long as possible, we lay a thin tape of plastic or ordinary material on top of the film.
9. Wooden block, attach to the end of the film using the same stapler. Such a technique is necessary to simplify the procedure for opening a greenhouse in case of watering or airing.
A greenhouse on a suburban area is not only its decoration, but also allows you to get a crop of organic vegetables for the whole family.
To achieve this goal, a do-it-yourself PVC greenhouse is ideal. Not always the standard designs offered by the market are suitable for the site in terms of size and shape.
One of the popular ways to arrange this simple structure is to make it yourself. For this, various materials, designs, installation methods are used.
Don't need a greenhouse? We suggest that you read the article -.
Types of greenhouses

When using PVC pipes, the following designs are usually suitable:
- wall-mounted - the structure is adjacent to one or two walls of a building, residential or technical;
- a greenhouse with two slopes in the shape of a house;
- polygonal, with a sloping roof;
- arched - with a rounded dome.
Wall buildings
Usually they are installed against the wall on the southwest or south side of the building. In this case, it is, as it were, an accumulator of thermal energy, heating up during the day and giving it away during the cool night.

The disadvantage of such greenhouses is the constant action of high humidity of the internal atmosphere on the wall of air, which can contribute to its premature destruction.
This can be avoided by plastering the surface and painting it with waterproof paint. To attach the greenhouse frame to the wall, you can use tubular brackets in the form of a glass.
The inner size of the pipe must match the outer diameter of the frame plastic pipe so that it fits freely into it. The connection must be fixed with a screw perpendicular to its axis. The metal bracket needs to be painted to protect against corrosion.
As a coating for such a greenhouse, it is advisable use monolithic polycarbonate. It is transparent, which makes the building an additional decoration of the exterior of the site.
Gable types
This is the most common form for indoor devices. The popularity is due to the simple form of the frame, which can be made by hand using standard PVC pipes and fittings.
 Such a frame is strong, durable and sufficiently resistant to wind and snow influences. Such frames provide a low reflection coefficient, and this contributes to the optimal heating of the PVC greenhouse under the influence of sunlight.
If you install the slope at a sharper angle, you can achieve an arbitrary descent of snow masses from the roof, which eliminates the need for periodic cleaning in winter.
But this is possible only on a hard surface that does not sag from the load. This property has window glass or cellular polycarbonate.
Gable greenhouses are equipped with doors and vents for ventilation. Through them, warm, moist air is released, accumulating under the roof.
If the side walls of such a greenhouse are installed with a slope, the illumination in the morning and evening hours will be higher. This somewhat complicates the design, but in mid-latitudes such a solution will be justified.
arched structures
Without a doubt, they are the most popular forms of structures for the device of closed ground. The design is durable, good stability and simple to disgraceful installation. In addition, preparing the site for its installation does not require complex solutions.
Thanks to the use of lightweight PVC pipes, the frame of the greenhouse is light enough to be moved without dismantling, which improves the possibility of optimizing crop rotation.
 The versatility of the material allows you to choose any size and configuration of the structure.
The arched shape of the greenhouse is demanding on its location in space. The structure must be oriented its axis from south to north. In this case, the maximum amount of sunlight will take place in the morning and evening hours.
In the daytime, the domed part of the greenhouse is most strongly illuminated, where the refraction of the rays is not so significant.
Dome structures made of PVC pipes
 Such a design can be considered a variant of the arched design. This shape allows the snow to flow freely from the blood, which facilitates maintenance in the winter.
In addition, this form is better suited for growing tall plants. Ventilation in a dome greenhouse is much more efficient given the reduced amount of space at the top of the building.
It is not difficult to make a greenhouse out of PVC pipes with your own hands, since the installation uses proven assembly technologies for plumbing systems. In this case, the same fittings are used.
Site selection and site preparation
The efficiency of its use largely depends on the choice of the location of the greenhouse. We have already pointed out the importance of orientation in relation to the cardinal points. But it is also important that it is in a well-lit place, not being obscured by bushes or trees growing nearby.

In addition, the platform on which the structure of PVC pipes is installed must be on a strictly horizontal platform. The durability of the structure depends on this. If it becomes skewed, conditions are created for the displacement of the polycarbonate or glass coating, which may be followed by its destruction.
With PVC pipe sizes up to 6 meters in length, it can be installed on a wooden beam base. It must be placed on a flat area since the fall, and in the spring it should be additionally checked for horizontality and compliance with the shape.
As a rule, this is a rectangle and it is enough to achieve equality of the diagonals. After performing this operation, the base must be additionally fixed to the ground with anchors.
When installing a wooden base, it is necessary to pour a drainage layer of sand and gravel mixture 10-15 centimeters thick under it. This will allow more active removal of excess water from under the greenhouse.
To install a PVC pipe greenhouse with a length of more than 6 meters, it is preferable to use capital strip foundation. This is especially important for soils subject to seasonal heaving.
Calculation of the need for materials for a greenhouse made of PVC pipes + drawings
To determine the amount of materials, it is necessary to develop a drawing of a greenhouse made of PVC pipes for do-it-yourself manufacturing.

In order not to perform tedious calculations for each part separately, it is better to use graph paper to complete the drawing. This will allow, with a certain scrupulousness of execution, to obtain the true dimensions by measurement. The accuracy with this method of execution is sufficient to perform the calculation.
Please note that all molded materials are available in standard lengths. Therefore, when designing, it is necessary to take into account the possibility of their rational cutting in order to prevent unnecessary waste.
Standard sizes of some materials:
- PVC pipes measuring 20-25 millimeters are produced in lengths of 1, 2, 3 and 6 meters.
- Beam made of coniferous wood - 4 or 6 meters;
- Cellular polycarbonate with a thickness of 4, 6, 8 millimeters is produced in sheets 2.05 wide with a length of 4, 6 or 12 meters.
- Polyethylene film with a thickness of 90-200 microns is sold in rolls, the width is from 1 to 3 meters. When installing, welding in width is allowed. For this, a household iron and aluminum foil are enough.
The distance between the arcs of the greenhouse made of PVC pipes is selected depending on the coating material. For a film, it should be 0.7-0.75 meters.
If the coating is made with polycarbonate with sheets overlapping by 10-12 centimeters, then it is necessary to provide for each sheet a support of at least 3 arches, that is, the distance between them should be: (2.05 - 0.1): 2 \u003d 0 .97 meters. The number of sheets is determined by the given length of the greenhouse.
 The amount of materials for the end walls is calculated separately. The supporting structure is made of a wooden bar measuring 50 x 50 millimeters and sewn with the main covering material using planks 15-20 millimeters thick.
The design of the end walls should provide for a doorway with a width of about 90 centimeters and a height of 1.8-2.0 meters, so that it is convenient to use a garden wheelbarrow. A window should be provided in the upper part of the end wall.
If polycarbonate is used for the coating, its fastening is carried out in two ways:
- By applying a screed across the greenhouse body. This part is made of galvanized steel strip with a width of at least 40 millimeters and a thickness of 0.7-1.0. The length per strip should exceed the outline of the frame by approximately 0.5-0.7 meters, which are needed to form the collar. The tension is made with an M10 stud, the length of which is 20-25 centimeters, using two nuts with washers.
- Fastening to the arches with cutting screws with special compensating washers with an installation step of 250-300 millimeters.

To install doors and vents, you will need canopies of 2 pieces for each part. Below are drawings of various frame options with dimensions.


Connecting pipes and fittings when assembling a greenhouse
To assemble the greenhouse, PVC pressure pipes and appropriate fittings are used - couplings, angles, tees and crosses.

When a set of parts is selected, they must be checked for compatibility. A normal fitting must be pushed onto the pipe by plunging at least 2/3 of its own length.
Adhesive connection
Adhesive compositions for PVC as the main component contain exactly this material, diluted with a special solvent that keeps it in a fluid state. Various additives are also used as additives to improve adhesion and give the composition the desired consistency.
After applying glue to the parts, long chains of PVC molecules are mixed, and as a result of the evaporation of solvents, the mass thickens. The material of both parts is mixed, forming a monolithic, durable assembly.
When purchasing glue for PVC, you need to carefully read the instructions for use, which contains instructions on how to prepare for gluing and how to properly carry out the process.
At room temperature, the setting time of the adhesive is about 4 minutes. At a temperature of 40 degrees, it is reduced to one minute.
A full-size part is cut off from the pipe with special scissors. They are designed in such a way that they do not leave burrs at the end.
Watch the video
Cutting can be done with any saw with fine teeth (hacksaw), but after that, you need to carefully remove burrs that can adversely affect the alignment of parts when gluing.
Before gluing the surfaces, the parts to be joined must be prepared in a special way. The main goal is degreasing. Gluing can be done outdoors if weather permits. The air temperature should be in the range of 5-35 degrees.
It is important to remember that the brush for applying the adhesive mass must be made of natural bristles, otherwise the synthetic material will also be dissolved and this may damage the strength of the connection. Often, adhesive manufacturers include a brush in the package.
Bonding of parts is carried out in the following order:
- Check pipe and fitting for fit. Mark the borders of the glue application with a marker.
- Clean parts from burrs and gross damage.
- Degrease the surfaces to be bonded.
- Apply glue with a special brush.
- Align the parts by putting the fitting on the pipe. Turn the parts through an angle of about 90 degrees and set in the desired position. This operation should ensure that the adhesive is evenly distributed over the surfaces.
- Details must be firmly held for 15-20 seconds.
- Depending on the ambient temperature, the drying time and the final setting of the adhesive will be up to 4 minutes.
- Excess adhesive mass from the surface of the parts must be removed with a rag.
- The glued parts must not be moved for 15-20 minutes.
Watch the video
When gluing PVC parts, the following defects may occur:
- Partial non-adhesion occurs when the adhesive is applied unevenly and if there are gross damages on the surface of the parts. In addition, an overdried layer of glue can lead - the time after application until the parts are combined is no more than 12-15 seconds.
- When performing work in conditions of minimum allowable temperatures, it can lead to soft non-gluing, which indicates insufficient polymerization of the adhesive.
- A porous adhesive layer is formed when the adhesive is applied unevenly. The reasons for this may be contamination in the area of gluing, poor mixing of the adhesive mass before application, involuntary displacement during drying.
Bonding is the main assembly method. However, when erecting greenhouse frames, there is no need for tight connections. Therefore, when performing such work, the assembly method using metal fasteners is often used.
Assembling the frame from PVC pipes with screws
The nature of the loading of the elements of the greenhouse frame made of PVC pipes allows its assembly using fasteners. This method even simplifies the assembly process. The pitched surface is not an obstacle to drilling if you use the simplest jig.
 During installation, drilling may be required at the installation site. With PVC pipes this is not a problem. In the right place, it is enough to leave a deep mark, which is easily done with a sharpened triangular pin made of any metal. In this case, the drill will not slip to the side on a sloping surface.
To assemble the greenhouse, it is enough to use standard M6 bolts with a convenient head shape. To install them, you need holes with a diameter of 6.5 millimeters. Together with the bolt you will need the appropriate nut, standard washer and spring washer - Grover. Caution must be exercised when tightening - PVC pipe does not have high compressive strength.
Watch the video
Self-filling foundation
A support base for a greenhouse is also necessary, as for any other structure. Only in this case it works a little differently.
The greenhouse itself, especially made of lightweight PVC pipes, is light in weight and has a large windage. If it is not well strengthened, it may well go to "walk" in neighboring areas.
Watch the video - the benefits of a concrete foundation
How can I arrange a foundation for a greenhouse:
- A support base made of wooden beams is installed if it is planned to keep the greenhouse in this place for 2-3 years. However, it is possible, without displacing this structure, to simply replace the wooden base.
 For it, a beam of 150x50 or 120x100 millimeters is used. Before laying it, you need to level the site and remove the sod from the locations of the supporting base.
It is necessary to arrange a drainage layer from a mixture of sand and gravel with a thickness of 120-15 centimeters. Lay roofing felt waterproofing in one or two layers on top of the drainage.
Lay the beam along the contour of the frame. The resulting rectangle check for equality of diagonals, fasten the sides together. Before laying, the material must be treated with an antiseptic, this will increase its service life.
It should be noted that treatment with antiseptics does not guarantee a long service life of the greenhouse, it will either have to be transferred after a few years, or the support must be changed.
Attaching the base to the ground can be done in different ways. Most often, trimming reinforcement 80-90 centimeters long, driven into the ground, is used. But screw anchors are more reliable. It's more expensive, but more reliable.

A layer of concrete mortar is poured over it, into which the first corner block is installed. It must be carefully set on the horizon using the building level. Then pull the cords and lay out the rest of the blocks around the perimeter along them. The setting time of the masonry mortar is about 7 days, after which you can continue to install the PVC pipe greenhouse frame with your own hands.
- A brick foundation on a concrete base is installed in the presence of loose soils on the site. To support the greenhouse, you need to dig a trench in the ground with a depth of 40 centimeters and a width of 20. A drainage layer 15-20 centimeters thick must be made along its bottom. It must be tamped and spilled with water for a better seal. Install reinforcement in the amount of two cores 5 centimeters from the bedding, using broken brick stands. It is advisable to install the formwork, aligning its upper edge with the horizon.
Concrete pouring in one run, continuously. In this case, it is necessary to install M12 anchor bolts at a distance of no more than 1.5 meters from one another.
After the concrete has completely cured, lay a brick belt in two bricks around the perimeter.
Watch the video
After a week, you can begin to install the frame of the greenhouse.
Other methods of making a foundation for a greenhouse using other materials are also used. Their choice most often depends on the presence and type of residues from the main construction on the site.
Step-by-step instructions for assembling the frame of the greenhouse
Greenhouse kits of various sizes are sold in the construction markets. The attached instructions give a complete picture of how to assemble and install them.
But not always their designs and dimensions satisfy the buyer in accordance with the installation site. Then greenhouses made of PVC pipes of the required sizes are made by hand.
But the basic assembly and installation techniques do not depend on this, since the components are the same.
Watch the video
When assembling, the following connecting elements are used:
- A glass is a plastic product with an inner diameter corresponding to the outer size of the pipe. It is attached to the base with a self-tapping screw through the bottom. The tip of the arch is inserted into the hole and fixed with a screw.
- A tee is a connecting element with three holes. When assembling the arch, perpendicular coaxial holes are used to install longitudinal ribs during the installation of the frame. It is used only for the manufacture of extreme arches.
- The cross is used for the same purpose when installing intermediate arches, to which the longitudinal ribs are supplied from two sides.
The mating parts can be fastened with glue or screws. The second method is more commonly used, since greenhouses are usually installed in early spring, when the outside temperature may not be sufficient for a reliable adhesive bond.
When mounting the greenhouse directly on the ground, the arches can be mounted on pins.

For the manufacture of pins, reinforcing steel is used, the diameter of which is selected depending on the internal size of the pipes used for the frame. Their length is 0.6-0.8 meters, they are driven into the ground to a depth of about half a meter.
After installing all the arches around the perimeter of the frame, wooden box boards are installed. Their size is 40-50x120-150 millimeters. Fastening is made directly to the arches using a metal strip with self-tapping screws.
Watch the video
Installing the frame on a prepared base is practically no different from the described procedure for greenhouses made of PVC pipes when mounted on the ground.

Greenhouse door installation
For a normal greenhouse, two doors are needed, which are installed on both end walls. Their main purpose is to provide convenient maintenance of the internal space of the structure.
Therefore, the width of the opening must be at least 90 centimeters, which allows the free passage of a garden wheelbarrow. In this case, the height should be about 1.8-2.0 meters.
In addition, the passage device must be sufficiently sealed to ensure the preservation of the microclimate at night.
In addition to the door in the greenhouse are installed several vents for ventilation. They are needed to remove warm, moist air that collects in the upper part of the building and is harmful to seedlings and greenhouse plants.

For the manufacture of the door, a wooden bar measuring 50x50 millimeters is used. The rectangular door frame is divided by a cross member. An obligatory element is a jib, which gives the structure rigidity. The joints of the parts are additionally reinforced with corners made of galvanized steel.
The door leaf is made of the same material as the main cover of the greenhouse - film, polycarbonate or window glass.
Watch video - door installation
Installation of the door at the place of use is carried out using standard door canopies in the amount of two pieces.

The doorway on the end walls is formed in the process of manufacturing their skin. For this, wooden blocks are most often used, even if the main material of the frame is a PVC pipe.
Cover installation - polyethylene film or monolithic polycarbonate
To separate the room from the outdoor space, it is done in several ways:
- installation of cellular or monolithic polycarbonate with a thickness of 4 - 8 millimeters;
- coated with polyethylene film 90-200 microns thick.
It should be noted that the use of the film is several times cheaper, but it has to be changed, as a rule, annually.
Watch the video
But polycarbonate, if it is of high quality (you need to beware of Chinese fakes), can last up to seven years, after which the material begins to become cloudy due to wear on the outer surface.
 Before installing polycarbonate sheets on the upper ends of the arches, you need to install a self-adhesive sealing tape.
The sheet is installed in such a way that the internal cavities are located vertically. In this case, there is no accumulation of moisture in the voids.
For installation, special fasteners are used, taking into account the properties of the material, for which only a standard tool is needed.
Watch video - installation and fastening of polycarbonate
A thermal washer and an elastic sealing ring are installed under the screw, and its head is protected by a cap. It should be remembered that this material has an increased coefficient of thermal linear expansion. Therefore, the hole for the screw should be 1.0-1.5 millimeters larger than the diameter of the screw.
 The distance between the fastening screws should be no more than 400 millimeters.
Joints and junctions of the polycarbonate coating are made using additional elements.
The procedure for installing polycarbonate is as follows:
- The end walls of the greenhouse are sewn up with a sheet.
- Extra parts are cut along the generatrix of the frame. To do this, you can use an ordinary construction knife.
- Cut out openings for doors and vents.
- The first sheet of polycarbonate is superimposed and attached. In this case, you need to perform an overhang in the amount of 8-10 centimeters.
- Further, the remaining sheets are successively superimposed and attached.

Film coating is installed in the following order:
- The end walls of the greenhouse are sheathed with a film. At the same time, at the edges of the door and window openings, it is fastened with strips of 15-20x40 millimeters and nails 60-70 long.
- Along the generatrix of the frame, the film is attached with a construction stapler as a temporary measure.
- The film is installed on top of the frame after sealing the ends. It is positioned in such a way that there is an overlap on the lower wooden base, to which they are attached with planks. If the greenhouse is installed directly on the ground, the edges must be filled under the base of the frame and sprinkled with earth.
- The edges of the film on the end sides are wrapped and fastened with planks together with the previously installed film on the end wall.
Pros and cons of PVC
The material has a number of positive qualities, which are as follows:
- Quick and easy assembly and dismantling of structures.
- The disassembled structure takes up little space and is light in weight.
- The construction of a greenhouse from this material does not require special skills or abilities and is available for DIY construction.
- Availability and low cost of materials for the construction of the greenhouse.
- High strength and resistance to external factors.
- The service life of a PVC frame is estimated at at least 10 years.
Even with a strong desire, it is not easy to find pronounced shortcomings in the design of a greenhouse made of PVC pipes. It is believed that it is dangerous to put them in a region with strong winds.
But this applies equally to any material. And there is only one way to solve it - installing additional stretch marks and stiffeners. For durability, it is also not recommended to use a soft coating material in such conditions.
In modern gardening stores, there is a fairly wide selection of ready-made greenhouses of various shapes and sizes, but it is much more pleasant to build such a structure with your own hands. One of the best materials for building a frame are plastic pipes. They are strong enough, not covered with rust and fungus, but at the same time they are easy to give the desired shape.
In today's article, the main stages of building a greenhouse from plastic pipes with your own hands will be considered in detail. You will learn what materials are best to use for the construction of the frame and as a cover for the building, as well as receive information on how to connect the frame elements and how to arrange irrigation inside the building.
Greenhouse made of plastic pipes
There are many materials that can be used to build a frame. Wood is considered the cheapest, but it has one significant drawback - even if the frame is treated with special antiseptics, the building quickly becomes unusable due to rotting and mold. Metal is considered an alternative to wood: it is quite strong and durable, but without special treatment, the frame can collapse under the influence of corrosion. In addition, without certain skills, it will be quite difficult to build a greenhouse in metal forms. It should also be borne in mind that metal is a fairly expensive material.
The most inexpensive, but at the same time, practical material for building a greenhouse frame is plastic, or rather, pipes made of this material (Figure 1).
Plastic pipes as the basis for the frame of the greenhouse have many advantages:
- High humidity resistance: unlike wood or metal, the plastic frame does not corrode and rot under the influence of high humidity in the greenhouse air;
- Easy assembly: plastic elements are quite flexible, so you can easily give them the desired shape without the use of special tools. In addition, such a frame is easy to assemble, and if necessary, it can be disassembled for the winter and re-mounted in the spring;
- Light weight: The plastic frame of the greenhouse is very light, so it is easy to transport. And if you decide to build not a greenhouse, but a greenhouse, you can move it from place to place without disassembling it. In addition, such lightweight structures do not need a foundation. Accordingly, you save time and money on building a greenhouse.
- High temperature resistance: the material practically does not burn and does not deform under the action of high temperatures.
 Figure 1. Structures of closed ground from PVC pipes
 In addition, plastic frames have high strength and wear resistance, and the structure can last up to 50 years, and it does not need to be treated with special antiseptics against decay and mold. It should also be borne in mind that even a large greenhouse made of plastic will have a low price, and its attractive appearance will make such a building not only practical, but also a beautiful acquisition.
As a rule, polypropylene and PVC pipes are used for the construction of greenhouses and greenhouses, so we will consider the features of working with them in more detail.
PVC pipe greenhouses
When planning to build a PVC greenhouse, you should decide on the rigidity of the material used. For example, if you are going to build a gable or single-sided building, you will need models of increased rigidity that will not only keep their shape well, but also successfully withstand the weight of the roofing. If you have chosen an arched or other rounded design, it is better to give preference to flexible products that are easy to give the desired shape.
There are other criteria for the selection of PVC pipes for the construction of a greenhouse:
- The wall thickness must be at least 3 mm so that the finished structure is strong enough to withstand not only the weight of the roofing material, but also strong gusts of wind;
- It is better to choose segments of great length. If necessary, you can cut them into pieces of the required size, but at the same time they are also suitable for the construction of frame elements of great length. It should be remembered that the shorter the pipe, the more connections will have to be made, and this, in turn, reduces the tightness of the building;
- Pay attention to the inner diameter: it must be at least 13 mm.
Since PVC pipes can be used to create a greenhouse of any shape, let's take a closer look at the features of working with flexible and rigid parts.
Note: Regardless of the type of construction chosen, you will need certain preparatory work: clearing and preparing the site, as well as building a foundation on which the frame will be attached in the future.
As mentioned above, rigid PVC pipes are used for the construction of gable and single-slope greenhouses.
The construction of a greenhouse from rigid pipes is carried out as follows:
- Support rods made of metal are attached to the prepared foundation. They should be located strictly vertically at the same distance from each other. One plastic pipe is put on each support. The optimal height is considered to be 1.5 meters. At the base they are fixed with steel brackets.
- Plastic crosses are put on the top of each support, with the help of which the rest of the frame elements will be attached.
- Prepare several pieces 1 meter long. They will act as horizontal jumpers connecting the vertical racks. These horizontal blanks are inserted into the side holes of the fixed crosses.
- After that, you can start assembling the roof ridge. To do this, you need to prepare several meter lengths, the number of which corresponds to the number of supports and connect them into one large horizontal crossbar using crosses.
- The final step will be the construction of the roof. Insert plastic pipes into the holes of the crosses of the previously installed supports, forming a roof slope. At the end, they need to be connected with one common ridge.
An arched greenhouse made of flexible pipes is easier to assemble, but there is a certain scheme for this process. First, with the help of crosses, you need to make 4 arcs, connecting for this 2 parts 3.2 meters long. To make end arcs, connect two more similar arcs using tees (Figure 2).
 Figure 2. Framework diagram
 Each arc is put on a metal rod-support. To do this, first put on one part of the arc, then fix it on a wooden base board with a metal bracket, and only after that the arc can be given the necessary shape and fixed on the rod on the other side of the base. Thus, a frame is formed, and at the final stage, end arcs are installed.
Following these instructions, you will quickly assemble the frame and be able to start covering the greenhouse with film or polycarbonate.
The use of polypropylene pipes
Polypropylene pipes are also considered a popular material for building a greenhouse frame. The advantage of such buildings is that they do not need to equip the foundation: just level the soil in the area where the greenhouse will be installed. You can also prepare a wooden frame, as shown in Figure 3.
Note: The leveling of the site plays a very important role, since the symmetry of the building will depend on it. If the platform for the greenhouse is uneven, the structure will be skewed. You can check the evenness of the site using the usual building level.
It is important to remember that polypropylene pipes are flexible, so they are not suitable for the construction of sheds and greenhouse houses. However, they have proven themselves well in the construction of arched structures. The frame is assembled according to the scheme for PVC pipes described above.
When erecting a frame, it is necessary to provide a place for a doorway and a vent. They are made at the ends of the greenhouse.
You can make a door and a window in a greenhouse from plastic pipes like this:
- Prepare six segments: two meter and four one and a half meters.
- Long pieces should be put on the metal bars of the base, installed at the ends. Pipes should be fixed to the base with metal brackets.
- The upper part of each workpiece is fixed to the horizontal ribs of the frame.
- At the level of the base of the front end of the greenhouse, a short pipe should be welded (between long racks). As a result, you will get a rectangular hole, which in the future will serve as a door to the greenhouse.
- At the rear end in the upper part, a similar segment is mounted, which will later serve as a window.
 Figure 3. Construction of a wooden base
 Next, you need to make two rectangles, the dimensions of which will correspond to the area of \u200b\u200bthe future door and window. In this case, it is necessary to strictly observe the dimensions so that the finished frame fits snugly against the frame. At the stage of sheathing the frame with polycarbonate, they are hung on hinges.
Polycarbonate and plastic frame
To cover a plastic greenhouse, you can use any available material: glass, film or polycarbonate. But it is still better to give the advantage to the latter option, since it is easy to work with polycarbonate, while it has sufficient strength and transparency, so the finished greenhouse can be used for several seasons.
To properly fix polycarbonate sheets on a frame made of plastic pipes, follow these recommendations:
- Each opening of the frame, which will be covered with polycarbonate, must be accurately measured and applied to the sheets.
- It is necessary to accurately cut the workpieces using a regular clerical knife.
- After all the parts are ready, their ends should be closed with special plugs, a profile or tape so that dust and dirt do not get into the cells.
- Next, proceed to the installation of sheets on the frame. The blanks are laid with a protective film outside, and it is not recommended to remove it until the installation is completed.
- Covering the greenhouse starts from the roof. To do this, lay out the first prepared sheet, align it vertically and fix it with special self-tapping screws with thermal washers directly on the frame. To increase the strength and tightness of the structure, it is desirable to place fasteners at a distance of 4-45 mm from each other.
- The second blank is laid close to the first sheet and connected with special plastic strips. The second sheet should also be fixed to the frame with self-tapping screws.
- Further, by analogy, I mount all the remaining sheets of polycarbonate. At the same time, it is important that the workpieces adjoin to each other end-to-end. At the corners, the material is fastened with special corner inserts.
- The bottom sheets must be firmly attached to the wooden base of the greenhouse.
At the final stage, panels are attached, which will act as a door and a vent. They must not only be fixed on the frame, but also hung on hinges, with the help of which the door and window will open in the future.
Do-it-yourself installation of a homemade greenhouse made of plastic pipes
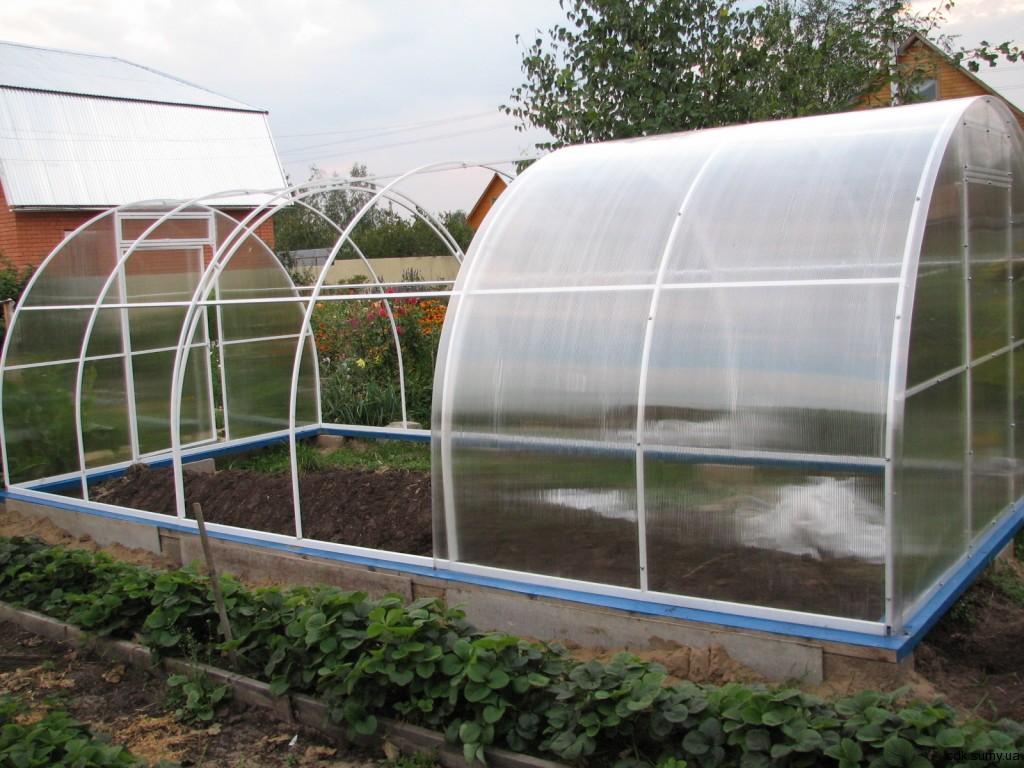
Despite the fact that plastic pipes can be used to build a greenhouse of any shape and size, the arched design is considered the simplest and most practical. Firstly, it is easy to build it with your own hands. Secondly, the implementation of the project will require a minimum of financial costs, and thirdly, the arched greenhouse is considered one of the most airtight, since there are practically no joints in its upper part. The detailed assembly of the structure is shown in Figures 4-7.
 Figure 4. Construction of intermediate and end arches
 Installation of an arched greenhouse made of plastic pipes is carried out as follows (for a structure 2.4 wide, 2 high and 4 meters long):
- Prepare the necessary materials: for a greenhouse of the indicated size, you will need 16 PVC pipes with a diameter of 25 mm and a length of 6 meters each, 28 single-plane tees with an angle of 90 degrees and 4 of the same tees, but with an angle of 45 degrees (accessory diameter - 25 mm), 4 two-plane tees and 16 corners by 90 degrees (each 25 mm in diameter). You will also need self-tapping screws, two-leg clamps with self-tapping screws, special self-tapping screws for polycarbonate and a connecting profile. It is better to buy fasteners with a margin in order to avoid difficulties and delays in the installation process. In addition, you will need 8 door hinges and a set of screws for them.
- Site preparation and foundation construction: the selected area should be leveled and a platform for the future greenhouse should be placed. The foundation is best made of wooden beams with a section of 100x100 mm. This material is inexpensive, but it has sufficient strength. Before installation, the wood must be treated with an antiseptic and dried, and then assembled in accordance with the markings, connecting with metal corners and self-tapping screws. To fix the foundation, a sand cushion is poured around its perimeter.
- Preparation of frame elements: starts by preparing pieces of suitable length. After you cut them into pieces, it is better to immediately mark each part with a marker so that you do not get confused during installation. For an arched greenhouse of the indicated size, you will need: 2 or 4 pieces of 400 cm each, 10 pieces of 190 cm long, 4 pieces of 180 and 140 cm long, 8 pipes of 76 cm, 18 pieces of 65 cm and 4 pieces of 46 and 10 see From the remaining parts you can make a frame for the future door and window.
- Frame installation: 190 cm blanks will serve as intermediate arches. They should be connected in pairs with crosses. The end arches are made from segments 140 cm long. Two such segments are connected by tees and attached to other tees with an angle of 45 degrees. As a result, the free holes of the tees must point downwards so that the door frame tubes can be attached to them. Blanks 46 cm long are connected to tees of 90 degrees and connected into one structure. In this case, it is important to ensure that the sockets of the 90-degree tees are directed perpendicular to the similar 45-degree tees. Next, they begin to assemble the side ties, using six pieces of 65 cm each. For each tie, you will need 5 single-plane tees, the leads of which should be in the same plane, since arcs will be attached to them. End ties are assembled from blanks of 76 cm and two single-plane tees for each tie. After that, doorways are assembled: parts of 180 cm each are fixed on the lower tees and connected with several more tees and a jumper 76 cm long. Next, you need to fix the continuation of the racks (10 cm pipes). Later they will need to be cut and connected to the arch. The final step will be the connection of the end ties and arches with tees.
- Fixing the frame to the foundation: one of the end arches is installed on the foundation and attached to it with metal brackets (Figure 7). Next, the first intermediate arch is installed and connected to the end arch using a small jumper, 65 cm long. By analogy, all other arches are attached. Next, a second end arch is installed and connected to the top and side screed.
 Figure 5. Ways of connecting side and end ties
 The finished structure must be checked and, if necessary, aligned. The frame is finally attached to the base beam with clamps and self-tapping screws. You also need to assemble the door frame and vents and attach to the frame with self-tapping screws.
The final step is the fastening of polycarbonate. The sheets are marked with parts of the future greenhouse and cut them with a sharp clerical knife. After that, the blanks are attached to the frame with special screws, moving from the end wall. At the same time, it is important not to remove the protective film until the installation is completed.
Pipe connection methods
Initially, PVC pipes were used for the installation of cold water supply systems, but their flexibility, strength and long service life significantly expanded their scope. In particular, they are often used for the construction of greenhouses.
 Figure 6. Assembling the end walls and doorway
 As a rule, pipes with a diameter of 20 to 32 mm are used in the construction of covered ground structures, as they have sufficient strength and can withstand the weight of a film or polycarbonate coating. In addition, pipes of various lengths (from 1 to 6 meters) are on the market, so you can easily choose the product of the right size.
You can connect the frame pipes using special clamps and ties, furniture bolts (along pre-drilled holes) or glue. When using the first method, the frame can be disassembled at any time to move the greenhouse to a new location.
Note: Clamps and ties are most often used for the construction of temporary greenhouses and greenhouses, which are dismantled for the winter.
The connection of the frame elements with glue does not allow disassembling the structure, but at the same time, this method is considered the most reliable. As a rule, this method is used for capital greenhouses on the foundation, which are used for the winter cultivation of vegetables and herbs.
 Figure 7. Scheme of attaching the frame to the base
 If you are planning to build a greenhouse out of plastic pipes, you will need several types of fasteners. First, you will need corners with which you can connect perpendicular elements. Secondly, you should buy tees, through which the elements are connected at an angle or in one specific plane. Additionally, you will need crosses, with which four pipe frame elements are connected.
Watering in a greenhouse made of plastic pipes
Plastic pipes are so versatile that they can be used not only for the construction of the frame of the greenhouse, but also for its internal arrangement, in particular for the installation of drip irrigation.
To make an automatic irrigation system, you need to make markings inside the building, planning the location of the water tank, pipes and drippers for irrigation. After that, you need to buy the required number of pipes, attach them to the tank and connect them with fasteners. In places of watering, holes are made and droppers are installed through which moisture will flow to the plants.
The assembly process is shown in more detail in the video.
Plastics lungs, they are easy to work with. They are not afraid of mold and fumes, they are not damaged by caustic chemicals. Greenhouses made of polymer pipes serve for a very long time.
Since the price of greenhouse structures is high, gardeners can make a greenhouse on their own. You don't have to spend a lot of money.
If we talk about size, then with modern materials, you can easily make a greenhouse according to individual sizes.
How to make a greenhouse from plastic pipes with your own hands?
PVC and HDPE pipes for greenhouses
For, the frame of which is made of pipes, a foundation is not needed, because the structure is light. Bases are required for the device boards and wooden blocks.
Choose quality, dry lumber. Treat all elements with an antiseptic, this will increase the life of the structure. Drying oil can be used instead of an antiseptic.
To work, you need a plastic pipe, PVC. The most commonly used pipes are white, but you can choose another.
How many plastic pipes do you need to build? Buy products with a diameter of 13 mm, for a greenhouse it is enough to purchase 19 six-meter pipes.
In addition to the items listed above, you need to buy steel reinforcement or bars. You will place them inside the pipes. You will need at least 10 rods 100 cm long.
If we talk about consumables, then clamps made of aluminum or plastic will be needed.
Types of greenhouses
Greenhouses can have a film covering, or polycarbonate. Most often, gardeners choose an arched design. She is can be of two types:
- with a plank box and arcs that were strung on steel rods;
- with frame made of plastic, arcs and tees made of the same material.
You can easily make a greenhouse with a gable roof. He can be two kinds:
- film coated;
- with polycarbonate finish.
Some landowners who are serious gardeners will appreciate two-layer greenhouses made of PVC.
Such structures are distinguished by excellent thermal insulation, because the space inside the greenhouse is reliably protected from the external environment by two sheets of cellular polycarbonate. Such a greenhouse gives off heat three times less than a conventional greenhouse.
Attaching the film to the frame
 In stores you will find polymer pipes of the desired diameter. Sellers will help you find the right ones for them. fitting, you don't have to look for them yourself.
Manufacturers in the pipe kit include swivel joints. Thanks to them, the process of building a greenhouse will accelerate significantly. You will find cross and tee splitters in the store.
Of course, the use of connectors will increase the construction budget. That is why you need to evaluate for yourself whether you will use fittings or not.
You can choose which plastic pipe greenhouse to make on your site. It can be of two types: stationary and collapsible. Stationary is erected by welding or gluing parts of the structure. Collapsible involves the use of screws.
Advantages of products made of polycarbonate and plastic pipes
Polycarbonate greenhouses have low cost. The frame is easy to do with your own hands. You can move the structure to another place at any time, it is very easy to adapt it to your needs.
The plastic greenhouse will be absolutely safe for soil and plants. With proper assembly, a long service life is guaranteed. Polycarbonate is a material that protects plants from ultraviolet radiation. Light passing through the material is scattered. At the same time, the sheets have a high degree of light transmission. Even with prolonged use of the greenhouse, it does not deteriorate.
Polycarbonate is not afraid of being hit by stones and even large hail. The material is 200 times stronger than glass and 6 times lighter, so no foundation is needed to install the greenhouse. Installation is carried out without special equipment.
Sheets are not afraid of temperature changes, greenhouses endure severe frosts and the hottest rays of the sun. Polycarbonate burns only if it is directly exposed to flame. The sheets are flexible, you can easily assemble arched and vaulted greenhouses.
A photo
Do-it-yourself greenhouse made of plastic pipes: photo examples.


Preparatory work
Locate the greenhouse in a sunny location. Leave free space around, there should be a passage around the greenhouse. If you are going to put up a greenhouse for one year, then it is better to stay on a folding or portable structure.
Choose stationary if you plan to grow crops annually.
Remember that greenhouses of this type are suitable for operation in the winter. For such structures, it is necessary to put a high-quality foundation so that the greenhouse does not come into contact with frozen soil, so that cold does not come from outside.
Determine the place Where will the greenhouse be located?. Clear the soil from the fertile layer, it is enough to remove a couple of centimeters. This must be done, because during construction, carnations and construction debris will fall on the ground.
How to install a greenhouse
How to build a greenhouse from plastic pipes under the film with your own hands? No matter which project you choose, installation includes a number of steps:
- Foundation preparation. It will replace the foundation, since pouring a concrete strip does not make sense. The plastic is light enough, no foundation is required.
- Assemble the frame. Use pre-purchased polymer pipes in your work, they can be rigid or flexible. Fix polycarbonate or reinforced polyethylene film. Glass cannot be used.
- Proceed to end side mounting. Make windows in the greenhouse, install doors. Hang locks.
This is a short description of the steps. In fact, the construction of a greenhouse has its own characteristics. It all depends on the type of greenhouse you decide to build in your backyard.
At first decide on a base. This is the frame that will hold the frame on the ground. It is needed in order for the greenhouse to retain its shape. The basis does not depend on which project you choose. The choice is limited by your financial capabilities and wishes.
Ramu can be made from a rigid plastic pipe, eight-millimeter boards, bars of small width. Most often, a thick board is used for the lower strapping device. Buy either her or the bars. The material is connected by cutting half a tree. Metal parts are not used to connect the base.
The base is either immersed in the ground, but for this, a shallow trench is first dug. Along the perimeter, you need to lay roofing in it, it should cover the walls of the groove and its bottom. After that, a greenhouse frame is installed in the trench.
Do not assume that a frame made of a polymer pipe can be self strapping. It is only necessary if there is a brick or concrete foundation. It is also installed when building a foundation made of wood.
The base is fastened with brackets to the beam; anchor bolts can be used in the work. They are fixed in concrete at the moment when it begins to harden. Or the bolts are fixed in the brickwork.
All options you can use with any project. But when building such a foundation, you will have to forget about changing the location of the greenhouse.
If you plan to move the greenhouse from place to place, then it is better to bring down a simple plank frame. Prepare the site, remove the sod, freeing the area.
Take from the need to make from dried wood. Treat the structure before assembly with hot bitumen. Additionally, impregnate the tree with an antiseptic.
Use a PVC pipe with 3 mm thick walls. Determine the number of six-meter segments yourself. Do not forget that one segment must be left on the screed.
For fastening arches buy plastic clamps. They will need as many as there will be PVC pipe segments. To securely fix the arches, attach them to a wooden base, buy mounting brackets or aluminum drywall fasteners. For each piece of pipe you need two pieces.
Take a sledgehammer and drive in pieces of reinforcement on both sides of the base, leaving 40 cm above the surface. Put on pieces of PVC pipe. Fasten the arches by fixing them to the frame with metal brackets.
Arrange the ends by making a doorway. For this purpose, use wooden blocks. Such an opening will act as a box. To increase the rigidity of the structure, reinforce the ends with wooden parts. At the highest points of the arches, make the top screed. Attach it with polymer clamps.
cover the greenhouse polycarbonate or film, fix the material. Make a door and vents.
Do-it-yourself greenhouse made of plastic pipes: drawings for manufacturing on a frame of plumbing polyethylene pipes.


Useful video
To your attention, a video about how to make a greenhouse out of plastic pipes.
And here is a video about a greenhouse under a film with your own hands from plastic pipes.
This is the simplest design, which you can easily assemble on your own. Such a greenhouse will last a very long time, delighting you with its aesthetic appearance and large yields.
If you find an error, please highlight a piece of text and click Ctrl+Enter.