Raised beds how to make a raised bed. How to fill warm beds
Spring for all summer residents and gardeners begins the same way: dig up all the land, divide it into beds, make a neat earthen roller for each. Then wait until the soil warms up, plant the plants and start fighting weeds that occupy the entire territory, including paths. But you can make improvements that will help you get more yield at less cost (labor, first of all).
Advantages and disadvantages of a high bed
Usually, having heard about the many advantages of such structures, people begin to wonder how to do it. How does it differ from ordinary landings at ground level? We list only the main advantages:
- The soil on your site can be absolutely any, this will no longer affect the crop. High construction can be filled with a universal soil mixture or suitable for a specific crop. If your dacha is located in a damp lowland, then drainage can be laid as the first layer: broken brick, Next, lay in layers eggshell, branches and grass left after the autumn cleaning of the site, leaves and earth.
- After many years of operation, the soil in the garden becomes less fertile, accumulates various pathogens. Having learned how to make a high bed, and installing it on your site, you can make fresh purchased soil and protect plants from decay and fungus.
- In spring, such structures warm up faster, which makes it possible to plant plants earlier. This gives a chance to get two harvests instead of one.
- The yield is 2 times higher than when using flat beds.
- Convenience of care of a bed, and also collecting fruits of low-growing plants.
- Space saving and aesthetic appearance.
Everything has its reverse side. The disadvantage of high beds can be called the need for material investments and labor in their creation. They dry out fairly quickly and require frequent watering. it won't fit. The limited space of the bed requires regular fertilization, as the soil is depleted.
What materials may be required to create a high bed
If you have only used flat beds, then be sure to conduct an experiment by putting one progressive design. If we talk about how to make a high bed, the first question arises about necessary material. The scope for creativity here is great, it all depends on the level of your skill and the amount you are willing to spend.
- high beds from brick. If you do not have bricklaying experience, then the design may not come out too aesthetically pleasing. The advantages of this are long-term and safe use.
- High beds from boards. They are the easiest to make. You need to have at hand a sufficient number of long boards, corners, transverse ceilings. As an option, you can use slats that are sheathed with wood or the minus is obvious - the tree rots. Usually, an old slate is taken, which is removed from the roof during repairs. It is believed that this harmful material, but the only damage to health can come from the dust generated when cutting it. Minus - fragility and the ability to break the structure during garden work.
- stones and cement mortar- very creativity to gardening. You can create designs for centuries, beautiful, durable, of arbitrary shape and size.
- Plastic bottles filled with colorful sand. Get original beds with low sides.

Optimum bed height
Depends on the characteristics of the garden plot and planted crops. If in the garden good soil, you can make sides about 15 cm high. This will make it possible to solve the problem of weeds and soil diseases, facilitate the care of the bed and improve its appearance.
If the soil is poor and a high bed is created as a separately functioning structure, then it must be made higher, 30-90 cm. Sometimes a height is laid at the level of the belt, but then it should not be made wide.

Mounting
The arrangement of high beds is a creative process. Each gardener will get a completely unique work, but the main thing is that the goals are achieved, horticultural crops grew well and bore fruit, and the bed itself was convenient to maintain.
Choose a location. It may be the most trampled down and unsuitable for planting. Line size future design. The length can be any, and it is better not to make the width more than 110 cm. Drive in pegs around the perimeter, so you indicate the size of the beds.
Now decide on the material. If this is a tree, then it should be protected from dampness, varnished or varnished, and then assembled in the form of a box using corners and nails. Raised slate beds are even easier to create. Using a grinder, you need to cut the sheets into strips of the required width (70-80 cm), and then, having dug a narrow groove along the perimeter, deepen them one at a time and trample them tightly. You can give strength to the structure using the same corners, in addition, you need to tighten it around the perimeter with steel wire.

Filling the beds
We proceed from the fact that the height of your bed is 80-90 cm. Put a wire mesh at the very bottom so that your vegetables do not fall prey to moles or shrews. Then about 25 cm can take all the waste of your personal plot: uprooted stumps, large branches. For better drainage here you can add large pieces of brick.

The next layer is 40-50 cm. This is a source of minerals and fertilizers. It can be small chips, grass, wood ash, lime, food waste (vegetable peelings, etc.). It is also worth adding rotted manure and compost, bird droppings with straw.

On top of a layer of 10-20 cm, you need to lay a quality garden soil. It is not necessary to mix the layers, it is enough to pour them abundantly and give time for shrinkage. The device of high beds is not as difficult as it might seem from the outside, but absolutely amazing results are achieved.
Irrigation Features
The design features are such that it absorbs more heat, and therefore consumes a lot of moisture. High is well suited. Since the soil temperature here is almost 10 degrees higher, this stimulates the growth and development of the root system. In addition, this culture loves light and fresh soil and does not tolerate wetlands. But don't let the soil dry out. If it is not possible to install, water several times a day, especially in hot weather.
The effectiveness of these structures is so high that, having put one as an experiment, you will soon decide: we are making high beds throughout the site.

Raised bed in spring and autumn
In the autumn, after harvesting, you may notice that the level of the earth has dipped a lot. Collect a new layer of organic matter (plants, branches, grass, fertilizers), lay it in the garden and fall asleep well with high-quality garden soil. If you still have not seen high beds live, the photo will help to present all the details. You don’t need to dig, you just need to water and cover with a film until the new year. In the spring, as soon as the snow melts, your garden bed will be ready for planting the first plants. It can be greens and radishes, which will later be replaced by cucumbers, tomatoes or cabbage. high location save plants from strong enough spring frosts, and the good heat dissipation of the bed stimulates fast growth and abundant fruit.
What is best to plant
The temperature of the soil of a high bed is always higher than the surrounding land. It also contributes to limited space, and an elevated location, and the decomposition of organic matter, which is crammed with the structure. In the first year of use, it is better to plant "gluttonous" plants that like excess nutrients. These are tomatoes, pumpkin, cucumbers, cabbage. Only in the second year, you can grow root vegetables, herbs and leafy vegetables. But even now the soil temperature will be much higher, which will allow harvesting sooner.
Summing up
Now you know how to make a high bed, and you can put it into practice on your site. Minimum hassle available materials, and the result is a neat garden without weeds and excellent vegetables that have ripened at least a month earlier. That's a strong enough motivation to try.
Do you know what an innovation is, how high beds came to our country from Canada. There, the land has been cultivated in this way for many years. Such planting options can be used not only for growing vegetable crops, but also to create original . Let's find out how to make beautiful and practical high beds in the country with your own hands. Photo, description technological processes and diagrams will help you with this.
Do-it-yourself high beds in the country: photos of designs and main characteristics
The rate of gas exchange, soil moisture and the presence of beneficial microorganisms depend on the size and shape of the beds. All these parameters affect the quality of the soil.
Raised beds can be used to grow big harvest berries, vegetables and fruits. At the same time, you can get good performance even from a piece of land that is not fertile. A feature of high beds is that they warm up faster than low designs.

There are several types of vertical beds. They differ not only in material, but also in functionality. Some options are made from building materials, while others are simple .
Here are the types of beds available:
- trapezoidal structures;

- multi-tiered beds;

- triangular structures.

When creating isolated beds, factors such as illumination, soil composition, and also its structure can be taken into account. At what height such beds will be placed depends on the volume of the root system, soil characteristics and your own preferences. Minimum Height- 15 cm, but to produce better insulation, you can raise them by 30-40 cm. Warm raised landings can be higher than 50 cm, since a layer is still laid on the bottom. narrow beds can be even up to half your height.

The length can be very varied. Most often it depends on the length of the garden. If the bed is too long, then it needs to further strengthen the sides. When arranging any garden, remember your own comfort and convenience. The best width is when you can reach the middle of the structure. Optimal value 90-120 cm.

Can be grown in raised beds different cultures. It is not recommended to use plants with tall stems, since it will be inconvenient to collect fruits from them. Root crops, strawberries, peppers, herbs and cucumbers are often planted on bulk structures.

For your information! A special benefit is the filler for raised beds. It is made from organic ingredients. Wherein root system located in the fertile layer, which contributes to the development and growth of plants.
Related article:
Let's find out how to make original beds and what materials they can be built from. Interesting ideas in our review will help you create a variety of designs.
Features of high beds: pros and cons
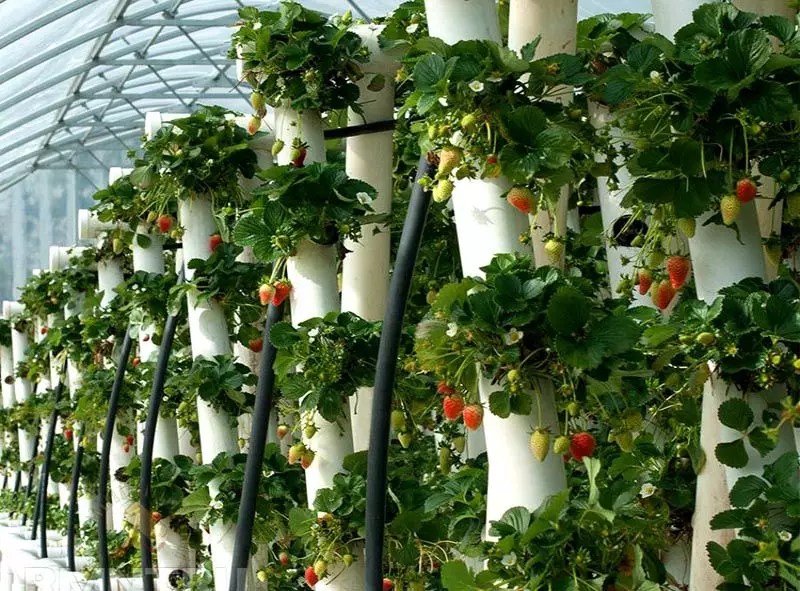
The main advantage of raised beds is that you can place a lot of vegetables and plants in a small area. High beds for strawberries are especially popular, fragrant herbs and cucumbers. Also, such structures have other advantages:
- bulk beds can be filled with specially prepared soil. In this case, the quality of the soil on the site does not matter much;
- it is possible to adjust the thickness of the soil layer for any plants;
- raised vegetable gardens are easier to weed and dig;
- raised beds can be set up anywhere, even with difficult terrain;
- seedlings can be planted on high embankments earlier, as the soil in them warms up faster;
- in raised gardens, the soil is looser, which contributes to better gas exchange;
- can be used for, which will hang from the edge of the fences for a high bed;
- depending on the material, you can create not only practical, but also beautiful designs. Some options can become a design masterpiece for your garden;
- high beds with sides are practically not subject to attack by weeds, and are also well protected from mold and fungi;
- the installation of the beds is not a difficult procedure, they can also be easily dismantled. The location of landings can be easily changed;
- inside such structures, you can create a comfortable one;
- soil on raised beds is maximally protected from freezing. During early frosts, such a landing can be covered with polyethylene;
- the erection of high landings is protected from erosion during heavy rains.

Such structures have certain disadvantages, but there are not so many of them. First of all, you need to feed mineral fertilizers. It is important to monitor the invasion of the bear.
For your information! Before starting work, treat the wood parts with an antiseptic and special impregnations. This will prevent the processes of decay and protect against the destruction of materials.
Creating vertical beds with your own hands: photo options
You can also create warm raised beds or vertical structures. They are popular because appearance and space savings. In addition, this perfect solution to protect plantings from various pests. Vertical structures are great for growing flowers, strawberries and herbs. You can not only make such designs from improvised raw materials, but even purchase ready-made options. You can see how to make warm designs in the video:

Why buy a vertical bed for strawberries: prices
You can see different variants design of vertical beds, but their most important advantage is their miniature dimensions. Similar designs can be built from any material, even from plastic bottles.
Vertical products do not require special care. They are at the optimum height for easy handling.
You can see how to make a raised structure for strawberries in the video:
How to make a pyramid-bed for strawberries with your own hands: dimensions and other parameters
You can build beds with a pyramidal design on your own. You will need tools and materials such as a tape measure and a board. To make the base you will need 4 support boards. They can be up to 2 meters long. In this case, the slices must be connected at an acute angle.

To increase the rigidity of the pyramidal bed, you need to install an additional pillar as a supporting element. In this case, the boards are mounted on horizontal surface and attach to each other. A rail is installed in the base. The resulting side is fixed vertically, and then the second and third sides are attached to it. After installation frame system the length of the rails is measured. They are placed at intervals of 25-30 cm. To make the shelf raised, its ends should be cut at an angle of 30 degrees. After assembly, the structure is filled with soil, which is rammed.
The technology of arranging vertical beds for strawberries from plastic pipes
To grow strawberries, you can build a vertical garden bed. At the same time, you need to prepare plastic pipes, steel cable and special knife for cutting. Volumetric section allows you to place inside required amount soil. The incision should be made along the structure. To fix the bed in horizontal position you need to make a hole in each of the halves. Then a fishing line or cable is pulled through them. Then the parts are placed one above the other. At the same time, you can do different levels beds from pvc pipes with your own hands.

For your information! If you plan to place structures in a suspended state, then you need to consider that they can sway. Therefore, it is better to install them in places that are well protected from the wind.
Do-it-yourself erection of vertical beds using a building grid
A compact design can be built for crops such as strawberries, herbs, flowers or potatoes. A good solution would be a vertical bed. To do this, you need to prepare a metal mesh, straw, special soil and essential tool for material processing.

To create a bed, you need to bend the grid in the form of a pipe. In this case, the cross section should be 0.9 meters. The edges are fastened with wire. Straw is laid on the sides, and the free space is filled.
To plant potatoes, such beds should be placed at a height of 50 cm from the surface level. Spaces of 10 cm are left between the plants. Then the first layer should be shed, then the soil should be laid and the seedlings should be planted.
Features of arranging a vertical garden for strawberries with your own hands: using pots
Ordinary strawberries can also be used to grow strawberries. Such designs allow you to create an attractive external design. You can use both plastic and clay pots. Thus, you can create a multi-level composition.
Pots must be selected so that their diameters become smaller towards the top of the structure. In this case, the difference between pairs of pots should differ little.

The largest pot is set in the selected location and filled with soil. After that, a smaller pot is placed in it, etc. When the structure is ready, plants are planted in the soil and watered. The largest pot is installed at the base of the structure. A rod smaller than the diameter of the container is placed inside. The pot is filled with soil, and the rest of the products are alternately strung on rods. After filling with soil, plants are planted. Pots are mounted on a pole or high stump.
The nuances of creating vertical beds for strawberries with your own hands from tires: photos of products
Exist different ways growing cucumbers in open field. At the same time, it is possible to build vertical beds. Also, this option is suitable for planting strawberries.
The tire structure is mounted on the same principle as pot structures. Tires fit for this. different section.But at the same time, keep in mind that old products are not particularly environmentally friendly material.

Before mounting, the tires should be cleaned, dried and, if necessary, painted. The largest tire is placed down, and a part is cut off on the side. The hole is filled with soil and planted with plants. Thus, other elements fit in. Tires can be beautifully decorated with patterns or even unusual cuts.
Article
How to issue beautiful beds for the lazy, the beds are high and smart - this is what a gardener needs to know who wants to make his life as independent as possible from garden worries. If you wish, you just need to master the way of designing lazy beds, which you can see on following photos. A bed of this type will allow you to enjoy a well-deserved rest in the country and will not require weeding every time. In addition, it is not only convenient, but also increases the productivity of crops.
Everyone knows how much time and effort should be devoted to each planted crop, which, however, sometimes does not even justify the result: seedlings may not germinate or may not end up with a normal amount of harvest. In this case, you should pay attention to the technology of lazy beds on your site!
Nice and comfortable
The lazy bed is a completely new approach to gardening that will allow seedlings to grow on their own and yield several times more. It is based on the rule that says that it is impossible to dig and weed the earth, except for its preparation and planting itself. Even if constant weeding can remove weeds and fluff up the earth, sooner or later it will dry out and will not be able to provide sufficient moisture for crops.
In this approach, the very preparation for future landing- it is advisable to do this from the fall, when you can collect material for mulching the soil (you need to cover it with straw, sawdust, cones, etc.), which, in turn, will prevent weeds from germinating in the area with such a cover.
- Install your own irrigation system. It is not necessary to choose the most expensive systems available in stores. In the case of such vegetable gardens, those from which you only need to press a button are quite suitable - and there will be no need to water with your own hands. Watering will allow you to make beautiful beds: green and lush. Also worth noting: watering can be done infrequently, but plentifully, giving the plants the necessary moisture until your next visit.
- A tool for working in the garden is a guarantee of saving time. Therefore, it is worth choosing one inventory and for many years. It can include not only the usual shovel and buckets, but also various little things that will make your work easier. Also find a place for inventory in advance.
- At the beginning of the planting season, dig up the ground once, prepare it for future seedlings or seeds. Plant plants and no longer disturb the ground: mulching will do its job and keep weeds out. All that remains for you before the harvest is to water the beds in the country on time.
This is an interesting and effective way that is suitable for both lazy gardeners and experienced, knowledgeable gardeners. A bed of this type will justify the efforts made and can bring a lot of amenities.
High bed as a way to get an intensive harvest
Although this is a very time-consuming process at first - building the frame itself and watering the beds, but it is she who will allow you to forget about the bad climate and low yields.
The high bed is always under the rays of the sun, which contributes to the warming of the earth layer, so it can be planted already in April without fear of freezing, and the lower mesh will prevent the invasion of moles and mice. A not too wide frame (within 150 cm) will allow you to take care of the garden bed on both sides. If you divide it into two strips of 80 cm wide - you can even do it yourself greenhouse by passing the film over both landings. It is worth noting that it is high beds that give the earliest harvest, first of salads, and then of fastidious vegetables. The only problem is more frequent watering, since water does not linger in such land for a long time.
Despite all the difficulties at the beginning, the landing justifies the efforts invested in it and serves for a long time without bringing much trouble, and the garden bed has a beautiful view.

digging smart garden for fragrant herbs, you need only once, before planting seedlings. Further, it requires a minimum of attention and care.
The market offers a large number of materials that allow you to create high beds with your own hands in the country. In this way, various vegetable crops are grown annually, receiving abundant harvests. For example, the merit high fences from pallets - convenience and order. Plastic beds also have certain advantages. However, tall buildings take up a lot of space, which is considered their disadvantage.
Beautiful tall vegetable gardens
The presence of fertile land in sufficient quantities is suitable for the creation of greenhouse facilities. Carry out arrangement high garden do-it-yourself in this way is better according to the requirements:
- The right choice of place for the garden.
- Determining the size of the area.
- Making a frame from improvised materials.
- Filling the fence with fertile soil mixture.
- Availability protective coating structures.
- Periodic harvest.
Board option
Beautiful fences are suitable for early sowing different varieties and plant species. They have several benefits:
- Suitable for any well lit area suburban area, including areas with rocky or;
- warming up the contents of the box intensively occurs in the spring;
convenient watering; - weather protection and mulch preservation;
- the presence of a drainage layer eliminates the stagnation of moisture;
- dig and weed large areas no longer required;
- use sand or gravel to backfill paths between rows.
wooden box
It is recommended to create high beds in the country with your own hands in order to solve a number of problems associated with the slow development of vegetable crops. Fences create individual growing conditions for seedlings when choosing the most suitable soil mixture. It is important to ensure constant watering beds to prevent rapid evaporation of moisture.
Fencing materials
In the manufacture of the box, logs, bricks, corrugated board or stone are used. If you build it from pallets with your own hands, red or cedar wood, then this will increase the life of the structure. The bottom inside it is usually covered with plastic or that protects against rodents.
The device of high beds does not require the use of expensive devices. For example, having made a box with your own hands, it is better to stretch a polyethylene film over it. Pre-install arcs made of metal or. The greenhouse should have dimensions corresponding to the dimensions of the beds made of brick, wood, blocks or stone. This will protect the seedlings from frost, extend the harvest period.
When is the best time to plant and what to plant
Autumn or late summer are more suitable periods for creating raised beds with your own hands. If you start working in the spring, during this period the impact of emerging processes on the development of seedlings is very weak and imperceptible.
Fences created in the spring are best filled a month before planting seedlings.
Such gardens will decorate the yard
To fill the high beds in the country with your own hands, the photos of which are presented below, the autumn period is most suitable.
Just when development continues in the earth internal processes. The layers in the box that have rotted over the summer provide the root system of plants with useful elements in the optimal amount.
Plant alternation
Seedlings are usually planted immediately after the construction of structures. After harvesting ripe vegetable crops, they begin to alternate them annually with healthy greens eg parsley, dill. This allows you to get abundant harvests every year.
Excellent strawberry garden
The internal decomposition process will prevent strawberries from freezing during severe frosts. This is possible if high beds for strawberries are covered with snow or special material in winter. When planting plants in a warm bed, it is convenient to grow them in it due to the least evaporation of moisture.
Raised bed for cucumbers and tomatoes
A bed for cucumbers or a tomato is built according to a principle reminiscent of the method of arranging a growing fence. The only difference is the need to install supports with crossbars along the edges, providing a garter of crops. Each cucumber lash, tied with a wire stretched between, gives a bountiful harvest.
Most appropriate place in the country they often equip several boxes. By doing them on the lawn, they leave a place for working with a lawn mower. Be sure to provide a certain distance between the rows for delivery fertile soil, mulch or fertilizer in special wheelbarrows.
Box preparation
Processing of wood material
The boards are cut according to the dimensions of the frame. Substances hazardous to human health should not penetrate the soil, therefore, processed wooden elements covered with foil. Then the processing is carried out in stages. This requires:
- Saw the timber into pieces of 50 cm.
- Saturate with a protective compound.
- Dry the material.
Various site locations
The earth is dug up simultaneously with fine grass to increase the permeability of the soil. In the presence of sufficiently dense earth, it is possible to remove the turf, taking into account the markings. The advantage of laying out the box from the boards is that it does not require the removal of too much soil.
Do-it-yourself frame installation
Construction device
The markings made before creating the fence allow you to build a perfectly flat structure. When installing, check the dimensions of all components of the box. The frame is made correctly if the diagonals of opposite corners are the same.
A step-by-step instruction that allows you to create high beds with your own hands involves several main steps:
- Move the frame to the marked area.
- Align shields according to markings.
- Make recesses for supports.
- Check the accuracy of the installation of shields by level.
- Remove excess soil or place pegs.
- After finishing the manufacture of high beds, fertile soil is poured into each of them.
Compost preparation
Mulching the soil causes more intensive evaporation of moisture. Do not leave gaps in compacted soil.
Filling the beds
Before filling, the bottom of the structure is covered, which is nailed along the edges of each wall. will protect plants from rodents. The laid layer of geotextile will prevent the germination of weeds in the soil.
Fill scheme
Step by step instructions include the following steps:
- Fill geotextiles with dry twigs, bark, large sawdust, shavings, leaves.
- Lay out layers of compost, bird droppings.
- Cover organics with grass, fallen leaves or bark.
- Apply the required amount of mineral fertilizers.
- Lay fertile soil.
The thickness of the created layers is usually 10 cm, they are not mixed together. Each of them is well compacted and leveled. Creating a fertile layer involves the use of:
- tops;
- sawdust;
- peat;
- wood ash;
- green manure;
- rotted manure;
- bird droppings, etc.
The video shows how to make a high garden bed.
If the beds in the greenhouse are created from a fertile soil mixture with your own hands, this significantly increases the yield. They need to be watered several times to compact. big amount water.
If the composition of the earth is not fertile, then purchased soil is suitable, which is shed with large amounts of water. Then they wait two days, during which the layers can settle. The compacted fertile soil from above must be covered with black agrofibre together with the frame. This will warm it up to the greatest extent and prevent the germination of weeds.
Many summer residents suffer due to the fact that the groundwater is too high on the site. Excessive soil moisture is not suitable for all plants, many develop poorly or die altogether. You can solve the problem by making high beds. With such an organization of landings, it is possible to control the degree of humidity. And a nice bonus to such a decision will be more early term maturation and a much larger yield.
Advantages and disadvantages
In addition to solving problems with waterlogging, high beds in the garden allow you to sow or plant plants 2-3 weeks earlier: raised above the ground, they warm up more actively due to the fact that the sun heats the walls. This is also facilitated by the decomposition processes occurring in plant waste, which make up a significant part of the backfill. Therefore, such beds are also called warm. If you put arcs on such a bed and cover it with spunbond or other similar material, then the crop can be harvested even earlier.
The device is more problematic in regions with a hot climate. The task in this case is not better to heat the earth, but to keep it from overheating. But this can also be solved: use materials with poor thermal conductivity, for example, wood, to fence high beds. For a better effect, you can make double walls, between which you can fill up, for example, sawdust, lay foam, or you can leave air layer- the best thermal insulation. It is better to paint the outer wall in a hot climate with white paint or whitewash. It is known that light surfaces heat up less. In this case, it will be possible to save the root system from overheating: in the south, the earth sometimes warms up very much and the higher the plant is, the cooler it will be. And over the beds you can stretch the same covering material. It not only retains heat, but also protects against overheating.
Raised beds can also be a good outlet for infertile lands. It is more convenient to lay out the imported soil in the beds, and not distribute it throughout the site. Maintaining fertility contributes to the compost layer, which is located under the layer of earth.
The problem of arid regions is also being solved. In this case, the fence for the high bed is coated from the inside bituminous mastic or upholstered with a film, a rolled waterproofing material is laid on the bottom (on the grid) (the roofing material will quickly rot, so something from modern type hydroisol). Complete waterproofing cannot be achieved, but to keep moisture inside in sufficient quantities - yes.

Carrots - one to one. The best on a high bed, although the same variety was planted on a regular one
As you can see, with a balanced approach, almost any problem can be solved. There are few shortcomings in high beds, but they could not do without them:
- In most cases, you have to make a fence, and these are costs.
- The complexity of the process. Again, it takes time to make fences, and also decent amounts of land are moved and plant residues and that is hard work.
- In rotting leaves, branches, bark, bears and other similar living creatures feel great. You have to fight them.
- Fertility has to be maintained by updating or completely replacing the "stuffing".
That's all the shortcomings. If you decide on the arrangement of high beds, be prepared for a considerable amount of work. But the harvest will be many times greater. For testing, you can make one or two beds. Then decide if you need them or not.
Dimensions

In one area there are very high beds and not very…
So, the dimensions of the high beds:
- Height - from 20 cm to 50-60 cm. Here, see what a difficult task is. The higher the bed is raised, the easier it is to process it - to bend less. But the earth and the rest of the "stuffing" will need more. Another point: if a small bed in height can be under the snow and will be covered from severe frosts, then the high one will freeze through: the sides will also be open. For those ridges where annuals are sown, this does not play any role, but for perennial strawberries, say, this is a problem. Therefore, the height is chosen based on these considerations. According to the experience of many gardeners for strawberries optimal height- 20 cm. Then we can hope that she will not freeze out.
- Width - from 60 cm to 1.2 m. Choose a distance that makes it convenient for you to process the bed. A distance of 60-70 cm is chosen if the approach to the garden is only on one side. If you can get to it from both sides, you can make a meter or more. It is important that the middle is processed without much stress.
- Long. Here everyone chooses based on the configuration of the site or their desire. There are no recommendations at all.
So that the bed is not too high, part of it can be deepened: dig in 20-30 cm, and already put walls on top. The removed soil will go to backfill (there is often simply not enough land), and the substrate from the lower rough layers can be made thicker. And in order to minimize the cost of maintaining such a bed, you can.
How to fence high beds
You can use anything that can hold the ground. The most durable curbs are made from brick, stone and concrete.

But the brick costs a lot, it takes a long time to fiddle with concrete. A concrete fence is made according to all the rules: first, the formwork into which the reinforcement is laid, then it is poured with concrete and they wait until it sets. But the service life is impressive - decades.

Fences for beds made of concrete are the most durable and will never "float"
A brick and stone fence is also folded according to all the rules: on a mortar with dressing. To reduce the consumption of bricks, the walls are placed in half a brick. And so that the earth does not move it, the rows are reinforced with a mesh.

But even in this case, you will need to install through the meter supporting pillars. If your soil is viscous, heavy, often waterlogged, such walls can be squeezed out. Therefore, put wooden or metal supports that will fix long walls or make small beds, as for


Fence for high beds made of expanded clay concrete blocks
They also make fences for high beds made of galvanized metal and slate. Slate can be used second-hand, you can buy a new one, wave or smooth - it doesn't matter. Cut the sheets into strips of the required width. There is no need to fear that it is harmful. In slate, asbestos is contained in a bound state, and it does not dissolve in water. It is harmful when it is sawed: the dust rises and enters the body through the respiratory tract. To reduce exposure, wear a respirator and wet the incisions.

They make plastic garden fences. Changed siding? Use it. There are old plastic panels - they are in business. But for plastic, a rigid base is needed. They make it from a metal mesh of thick wire.

Grids can become the basis for pebbles or pellets. Only in this case, a double frame will be needed, inside which stones or some other material are poured. This technique is called "gabion" and not only fences for garden beds are made from it, but also fences. But so that water does not seep through the walls from the gabion beds, the inside of the box is lined with a dense film.

The most popular fencing is wood. You can use boards, timber, logs. Wood is good for everyone, except that it rots.

And since all conditions have been created in the high beds to activate this process, destruction occurs quite quickly. You can slow down the process somewhat by painting the boards or by impregnating them with a bioprotective composition. But there is still no guarantee against destruction.

But the material can be used cheap, and sometimes even junk: the remains after construction, slabs, old logs, pallets, etc. If desired, you can even make a fence out of branches. Only the bark is desirable to remove: it is under it that there are many larvae and woodworms. Although ... they will also recycle wood residues, which you lay on the bottom of the backfill. But too many of them are also not needed, so, probably, it is still better to remove the bark.

From the same branches, only freshly cut, you can make a wicker fence. And it will also need to be lined from the inside with a film: to keep water and earth inside.

You can even use straw. It is tied into small bundles, which are interconnected with a wire. It simply cannot be cheaper, but it keeps water and temperature well. The only disadvantage of this option is that such a fence will last a maximum of two seasons, but rather one. But it can then be used as one of the layers.

There are high beds without a fence: the so-called bulk. The soil in them is poured in the form of hills.

To improve drainage, branches are laid inside such a ridge. To reduce the height of the bed (for example, under tomatoes), it is slightly deepened, throwing the soil to the side. After laying the branches, it is covered from above, often there is a need for additionally imported soil. If you can’t choose the row spacing deeply.

The disadvantage of this kind of garden: when watering and during rains upper layer soil is washed away. Therefore, they began to make boxes - to avoid washing out the soil.
Layers of high beds
Framing is only a small part of the job. You still need to fill the received box. It must be said right away that the thickness of the layers depends on the height of the bed that you have chosen, so if any values \u200b\u200bare given, then only approximately. In addition to the size of the beds, the choice of plants affects the thickness of the layer, for example, the fertile one: 5 cm is enough for someone, and much more is needed for someone.

So, what to pour into a high bed - layers from bottom to top:
- Fitted to the bottom metal grid fine mesh or layer . You can put cardboard. Mesh and geotextile - protection against rodents and moles. Cardboard plays about the same role, but it is less effective.
- Large wood residues: thick branches, branches, even chocks and bars. This layer serves, firstly, for drainage, and secondly, moisture accumulates in the wood. The more arid the climate in your area, the more wood you need. Moreover, the following wood layers too.
- Shredded small branches, bark. Other coarse plant residues will do: corn stalks, straw. Their mission is also twofold. They store water, and when decomposed, they release heat and nutrients. But when using corn trunks and straw, keep in mind that the bed will soon sink: these remains quickly rot, but the yield will be high, and you can add fertile land on top.
- Paper, thin cardboard. It is usually lined with a thin layer. They use packaging cardboard more often, because glossy paper is not suitable, just like newspapers: the lead base of the paint is not at all what plants need to be fertilized with. If there is an old unnecessary burlap (natural), you can lay it.
- A layer of plant residues: foliage, grass, semi-decomposed sawdust. Be careful with sawdust: they strongly acidify the soil. So sprinkle them under plants that love acidic soil, or neutralize the acidity by sprinkling them with a good layer of ash.
- Fertile land.
In the last two layers, you can add a good portion of mature compost, as well as sprinkle deeper layers with it. This will speed up the “readiness” of the high bed for planting.
When is the best time to plant and what to plant
It is better to fill a high bed in the fall. During this period, there will be enough “material” and during the winter the processes inside will gain momentum. In this case, you can plant plants in the spring and hope for high yield. It can be done in the spring, but there are unlikely to be any significant differences in yield: the processes have just begun and will not be able to have a noticeable effect on the fertility of the backfill. Although you will definitely feel the difference in the amount of water for irrigation: much less water is required.

One of the high bed options: metal mesh and reinforced polyethylene film
Plant alternation
In the year of the device of a high bed, plants requiring high fertility can be planted on it: cucumbers, zucchini, zucchini, pumpkin, any kind of cabbage, eggplant, tomatoes, Bell pepper. The next year, you can plant greens - spicy-aromatic and leafy. Root crops feel good in the second year.
After harvesting the second crop, fertility must be restored. If the contents of the bed sagged, in the fall they fill up with good earth mixed with mature compost. If there is nowhere to fill up, remove part of the top layer (on compost heap or in another box as part of the backfill) and replace it with fresh soil with fertilizer.
Raised bed for strawberries
It differs only in that covering material is spread over the finished “pie”. Holes are made in it, in which plants are planted. This option leads to the fact that moisture evaporates in minimal quantities, and weeds do not grow in the aisle. The second option - mulching the earth also works well, but evaporation is more intense.

Features of strawberries are that its roots are located mainly on the surface. Therefore, the fertile layer can be small. But this same feature leads to the fact that in severe frosts it can die. Although there is a decomposition process inside the high bed, warming up the soil, if the bed is without snow and not covered for the winter, the root system may freeze.
Raised bed for cucumbers and tomatoes
In its structure, it is no different. Is it only because they need poles and crossbars or stretched wire around the edges in order to be able to tie up bushes of tomatoes or lashes of cucumbers.

DIY high beds
Most often, questions arise not when laying layers in high beds, but when making a box. Since women often do a lot of gardening, right up to making fences for garden beds, many points may not be clear to them. To clarify the most difficult ones, we present photo reports of making a box from boards and slate - the most common fences.
From the boards
Several options for how to make high beds from boards were in the photo above. The main snag is usually in the connection at the corners. The easiest way is to overlap them: just put one to the other at 90 ° and knock it down with nails. But there are aesthetes who all strive to do the right thing. And that's right - cut down two boards at an angle of 45 ° and connect them like that. It is this option that will be shown in the photo.

To make it convenient to fix the fence on the ground, vertical bars or pieces of board are nailed in increments of 1.2-1.5 m, the length of which is about 20 cm more than the selected bed height.

The lower end of the bar or board needs to be sharpened - it will be easier to hammer the fence into the ground. Then we take a miter box or a circular saw, and cut off the edges at an angle of 45 °. Putting two boards together creates a perfect 90° angle.

For a strong connection with inside corner set the bar, to which we nail the boards.

Here's what happened. Only he lies "burdens" up. They are driven into the ground
Fencing for high beds made of wood does not take long, but even easier, connect the boards end-to-end, and nail for strength metal corners(pictured below).

From logs
It is not more difficult to make a similar box from hewn logs. For example, this option: two long sides from logs, and short ones from pieces of boards.

Whitewash the finished fence: both pest protection and a more attractive look.

from slate
When making beds from flat or wave slate, questions also arise about how to fix it. The easiest way is to dig in. But this is uneconomical: you will have to make the stripes wider by at least 10 cm and still there is no guarantee that the slate will not “float” in the spring. In the muddy earth, it will simply be squeezed out with a mass. You can fix it, but it's too much time and effort.
Therefore, most often corners or pipes are driven in from one or both sides of the sheet, which clamp the slate and prevent it from deviating strongly. In the photo, the corners are driven in only from the outside: from the inside, the mass of layers of the high bed will press, so that the fence will not fall inside.

The joints of the two sheets are insured with a special welded plate. For reliability, they can be bolted to a wooden bar attached from the other side.

A piece of reinforcement with a welded plate - for insuring the junction of two sheets of flat slate
Another option is to make a frame. Attach a bar or a corner to similar racks with welded plates - for whom it is cheaper. And to this frame, attach the slate cut into strips (it holds well with nails, but it’s easier with self-tapping screws).

Frame from a bar in a fence for a high bed
By the same principle - with guides - they make beds from plastic panels and others similar materials. As you understand, especially virtuoso skill is not needed here. The main thing is to keep well.