Stands with shelves for flowers with their own hands. Photo and video
Today, almost all houses and summer cottages are decorated with fresh flowers. They enliven the room, make the air cleaner, cheer up. To save space or create an arrangement of pots, flower stands are usually used. But store copies are quite expensive and do not please with a variety of designs. Therefore, creative people who want to create interior items with their own hands may well make a flower stand themselves.
The main types of flower stands:
- forged coasters. Flowers look very elegant in them. They are durable, reliable and have an elegant look, but making them yourself at home most likely will not work, unless, of course, you are a professional master;
- wooden coasters. This option is the most common. They are more economical and fit any interior. The easiest way to make a stand for flowers with your own hands is from wood. The material can be boards, chipboard, natural material, for example, a piece of log with branches sticking out in different directions, etc. To make a wooden stand look even better, it is usually varnished;
- metal flower stands. Such coasters, as well as forged ones, are not subject to self-production. The exception is combined products, in which the bases for pots are made of wood, and ready-made metal pipes with a cross section of 25 mm are used for supports. But if you still tune in to metal flower stands, due to their reliability and resistance to external influences, you will have to buy ready-made ones;
- flower stands, which are a composition of several different items. There are no longer any rules and regulations. It all depends on the imagination and the amount of free space. Below is a master class on making one of the options for such flower stands, and photos as illustrations.
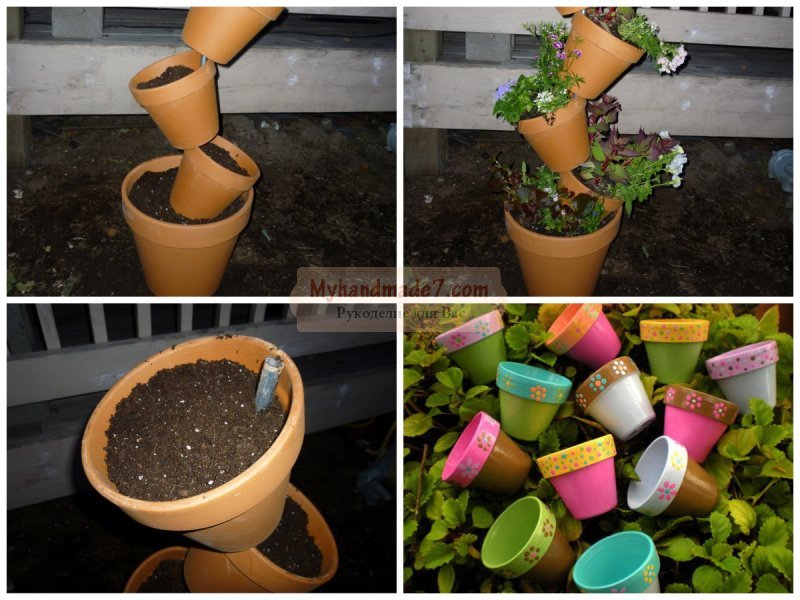
Master class number 1: flower stand + decorative bird bath
This stand is more suitable for decorating a yard or an open veranda. For her, you can use pots of different shapes, or you can use the same ones. The color in which they will be painted depends on your idea and taste preferences. In our case, the pots are one-color, but you can paint them in different colors.

For work we need:
- one large and tall pot that will serve as a base;
- four smaller flower pots;
- one pot, which will be at the very top. It is smaller than the base, but larger than the intermediate pots. A decorative bath will be attached to it;
- a metal bar as a support for the entire structure. If the store does not have the size you need, then you can buy a longer one and cut it with a hacksaw;
- spray paint;
- spray primer;
- a small figurine of a bird made of ceramics;
- waterproof adhesive.

The sequence of work is as follows:
- prime the surface of the pots and after drying, cover with paint. Color can be one or more, according to your taste;
- we measure and add up the height of all the pots, add 600 mm to them and thus calculate the height of the support rod. Using a hacksaw for metal, cut off a piece and hammer it into the ground by 600 mm. This action will provide the structure with a stable position;
- through a hole in the bottom we put a pot base on the rod, set it straight and fill it with earth;

- then we put on all subsequent pots, one after another on a rod, fill it with earth and tilt it alternately to the right, then to the left;
- we install the topmost pot directly, like the base, we attach a plastic or ceramic bath prepared in advance to it. We glue a bird figurine to its edge and stand for a day until it dries completely;
- after all the work is completed, we plant flowers and enjoy the result.
Master class number 2: hanging flower stand
For placement on the veranda or indoors, a hanging flower stand is most suitable. Wood and rope are the main materials needed to make it. On it you can place flowers that you do not want to hide on the windowsill behind the curtains.

To make it we need:
- wooden board or shelves from old furniture;
- rope, not thick, but not thin;
- flower pots, in our case four pieces, and you can take it if you wish;
- jigsaw;
- drill;
- paint and brushes;
- metal ring.

- in order to provide the product with the necessary strength, the wooden bases into which the pots will be inserted should be made a couple of centimeters wider than the pot itself. To achieve this, attach the pot to the board with the wide side, circle it with a pencil, and then, measuring 2 cm in each direction, draw a square. This will be the size of the base. We draw such squares according to the number of pots;

- to outline the line of the internal cut, cut out a round template from cardboard paper. Its diameter should be less than the circled pot by 15-20 mm. After the template is made, circle it inside each of the base squares;

- now you need to cut a hole into which the pot will be inserted. To do this, attach the square to the desktop with a clamp, make a hole in its middle with a drill, insert a jigsaw through this hole and cut out the inner circle. In the process of work, be careful and do not rush, so as not to spoil the product;


- after the holes for the pots have been cut in all the base squares, drill holes for the ropes in all corners of each of them. Care must be taken to ensure that the holes on all the squares are in the same places;


- now you can think about the design. Paint the wooden parts with paint of different colors or stain, depending on the style and interior of the room. The rope also needs to be painted, we chose black, but you can take any other of your choice. To do this, use acrylic paint;

- after that, the assembly of the structure follows. It must be produced taking into account the height of the plants that will be installed in the base. We start the assembly from above: threading the four ends of the rope into the ring, we stretch them into the corner holes of the first square and tie a knot under it to fix it;

- in a similar way, we fix all the base squares for the pots on the rope, and cut the remaining ends under the last one;
- after that, insert the pots and hang the stand in the desired place.
Master class number 3: floor stand for flowers
With graceful curved legs, this stand will brighten up any room. It consists of a triangular base with rounded sides on which the pot will stand, shelves of a slightly smaller size and the same shape, and three curved metal legs.
To make curved legs, you will have to bend metal tubes yourself. A special bending template will help us with this.
We will need materials:
1. For stand:
- 2 pieces of waterproof plywood 24 mm thick - one 37x37 cm, and the second - 22x22 cm;
- 3 copper pipes with a diameter of 1.5 cm and 68 cm in length;
- 3 bars with balls at the ends for the legs;
- polyurethane adhesive.
2. For template:
- a piece of fiberboard or MDF 40x80 cm;
- 5 bars 2x4x10 cm;
- clamps, screws.
Manufacturing sequence:

- on pieces intended for shelves, we make markings using a compass;
- cut out the details with a jigsaw, grind the edges with sandpaper;
- on the basis of a flower pot, we draw medians so that even ones appear along the rounded sides. We place the shelf exactly in the center, press it tightly and drill three holes in its corners. The drill must pass through both parts;
- we grind the edges of the shelves with sandpaper;
- we fix the wooden balls used for the legs with a vise and drill holes in them;
- we open the wooden parts with a layer of varnish, dry it, lightly sand it with sandpaper and apply another layer;
- we also grind metal legs, apply varnish or paint;
- we insert the legs into the holes on the top shelf, and at the level of the small shelf we rewind them with double-sided tape and glue them;
- we insert a bar with a tip in the form of a ball into the hole of the pipe leg and fix it with glue for greater reliability.

Making a template and giving the legs a curved shape:
- we mark the plate around the circumference and attach the bars to it with the help of screws;
- the tubes themselves are gently pressed against the bars by means of clamps;
- after the clamps are relaxed, the pipes spring back.
Indoor flowers are an essential attribute of home comfort. In order for them to grow well, it is necessary to consider the location of the pots. Therefore, you should get plant stands in advance. You can make them with your own hands. Some designs are made from improvised means in a matter of hours.
What are flower stands?
Flower stands are divided into 2 types. They are floor and wall. The latter must be especially strong. With a heavy load, the entire structure can simply collapse to the floor. Therefore, if you have several large pots, then it is better to stop at the 1st type of coasters.
A more rational approach to creating such structures can be considered the manufacture of light decorative options.
jar stand

You will need:
- Wooden plank
- Acrylic paint in white and brown
- pipe holder
- self-tapping screws
- Nice cans with the same diameter as the pipe mount
- Spatula or iron brush
Preparation method:
- The board must first be decorated. To do this, degrease it. After a while, cover with a darker acrylic paint. It should be chosen over alkyd as it is less toxic, odorless and dries relatively quickly. After a few hours, we cover the dried board with white paint. Again, leave the workpiece for several hours.
- We age the surface with the sharp edge of a spatula or an iron brush. To do this, in a chaotic manner, we apply short and long scratches all over the board. The blank in the final form should be made in the style of shabby chic.
- On the board with a pencil, mark the places for installing cans. To do this, take pipe mounts. They look like sliding rings with a hole for fastening. Attach them in the right places. Then, holding each with one hand, secure them to the self-tapping screw.
- We decorate banks. They can also be coated with acrylic paint of any color. Choose a jar according to the size of the future flower. After painting, earth is poured into it and a flower is planted.
- It remains only to attach the board to the wall. To do this, we outline points for fastening on the wall. Then we drill them out with a drill. Insert a dowel into the hole. After that, we put the board-stand on the self-tapping screw. We insert jars with planted plants into metal fasteners. Their upper part, if desired, can be decorated with twine.
- It is best to use a similar stand for shade-loving plants. If it is located near the window, violets can be planted in jars.
Wooden flower baskets: master class
Stands can be made from processed solid wood, plywood or MDF. In the latter cases, the base material must be moisture resistant, as it can deteriorate due to periodic spraying of plants.
A fairly convenient option is a cabinet-stand for several pots.

You will need:
- jigsaw
- Drill
- Ruler
- Dowels and screws
Manufacturing instruction:
- First, let's sketch out the stand template. It consists of 9 parts. 2 circles will be the bottom-base and top, and several rectangular blanks will be the bearing support. The approximate diameter of the circle is 40 cm. The height of the rectangular parts is 50 cm. With such dimensions, a do-it-yourself flower stand will come out quite stable.
- To begin with, we transfer the desired dimensions to MDF. After that, we cut out 3 identical circles, 2 narrow rectangles and one wide one.
- We saw one of the circles with a jigsaw perpendicular to the center point. We should get 4 sectors.
- We take 2 large circles and a wide rectangle. We outline the marks for fastening and drill them. Then carefully plant the parts on the screws. They should look like this: 2 circles and a rectangle diagonally between them.
- Let's move on to embedding other rectangles. They need to be placed at an angle of 90 degrees to the wider one. Details are also attached to self-tapping screws.
- The sawn sectors will need to be placed at any convenient level in the parts obtained after crossing the rectangles. They look best on different levels. Sectors are also planted on self-tapping screws.
- After sawing the blanks, you may notice that the edges are left unfinished. You can edge them on your own or hand over parts of the future stand to the furniture base, where a specialist will do it.

How to make flower stands on the windowsill?
Many housewives are faced with the fact that the window sill becomes the only bright place in the apartment for growing flowers. In this situation, he simply physically cannot accommodate all indoor plants. A hanging flower stand will help solve the problem. You can do it for walls too. In this case, they are equipped with additional lighting.

You will need:
- Several boards of the same width and length
- Strong ropes
- jigsaw
- acrylic paint
- Anchor bolts
- flower pots
Manufacturing instruction:
- This flower stand is designed for a certain number of pots of the same type. The structure is essentially suspended. Therefore, special attention must be paid to fastening. First, let's decide on the length of each shelf and the number of pots. If we make a stand for the window sill, then we can put it along the entire space.
- Then we mark on the boards the location of the pots. To do this, put one of them, screwing upside down. We circle it along the diameter of the upper part. Then we retreat from the circle a verified distance and circle the following flower locations.
- Using a jigsaw, cut out these circles. It's easier to do so. At one of the points of the line, we drill a hole with a drill. Then we insert a jigsaw file into it and cut it in a circle.
- If the resulting hole came out with chips, then we go along it with sandpaper.
- We make holes for fastening. To do this, we drill them with a drill with a large diameter at the corners of each board. The holes must be at the same distance.
- Then we form two large pieces of rope (about 2-3 m.). It should be twisted and strong enough. We stretch one of them through the left holes in the boards. It's best to do it from the bottom up. Under each hole and above it, we tie the rope with a knot. This will help hold the boards. It is better to start linking the shelf from the top holes. Then you need to leave a little rope for hanging the structure and put it down again through the bottom holes. We do the same with the other cut and the opposite side.
- On the top of the window opening, mark the points for attaching the stand. The distance between them is equal to the length of the boards. We drill them with a drill, and then we mount an anchor bolt in the holes. Make sure the anchor is firmly seated in the concrete.
- We paint the almost finished stand with any acrylic paint. If your flowers require periodic spraying, then the surface should be covered with a waterproof varnish or any means for protecting wood indoors. After the boards are dry, hang it by the anchor bolts. At the end, we plant flowers in pots, along which holes were circled. Carefully insert them into the holes in the stand.


Indoor plants make the house more beautiful and comfortable, clean it of carbon dioxide and saturate it with oxygen. Well, in order for indoor flowers to harmoniously fit into the interior of the house, it is important to place them correctly.
The problem is that sometimes there are not enough window sills for all the flowers, in addition, it is not always comfortable for green spaces on the window sills, because in sunny weather it can be too hot for them, and the aggressive sun, reflected from the glass, can damage the leaves, and in frost on the window they will be cold.

The ideal solution would be a flower stand. Moreover, well-chosen coasters themselves can decorate the room.


Kinds
Stands for indoor plants are different in their structure, configuration, material of manufacture and colors. Based on these criteria, several types of stands are distinguished.

Floor stands for flowers are hinged shelves on a stable vertical support. Moreover, the stand frame can be both mobile and fixed. This product can combine several shelves at the same time.

Shelves-stands are a rectangular frame, reminiscent of a bookcase with open shelves. You can find modern models, the design of which has an oval or round shape.

Mobile stands are products of various shapes, consisting of 2 or more tiers with wheels that allow you to move flowers.

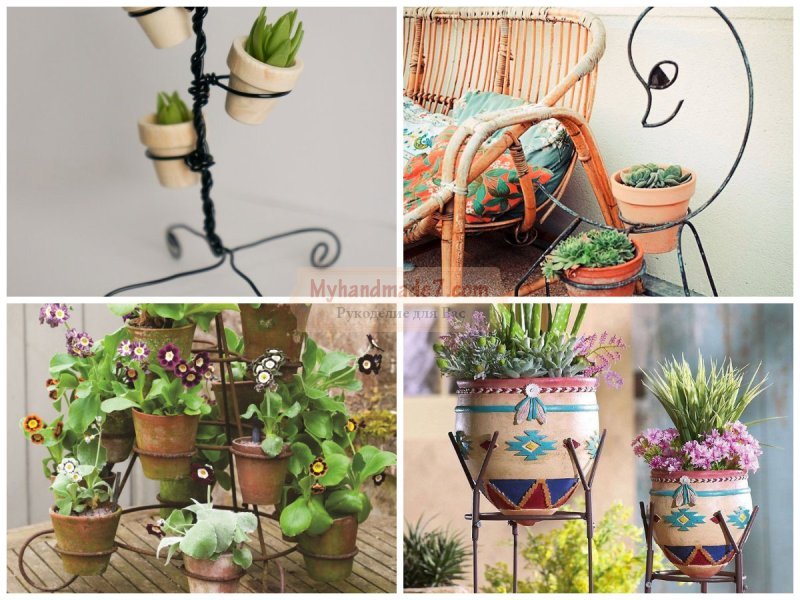
Unusual models are stands of unusual shapes and colors, for example, racks on which trailed parts and carved or concave supports are fixed, often such products are brightly painted. Unusual creative supplies can be seen in the photo of the flower stand.

Material
The most common materials for creating a coaster are wood, metal, plastic, stone and glass.

Metal. Metal flower stands are the most popular, because due to their strength and stability they allow you to place the maximum number of flower pots.

In addition, if we are talking about a forged stand, then it is also very elegant and elegant.

Forged flower stands can be made in different stylistic directions.

Recently, manufacturers have been delighting flower growers with unusual forms of forged stands, for example, in the form of a medieval carriage, or an Egyptian pyramid, or a musical instrument.

Wood. Wooden flower stands are convenient, practical and inexpensive accessories for indoor plants.

Thanks to wooden supplies, you can not only decorate the interior, but also change the space by placing several flower pots in one zone, thereby focusing attention in the right direction.

Wooden products look great in the interior of Provence and in a minimalist style. More original analogues, for example, in the form of wooden steps, will harmoniously fit into the interior, made in a hi-tech or loft stylistic solution.

A stand made of natural wood will become stronger if it is supplemented with metal parts, which, among other things, will add elegance to the design.

Many people think about how to make a flower stand on their own. In order to make a stand with your own hands, you will need a wooden frame and wicker elements, such a stand is great for a rustic-style room.

Glass structures
Such a design solution as a glass flower stand looks quite interesting in the interior.

Glass flower stands can be of various shapes and colors, decorated with patterns, matte and transparent. This stand model is suitable for any style room.

Plastic
Plastic is popular with florists due to its plasticity, because it can be used to make a product of any shape and size.
Therefore, as an accessory for flowers, you should look at plastic models, because both a low and a high flower stand will be equally beautiful and comfortable.

In addition, plastic coasters are usually sold at an affordable price.

Photo stand for flowers


If you want to decorate your home with indoor plants, but space is limited, then you will definitely need stand for flowers, do it yourself you can make it from wooden boards. Some creative ideas can be used to form original racks out of just clay or plastic pots with no additional structures. We have already done with you from beads, satin ribbons and paper, but artificial flowers cannot fill the air in your room with the freshness and aroma of a flowering plant.
DIY flower stand
The green corner of the house is the dream of every hostess, because this is one of the main ways to create a warm and cozy homely atmosphere, for this very purpose we also create. The only possibility for many housewives is to place flower pots on the windowsill, but then they will be hidden behind the curtain most of the time, which is why it can be used do-it-yourself wooden flower stand. Various coasters can be found in stores that sell flower pots, but sometimes they do not meet your requirements at all, and then you decide to make them yourself. Perhaps, in order to realize your creative idea, you will need to master new tools, some of which are even considered masculine. For example, you may need a jigsaw, saw, grinder. Don't worry, you won't have any difficulties when working with these tools, but the result will exceed all your expectations.

DIY flower stands for home can be suspended and floor, even multi-level. In this case, we will make a hanging multi-level shelf that will decorate your home interior. A wooden shelf will perfectly complement the interior, where natural textures predominate.
Before you start making an accessory for your home, you need to go to a specialized store and purchase wooden boards, but you can also take old shelves that will get a second life and become a decoration for your home.

To form a suspended multi-level shelf, we need a thick rope-rope, whose natural color will fit perfectly into the interior, and to attach the suspended structure, we need to prepare a metal ring. Of the tools, we will use a drill with a large diameter drill, a jigsaw or a jigsaw. To process wood, you will definitely need a brush and paint (or varnish). Of course, when it comes to houseplants, we need four ceramic pots, but you can use 2-5 pots for your design.
If you still do not dare to take on such complex tools, then you can create ones that will also decorate your home.

DIY wood flower stand
We need not only to make a beautiful hanging shelf, but also to solve the issue with the strength of our design. Therefore, when you consider the master class, how to make a flower stand with your own hands, pay attention to the fact that there must be at least two centimeters from the wall of the pot to the edge of the wooden stand, otherwise the wooden plank may break.
From the boards, we need to cut out squares or rectangles, the width of which will be 4-6 cm larger than the pot in its widest part. When the squares are ready, it is necessary to draw a circle in the middle - circle the pot in its widest part, but not in the widest part, otherwise, when we insert the flowerpot into the hole, it will simply fail. The hole should be slightly smaller than the base of the flowerpot, so the pot will be securely fixed in the wooden shelf. You can measure the squares after the circle is drawn in the center. Recall once again that the circle in diameter should be a couple of centimeters smaller than the diameter of the pot at its widest point.

Next stage, how to make a flower stand with your own hands, the use of complex tools for cutting the inner hole is expected. First we will fix the square, and first of all we will make a hole in the very center with a drill. We will need this drilled hole in order to “penetrate” the center of the circle with a jigsaw for its subsequent sawing. You must work very carefully with a jigsaw so as not to go beyond the outlined boundaries, while it is desirable to get an even, neat circle. Thus, it is necessary to prepare all four blanks. Only when the holes are cut in the center, it is necessary to drill holes along the edges (in the four corners), into which the ropes will be threaded, which will hold our multi-level structure. It should be noted that only those plants that hang down with vines should be placed on such shelves, as in other hanging structures. It is important to first make marks on all the squares in the corners, because on each plank they should be located without offset.

How to make a DIY flower stand
Further decoration do-it-yourself flower stands, photo which you see in the master class depends on your imagination. If the tree has a beautiful natural texture, then there is no need to hide it, but only emphasize it by varnishing the tree. However, you can paint the wood any color you like to match the shelves to your home. To paint the wood, you can use acrylic paint, for example, dark blue.

In order to give the paint an antique effect, two shades of paint are usually used: the lower one is darker (brown or burgundy), the upper one is light (aqua, turquoise, mint, blue). First, the surface is covered with dark paint, waited for it to dry and covered with a transparent varnish on top. After the varnish has dried, cover the surface with light paint. When the top layer dries, with soft sandpaper, you need to make “scuffs” in the corners. Thus, you artificially create the look of aged furniture, which will give the interior a vintage shine. Crocheted tablecloths and carved photo frames will fit perfectly into such decoration.
Even if you take plants whose branches hang down, you need to measure the height of the bush that rises with a pot in order to know what the distance between the shelves should be. It is advisable to make the same distance between all four shelves, then the whole structure will look neat and stylish.

The next stage will form DIY flower stand: cut off four pieces of rope of the same size and fasten the pieces to a metal ring. Then the ropes must be threaded into the holes made in the first square. On the ropes, you need to tie knots under the base, before aligning them so that they are on the same level. Next, step by step, you need to fasten all the other square planks, completing nodes under each, which will be the main fastener. The knots are easy to adjust so that the planks are parallel to each other. The excess part of the rope below can be cut off.
Note that one such hanging structure can accommodate four plants, while it does not take up space, since it can be hung near a window or anywhere on the wall. Such a solution would be ideal for a small apartment, but if you are the proud owner of a summer house, then in the summer months the structure can be hung on the veranda.
Do-it-yourself flower stand
DIY floor stand for flowers formed from pots of different diameters. At the base there will be the largest pot, four more medium-sized flowerpots will follow them up, and a small pot will complete the structure. At the base there will be iron reinforcement, on which the rest of the pots will be attached one by one, forming a pyramid. The length of the iron rod will determine the height of your future floor stand. The rod should be thick enough in diameter if you plan to attach large flower pots to it, but you can also make a decorative coaster from miniature pots. You can use such a stand for decoration, then put sisal into each pot, forming a nest, and into it - a decorated decorative egg.

The pots can be pre-coated with spray paint to give the stand a decorative look: they can be made in one color or create an original color transition. Before painting flowerpots, they should be covered with several layers of primer. The paint is also applied in several layers after the previous ones have dried.
In four medium-sized pots, holes should be made at an angle: such a hole should pass through the bottom and the wall, when you pass the reinforcement through this hole, the pot will be at an angle. The largest flowerpot will be our base, it is necessary to fix the reinforcement vertically in it, and then string three inclined containers and the last, smallest one. Flowerpots should be filled with earth and home flowers should be planted. Do-it-yourself flower stand can be located anywhere in your home, and this idea can also be used to form a flower bed on a personal plot.

DIY flower stands: photo
In the store you can find the most original racks for flowers made of metal, do-it-yourself it is quite difficult to perform them, because when working with metal, it is impossible to do without special hacksaws, welding machines and other tools that require special skills to work with.
Beautiful forged racks, despite their popularity, can "weight" the interior, as the designers say. Therefore, if you decide to buy such a rack for indoor plants, evaluate the space of your room, it is advisable to place them in spacious rooms, and it is strictly forbidden to use them in cramped small apartments.
You can breathe life into old, seemingly unnecessary things for a long time, for example, iron legs from an old sewing machine or metal chairs that have long lost their decorative look.
Many lovers of indoor plants sooner or later ask themselves the question: how to place all the flora in the house?
You can solve this problem quite effectively by using various flower stands in your interior.

Whether to buy a ready-made stand and how to choose, or whether to order according to an individual design or make it yourself - depends on your desires and capabilities. Even more recommendations are presented on the website http://clubsamodelok.ru

flower stands
Flower growers are well aware that plants need certain conditions in order for them to please with their juicy greenery or beautiful flowers. Some plants require more light, others less.
Properly selected flower stand simultaneously solves several problems:
- Provides plants with a comfortable environment
- Saves room space
- Is part of the interior, emphasizing the appropriate style

Stands are floor and suspended (wall). Both of them are distinguished by a variety of designs and materials.

Floor stands for flowers
Floor stands for flowers can be either for one plant or for several. On single ones, as a rule, they have large flowers - palm trees, ficuses, hibiscus, etc.

The cache-pot of such plants is quite voluminous and heavy, therefore the stand under it must be quite strong - wooden or metal.

On racks for a group of plants - light-loving flowers are placed at the top, under them - preferring partial shade. Such stands are the most popular, as they have the following advantages:
- Versatility - the ability to arrange plants with different lighting requirements
- Mobility - does not require any installation work, can be easily moved to any other place
- Compactness - the convenience of placing the right number of plants in a small area

Especially effectively the issue of compactness is solved by high flower stands. There are such vertical structures that are fixed to the floor and ceiling for greater stability.

Straight high stands also look original for one plant, which in this case receives the maximum amount of light, since it is located at the level of the window.

Wall flower stands
You can decorate the empty part of the wall with the help of plants. To do this, you need a stand or shelf that is attached to the wall. There is a huge variety of such designs, for every taste and budget.

By the way, you can make a hanging flower stand with your own hands. You will need wooden planks and a thick rope. Drill large holes in each board for the pots and small holes in each corner for the rope. Install the shelves by threading the rope through the holes and securing it to the knots.

This design using natural materials will perfectly fit into the interior of a country or country summer house. And if you paint the shelves in bright colors, then you can use it in the nursery.

Advice! In wall or hanging flower stands, it is better to place ampelous plants hanging down.

Variety of materials
The variety of materials from which flower stands are made is striking in its quantity. The simplest and most budget option is plastic, sometimes using metal hollow tubes.

Such flower stands are conveniently placed on the balcony or loggia, in the kitchen. Made in white, they look light and airy, without overloading the interior.

Their plus is that the plastic does not deteriorate in the open air, there is no need to tint.

Wooden flower stands are also popular. As a rule, they are shelves, racks or whatnots. Both floor and wall stands are made of wood.

One of their advantages is that you can always repaint in the desired color when updating the interior. Wooden structures will perfectly harmonize with the furniture in the living room or bedroom.

They are also suitable for plants on the loggia. Often they place wooden or plastic flower stands on the windowsill when the hostess has a lot, for example, violets or cyclamens that require the same amount of light.

Perhaps the most chic and sophisticated option is forged coasters. There is no limit to fantasy, and blacksmiths sometimes offer simply masterpieces: butterflies on the wall, cats on the floor, as well as scorpions, bicycles, etc.

A forged flower stand can be made in a classic style, in a Provencal style, and in some exotic style - oriental, Japanese, etc.

The most important positive features of forged products are strength, stability and durability.

Shelves made of glass and metal look beautiful. The metal base can be forged. But there are options for glass coasters on chrome tubes. Such flower stands are applicable in modern interiors.

Colorful wicker coasters will perfectly fit into the premises of ethnic style, eco or country.

Looking at numerous photos of flower stands, various in shape, color, design and material, you understand how interesting this interior detail can be.

In addition to performing their main function, flower stands attract attention with their originality and beauty.

Photo stand for flowers


