Wooden benches. Beautiful do-it-yourself garden benches: drawings and photos.
In suburban areas, I want to not only work to get good harvest. There is a desire to admire the fruits of their labor, admire the sunset, communicate with relatives and friends, and breathe fresh air. In order to comfortably spend time on your suburban area you need to get comfortable garden furniture. Bench - perfect option for inexpensive and efficient arrangement garden, decoration of the natural landscape and quality leisure activities.
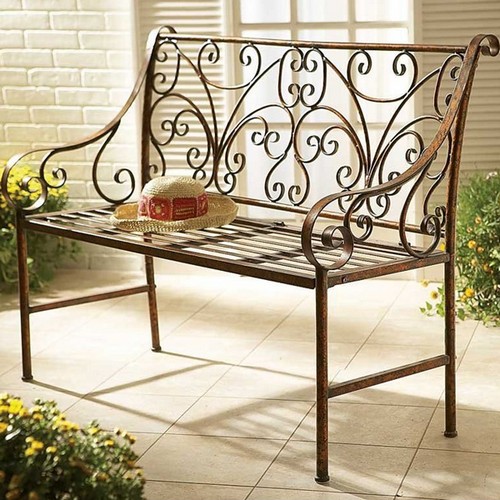
Some stone, metal or wooden benches can be a real decoration of the site. In a traditional garden, a Victorian-style wooden bench will certainly attract the eye, a rough log bench in combination with similar gazebo and house structures will become part of the whole countryside ensemble. Therefore, it is very important to choose the appearance of the bench in advance, even before it is made. If you already have dominant solutions in the landscape, for example, a recreation area built in Japanese style, then the bench should be made in a restrained, strict form, without pretentiousness and catchy colors. But if the bench will complement children's Corner for games and pastime for kids, then its elements can be painted in bright, multi-colored juicy tones.
The appearance of the bench has great importance, but the most important thing is the comfort of the model. Be sure to carefully consider the height of the bench, the width and depth of the seat, the slope of the backrest and the quality of the finish, as they say, without a hitch ...
Before you make a bench, you should provide for the conditions for its operation. If you plan to make a stationary bench with long term use, its deepening into the ground is thought out, preferably to a freezing depth, but not less than 40 cm. If the bench is moved around the site or hidden for the winter season, it should be as light as possible and occupy a minimum of space. So at this stage, first of all, the practicality and functionality of the product are taken into account. Usually bulky stationary benches are made for use in large areas, and in small areas it is rational to place light, portable models, which can be moved to the recreation area upon arrival of guests, and then placed in a quiet, secluded corner.
Also pay attention to exterior finish garden bench. Currently, modern manufacturers offer huge selection various finish coatings for any surfaces.
Note! Wooden products can be coated with yacht varnish with a special primer, or painted with moisture-resistant paint for external works. Metal elements on top are protected with solutions and paints with an anti-corrosion effect. Even stone surfaces that have been treated can be impregnated special composition, which will protect them from temperature changes, give them shine and depth.

The construction of a wooden bench begins with the development of a sketch. At this stage, it is determined what elements the shop will consist of. The width and length of the bench is calculated depending on the space it occupies. The height of the product from the ground to the seat should be about 50 cm. The height of the back is usually made from 40 to 50 cm, and it should have a slope of about 20-30 degrees.
All curly elements of the bench in the form of templates must first be drawn on paper or thick cardboard, and then make it with a hacksaw or an electric jigsaw. When all the measurements and sketches are made, they start cutting out the blanks.
The next step is the surface treatment of the wood. With help grinder remove all nicks and smooth the surface. If the bench is installed permanently, then it is necessary to fix the supports by digging into the ground to a depth of at least 40 cm. lower part pre-impregnate the supports engine oil and additionally wrap them with oiled polyethylene or any absorbent film. After installing the supports, the bench is assembled. To do this, the remaining elements of the product are installed in the prepared mounting grooves, which are fastened with self-tapping screws or bolts.
For the manufacture of wooden, stationary or portable benches, you can use stable and practical rounded legs for the legs. wooden blanks round shape. You can buy them in any specialized store or in the market with goods for the garden. Most affordable option- These are pine round logs with a smooth surface and a diameter of 80 mm (minimum). For the seats and back of the bench, boards with a section size of 20 × 120 mm are suitable, for armrests you can purchase wooden blocks with a section of 35 × 55 mm.
After assembly, the surface of the wooden bench is treated with an impregnation that protects the structure from fungi and moisture, and covered protective varnish or paint.

The base of the garden bench can be made of brick or any stone that can be finished on top. facade tiles, the same as on the house or gazebo. It will look very harmonious and beautiful.
Before laying, it is necessary to prepare the base, dig a trench 10 cm deep. After preparation, crushed stone and sand are poured into the recess, rammed, constantly spilling water. The substrate is concreted from above and leveled. Columns made of stone can be of arbitrary width, the main thing is that the height with a bench should be no higher than 45-50 cm, and no lower. After masonry mortar grasp, after two days, you can lay two wide wooden boards on top of them, at least 20 mm thick. Boards, of course, are pre-treated, sanded and sanded.

For a stone bench, the base can be made of stone, brick, metal or wood. The bench itself is made of natural or artificial stone. In the form of a natural surface, you can use any solid piece that comes on sale. The main thing is that one surface of it should be perfectly flat, and the second can be easily adjusted during the manufacture of the legs of the bench. An artificial stone slab can also be made independently, from a concrete solution with the addition of fine gravel or marble chips (for beauty), reinforcement and a special shape (which can also be made independently). If in concrete mortar add special plasticizers for extreme climatic conditions, the finished stone will last for many years.
The base for a garden bench made of stone must be mounted to the depth of freezing of the earth so that the product stands stably and for a long time. In our climatic conditions, this size can be up to 70 cm. This design of the bench will serve you reliably and efficiently for many years.
A stone bench will give the site solidity, it will last longer and will cost less than a bench made of wood. You can arrange your own flower beds from slabs or blocks, or build a bench that will be connected to a stationary barbecue. During operation, benches made of stone may not be very comfortable. This problem is solved by placing on a bench decorative pillows or mattresses, which will become an additional decoration of the landscape area.
A bench is a wonderful piece of landscape design. The presence of a bench in the garden makes it cozy, conducive to relaxation, unhurried conversation with a glass of cool lemonade in your hands ... Or maybe the bench will become a favorite place to read books in fine warm weather.
Universal garden benches
Whichever way you look, but without benches in the garden no way. And the point is not even that it is very convenient and functional, but that the garden bench has always been almost the main element of decorating the backyard. In order for the bench to fit perfectly into the overall look of the garden and at the same time retain its functional affiliation, it would not be out of place to consider this item of “garden interior” in some more detail.

garden bench materials
Modern benches are made from classic materials - wood, stone, wrought iron, marble, and from more modern ones - plastic, synthetic fiber. Often benches can be made simultaneously from two or more materials - stone and iron, wood and glass, forged steel and wood. The style in which this item is made depends on this. And this means that it is necessary to select a bench for the garden, taking into account its stylistic features. For example, a bench made of stone or forged steel and wood will fit perfectly into a garden made in classical style, and a plastic bench will look great on the lawn in front of the cottage in a modern style.

But still, the most popular material used for making garden bench, is a tree. In particular, teak is most often used. Teak wood has always been used in shipbuilding as it is very resistant to moisture. On the fresh air appears on teak furniture gray coating which is easily removed with a soft brush. In addition, teak furniture must be treated with teak oil, which comes with the furniture - this way the furniture will last for many years.

Manufacturers of garden furniture often do not limit themselves to the production of benches only, but also produce entire ensembles of garden furniture. In addition to benches, it includes a table, chairs, swings, chests for storing pillows - and all this, made in the same style, will be an amazing decoration for any garden.

Where to put a garden bench
If it is planned to put only single benches in the garden, then be sure one bench should be placed at the porch - this will be a wonderful sign of hospitality, and if you put another bench somewhere in the depths of the garden, under a spreading tree, then this place will become a wonderful corner for solitude and relaxation in silence.

Of course, the bench, first of all, plays a functional role. Therefore, it is worth paying special attention to its dimensions. For example, if a bench is installed in that part of the garden where family barbecue gatherings take place, then there the bench should be long, or several small benches, so that all family members and guests can comfortably accommodate. But if we reject the truly functional purpose of the bench, then you should pay attention to the psychological aspects of its use.

According to psychologists, sitting together on a bench able to reconcile quarreled spouses, to make friends with a pleasant interlocutor. And the secret of this is that when people sit on a bench, their eyes cover the same landscape, they breathe the same air, their thoughts and feelings gradually begin to flow in the same direction.

Garden benches - photo
But as for the shape of the bench, now there are a lot of them and you can choose any one to your taste. Let's say there is a huge sprawling tree with a wide trunk growing in the garden. A round bench can be installed around it so that those sitting have their backs to the tree trunk. But if you build a beautiful round flower bed or a small fountain, then a round bench will also fit perfectly there, only those sitting will already be facing the center of the composition. Round benches are very convenient because they can accommodate a lot of people, while not taking up much space.

Everyone who has installed a bench in his garden, or even several, can say with confidence that he received another peculiar room, cozy corner your home, where it is always nice to relax and spend time with loved ones. The only difference is that this corner is in the open air.


![]()


![]()


![]()


![]()


garden bench- This is a necessary object on any personal plot. It not only provides a place for the owners and their guests to relax, but is also able to complement and decorate the landscape design of a picturesque corner. Benches are made from the most various materials, but the most popular are traditional manufacturing options - from metal, stone, wood. Since working with stone and metal (polishing, welding, forging, etc.) requires special skills from a person, most people who want to make a bench for their backyard with their own hands choose wood.
Often, in order to make a shop, you do not need to buy anything, logs, wheels, planks, etc. are nearby. A do-it-yourself bench will not only save a certain amount of money, it will become the pride of the owner, help create an original, unique cozy corner in the garden or in the garden.
A wooden bench can be small or large, straight, angular, round, etc. The choice of size, model depends on the place where you want to install a bench, on the material base that you have, and, of course, on the skills of the master. But even without much experience in the manufacture of joinery, using drawings, diagrams and a description of the work, you can make a neat, solid product with your own hands that will last you for many years.
Creating a bench with a back for a personal plot
It is not difficult to make a comfortable wooden garden bench with your own hands: firstly, the materials necessary for it are available and inexpensive, and secondly, the product has simple design, the creation of which does not require work with special tools. As a result, you will get a strong, reliable bench with a wide back, where it will always be a pleasure to relax.
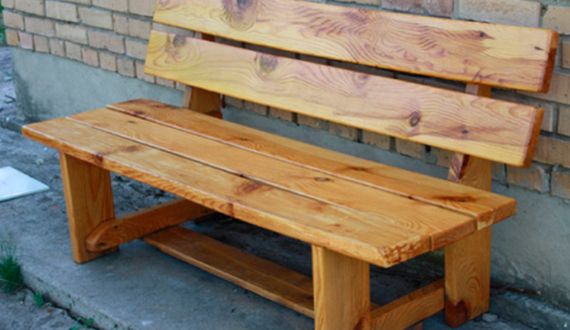
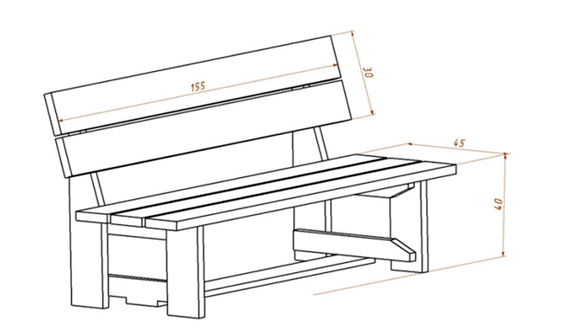
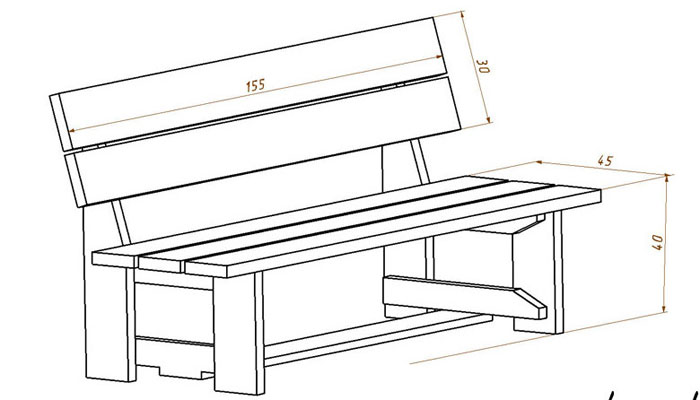
The design and dimensions of the bench are determined by several factors. Seat length - 1500 mm. This size allows you to comfortably accommodate three of them. The back is inclined at an angle of about 18 degrees, provides an opportunity for a seated person to take a comfortable position. The distances between the boards that make up the back and seat allow precipitation to not linger on the surface, which, in turn, will prolong the integrity of the wood and the product.
The above drawing shows an approximate ratio of the dimensions of the details of the bench with the back, which you can do yourself. It clearly shows the ways of connecting and strengthening the structure.
Materials and tools
- 2 boards 6000x150x40 mm.
- Wooden beam 40x40 mm to reinforce structural connections.
- Self-tapping screws.
- Drill, drills.
- Electric jigsaw.
- Electric planer for chamfering and surface grinding of wood parts.
- Sandpaper.
- Screwdriver.
- Primer and varnish.
- Square.
- Roulette.
- Pencil.
- Joiner's glue.
Description of work
- First, we cut the boards in order to make blanks of the necessary parameters with our own hands:
- 5 boards 1500x150x40 mm for the seat and back.
- 2 boards 360x150x40 mm for the front legs.
- 2 boards 520x150x40 mm. Then we cut them lengthwise to get 4 bars for attaching the legs to the seat. Wherein outside corners we cut off the bars, so it will be more convenient to position the legs.
- 2 boards 720x150x40 mm for the leg and back support. We make a cut on them, as the drawing shows. This will allow you to position the back at a comfortable slope.

- All cut blanks must be carefully processed so that there are no sharp edges and burrs. After planing, sanding, chamfering, other processing, the width of the boards will decrease, so the actual dimensions and drawings may vary slightly.
- Let's start assembling the legs. The distance between the rear and front supports is 280 mm. The parts are connected using transverse strips at the top and bottom with self-tapping screws. For greater reliability, these and other connections should be additionally coated with glue.

- Then, on the upper strapping beams (also with self-tapping screws), we fasten the boards for the seat. We place them at a distance of about 10 mm from one another. Fastening is best done from the inside, deepening the head of the screw into the wood. Thus, metal elements will be more protected from natural influences. If the size of the self-tapping screw is insufficient, you should pre-drill a hole larger than the diameter of the self-tapping screw with a drill.
- Next, you need to install the lower transverse bar, which will fix the position of the legs.
- We fasten the lower bar forming the back with self-tapping screws at a distance of 200 mm from the seat, the second - 10-30 mm from the first.

- After assembling all the details of the bench ready product need to be covered with protective impregnation. This tool will protect the material from destruction, from exposure to moisture, the appearance of mold, insects. After drying, carefully inspect the bench, sand again all the rough places with fine-grained sandpaper, especially the details in the seat and back area. Open with varnish. After the third layer of varnish has dried, the do-it-yourself garden bench is completely ready for use.
If you want to extend the life of a wooden bench, place it indoors during the cold season.
Curved bench by the hearth
Benches of a curved shape not only look interesting, they allow you to originally arrange seating around a tree, a lawn, when those sitting are located with their backs to it or, conversely, facing inside the bend. The latter constructions are appropriate if a group of people takes places around something, for example, by the hearth.

Making a bench with a back and a radius seat with your own hands is not an easy task, but if you follow the recommendations, descriptions and use ready-made drawings, you will succeed.
What do you need to create a curved bench?
Prepare materials:
- boards for the back and seat - 150x25 mm;
- boards for the frame - 150x50 mm;
- bars for legs - 100x100 mm;
- stainless steel screws (self-tapping screws) - 60 mm;
- stainless steel screws (turnkey screws) - 150 mm for fixing the backrest supports;
- stain or paint.
In the work you need to use special tools:
- miter or circular saw;
- drill with drills;
- grinder or sandpaper of different grain sizes;
- square, tape measure;
- pencil.
Work procedure
- Calculate how big your garden will be wooden bench. It is necessary to make its scheme on a sheet of paper, determine the angles of the connection of the parts. In the proposed version, the height of the backs (from the seat), the depth and height of the seat are 450 mm. The drawing might look something like this:
- Connect with self-tapping screws the bars intended for the main part of the bench - the frame. Install jumpers in the middle of each of the three sections. They will support the seat, create higher rigidity, and give stability to the entire structure.

- Saw off legs from a bar 100x100 mm required size. Turning the frame over, install them in their places, securely fasten them with screws. In order for a do-it-yourself bench to endure heavy loads, use several self-tapping screws for each leg. Carrying out work on uneven surface, put a few boards under the product, then it will not vibrate in response to your actions and maintain the integrity of the joints and corners.
- Check how straight it is garden bench, adjust as needed.
- We begin work on the design of the back. It is necessary to make supporting parts for the backs, given the slope of about 20 degrees. Drill holes for their fastenings with turnkey screws.
- Let's move on to the seat upholstery. Prepare the planks - sand their surface, round off sharp edges. It is necessary to start work with the longest board, it is located along the front edge of the central (out of 3) section of the wooden bench. After installing it, carefully trim the edges. Next, lay shorter boards. At the same time, they can be fastened tightly to one another or (more desirable) leave small identical gaps. To keep the gaps between the boards even, you can use laying spacers ceramic tiles. Fasten the boards with stainless screws.

- Install the supporting parts of the backs, attach them to the frame with turnkey screws.
- The difficulty of creating a back for a curved bench lies in the precise cutting of the boards for their docking. You should not rush, holding the boards, put marks on them. Then saw off all the excess. When calculating the number of boards to form the back, you need to make a small margin in case of damage to the part.
- Using a grinder, or simply with sandpaper, process surfaces, edges, especially corner fragments, remove roughness and uneven areas
- Saturate the wood with wood stain to increase its resistance to decay.
- Paint a curved wooden bench set by the hearth.
The garden bench is ready. Such a beautiful original place, created by one's own hands, will bring together a large family, a group of friends, and give many pleasant hours spent together.
To make your household plot comfortable to use and beautiful, you need to use such elements landscape design, like flower beds, paths, and gazebos. Especially important garden furniture. It is she who guarantees your convenience.In our review, we will find out how a do-it-yourself garden bench with a back is constructed. Drawings and detailed photos will allow you to make the best design.
Comfortable garden furniture is a wonderful addition to the garden ensemble
Before you make a bench for a summer residence with your own hands, let's see what varieties of this design exist. Classification can be made taking into account factors such as material, functionality and characteristics.
Benches can only be a piece of furniture designed for sitting, or have a multifunctional purpose. For example, to be used as a rocking chair or a table.Popular and original benches - swings. Designs with backs that are stationary are in demand. They are made of brick or concrete. There are also folding benches.
For the manufacture of products, the following materials are most often used:
- plastic options they are light in weight, and also endowed with resistance to all kinds of climatic changes;

- wood great solution for anyone suburban area. This is a traditional option that has many advantages;

- metal can be used in two configurations, from profile lines or as a forged structure;

- to himself durable material applies a rock. For a bench, you can take two boulders, as well as use purchased material.

You can even make a product out of concrete. There are also combined options do-it-yourself garden benches with a back. Drawings will help to build a structure from any material. You can combine a metal frame with wooden planks. You can also combine stone and wood.
Benches can have a different design:
- a simple option - a bench without a back;
- you can build a bench with a backrest with your own hands;
- a bench with a table is suitable as an option for the garden;
- a bench with a canopy is used as a miniature gazebo.
When creating structures in art style Special attention given appearance. All kinds of shapes can be used instead of the side parts.

When creating drawings, it is important to consider general form products, as well as all dimensions of the structure. Furniture made of wood, forged steel or stone will fit perfectly into a garden created in a classic style. BUT plastic products suitable for landscape design in a modern style.It matters where the bench is placed. You can put it near the porch, and also place it in the depths of the garden under a beautiful tree.

Note! A bench made of wood can be comfortably used at any time of the year, since the level of thermal conductivity is lower than that of stone and metal.
Original benches for summer cottages made of metal and wood
You can try to make a metal or wooden bench with a backrest with your own hands. Metal products are known for their exceptional durability. However, they do not require constant attention. They can be coated with a special anti-corrosion compound only once a year.Modern designs using forged elements are performed using a welding machine.

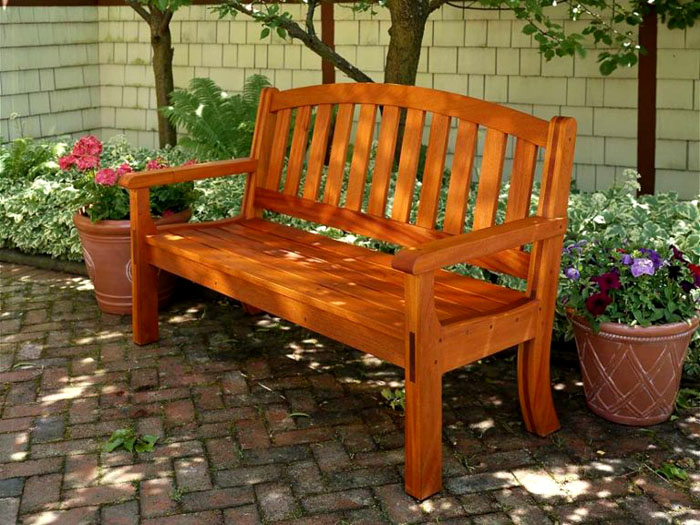
Benches are made from wood beautiful design. Such products are suitable for almost any landscape design. To protect similar designs you can use special varnish compositions.

This will protect wooden surface from the development of mold, fungi, as well as from sunlight. Rarely who uses fully hardware, as they cool down a lot in the cold season and heat up in the heat. Most often, load-bearing elements and legs are made from this material, and the back and seat are made of wood.

From profile pipe rectangles are made, and then jumpers for support are welded to the side walls. You can build more functional design with armrests soft pillows and back.

To create smoother lines, you can bend the pipes. This will result in furniture with rounded edges.Board benches are popular. The design can be made in the form of a sofa, and pillows can be placed on top.
You can also build simple bench handmade from wood. In this case, the legs can be in the shape of the letter X. From the boards, you can make a bench in the form of the letter P. In this case, it is necessary to ensure a rigid fixation of the seat and legs.
Note! The use of special coating compositions will allow for a long time to preserve the natural pattern of such materials.
Photo of do-it-yourself benches made of stone
Do-it-yourself garden bench with a back can be made of stone. This material is characterized by high performance properties, as well as significant strength. stone structures can be used for any garden style and design. The use of stone elements to complement general design. Such furniture looks good against the background of a building that has separate details made of stone.A bench made of stone will make a wonderful combination with stone flower beds, steps, ponds and paths. Similar benches are often combined with wood.

Note! Often marble is used for the construction of such benches. Sometimes quartzite and even coarse-grained granite are used.
Photo of garden benches with your own hands: how to make from improvised materials
Plastic products are also endowed with certain advantages. Here they are:
- low weight of the structure, which ensures its ease;
- affordable price;
- a wide variety of colors;
- practicality.

You can use all sorts of combined combinations that will differ or combine in texture, color palette and materials. A good solution is the combination of stone and wooden parts.

Try to make original combined designs. It can be a sandbox bench for children, as well as a flowerbed bench.
Note! Unusual designs can be made from old pieces of furniture. For example, from old .
How to make garden benches and benches with your own hands: popular technologies and ideas
To make a bench with a wooden back with your own hands, you first need to understand its design. A simple device involves a seat on some kind of support. But there are also products that have a non-standard configuration, designs with forged or carved parts, as well as furniture with armrests.
An easy solution is to use two drawers and a couple of boards. In this case, the boxes will be installed as supporting elements. They can be filled with soil and made into them beautiful flower bed. A seat is mounted from the boards, which is installed between the boxes. Be sure to sand the surface with sandpaper. For more practical design, you can replace the boxes with stone or concrete pedestals. Seats can be built from halves of logs or from processed boards. The seat must be secured with metal corners. To attach them to concrete foundations dowels are used. And fixing to the tree can be done using self-tapping screws and through bolts.
| Image | Stages of work |
|---|---|
 | It will take detailed drawing with all sizes |
 | The blanks must be polished. The rear legs are also a support for the back. All blanks are pre-marked. |
 | At a height of 40 cm, mark the place for fixing the seat. Then the board is cut at an angle of 20 degrees. The front and rear legs are attached with a bar. |
 | The side parts are attached with seat boards. They are screwed in with screws. To fix the structure, you need to strap with a beam. Two boards are attached to the back. |
 | Finally, a special coating is made that protects against precipitation. |
Helpful information! As supports, you can use flowerpots with ornamental bushes and dwarf trees.
Bench with storage box
You can build a convenient design with storage boxes. At the same time, it is worth using old furniture. Pick up before work correct screws. Their thickness should correspond to the thickness of the wooden elements.

Bench with drawer wonderful solution for loggia and balcony. In this case, you can use the old balcony. The design with a box consists of two walls, a seat and sidewalls. It is also recommended to make the bottom of the box. As fasteners, you need to use metal corners.The design can be varnished. And in order to make it comfortable to sit, additionally arrange soft pillows.
Features of a do-it-yourself wooden garden bench
It is easy to make a bench out of wood with armrests. To do this, you will need special bars for supports, boards for the back and seat, glue, saw, dowels, milling machine.First, a drawing of a wooden bench with a back is made. Then, according to the schemes, templates are cut. Contours are placed on all blanks, and why parts are cut with a saw. Sections must be polished. Holes are made in the backrests. First you need to fill them with glue, and then insert the dowels into load-bearing beam. Planks are fixed with dowels. Then the bench is covered with a special varnish composition.
The secrets of designing a country bench with your own hands from a log
A practical solution is a garden bench made of logs. For sitting, the tree trunk is sawn into two parts. The back can be built from a trunk having smaller thickness than the element for sitting. Legs can be built from the remains of a log. Connections are made with metal pins. Here's how it's done:
- holes are made in the details for the pins;
- the pin is driven into the middle of the length;
- on top of the free edge is the second part and is also clogged.

Fasteners are installed with a hammer. Pins suggest a strong connection to enhance fixation. The surface of the structure must be sanded.
How to make garden benches with a backrest in ethno style with your own hands
A rustic and ethno style bench will fit perfectly into the courtyard setting. It can be used to create amazing natural corner. To build such structures, wood is used with or without bark. In the manufacture of benches, you can use a variety of curved shapes. Before construction, all parts must be sanded and processed.To create a seat, apply unedged board. All construction details are rounded.

Ethno-style benches are perfectly combined with wicker fences. In this case, you can build a back in the form of weaving. Branches should be placed tightly. But you need to leave gaps between them. Materials such as stone, wood, bamboo or even rattan are suitable for creating ethno-style furniture.
Here are some popular designs:
- for Moroccan style threaded parts can be used;


Do-it-yourself drawings of benches for giving: photos and diagrams
When performing the bench, individual needs are taken into account, as well as certain parameters. To create quality construction you will need a drawing with all dimensions.An important point is the calculation of the amount of materials, which will depend on the final design parameters. Profiled timber is especially convenient. To round the edges, you can use a special cutter.
Do-it-yourself garden bench with a backrest drawings: double designs
Benches can have different capacities. Most often they are designed for 2-4 people. For a double structure, you will need bars and boards. To build such a product will take no more than one day. Before cutting, you need to choose the right drawings.

Do-it-yourself bench for giving from a tree: how to do it step by step
First of all, boards for sitting are being prepared. In this case, the material is cut and processed. Will help in this matter Sander or cutter. You can also use sandpaper, but it will take much more time. With the help of bars, you can build strong legs. The areas where the fasteners will be placed must be marked.
Metal pins are used as fasteners. For greater strength, you can use special glue. The pins are also used for reliable fastening of the backrest. After marking, you need to measure the distance from the edge.

The assembly goes like this:
- the bars are stacked on top of each other;
- all parts are fastened with clamps;
- holes are made in the center and along the edges;
- through the holes made, the parts are fixed with studs.
How to make a simple design look at the video:
The seat boards are then attached to the legs with nails. After that, the nail heads can be masked with a mixture of mastic and sawdust. Be sure to cover the surface with paint or varnish.
Do-it-yourself garden bench from improvised materials: from pallets
You can make a bench from pallets with your own hands. A photo interesting options you can see on our website. Such furniture can be placed not only in the garden, but also in country house or on the veranda. For installation work you will need three pallets.

This is how the assembly goes:
- the pallet is divided into two halves. These halves will be used for the back;
- two pallets are connected together with nails;
- then the back is attached to them;
- a mattress of suitable dimensions is placed on top.
Note! soft objects can be secured with straps.
Video: how to make a simple pallet bench
Do-it-yourself drawings of a garden bench with a wooden back: a transformer option
A transforming structure is independently constructed. To do this, you need boards and bars.

Do-it-yourself transforming bench manufacturing technology
You can build a structure by doing the following:
- 3 boards are attached to the supporting part, a seat will be made of them. Insert 4 screws into each board;
- when assembling units, it is necessary to apply carpentry glue to these zones;
- legs for backrest support must be sawn from the end side. Then the legs must be connected in pairs;
- then you need to make a back, which, when transformed, will transform into a countertop.
- boards are fastened so that there is a gap;
- in the support board, it is necessary to make 3 holes with a diameter of 0.8 cm.
Here is a convenient transformer design:
To create an axis of rotation, you need to make two holes on the back leg. The backrest is attached to the base with bolts.
Article
Benches, which are usually located in parks, cottages or gardens, are not only main part landscaping and exterior. Garden benches are designed for relaxation, so 2 things are most required of them: aesthetics and comfort.
From what original benches often do today, rest turns into something more, and the benches for summer cottages and parks themselves become not only a household item, but also entire pieces of art. At the same time, most often a rather interesting, not time-consuming and cheap bench can be created with your own hands.
In order to design a wooden bench on your own, it is enough to have some skills in working with a wood tool, as well as find a suitable drawing of a bench or just come up with its design.
Today there are a lot of original solutions that will help you choose the best way for a cottage or a private house.
Since wood remains the most natural and cheapest material for creating benches, before making a bench, it is worth sorting out what types of benches are and how they can be assembled.
Ordinary garden bench
For the manufacture of garden bench predominantly used wooden materials, but for rather massive shops large sizes also have to use metal parts. We are talking primarily about fasteners and connecting elements that a bench made of wood has.
Main consumable for a bench, a wooden board usually becomes. In order to consider the necessary different types benches materials, you can evaluate a separate example.
The bench installation process
Making a standard garden bench requires wooden board 1500 mm long, 150 mm wide and about 40 mm thick. For ordinary light bulb 5-6 such boards are enough.
For the rear legs, you can use 2 of the same blanks, only shortened to one meter. These legs should also serve as a backrest. The front legs will be made from the same board, but 360 millimeters long blanks are used for them. It should be borne in mind that a do-it-yourself bench made of wood can also be made with a different height. The main thing is to calculate it correctly.
The result is a bench one and a half meters long, with a seat height of 45 cm and with twice the height of the back. In this case, the width of the seat is about 40 centimeters (for three boards per seat).
Strengthening of the structure is carried out with the help of bars with a square section of 4x4 centimeters. Such a simple wooden bench will be fastened with self-tapping screws.
To improve the fastenings, bars are used, additional cutting of the boards before joining, a back slope is made - this is how a bench is obtained, as shown in the photo.
In addition to these materials, you can also use varnish and a primer to cover the surface of the bench in order to protect it from external moisture. Based on this, one can consider other more original designs, but mainly it is worth deciding on the order in which work is done to create such a shop, because any do-it-yourself bench made of wood is complex structure, requiring some construction technology.
Making a bench: stages

The technology includes 7 stages:
- At the first stage, you need to prepare materials or, if possible, find elements that are already suitable for the design in size and shape. In extreme cases, you can even buy a set of type constructor. But if you wish, you can find the original blanks and process them yourself. An important milestone wood preparation is the creation of a layout, diagram or drawing of a bench made of wood. Due to the accuracy of the specified dimensions and calculations, you can immediately determine right amount material, which will save the cost of building a shop. According to the drawings, the workpieces need to be cut and processed from all sides of the surface, to prepare connecting elements, sand the boards for the back seat, legs, and round the ends of the boards to secure them. Then you can proceed to the next step.
- At the second stage, you need to process the rear legs, noting the height of the seat on them, as well as cutting off the parts to which the back boards will be attached. Optimal degree the backrest can be up to 20 degrees, and sometimes more. These cuts must be made with a jigsaw.
- The third stage is the connection of the legs with the help of bars. The front and rear legs are connected by bars from below and from above. This allows for additional structural stability.
- At the next step, two sidewalls (pairwise knocked down by the lower and top harness rear and front legs) are connected by boards for sitting. The boards are screwed with self-tapping screws to the upper bars and should have gaps of 10-20 mm between them to remove moisture and ventilate the bench.
- At the fifth stage, use bottom harness connecting the bars of the two sidewalls, for which you can use an additional board 150 centimeters long. For greater stability, the legs themselves are connected with boards - rear and front separately.
- At the sixth stage, they mount the rear legs with a backrest with their own hands. It is advisable to mount the backs at a height of 20 centimeters from the seat, also leaving gaps between them.
- The last step is varnishing the furniture. Thanks to deep impregnation and varnish coating the bench acquires protection from moisture, fungi, and insects. In addition, the varnish saturates the color of the surface of the bench, from which it becomes even more pleasant to look at.
Variety of garden benches
A do-it-yourself wooden garden bench can be made quite trivially, but it can also be different. original solutions, as mentioned above. If we take the above example of a standard garden bench as a basis, then by changing some of its elements, you can get a large number of possible schemes.
Often, to install a bench, it is enough to have two pairs of supports, between which one or two boards are laid. Flower beds can act as such supports, as the photo below shows.

There are a lot of variations of such a bench, there is only one problem - ensuring reliable fastenings to the flower beds, which, however, is solved with the help of metal fasteners, wooden spacers, or otherwise.
Various supports can serve as wooden structures, for example, small turrets made of wooden blocks folded in the form of a house, or ordinary foam blocks, and so on.
A wooden bench with a back can be made from logs. Log benches and log benches look quite beautiful and fit especially well into the landscape of a park or garden. In addition, creating a bench from a log is quite simple and quick, although it may require additional physical effort.
A log for a bench is sawn lengthwise and a surface is obtained that serves as a seat. The half-log is laid on parts of the other half of the log, often the bark is not even removed from such benches, which gives them a particularly natural look.
As you can see in the photo, the only catch here is the creation of the back. In this case, it is necessary to use metal or forged pins at both ends of the log, to which the back is attached from a board, beam, or another part of the log.
You can also do a lot large structure, immediately fold a table with two benches using full-fledged logs as a support for the structure and set the plane of 2 benches perpendicular to them, as well as the table between them, which will be raised on the trimmings of shortened logs.
Irregular wood and extraordinary solutions

Specifically looks garden furniture, not made according to the format, that is, when there are no clear drawings of benches or diagrams. The main requirement for such benches is the presence of additional connections to ensure rigidity and increase the endurance of the structure. To do this, the legs and backrests are additionally connected below under the seat of the bench.
The back can be of several types, for example, wicker or from several coarse branches. After completion of work, such benches are also treated with varnish and, thanks to their careless appearance, become quite interesting decorations.
In some cases, the legs of the bench are driven into the ground, after which the seats are installed on them. As an option for the back, a wicker back can also be considered, but for this option it is worth foreseeing not 2 rear legs, but several at once (3-4 or more).
In general, a do-it-yourself wooden bench is always something special. Woodworking masters recommend not being limited to the template schemes of such shops, but paying attention to creativity. Experimenting with the height of the benches, various kinds materials, supports, long or short boards, by installing seats along and across the length of the bench, you can achieve stunning and unforgettable success. The main thing before you make a shop is to understand that it is simple and start experimenting. But before you try original bench, you should still try to assemble at least the simplest one according to the drawing.