Bread box scheme made of wood. Breadbox - what is it used for, what should be the dimensions, features of different types
Since ancient times, bread in our country has been given a special place on the table. How many sayings about him are folded, how much work has been invested in him? That is why special attention was paid to the storage of this product.
Breadbox - then and now
Previously, the so-called wooden boxes were in great demand. The people said that if it was skillfully made, then bread in it retains its properties for seven days, remains fragrant and soft. The tree has a light, porous structure. Thanks to this, the humidity inside the box is perfectly regulated. Our ancestors beautifully designed it, decorated it with carvings, painted it with bright, elegant patterns. Today we call such a box - a wooden bread box.
To date, there are craftsmen who independently make boxes for storing bread from wood. Of course, now the craftsmen have developed more convenient designs than existed in the old days. The modern wooden bread box has a more compact shape, as it is designed for an ordinary family. After all, if earlier in the family there were 10-15 people, today it is mostly 3-4 people.
Of course, this product also has a significant disadvantage - it is quite difficult to wash it. The tree very easily absorbs moisture and dries for a long time. Therefore, consider this issue carefully. When cleaning a wooden bread box, do not use too wet sponges and rags and leave to dry in a warm place with the lid open. Otherwise, you run the risk of getting just a swollen piece of wood instead of a beautiful box for storing bread.
Is it possible to make it yourself?

Anyone who knows how to use it at least a little can make it on their own at home. Below we will describe several ways how this can be done. The general scheme remains unchanged, only the details change. However, before choosing one of them, you need to think about how much bread you plan to store.
A wooden bread box made with your own hands will bring you a lot of benefit and joy if you remember the main rule - the bread will remain soft for much longer if the percentage inside it slowly changes. It depends on the filling of the wooden box: the more product it contains, the slower the change humidity. But it's also not worth slaughtering it completely. And the product will be wrinkled, and you will not close the lid.
If there are few people in the family, then an ordinary small bread box will do, but if there are a lot, then it is best to make a bread box consisting of two compartments. They can store different types of bread.
General manufacturing scheme

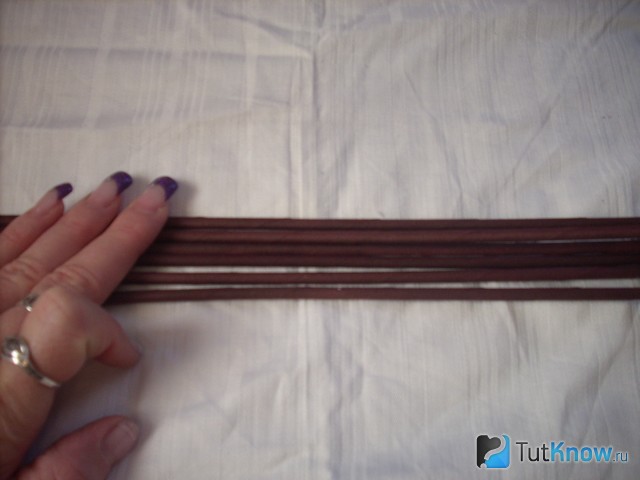
First of all, you will need a wooden board. It is best to choose birch, oak, ash or linden. But you should not use pine, it is saturated with the smell of resin, and bread easily absorbs odors. Its thickness should be about ten millimeters. Also stock up on the slats from which the flexible cover will be made, a handle and fasteners.
We use the board for the manufacture of two side walls, the top bar and the bottom. Semicircular grooves are made on the sidewalls from the inside. We recommend using a milling cutter for this. For example, a finger cutter can be used, which must be installed on a drill. The lid will move along the grooves.
Our wooden bread box will also require a lid. It is made from a small thickness. Reiki is either fastened with a cord or glued to a fabric base.
Bread box options

As we have already said, the general principle of making a wooden bread box remains unchanged. What could be the details?
For example, according to the same scheme, you can make a two-tier product for a large family. Secondly, the form itself can change. You can create rounded, rectangular, square, shaped wooden breadbaskets. The photo above shows you that the shape of the "box" can be any. Doors can also be attached in different ways. Optionally, it will be a movable roof made of thin rails. It can be dense, attached with fasteners on the side walls and opening up or down. You can even make a completely unusual option - and the lid of your bread box will open to the side, like a microwave oven door.
The inner surface of the product is not covered with anything, but the outside can be opened with varnish or linseed oil. Further, it all depends on your imagination - many decorate home-made bread bins with carvings, paintings, etc.
Afterword
Of course, the modern market offers us a huge number of options for bread bins. They are made from plastic, metal, wood and other materials. It would seem, why suffer and do everything yourself, when all this has long been stamped in factories and freely sold in stores? But after all, a thing made with your own hands always gives a special warmth and comfort to the room.
As for the boxes for bread made of other materials, I would like to note that none of them has the same qualities that distinguish a wooden bread box. Consumer reviews indicate that only wood products retain the natural taste and softness of bread for a long time. And if you decide to make it yourself, you will be able to maintain the style you need, you will be confident in the quality of the materials used, and just dream up.
Bread and pastries have long been stored in special wooden containers (boxes). bakery products in the bread box stay fresh longer and do not go stale. A modern, factory-made fixture can be made of wood, plastic, or metal. It corresponds to its purpose, but a hand-made product can become a real decoration of the kitchen interior.
How to make a bread box with your own hands
- sketch a drawing of a household item;
- prepare all the necessary tools;
- choose suitable materials.
A preliminary sketch will allow you to make a more accurate drawing and imagine what the finished product will look like. 
Materials and tools
The selected material must be environmentally friendly. You can not take toxic plastics and boards painted with non-food paints. For kitchen utensils are best suited:
- plywood;
- birch bark;
- wooden mat;
- bamboo.
Important! For the manufacture of kitchen utensils, only those types of wood that do not have a specific smell are suitable. Softwoods such as spruce and pine are not suitable due to their persistent aroma. Bread quickly absorbs odors.
For fastening individual components and parts you will need:

The doors of bread bins differ in the way they function. They can:
- move apart in different directions;
- open in the usual way;
- go up and fold like horizontal blinds.
Fasteners for doors are selected according to their type.
In addition to the material and fasteners, you need to purchase the right tool. A standard carpentry kit will do.
Forms and types of homemade bread bins
Bread can be stored in bread bins having the shape:
- open deep dish;
- containers with doors;
- boxes with lids.
Breadbaskets can be made from the most unexpected materials. Home craftsmen manage to build these kitchen utensils from:

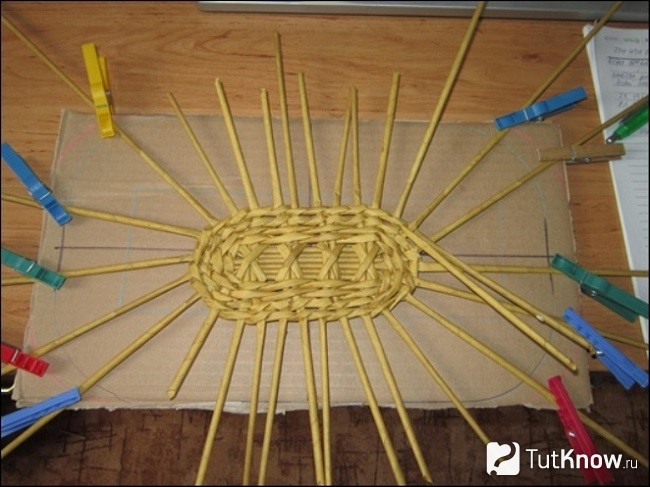
The most common bread bins in everyday life are made of wood and wicker. There are wicker boxes in almost every home. They differ in shape and size, they are united by a functional purpose.
Some craftsmen create wicker kitchen utensils from plain paper. To do this, the sheets are folded into a tight tube and glued together. Then they are intertwined, creating unusual things. At the final stage of production, the surface of the product is covered with a layer of primer and paint. Paper tubes can be dyed in different colors at the very beginning of the manufacture of utensils.
With some woodworking skills, a bread storage container can be hollowed out from a single piece of wood. Clay cookware can be made by anyone, provided they have the ability to fire the finished piece in a professional oven.
Attention! Things made in the Russian style came into fashion. Birch bark can become a decoration of the kitchen. A stylish and beautiful bread tray is woven quite simply. It is difficult to find and properly prepare birch bark. It must be sufficiently soft at the time of manufacture of the container.
Measurements and drawings
A sketch of the future product is preliminarily made. It must take into account the specifics of the selected material. The drawing is created based on the drawing and the original dimensions.
For such a product, you need to take into account the average amount of bread consumed by the family. In other words, the size of the bread box depends on the amount of bakery products that will be stored in it.
The container must have a depth, height and length. All these parameters should take into account the dimensions of standard bread rolls. In this case, baking should fit freely in the box.
A factory-made bread box with curtain doors can easily fit 3-4 loaves inside.
Drawings for a wooden product can be drawn immediately on plywood or previously on a sheet of paper. It looks something like this: 
Breadbox on your own: step by step instructions
To make a product according to the given drawing, you need to prepare the following tools and materials:
- small wooden or plywood boards;
- sushi mat;
- jigsaw;
- sandpaper;
- small nails;
- furniture stapler;
- glue for gluing PVA wood;
- door handle.
Work is carried out in the following sequence:
- first of all, a drawing of details is drawn on the surface of the plywood piece;
- all walls and covers are cut with a jigsaw;
- the sides of each plank are carefully sanded;
- the structure is assembled according to the drawing.
In the drawing, the numbers indicate the structural details of the future product:
- two rectangles with units are the bottom of the bread box;
- the third rectangle with the number 1 is the back panel;
- fourth one - top;
- deuces are sidewalls;
- number 3 - front panel.
It is better to round off the upper corners on the side walls, so it will be easier to fix the mat.
The mat in this design works as a door. It is attached with a furniture stapler. The product is ready, it remains to put any suitable rug on the bottom of the bread box. It can be made from food grade plastic or fabric. 
Bread box - a vase can be made of paper and a plastic bottle. In this case, a five-liter container is used as a form. Work goes in the following sequence:
- The plastic bottle is cut lengthwise from the neck down. The result should be two equal parts.
- Paper (newspaper) is torn into small pieces.
- The plastic form is coated with vaseline.
- Pieces of paper are glued one after another onto the surface of the mold.
- Each paper layer is abundantly smeared with PVA glue, there should be 5-6 layers in total.
- The glued form is set aside for several days until completely dry.
- After the glue has completely dried and the papier-mâché has become hard, it can be removed from the base.
- A stand is made in the same way, only a deep plate is taken as the initial form.
The resulting parts of the product are covered with paint. You can decorate the breadbasket in any way possible:
- paint;
- paste over with beads;
- make a mosaic of colored pea halves.
For those who sew and knit, it will be easiest to make a beautiful baking container from patches and threads.
It is easy to make a birch bark braid if you follow the following rules for preparing material:

The type of weaving is chosen according to your own taste. It can be a standard weave of stripes with a rug. This is the easiest way for beginners. It is best to make the details of the product individually, and then connect the entire structure together.
Whatever materials the kitchen utensils are made of, the main thing is that they are made neatly and tastefully. In this case, the time and effort spent will give the desired result.
Learn how to make bread bins from wood, birch bark and the most unexpected materials such as plastic bottles, cardboard, paper.
Do-it-yourself bread box from a plastic bottle: a master class

The video of the master class:
To make this bread tray, you will need:
- five-liter canister;
- scissors;
- five-ruble coin;
- napkins;
- PVA glue;
- water;
- halves of dry peas;
- acrylic paint in brown, lilac and gold;
- acrylic lacquer;
- brushes;
- marker.

Do not throw away the bottom of the bottle, cut it in half.

You will need two semicircular rings from it, which must be glued on both sides to the main part. Positioning the tape across, attach them to the 1st and 2nd half of the bottle, which will soon turn into a bread box.

Cut the newspapers into strips, dilute the PVA glue with water about twice. Dipping strips of newspaper here, glue them over the plastic blank from the outside and from the inside in two layers.

Now generously grease this paper surface on both sides with PVA glue using a brush. Take the top of the bottle, cut off the neck from it, it is not needed. Paste the workpiece also with newspapers.

Wait until these parts are completely dry. Then glue the small rounded one onto the large one with a hot gun.

Draw wavy lines along the edge of the bread box and the rounded leg part that will become the stand.
It is convenient to draw an openwork edge with a coin, applying it next to the previous outline, and also outline it with a marker.
Cut along these markings with scissors. Again, dilute the PVA glue with water in a ratio of one to one, coat the workpiece with this mixture, glue thin napkins here in one or two layers.
Take thick patterned napkins, separate this upper colored part, you only need the lower white one. Twist each thin tube on the table, moistening with water. With these elements you will need to make an edging, glue them along the wavy edge of the bread box.

Now glue the halves of dry peas along the edges, placing them with the convex side out.
Here is how the bread box is further transformed.

With your own hands, you will need to draw patterns on it, then glue various curls here from napkins pre-rolled into a tube.

To do this, apply glue with a thin brush, then attach paper elements here. When they dry well, paint the bread box with black acrylic paint.

Then apply lilac paint to the coils and other decorative elements, and then go golden.

It remains to cover the product with acrylic varnish, wait for it to dry completely. Now you can lay a napkin inside, lay out the bread and serve it to the table.
Do-it-yourself bread box made of fabric and cardboard
Surprisingly, these materials will also help you make a bread basket. In such a container, it will look good, this device will help set the table in an unusual way.

To sew it, take:
- two square pieces of cotton fabric with sides of 28 cm;
- a square sheet of cardboard with sides of 27 cm;
- ruler;
- scotch;
- pins;
- ironing board;
- iron;
- scissors;
- braid.
Insert a sheet of cardboard here, stitch the unsewn side. To make the edges of the bread box the same, make the same line along the entire edge of the rectangle.
Stepping back from the edges of 7 cm, draw a square inside with chalk, which also needs to be stitched. Connect the corners, chop them off with a pin, sew here on a typewriter.

If you want to sew a round bread box made of fabric and cardboard, then with your own hands you need to draw a circle on thick paper, this will be the diameter of your product along with the sides.

It is necessary to cut out 2 canvases, put a circle of cardboard between them, sew the edges using a braid. You will sew it on the edges perpendicular to this surface. A total of 12 ribbons are needed, two for each fragment. Then you tie them up, make a bread box with sides.

Instead of fabric, you can use a blank that you will knit yourself. This is very easy to do. The result should be like this square, but without corners. Two identical parts are required.

Put it on cardboard, cut it out according to this template. Fold the product so that the two cut-out parts are on top and bottom, and the cardboard is inside. But first, the sides of the cardboard must be bent to give the product a shape.
Sew it around the corners and you'll have a bread basket like this.

If you want to close the device so that the bread does not get stale, then adopt the following type of needlework.
Weaving a bread box from newspapers, paper: a master class

This is how beautiful the breadbaskets from the tubes turn out. To do this, take:
- newspaper and magazines;
- thin stick;
- clothespins;
- tray with sides.
If it is a decorative bread box, you can use newspapers, but for a real one it is better to take thick paper that does not contain dyes.
Need first. Let's start weaving a lid out of them first. Take 6, arrange them next to each other.
Place two more on top of them, secure those with a third.

Using the same technology, attach two more tubes, placing them next to the newly fixed ones.

Take a couple more of these elements, place them next to the ones you just made. Also fix the data with the third tube, arranging it with a cross.

Continue to weave further, but in a circle with a string of two tubes.

See what should happen at this stage.
As you can see, this blank must be attached with clothespins to a rectangular base. Then, use a tray for this. To give the breadbaskets from the tubes an oval shape, then weave only on the elongated sides.

After that, braid again in a circle, then braid the sides of a deep tray or other container of a similar shape.

In the same way, not only the lid is created, but also the base of the bread box with your own hands with lower sides. Perform a handle on the lid so that you can remove and put on this item.

This is how weaving from newspapers or paper is carried out. If you have the opportunity to work with wood, then look at another option for making this useful item.
DIY bread box made of wood
For this kind of work, you will use:
- boards;
- bamboo mat;
- wood glue;
- small cloves;
- wine cork;
- furniture handle;
- plastic food mat;
- furniture stapler.
- under the number 1 there are four parts - 2 will go for the bottom, one is the top, another one for the back panel;
- under number 2 there are two sidewalls;
- number 3 is the front panel.

Everything is extremely simple. You need to cut out these details, knock them down with small nails. After that, the corners at the top are sawn off.

Cut a wine cork into 7 pieces, glue them to the bottom surface of the bread box. They will become the legs of this item.

Attach a furniture handle to the bottom of the mat, attach it to the front panel of the bread box using a furniture stapler.

Use a plastic cutting board as a pallet, you can saw off the excess. To make the sides, make small cuts in the corners, lift the edges of the pallet up.

This is how a wonderful bread box will turn out, made with wood and a mat.

Birch bark bread box: master class

Before you do it, read the rules for preparing this material.

- In order not to destroy the tree, it is necessary to harvest birch bark in permitted places where trees are to be cut down.
- Collect the bark during the period of sap flow, then it is most pliable.
- The birch bark is dried naturally, without the use of fans and radiators.
- After that, various irregularities are cut off so that it becomes as smooth as possible on both sides.
- Boil water, put birch bark here, boil for half an hour.
- The last stage is the drying of the material, after which you can proceed to creativity.
You can use two options for weaving. For the first, you need to put an even number of stripes horizontally. Starting from the left edge, weave them through one. The second strip is also attached vertically, but in a checkerboard pattern with respect to the first. The third tape repeats the amplitude of the first.
For the second method, you need to bend the edges of the previous tape to the next.
To secure the edge of a straight weave, add a wire made of stainless metal when creating this fragment of a birch bark bread box.
See how to attach an additional ribbon during the weaving process.

To create a bread box from birch bark, take 24 strips cut from this material. Half of them will be needed for the vertical, half for the horizontal.

When you complete the body, you need to draw the corners between the 5th and 6th tape, using the same method indicated above.
Then you need to make a bread box cover, the height of which is 1.5–2 diagonals from the strips. Edge with teeth.

In such a bread box made of birch bark, the bread will remain fresh for a long time, it will not become moldy, since this natural material has bactericidal properties.
You already know how a bread box is made of wood. But not everyone has such boards and tools for cutting them out. Check out another master class that will solve this problem.
Do-it-yourself bread box from available materials

To do this, take:
- thick cardboard;
- bamboo napkin;
- scissors;
- self-adhesive tape;
- the cloth;
- lace;
- glue;
- ruler;
- pencil;
- Furniture handle.

Calculate the size of the details of the bread box, based on the size of the napkin. In this case, the napkin is 30 cm wide, so the width of the bread box will be 28 cm. Based on these dimensions, cut out from cardboard:
- front wall 28 by 3.5 cm;
- bottom size 20 by 28 cm;
- two sidewalls measuring 20 by 17 cm;
- back wall measuring 28 by 17 cm.

Now you need to paste over this blank with a self-adhesive film. Choose the color so that it harmonizes with the color of the kitchen. If you like wooden products, then you can also take a rattan film.

Stick it not only on the inside, but also on the outside. Take a napkin, cut off a strip from it, with which you will decorate the front panel of the bread box. Glue this detail, decorate the top edge with lace, attaching it in the same way.
We continue to work with the large remaining part of the napkin. Sometimes on such things the reverse side is decorated with a cloth, if you don’t have this, then glue the fabric on the back of the napkin.

On the front side, glue the lace on the sides and bottom.

Glue a part of this napkin to the back wall so that it goes down and covers the front of the bread box. Now you understand why the napkin should be a couple of centimeters wider than the bread box.

To make it more convenient to fold back the napkin to get or put the bread, glue a small wooden handle to the bottom.

Here is such a wonderful device for storing bread. You will spend a minimum of money on it, and if you decide to buy a bread box in a store, it will cost you much more.
Do-it-yourself step-by-step decoupage of a bread box
You can not only make a bread box from scratch, but also decorate an existing one. If it is monophonic, and you want a holiday, cover it with flowers in the Provence style. Thus, you can update the old breadbasket.

For creative work, you will take:
- acrylic primer;
- napkins of the desired pattern;
- brush;
- water;
- PVA glue;
- scissors;
- acrylic lacquer;
- acrylic paint of the desired tones;
- sandpaper.

Acrylic primer will make the wooden thing more durable. Acrylic paint is better on such a surface.
When the primer dries, cover the bread box with paint of the desired tone. In this case, white was used. The side stripes are covered with blue.

Cut the napkin into the desired fragments, separate the top. It will be needed for further decoration.

If you have a special blending glue, use it, if not, then take PVA, slightly diluting it with water. Using this solution, glue the napkins to the surface of the bread box, let it dry.
If you want to bring the effect of antiquity, then in some places rub the surface of the bread box with sandpaper.

Apply three coats of varnish, allowing each to dry. In this way, with the help of decoupage, you can decorate a bread box.
If you want to see how the decoupage of a bread box is done, then you have such an opportunity.
The second plot will reveal the intricacies of how a bread box is made from tubes.
Since ancient times, it was customary to store bread in wooden boxes, which the people began to call bread boxes. Thanks to this device, the pastries remained fresh and did not get stale for a long time. Modern bread boxes perform the same function as their predecessors, but now they are more functional and easier to use.
Now in any hardware store you can buy this device. And here, a do-it-yourself wooden bread box will become a real decoration of the interior of any kitchen and retain the warmth of the master's hands. Where to start and what material do you need?
You need to prepare in advance before starting the manufacturing process. Stock up on all the necessary tools and materials, prepare drawings of the future product in accordance with the dimensions, as well as the way the door functions. It is even possible to make an approximate layout if such work is carried out for the first time. The last thing is the design.
First you need to choose the material from which the case will be made. Do-it-yourself bread box can be made from:
- Plywood
- tree
- bamboo
- birch bark

Any of these materials is remarkably breathable and regulates moisture inside the bread box - they are often combined in one product. Thanks to these properties of wood, bread retains its taste and smell for a long time. For fastenings and connections, small screws, carpentry glue are used. Depending on how the door will open, small canopies and a handle may be needed. Breadbaskets are made into several types, depending on how the door is designed:
- Simple
- carved
- Blinds

A standard carpenter's kit will do the job. The surface finish of the product can be a wound - it is determined by the design, and, accordingly, the finishing materials for the coating.
Making a wooden bread box with your own hands is quite simple. It is worth considering that the ideal option for this would be linden, ash and birch. Pine and spruce have a too strong smell that bread will absorb. The manufacturing process itself can be divided into the following stages:
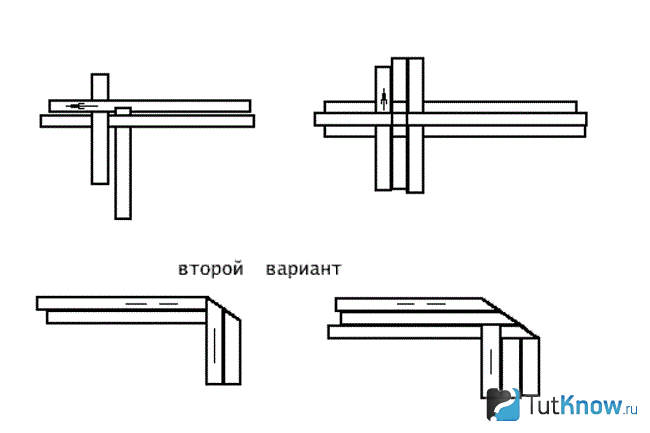
- According to the drawing, all elements are cut out of wood, which should be tightly joined together. Dimensions can be arbitrary. An example of parameters is shown in the figure.
- Parts can be connected with screws, furniture studs or carpentry glue. More skilled craftsmen use a spike connection. Spikes are formed on some parts, and recesses on others.
- The seams at the joints are coated with glue for a better connection. In this case, all connections must be carefully processed. This is done with sandpaper.
- At the end, a door is made. A modern wooden bread box is usually equipped with a shutter door, which is made of thin planks.
- In order for the shutter door to move, you need to make a groove inside the body of the product, along which this element will move.

You can make a version of the door of a simpler sample. In this case, the curtain will lean outward. It is also made from thin strips. Often the slats are replaced with a bamboo rug, which is stitched with a strong thread.
In any case, such bread bins will be quite roomy and functional. Thanks to the material, the product is completely environmentally friendly and will suit any style of interior. The surface can be varnished on wood, after painting with a pattern. Those who are engaged in carpentry can decorate the body with wood carvings.
Plywood as an analogue of wood
A cheaper analogue of wood is plywood. A do-it-yourself plywood bread box is made according to the same principle as a wooden one. The main thing is to draw a sketch of the future product and cut out all the constituent elements with high quality. Plywood is difficult to work with, as the edges can peel, so you need to be very careful. To work, you will need the following tools:
- Jigsaw for sawing
- The drill will form holes for connecting parts
- The grinder is designed for processing saw cuts

The last step is assembly. The figure shows the simplest example of this procedure.

Housing elements can be connected using glue, self-tapping screws and grooves. Hinges for fixing the door are installed outside. At the end, general grinding is performed, and then the surface is decorated. The housing must have holes for ventilation.
Bamboo bread bins
Bamboo material is not only a decoration for finishing the body of the finished product. Often, craftsmen make small bread bins from bamboo napkins. Such a product will be made for several hours, not days - this is the main plus.
For work you need:
- bamboo napkin
- Cardboard
- self-adhesive
- Scissors
- Textile
- Marking pencil
- Decorative wooden handle

The dimensions of the future product are determined by the parameters of the napkin. The body is made of cardboard. The side walls on one side should be rounded. This is done so that the door closes smoothly and fits snugly against the structure.
Parts are glued together with glue. From above, from the inside, the made body is glued with self-adhesive. Thanks to this technique, the cardboard will become much stronger. The last step will be finishing with bamboo. Cut the napkin into two pieces. The first size corresponds to the bottom, and the second will be the door. Your finishing option will make the product unique.
Birch bark

Many craftsmen are interested in: how to make a bread box from birch bark? This material is very soft and pliable for weaving. It is difficult to buy this material, but you can make it yourself by cutting off the top layer of birch bark.

Since the body of the product is formed due to weaving, the bread box in its appearance resembles a box with a lid. Over time, the birch bark material hardens.
Weaving methods:
- Rug
- Angular

At the same time, you need to monitor the formation of the edges of the panels - they should be even and tightly woven. To do this, they use a few basic tricks, adding stripes for rounding.

The fabric for the lid and bottom is woven of the same size, and also applies to the side sections. The connection is a birch bark tape, which is woven into the gaps of the panels. A do-it-yourself birch bark bread box will make the interior of the kitchen more unique and authentic.

More often than not, the stick is stored either in the refrigerator or in a plastic bag. But the best place to store bread is a wooden bread box that breathes and maintains a constant level of humidity. For this reason, the bread in it can not grow moldy or stale for a long time. Such a wooden bread box) (well) of course under the arm is easy to make with your own hands.
How to make a wooden bread box with your own hands?
In the interests of making a bread box, you will need a riveting having a thickness of about 10 mm. For the breadbasket, swindle, ash, oak and birch are the most suitable. You should not make a bread box from pine, so (that is) in this case, the bread will be saturated with the smell of resin. Excluding this, you will need wooden slats for the manufacture of a flexible cover, fasteners and a hand.
From the board you need to cut the bottom, the top bar and two sidewalls. Inside, take both sidewalls, you need to choose a semicircular slot so that a flexible cover can be wound around it. Better goodbye to make grooves with a milling cutter. To do this, you can use a finger cutter installed with a drill.
The lid is made of thin wooden slats, which you can either stick on a fabric base or insert a cord inside.

If you don’t have a big surname, then you can make a two-tiered bread box according to the same principle.