Do-it-yourself garden furniture for summer cottages - photos of successful homemade products. DIY wooden furniture at home Do-it-yourself furniture at home
Unusual wooden bed for a rustic bedroom
At first glance, making a piece of furniture yourself is very simple. Only when a person begins to do this, it turns out that it is not so simple. It is necessary to find a working material that is suitable in texture and color, process it correctly, manufacture and correctly assemble all the elements.

Unusual interior design in a wooden forester's house
By assembling furniture with his own hands, a person wants to give his home more individuality and unusualness. But there are other benefits as well.

Wood furniture for a country-style kitchen
- Environmental friendliness. Wooden elements fit perfectly into a children's room or bedroom, in all rooms where materials should be as safe as possible, natural, free of harmful substances. Inside the array can only be resins and essential oils. But they affect the human body more positively than negatively.
- Sustainability. Any wooden furniture serves at least 45-50 years. It is resistant to mechanical stress.
- Ease of repair. Despite the complexity of manufacturing, the repair of furniture elements is quite simple, requiring a minimum amount of effort, skill and tools.
- Ergonomics.
- The maximum degree of comfort. When creating wooden furniture with your own hands, you can immediately take into account all the features of the physique of the future owner.
- "Flight of fantasy". Any, even the most daring design idea, will look great on a wooden background. Hand finishing will give the furniture even more chic.
- Price. Furniture made from solid wood in industrial production is quite expensive. If you make it yourself, then the price decreases significantly.

A beautiful decoration of your interior - a solid beech armchair
In addition to all the above advantages of furniture elements, one more thing should be noted - accessibility. It is not necessary to buy them in luxurious, designer salons. It is enough to study the basic principles of its production and get down to business, working with your own hands, you can create a completely unique piece of furniture.

Large garden swing made of wood for a summer residence with your own hands
The main styles that have wooden furniture in their arsenal

Wooden kitchen furniture for a dining room or a cozy cafe
Many talented designers work with solid wood furniture. It is a mistake to assume that it can decorate only rooms decorated in a classic style. There are areas in which you can successfully fit wooden furniture:
- Country. Its distinguishing features are angularity, roughness in lines, and the absence of artificial surface treatments. Wood is an ideal working material for furniture that decorates a country-style room. These can be cottages, private houses, inside which you can easily create an atmosphere of primitiveness.

Spacious and bright rustic living room in country style
- Eco style. For admirers of this trend, it is not fashion trends that are important, but naturalness and naturalness. They are close to the country style, the only difference is the shades, in the first version bright and dark tones can be used, in the second, light, natural ones are preferred. Eco-style rooms suggest the presence of a large number of modern appliances, while wooden furniture will make the interior softer and more sophisticated.

Wooden table with carved legs for interior decoration in eco-style
- Provence. This direction is well known in the world of women's interior design. Its distinguishing features: a large number of flowers, silver, cute dishes. This is a "warm, cozy" style. You don’t want to leave such a kitchen and living room, so a wicker chair or a wooden table will fit perfectly into it. But the main thing here is not to overdo it, massive elements will attract too much attention and be perceived separately from all other thematic elements.

Interior in a romantic Provence style with wooden furniture
In other styles, you can also see wooden furniture, but in smaller quantities. For example, in the directions of minimalism and modernity, additional wooden accessories are very relevant: lamps, watches, figurines, vases.

Wooden interior design in the style of minimalism
General principles for creating wooden furniture

Beautiful and functional wooden kitchen
Before you start working with your own hands, you need to develop a project, on the Internet you can find a photo of the desired element.

Ready-made wooden facades for kitchen furniture
The next step is the selection of wood. It must be 100% tested and of high quality. This is what determines the lifespan of the item. It must be remembered that the working material is divided into soft and hard. The faster a tree grows, the softer its wood is considered.

Do-it-yourself wooden outdoor furniture
Oak is considered the most valuable and expensive. It is valued because of the ability to successfully dye in any color.

A set of furniture for a dining room in a house or cottage, made of wood with your own hands
Mahogany is considered just as valuable. Its advantages are high strength, moisture resistance. It is from this wood that the most chic and luxurious wooden furniture is obtained.

Do-it-yourself mahogany outdoor furniture for the playground
Pine, spruce, cedar, maple, cherry, walnut are considered less expensive and affordable for the middle class of the population.

Beautiful massive and durable wooden dining table
After choosing wood, you need to purchase shields. It is better if they are monolithic.
Main stages of work
- Development of a drawing of a future product.

We develop a drawing of a garden chair made of wood for a summer residence
- Preparing a tree for sawing, drawing markings on it, sawing.

Marking and preparation for cutting

The process of drilling holes in the manufacture of furniture with your own hands
- Product coloring.

The process of painting a finished wood product
- Assembly of elements.

Assembling handmade wooden furniture
Necessary tool for work
- Screwdriver.
- Jigsaw.
- Plane.
- Furniture stapler.
- A hammer.
- Screwdriver.
- Furniture knife.
- Paint, varnish, brush.
- Necessary accessories.

Furniture making tool
In addition to all of the above, you will need hardware, additional consumables. If the master is experienced, he can use more complex working tools.
Finishing the finished product

Processing of the finished product by the method of chemical aging of furniture
When the manufacture and assembly of a furniture product is completed, it is necessary to give it a finished look. You can simply paint the element, apply decorative decorations on it with your own hands.
Basic processing options
- Toning.
- Painting.
- Lacquering.
- Resin removal.
To make high-quality tinting of furniture means to give it the most natural and beautiful shade. They can be very diverse, but naturalness will always be viewed first.
Varnishing a furniture element is the creation of a glossy sheen. Additionally, this layer protects it, increases wear resistance.

Do-it-yourself wood finishing with varnish
In the process of processing furniture elements, it is necessary to remove resin residues from all working surfaces. This is done with alcohol, gasoline, acetone.
The simplest and most popular method of finishing wooden furniture with your own hands is to cover it with a standard varnish. It does not require large expenditures and complex finishing tools. The undoubted advantage is the preservation of the original appearance and texture of the working material.
If the tree belongs to hardwoods, then it can be covered with colored paint. With this method, inexpensive wood can be painted to look like an expensive variety.
Painting methods
- Solid.
- Toning.
- Applying a layer of coloring element under the varnish.
It is necessary to apply paint very carefully and carefully, observing certain stages of work.
- Cleaning of all irregularities, knots.
- Resin removal.
- Removal of cracks and chips.
- Primer.
- Coloring.
After the paint dries, a decorative pattern can be applied to it. This can be done with a brush, airbrush.
In most cases, there should be several layers of paint and varnish. After each of them dries, it is necessary to grind, sandpaper is used for this.
Particular attention should be paid to carved elements, they are more difficult to process.
Wooden furniture is "able" to fit into any interior, the main thing is to do it correctly. Individuals with a well-developed sense of style and imagination can create a whole small world in their home, unlike others, unique, with its own atmosphere and mood.

An excellent option for using wooden furniture in the interior of the kitchen-dining room
Video: how to make a wooden dining table with your own hands in a garage workshop
Assembling furniture yourself at home is a laborious task, but at the same time it is an excellent tool for saving the family budget, as well as an opportunity to demonstrate an original design approach and aesthetic flair. Making cabinet furniture with your own hands is not very common, but it brings significant benefits and moral satisfaction. The created product can be very stylish and favorably emphasize the overall interior design.
Select fasteners after you decide on the base material.
In order to cope with this not very simple, but exciting task yourself, you must have at least initial skills in working with the tool and be attentive and accurate. To create cabinet furniture, you can pick up inexpensive parts or use the materials available in the house.

The created product can be very stylish and favorably emphasize the overall interior design.
To assemble a cabinet or chest of drawers, you must first calculate the parameters of the future product. To make cabinet furniture with your own hands, the first step is to make a drawing with the dimensions of all the details.

Before making furniture, prepare a drawing of the future product.
You also need to determine what material you will use in the assembly. Depending on this, fasteners, tools and auxiliary arsenal (sandpaper, etc.) are selected.

You also need to determine what material you will use when assembling.
Wood as a material can be "capricious", it is important to choose quality boards with a good, even texture, dried and processed. Birch, poplar, maple, aspen and other hardwoods are suitable. Conifers need special conditions, so pine or spruce should be selected in combination with some other variety. Try not to pick up layered rocks so that the base does not split during processing.

In the manufacture of cabinet furniture, pay attention to the fact that laminated chipboard may crumble during insertion of fasteners.
Do-it-yourself cabinet furniture can be made of chipboard, MDF or chipboard (the latter option is the most common). These materials are processed in different ways.

The material requires accuracy and precision in outlines and actions.
All details of the future cabinet must be carefully checked against the drawings and carefully adjusted to the intended dimensions.

Wood as a material can be "capricious", it is important to choose quality boards with a good, even texture, dried and processed.
To make an adjustment (cutting) you will be helped in a specialized store. This can also be done with a ruler, pencil and wood saw at home.

If desired, you can improve the appearance of the original inserts.
Chipboard panels must be coated with a protective compound - this will reduce the risk of evaporation of resinous substances. Other materials do not require this approach.

Do-it-yourself cabinet furniture can be made of chipboard, MDF or chipboard (the latter option is the most common).
How to work with laminated chipboard - the main material of cabinet furniture?
Material such as laminated chipboard is quite actively used in the manufacture of furniture. Chipboard has a number of undeniable advantages over chipboard:
- better holds fasteners;
- inhibits the evaporation of formaldehyde;
- looks aesthetically pleasing;
- You can choose an interesting texture and color.

Do-it-yourself cabinet furniture implies the ability to process the material, for example, to clean and close the cuts with an edge to match the overall surface (this must be done to avoid evaporation of the chipboard adhesive. It must also be remembered that when cutting to size, chips and cracks in the laminated part are possible. For assembly cabinet furniture made of laminated chipboard will require caution, care and accuracy.

Material such as laminated chipboard is quite actively used in the manufacture of furniture.

The panels must be coated before assembly, not after, to avoid smudges.
In a nursery, chipboard furniture is not always appropriate, especially if the room is small, poorly ventilated or located on the sunny side, and the base itself is not of very high quality. Resins and chemical compounds can quickly evaporate and create an unfavorable atmosphere. This also applies to chipboard. It is better to prefer solid wood and plywood.

Do-it-yourself cabinet furniture implies the ability to process material.
What tools are needed?
Tools that are in the house are suitable for assembling cabinet furniture:
- screwdrivers;
- screwdrivers;
- Sander;
- jigsaw;
- wood saw;
- ruler;
- simple pencil.

Sandpaper is suitable as a material for cleaning surfaces. In order to measure the elements correctly, it is necessary to do this not on the floor, but on a table, preferably a carpentry one or something like it. Can be used as supports when cutting off extra centimeters of stools from the board.

To assemble a cabinet or chest of drawers, you must first calculate the parameters of the future product.
Preparation before assembly
The selected material - chipboard, chipboard or solid wood panels - must be properly processed. The preparation of cabinet or chest of drawer parts consists in leveling the surfaces, if it is not a laminated base, as well as in cleaning them from roughness and burrs. The cut edges of the laminated chipboard can simply be sanded and covered with a matching laminated edge.

A practical addition is the spotlight.
Any material that you are going to use must be of high quality and well dried so that after manufacturing the product does not create dangerous chemical fumes in the room.
Before assembling cabinet furniture, you need to carefully measure the dimensions of the area where the structure will be installed. For a cabinet with doors, you need to leave some free space so that the doors can open without the possibility of rubbing against the walls.

In work, you can use a power tool, which simplifies the attachment of one or another part to the body.
Repeated parts of the future product must be symmetrical to each other, otherwise skew is likely.
Select fasteners after you decide on the base material. Try to get reliable connecting parts. They should be bought with a margin so that in case of failure it can be easily restored.

Sandpaper is suitable as a material for cleaning surfaces.
Basic assembly steps
Before making furniture, prepare a drawing of the future product. It is necessary to once again check the dimensions of the cabinet schematically indicated on paper with the proportions of the prepared parts.
- Mark the extra centimeters of chipboard panels with a simple pencil, saw off along the lines with a hacksaw for wood, clean the edges and close them with an edge.
- Attach the side, bottom and top panels to the back panel using a screwdriver and self-tapping screws.
- Before hanging the doors, mark the places for the hinges. If the sashes are heavy, increase the number of fasteners, otherwise, over time, the panels may warp under their own weight. The distance from the edge to the lower and upper loops should not be less than 12-13 cm.
- Fasten the hinges and check the operation of the doors. They should fit snugly, without gaps and displacements. Don't forget to embed the mini-lock.
- For a cabinet with sliding doors, you should choose a roller mechanism that will be located at the top and bottom of the panels. Most often, aluminum elements are used for this.
- If legs are supposed, then they need to be done before hanging the doors. After the assembly of cabinet furniture with your own hands is completed, check the stability of the structure, how level the cabinet is and whether it “sinks” in one direction or another.
- Using self-tapping screws and planks, make supports for the shelves. The latter are adjusted in size after assembling the cabinet body. For glass shelves, special holders are sold that will not damage the base.
- It is better to equip the boxes (if intended) with guides, then they will slide out easily and freely, without the possibility of warping and getting stuck.

The selected material - chipboard, chipboard or solid wood panels - must be properly processed
In the manufacture of cabinet furniture, pay attention to the fact that laminated chipboard may crumble during insertion of fasteners. The material requires accuracy and precision in outlines and actions.

Drying time is required after each layer is applied.
furniture fittings
The choice of fittings for cabinet furniture is a moment no less important than the assembly itself.
| Cabinet hinges | Poorly selected loops can nullify the results of your efforts. |
| Hinge mechanism with four hinges | Today, this item is being used more and more. Adjustment is carried out both at the stage of fastening, and after completion of the installation work. |
| Drawer guides | You can take roller or ball. |
| Handles for drawer lids and cabinet doors | They need to be matched to each other. They may differ in style - it is important to adhere to a single design for the facade or for internal content. For children's wardrobes or chests of drawers, it is recommended to choose a streamlined handle so that the child does not get hurt during movement or play. |

Any material that you are going to use must be of high quality and well dried.
Furniture finishing
If desired, you can improve the appearance of the original inserts. It can be mirror panels, dividers, various patterns or stencils, an ornament. A practical addition is the spotlight. In addition, it looks quite stylish, especially if there are glass or frosted inserts.

When installing furniture, make sure that direct sunlight does not fall on it.
When using natural wood, it is recommended to cover it with a varnish composition. Finding the right shade is not difficult. For fixing, the coating should be applied two to three times, then the surface will look smooth and even. Drying time is required after each layer is applied. This will make the surface resistant to abrasion and fading. The panels must be coated before assembly, not after, to avoid smudges.

Repeated parts of the future product must be symmetrical to each other, otherwise skew is likely
The popular design with craquelure varnish makes the facade of the cabinet cabinet look original and expensive.

With the help of decoration, you can not only give style to a new piece of furniture, but also ennoble an old product.
Advice: when installing furniture, make sure that direct sunlight does not fall on it. This will avoid fading of surfaces and drying out of the wooden base.
To create cabinet furniture, you can pick up inexpensive parts or use the materials available in the house.
VIDEO: Manufacture of cabinet furniture. A couple of tricks.

Wooden furniture has always been in great demand among consumers. This is quite understandable. Wooden furniture has an attractive appearance, exclusive design and high environmental friendliness. Many owners of their own homes are interested in the question of how to make furniture with their own hands. A wooden structure can, of course, be ordered. But if you create objects yourself, you can bring to life the most original and daring ideas. Consider further how the manufacture of wooden furniture with your own hands is carried out.
General information
Making wooden furniture with your own hands may well turn into a creative hobby. The resulting masterpieces will be able to take their rightful place in the apartment or in the country. Created wooden furniture with your own hands can be a wonderful gift. Designing objects for yourself is considered more of a creative process than a technological operation.

Advantages of home production
Handmade wooden furniture is not only the pride of the owner of the home. From simple bars and boards, you can construct a lot of necessary things: from a stool to a bed or wardrobe. The most important thing is that self-made items will fit perfectly into the existing interior. It is also important that the manufactured furniture will be exclusive. After all, its own schemes will be used in its creation. Well, among other things, in the manufacturing process, you can practice carpentry.

Instrument preparation
There are various devices with which wooden furniture is assembled with your own hands. Here you can not do with one hammer and chisel. You will need a jigsaw, cutter, screwdriver, drill, planer. A high-quality and easy-to-use tool is needed not only in the process of preparing elements. Special devices are also needed for decorative trimming of legs, frontal parts, drilling for fittings. The end result of the work depends on how high-quality the tool used will be, namely, the external one. All devices can be divided into 2 groups: manual and electric. With their help, you can not only assemble, but also repair wooden furniture with your own hands. Let's consider them briefly.

electrical tools
Do-it-yourself wooden furniture is assembled using the following devices:
- Circular saw. This tool is used to create cross cuts and clean cuts. wood is cut, elements, figured blanks are processed and manufactured.
- Planer. This tool is needed for surface treatment.
- Electric hacksaw. With it, you can cut thick and large bars, as well as metal profiles. This tool is needed for rough processing of the material.
Hand tools

Work plan
First of all, you need to draw up sketches, according to which wooden furniture will be assembled with your own hands. The drawings must contain all the necessary dimensions of future structures. It is advisable to schematically draw the location of objects in the interior. If it is planned to assemble complex structures, sketches can be drawn up in several projections. After drawing up the scheme, you need to start preparing the material. Wooden furniture, made by hand, should look neat. Therefore, it is necessary to pre-process all the details, the areas of their connection. The joints and dimensions must be accurate and consistent with each other. Fixation of elements can be carried out with the help of a very important moment is the decorative processing of objects. Here you need to be extremely careful. Experts recommend that you first practice on samples, outlining the boundaries of the intended thread.

console table
For the manufacture of this item, plywood is needed, the thickness of which is 1 cm. It is advisable to glue the ends of the sheet immediately. You can iron narrow stripes with a flat, heavy object (an old iron, for example). Before starting work, plywood should be carefully sanded. Its surface should be smooth and even. The drill then needs to drill holes in the connection areas. Self-tapping screws will be screwed into them. The table will consist of 3 wide parts, made up in the shape of the letter "P". For greater stability, 2 narrow boards should be screwed to each element. For better docking, two to three centimeters should be retreated from the edges of the plywood. A thin narrow rail is glued on the sides. It will hide the joints. For fixing, PVA or simple is suitable. On the underside of the tabletop, pre-prepared metal corners should be fixed. They are fixed with screws. After lubricating the joints with glue, attach the countertop to the supports and pull both sides at a right angle. For greater convenience, rollers are screwed to the legs at the bottom. Drill a hole according to the shape of the wheel. The roller is fixed with bolts, which, as a rule, are present in the kit. Here you should try to fix the elements on the same level.

hanging rack
To make its design light, it is better to use plywood. Shelves are prepared according to the expected number. 4 holes are drilled in each element at a distance of 2-3 cm from the edges. After that, the shelves must be coated with water-repellent paint. Its color is selected in accordance with the scale of the interior. To fasten the shelves together, you will need two strong and long ropes. They are threaded through the holes, cross at the top. Under the bottom shelf, tightly tighten the knots. Next, you need to prepare small wooden sticks. They are needed to maintain the same distance and fix the shelves at the same level. Sticks are inserted between the threads of the rope. Hanging rack is ready. It can be hung on the wall and a variety of items can be stored on the shelves: flower pots, books, vases, photographs. The design will perfectly fit into almost any interior. This rack can be any size. But at the same time, the design does not take up much space.

do it yourself
Sometimes you need to refresh the items in the house, breathe new life into them. do it yourself according to a specific plan:

When arranging a living space, furniture plays an important role. It can decorate the interior you have created or spoil the entire appearance of the room. Therefore, her choice should be treated responsibly. If you are looking for original solutions, you may find that there is a wide variety of furniture of the same type made of MDF and similar material on the market.
If you look at wooden furniture, then its prices may seem exorbitant. Given this, many home craftsmen have solved this problem by making wooden furniture with their own hands. In this article we will talk about how and where you can use this furniture. The main question is how do-it-yourself wooden furniture is made.

What is the best thing to do
First you need to understand what is best to make furniture from wood, or rather, from what type of wood. Remember, quality wood doesn't have to be expensive. So, as a basis, you can take special wooden shields, which can be made from a single piece of wood or obtained by pressing.

Regardless of what material you will use, the process of manufacturing wood furniture requires a special approach. So, you need to choose the right base material. Wood is divided into two categories:
- Soft.
- Solid.

Soft is easier to work with, but it is short-lived and subject to mechanical stress, that is, after an impact, marks / dents may remain in it. As for solid, it is more difficult to work with it, but it has a much longer service life. If we talk about tree species, then among the hard ones we can distinguish:
- Acacia.
- Ash.
- Apple tree.

This material can be used in the manufacture of frame furniture. That is, the furniture that will be subjected to serious loads. As for soft rocks, this list includes:
- Fir.
- Pine.
- Juniper.

These types of wood are mainly used to make decorative parts that are not intended for high loads.
When choosing wood, you should also take into account the operating conditions of future wood furniture. So, there are rooms in which the level of humidity is significantly increased. As a result, you should choose the wood that is resistant to the negative effects of moisture, that is, moisture resistant. For example, the following types of wood can be used in a bath room:
- Linden.
- Cedar.

So, if you break it all down into categories, you might end up with something like this. Pine and other soft woods are often used to make furniture frames. All sorts of decorations are also made. Among the more reliable breeds, beech looms. However, it is unstable to moisture.

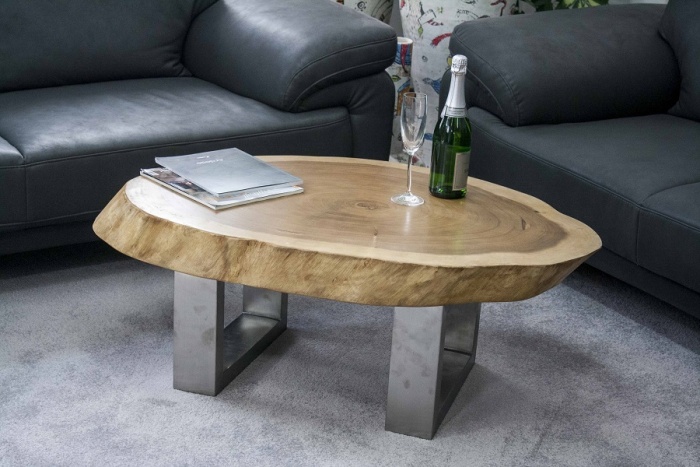
As for oak, its excellent characteristics, both in terms of hardness and appearance, are very popular in the manufacture of chests of drawers, beds, cabinets, etc. If you want to make a coffee table, then the best option for this is birch. From it you can make chairs, tables and other items.
Advice! It is not always possible to use an array in the manufacture of wooden furniture with your own hands. You can use improvised material, for example, pallets, bars, logs, etc.
Features of the production of furniture in the workshop
In order to understand all the difficulties of the upcoming work on the manufacture of wooden furniture with your own hands, we suggest that you familiarize yourself with the process of its production in a workshop. So, all raw materials must be stored in a special warehouse. There is also a workshop, which provides a room for assembly and painting. A drying chamber is a must. After that, the furniture is sent to the warehouse with finished products.

In the process of its manufacture, specialized equipment is used. A large number of processes are automated by means of installed machines. For example, the following equipment may be used:
- Grinding machine.
- Planer machine.
- Edge banding machines.
- Machine tools for linear planing and more.
However, at home, this may not be all. Therefore, we suggest that you consider the features of the process of how to make furniture with your own hands.
We make furniture with our own hands

Regardless of what kind of wood furniture you make, the entire technological process will consist of the following steps:
- Markup.
- Sawed all the blanks.
- Processing of workpieces.
- Drilling process mounting holes.
- Assembly of all parts in one design.
- Painting.
- Lacquering.
- Drying.

As for the connection method, there are two types in the production of wood furniture:
- Detachable connection.
- Permanent connection.
Now consider the important nuances of how wood furniture is made:
- Children's.
- For a gazebo.
- For giving.
For children's room

In this case, it is extremely important to build on certain requirements that apply to wood furniture for a children's room. First of all, the finished product must be environmentally friendly, safe and convenient to use. Also, such furniture should not fall out of the general interior.

Plus, some requirements apply to the treated surface. It should be free of any roughness. That is, everything that can lead to a child getting a splinter. As a result, everything must be treated with varnish or paint. As for the choice of coating, it is better to choose a natural-based varnish. Speaking for the shape, it is desirable to avoid sharp corners. This will reduce the chance of injury.
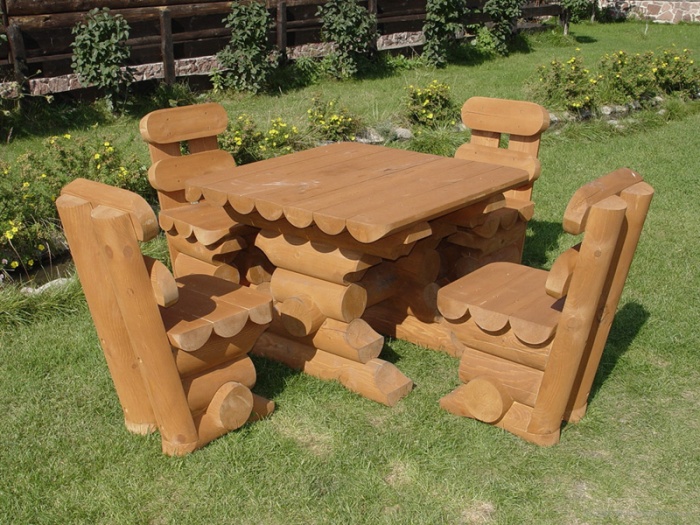
For gazebo

For a gazebo, do-it-yourself wooden furniture, drawings and diagrams can be found in this article. There are many original solutions for gazebos. And ready-made drawings of furniture will help you with this. So, for a table, you can use a wide board, which is assembled into one countertop design using a beam. The tabletop can be rounded. The surface is carefully sanded and varnished. Legs, crossbars and braces are connected using self-tapping screws.

So, in any case, when choosing wooden furniture for a gazebo, the following nuances should be considered:
- What will it be, portable or built-in.
- If the gazebo is open, then the wood must be moisture resistant.
- Determine the length and width of the bench so that it is comfortable to sit on.
- Based on the configuration of the gazebo, determine the shape and future furniture.

For giving

In this case, you can use a variety of materials, such as wicker. You can weave armchairs and other exquisite wood furniture. You can also use pallets. But for this they should be carefully processed, and at the end painted and varnished.
Important! If wooden furniture for summer cottages is made for the street, then think about how it can be taken indoors during the period of rains and severe frosts. This will significantly extend its lifespan.
Conclusion
So, we examined the possible options for how and from what it can be made from wood. Of course, in this matter you can connect fantasy. If it is not enough, then look at the photo in this article. We also offer viewing of the prepared video.
I have been designing cabinet furniture so that people can make it with their own hands for a long time, remotely for some time now. On the questions that I am asked every time, one conclusion can be drawn - in order to make furniture with your own hands, step-by-step instructions are a must. Offhand, what questions I usually hear:
- Do you only do the design or will we also discuss inside what shelves will be?
- Will you give us cut cards so that we can order detailing?
- And will the holes that are needed for assembly be marked on the cards? Who will make them?
- How do I find out what accessories I need to buy and what else I need, will you tell me everything?
- Will there be drawings for assembly, or just a general design that you will draw for us?
Questions, in general, are understandable and logical, if they sounded in the same sequence that I listed. This is usually not the case. Usually people are worried about how the most difficult stage will occur. And all other stages, no less important, are unconsciously "released" from attention. It shouldn't be. If you do not follow the step-by-step instructions, the process of making furniture with your own hands will turn into a chaotic and uncontrollable process. It's easy for me to give out the whole heap of documentation. But, as practice shows, an unprepared person will simply get confused in it, give up the very idea of somehow saving money and doing everything himself. But in fact, it was only necessary to stick to the sequence. As they say, "appetite comes with eating." So it is with furniture - it is enough to start consistently taking certain actions and many frightening things become understandable and elementary.
DIY furniture: step-by-step instructions briefly
The process of making furniture with your own hands can be conditionally divided into several stages:
- Drawing up a design project in full accordance with the size of the room, ergonomic requirements and the desired functionality.
- Development of internal filling of cabinets, cabinets, tables and other pieces of furniture. Search for the optimal reliable design for future furniture.
- Calculation of detailing of furniture, dimensions of facades, preparation of estimates for the purchase of fittings and components.
- Acquisition of materials, accessories, ordering the cut of details of future furniture with your own hands, facades.
- Drawing up specifications for drilling products. Maps are usually compiled only for drilling through holes for assembling cases. Internal fittings for drawer runners, lifters, hinges, etc. usually omitted to avoid confusion. Otherwise, the risk of drilling through the park where it was not planned will still remain.
- Assembly of furniture cases.
- Fasteners for internal filling (drawers, bottle holders, mesh baskets, trousers, awnings, hooks, etc.).
- Fastening and adjustment of the front part (installation of hinges, gas lifts, lifting, folding and sliding mechanisms, etc.), installation of furniture in place.
In furniture production, the “office” is involved in the first five stages, represented by the designer, furniture designer and supplier. The last three stages lie on the shoulders of the workshop - assemblers and fitters. Consider each step of the step-by-step instructions for making furniture with your own hands in more detail.
Design project development
At this stage, the appearance of the furniture is being worked out, all options for arranging the room in the room are considered, and the optimal one is selected. It is important to take into account not only the aesthetic criteria for assessing the external design of furniture. But also to make the furnishings comfortable to use. For this, there are requirements for ergonomics and functionality that must be met. Furniture should be exactly as much as is required to accommodate all personal belongings. No one needs a pile of "towns" of closets in the house. As well as furniture that cannot be used for storage.
Development of design and internal content

This stage of the step-by-step instructions for making cabinet furniture with your own hands is closely related to the first. Even at the stage of drawing up a design project, requirements for functionality and content are put forward.
For example, well, why do I need just a beautiful closet? After all, I want to hang clothes in it (it should be of the appropriate depth under the hangers) and store shoes in it (drawers or shelves are laid).
There are often compromises to be made in the design process. Someone, let's say, has always dreamed that in the kitchen the drying dish was located in a drawer. But the size of the room itself, the need to place a dishwasher, a washing machine, a stove, a refrigerator in the bottom row of kitchen tables do not initially allow allocating space for such a table with a drawer. This means that you will have to give up your dreams.
Also, it is not always possible to implement exactly the design design that you liked in some interior magazine or on a thematic site. When developing, the possibilities of materials are taken into account. Chipboard, as a material, is not able to take on bizarre bends, like solid wood or molded acrylic. Often, light, weightless structures with their own hands are simply impossible to implement. To be honest, some pictures from the Internet cause bewilderment among furniture makers. Like this one, for example.

Such retractable stools by weight can only withstand a cat. Unless, of course, inside the cabinet is a powerful steel structure (otherwise, the fasteners of the sliding mechanisms will simply be pulled out of the chipboard under weight).
Calculation of detailing, drawing up estimates and cut maps
Only after the approval of the design project and the internal filling of the furniture, they proceed to the calculations of detailing and the preparation of estimates for the order and the purchase of materials, components and accessories.
For chipboard, detailing is calculated. I am using a simple excel spreadsheet. In addition to numbering, the names of parts and overall dimensions, it indicates on which sides the ends will be seamed.

Detailing is then transferred to a special program for cutting. In general, cut cards are needed more for visual control. Many furniture companies that cut laminated chipboard use their software and transfer the details to their cut cards.

Facades are not always made from sheet material. Therefore, cut maps are not compiled for them, only overall dimensions are indicated. BUT! When using sheet material with a pattern, cut cards are a must. This is especially important for kitchens where cabinets are close to each other - the pattern on the facades should “flow” from one door to another in order to look holistically and neatly.
According to the list of accessories, everything necessary for assembly is purchased. Without drilling maps, it is impossible to calculate the number of hardware that will be required for assembly. Hardware is called small fasteners: confirmations, self-tapping screws, nails, screws, etc. But the rest of the fittings, in the form of guides, canopies, hinges, handles, etc. can be calculated and purchased in full.
Examining Drilling Specifications
After you have ordered a cut of parts, purchased accessories, you will have time to draw up and study drilling maps.

To compile assembly drawings and designate drilling (some furniture makers call drilling an additive), I use the Basis Furniture Maker program. Its only drawback is that it does not "mirror" the details. That is, on the sides of the cabinet, logically arranged mirrored in relation to each other, the fasteners will be designated in exactly the same way. But you will have to drill from different sides - after all, a countersink is required for confirming a specific expanding shape. This is the only nuance according to the drilling maps. It is required to keep in mind a three-dimensional drawing of a cabinet, any other furniture, in order to understand which side to turn the part to drill holes. Actually, it's easy. The edged sides of the parts also serve as a hint. After all, rolled ends can only be from the visible, front sides of the furniture. At the junctions, the parts are not trimmed for a tighter fit.

Case assembly
With pre-drilling, the furniture cases will be assembled as a constructor. There are several nuances - for example, "helicopter" fasteners, when in order to connect coaxial parts it is necessary to turn them perpendicular to each other. All such nuances will be discussed in the "Design moments" section.
Fasteners and adjustment of internal filling
When fastening internal fittings, you should rely on the information in the attached instructions. Manufacturers of components are well aware of the nuances of fastening and adjusting manufactured fittings. Nowhere will you get more complete and relevant information except in the instructions - they are supplied with all more or less complex furniture mechanisms. If suddenly the instruction seemed incomprehensible or written in a foreign language, there is only one option left - turn to Google. There are a lot of videos that will help you visually familiarize yourself with the process of installing a particular fastener.
Fastening and adjustment of facades
Only after installing the furniture body with your own hands in the place planned by the design project, the hanging and adjustment of the facades is carried out. If the floors are uneven, the doors sag noticeably forward, it makes sense to make substrates under the base. There is no point in fixing and adjusting the facade part not at the place where the furniture is placed - there are no guarantees that the floors will be just as even (or uneven) there.
Here, in general, are all the stages of a step-by-step instruction for making cabinet furniture with your own hands. I hope the information was useful to you.