Making garden benches. D garden bench model
The garden bench is one of the important elements of coziness and comfort of the estate. It can be used to relax with friends or dedicate a little time to reading alone. The main thing is that it should be comfortable and look harmonious against the background of the overall design of the site. To do this, you can think over and make your own bench for the garden.
Before moving on to the very arrangement of a cozy place on the site, it is necessary to choose the right location, think over the nuances and choose the design.
Bench placement rules
- At the very beginning, even before creating a bench drawing, you need to choose a place in the garden for its location. Not only the subsequent comfort, but also the selection of the necessary material depends on this factor.
- On a site where a lot of trees grow, it is conceptually better to put a wooden bench with a frame. For a small area, a small shop in an openwork design is more suitable.
- When placing a bench in a quiet place, surrounded by clubs with flowers, or near a body of water, a great place for secluded relaxation will be created.
- Also, benches are often installed on verandas, in gazebos or on picnic areas. In this case, for convenience, several identical benches are usually placed in a row or around the site. It is possible to combine a table and several benches. It is best suited for family tea parties and board games with friends.
- Most the best option installation of benches will be their placement in a place from which flower beds, a panorama or a reservoir can be seen. You should not install a bench in such a place that you can see the fence of the neighbors or the blank wall of the house from it.
- It is quite appropriate to place a bench on a playground for children, near the entrance to the house or near the summer pool.
- Another good place is not far from the beds or among the plantations in the garden. It is advisable to find a place under branchy trees in the shade. If there is none, then you can place a bench under a canopy.
- A bench made by hand, framed will look beautiful flowering bushes or flower beds, on a stone platform, on a small hill.
- The design of the manufactured product is best combined with the place in which it will stand.
Variety of materials
- For the construction of benches, you can use different materials:
- wood;
- metal;
- plastic;
- a rock.
- Most simple models in the manufacture can be called options from solid wood. From this malleable and, importantly, natural material, you can make many different benches in shape and style.
- Stone benches also look quite aesthetically pleasing, but are less functional than wooden ones. In winter, you don’t want to sit on such a bench at all, but there is always a desire to look at its beautiful design.
- Forged options are quite complex in the production part, but they look very impressive. Only a master blacksmith, a specialist in this field, can undertake the design of such shops.
- Plastic options are quite simple to make, the costs will be minimal, but such products will not last long.
- There is various options combination of benches and benches. They are usually made from wood and stone. Often they are decorated with textile pillows, warm blankets and capes.
- You can also design a bench from unusual materials. Among them, the most interesting options can be called:
- whole log;
- wheel rims in combination with uncut boards.
Design options for garden benches

The manufactured product can have both a completely classic and an unusual shape. The bench can repeat the silhouette of an animal, ship, car, as well as other objects and images, or simply be decorated with individual decorative elements. To prevent the bench from looking boring, it can be painted in different colors. Creating a pattern and a pattern is quite appropriate here, especially if children often visit a suburban area.
Structural design requirements
Please note that manufactured with my own hands benches must meet the following parameters.
Convenience
Since benches are designed for comfortable rest, it is therefore important to think over a design that will allow all family members to sit comfortably, relax and unwind. Of course, it is best to choose options with backs.
Security
To avoid injury, the bench must be made strong and durable. It must be capable of withstanding heavy loads. It is necessary to assemble the structure carefully, while using only high-quality materials and fasteners.
Moisture resistance and tolerance to temperature fluctuations
For our region, it is important that climatic conditions do not affect the bench, which will be outside all year round. Then it will last a long time.
DIY garden benches: drawings and photos
Before starting the construction of the bench with your own hand, you must definitely make or select the correct drawing. Before that, you need to decide on the appearance and materials for its manufacture. Numerous photo materials from garden magazines and landscape design resources will help you with this.
Today on the Internet you can find a huge number of design options for benches. All of them have their own nuances, but are designed to perform one function. After careful selection, you can think of an independent design of the bench or use the option you like. It is not necessary to make it exactly the same as in the photo, you can combine several original variants and add something of your own.
DIY garden bench: drawings
- After completing the selection of the design of the bench, you can start working on the drawing. For this we need:
- piece of paper;
- pencil;
- ruler.
- At this stage, the issue of choosing optimal height, the number of legs, the depth of the seat and other important nuances. Therefore, there are several general rules creating a bench layout. When drawing up a drawing, it is important to use them:
- seat height should not exceed 40 - 50 cm;
- The average seat width should be about 50 - 55 cm.
- These values are standard, but they can be applied during the construction of any kind of bench. The main thing is to keep the proportions, otherwise it will not be very convenient to rest on the finished product.

- If the bench is supposed to have a back, then for its manufacture you can use the standard height value, which is not less than 35 cm, but not more than 50 cm.
- It is important to determine the type of fastening of the back to the bench. It will be based on the possibility of transferring the structure from place to place. A non-portable bench involves fastening the legs firmly into the ground, in this case any backrest can be fastened.
- Making a wooden garden bench with your own hands, according to the drawing, it is possible to calculate the amount of material that will be required in the manufacture of a particular design. If wood is used, then several important notes are made immediately on the drawing. One of them is bevel inner surface legs, which prevents the accumulation of water from the bottom of the structure and its subsequent destruction. Also, the diagram shows the dimensions of each of the parts separately, in addition, the angles of attachment of all elements are indicated exactly, taking into account all the nuances of the design of the bench.
- Natural solid wood is the best suited for the manufacture of benches, because it is easy to process, it looks noble and absorbs heat.
- When selecting material, it is important that there are no flaws on the tree. The array must be well dried before starting work on the product.
Do-it-yourself wooden garden benches
Necessary materials:
- screwdriver;
- wooden boards - 3 pcs. on the seat, 2 pieces on the back, parameters: 150x15 cm, thickness - from 3.5 to 4 cm;
- boards for legs acting as holders for the back: dimensions 90 x 15 x 4 cm;
- sandpaper;
- boards for front legs: parameters: 36 x 15 x 4 cm;
- jigsaw - cutting boards;
- primer;
- beams - strengthening the strength of the structure, dimensions: 4 x 4 cm;
- electric planer - grinding wood parts;
- self-tapping screws;
- wood varnish.
Step-by-step instruction
Consider the sequence of manufacturing a wooden bench.
- To make a bench, you can buy boards of the right size ready-made. If there are none, then with a jigsaw you will need to cut out the necessary blanks.
- After cutting the tree to the required length, it is processed. Seat and back blanks are sanded. Each of the ends is processed by an electric planer. With it, they also need to be rounded a little.
- The rear legs are attached strictly at the right angle, since they act as a frame to which the back is attached. To do this, markup is applied to 2 pieces of wood 90 cm long.
- First, the value of the length of the product is marked on the longest board. This material does not yet need to be processed. From the beginning of the mark, a small cut is made along the full length of this board. Its value should be no more than 20 ° C, since it is he who will later form the angle at which the back of the bench will be tilted.
- On 2 legs at the back, cuts of the same size are made not only in terms of the angle of inclination, but also in terms of height. This will avoid creating a skewed bench.
- The assembly of the structure begins with the legs. It is important to observe the selected gap between the legs located in front and behind. They are connected to each other with a beam. It runs across the entire width of the bench. It is best to make a double strapping, which will pass from below as well as from above.
- After collecting the side parts, we proceed to collect the main parts of the seat and back, which are connected by pre-prepared boards. Fastening occurs to the beams from above with the help of self-tapping screws. Between the blanks, you need to leave gaps ranging in size from 1 to 2 cm. They are needed to ensure the passage of air and in the future will prevent the accumulation of moisture in the details of the bench.
- It should be noted that the bench must be made stable so that it can serve for a long time. To do this, it must be strengthened by tying with beams from below. To do this, you need to screw 2 blanks to the legs. Of course, it is not necessary to use 2 boards, one transverse one attached to the strapping of timber will be enough, but it will be more reliable this way.
- Next, the backrest is installed using 2 boards. One of them is attached at a distance of 20 cm from the seat, and the second - 38 cm.
- The last step is the coating. finished product. It is necessary to protect the bench from environmental influences. Lacquer and impregnation are best suited. It will do a good job of protecting the product from the appearance of areas with mold and insects. After varnishing, the furniture will become even more beautiful, it will look more elegant. To give it shine, polishing is performed, and a layer varnish coating applied at least 2 times.
Do-it-yourself garden bench with a back: instructions

Such a design is made quite simply and does not take much time.
- You will need:
- support bars - 6 pcs. (3 small and 3 larger);
- seat and back boards.
- Assembly is carried out after the creation of a drawing, which accurately indicates all dimensions and angles.
3. It is important to keep track of how the parts are arranged during the assembly process. The slightest discrepancy will lead to a skew of the bench.
- Usually designs with backs are made portable. Therefore, you need to make it in such a way that it stands exactly. In this case, more attention should be paid to the design of the legs. The stability of the structure depends on them.
Garden bench with hands: successful homemade

There are many different options for making benches with your own hands. Consider some of the simplest and most successful options:
classic bench
This type of bench has a rectangular seat and back. To assemble it, you will need the same materials as for a regular bench. When connecting the parts, you can dream up a little and replace the vertically arranged strips with those that will be arranged in a cross. You can decorate the top bar of the back with beautiful carvings. When creating armrests, blanks can be given a figured look. The same goes for the legs.
Table and benches
The design of benches and a table is appropriate for any suburban area. However, its assembly has several nuances. Each of the large parts is assembled separately from each other. Their connection is made at the very end. To do this, use 4 lower bars. On each side are attached 2 of them. The table consists of a tabletop and legs, which are arranged crosswise. The benches are pretty easy to assemble. You will need boards, the length of which is calculated when creating a drawing. First, the seat part is fastened, while it is important to give stability to the structure, and then the table is fixed in the very middle.
metal bench
This shop is a little more difficult to make than the two previous options. In this version, the seat frame is first made, and then the legs, which are welded to the corners of the seat. Stiffeners are welded between the legs located in front and behind. Next, the back frame is made, which is subsequently welded to the seat. Its angle of inclination should be about 15 - 20 ° C. The last step is polishing, cleaning and priming the finished product. Only after that, boards are attached to the metal frame in the area of \u200b\u200bthe seat and back. Bolts and nuts are used for fastening.
On the network you can find many photos of successful homemade garden benches made by yourself. All these design options for recreation look very beautiful. It may seem to many that their manufacture will be difficult, but in fact, any craftsman can make such benches with a little effort and patience.
A bench is simply necessary in the country or in the garden. Its main purpose is as a place to relax. He who knows how to work, he must be able to rest. Someone just installs a bench, and someone creates interesting corner, which certainly has a good rest. You can just relax, or you can just enjoy the surrounding nature and the results of your work. There are many ideas worth considering. Of particular interest are ordinary designs that can be repeated by anyone familiar with wood and owning a primitive set of tools.

Everyone can imagine what the most ordinary bench looks like, but not everyone likes simplicity and most opt for original solutions. Everyone wants to have something that is not, for example, a neighbor in the country. Almost all gardeners start with decorating their dacha or garden plot, and there are also many options here. As an option, you can do the design of the site from the installation of a bench, having previously decided on a place of rest. After all, a place of rest is not needed later, it is needed now. Therefore, the design of this place should be taken up at the first stages of the process of decorating a summer cottage or personal plot, and only then proceed to the design of the rest of the territory.
As a rule, summer residents are very keen on growing various green spaces and flowers. Especially, there are a lot of them near buildings. Alternatively, you can combine plantings with a recreation area by installing a bench not far from the cottage. In this case, everything will look organic: green spaces, flower beds, and an original bench.
 Two flower beds made of boards and a bench between them
 There are a lot of options: from the simplest to the most sophisticated. The simplest option may consist of two wooden boxes in which flowers are planted, and two boards built between these boxes. Boards must be planed and well sanded. This design can be placed directly near the wall of the cottage. You can attach a pair of the same planed boards to the wall, which will serve as a kind of back. Instead of wooden boxes, you can install concrete pedestals that can last much longer than wooden elements.

It is very simple to build such a structure, and most importantly quickly. As for the boards, they can be bought ready-made or made to size yourself using unprocessed boards. But in this case, you will have to work hard, but the bench will not cost anything, and the result will certainly please. If concrete flowerpots are used, then the boards can be fixed with metal corners. The only problem is the difficulty of drilling holes in concrete. In no case should you use a perforator, since a flowerpot, even a concrete one, will easily crack, especially if it is made independently.

You can not fasten the boards, but instead of the boards put a huge log, which is not necessary to fasten if you install it correctly.
As mentioned above, there are many options, and they are created based on real opportunities, which the owner of the cottage has. Alternatively, you can simply set up a bench to relax away from flowers and green spaces. After all, it's not a secret for anyone that various insects are hiding in flowers and between the leaves of plants, which do not in any way encourage rest, but on the contrary, make them leave the worst memories of the rest.

Hollow blocks can be used as a bench, into the voids of which processed boards are simply inserted, which can serve as seats.

To make it comfortable to sit, the sharp corners of the blocks should be rounded. Well, if these blocks are heavy and large. If the blocks are small, then they can be fastened with studs into one piece.
log bench
The site can be designed in any style, but almost everyone is moving away from standard approaches to solving the problem. Everyone wants to have something of their own. But not everyone knows that the new is the improved old. As a variant of the new, but somewhat improved old, this is the option of using a log as a bench. As a seat, you can use a log of large diameter, sawn lengthwise. A log of a smaller diameter, also sawn lengthwise, is used as a back. Or a smaller diameter trunk, but cut closer to the edge. Narrow pieces of logs are used as legs.
 Log bench - quick and easy
 Legs and seats are connected to each other with metal pins. Holes of a slightly smaller diameter are drilled under the pins. The pins must fit into the holes with force. At the same time, half of the pin is hammered by blows on the pin, and the second half is driven by blows to the tree. As a rule, they do not hit the tree itself, since traces of the hammer may remain, but with the help of a wooden tip. Such a connection must be reliable, although there are many mounting options.

In the photo, a little higher, you can see another option, in the style of "ethno". Its organization is associated with the presence of a stone, although this option is quite feasible in the presence of a log. Sufficiently used as a seat thick log, and as legs - part of a deck of large diameter. In one and the other part of the deck, grooves are cut out for the seat. An ax or grinder is used as a tool. Alternatively, you can resort to using a chainsaw. These are not post-Soviet Friendships or Urals, which have significant weight, and they, perhaps, are convenient for felling pine trees in Siberia. If you adopt the Stihl chainsaw, then with its help you can make not such works of art.
It is also possible to make a table out of logs, which is simply necessary in the country. In the photo you can see the results of such actions. The table top is made of boards, and the rest of the ensemble is made of logs of different diameters.
 Table with benches made of logs
 The next bench, built in this style, has a completely original design. Here, the legs and armrests are made of branches of various thicknesses, and the seat is made of processed, high-quality steel. edged board.

Another bench is made in the same style. The only difference is that the boards and branches have the opposite direction. The result is a completely different look. As far as execution is concerned, no special skill is required here. The more careless the end result, the more valuable it is. In any case, this is how others perceive such an approach. Most likely, people are tired of imaginary perfection and they prefer handicraft and primitivism.
 Wicker back - you will meet infrequently
 Alternatively, you can arrange a recreation area around the tree and install a bench.
 Resting place under the tree
 It is not at all difficult if you install a swing and a gazebo nearby. Above the bench itself, it is better to build a pergola that looks like an arch. For a good rest, only a pond, fountain or waterfall is missing.
Benches made of metal and wood
As a rule, no one dared to build a metal bench. AT summer period they can heat up to such temperatures that it makes no sense to talk about rest at all. In the case of a cold snap, the picture is the same. The bench becomes so cold that it is impossible to sit on it. But the benches, where a combination of metal and wood is used, are the most in demand. As a rule, the frame is made of metal, which provides high reliability structure, and the seat and back are made of wood, which provides a certain comfort.
 Bench from a profile pipe
 If the design is improved and soft armrests, soft seats and backs are made, as in the photo, then similar design can compete with the most modern options for rest benches. To make the seats, armrests and backs soft, it is enough to fit suitable material furniture foam. In a similar style, it is possible to build a countertop.
On a note! When using wood, it is advisable to leave between separate elements gaps up to 5 mm. This is due to the fact that when the humidity of the environment changes, the dimensions of the elements also change.
 Stylish benches made of metal and wood
 In the process of creating a recreation area, care should be taken that there are no sharp corners, especially in metal structures. This is very important if you have children. All elements of the ensemble, such as benches, tables, garden chairs, are made from round and square pipes, bending them so that smooth transitions are obtained.
 Table and bench made of pipes and boards
 The presence of metal allows you to bend structures of any shape, although you can’t do it so easily and you need to special device. The presence of such capabilities allows you to bend structures in one go, without using other tools for this, such as a grinder and a welding machine. The main thing is to think over the design to the smallest detail. If a tree is used, then only well processed. It must not be allowed to wooden elements burrs or chips were present.
Board benches
The most popular option is plank benches. There are quite a lot of options. There are even designs similar to sofas. If you put them on soft pillows, then you can lie down.
 This garden bench is more like a sofa: with sufficient dimensions, you can lie down
 Designs of garden furniture, based on a modern approach, are assembled in an elementary way. As a rule, they consist of rectangles with partitions made of thinner wood, interconnected into one.
If you strain and make your imagination work, then from an ordinary shop you can build a work of art if, for example, wooden wheels are installed instead of legs and armrests.
 A bench made of boards with a back and wheels instead of sides - looks interesting
 One of the most simple designs country bench consists of one board, to which legs are attached in the form of the letter "X". Similar shops were built by our ancestors, although they can be found today.
 Traditional shop design
 Using a tree, you can build a bench in the form of the letter "P". In this design, it is very important to ensure a secure fastening of the seat and legs. This option involves the use of a thick board or timber for reliability. Alternatively, you can install the board "on edge", for greater rigidity, and for greater reliability, it is recommended to fasten it with metal corners.

This photo shows an option where washed down is carried out at 45 degrees. With the help of a special tool, this is not difficult to do. If all the parts are connected, you get an angle of 90 degrees. If the board is thick and the seat does not sag, then the bench will last quite a long time.
In the photo below you can see another version of an interesting solution, which is characterized by increased reliability. Boards are used as legs different lengths. The difference in length is the thickness of the board: every second board should be shorter. The structure is connected with nails. Moreover, through one board, the nails are hammered either into the board for sitting or into the board for the legs.
 Bench in modern style
 original solutions
Along with the classical approach to the process of making benches, there is also an original one, although appropriate materials and tools are needed to solve such a problem.
For example, a bench can also be built from a large stone if an appropriate wooden platform is attached to it.
 Bench made of stone and boards
 In the presence of bamboo, a seat is also made from it, which will take on a more exotic look.
 From bamboo, and whole
 Or stone.
 Sitting in winter will be unpleasant, but beautiful ...
 It all depends on the flight of fancy. The real owner does not have unnecessary things or materials in the country. With a reasonable approach, you can attach any thing, and it will not just lie around in the country or lie dead weight in the garage or in the barn.
How to make a bench: photo reports
Naturally, not every owner has a set of tools for making stone benches, but everyone has a minimum set of tools for working with wood, especially since these are very simple and affordable tools. Therefore, it makes sense to consider wood structures. Everything that is done with one's own hands is ultimately a matter of pride.
Bench without back
The design, although simple, has a rather spectacular appearance due to the material used. A bar with rounded edges serves as legs. In extreme cases, such a beam can be prepared independently from round logs of small diameter, trimmed from 4 sides. The result is the same beam. Therefore, there should be no problems with the construction of the bench. The legs of the bench will be made from this material. To do this, lay the cut bars flat (horizontally) one on top of the other. It is this design solution that brings a certain exclusivity to the design.
 A simple shop looks interesting due to the material
 The backless bench is 120 cm long, 45 cm wide and 38 cm high. It is possible to round the edges of the beam in any way. In order not to strain too much, you can already find a ready-made, profiled beam. Although, it will cost a lot more, but working with him is a pleasure.
Depending on the size of the bench, it is not difficult to calculate how much timber is needed. If a bar is taken, with a section of 70x70 mm, then with a height of legs of 380 mm, it is enough to put 5 bars one on top of the other. We consider: 45 cm multiplied by 5 pcs. and get 2.25 m of timber. Since there are 2 legs, the timber will go 2 times more, which means 4.5 meters of timber. A board is taken as a seat, 40 mm thick and 90 mm wide. Given the width of the bench, you will need 5 boards, 1.5 meters long. If you calculate more accurately, you will need 1.2 m x 5 pcs. = 6 m board.
At the first stage, boards are cut according to size. In this case, it is necessary to round off all sharp edges. To do this, you can take a planer or just large sandpaper and carefully process the boards. In order not to do much on your own, there is another option: you can simply negotiate at the sawmill and get a well-crafted board, especially since they have all the possibilities for this. It remains only to take and cover them with varnish.
 Finished boards
 After that, they begin to manufacture the legs, for which the beams are cut into identical segments, 45 cm long, after which they are stacked one on top of the other in 5 pieces. The next step is to connect the legs for stability. In this case, the bars can be fastened with metal pins or with the help of wooden dowels. The distance between the fasteners is 7-10 cm. As a rule, such a connection is made using glue, then the connection is more reliable.
 Lines where pins will be placed
 Pin connection requires precision drilling of holes, otherwise the bars will not be on the same line. For this, it is better to use a template. In addition, the dimensions of the elements of the legs must be the same, then it will be possible to accurately mark the place for drilling the holes. For those who are familiar with drafting, tape measure and pencil, it will not be difficult to get everything right.

The pins should be installed in a checkerboard pattern, so it is necessary to mark with this feature in mind. In the same way, the boards are attached to the legs at the rate of two holes per board.
From a technological point of view, this is not a bad connection option, but it requires a certain skill and experience with wood. The connection step can be simplified if the leg bars are stacked one on top of the other and rigidly connected with a clamp. Then the accuracy of drilling will be ensured. Alternatively, the beams can be connected using long metal studs and nuts with washers. In this case, it is enough to drill through 2-3 holes.
The seats can be nailed to the legs, which greatly simplifies the entire manufacturing technology of such a bench.
 The bench is made by hand. Remaining finishing work
 When using nails, it is advisable to hide the caps, as they will then rust, which is completely undesirable. To do this, the nails are hammered so that the hats hide almost 5 mm deep into the tree; for this, you can use a guide. After that, putty is taken, a little sawdust is added to it so that the color matches, and the recesses are puttied. After complete drying, the places are carefully sanded with sandpaper. So that the place where the nails are hammered does not stand out against the general background, they are covered with a suitable varnish.
Varnishing technology wooden surfaces quite simple, especially since it is described in detail in the instructions for use.
Bench for giving from broken chairs
If there are two old chairs and there was not enough imagination to adapt them somewhere, then you can make a bench out of them. Only the same and strong enough will do. If they are loose, then they will have to be repaired. The chairs are dismantled so that the backs and legs remain. After that, two chairs, or rather what is left of them, are installed side by side and connect their backs with the help of slats of the appropriate thickness.
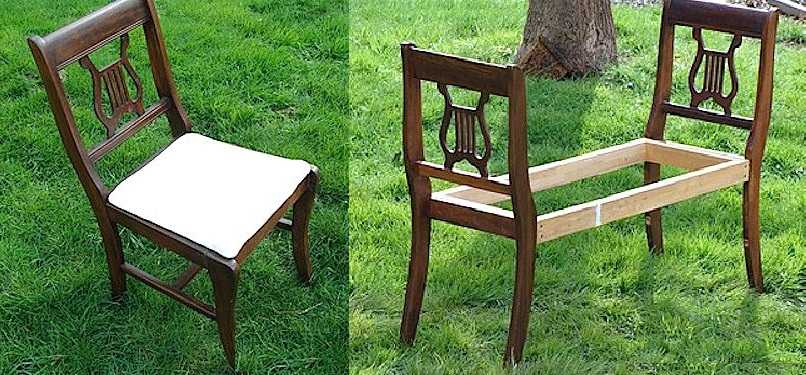 Bench from old chairs
 To make the structure rigid, at a height of 20 cm from the floor, the structure is connected with the same rails around the entire perimeter. Subsequently, these slats will serve as a footrest, and if the bottom is sewn up, for example, with plywood, then you can store some things here.
 We paint the made structure
 After the structure is reinforced and sanded, it can be painted. In this case, ordinary paint is suitable, which can hide some of the flaws in the whole structure, and especially in old chairs. It remains only to cut a sheet of plywood, lay foam rubber on it and cover it with some kind of fabric. At the same time, one should take into account the fact that the bench will mainly stand on the street until the very cold weather. Therefore, it is better to opt for, for example, leatherette. In any case, the material must be moisture resistant.
 Finished bench from strands
 Pallet Garden Bench Chair
For a reasonable owner, any material has its own value. Garden furniture can be easily made from cargo pallets. Moreover, it is not particularly necessary to disassemble them: a back is made from one pallet, and a seat is made from the other. It remains only to think about what to make the armrests and legs from.
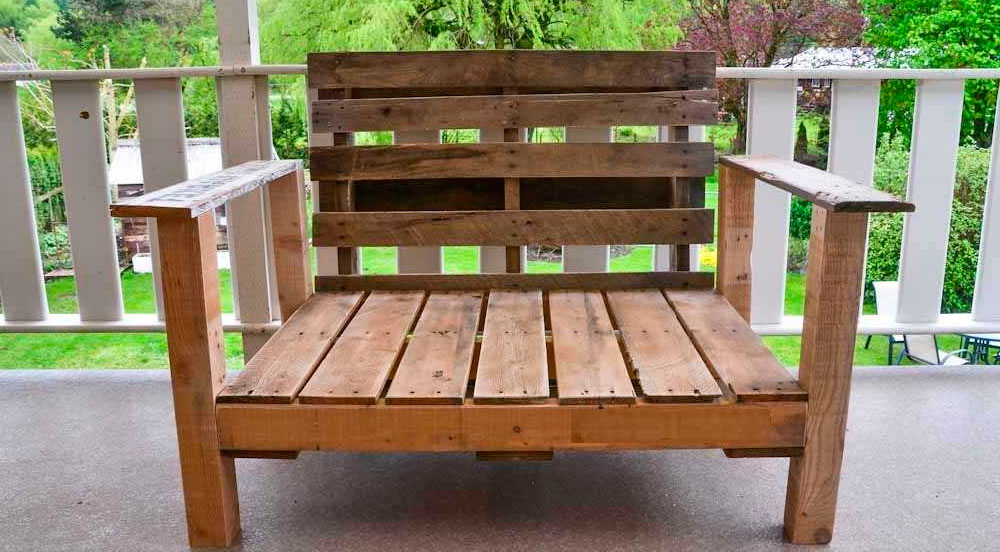 Here's what should happen
 One of the pallets is reinforced with additional bars, which are fastened with self-tapping screws.
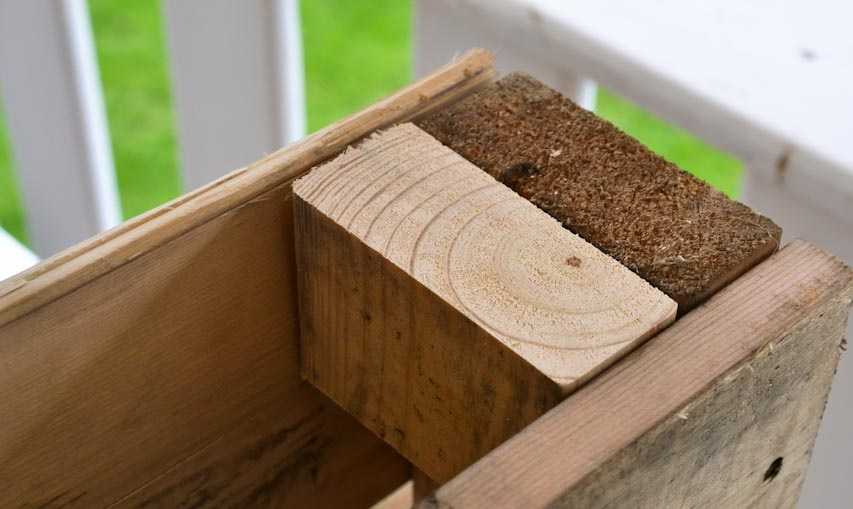 Strengthening the corners of the pallet
 After that, a beam is taken, with dimensions of 100x100 mm and an arbitrary length, after which 4 identical segments are cut off, up to 80 cm long. They are attached in those places where the reinforcement bars set in advance are located. As a result, there will be enough legs, 20-25 cm long. For fastening, self-tapping screws are used, at least 150 mm long. In the process of work, it is necessary to make sure that the bars are screwed correctly so that the legs of the same length can be installed.
 Attaching the legs for the armrests
 If after these steps it is not possible to obtain an absolutely even structure, then the legs can be filed at the end if the bench does not settle smoothly.
To garden plot was comfortable enough, it should be properly equipped. An important component are garden benches. They can be made independently in different ways and from various materials.
Bench made of concrete slabs and boards with a back
Looking at the drawings of the bench, you can find out the features of its device. You can make such a design with your own hands relatively easily, quickly and without high financial costs.
Making a bench with a backrest with your own hands in a step-by-step instruction is described in great detail.

Assembly: the initial stage
After preparatory work the wood processing time is right. In order for a do-it-yourself bench with a back to serve for a long time and decorate the site, it is necessary to pre-process the materials.
wood cover antiseptic formulations and let dry. After that, you can start collecting backs.

On one of the two-meter boards, fifty centimeters are measured from the edges. At this level, the edges of the white will be located.tons of slabs. From this mark another fifteen centimeters are measured to the center of the board. Here the first boards will be attached. From the resulting marks we measure seventeen and a half centimeters - the gap between the boards of the back. Next, we measure fifteen centimeters for two more boards. Between them there should be a gap of five centimeters. All this can be seen in the drawing.

Wood glue is applied to sections of fifteen centimeters. Boards are applied to them, the length of which is sixty-five centimeters. Additionally, they are fixed with self-tapping screws.

From above, between the boards of the back, pieces of seventeen and a half centimeters are glued. In order for the parts to stick together well, they are clamped and held until the glue sets. After gluing is completed, the back is covered with an antiseptic.

All wooden details can be covered varnish. This will give them additional stability and attractiveness.
Assembly of the main part

It is better to collect the main part of the bench from two sides. Placed between the boards concrete plates, and threaded rods M16 fifty-five centimeters long are inserted into the drilled holes. They will need four pieces.

The rods are fastened with nuts and washers M16. They are twisted at the same time from different sides to make the bench even.


A simple bench with your own hands
You can make benches for giving with your own hands quickly enough if you follow the instructions. Consider four options for such garden structures.

On the drawings benches detail all its features. Making such a bench with your own hands is quite simple. The only difficult element is the concave seat.


The number of parts and their dimensions are indicated in the table.

The manufacture of benches with their own hands from wood begins with blanks necessary details. Boards and timber are sawn into pieces of the desired length.

The manufacture of seat supports will be somewhat more difficult. You will need to markup on the blanks. Two points are marked along the edges at a distance of seven and a half centimeters from the bottom side, and in the center a point at a distance of four and a half centimeters. They are connected using a flexible plastic ruler and cut out jigsaw. Sections are treated with sandpaper.


Seat supports are attached to the two upper tsargs. One on each end and one in the middle. Next, the supports are screwed, spaced from the extreme ones by the width of the legs. All connections are made with self-tapping screws.

Boards are attached to the resulting base seats. It is desirable to deepen the hats of self-tapping screws.

Then attach legs. They are attached to the seat supports. The lower tsargs help to fix the legs.


The finished product is covered antiseptic and varnish.
Simple bench #2
To make such a garden bench with your own hands, you will need concrete flower girls and boards. Flower girls are required to create the base of the bench. Use two with rectangular base and two cubes.

In order for the base to be stable, the flower girls must be glued or connected from the inside with staples fixed with self-tapping screws. A layer of drainage and soil is poured into the tank. This increases their stability.
The seat for the bench is made of boards. To do this, they are cut into segments of the desired length. These blanks are laid so that they have a distance of half a centimeter. Then they are connected using cross bars. Planks are placed in three places: along the edges and in the middle. Corners are attached to the planks. With their help, the seat will be fixed on the flower girls.


Do-it-yourself bench with a back

Prepare the details of the bench shown in the figure. They are processed antiseptics before connection.


Then the supports are assembled from the parts. Pre-round the corners and chamfer. First, parts A and B are connected with a bolt, and then B, C and D are also connected using a bolt.

The inclination of the backrest is determined by part D, after which it is connected to part A. Similarly, but in mirror image, another support is made.

After that, the back and seat are assembled. To do this, the supports are placed so that there is a distance of twenty centimeters between them. First, the front and rear bars are screwed to the supports, then all the others, and finally the stops are screwed.

At the last stage, the back of this bench is screwed.

Bench #4Another option for a simple do-it-yourself bench. Its length is one hundred and twenty centimeters. The height from the ground to the seat is fifty centimeters, the height of the back is also fifty centimeters.

The base is made from boards, whose thickness is five centimeters, and the width is from ten to twelve. One of the legs continues and is the backrest support. The supports are connected according to the “half-tree” method and fastened with bolts.

The basis for the seat is a bar fixed on self-tapping screws. The short legs on the back of the bench are colleted together to increase stability. The seat and back are sheathed with boards with a smaller thickness. The surface is painted or varnished.
A simple bench with a back for a summer cottage

The dimensions of the structure and wooden parts can be seen on drawings benches. If we consider how to make a bench with our own hands, then this option will be the most optimal in terms of the simplicity of the process and the result obtained.


Materials are best purchased already cut to size. If there is no such option, then you need to cut them yourself.
The resulting blanks polished. The ends of the boards are treated with an electric planer.

The rear legs of this simple do-it-yourself bench are also a support for the back. To create the desired level of inclination, the blanks are marked.
At a height of forty centimeters mark the place of attachment seats. Above the board is cut at an angle of twenty degrees. The cuts on the two blanks should be the same.
Gather first legs benches: the front ones are connected to the back ones with a beam. It is better to do this from above and below.

When the side parts are assembled, they can be connected to each other with seat boards. Screw the boards with self-tapping screws, leaving distances of one or two centimeters.

To strengthen the structure and increase its stability, make the lower strapping bar on the legs. Two boards are attached to the back.
Finish the work with a finish coated which will protect the product from moisture and adverse conditions.

Do-it-yourself pallet bench
Make a bench with your own hands pallets It's easy if you use your imagination. To do this, you need three or four of these wooden structures. Some will need to be cut to get additional details. The simplest do-it-yourself pallet bench design is when two pallets are attached perpendicular to each other, creating a back and seat.


So that the design does not turn out to be too cumbersome, it is better to cut the pallets along the right size. Fasten the elements with self-tapping screws. Add side details that enhance strength and make legs. All this can be seen in the photo.


Since the material of the pallets is raw, rough, it will need to be preliminarily grind. This will allow you to do without splinters.
The manufacture of benches with their own hands from pallets is being completed with varnish or paint.


Bench puzzle
You can make such a bench with your own hands if you have a wide board and shovels for shovels. Figured seats are cut out of the board in the form of puzzle pieces. Legs from cuttings for shovels are attached to them. Separate stools are obtained, which are quickly assembled into one long bench. All manufacturing steps are detailed in step-by-step photos.


Benches from unnecessary chairs: two do-it-yourself options
First option

To create such a bench for a summer house with your own hands, you will need four old chair.

From the first two chairs filmed parts on the front of the seat.

The rest sawed off the front legs are slightly lower than the seat structure.

From the resulting details you need take off old varnish or paint. To do this, a special agent is applied to the parts that dissolves paint and varnish coatings. Then the softened layer can be removed with a spatula.

The racks should drill dowel holes. Holes are required on the front and end sides.


The dowels are smeared with glue and inserted into the drilled holes.

When the dowels are glued, you can collect base benches. To make the design durable, the parts are fastened with self-tapping screws. Construction surface sanded.


For seats benches choose a board that is suitable in size, saw off the excess.

If several narrower boards are used, then they are glued together with wood glue. For a tight connection, they are clamped with clamps and waiting for the glue to dry.

The finished seat is also glued to the base with wood glue. Heavy objects are placed on the board and clamped together with the base with clamps.

When the glue dries, cover the seat with masking tape and stain other structural elements with wood paint.

The adhesive tape is removed and the seat is processed wood stain. In conclusion, the entire bench is varnished.

Second option

To make a second garden bench with your own hands from old furniture, you will need two chairs. It is better if the back and hind legs are not separated.

Two identical chairs clean up all parts of the structure except for the rear legs with a back.
take bars 5 cm wide and 3 cm thick. Two pieces are cut off, equal in length to the width of the chairs, and two pieces of the same length as the finished bench will be. From these four parts, a rectangle is assembled. It is fixed to the backs of the chairs with self-tapping screws.

Another frame is assembled in the same way. Several cross bars are attached to it. This design is attached under the seat, makes the bench more reliable and plays the role of a shelf.

If the chairs are old coating then remove it with sandpaper. After that, the surface is puttied special composition or primed. When the layer dries, it must be sanded with fine-grained sandpaper. At the end, the structure is covered with paint.

Do-it-yourself seat for a garden bench is made from Chipboard or plywood. A rectangle is cut out of the selected material, which is larger than the base by half a centimeter on each side. Then cut out a piece foam rubber with the same dimensions. A rectangle is cut out of the upholstery fabric. It should be larger than the seat by five centimeters on each side.

Foam rubber is laid on a sheet of plywood, it is covered with a cloth on top. The fabric is fastened from the inside with furniture stapler.
The seat is attached to the base with a piano loop.
Bench-swing

To make such a bench for giving with your own hands, you should prepare the necessary materials. Start manufacturing by creating basics designs. The seat bars are attached to the back bars at a selected angle.


Along the seat install additional ribs providing rigidity.


Attached to the seat planks, drilling holes in the base bars for fastening. The same goes for the back.


Armrests are installed on both sides of the seat. They can be bolted on.


The resulting bench cover wood preservatives and varnishes. It is very important to paint over everything as carefully as possible.

The bottom of the bench is reinforced with metal profile. Chains are attached to the profile, on which the swing bench will be suspended. Be sure to check the reliability of the beams on which the bench will be suspended.


log bench
To make such a bench with your own hands from wood, you will need chainsaw. A thick log one meter long is taken as the main material.

Log mark out, to get two slightly unequal parts. The back will be made from the smaller one, and the seat from the larger one.

Chainsaw log sawed along the mark. The resulting irregularities are immediately cut off with the same saw.


The cut triangular piece is cut into pieces and inserted into the holes in the seat. The back is fixed on top. The bench is almost ready. It remains only to give it a more decorative look.


Can the seat be placed on legs. To do this, recesses are made in the lower part for installing a pair of logs as legs.


Bench-transformer
Design features of the transformer can be seen in the drawings of the bench. A do-it-yourself transformer bench is made from planed boards, which is cut to the named sizes.


In sliced lumber details holes for fasteners are drilled.


At the tabletop, boards located on the edge can be made wavy.

In material intended for countertops, drill holes with a diameter of twenty-two millimeters and a depth of three centimeters. Cuttings of the same diameter will be inserted into them.

The edges of parts and edges are processed and rounded. 

The assembly of all elements is carried out with screws and screws. Screws are needed with dimensions 6x70 and 6x90, screws - 8x80.


Wooden parts stain stain.

The structural parts that will move are connected by hinges.

Between the boards of the tabletop place parts of a round cutting.

Set the stop for backs.

A do-it-yourself transformer bench is covered varnish.


rocking bench
Making an original bench with a backrest with your own hands is not difficult if you have the tools and materials. First you need to consider the drawings of the bench, which contain a small amount of detail.

The side parts according to the pattern are transferred to euro plywood three centimeters thick. They are cut with a jigsaw and the ends are processed with a grinder.

To fix the connecting strips, markings are made. Then holes are drilled. After assembling the frame, the rails are fixed with self-tapping screws. The attachment points are spatulated, and the product is completely varnished.

Bench around a tree
The simplest version of such a bench - hexagonal. The size depends on the size of the tree. Measurements are made at the height of the seat. To the result obtained, another margin of fifteen to twenty centimeters is added. If you divide the result by 1.75, you get the length of the inside.

For cutting boards ten centimeters wide are laid in four rows at intervals of one centimeter.

The cut point is marked immediately for all rows with an angle of thirty degrees. So cut out six sets of blanks.

Legs are used with a height of sixty to seventy centimeters. They are connected by crossbars by drilling holes and using bolts with nuts.

The seat is installed so that the joints are located in the center of the ribs of the legs. Screw the outer pieces first, then the inner ones. In this way, the entire hexagonal structure is assembled around the tree.


At the end, they make a back and mount an apron. The result is a circular bench with a do-it-yourself backrest.

The finished product is processed oil impregnation.

Bench made of curved branches

A bench made of curved branches will look original. For you will need branches for the front, two legs, a horizontal top and a pair of transverse branches.

Sawing branches so that they match each other as accurately as possible. Then they are connected with metal corners.


Similarly made back and connect it to the front.


The finished product is placed on a flat area and the seat is assembled.

Bench options
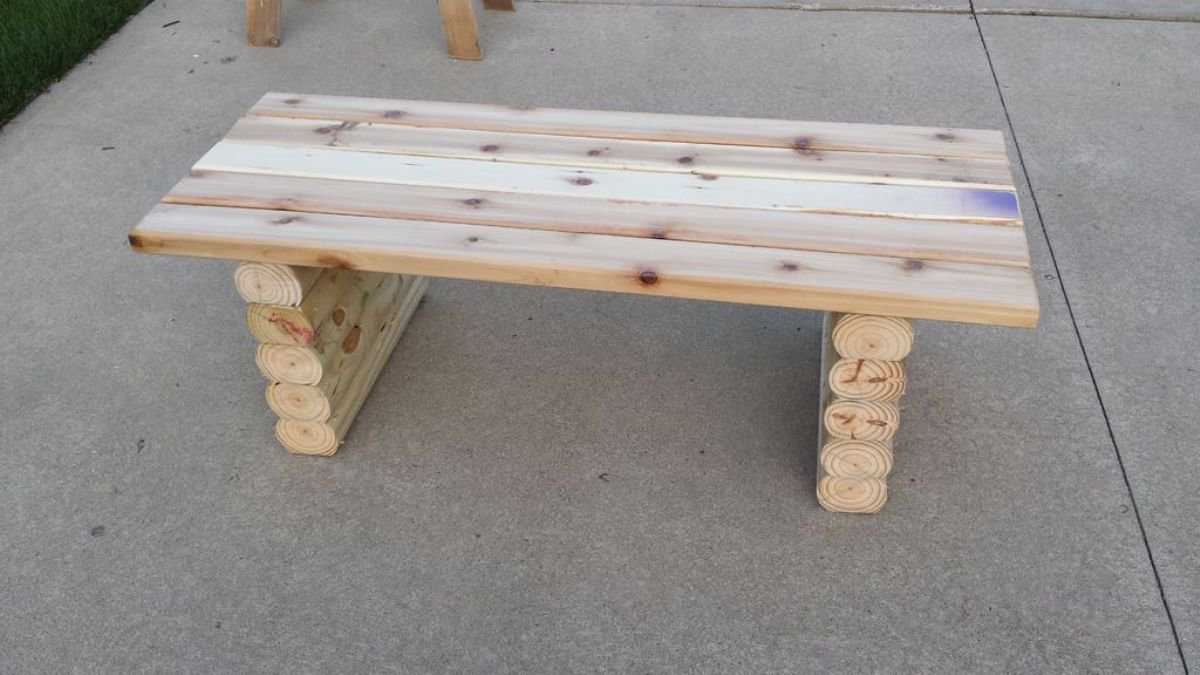
- log bench which blends in well with the natural environment. It consists of half a log used for the seat, and two short round logs that are legs.

- Beautiful wooden bench with a back and armrests, reminiscent of a sofa. Curved and carved elements make it more attractive, while left knots and bumps give the design a natural look.

- Bench made of wood and metal. The base of the structure is metal. The wooden parts of the seat and back are fixed to it. Due to the small thickness of the metal parts, it looks light.

- A bench of a simple, classical form. It is made of wooden, rather wide boards. This width allows you to comfortably sit on the bench. Armrests make the design more complete.

- original bench made of wood with curly details. This option is well suited for a site with a natural rural design. Carved legs and armrests, figured back - all this gives the product originality.

- Bench with an interesting back. The curved parts gradually deviate back, creating a unique design. The seat is slightly curved but has a more traditional appearance.

- Wood complex- a table with two benches. The design looks traditional due to the material used. The original solution is to fasten all the components into a single structure.

- The bench is made from solid wood. A single piece is cut out of it, combining the back and seat. The legs are attached to the bottom. The log is required quite large.

- Bench with storage box for toys. Outwardly, it looks like an ordinary wooden bench-sofa, but under the seat it has a box in which you can put various things.

- Comfortable wooden bench with a simple shape. The base is made in the form of a rectangular box. The back is also simple with a straight shape. The seat is padded with soft cushions for added comfort.

- A wooden bench placed around a tree. It is made as if it consists of four benches, each of which has one armrest. The composition looks attractive and comfortable.

- Bench of a simple form from wide boards. It looks solid, but its size is somewhat hidden by the gaps between the boards and the light blue color in which it is painted.

Garden benches are the most popular small architectural forms. You can make them of any size and design, but in addition to their direct purpose, the benches also perform a decorative function. You can make a garden bench for yourself with your own hands, using our drawings and photographs.
How to make a bench from "junk" materials
The easiest way is to make a bench out of wood. This is traditional material for garden furniture, affordable and easy to process. But even in this case, you can save money by choosing as the main material the one that literally lies under your feet.
The first option is trees, poles and stumps from your own site or a nearby forest plantation, in which sanitary felling is carried out.
Carefully cutting off a couple of medium-sized stumps, they can be put on the base of the bench. From the poles, make the lower crossbar for structural rigidity. And for sitting, dissolve part of the trunk on the circular. If there is no equipment for longitudinal sawing, then you can take an unedged board with a thickness of 75 mm.

In this example, the bench is already more comfortable - in addition to the seat, it also has a backrest. The model is a little more complicated, since you will have to find a higher part of the trunk and process it in two steps - first make a profile cut with a “ledge”, and then dissolve the workpiece into two halves.

And to assemble the next bench, you will need:
- two short logs of the same diameter for the base;
- two medium-thick poles for supporting the back;
- one long log, sawn into two halves (for the seat and back).

In short logs, you need to choose a groove so that a long log fits into it. Then the seat is fixed in the grooves, and each pole is fixed at two points - to the base and the seat. For fastening, it is better to choose powerful self-tapping wood bolts.
Another budget material for a country bench is pallets (wooden pallets). But for the manufacture of garden suitable for furniture not any pallet. Ideally, you need from a good edged board, the so-called euro pallet, which can be recognized by the EUR marking.

In principle, the standard width of the euro pallet is somewhat large for the seat - 80 cm. It can be shortened to 67 cm by cutting along the contour of the central bar. But you can not do this. Here are some examples of simple structures with different options bases and seats:
1. Bench of four pallets uncut in width. Three serve as a base, and the fourth as a back. At the pallet for the back, you will have to remove part of the support bars, and ensure the rigidity of the bench with wooden slats.

2. In this case, four pallets are also used, but already cut. Three ropes woven obliquely are used to fix the back, and wallpaper nails are used for decoration.

3. This bench is made from just two pallets. One is intact, and the second is cut and, as it were, bent at an angle - it serves as both a seat and a back. The design is good for its mobility - there are small wheels as legs.

Perhaps the only inconvenience of using euro pallets as a starting material is standard sizes 80x120 cm. They limit the possibilities for creativity to some extent. The use of ordinary lumber (boards, bars and beams) allows you to make a bench for giving for every taste.
Board and bar
It should be said right away that any bench drawing can be adjusted for specific conditions. The only limitation is that the thickness of the board and the section of the bar are sufficient to fulfill the load-bearing properties.
Below is a drawing of a bench, which is made of only three “paired” elements:
- seat and back;
- short support (back leg) from a board in the form of a trapezoid;
- long support (front leg).
 1- front leg; 2 - rear leg; 3 - seat; 4 - back; 5 - front view; 6 - side view
The result is a stable structure with a triangle at the base and two transverse stiffeners.
This is what the bench looks like in real life.

In this drawing, the bench is in a more complex design. For its manufacture, you need a 40x140 mm board (supports, back and seat), a 40x70 mm bar (short bundles of supports) and a 20 mm board (long bundle between the sidewalls).

And this is the same design, but using a board and a bar 75 mm thick. Small differences in the base and attachment of the ligaments are not fundamental.

There is only one condition in principle - the boards in the seat are attached with a small gap, sufficient to compensate for the expansion of the tree in high humidity.
large forms
Wooden benches in a "large format" look original.
For example, here is such a "thick" unedged board across the entire width of the log. Coated with clear lacquer, it conveys natural beauty tree with all color transitions.

From rounded logs, you can build not only a summer house or a bathhouse, but also such a garden bench.

And from a bar you can assemble an original chair that can serve not only under a canopy, but also in the open air - removable pillows can be easily brought into the house in bad weather.

stone and wood
Stone, like wood, also organically fits into the landscape. suburban area. Of course, a flat slab is practically never found in nature, but sawn stone can be used.

The next option is easier to perform - the bench is made up of small blocks wild stone. And since such a surface is not only cold, but also uneven, you can’t do without pillows.

Pillows add comfort, but they have to be constantly brought in and out. That is why for seats in garden benches, regardless of the base material, wood is used. Like this one original bench, at the base of which a gabion is used (a mesh cage filled with stone, rubble or pebbles).

Concrete is no less popular for making the base of the bench. But it is difficult to make a form for pouring a complex contour at once, but a small formwork is simple. And even a “cold joint” when pouring in two steps will not affect the strength of the structure (such as in this photo).

Another option artificial stone- hollow building concrete blocks. It is enough to fasten them together with good masonry glue, and lay a bar in the cavity, and the bench is ready.

metal and wood
The simplest design benches on metal frame use a square profile.
You can weld two sidewalls from a profile pipe in the form of the letter "H", and wooden seat from the array will also serve as a "stiffener".

In the following example, solid wood is also used as a stiffening element, but the supports are made in the form of a square with a cross member for attaching the seat.

And this is the simplest self-supporting construction of a square profile, in which the strength and rigidity of the welded base is sufficient to make the seat from a wooden bar.

The following photo shows a factory-made bench.

But if there is a pipe bender in the home workshop (and it’s easy to do it yourself), then bend two types of arches and a “wave” from round pipe simply. Then metal blanks it is necessary to weld, put plastic plugs on the legs (sold for any profile and pipe size) and fix the bars on the “wave”.
Do-it-yourself bench for giving: photo, drawings, diagrams. Arrangement of a personal plot is carried out by various methods: sheds and gazebos are installed, paths are laid, flower beds and flower beds are broken. The final nuance is garden furniture. For arranging a small recreation area, a do-it-yourself country bench with a back is suitable: drawings and diagrams of beautiful designs, as well as recommendations for their creation, you can find in this article.
A garden bench with a backrest can be a key element in the design of the local area.
Types of designs and photos of country benches
The modern range of garden furniture is quite extensive. Classification of products is carried out on the basis of such signs:
- characteristics;
- material;
- functionality.
 Wooden bench located on the veranda of a private house
Photo of country benches with their own hands, their functional side
Functional features furniture are valued along with their practicality and durability. All products are divided into two large groups:
- benches used exclusively for sitting;
- multifunctional benches (the product can perform several functions - be a bench, rocking chair or table).
 Bench with backrest made of logs and planks
Helpful advice! Use unusual design transforming benches to save space in the garden. It can easily be converted into a table for writing or eating outside.
Many homeowners install swing benches. To create them, materials of various types are used, and the structures themselves can be given an interesting shape. To make it convenient to use such a bench, it is imperative to build a canopy over it. It will provide protection from the sun and rain.
 Bench-swing - a great option for garden furniture
Popular for making do-it-yourself benches with a back, having a stationary type of placement. Most often they are made of concrete or brick, and a special place is selected for installation. Such products are not afraid of the influence of the sun and moisture.
There are folding benches with small dimensions and a mobile design. They are useful if the suburban area is rarely used. During the absence of the owners, folding benches are removed to the garage for storage or to the house.
 Wooden bench with a back used to organize a seating area in the garden
Photo of a bench for a summer house with your own hands made of wood and metal
Metal products have the highest strength characteristics. They are reliable, durable and can be used throughout the year. Metal structures are unpretentious in terms of maintenance. It is enough to periodically cover their surface with an anti-corrosion agent that will protect the benches from the harmful effects of moisture.
 An example of a wooden bench with a metal frame
A bench made entirely of metal will have a very massive appearance, so modern designs are made using forged patterns. It should be remembered that for this you need to acquire a welding machine.
Most of the owners of suburban areas, who decide to make a bench for a summer residence with their own hands, prefer wood. This material becomes the basis for creating benches with a beautiful design, excellent operational characteristics and warm texture. Regardless of the design of the garden or yard, wooden products can always fit harmoniously into the landscape.
 Combined bench made of wood and metal with forged elements
Helpful advice! Take oak or larch for work.
In order to protect the surface of the product, it is necessary to cover it with a varnish or paint. This will prevent damage to the wood, which is caused by insects, fungi, mold, as well as moisture and sun. Using a lacquer as a finish will help preserve the natural grain of the wood.
 Metal products are characterized by high strength and long service life with minimal maintenance.
Photo of a bench for giving with your own hands made of stone
If you prefer practical options benches, you should pay attention to products made of stone. This type of material is characterized by low cost and long service life, and the structures are durable, reliable and aesthetically attractive.
The stone belongs to the category of materials of natural origin. Despite this, the designs of such benches will not always be able to support any design and style of the garden. Stone elements must be present on the site as an addition. The shops look especially advantageous against the backdrop of a residential building, partially made of stone.
 Bench made from natural stone, with soft mattresses and colorful pillows
A good ensemble will be made of stone:
- steps;
- tracks;
- reservoirs;
- gabions;
- flower beds.
The supports of fences, arbors and awnings can be made of stone partially or completely. If at least one of these elements is present on the site, stone shops will always come in handy. However, it should be remembered that such products do not have a back.
 Even the simplest stone bench looks elegant, noble and solid.
DIY photo of country benches: successful homemade products made of plastic and other materials
Plastic products have a number of advantages, which include:
- simplicity and low weight of the structure, due to which the transportation of the material does not cause difficulties, and the bench itself can be moved from one place to another;
- profitability;
- wide choice color solutions, which allows you to make a product that will subsequently fit well into the design of the garden;
- practicality (folding-type structures are easily disassembled and stacked in the trunk and also easily assembled on site).
 Plastic benches are lightweight, making them extremely mobile and easy to transport.
Helpful advice! Use the drawings of garden benches with your own hands to create structures from combined materials. You will be able to endow your product with positive performance characteristics that are inherent in each type of raw material used.
Combined combinations of materials of different texture, texture, color and origin are used not only for decorative purposes. The most common option is a combination of stone and wood.
 Combined bench built from metal and wood
Designs made of wood and complemented by stone or metal elements look original. In such projects, wood creates a soft and beautiful texture, while stone and metal are responsible for strength.
Do-it-yourself examples and technologies for creating country benches and benches
The designs of the bench and bench have some distinctive features. Building a bench is the easiest way to organize a seating area in the garden. The product does not have a back and, unlike a bench, has a simple external design.
 Creating a shop - fast and easy way garden seating arrangements
A do-it-yourself wooden bench with a back can have a more complex decorative design:
- non-standard form;
- armrests;
- design, decorated with carved and forged elements.
The simplest ideas for creating country shops
To revive the design of a simple bench, it is not necessary to come up with a complex drawing and puzzle over the creation of additional accessories for the garden. It is enough to use two wooden boxes and several boards.
 Original wooden bench with a table designed to seat two people
The boxes in this case will serve as supports. After making the bench, they can be filled with earth and organize a small flower bed. A seat is made from the boards, which is installed between the boxes. The material must be sanded well with sandpaper, remove all irregularities and burrs.
Helpful advice! From benches based on boxes, you can make a garden bench with a backrest with your own hands. It is enough to install the structure against the wall and nail it onto its plane necessary place several boards as a back.
 Rice. 1-1. Scheme of a bench with wooden flower boxes: 1 - arrangement of a bench and calculation of materials: A - logs (2x4 boards 17 1/2" long - 6 pcs., 2x4 boards 20 1/2" long - 4 pcs.); B - drawer bottom (3/4 plywood 20 1/2” x 20 1/2” - 2 pcs.); C - trims (1x4 boards 23 1/2” long - 16 pieces); D - side lamellas (boards 1x6 25” long - 32 pieces); E - trims for facing the top (2x4 boards 45" long - 8 pieces); F - seat frame (2x4 boards 63" long - 2 pcs., 2x4 boards 17 1/2" long - 2 pcs.); G - cross bars (1x2 boards 17 1/2” long - 5 pieces); H - seat (boards 1x4 60" long - 5 pcs.); 2 - side facing; 3 - installation of the walls of the flower box; 4 - mounting dimensions of the walls of the box; 5 - diagram of the device for the bottom of the flower box
Wood structures have a certain disadvantage. The material itself requires constant care, and in this case the tree is also in contact with the soil, it is necessary to periodically water the plants. To make the shop more practical, wooden boxes can be replaced with concrete or stone pedestals. Concrete flower beds can be made independently or purchased at the store.
For the seat, you should use processed boards or half a log. The choice of raw materials depends on the style in which the design of the garden or patio is made. It is recommended to fix the seat with metal corners fixed to concrete using dowels, and to wood using through bolts or self-tapping screws.
 Rice. 1-2. Scheme of a bench with wooden flower boxes: 6 - mounting dimensions of the seat frame; 7 - strengthening the design of the bench; 8 - installation of seat rails; 9, 10 - drawer installation
As supports, you can use flowerpots with dwarf trees or ornamental bushes. Only one, but very important requirement- the container must be very strong. A hole is cut into the seat in the shape of a flowerpot in the place where the legs of the benches are usually located. The size of the hole should be sufficient to allow the plant to grow and care for it, however, it should not exceed the size of the container. Essentially, a plank seat is placed on top of the flowerpots and fixed by gravity and the weight of those seated.
 Corner wooden bench with flower boxes installed on the veranda of a private house
Making country benches from wood with your own hands in ethno style
Ethno and rustic design styles are often used in interior design. A country house, cottage or cottage is a great place to create an eco-friendly and natural corner suitable for a family vacation. This design can be continued in the garden. To do this, it is enough to make a bench with a backrest with your own hands from logs (Fig. 1) and other natural materials.
Helpful advice! For the construction of the structure, logs with or without bark can be used. To process the material or leave it in its original form - depends on your wishes and the design of the site.
 Benches made of logs are distinguished by originality and environmental friendliness
Do-it-yourself technology for making a country bench from a log
To form a seat, it is enough to saw a tree trunk along. This can be done exactly in the middle (in the diameter zone) or by moving the saw closer to the edge (in the medium diameter zone). The back is made from a thinner tree trunk, or you can cut closer to the edge. As a result, this element must be thinner and lighter than the seat part.
 Rice. 2. Garden bench made of logs in the courtyard of a country house
Legs can be made from the remains of a log. They are connected to the seat part with metal pins. It is done like this:
- In the parts to be connected, holes are made for the pins in the appropriate places. The diameter of the holes should be slightly smaller than the diameter of the fastener.
- The pin is driven into one of the holes approximately in the middle of its length.
- On top of the free edge of the pin, the second part to be connected is placed and also hammered. In this case, the blows fall not on the pin, but on the wood.
 Ethno and rustic styles are great for decorating a personal plot
Fasteners are hammered with a sledgehammer or hammer. Since wood is a fairly soft material by its structure, hammer blows can damage its surface. To avoid this, you need to put an unnecessary board under the instrument.
Pins provide a reliable connection of all parts. To strengthen the fixation, you can install 2-3 pins.
 Bench with a back made using logs
Ethno style in do-it-yourself country benches with a back: additional ideas
In the ethno style, you can create a design with a non-standard design. The highlight can be, for example, the manufacture of a bench using curved branches of different diameters. Before assembling the product, these branches are processed and skinned. In other words, the bark is removed from them, and then the surface is polished with sandpaper. An unedged board must be used to assemble the seat. It is processed in a similar way.
 Various options for wooden benches created in ethno style
Note! All elements of this design have rounded shapes, and the seat boards face forward.
If your summer cottage has a wicker fence, you can use the same design option with some changes. Short seat boards can be replaced with long ones by placing them along. The back is formed according to the principle of weaving from branches of medium thickness, which bend well.
 Rustic bench will become a unique object in the garden
To make a wicker back, it is not necessary to have any special skills. You may not get a very neat result, but this is not necessary. The back should be simple and unobtrusive, coarse weaving will only increase its decorative properties. Branches can be placed tightly or, conversely, leave gaps between them so that your bench “breathes”.
 A bench made of logs is installed on a closed veranda of a country house
A bench as an alternative to a do-it-yourself cottage
Despite the absence of a back, this scheme (Fig. 3-1) for making a bench looks quite attractive due to the characteristics of the material from which it will be made. The design itself has a very simple structure, so everyone can handle the technology of its creation.
For the legs you will need a rounded timber. If you have logs with a small diameter, you can save on the purchase of material and trim them yourself. The original appearance of the bench is obtained due to the fact that the bars are stacked one on top of the other and fixed. The result is a beautiful support for the product.
 Rice. 3-1. The procedure for manufacturing a simple wooden bench: 1 - drawing up a design drawing
Calculation of parameters and required materials
The height of the bench for giving can be adjusted according to your needs. This indicator also depends on the diameter of the timber that will be used in the work. To calculate the amount of material, you need to determine how many bars will be stacked one on top of the other to form the required height of one of the legs.
Size chart:
| Product Parameter | Indicator, cm |
| Length | 120 |
| Height | 38 |
| Width | 45 |
| Seat board (section) | 4x9 |
In our case, 5 bars are required, the length of which is 0.45 m. Calculation formula: 5x0.45 \u003d 2.25 m. Based on this, 4.5 m of timber (2.25x2) will be required to build two supports. The seat will consist of five boards 1.2 m long. For its manufacture, the following amount of material will be required: 5x1.2 \u003d 6 m.
 Rice. 3-2. The procedure for manufacturing a simple wooden bench: 2 - cutting wood for the legs of the bench; 3 - drilling holes in the details of the legs; 4 - preparation of boards for the seat; 5 - processing the edges of the seat parts
Helpful advice! To round the edges of the timber, you can use a cutter or purchase ready-made profiled material. Its cost is higher, but profiled timber is much more convenient in work.
Initial stage: preparation of material
To begin with, boards for the seat are being prepared. The material is cut into the required number of boards of the appropriate length and processed. Sharp corners should be rounded off. Take advantage of the capabilities of a milling cutter or grinder for this. If you do not have such a tool at hand, it will be enough to process the edges with sandpaper.
 Rice. 3-3. The procedure for manufacturing a simple wooden bench: 6, 7 - marking the details of the legs; 8 - drilling holes at the intended points; 9 - application protective coating on seat parts
Grinding with sandpaper is a long and laborious process. To simplify your work, you can order the grinding of the material at the sawmill. After the boards are prepared, they need to be opened with a varnish composition. It can be a completely transparent varnish or a tinted composition (the choice of topcoat is up to you).
The bars intended to form the legs of the bench are tightly stacked next to each other so that their edges form a straight line. Using a pencil and square, mark the areas where the fasteners will be installed. The lines should be distributed along the entire length in increments of 7-10 cm.
 Rice. 3-4. The procedure for manufacturing a simple wooden bench: 10, 11 - fastening the legs to the seat; 12 - view of the finished product
Assembling a wooden structure: mounting fasteners
Metal pins will be used as fasteners. An alternative replacement for them can be dowels made of wood. Holes are made for the installation of fasteners, the diameter of which is slightly smaller than the diameter of the pins, and the depth is half the length of the pin.
To fix the parts, the fasteners will be hammered into one of the bars, and the next element will be pushed through the hole on top of it.
 A simple bench without a back can be used not only for sitting, but also as a table.
Helpful advice! Assembling the structure with pins - reliable way mounts. To increase the strength of fixation, you can use the adhesive composition during installation, but this technique will make the structure non-separable.
The pin connection is also used in the process of creating, according to the drawings, a do-it-yourself bench made of wood, the design of which is equipped with a back. A qualitative result can be achieved only if all the holes are located strictly one above the other. As a result, all parts during assembly should form an even edge line.
 Wooden table and benches painted in White color, form a cozy dining area in the garden
After drawing the marking lines, you need to measure the distance from the edge, which should be the same. For these purposes, it is recommended to create a template. It is enough to take a piece of the bar, the width of which is 1.5 cm. It will serve as a kind of limiter. In other words, a distance equal to the width of this bar will separate the holes from the edge. Attach the template exactly along the edge line and mark the intersections with the already existing perpendicular markings.
The installation of the pins should be done in a checkerboard pattern, so you should place the holes not at each intersection of the lines, but through one. Holes are also made on the other side of the bar. They should be staggered in relation to the holes that were made earlier. As a result, when connecting the legs to the seat, each plank will have a pair of pins.
 A simple bench with a backrest built from wood
The final stage of creating a bench made of wood
From a technological point of view, the previously described type of connection can be considered correct. However, the scheme of its installation is quite complicated for a person who does not have the necessary skills.
There is an easier way to fasten the structure:
- The bars are stacked on top of each other.
- Folded parts are fixed with clamps.
- Performed through holes at three points (in the center and along the edges).
- Through the holes, the parts are fastened with a long stud (do not forget to put washers under the nut and cap).
 Original bench made from an old wooden bed
After that, the seat boards are nailed to these legs (on top) or you can make a pin connection in this place.
Helpful advice! To hide the placement of the nails, prepare a masking composition from a mixture of very fine sawdust and mastic intended for wood. Choose mastic to match the shop. Apply this mixture to all joints. After drying, the surface should be sanded.
 A variant of a simple board bench attached to a tree in the garden
When the assembly of the structure is completed, grind all the parts. Their surface should be as smooth as possible. After that you can apply top coat. Use for this purpose a varnish composition or wood paint intended for outdoor use. It is better if the finish coat is translucent. In this way, you can leave the natural pattern of the wood visible.
 Wooden benches with comfortable soft seats decorated with pillows
Do-it-yourself drawings of benches for giving: photos and descriptions
Bench for giving due to the presence of a backrest, it has a more convenient design than a bench. You can lean on it and relax your back. The capacity of such products can be different, but usually do-it-yourself drawings of wooden garden benches are made for 2-4 persons. This is done for the reason that the long structure needs to install an additional support. As a result, the process of creating a product becomes more complicated. In fact, there is enough space for 2-4 people, so you can limit yourself to making the simplest designs.
 The bench, due to the presence of a backrest, has a more comfortable seating design compared to a bench
Do-it-yourself country bench with a back: design drawings for two persons
To make a bench for a summer residence with your own hands with a wooden back for this project (Fig. 4), you need to acquire the following tool:
- drill;
- a set of drills;
- hacksaw;
- planer.
Note! The design is intended for installation in the garden, on the balcony or terrace.
 Benches built from wood harmoniously fit into any landscape
It will take you no more than one day to complete all the work on creating a bench. A square bar made of pine will be used as the main material. The parameters of its section are 6x6 cm. You will also need "twenty" boards. Before cutting these boards, they should be planed until parts with dimensions of 5.8x5.8 cm are obtained.
Do-it-yourself bench for giving from a tree: step by step instructions
Assembly do-it-yourself benches for summer cottages from pine bars is carried out in the following sequence:
- with the help of dowels and adhesive composition, we assemble the legs for the U-shaped sides. Then, using the same fastening method, we fix slats (5.8x2 cm) and prongs (3.5x3.5 cm) mounted on the sides on them;
 Rice. 4. Drawing of a wooden bench with a back for two persons
- to mark the locations of the reciprocal holes for mounting dowels, use a marker;
- connect the sidewall and the longitudinally located rail. In order to mark the position of the sidewall, a 2 cm thick spacer should be used;
- fix all elements while drilling holes with clamps. This will allow you to achieve accurate mating between the connected parts of the structure;
- before doing final assembly, sand all the elements well.
The last stage of construction is the application of a protective agent and a top coat.
 For a longer service life, wooden structures need to be treated. protective agent and applying a finishing coat
Do-it-yourself country bench from improvised materials: the use of pallets
From such improvised materials as pallets, you can create an interesting bench design (Fig. 5). It can be installed not only in the garden, but also on the terrace and even inside country house. Three pallets are required for work.
Manufacturing steps:
- one of the pallets is divided in half. These halves will subsequently be the back of the product. Cutting must be done so that after assembling the parts of the back and seat form a figure of a geometrically correct shape, and all edges coincide;
 Rice. 5. The procedure for making a bench from pallets in six photos
- two other pallets are knocked together with nails. We fix the back halves to them;
- a mattress of the appropriate size should be placed on top of the structure. You can use cushions from an old sofa, reupholstering them first, or sew new ones. You can also put a few small pillows on the back.
 Usage wooden pallets – interesting way creating original garden furniture
Helpful advice! You can leave the mattress lying still or fix it with straps. For greater functionality, wheels can be added to the design.
Do-it-yourself drawings of a country bench with a wooden back: Transformer design
For the manufacture of the structure, you will need to purchase pine lumber.
Materials for work:
| Material type | Quantity, pcs. | Section size, cm | Length cm |
| Board | 6 | 3x10 | 100 |
| Board | 2 | 3x10 | 32 |
| Bar | 4 | 3x6 | 80 |
| Bar | 2 | 3x6 | 50 |
Manufacturing technology of a transformer bench
Following the step-by-step instructions, you can create an interesting bench, the design of which can be transformed into a table with two benches (Fig. 6).
The main stages of making a bench:
- having created the supporting parts according to the drawing, attach 3 boards to one of them. The seat will be formed from these boards. At the same time, do not forget to step back from the end part by 5 cm. 4 self-tapping screws must be installed in each board. Two of them will fix the seat to the support on one side, the rest are designed to fix the seat to the other support (on the other side of the product);
 Scheme with mounting dimensions of the transformer bench
- for each nodal assembly zone, it will be necessary to install 4 fasteners;
Helpful advice! When assembling the assemblies, apply wood glue to these areas. Adhesive composition increase the strength of fixation and durability of the entire structure.
- after all the parts are prepared for work, the legs, which have backrest and seat support, should be sawn from the end at an angle of about 75º. Using self-tapping screws designed for working with wood, connect the legs in pairs with the middle bars. Optimal length fasteners is 5 cm;
 Rice. Fig. 6. Scheme for creating a transformer bench: 1 - kinematic diagram of the transformer in the "table" position (1 - position limiters B (pipe 20 × 20 mm, length 35-49 mm), 2 - support rod); 2 - detail C (pipe 40 × 20 - 2 pcs.); 3 - connecting jumpers (pipe 20 × 20 mm). D - for an external bench, D1 - for an internal one; 4 - parts B, B1 (pipe 40 × 20 mm). B1 is mirrored with respect to B; 5 - bench leg (4 pcs.), where: A - steel pipe 40 × 20 mm, 1 - jumpers (pipe 20 × 20 mm - 4 pcs.), 2 - support rod
- next is the back. In the process of transformation, it turns into a countertop. Locate the longitudinal edge of the support board. Its length is 32 cm. Here you need to attach three boards 150 cm long. In this case, the indent from the end in this case will already be 8 cm;
- boards are mounted so that a gap of 1 cm is formed between adjacent elements;
- in the support board, you need to make 3 holes, the diameter of which is 0.8 cm. It is better to perform this procedure in advance. These holes will be used to fix the back of the bench in a horizontal position.
 One-piece wooden structure for the garden, consisting of a table and benches
The final stage of the construction of the transformer bench
To create axes of rotation, make 2 holes in the top of the rear leg. Fixing the back to the base of the product will be carried out by a pair of M8 bolts.
One of the holes made will be axial, the second - ordinary. To simplify the operation of the bench, equip the bolt in the area of \u200b\u200bthe axial hole with a nut with 6 edges, for the second, a wing nut is suitable. She should bend her mustache. Due to this simple manipulation, fasteners can be turned away / wrapped without the use of additional tools, but only by hand force.
 The key link in the patio is a wooden bench with a back
Upon completion of all work, you need to check the design for operability. Set the backrest in an inclined position and secure it with bolts. Remove the fastening element from the hole and move the backrest to a horizontal position. To fix it, place the bolt in its original place and secure with a nut. The design is completely ready for operational use.
When creating benches, you can experiment. The main thing is that at the same time the product turned out to be durable and practical.