Mini brick oven for home. Not cramped and not offended: a small brick oven will warm the whole house and will not take up much space
The advantages of the Russian stove can be listed for a long time: it warms and feeds, and provides a warm bed for sleeping. But in a small house there is not always enough space to accommodate a bulky structure. The masters of the stove-makers came up with a small copy - a mini Russian stove built with their own hands is not inferior in function to a full-fledged design.
For those wishing to try their hand at the stove business, we suggest considering one of the options for building a mini-stove with orders and a description of the technologies. If you enlist the help of an experienced craftsman, you can independently build a beautiful, efficient, useful heating unit that will last for decades.
Fundamentally, a miniature stove does not differ from an ordinary Russian stove - it has a similar design, the same functions, the same design. The main distinguishing feature is the size: it takes up much less space on the floor due to the fact that the stove and the crucible are arranged and located side by side.
The floor area occupied by the structure is usually no more than 1 m x 1.3 m, but other options are possible, a little more or less. The height of the structure is the same as usual: the main part at the top smoothly rebuilds into a re-tube and ends with a pipe extending into the ceiling.
Both the large cooking chamber and the stove are actively used for cooking. A small firebox melts quickly enough, so it is used in the summer when heating the whole house is not needed. On the burners, you can easily place 2-3 pans at once, and if a large oven is also heated, then bake bread.
The stove also stays hot for a long time, so it can be used for reheating or simply for keeping breakfast or lunch warm.
A feature of a compact stove is the preservation of two fireboxes, which are used with the same activity. But they are often located on two opposite sides - in this case, a free approach will be required both in front and behind.
It must be remembered that a mini-copy in terms of danger level does not differ from a large Russian stove, therefore, during construction, it is also necessary to insulate the foundation and nearby surfaces that are prone to fire. Walls, wooden sections of the floor, the edges of the opening in the ceiling are sheathed with metal or asbestos sheets.
Difficulties may arise for those who want to build a couch - of course, the mini-version does not imply a full-fledged place to relax, the occupied area is too small. However, you can build a niche for drying, as well as install a small boiler
DIY construction technology
In everyday life, there are many options for mini-designs that have various names. Often they are simply called Russian stoves or "housekeepers". If you plan an independent construction of a heating structure, then it is better to stop just at the construction of a Russian mini-oven - it is made both easier and faster.
The first two stages are universal and suitable for the construction of any Russian stove. Starting from the 3rd stage, we present development by A. Emshanov- an excellent example of a compact and multifunctional mini-stove.
Stage # 1 - preparing tools
Even for the simplest masonry, a special stove-maker's tool is required. Despite the apparent primitiveness of the devices, each of them has a clear purpose. We list the main tools that are best prepared in advance.
Image Gallery
For summer kitchens, livestock pens and garages, it is very beneficial to install small-sized brick heating stoves, as they have a high heat transfer coefficient and economy. As an energy resource, you can use coal, firewood, briquettes and pellets, in general, all types of solid fuels. We will pay attention to a separate design, as well as the basic principles of masonry and watch the video in this article on this topic.
Brick ovens and the basics of their masonry

Any brick mini-oven, just like a full-sized one, requires a certain order for laying bricks and pouring the foundation. All structures have a certain written or unwritten operating instruction, which depends on the masonry and the size of the heating device.
About brick

- Each side of the brick has its own name and you need to know this for its laying, since it can be installed in any plane. This is especially true for laying stoves, where the brick can lie flat (on the bed), on the end (on the poke) or on its side (on the spoon).

- For laying small-sized stoves, as a rule, a spoon dressing is used, which is the first on the left in the upper figure. But any dressing implies the absence of continuous vertical seams. This means that the brick from the top row must overlap the joint on the bottom row, and so on to the very top of the structure, including the chimney, if it is also brick.
- At this time, in the Russian Federation there is a single standard for building bricks, so a single one has dimensions of 250x120x65 mm, - 250x120x88 mm and a double one - 250x120x103 mm. Of course, there are other sizes, for example, the double sand-lime brick M 150 has 250x120x138 mm. The brick of Western European production also differs in size, besides, there are no uniform standards, more precisely, there are much more of them.
- classic dimensions (250x120x65 mm) weighs from 3.5 to 3.8 kg. The letter M with the numbers behind it indicates the brand, and the numbers themselves indicate the allowable compressive pressure in kg / cm 2. Marks are M 75, M100, M125, M150, M200, M 250 and M300.
| brick name | production arch | Length | Width | Thickness |
| Fireclay straight | SHA #5 | 230 | 114 | 65 |
| Fireclay straight | SHA #8 | 250 | 124 | 65 |
| Fireclay straight | SHA #9 | 300 | 150 | 65 |
| End wedge | SHA No. 22 | 230 | 114 | 65/55 |
| End wedge | SHA No. 23 | 230 | 114 | 65/45 |
| Rib wedge | SHA No. 44 | 230 | 114 | 65/55 |
| Rib wedge | SHA No. 45 | 230 | 114 | 65/45 |
Firebrick size chart
- As you can see, fireclay bricks have slightly different sizes and the table is here specifically so that you can compare the sizes when you make a firebox. There are also other types of refractory bricks, such as quartz, carbon or hollow. But the most attractive in appearance is fireclay, in addition, it can be made in different colors.

- Now there are tools for cutting bricks quickly and accurately, and if earlier you had to do such things with an ax or a small pick, now there is a diamond-coated disc for this. It is installed either on a grinder or an electric circular, but the second option allows you to cut only straight lines, while a grinder (see photo above) can cut various shapes.
Advice. When cutting a brick with a grinder or an electric circular saw, a lot of dust occurs, so to avoid this, soak the stone being processed in water or cut it under a weak stream from a hose.
Mortars for masonry

- For laying bricks, cement-sand, cement-screening and clay-sand mortar are used. So, screening instead of sand for mortar is used to fill the foundation, and the cement-sand mixture is used for one or two first rows of masonry. If for cement grades M 400 and M 500 sand is added respectively 1/4 and 1/5, then the screening for the screed should already be mixed 1/6 and 1/7.

- A mixture of clay and sand is somewhat more difficult to prepare, as this will take more time. In order for the clods of clay to break well, they need to be soaked in water since the evening, and those that are not soaked, it is best to knead with your hands so that there are no small lumps left.
- The ratio of clay to sand can be 1/2 or 1/3 - everything will depend on the fat content of the solution and this can be checked with a trowel. The normal consistency will be if the solution slides easily off the trowel, leaving almost no traces, and will be as thick as mashed potatoes.
garage oven

- We bring to your attention, built by Alexander Zalutsky according to the project of V. M. Kolevatov with a blind hearth. If you already have a poured foundation, then it can be erected in half a day, but just in case, let's see how this foundation is equipped. The depth can vary from 50 to 70 cm, and even though the structure will not be too heavy, you need to go deep below the freezing point of the soil.
- Considering that we will have a furnace of two by two and a half bricks, that is, approximately 50 × 63 cm, the perimeter of the foundation will need to be increased by at least 5 cm in each direction. Cover the bottom of the excavated hole with sand 10-15 cm, fill it with water to sit down, and then pour rubble on top, leaving 20-30 cm to the top for a cement screed. Instead of crushed stone, screenings, gravel or various construction debris can be used.
- The backfill is carefully compacted and ruberoid spreads on it. After pouring the solution and drying the screed, cover it with another layer of roofing material according to the size of the furnace being built.
Advice. Considering the fact that the soil is constantly moving, the neck of the foundation can be made a little (by 5-10 cm) already backfilled. To do this, install the formwork from the boards on the backfill.

- Lay a layer of bricks on a dried and waterproofed foundation, two by two and a half stones in size. To do this, use cement mortar, just make sure that the corners remain straight, 90⁰, and the base is strictly horizontal. You will not have to cut the bottom row at all, although this is still foreseen in the future.
- We are considering how to build mini-brick ovens, and we are laying the next row, but not a solid one, but only a border, that is, a total of seven bricks. Do not forget that now we are already switching to a clay-sand mortar. We will install the furnace door on this row, having drilled holes in it in advance to improve traction (this can be seen in the photo).

- We install the door on a galvanized wire and cover it with three rows of bricks. If there is a fireclay brick, then it is better to overlay the furnace compartment with it, but in our situation only one fireclay was installed for experimental verification of heating. A row was laid on top of the door without any trimming, but if the dimensions of the cast-iron box require it, then it is better to make cutouts.

- Raise two more rows of bricks above the door, and this will end the firebox. The third row after the firebox will be laid with a poke, that is, across, as can be seen in the top photo on the left, so the outlet is one brick in size. On the next row, spoon masonry is again used - the stone is installed on the bed, with a spoon out and in.

- After that, the narrowing of the hood begins - the brick is placed on the edge and the masonry is obtained two by one and a half bricks. After that, one row is placed on the bed, narrowing the exit to the size of a brick, and then again a jumper is inserted on the edge and in the middle, as can be seen in the photo above on the right side.

- So you raise the masonry up to the metal pipe, which you release through the wall, thus arranging a knee. After that, the do-it-yourself brick mini-oven ends, but this does not mean that it can be melted right away. It is better to wait at least a few days so that the solution is at least half dry.
Advice. Most likely, in this case, you will install a metal exhaust pipe, the price of which will be lower than that of a brick one. But it must be raised above the top point of the roof at least 0.5 m to improve traction. Do not forget to install a cap over the pipe.
Conclusion
Small-sized brick ovens for a summer residence or a garage are sometimes folded without any scheme and preliminary calculations. But in this case, you need to know the principles of laying furnaces well and clearly imagine the traction system in the future design.
A mini brick oven for a summer residence is done completely with your own hands and, moreover, it does not take much time. The mini brick oven is perfect for places where there is no central heating. This is, for example, a cottage.
You can always come and warm up the room, also cook your own food. Today we will tell you how to make this design. The installation cost is not high, and everyone can afford it.
You can also see various types of this design in the video in this article.
What is attractive mini-oven
A brick mini oven for giving is quite attractive in many ways:
- It occupies a small area, which is equal to 0.40 meters squared. Despite its very small size, it can give off heat for a long time and can serve as an alternative to a metal potbelly stove.
- Due to its small size, it does not need to build a solid foundation. It can be laid out directly on the floor.
- If the floor is wooden, then it is advisable to put a sheet of metal with asbestos on the bottom of the stove to protect the floor from fire. Compared to a potbelly stove, it is more functional, as it has a hob on which you can cook food.
- It can be made entirely by hand. From this, its price will not be significant.
To ensure this functionality, the furnace design includes:
- Cast iron stove for cooking.
- Chimneys to increase the efficiency of the furnace.
- smoke tooth. Its use allows you to turn a mini-oven into a fireplace.
A mini brick stove is laid out within one working day, of course, if there is work experience.
After laying out the stove, you can try it in operation by partial ignition, using wood chips or paper for this.
Attention: It is forbidden to kindle the stove using large fields, as cracks may appear in the stove structure under the influence of high temperatures.
After a trial ignition, without allowing the stove to warm up, it is allowed to dry naturally. This may take up to 2 weeks.
Masonry mortar
If you are making mini ovens for brick baths, then you need to make a solution taking into account high humidity.
- To lay out a mini-oven, you can use various types of mortars, such as cement-sand, cement-screening or clay-sand. Cement screening mortar can be used to fill the base under the furnace, if necessary. A cement-sand mortar is prepared for laying out the first two rows of the furnace, and the entire masonry is laid out with a clay-sand mortar, starting from the third row.
- Clay-sand mortar requires much more time to prepare. To get a high-quality solution, the clay is soaked in the evening so that all the smallest particles of clay soften. Moreover, it is necessary to select the desired fat content of the clay, or rather the solution, adding sand or fatter clay to it. This process is very laborious, but it is necessary for the mini-stove to end up strong enough.
- How ready the solution is for work can be checked with a trowel: if it does not stick to the trowel and does not leave its marks on it, then it can be used. At the same time, its density should correspond to the density of mashed potatoes.
Step-by-step masonry scheme.
Installing a mini oven
Brick is a traditional stove lining material that has been used for centuries. A mini brick oven is made of bricks, but it is best to use two types of them during construction.
- To build a working one, it is often worth using refractory material. He will be able to withstand the firebox even with coal.
- For finishing, the front material is quite suitable.
Attention: In the construction, you can use just one ordinary brick. Only in this case it will be possible to heat only firewood alone.

Having prepared the right amount of bricks, you can start work, the instructions are given below:
- First of all, you should decide on a place for a mini-oven. Its effectiveness largely depends on this.
- A mini brick oven for a bath will occupy an area of \u200b\u200babout 800x550 mm. It is only necessary to lay a fire protection layer, as well as a layer of waterproofing. Roofing material can be used as a waterproofing layer, and sheet asbestos can be used as a fireproof layer if the base is wooden.
- A layer of sand is poured onto the waterproofing layer, about 10 mm thick.
- The first row of bricks is laid on top of the sand, without the use of mortar. This row is aligned strictly horizontally, hammering peeking bricks with a rubber mallet.
- A thin layer of clay mortar is applied to this brick row and the blower door is immediately installed. The door is set strictly horizontally and strictly vertically, after which it is securely fixed. After fixing it, you can begin to lay out the second row.
- The 3rd and subsequent rows are laid out with refractory bricks (chamotte). After laying out the 3rd row, a grate should be installed, which should be in the center of the blower.
- The 4th row is laid out in a quarter of a brick (on the edge), regardless of how the previous rows were laid out. The back wall is laid out without mortar. In the future, these bricks will be removed.
- After the 4th row, they begin to install the firebox door. It is installed in such a way that it opens from the bottom up. It is fastened in the same way as the blower, with the help of wire, the ends of which are embedded between the bricks that form rows of masonry. The door is exposed and securely fixed.
- The 5th row of bricks is laid out according to the 4th row, but the bricks lie flat.
- Then the last row of the 6th is laid out, which lies on the edge. The walls of the chimney and the inner surface of the bricks are cleaned of mortar and wiped with a damp cloth.
- The next row lies flat, while the back wall is laid out on an edge in two bricks.
- This row closes the level of the firebox and in this row a brick is installed at an angle so that it hangs over the firebox, as it were, shifting the flame closer to the center of the stove. This operation is done on the eighth row. This brick is effective when the stove is used as a fireplace, working with the firebox door open.
- The 9th row is shifted somewhat back, which allows you to maintain an open door. To ensure the tightness of the joints of the slab and brick, an asbestos cord is used. Laying a cast-iron stove on clay is not recommended.
- On the 10th row, a place is formed for installing the pipe. In this case, an attached metal pipe made of light iron is used. A brick pipe for such a mini-stove will be heavy.
- The latch, sealed with asbestos cord, is installed on the 11th row.
- With the help of the following rows, a part of the pipe is formed, which is joined to a metal pipe - a chimney.
- The final stage in the construction of mini-ovens is its whitewashing, but decorative tiling can be done. Unfortunately, whitewashing is not practical: approximately once a year, whitewashing will have to be repeated, and tiles will not only decorate the stove, but also save you from constant whitewashing.
- Before whitewashing, it is advisable to clean the stove of debris and make a trial ignition. If the stove is working and there are no problems, you can start whitewashing or cladding, after which you need to give time for complete drying. This is very important and you should not rush to ignite the mini-stove so as not to harm. You should prepare for the heating season in advance, then the winter will not seem so cold.
Material for mini oven
Building a mini-stove with your own hands requires, at a minimum, the ability to determine the quality and quantity of the material.
- In order to fold such a furnace, you need to stock up on red bricks, about 60 pieces, and refractory (chamotte) bricks, about 40 pieces. It will take about two buckets of mortar to put all the bricks together.
- The stove will not be complete if you do not purchase and install elements such as a furnace and blower door, a hob and a grate, as well as a metal valve. As for the grates, doors and stoves, it is better to purchase cast iron ones. Cast iron is not afraid of high temperatures and does not lead to large temperature differences if large elements were made according to technology.
- The design of the mini-stove is simple and its construction does not require much effort. The main thing is to correctly determine the stages of its calculation and purchase all the necessary materials, have the right tool and prepare the right solution.
Attention: It is very important that the laying is carried out in accordance with the basic requirements for laying out such surfaces: to be even and neat, and the inner surfaces of the chimney and combustion chamber should not have sagging from the solution.
- The efficiency of such a mini-oven is approximately 90%, which says a lot. At the same time, it is important to note the financial costs, which are minimal, while the functionality of the stove is quite high.
- You can build a mini-stove for any combustible material, but, as a rule, wood or coal is burned in such furnaces. The use of other combustible materials is not justified, based on some requirements, including fire safety.
- Using wood or coal, the stove does not emit any foreign odors that could harm health. You can imagine what the smell would be in the house if diesel fuel was used. Only using firewood, peat or coal will the stove be environmentally friendly.
Attention: Brick mini stoves for a bath should be made only on wood, because only such fuel provides high-quality heating and is completely safe.
A mini brick oven for a summer residence can have a rather different shape. Therefore, look at the photo beforehand and select the option you need.
iz-kirpicha.su
Small oven 2 by 3 bricks

A Dutch stove designed for heating high rooms. A simple narrow contour is formed by successively placing functional holes vertically.
Oven 2.5 for 3 bricks for 2 floors

Thick-walled furnace with a combined two-turn system. The array is set on a solid foundation. The double dash marks the ordering for the second floor.
Oven 2 to 3.5

Simple compact design. Two turns of the convective system and the absence of a hood ensure uniform and good heating with different types of fuel.
Oven 2 by 4.5 bricks with hob
A stove suitable for a summer residence or a summer kitchen is loaded with fuel through a cooking stove. The blower is also not equipped with a door. The gas, having passed through the transshipment wall, goes down and only from there goes into the pipe.
Swede cooking oven

A small combined design equipped with a hood is designed not only for heating, but also for cooking.
Strict observance of the order, the use of a plumb line and a building level will ensure the construction of a geometrically correct, functioning structure. Excessively thick mortar joints or the presence of voids in them are not allowed. It is recommended to monitor the indicators of the cross-section of smoke channels, in order to avoid their narrowing.
At the end of the work, the finished furnace is cleaned of dust and excess solution and left to dry for several days. High-quality materials, compliance with the technology of work and fire prevention measures will ensure a long period of its flawless service.
izkirpicha.com
A miniature oven from a can
This version of the stove is perfect for those who like to relax in nature. The finished product has a minimum weight and takes up very little space in a hiking backpack. Despite the simplicity of the design, the stove from the can is very convenient and productive - a liter of water can be boiled by spending a few small dry branches on it.
At the same time, such a home-made stove can work not only on branches, but also on leaves, cones and even hay. You definitely won't leave hungry!
The first stage is the preparation of components
Prepare three tin cans of different sizes in advance. Canned food containers are great. From the largest jar you will make the body of the furnace, place a medium-sized jar in the body, and make an impromptu burner from a small container.
Additionally, prepare scissors, a bar, an electric drill and a felt-tip pen.
The second stage is the manufacture of the template
The mentioned wooden block will help you to properly make a mini oven. You will use it as a template for creating holes and other activities.
First step. Insert a wooden block vertically into the largest jar and approximately at the level of the lid, mark a couple of lines on the wood at a distance of about 8 mm.
Second step. Saw out a rectangular recess of such a size that the top edge of the container can freely enter into it.
Third step. Set the bar so that the can rests steadily on it, while the upper edge of the large can, at the same time, is held in the previously prepared recess in the bar.
The third stage is the preparation of a large jar
First step. Draw a line over the bottom edge of the largest jar. This line will serve as a markup to create vents. The line can be applied with an ordinary felt-tip pen.
Second step. Drill holes along the marking line. The optimal number of holes can only be selected empirically. Excessive ventilation will lead to too rapid combustion of the fuel, and if there is insufficient draft, the stove simply cannot work normally.
Therefore, make a small number of holes to begin with, and then, if necessary, drill them after the initial tests of the furnace.
The fourth stage is the preparation of the middle can
With the second jar, do the same as with the first, with the only difference being that the vents should be under the top face, and not above the bottom.
Drill many holes in the bottom of a medium-sized container. Choose the size and number of these holes so that the loaded fuel does not fall out in the future. As a result, the bottom of the can will look like a sieve.
Fifth stage - assembly of the stove
Insert a medium-sized jar into the largest container. The pairing should be sufficiently rigid, but not tight - a small gap is required between the walls of two cans for air circulation.
The sixth stage - the manufacture of the burner
To create a burner, use the smallest tin can.
First step. Prepare holes in the side of the jar in the same way as you did with the previous containers.
Second step. Cut out the bottom of the can with metal shears.
Third step. Carefully align the edges of the burner and clean them with a file.
The seventh stage - checking the stove
Take the main part of the stove (the middle container inserted into the large one) and load fuel into it (cones, wood chips, leaves, small branches, etc.). If possible, load dry knots directly from the trees into the oven, as fuel from the ground may be damp.
Ignite the load and let it warm up. At first, you may not be very good at it, but very soon you will learn how to kindle the stove with literally a couple of matches.
Let the fuel flare up intensely, place a burner on the stove, and a pot, kettle or other container on it.
Video - Do-it-yourself mini oven
A simple "baby oven" made of bricks for the home
Set for laying a mini brick oven
Start by preparing the fixtures necessary for the construction of the unit in question. You will need the following:
- red oven brick;
- fire-resistant brick;
- chamotte and building clay;
- sifted fine sand;
- roofing iron;
- ruberoid;
- doors for the furnace, cleaning and blowing chambers;
- grate;
- stovetop for one burner;
- valve;
- steel pipe;
- plumb;
- yardstick;
- protective gloves;
- trowel;
- level.
Furnace masonry
Having prepared all the necessary devices, go directly to the stage of arranging the “baby” brick stove.
First step. Choose a place for arranging the heating unit. The distance from the walls of the furnace to the nearest walls of the room must be at least 300 mm.
Second step. Lay out a brick foundation measuring 76x50.5 cm. The depth of the foundation should be at least 5 rows of bricks. Dig and level a hole of a suitable size, lay a layer of clay on its bottom, carefully compact it and cover it with a layer of roofing material.
Third step. Lay out a platform of 12 bricks. Coat each brick with a clay solution.
After laying out three rows of the base, cover them with a second layer of roofing material and continue laying. The level of the foundation must match the level of the floor.
Be sure to check the horizontal and vertical laying of the foundation using a plumb line and level.
Fourth step. Lay out the first floor row. Lay out the second row in the same way, but provide a place for mounting the blower door. Before installing the blower door, wrap around the edge with a strong asbestos rope. Secure the door with wire.
Fifth step. Lay out the third row of the fireclay brick oven. For masonry, use a separate refractory clay mortar.
Sixth step. Install a grate in the fourth row and continue laying, placing bricks on the ribs. In the fifth row, lay the brick flat, in the sixth - again on the edge.
Seventh step. When laying the eighth row, install a beveled brick. In this design, it will take on the functions of a smoke tooth and will provide a displacement of fire when the furnace door is opened.
Eighth step. Wrap the door of the combustion chamber with asbestos cord and install it in its place.
Ninth step. When laying the ninth row, mount the hob.
Tenth step. Continue laying the stove until you reach the beginning of the chimney device (starting from the tenth row). In the chimney, prepare supports for installing the internal partition. Place a protruding (knockout) brick in the rear wall of the furnace unit. It is not necessary to lubricate it with a solution, because. by the end of the work, this brick will need to be removed.
Eleventh step. When laying out the eleventh row, install a valve previously wrapped with asbestos rope. Install a metal flue pipe.
Twelfth row. Remove the protruding brick that was not fixed earlier.
Let the stove dry for a week and you can start using the unit. The best fuel option is wood.
Video - Detailed laying of a 3x3.5 brick oven (part 1)
svoimi-rykami.ru
Advantages of a mini oven
- Small ovens are optimally economical.
- They have a high heat transfer coefficient.
- They have a high heat capacity.
- You can melt with firewood, coal, pallets, briquettes and other solid energy resources.
- They also combine cooking functions in the presence of a cast-iron stove, as well as the functions of a heater or fireplace.
- Due to their small size, they are suitable for both home and bath.
Necessary tools and materials

To build a small stove you need:
- 60 pcs. red oven brick
- 37 pcs. fireclay bricks
- 20 liters of clay mortar
- one door blew
- one grate
- one firebox door
- one cast iron plate
- one latch.
From the tools you need to prepare:
- trowel
- pick hammer
- level
- plumb line
- roulette.
 The small-sized furnace occupies only 0.4 sq.m. It is laid out from a brick placed on edge or flat. If you know the basic rules for building a furnace, then its construction will not even require a diagram or preliminary calculations.
Due to the relatively light weight of the mini-oven, it does not need a foundation, but in this case a thick, durable board should be used for the floor, well fixed on the logs.
Masonry order
- The first step is traditionally site selection and preparation for the construction of the furnace. To do this, it is necessary to lay a piece of plastic film, roofing felt, hydrosol or glassine 78 by 53 centimeters in size on the surface. Pour dry sand over the bedding (layer thickness 1 cm) and level it.
The first brick row is laid out on the sand (12 bricks without fastening are used) strictly horizontally, which can be checked with a level. On top of the first row, we thinly apply a solution of clay and install a blower door. Pre-wrap the door with a piece of asbestos cardboard or wrap it with a cord. Secure it with wire.

www.pechinfo.ru
Schemes of brick mini-ovens
Small ovens occupy a small area, the dimensions of their bases hesitate from 50 to 70 centimeters wide and up to 65-100 cm long. Height heating facility is from 1.5 to 2.3 meters. A hob, oven, hot water tank are built into the oven. Stove makers have also developed appliances designed only for home heating.
small heating structure
This is the simplest heating structure. Let's analyze the model of the following sizes:
- width grounds - 51 cm;
- length bases (depth) — 89 cm;
- height — 238 cm
A mini-stove is installed in the middle of the kitchen or against the wall. Optimal heating area - 20-35 meters. Interior partitions are erected around the stove, which allows you to heat both the kitchen and the adjacent room.
Inside the device are:
- combustion chamber;
- blew;
- smoke channels leading to the chimney.
Furnace door mini ovens ( cast iron or glass) is selected depending on the aesthetic preferences of the owners of the house. The door made of heat-resistant glass, through which you can see how the firewood is burning, gives the structure a resemblance to a fireplace. In the middle and top ovens install two smoke dampers. There is one door for cleaning channels. To build this model of the device you will need:
- 260 pieces brick ceramic;
- 130 pieces of fireclay bricks;
- grate (40x23 cm);
- furnace (30x20 cm) And blower (20x14 cm) doors;
- 2 doors for cleaning holes ( 20x40 cm);
- metal pre-furnace sheet (50x70 cm);
- two sheets roofing material 60x100 mm in size;
- sand and clay(or ready-made clay-sand mixture for masonry), clay-chamotte mixture.
Base and top mini-ovens are laid out with ceramic bricks on a clay-sand mortar. Firebox put from fireclay bricks on a clay-fireclay mixture.
On the long side grounds fit three and a half bricks, on the short - 2 standard bricks 25 cm long. In height, the masonry consists of 35 rows.
Small heating and cooking stove
This is a model of a mini-oven for heating and cooking - a convenient and very compact structure. Optimal heated area at sub-zero temperatures 20-25 square meters.
The device has the following dimensions:
- length bases (depth) — 64 cm;
- width grounds - 51 cm;
- height — 215 cm.
The structure is being built in the kitchen. The device includes:
- blew;
- combustion chamber;
- smoke channels leading to the chimney;
- cooking floor;
- niche for the oven.
Cooking floor made of cast iron has a hole that closes with a disk and a circle. On sale there are also continuous floorings. IN niche for the oven have a metal oven or hot water tank with a tap. If a niche is left free, it serves to dry things. For building a stove need:
- 222 pieces of ceramic bricks;
- grate (40x25 cm);
- door for firebox ( 20x20 cm);
- door for blower ( 14x14 cm);
- cooking flooring (35x38 cm);
- metal oven or hot water tank;
- iron pre-furnace sheet (50x70 cm);
- two doors for cleaning holes ( 20x14 cm);
- two valves;
- piece of flat slate;
- steel corner;
- clay, sand or ready clay-sand mixture for masonry.
Before starting laying, preparatory work is carried out. They include the following steps:
- choice project;
- choice and purchase materials;
- purchase of metal stove parts;
- preparation tool, containers for solution;
- preparation places for the construction of the stove;
- construction mini ovens.
Project selection
On the Internet and in textbooks on the furnace business, there are ordinal diagrams-drawings of a dozen mini-furnaces.
The choice is great, but if the home master has no experience at all, it is worth consulting with local professionals or with people who have successfully built such stoves. Choosing a device that you plan to build with your own hands, take into account several factors:
- area heated room;
- number heated rooms;
- temperature air in winter;
- frequency of use heating facility;
- appointment mini ovens;
- an experience furnace construction and repair;
- material expenses.

Photo 1. Before starting construction, it is very useful to simulate the appearance, dimensions and order of the future stove.
If planned Cook, an option with a hob and oven would be preferable. Need in hot water in winter and in the off-season, it will close the hot water tank in the niche. In it, by removing the removable tank, you can dry shoes and other things. If the house always has electricity or a gas stove, choose the option of a stove without a hob and a niche for the oven.
For regions where winter temperatures drop below 20 degrees and keeps at this level for weeks, suitable large oven with heat shields. mini oven Not recommended heat continuously more than two hours in a row.
For many people it matters design designs. It can be tiled or laid out with bricks with a relief surface.
materials
For the selected mini-oven project, you will need high-quality bricks. Should choose smooth brick 1 grade, uniform color, without chips and cracks.
For laying bricks for a home master without experience, it is better to choose ready mix in a hardware store. It is bred according to the manufacturer's instructions.
If the master creates a solution from individual ingredients, you should purchase sand and clay. The ratio of materials is determined empirically. The solution is scooped up with a spatula and its working surface is tilted at 45-50 degrees. masonry mass normal composition does not fall in lumps from the spatula and does not flow from it.
Instruments
For work, you will need all the tools of the stove-maker and a table on which you can stand when laying the upper rows. To the list tools include:
- spatulas: wide and narrow:
- Master OK;
- stitching to form beautiful seams;
- trowel;
- hammer a stove with a flat butt and a pickaxe;
- mallet;
- level long building;
- plumb line building;
- wooden beam for the frame;
- threads, fishing line, chalk for marking the base;
- Bulgarian with a set of discs for cutting and grinding;
- rule aluminum.
To prepare the solution, you need big tank. To mix the paste you need wooden stirrer(oar) and construction mixer.
Preparing a place for the oven
Before laying the mini-oven, prepare in advance foundation. This is necessary because even the smallest appliance with a brick pipe weighs from 500 kg and more.
Such pressure on the floor boards will lead to deformation of the floor and stove walls. This can cause a fire on the roof and in the house.
There are several options for building foundations. The construction of a concrete base for a mini-oven includes next steps:
- excavation of a foundation pit depth 50-70 cm;
- compacting the soil in the pit;
- laying a layer of rubble in the pit ( 20-25 cm);
- laying in the sand pit ( layer 15-20 cm);
- compaction of sand and gravel;
- waterproofing the pit with roofing material: the joints are sealed with tar, bituminous mastic;
- installation of steel reinforcement with mesh diameter no more than 8-10 cm;
- pouring concrete and compacting it with a vibrodrill;
- laying two layers of roofing material on dried concrete for additional waterproofing.
Masonry order
Ceramic brick laying is carried out on a clay-sand mortar on a prepared foundation:
- 1 and 2 rows. Solid laying.

Photo 2. Masonry scheme of the first rows for a small heating and cooking stove. Next comes the flue pipe.
- 3 row. Lay out the blower chamber. Install (on wire or metal strips) the blower door.
- 4 row. The laying of the blower and the strengthening of its door continue. A ledge is laid out for the grate.
- 5 row. A grate is placed on the ledges freely, without mortar. They leave him around gaps of 5-7 mm.
- 6 row. A furnace door is installed in the furnace portal. It is fastened by laying steel wire in the seams or using steel strips. Planks are also laid in the seams on the mortar.
- 7-11 rows. Laying the furnace, final fixing the door by laying wire (steel plates) into the seams on the mortar.

Photo 3. Installation and fastening of doors for the firebox and cleaning. With the help of a plumb line, the accuracy of the tub is monitored.
- 11a. Upon completion 11 rows lay a metal strip (or corner) on which the hob will rest. After that, lay the cooking floor.
- 12-15 rows. Walls are erected around the cooking floor (cooking chamber), a chimney coming from the firebox is laid out.
- 15a. In order to have a vault of non-combustible material above the cooking chamber, a sheet of flat slate is placed on it.
- 16 row. The vault of the cooking chamber is closed with solid masonry, the chimney continues to be laid out.
- 17 row. Installation of a door for cleaning the chimney (on wire or steel strips).
- 18 row. Fastening the door.
- 19-22 rows. Laying according to the chosen scheme.
- 23 row. Laying out a niche for the oven.
- 24 row. Laying the walls of the oven, installing the oven. Strips of asbestos cardboard are placed at the bottom of the chamber around the perimeter. The oven is wrapped with asbestos rope (for greater contact with the brickwork and heat accumulation) and finally installed in a niche.
- 24-27 rows. Brickwork is erected around the oven.
- 28 row. Installation of a second door for cleaning the smoke channel.
- 29 row. Installation of a valve above the smoke channel.
- 30 row. Laying according to the chosen scheme.
- 31 row. Installation of a second valve above the smoke channel.
- 32 row. Finishing masonry.
Besides, 32 row is the basis for building chimney. It can be brick or metal.

Photo 4. An example of a finished brick mini-stove with decorative trim. The design is not intended for cooking, but it will heat the house well.
Problems when building a mini-oven with your own hands
Amateur stove-makers, out of inexperience, commit mistakes which then lead to problems. Consider the most common cases:
- Furnace masonry with deviation from the project. As a result, there is no normal draft in the smoke channels, and the walls heat up unevenly. The solution to the problem will be disassembly of the furnace and masonry according to proven schemes.
- Laying ovens "by eye", without using a level, frame, plumb lines, rules. The device warps, the center of gravity shifts, during operation the device collapses faster.
- Incorrect solution preparation. The masonry cracks and crumbles. A temporary solution to the problem is to buy a factory mixture and filling cracks with new mortar. If the masonry cracks constantly and deeply, oven will have to be moved.
- The firebox of a freshly folded and wet device. This will lead to cracking of the masonry, which will need to be slurry.
Useful video
Check out the video, which shows an example of the construction of a small heating and cooking stove with detailed explanations of each stage.
It is recommended to build a compact furnace of simple design in small residential buildings. These can be country houses or makeshift houses built by the owners of the estate next to the cottage being built. mini oven ideal for heating small industrial premises without central heating: workshops and cabins in the countryside.
ogon.guru
Brick ovens and the basics of their masonry
Any brick mini-oven, just like a full-sized one, requires a certain order for laying bricks and pouring the foundation. All structures have a certain written or unwritten operating instruction, which depends on the masonry and the size of the heating device.
About brick
- Each side of the brick has its own name and you need to know this for its laying, since it can be installed in any plane. This is especially true for laying stoves, where the brick can lie flat (on the bed), on the end (on the poke) or on its side (on the spoon).
- For laying small-sized stoves, as a rule, a spoon dressing is used, which is the first on the left in the upper figure. But any dressing implies the absence of continuous vertical seams. This means that the brick from the top row must overlap the joint on the bottom row, and so on to the very top of the structure, including the chimney, if it is also brick.
- At this time in the Russian Federation there is a single standard for building bricks, so a single one has dimensions of 250x120x65 mm, one and a half solid bricks - 250x120x88 mm and a double one - 250x120x103 mm. Of course, there are other sizes, for example, the double sand-lime brick M 150 has 250x120x138 mm. The brick of Western European production also differs in size, besides, there are no uniform standards, more precisely, there are much more of them.
- Red solid brick of classic dimensions (250x120x65 mm) weighs from 3.5 to 3.8 kg. The letter M with the numbers behind it indicates the brand, and the numbers themselves indicate the allowable compressive pressure in kg / cm 2. Marks are M 75, M100, M125, M150, M200, M 250 and M300.
| brick name | production arch | Length | Width | Thickness |
| Fireclay straight | SHA #5 | 230 | 114 | 65 |
| Fireclay straight | SHA #8 | 250 | 124 | 65 |
| Fireclay straight | SHA #9 | 300 | 150 | 65 |
| End wedge | SHA No. 22 | 230 | 114 | 65/55 |
| End wedge | SHA No. 23 | 230 | 114 | 65/45 |
| Rib wedge | SHA No. 44 | 230 | 114 | 65/55 |
| Rib wedge | SHA No. 45 | 230 | 114 | 65/45 |
Firebrick size chart
- As you can see, fireclay bricks have slightly different sizes and the table is here specifically so that you can compare the sizes when you make a firebox. There are also other types of refractory bricks, such as quartz, carbon or hollow. But the most attractive in appearance is fireclay, in addition, it can be made in different colors.
- Now there are tools for cutting bricks quickly and accurately, and if earlier you had to do such things with an ax or a small pick, now there is a diamond-coated disc for this. It is installed either on a grinder or an electric circular, but the second option allows you to cut only straight lines, while a grinder (see photo above) can cut various shapes.
Advice. When cutting a brick with a grinder or an electric circular saw, a lot of dust occurs, so to avoid this, soak the stone being processed in water or cut it under a weak stream from a hose.
Mortars for masonry
- For laying bricks, cement-sand, cement-screening and clay-sand mortar are used. So, screening instead of sand for mortar is used to fill the foundation, and the cement-sand mixture is used for one or two first rows of masonry. If for cement grades M 400 and M 500 sand is added respectively 1/4 and 1/5, then the screening for the screed should already be mixed 1/6 and 1/7.
- A mixture of clay and sand is somewhat more difficult to prepare, as this will take more time. In order for the clods of clay to break well, they need to be soaked in water since the evening, and those that are not soaked, it is best to knead with your hands so that there are no small lumps left.
- The ratio of clay to sand can be 1/2 or 1/3 - everything will depend on the fat content of the solution and this can be checked with a trowel. The normal consistency will be if the solution slides easily off the trowel, leaving almost no traces, and will be as thick as mashed potatoes.
garage oven
- We bring to your attention a brick stove-fireplace built by Alexander Zalutsky according to the project of V. M. Kolevatov with a blind hearth. If you already have a poured foundation, then it can be erected in half a day, but just in case, let's see how this foundation is equipped. The depth can vary from 50 to 70 cm, and even though the structure will not be too heavy, you need to go deep below the freezing point of the soil.
- Considering that we will have a furnace of two by two and a half bricks, that is, approximately 50 × 63 cm, the perimeter of the foundation will need to be increased by at least 5 cm in each direction. Cover the bottom of the excavated hole with sand 10-15 cm, fill it with water to sit down, and then pour rubble on top, leaving 20-30 cm to the top for a cement screed. Instead of crushed stone, screenings, gravel or various construction debris can be used.
- The backfill is carefully compacted and ruberoid spreads on it. After pouring the solution and drying the screed, cover it with another layer of roofing material according to the size of the furnace being built.
Advice. Considering the fact that the soil is constantly moving, the neck of the foundation can be made a little (by 5-10 cm) already backfilled. To do this, install the formwork from the boards on the backfill.
- Lay a layer of bricks on a dried and waterproofed foundation, two by two and a half stones in size. To do this, use cement mortar, just make sure that the corners remain straight, 90⁰, and the base is strictly horizontal. You will not have to cut the bottom row at all, although this is still foreseen in the future.
- We are considering how to build mini-brick ovens, and we are laying the next row, but not a solid one, but only a border, that is, a total of seven bricks. Do not forget that now we are already switching to a clay-sand mortar. We will install the furnace door on this row, having drilled holes in it in advance to improve traction (this can be seen in the photo).
- We install the door on a galvanized wire and cover it with three rows of bricks. If there is a fireclay brick, then it is better to overlay the furnace compartment with it, but in our situation only one fireclay was installed for experimental verification of heating. A row was laid on top of the door without any trimming, but if the dimensions of the cast-iron box require it, then it is better to make cutouts.
- Raise two more rows of bricks above the door, and this will end the firebox. The third row after the firebox will be laid with a poke, that is, across, as can be seen in the top photo on the left, so the outlet is one brick in size. On the next row, spoon masonry is again used - the stone is installed on the bed, with a spoon out and in.
- After that, the narrowing of the hood begins - the brick is placed on the edge and the masonry is obtained two by one and a half bricks. After that, one row is placed on the bed, narrowing the exit to the size of a brick, and then again a jumper is inserted on the edge and in the middle, as can be seen in the photo above on the right side.
- So you raise the masonry up to the metal pipe, which you release through the wall, thus arranging a knee. After that, the do-it-yourself brick mini-oven ends, but this does not mean that it can be melted right away. It is better to wait at least a few days so that the solution is at least half dry.
Advice. Most likely, in this case, you will install a metal exhaust pipe, the price of which will be lower than that of a brick one. But it must be raised above the top point of the roof at least 0.5 m to improve traction. Do not forget to install a cap over the pipe.
Conclusion
Small-sized brick ovens for a summer residence or a garage are sometimes folded without any scheme and preliminary calculations. But in this case, you need to know the principles of laying furnaces well and clearly imagine the traction system in the future design.
A stove in a country house is simply necessary, especially in cases where the garden plot is used not only as a place of rest, but also for fruitful agricultural work, the fruits of which provide the gardener and his family with vegetables and fruits for the whole winter. If the dacha serves as a kind of source of wealth, then its owners have to work on the land from early spring to late autumn.
During the "off-season", and sometimes even in summer, the nights are quite cold, and therefore without heating it will be very uncomfortable to be in the house. In addition, you can’t do without hot food in the countryside, and cooking on a fire is inconvenient, and not too hygienic. And in fact, and in another case, the oven can always come to the rescue.
In addition, we can recall the aesthetic component of the issue - most people love to sit by the open firebox, watching the flames. It is especially pleasant to arrange such a cozy evening and relax in a comfortable chair after active work in the garden.
As you know, not all country houses can boast of a large area, so most often a mini stove for a summer residence is chosen for such conditions.
Criteria for choosing a country stove
Based on the specific conditions of future operation, it is necessary to determine the criteria by which it is worth choosing a stove for a country house. These may include not only technical and ergonomic characteristics, but also economic considerations.
- The compactness of the device or brick structure is one of the main conditions for a small summer cottage.
- The most important condition for a country stove is its safety, as usually suburban houses are built from wood, which dries quickly in the sun and, if sparks hit it, can literally flare up like a match. In addition, the device itself and the chimney must be completely sealed, have excellent internal draft, since carbon monoxide that enters the premises can lead to irreversible tragic consequences.
- The stove, installed in the country and not used in the winter, must withstand this rather long period without a firebox and not become damp.
- Quick kindling and warming up of the appliance, distribution of heat throughout the premises are also important conditions for a country stove, since in rainy weather or just after completing work in the garden, you want to relax in warmth as soon as possible and drink hot tea.
- It is advisable to have a stove with a large firebox door in the country - so that it can play the role of a fireplace, since it will be quite difficult to do without evening gatherings near the fire.
- Long-term preservation of heat is especially necessary if summer residents come to the dacha overnight, so that the heat from the stove heated in the evening is enough until the morning.
- It will not be easy to do without a hob in a country stove, especially in cases where electricity is cut off quite often in the village and gas supply has not been carried out.
- An important accompanying factor is the fuel needed for the furnace. To save money, you should choose an "omnivorous" heater that can be heated with different types of fuel - firewood, brushwood, briquettes, pellets, coal and even household waste.
- It is desirable that the furnace should be provided with a hot water register for the shower.
- The simplicity of the chosen design of the heater will allow you to install or fold it yourself and save a significant amount, since calling the masters will be quite expensive.
- The aesthetic appearance of the stove is also important, as it can decoratively transform the room or, conversely, introduce disharmony into its design.
Varieties of mini-ovens according to the material of manufacture
Country mini-stoves can be made of different materials - for example, they are steel, cast iron and brick. Each of the varieties has its own advantages and disadvantages. Which type is preferable depends on several criteria, which will be discussed below.
You might be interested in information on how to build
Steel furnaces
Steel stoves can be called an ideal option for installing them in the country. Of course, self-made, they will not look as aesthetically pleasing as those purchased in specialized stores, but home-made stoves will cost much less.

Steel furnaces - the most affordable and easy to install
A steel stove is the lightest and most affordable heating device. It is, as a rule, quite mobile, therefore, if desired, for the summer period it can even be moved to the gazebo or to the veranda, disconnected from the chimney. The compactness of the steel device allows you to install it in a small room, and its relative lightness does not require a monolithic concrete foundation for it - it will be enough to organize a non-combustible flooring from asbestos and metal sheets.
Furnaces made of this material almost always have a hob, which warms up quickly enough and remains hot throughout the entire furnace. In addition, you can choose a model that has an oven that allows you to bake bread or pies in summer conditions.
The disadvantages of steel products include the following points:
- Such furnaces are less durable than cast-iron or brick ones, but since they will not be heated all the time, metal oxides, which are formed under the influence of flame and temperatures during furnaces, in between them, interacting with oxygen, form a thick heat-resistant soot. It is this layer that makes it possible to operate the furnace for 18–30 years, that is, two or three times longer than with regular heating.
- Not all steel stoves that have proven themselves in other conditions are suitable for installation in summer cottages. For example, these include long-burning models "Slobozhanka" or "Bubafonya", as well as some other options. They are not recommended for the following reasons:
- long heating of the surface;
- lack of a full-fledged cooking surface;
- having a relatively small size, they still take up a lot of space, since they cannot be installed close to the wall;
- do not have glass doors, so they can be used as a fireplace only by opening the solid door wide open. " Bubafonya"And it is completely impossible to use in this role.
- rather unaesthetic appearance of furnaces.
- It is impossible to use furnaces working at mining in the cottages, as they emit an unpleasant and unhealthy odor. In addition, they are quite flammable and explosive.
Cast iron mini ovens
Cast iron stoves have many advantages and are great for country conditions, but only if they are installed permanently. This metal has a large mass, and it must be taken into account that it is most likely impossible to take such a furnace outside in the summer. In addition, it will also not be possible to build the hot water register into the cast-iron model on your own, since cast iron is almost impossible to process at home. Therefore, if you plan to install a stove with this function, then you need to immediately purchase a model that is initially equipped with it.

Cast iron stove - reliable, durable, has a high heat transfer
The price of cast iron products is quite high, but such a stove will last a very long time, unless, of course, it is subjected to sudden changes in temperature (cast iron can crack when, for example, a bucket of cold water is splashed onto a red-hot stove), and excessive mechanical stress - this metal doesn't like bumps.
Under the cast-iron stove, it is necessary to arrange a foundation, as it is very heavy, and a wooden floor her may not endure. In addition, the furnace is heated to high temperatures, so the foundation is necessary to comply with fire safety rules. And, it must have a sufficiently large size and go beyond the dimensions of the furnace by 400 ÷ 500 mm on all sides of the heater.
Otherwise, a cast iron stove is ideal for giving, due to its following positive qualities:
- For this material, breaks in the heating period are insignificant, since it does not oxidize and does not burn out.
- Cast iron is not affected by moisture, so it does not rust.
- The material warms up well and keeps heat for a very long time.
- Usually, cast iron stoves have a large enough hob that allows not only to boil the kettle, but also to place a pot or pan next to it.
- As a rule, heaters made of this material are given a very aesthetic appearance. The walls of the stove can be decorated with an ornamental floral pattern. Cast iron stoves can only have a decorative appearance or be made in the form of a stove.
- This type of stove is produced in a large size range, it can have a built-in oven and even a heating circuit.
brick ovens
Brick stoves are considered traditional for private houses in Russia, so country houses are often no exception. Brick stoves are rightly recognized as the most reliable and heat-intensive.
The stove can be installed in such a way that it will heat two rooms at once without installing a heating circuit in it. Properly withdrawn with the valve installed - completely fireproof, but under such a structure it is necessary to equip a reliable foundation, completely isolated from the foundation of the walls. This must be observed in order to preserve the integrity of the masonry, since when the foundation of the house itself shrinks, it can pull the base of the furnace along with it.
It should be remembered that brick ovens really do not like dampness and long periods of downtime, therefore, in order to achieve the desired heat transfer after an unheated period, it is necessary to carry out two or three drying furnaces without a heavy load. And, in each of them the amount of firewood needs to be increased - this process is often called "overclocking".
It is precisely because of the fear of dampness by brick buildings that such stoves are installed in the country house only in cases where the country house is inhabited for most of the year, and it is possible to carry out periodic heating.
Many residents of private or country country houses consider only brick stoves to be real and useful, not recognizing heaters made from other materials. Indeed, brick ovens give the house a special warmth and comfort. And more importantly, they can be multifunctional. Specialists in the furnace business have developed a considerable number of different models, from which it is quite possible to choose the right one for a specific area of \u200b\u200bthe country house.
Overview of models of small stoves for summer cottages
To make it easier to make a choice, it makes sense to consider several ready-made models made from various materials. Such stoves can be purchased in specialized stores, and some of them (steel and brick), if you have the skills, it is quite possible to make it yourself.
Cast iron models
Bake PINETO
An excellent model for giving, both in size and design, and in terms of characteristics, is the PINETO stove from the Polish company Nordflam. The model is made in a "vintage" style and has a bronze color, so it will fit into a variety of interior options, be sure to decorate it with your presence.

Having a door with fire-resistant glass, the furnace can be used as a fireplace. The hob is large enough to accommodate two items of cookware, then eat you can cook two dishes at once. The outlet for the chimney pipe is located at the top, on the hob, which means that the stove can be installed very close to the wall of the house, provided that a heat-resistant protection is installed. material - brick, special drywall, asbestos board or ceramic tiles.
This model has the following specifications:
- Type of fuel - firewood.
- Power - 6 kW.
- Heating area - up to 70 sq. m.
- The oven has a top connection.
- diame tr trchimney flue - 120 mm.
- Efficiency - 87%.
- Door opening type - side.
- The model has the following features:
- systemsself-cleaningglass;
— long burning;
— secondaryafterburning.
- Width - 440 mm.
- Height - 610 mm.
- Depth - 330 mm.
- Weight - 165 kg.
The manufacturer provides a one-year warranty for its product.
Prices for the Pineto oven
pineto oven
Bake " Isotta Forno»
Another version of a compact and aesthetic cast-iron stove, produced by the Italian company LaNordica, well-known in European countries, and now in Russia, is the Isotta Forno model.

This heater will not take up much space, as an additional function - an enameled oven, is located on the "second floor" above the firebox. Therefore, such oven can be purchased even for heating a very small room.
Prices for the oven "Isotta Forno"
La Nordica Ghisa Isotta forno
The technical characteristics of this model are as follows:
- Production material - cast iron.
- Type of fuel - firewood.
- Efficiency - 90%.
- Power - 11 kW.
- Heating area - 95÷100 sq. m.
- Door opening type - side.
- The oven has a top connection.
- Chimney pipe diameter – 150 mm.
- The model has the following features:
- systems self-cleaning glass;
— long burning;
— secondaryafterburning.
- Width - 795 mm.
- Height - 1244 mm.
- Depth - 530 mm.
- Weight - 296 kg.
The Isotta stove is made entirely of cast iron and has double walls, between which the possibility of air circulation is created.
Panoramic glass with self-cleaning function is able to withstand temperature heating up to 750˚С.
On the side of the oven is a door into which longer logs are laid.
The device is equipped with an air supply regulator that is able to completely shut it off, which is especially important when using the long burning mode, as well as to create a beautiful picture of the play of flames. In addition, the regulator ensures the operation of the furnace in the gas generation mode and helps to clean the glass from soot.
This furnace model is capable of heating an area of about 100 m² for an hour, while the walls of the structure are heated up to 80 ° C.
When fully bookmarked, in the smoldering mode (long-term combustion with afterburning of pyrolysis gases), the furnace is able to provide the room with heat for 15–18 hours.
Stove-fireplace "Svezia"
This product of the Italian company "LaNordica" harmoniously combines refinement of taste and practicality, as the materials used in its manufacture and decoration are aesthetic and durable. The body of the furnace is cast from high quality cast iron, and the cladding consists of steel and ceramic or natural stone panels. These materials, as well as the glass part of the door, are fireproof and can withstand temperatures of up to 750°C.

The model is equipped with a removable drawer for drying firewood and an ash pan, which are installed in the niches provided for them in the lower part of the appliance body. With a sufficiently high power, the stove consumes only 2500 g of firewood per hour.
The technical characteristics of the Svezia fireplace stove are as follows:
- Production material - cast iron.
- Finishing material - steel, ceramics or natural stone.
- Type of fuel - firewood.
- Efficiency - 84.5%.
- Power - 9 kW.
- Volume heating– 258 m³.
- Bakehas an upperconnection.
- diametr trchimney bottoms - 150 mm.
- Door opening typeside.
- The model has the following features:
— systemsself-cleaning glass;
— regulatorair intake;
— long burning;
— secondaryafterburning.
- Width - 599 mm.
- Height - 1254 mm.
- Depth - 544 mm.
- Weight - 188÷230 kg, depending on the lining.
- The hearth size is 377×340×385 mm.
Heating and cooking stove "Rosa Palladio"
This version of the Rosa Palladio heating and cooking stove by the same Italian company LaNordica has larger dimensions than other models, but it is also equipped with much more functionality - this is a spacious hob and a voluminous enameled oven that allows you not to cook any dishes but also bake bread products.

This model can be called combined, since its frame and main elements are made of cast iron, and the cladding is made of high-quality steel and ceramic plates, which contribute to longer heat retention. The oven can be installed in a rustic kitchen or room. Ovens are produced with finishes made in different colors - these are burgundy-brick ("Burgundy"), milky pink ("cappuccino") and milky gray ("parchment") shades.
Technical characteristics of the heating and cooking stove "Rosa Palladio":
- Production material - cast iron.
- Finishing material - steel and ceramics.
- Type of fuel - firewood.
- Efficiency - 79.8%.
- Power - 10 kW.
- Volume heating- 185 m³.
- Bakehas an upperconnection.
- diametr trchimney bottoms - 150 mm.
- Door opening typeside.
- The model has the following features:
— systemsself-cleaning glass;
— regulator with two air intake systems;
- long burning mode;
- mode secondaryafterburning.
- Width - 1030 mm.
- Height - 851 mm.
- Depth - 660 mm.
- Weight - 169 kg.
- Size doors - 420 × 395 mm.
- The furnace size is 270×340×400 mm.
Steel furnaces
More affordable, but no less effective - steel models of stoves for summer cottages. They can have a variety of designs and shapes - from the simplest to the most complex. Steel models are equipped with only the necessary functions or may have advanced features. Their cost today is from 4,000 to 25,000 rubles, depending on functionality and design.
Heating and cooking stove "Breneran" type OO with two burners.
This economical option is suitable for a small room, as it has a compact size. However, despite this, it is able to heat a room up to 100 m³.

This model is made by the Russian manufacturer Laoterm from high-quality steel and has a coating of heat-resistant paint, which is hardened with the first heating of the device.
Prices for the Breneran oven
The stove is equipped with an air intake regulator, which is located on the door, and a regulator-gasifier is provided on the branch pipe for connecting the body to the chimney. The hob has two burners with removable lids for quick heating or cooking.
The door of this model is equipped with a comfortable safe cool handle. The convenience of the stove lies in the fact that it can heat two or three small isolated rooms. To do this, flexible sleeves made of metal are attached to the upper holes and bred through the rooms.
Technical characteristics of the Breneran furnace:
- The material of manufacture is steel, sheets with a thickness of 4 mm are used for the firebox.
- etc.
- Efficiency - 75%.
- Power - 6 kW.
- The volume of the heated room - up to 100 m³.
- The oven has a rear connection.
- diametr trchimney flue - 120 mm.
- Door opening typeside.
- The model has the following features:
- regulator with two air intake systems;
- Width - 455 mm.
- Height - 555 mm.
- Depth - 720 mm.
- Weight - 73 kg.
- Sizedoors: 420×395 mm .
The manufacturer's warranty is 2.5 years.
The model does not have a viewing glass on the door, and if you want to sit near an open fire, you will have to open it wide open. Therefore, for the purpose of fire safety, a base made of heat-resistant material should be provided under the furnace, and the sheet should extend beyond the appliance body by at least 500 mm.
It should be noted that, despite its modest size, the oven has a fairly high price. To date, its cost varies from 15,000 to 19,000 rubles.
This version of the steel potbelly stove can be called the most affordable by price, by compared with all existing models of mini-ovens for summer cottages, since its cost today varies from only 2800 to 4000 rubles. In fact, this model is an ordinary, familiar potbelly stove and has a very simple design.

The furnace is made of steel 5 mm thick. The device is equipped with a solid metal door with a side opening that does not have a viewing glass.
Prices for the stove "Vesuvius mini"
Vesuvius mini
Another disadvantage of some versions of these stoves is the absence of an ash box, although the manufacturer, giving a description of the product, notes that the firewood, when burned, gives an “ash cushion”, which prevents overheating of the bottom of the furnace. However, the absence of this element excludes the possibility of qualitatively adjusting the draft inside the furnace, and you have to perform such an adjustment yourself, slightly opening the furnace door - and this, you see, is extremely inconvenient. Therefore, choosing this model, it is best to find an option that has an ash pan, which is also a draft regulator.

Model specifications:
- Production material - steel 5 mm thick.
- Finishing material - heat-resistant paint.
- Type of fuel - firewood, briquettes, paper, shavings, branches andetc.
- Efficiency - 60÷70 % .
- Power - 5 kW.
- The volume of the heated room - 100 m³.
- The oven has a top or rear connection.
- diametr trchimney flue - 155 mm.
- Door opening typeside.
- Width - 310 mm.
- Height - 623 mm.
- Depth - 470 mm.
- Weight - 27 kg.
- Sizedoors: 420×395 mm .
- The model has the following features:
- in the presence of an ash drawer - an air intake regulator.
The best fuel for this stove is chopped dry firewood, which quickly flares up and effectively warms up the walls of the device. The wood of birch and aspen gives the least soot and clogs the chimney, but the logs need to be dried well, after being brought into a warm room. Damp firewood is also allowed, but they are less efficient in terms of heat transfer.
The hob is large enough and allows you to cook two dishes on it at once, which is quite comfortable in country conditions.
The model has a low weight, so it can be installed even on a wooden floor, previously protected with a heat-resistant material.
The disadvantage of such a potbelly stove is the lack of a water circuit for the shower, but, if desired, it is quite possible to install it, although this process will require additional costs.
Stove-fireplace «NARWIK WT»
The steel stove, manufactured by the Polish manufacturer EuroKom, has a water circuit that allows you to heat water for use in the shower or when washing dishes. The side walls of the case are finished with ceramic plates, which contribute to the preservation of heat and its longer return to the room.

The firebox of the device is made of high-quality steel, having a thickness of 6 mm, and, in addition, it is lined with fireclay bricks from the inside, which protects the metal from burning through and also retains heat well for many hours.
The stove has two niches - for drying firewood and for heating or cooking. The design is equipped with a retractable ash drawer.
The principle of operation of this furnace is based on the natural circulation of heat, and, in addition, thanks to the water circuit, thermal energy can be transferred through a pipeline to an adjacent room.
The small size and aesthetic appearance of the device allows you to place it even in a small room.
The technical characteristics of this model speak of its effectiveness and comfortable use:
- Production material - steel.
- Finishing material - ceramics.
- Furnace lining with fireclay bricks.
- Cast iron grate.
- Type of fuel - firewood.
- Efficiency - 78%.
- Power - 11 kW.
- Area heating– 85 m².
- Bakehas an upperconnection.
- diametr trchimney bottoms - 150 mm.
- Door opening type hinged.
- The model has the following features:
- system self-cleaning glass;
- air intake regulator;
— system of an obduv of a door;
- long burning mode - up to 8 hours;
- secondary afterburning mode;
- equipped with a cast-iron grill;
- panoramic view of the flame.
- Width - 590 mm.
- Height - 970 mm.
- Depth - 550 mm.
- Weight - 120 kg.
- The furnace size is 270×340×400 mm.
The manufacturer's warranty is 5 years.
Naturally, having such advanced features, the oven cannot be cheap, so its price varies from 46,000 to 65,000 rubles.
Another, very miniature steel stove, is presented on the proposed video:
Video: Wood-burning stove "Mini-Horizon"
Brick mini ovens
For those who do not recognize ovens other than brick, I would like to present two options for compact structures that are accessible in design even for self-construction.
First option
Small-sized oven equipped with a hob and a door with heat-resistant viewing glass.

This version of the heating structure is so compact and simple in design that, having set fire to install a brick stove in a country house, even a novice master can build it. In order for the work to be of high quality, and the furnace to stand for many years, it is necessary to follow the recommendations and adhere to the presented ordering schemes.
This oven has the following dimensions: width - 510 mm, depth - 640 mm and height - 2150 mm. The design has a single-burner hob and an oven, which, if desired, can be replaced with a drying chamber or a hot water tank.
These dimensions assume a furnace depth of not more than 500 mm, and a chimney opening with a cross section of one brick laid flat.
It should be noted that the presence of a hob and an oven not only allow you to cook hot food, but also contribute to faster heating of the room where such a stove is installed.
To ensure the compactness of the stove, its design is thought out in such a way that the firebox, cooking chamber, oven and flue ducts are located vertically. The heated air, together with the gases emitted by the fuel, passes outside the rear wall of the cooking chamber, and then enters the flue ducts and the pipe.
This design consists of the following elements, numbered in the diagram below:
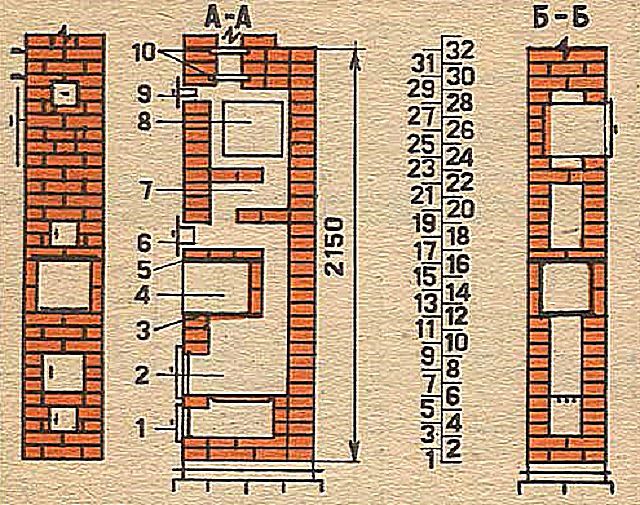
1 - ash pan or blower chamber;
2 - combustion chamber with a cast-iron door;
3 - cooking cast-iron single-burner stove;
4 - cooking chamber;
5 - a metal corner and plates that cover the cooking chamber and create a base for masonry;
6 - a chamber for cleaning chimney channels;
7 - horizontal channel of smoke circulation;
8 - oven;
9 - the second chamber for cleaning internal channels;
10 - valve.
For the construction of such a brick mini-stove, it is necessary to prepare the following materials and parts (excluding the foundation and chimney):
- Red brick - 222 pieces;
- Furnace door 200 × 200 mm - 1 pc.;
- Blower door 140 × 140 mm - 1 pc.;
- Cleaning doors - 2 pcs.;
- Cast iron hob with one burner 380 × 350 mm - 1 pc.;
- Oven 320 × 280 × 420 mm - 1 pc.;
- Gate valve -2 pcs.;
- prefurnace.;
- Flat slate panel 510×370 mm - 1 piece;;
- Steel corner - 350 × 350 × 4 mm;
- Clay - 5 buckets;
- Refractory clay - 2 buckets;
- Sand - 14 buckets.
You might be interested in information on how to choose a wood burning
The design of the furnace itself consists of 31 rows of bricks laid flat. The scheme of serial masonry can be well seen in the drawings below.
This figure shows the ordering from rows 1 to 11, and the linear parameters of the first row are indicated, that is, the bases that you will need to focus on when displaying the building in height.

On the third row, a blower door is installed, and on the fifth, a grate is laid.
Before laying the sixth row, a furnace door is installed and fixed on the front brick of the fifth row, which is then supported on both sides by bricks of the sixth row of the order.
After installing row 11, stepping back from the back wall of the resulting well to the width of a brick, a metal strip or corner is installed, which will become the basis for laying the hob. Then, on top of the walls and the metal lintel, a cast-iron hob is laid.
The next part of the drawing clearly shows the laying of the order from the 12th to the 22nd row.

Continuation of masonry - ordering from the 12th to the 22nd row
From the 12th to the 15th rows, the walls of the cooking chamber and the rear vertical chimney channel are removed.
Having laid out the 15th row, metal corners or a slate sheet are laid on top of it, which forms the basis for further continuous masonry.
At 17- ohm the door of the cleaning chamber is installed in a row, which overlaps by 22 ohm row, and under it an empty space is formed, combined with the rear chimney.
The last part of the diagram shows masonry from rows 23 to 31.

Completion of the erection - ordering from the 23rd to the 32nd row
On the 24th row, pieces of asbestos are laid on the inner edges of the well. Then the oven box is wrapped with asbestos rope and installed in the place intended for it. Asbestos protection will keep the walls of the cabinet from burning out, and will also help to keep heated air in it for a longer period.
At 28- ohm the door of the cleaning chamber is installed in a row and is immediately fixed on both sides with brickwork.
On the 29th and 31st rows, chimney valves are mounted in the masonry, and from the 32nd row, the chimney is being erected.
As can be seen from the drawings, the scheme of this design is simple and accessible for execution, but still, before starting laying on the mortar, experienced stove-makers recommend that the furnace be assembled dry.
For laying any heating brick stove, it is necessary to prepare a clay mortar, which consists of one part of water; four parts of oily clay and eight parts of sand. Before kneading, the sand must be sifted, otherwise the mixture will turn out to be heterogeneous, which will interfere with the accuracy of the masonry. The mortar, as a rule, is diluted at the rate of two buckets of the mixture per 100 bricks.
Second option
Such a model of the stove is suitable for giving only if you need to provide efficient heating in the rooms, since it is able to fully heat two fairly large rooms. Therefore, such furnaces are most often installed even as part of the wall, which is a partition for them. The design does not have a hob and oven, so it will not be possible to cook hot food or boil a kettle with it.

This model has the following parameters: width - 510 mm, depth - 890 mm, and height - 2380 mm.

You may be interested in information on what to guide when choosing
The design of the furnace consists of the following elements (starting from the top):
- chimney dampers;
- cleaning chamber with a door;
- firebox door;
- an ash pan or blower door;
- waterproofing material.
Such a furnace consists of 35 rows of masonry, and for its construction the following materials and cast-iron parts will be required (again, without taking into account the arrangement of the foundation and chimney):
- Red brick - 260 pcs.;
- Fireclay bricks for laying the firebox - 130 pcs.;
- Grate 250 × 400 mm - 1 pc.;
- Furnace door 200 × 300 mm - 1 pc.;
- Blower door 140 × 200 mm - 1 pc.;
- Cleaning doors 140 × 200 mm - 2 pcs.;
- Gate valve - 2 pcs.;
- prefurnacemetal sheet 500 × 700 mm - 1 pc.;
- Sheet of roofing felt for waterproofing 1000 × 600 mm - 2 pcs.;
- Clay - 6 buckets;
- Refractory clay - 3 buckets;
- Sand - 18 buckets.
The mortar for laying the furnace is kneaded in the same proportions as for the first model.
The ordinal scheme consists of three parts, which will make it easy to understand the construction of the structure.
The first part represents the masonry from the 1st to the 12th row. Here you also need to pay special attention to the dimensional parameters of the first row, which will need to be guided throughout the work with the help of a plumb line and a building level.

Ordering - from the 1st to the 12th row
The first row is laid on a roofing material laid in two layers on the foundation. For a more accurate drawing of the first row, chalk markings can be made on the waterproofing material.
A blower door is installed on the second row, and a vertical chimney channel begins to form.
On the fifth row, a grate is laidoverlapping the blower chamber. Masonry, starting from this row and ending with the 15th, is made with fireclay bricks.
On the sixth row, a furnace door is installed and fixed with wire. Further work is proceeding according to the scheme.
You may be interested in information about what is on wood
The second part of the diagram represents the order from the 13th to the 24th row.

The middle part of the furnace - from the 13th to the 24th row
These diagrams show the gradual formation of the combustion chamber and vertical channels, so it is very important to adhere to the exact repetition of the drawing, observing the dimensions of the brick. Having laid out the 16th row, on the 15th ohm stack a layer of clay-cement mortar, which will strengthen the bottom of the cleaning chamber, and then the door itself is installed.
The last part of the diagram represents the laying order from the 25th to the 35th row.

The final stage - from the 25th to the 35th row
On the 25th row, the bottom surface of the second cleaning chamber is sealed - for this, a layer of clay-sand mortar is laid on the brick surface. The cleaning chamber door is also installed on the same row.
On the 28th and 32nd row, two valves are installed, with the help of which the thrust will be regulated. These tools allow you to solve the problem if it suddenly shows up.
From the 35th row, a chimney begins to rise, with a section of half a brick.
If you want to install a brick oven in the country, you can find other models of these structures, however, in the absence of experience, you should not choose structures that have complex internal masonry patterns, since at first you can easily get confused in their configuration.
You may be interested in information about what is
Video: an example of dry laying a miniature brick oven for a summer residence
When making a choice in favor of a particular furnace, you need to take into account all the "pluses" and "minuses" of materials, operational features of structures, and also make a list of criteria that you should rely on.

Evgeny AfanasievChief Editor
Publication author 10.01.2016
![]()
With this design, it is very convenient to warm up hands or gloves in winter. You can warm a small pot of water. Which, in principle, is very important in the winter period when traveling for fishing or winter hiking.
On the video you can see a real review of how convenient this design is to use, its disadvantages and advantages.
This design is assembled from the following materials:
- a large tin can;
- a small tin can or spray can of paint;
- fastening for a metal profile under drywall.
The basis of this design is an ordinary can of dog food. In principle, you can take any long tin can, it still will not change the design.


Also in the design there is a ring, which is made from a conventional fastener for a metal profile for drywall. It is necessary in order to use it instead of a burner, put it on top of a mini oven. This will provide convenience so that something can stand on top.
At the top of the can, round holes of medium size are made, around the entire perimeter, at an equal distance from each other. They are necessary so that air can freely pass inside.


Now turn the jar upside down. A hole is cut out in the bottom for a tin can of smaller diameter (instead of it, you can take a container from a can of paint, it will burn out longer and fit in size). The smaller jar should be approximately 2 cm smaller than the main one, and also smaller and 2-4 cm in height. We cut a hole so that the smaller jar fits very tightly and does not hang out.
Insert the smaller jar upside down. Having previously made holes in its bottom, at the bottom and at the top of the side walls. Only after that we insert a smaller jar into a large one.


With the help of such a mini stove, it is very convenient to warm your hands, chips are thrown into it from above, the outer part does not get very hot, it just heats up. The burner is easy to hide inside at the bottom of the jar.

This design has its drawbacks: if there is a bowler hat on top, it needs to be removed from time to time; this design must be constantly monitored so that the chips do not burn out (constantly toss).
And the advantages of this design: very good heat transfer to inflate the coals, if the fire goes out, it is not necessary, new chips are simply thrown in and after a while they flare up under the air flow; Small size is very convenient to carry.