Glass making at home. Create a mirror surface
Tired of old glass surfaces? Do you want variety and don't know how to do it? There are simple and effective method, which will help to deal with annoying glass surfaces. What is it? Is it a simple replacement? Not really. There is a best and original version- do frosted glass with your own hands. Such a transformation is fully justified and allows you to create an indescribable effect.
However, an ordinary person has a logical question: how to make frosted glass at home? You will learn the answer to this question from our article. You will see several ways of matting, as well as the rules for surface care.
Benefits of frosted glass
Why is frosted glass so good? This solution has its advantages:


If you decide to experiment, then let's look at the available techniques for creating a mat on a glass surface.
Options for creating frosted glass
Matting methods are quite simple, so everyone can do it on their own. So what are these methods? Below is the list:
- gluing a matte film;
- applying a matting paste to the surface;
- using a sandblaster.

Matting glass with film
This method can rightly be called the most accessible and simple. A special frosting film is sold on the market to help you work with glass. You just need to stick it on the glass from the back. This is all work. But, there is one drawback - although the surface becomes opaque, you cannot call it a full-fledged mat. If you want to get a really matte structure, then use the following options.

Matting glass with paste
It's no less hard way. All you need is a frosting paste for glass, which is easy to buy at the store. It is produced by different companies. The glass matting process itself is very simple:


That's all, now your glass has become truly frosted. Above we mentioned stencils. This is a great opportunity to make an original gift for family or friends. The work is practically no different from the previous one. You can buy or make a stencil that will have the pattern you want. You can even order products with inscriptions and congratulations. Then it remains to carefully stick the stencil on the glass surface and smooth it, starting from the center, moving towards the edges.
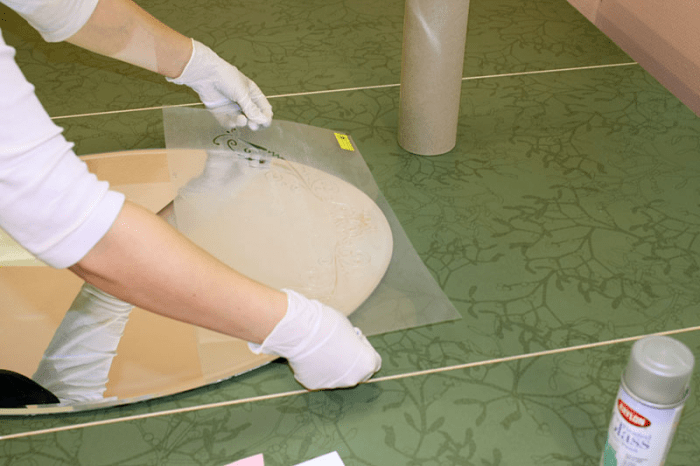
In the event that the drawing is small and the glass area is larger than the stencil, then cover the unprotected areas with masking tape so as not to matte the unnecessary surface. Then the process is identical: apply the paste, smooth it over the surface with a layer of 4 mm and wait 20-30 minutes. It remains to wash off the paste, rinse everything hot water and remove the stencil. The drawing is ready.
You can find detailed instructions for matting with paste in this video:
Matting glass with a sandblaster
This is the method used in production. It is the most reliable and high quality. But, it is difficult to call it accessible. After all, sandblasting equipment costs a lot of money. If you have such a unit, then it's good. Some rent it or are looking for friends with such a device. The sandblaster can make matting of any depth and density. And for processing large surfaces, it is simply indispensable.

Advice! You should not immediately start trying to frost the glass on the work surface. It is better to practice on unnecessary glass.
The disadvantage of this method is not only the mandatory availability of equipment, but also the fact that the glass after processing will lose about 3 mm in thickness. That is why it is recommended to use glass with a minimum thickness of 5 mm. In addition, you will need sand and a respirator to work.

The process of creating a mat on glass is as follows:
- First, clean your work surface.
- In the case when you want to create a pattern on the glass surface, stick a stencil in the desired place. Glue it carefully, as sand under high pressure can penetrate inside.
- Now you need to take care of safety: protect the room, as well as yourself. Use gloves to protect your hands, a respirator or mask to protect your face and respiratory organs, and goggles to protect your eyes. It is advisable to work in a protective suit, as the unit will create a small sandstorm.
- Do a test run on the unwanted glass to make sure the jet quality is right.
- Press the pump against the glass and, using circular motions, evenly treat the glass surface. Do the process several times. The longer you work, the larger the layer will be.
- At the end, tear off the stencil and wash the glass.

That's all, now you know how to make glass frosted. You can choose any option that will be affordable for you, according to your strength and capabilities. BUT detailed instructions on sandblasting matting you can find in this video:
How to care for frosted glass
If making frosted glass is one thing, then caring for it is another. For example, many do not know how to wash frosted glass from greasy spots. After all, whatever one may say, this cannot be avoided. Even on the mat, dirt, stains and stains will be visible. What to do in this case? The first tip is to clean the glass surface as soon as dirt has formed. Then the stain will not eat into the material, and it will be quite easy to wash it off. You can even not use detergents and cleaning agents. It is enough to wipe the surface with a damp cloth or microfiber cloth.

In the event that you find serious contamination on the glass, then you can wash it by special means, which can be bought in specialized stores or in a supermarket. However, you should remember one thing: the matte surface is afraid of cleaners that contain silicone or fluoride.
To keep the matte surface always beautiful, you should take care of it from time to time. Natural suede will help you with this. It is enough to wipe the product with a piece of damp cloth. Another way is to wash the surface with hot water with the addition of vinegar. When you have processed the product, it must immediately be dried with a napkin.
There is another folk way:
- take a glass of water;
- add a few cloves of chalk to it, which must first be crushed into powder;
- mix everything and apply the product on a matte surface with a rag;
- after drying, remove all dirt with newsprint.
Note! Difficult stains and dirt can be removed ammonia. Just be sure to ventilate the room while working or be outside. After all, everyone knows what a strong smell ammonia has.

These simple tips will help you properly care for your handmade product.
Summing up
As you can see, your old glass can be turned into an original product. With the help of matting, you can not only hide from prying eyes, but also to create unique souvenirs for relatives and friends (cups, vases, beautiful bottles, mirrors). The matting process itself is simple, accessible to everyone. And if you properly care for such a matte finish, it will remain beautiful for many more years.
In the early winter morning, approaching the car, you can see the windows covered with white frost. There is not always time to wait for the car to warm up and the windows to thaw on their own. Fortunately, auto chemical manufacturers and folk remedies offer many solutions to this problem.
Why do car windows freeze?
Let us first understand the causes of frost. All machines are equipped with holes designed for air circulation, but for various reasons they may not function. When the temperature drops inside the cabin, drops of moisture (condensate) form, which subsequently turn into a white crust on the glass, and the impossibility of escaping air from the car interior significantly increases their number.
No seals or a large number of The holes also provide easy access to the interior of cold air from the street. Once inside, it turns into dew and eventually freezes on the glass as well.
A malfunction of the heating system in a car often causes excessive fogging of the windows, for example, a leak of antifreeze increases the liquid content in the air several times.
The last reason for the freezing of car windows is dampness in the cabin, for example, when getting into a car, people bring in a certain amount of snow, which later turns into a liquid and evaporates, and then moisture evaporates and frozen dew forms.
How to remove ice from car windows and prevent its occurrence

The daily detection of an ice crust on the windows should alert the car owner, it is best to establish its cause in a car service, ibid. experienced professionals help fix the problem.
But not everyone wants to spend time and money visiting a service station, then folk remedies that have been proven over the years come to the rescue, which will prevent the windows from freezing:
- Open windows at night;
- A blanket;
- Temperature equalization inside and outside the cabin;
- Keeping glass clean
- Salt;
- Special mats;
Many motorists slightly open the windows, but this method should not be used in unguarded areas and during snowfall. In the first case, it is easy to become a victim of thieves, and a blizzard will fill the interior with completely unnecessary moisture.

The method, proven for centuries, is that the cover does not allow moisture to come into contact with the glass and form a frost crust. This method is well suited for the windshield, the sidewalls are left without protection. The windshield is most susceptible to ice crusting, this is due to the fact that it is at an angle and it is easiest for condensation to settle on it.
If it is not possible to leave ajar windows for the whole night, then it is worth opening all the doors and cooling the interior, releasing warm air from it, so the lack of temperature contrast will protect against condensation. It is enough to spend a few minutes cooling the car than to spend precious morning time cleaning the car
Moisture drops are primarily formed on surface irregularities, therefore, thorough washing of glasses will significantly reduce the adhesion of water to them, and, as a result, the formation of frost will be minimal.
It is enough for the motorist to thoroughly rub all the windows in the cabin with a rag with salt, it is an excellent abrasive, absorbs excess moisture and prevents the windows from freezing. Glycerin is a good addition and enhancer of the action of salt; it creates a protective film on the glass surface.
See what to do so that the glass does not freeze:
How to clean car glass from ice: folk remedies
If it was not possible to carry out the prevention of icing, then the means popular among the people come to the rescue, allowing you to get rid of frost on the windows as soon as possible.
Every time you sit down vehicle in winter, we bring snow into the cabin, which gradually turns into water. Rag mats take all the moisture inside themselves and do not have time to dry out, so if possible they should be replaced with rubber counterparts, then it is easy to remove excess water from them and keep the cabin dry.
However, snow can also be a means of preventing glass icing, some motorists cover the windshield and rear glass with a layer 3-5 millimeters high, and in the morning it is enough to remove the white snow coating, clean windows will be found under it.
- Scraper;
- Interior airflow;
- alcohol-containing solutions.
Every car owner winter period there should be a snow brush and an ice scraper, often they are combined into a single device. The scraper really does a good job of cleaning the glass, but rough actions harm the coating, and scratches form on it, so you need to use it very carefully.

If there is enough time, you can turn on the stove in the cabin by directing streams of warm air onto the windows, it remains to wait for the ice to slide and remove it with a scraper, without fear of damaging the surface with rough movements.
Any liquids that contain alcohol speed up the process of ice melting, so as not to spend money on expensive chemicals you can make them yourself. Methanol is always included in the basis of any store autochemistry, which is designed to deal with frost, so it is enough to mix vodka and water in a ratio of 2 to 1, apply the resulting mixture with a spray gun to the glass, and then easily remove the remaining ice with a scraper. At this time, the interior will warm up thanks to the stove, which must also be turned on before cleaning.

It is forbidden to pour hot water on the glass in the hope that it will instantly and everywhere melt the ice. Firstly, a temperature difference that is dangerous for glasses is again obtained, and, secondly, in severe frost, boiling water quickly cools and turns into an ice build-up, thereby only worsening the situation.
If none folk method did not like it, then it is presented in car dealerships big choice sprays, both protecting glasses from freezing, and allowing you to make them clean faster. The price range allows you to choose the most available remedy, but it is worth remembering that ordinary alcohol is the basis of the majority, so folk remedies are no worse than purchased ones.
Outcome
Summing up, I would like to once again remind car owners of the basic rules that will protect you from morning frost on the windows or allow you to eliminate it by spending a minimum amount of time.
- Always keep an eye on the technical condition of your car, ventilation failure is the first reason that causes condensation on the windows.
- The same temperature in the cabin and outside minimizes the formation of drops on the windows.
- It is advisable to regularly wipe the foot mats from melted snow and dirt, because dampness in the car not only increases the atmosphere in it, but also increases evaporation and the formation of frost on the windows.
- by the most effective tool The removal of the ice crust is a scraper, but it harms the glass and forms microcracks on it. It is safer to combine it with a liquid that contains alcohol, it will turn the ice into a pulp, and mechanical movements will effortlessly remove it.
If the house has unnecessary glass (whole or broken) that clutters up the space, do not rush to throw it away.
You can make a beautiful product out of it, or decorate existing items.
This is good way release this material because handmade crafts and gifts are much more appreciated by people.
In this article we will tell you what can be done with whole or broken glass, how to make a herbarium in it or bake a flower, how to turn its surface into a matte or mirror, and other subtleties of craftsmanship.
 Glass is an universal material
used to create various items interior.
Glass is an universal material
used to create various items interior.
It is used to produce not only dishes and furniture, but also paintings and panels.
You can even give a second life to a broken object, using fragments and fragments.
There is different kinds glasses that are different depending on application:
- building;
- porous;
- liquid;
- artistic, finishing, etc.
Such a variety of materials allows a skilled person to create unique kaleidoscopes, to make products of bizarre shapes and colors.
many crafts even a beginner can create, the main thing is to have necessary tools, patience and desire.
First you need to determine what exactly you want to make from glass. There are many depends on the imagination of the author and resources available.
All products can be divided into categories:
- household;
- aesthetic.

Here are just a few examples:
- candlestick decoration;
- glass ornaments, flower arrangements;
- small souvenirs from broken glass;
- thematic installations;
- decoration of household items - dishes, chandeliers, mirrors.
Let's figure out in order what items can be made from old unnecessary glass.
A shelf
Glass shelves are popular because able to easily fit into any interior. In addition, they can withstand significant loads, although they seem fragile.
Good glass furniture looks in small rooms - due to transparency, it seems less noticeable, due to which it does not visually take up space in the room.

The location must be accessible to adults, but out of reach of children(so that the child could not hang on it).
To make a shelf, you will need:
- glass cutter (more convenient to use oil);
- Sander belt type with abrasive skin (grain value should be 120 units);
- respirator, gloves and other protective equipment;
- rulers (you will need to periodically check whether the layers are even).
It is created in the following order:

Aquarium
To make it yourself, you will need:
- silicate glass premium.
- Glue containing silicone. Look carefully at the information on the packaging: it should indicate that it is suitable for aquariums (it does not contain antibacterial substances that harm fish and plants).
- about 8 pieces small corners suitable for predetermined dimensions.
When gluing parts, you need to remember certain requirements:
- the seams should be thick, at least 2-3 mm;
- the outer edges must be sanded, and those under the glue should not be touched.
The build process itself looks like this:

Do not rush to immediately "transport" fish and other marine life here. Spend 3-5 hour hydrotest– fill it with water and check if the structure is leaking liquid, if the seams are leaking, etc.
Now you have an idea of how to make your own aquarium at home.
Greenhouse
Glass is often used in the construction of wooden or metal greenhouses. This is classic version greenhouse facilities, which allows you to maintain the necessary microclimate inside.
If you have a lot of leftovers window glass, they can be successfully applied to create a greenhouse.
 In such a structure, the walls and roof are made of glass, which gives a number of advantages:
- You can use the greenhouse all year round. The material retains transparency, structure, appearance and thermal insulation properties.
- By connecting heating to it, plants can be grown in winter. In the summer clear glass transmits light, which allows plants to grow.
- Glass is resistant to abrasion and easy to clean.
- The walls of the building can be easily replaced in case of damage. The change will be inexpensive, and used glass is suitable for this.
- Glass does not emit harmful substances and odors even during thermal exposure. It's ecological pure material which is also easy to care for. The glass is resistant to chemicals used for cleaning.
- Reinforced or tempered type (thermal glass) can withstand impact large hail and other adverse weather conditions.
In addition to all these properties and an attractive appearance that lasts for years, this design has disadvantages:
- Need to pick up reliable frame and prepare a solid foundation (such loads can withstand strip foundation), since the glass has a high weight. You can’t say so in appearance, but the material weighs a lot: for example, glass 4 mm thick square shape weighs about 10 kg, and the mass of a 6 mm layer is 1.5 times greater.
- Building a glass greenhouse will not be cheap.
- Glass holds shock and mechanical influences weakly.
- Glass has a high thermal conductivity, so it heats up and cools down quickly. This is especially harmful to plants during daily temperature fluctuations. Therefore, you need to take care of the system to maintain the desired temperature inside the room.
- A room made of glass can only be built in the form of a house.

It all starts with preparation:
- Creation of a drawing of a future greenhouse, determination of its dimensions.
- Choosing a suitable location. It is necessary to take into account the level of lighting, orient the room in such a way that the heat is distributed evenly.
- Accounting for the direction of the wind in a given area. It is best to protect the structure on the leeward side with some kind of object (bush or other small obstacle).
- Determination of soil and relief features. You need to choose a dry and level place.
- Calculation of the distance of the greenhouse to the nearest source of electricity and water supply. The closer, the easier it will be to build a system for heating and watering plants.

Below is shown, where not to be placed greenhouse. If done incorrect choice, the greenhouse may collapse, or the plants grown will grow more slowly.

A reasonable solution would be to create a wall greenhouse. This is will save area, reduce the distance to water and electricity, and spend less money on construction.
Below is a typical drawing. You can change it to your desired size if you wish.

Based on drawing are elected Construction Materials . The foundation must be at least 0.5 meters in height and have a solid frame - metal or wood (bars or profiles measuring 5 by 5 cm, the distance between the posts - up to 0.8 m, based on the size of the glass and the frame itself).
Can be used different types glass. The main thing, so that they match the dimensions of the frame. For example:
- single (2.5 mm thick) is suitable for side walls installed in a small wooden frame;
- double (up to 3.5 mm) cannot be used as a top window;
- display case (6 mm) will become a strong wall, but will need reliable fastening and supports;
- multi-layer will fit in almost any part.
Pick up glasses according to the purpose of the building.
If there are tropical plants in the greenhouse, it is better to use laminated glazing, which will reduce the cost of internal heating.
Ordinary glasses are also suitable for greens and vegetables.
The best growth is provided by double-glazed windows. There are several types of them:
- single-chamber;
- two-chamber;
- heat-saving;
- energy saving.
Double-glazed windows from old plastic windows are perfect.

Need to prepare the following building materials:
- supporting corners;
- wooden beams or metal bases under each side of the frame;
- beams;
- mounting foam and hardware;
- glass or double-glazed windows;
- sealant (for fixing and insulating glazing);
- details for the door (handle, lock, hinges);
- corners on which wooden parts will be attached.
Cords, pegs, containers, buckets and shovels are needed for marking and preparing the foundation. A hacksaw, chisels, a glass cutter, an electric planer and a construction level will be needed when assembling the greenhouse.
Now that everything is ready, we will tell you in detail how to make a greenhouse.
Assembly is carried out in the following order:
- At the selected site, you need to plan the soil and remove vegetation. Make a marking under the trenches by installing pegs and cords.
- We dig trenches according to the planned markings (depth 0.4 m, width - 0.2 m). We will plan the bottom of the pit, fill it with a 10-centimeter layer of a mixture of crushed stone and sand.
- We assemble the formwork, check the height of the edges. We lay the welded mesh or steel reinforcement, fasten the anchors to the frame.
- We prepare concrete (a mixture of cement and sand 1: 3 with the addition of crushed stone and water). Pour the resulting solution and give it time to harden.

We lay two layers of roofing material directly on the surface of the foundation. They will protect the wooden frame from moisture. We process wooden blanks antiseptic.
Screw the frame support bars to the anchors, then make selections in the bars on which the glass will be attached.
We fix the racks and bars.
Make sure the structure is upright. Install braces and fix all elements with metal corners .
Connect all the remaining elements together. Check everything first for cracks and gaps, then make sure the structure is stable. When it is clear that the greenhouse stores heat, bring all the plants into it.

colored mosaic
For decorating surfaces, a special mosaic is suitable - smalt. But in its absence, you can use color broken glass. By the way, smalt is also made from broken glass, you can read about it in detail.
To do this kind of work, you need to prepare:
- drawing, glass base for mosaic (or plexiglass);
- glass cutter, wire cutters and a special glass breaker for working with glass;
- colored glass from which the mosaic will be made;
- medical syringe, which is useful for applying the material;
- transparent silicone;
- tile grout (black).
Consider the manufacture of a mosaic in the form of a butterfly.
So, the finished drawing needs to be transferred from paper to a glass base. With the help of tools, we cut out wings from colored glass. Then cut with a glass cutter.

After they are separated from the base, you need lay them out on a prepared drawing.
Pieces of glass need to be coated with silicone, then glued to the glass base. For this, you will need a medical syringe.
When you glue the fragments, leave gaps between them. Later they will need to be filled with grout for joints.
It is necessary to overwrite the seams only after the silicone has grown.
Be sure to wear rubber gloves. The grout itself diluted according to instructions located on the package with the substance. The result is a mixture as thick as sour cream.
We apply it to the mosaic.

As you can see, it covered the entire surface of the product, and the seams were securely sealed. It remains only to remove the excess mixture from the glass. Do it you can use a wet sponge.
The procedure for creating any other mosaic is similar, the specifics of the work will vary slightly depending on the pattern.
Here is an example of another product made using the same technology:

As you can see, the mosaic is a versatile technique, with which you can decorate completely different interior items using broken glass.
The main thing is to apply contours in advance so that the resulting drawing looks organic.
Herbarium and flower in glass
This is a very unusual, rare and beautiful fake. This technique allows you to "perpetuate" any flower (or other object) in glass, making it an ornament (for example, a pendant).
Naturally, in order for the sheets to be visible, you need to use only transparent glass (designed for fusing or ordinary).
Of the tools, you may only need a special oven, a glass cutter and a machine for turning the edges of glass.
Needs to be cut and trimmed two circles of equal diameter, in the dimensions of which the flower will fit. Plus, you need to leave some space if you want to make a pendant (in small area a hole will be made for the lace).

By the way, this is a difficult operation, the end result is predictable. Difficult to control the process: the grass can burn out completely, or a clear silhouette remains.
To minimize possible damage, it is better to paint the flower in advance: even if the leaves burn out, the paint will retain the original shape of the flower and remain inside the glass.
You can approach the matter artistically by coloring the flower with transitions of shades.
You need to use only paints for fusing - they do not fade at high temperatures. After applying it, you need to let it dry.
We put the painted plant between the glasses and put it in the oven.
Need to pick up correct baking mode. It is selected depending on the glass used. The approximate range is 740-800 degrees.
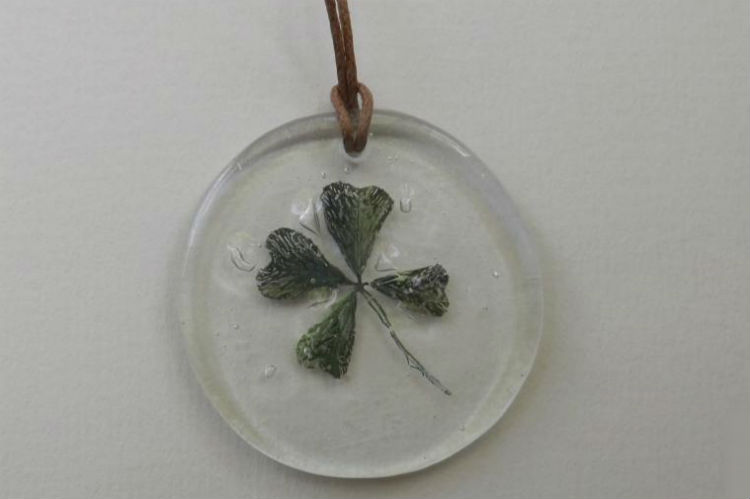
Please note that between the glasses air bubbles may form. If after baking there will be few of them, and the sizes will be small, they can additionally decorate the product.
If the plant burns out only partially, it may turn out to be a little openwork, fibrous.
Photo frame
A more difficult operation will be decorating frames, panels and paintings.
Before you make a frame with glass, you will need to prepare:
- fiberboard sheet right size(dimensions are selected based on the intended pattern);
- broken glass (transparent and colored);
- acrylic paints, gouache or ink;
- glue.
A dense layer of acrylic paint is applied to the fiberboard sheet. Optional, can be covered with one or more shades. This is necessary to prepare the background. When everything is dry, the sheet must be inserted into the frame of the future product.
Then, on the future panel or picture, you need to apply the outlines of the planned drawing using a stencil or by hand.
For this, ink or gouache was needed - to circle the outlined lines twice and glue the fragments along them.
Having pasted them in the background area, you need to let the product dry.

Mirror
The easiest way is to decorate mirrors with fragments (colored or transparent). You can do this with vases, candlesticks, trays.
Since the essence of the decoration is gluing pieces of glass, be sure to wear rubber gloves before starting work, they will protect your hands from cuts and allergies to the substances contained in the glue.
On the surface of the object pre-mark the pattern, along which fragments will be laid out. Only ceramic glue is suitable, the layers of which must be applied using a special tool - scrapers.
If transparent glasses were used, they can be painted with acrylic paint intended for glass work.
After the layer with the fragments dries a little, holes between them can be closed putty for tiles, or cement for mosaics. You need to act carefully, but the surplus will still remain. You can remove them using a damp cloth.
Here is how mirror frames made in this style look like.
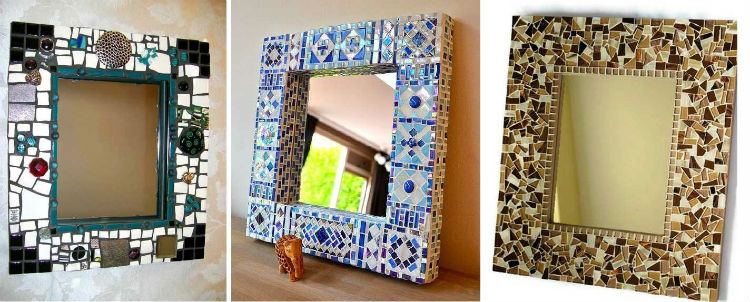
Similarly, you can decorate:
- frames for photographs, mirrors, paintings;
- flower pots;
- caskets;
- drawers;
- countertops and other items.
- accurately calculate the number of glass pieces (prepare paint to finish painting transparent fragments);
- apply clear markings and indicate where and which layer will need to be laid.
Other items and decorations
The list of crafts is not limited to this. Here's how you can decorate the interior.
Painting from multi-colored cullet
All work can be done at home, having prepared in advance:
- plywood;
- finished drawing;
- a bunch of multi-colored pieces of broken glass.
Plywood is needed as a base-frame on which the drawing with glued glass will be held. The picture itself can be drawn in advance, or you can take a suitable template.

Glue the pieces so that they fit snugly together. Better to use stronger adhesive. Try to keep them walking along the lines, observing the pre-planned color scheme drawing.
In no case do not touch the glass until the glue dries, otherwise there is a risk of moving the pieces from their original place.
In addition to pieces of glass, you can use other elements for decoration:
- beads;
- seashells;
- sequins;
- buttons, etc.
Fusing drawing
You can make a multi-colored picture both with the help of mosaic and fusing technique. It consists in baking pieces of glass, pre-folded into a specific pattern. Whole operation held in muffle furnace at high temperature (at least 800 °C).

This technique first appeared in the 1990s. in Germany, and it was based on another, more ancient method of glass processing - the “hot enamel” technique.
The main task is to correctly position the glass elements in advance so that as a result of heat treatment, they are combined into one whole. Therefore, the material becomes homogeneous, metal connections not present in this product.
The image completely depends on the performer: you can make it more voluminous, convex, leave some areas flat, increase the thickness and relief of the stained glass.
All disparate parts are laid out on a glass base - the most even and flat surface. This creates the illusion of perspective, volume, depth of the product.
The use of colored pieces allows you to expand the color gamut. This is exactly what a glass base is needed for, since when working on a metal plate, this effect cannot be achieved.

This product is also quite durable. It practically does not age, the color remains unchanged.
The only negative in the heat treatment itself is this technique will not allow you to get clear contours of the image. Colored pieces inevitably float on each other and an effect similar to watercolor is obtained.
The use of liquid glass
Advanced craftsmen can create a craft using.
You can buy this material at a hardware or hardware store. Or use other types of liquid glass, for example, clerical silicate glue, which is often used to simulate the expanses of the sea.
But such a substitute will be less durable and hard than liquid glass.
Almost any object can be decorated with this material.
After applying a layer of liquid glass, apply decoration on it - pebbles, shells, beads, sparkles, etc.
If you want to make decorative elements more voluminous, apply two layers of liquid glass.
With liquid glass pretty easy to work. They can both decorate the surfaces of various objects, and make their own decorations:
- hairpins;
- earrings;
- brooches;
- figurines;
- vases, etc.
You can decorate the interior with liquid glass in a simple way- apply small objects on a layer of glass according to a pre-designed pattern, then allow the product to cool.
Decor elements
What can be done if only small broken glass is at hand? It can be turn into powder and use as decoration.
To grind it into powder safety precautions must be followed:
- use gloves, goggles;
- find a deep enough and strong container.
The resulting broken glass powder is applied to the selected object in the areas where the glue was previously applied. Once the glue dries, you can cover it with another layer. By analogy, powder can be used to paint pictures, decorate interior items.
In addition to glass, you can additionally decorate objects with the following materials:
- shells (sea or river) and shells;
- beads or beads of a suitable size;
- walnut shells and other improvised materials.
The challenge is to find the right combination of all decorative materials, then the product will look beautiful and organic.

Making black, white and colored paint for house glass
How to make glass colored, white or apply a pattern to it at home?
Glass surfaces must be treated with special paints that have good grip on smooth surfaces. Conventional paints and varnishes are not capable of this, so the coating is quickly erased.
The composition of the paint should not be too liquid, but it should be applied in thin and translucent layers.
Best suited for liquid glass acrylic paints. They have good adhesion, and on the planes they look like a matte film. Even when mixed, they retain color purity and are resistant to ultraviolet rays.
You can paint the surface with polyurethane mixtures. This is an elastic substance that instantly hardens on glass. Layers are perfectly transparent.
Compositions can be made independently.
 Here are a couple of recipes:
- White paint is prepared by mixing four parts of silicate glue and one part of kaolin (it must be thoroughly rubbed).
- Black shades are created by mixing one part charcoal with three parts silicate glue and one part printing ink. The resulting mixture must be filtered.
Various colored dyes can be made using special fabric dyes.
The order is as follows: dissolve 5 g of gelatin in 200 ml of water, after which we dilute the necessary coloring matter in a separate bowl. The required shade is obtained by gradually mixing the contents of the two prepared solutions.
Prepare in advance the following tools to paint glass with paint:
- spray;
- end brushes with bristles;
- paint roller or foam swab.
Pre-treat glass:
- Wipe the glass with soapy water, then rinse first with warm and then with cold water.
- Apply acetone to degrease the glass. Solvent traces can be removed with a simple dry cloth.
- Those places that do not need to be painted should be protected. Apply one or two coats of masking tape to these areas.
Instructions for staining glass at home:
- Prepare the mixture and pour it into a small bowl (this will make it easier to apply paint to the surface).
- Paint glass using a brush, spray gun, foam swab or roller. Watch out so that the layers are evenly distributed over the entire surface.
- Once the paint is dry, remove the pieces of masking tape. If some areas are weakly colored, apply an additional layer.
How to make it opaque?
To achieve a frosted glass texture, you can:
- chemical and mechanistic methods;
- using a sandblaster.
Follow the instructions below and you will learn how to make glass opaque.
It is easier and safer to use a mechanical method based on the use of abrasive paste or sand.
You need to take polished glass with a thickness of 4 to 6 mm, put it on a flat surface, placing a thick cloth under it.
On the sides of the glass, you need to nail thin spatulas so that it does not slide on the table.
Prepare sand (river or corundum is best: it scratches glass more smoothly), then sift it through a sieve until smooth.
 After that, apply sand to a board measuring 20 by 30 cm and moisten it with water. Put glass on top of the board, and any weight on top of the glass so that it firmly presses it to the surface.
Move the board parallel to the side edges of the glass. Never make circular motions.
Moisten the sand as it dries.
Periodically check if the frosting process is successful by scraping sand from the surface and pulling the glass out to the light. Continue the process until you get the expected result.
Create a mirror surface
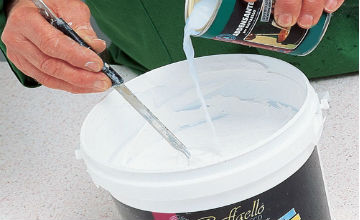
How to make a mirror? First you need to grind our glass, wetting its surface with water.
Required in advance prepare the following items:
- glass;
- containers in which the solution will be prepared and mixed with silver;
- rubber gloves;
- silver (nitrate) and tin (dichloride);
- distilled water, caustic potash or soda;
- honey, ammonia and formalin;
- alcohol, cotton wool;
- colorless varnish;
- glass rod and nitric acid;
- a spray bottle with which the mixture will be applied to the glass, plus a brush with soft bristles;
- frame or wooden sheet with clamps;
- dye.
We put on rubber gloves and carry out all work exclusively in them.
Further, when manipulations with glass are carried out, hold it carefully by the ribs, otherwise you risk stain a smooth surface. This is important because the material will often need to be dragged from place to place, washed and applied to various substances.

The procedure is as follows:
- We wash the glass with distilled water and crushed chalk. All sides must be clean, incl. ends.
- We treat the surface with an alkali degreasing solution (sodium or potassium, with a content of about 10%).
- Rinse the glass again with distilled water.
- Wipe clean glass with a cotton swab dipped in 1% stannous chloride solution. Then immediately place the mirror in a container filled with distilled water. Let him get wet.
- While the glass is filled, clean and degrease (with the same alkaline solution) the container in which you plan to silver the glass. Please note that the temperature of the surface of the future mirror in water should be 10 degrees higher than that of the solution induced for silvering.
Would need prepare two solutions with the content that will cover the glass. Use only distilled water for this:
- The first solution consists of silver nitrate (1.6 g) and water (30 ml). After mixing them, watch what kind of sediment you get. Drip 25% ammonia into it until it disappears, then add another half glass of water.
- Pour 40% formalin solution (5 g) into the second graduated container.
- Put the glass in horizontal position on the surface prepared for silvering.
- Now start covering the glass: pour the resulting solution into the middle, roll it out in an even layer using a glass rod. Alternatively, dip the glass into the chemical mixture so that the silver does not get on the opposite side.
- The solution needs to freeze. It takes 3-10 minutes to "mirror" it, depending on the initial temperature of the mixture.
- When everything is dry, you need to put the mirror upright. Until the silver layer is fixed, it may be damaged, so lean the product against the support with the unfinished side.
- The mirror needs 2 hours to dry at a temperature of up to 100 degrees.
- Examine the received product. Silver drips can be wiped off with cotton wool with a solution of nitric acid.
- Rinse the mirror first in water and then in alcohol.
- The silver layer should have cooled down by this time. Spray it with clear varnish from a spray bottle.
- When the varnish dries, paint the darkened surface. Then paint the silvered part with red lead, spreading it in turpentine. The glass part must be wiped with a solution of nitric acid.
- Let everything dry and look at the result. If everything suits you, it remains only to put the mirror in a frame with clips.

How to make a hole?
A hole in glass can be drilled with:
- flexible shaft drills;
- dental burs.
The structure itself amenable to mechanical processing, but the fragility of glass must be taken into account. Therefore, it is necessary to calculate the force and points of impact, as well as the order of work.
Processing should not lead to cracks, breaks and chips on the main surface, otherwise the entire product may break.
Before making a hole, you need to prepare the glass for processing. Working surface needs to be cleaned and levelled. Watch for the presence of defective areas - under mechanical stress, they can chip and ruin the workpiece.
First, make a markup: mark the lines of future holes in such a way that the surface flaws are located inside the circle and do not go beyond it. Additionally can be treated with chemicals, ridding it of oil traces.
 Determine where the work will be done. It is necessary to prepare the fixing equipment.
The very method of fixing the glass is determined based on the chosen technology for creating the hole.
Usually, the workpiece is placed in a vise, and under the areas that will be affected, they put damping soft materials.
What if you need to make a small hole?
Miniature holes can be drilled with a drill and drill. The drill is pre-needed:
- glow;
- immerse in sealing wax and hold until the substance begins to melt;
- moisten the tip in turpentine.
After that, you can start working.
The second option is:
- Grind camphor and particles of coarse sandpaper.
- Pour the resulting elements into a small container, and then dilute them with turpentine. Place this paste on a clean glass surface of the workpiece.
- Prepare a small cut copper wire. It will need to be clamped in the drill chuck. Such equipment needs to be sent, so prepare a guide jig (plywood).
- Preparation completed. You can start drilling.
Large holes in glass are made in a different way. If needed diameter exceeds 10cm, household equipment will not help here.
 You can still drill, but you must first make a small through point in the center of the future hole.
Any small-format glass of small diameter (up to 1 cm) will cope with this. Third-party chips will occur, but this is not a problem: they form in areas that will later be removed.
Having received a small through opening, you need to stick a piece of wire into it and fix it.
One end is fastened with a glass cutter. After checking whether the elements are securely fixed and whether the tool moves smoothly in a circle, you can cut the circle.
If you can't drill a hole, you can melt it. You will need to prepare a tooling in which liquid tin or lead will be prepared. The glass blank is processed with gasoline, acetone or alcohol.
Having made the markup and formed the zone of the future hole, the resulting area is sprinkled with moistened sand.
It should be enough to create a funnel, the bottom of which will be comparable in size to the edges of the hole, then metal is poured into it.
After 1-2 minutes, it will cool down, and the sand equipment can be removed along with the mold.
As a result, in a glass blank a hole with smooth edges is formed. The risk is only in the melting process itself: it is impossible to control the diameter that is formed after the interaction of glass and metal.
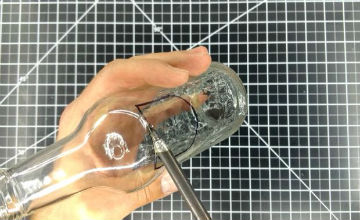 The last option is to cut a hole with a soldering iron. You need to start by creating risks with a needle file.
Carefully mark the zones in which the soldering iron will melt in depth.
Then you need to warm up the sting and start cutting. Act slowly and carefully.
It is better melt small pieces, periodically cooling the glass (so the risk of formation of deformation of nearby areas will decrease).
The result will be exactly the opposite of the above method:
- the boundaries of the intended diameter of the hole will be maintained;
- the edges will be uneven.
Related videos
findings
As you can see, unnecessary or broken glass is suitable for decorating the decoration of the room with handmade items. The main thing is desire and imagination.
You can also decorate other glass containers.
If you don’t want to work on crafts, don’t throw away glass anyway. Take it to or to a special container for collecting glass.
In contact with
Badges, brooches, various decorations and many household items cover enamel- glass applied to metal. Here we will try to make glass. These experiments require a special oven. For this reason alone, glass making cannot be done at home. But, in addition, skills in working with hot melts are also needed, so experiments, of course, must be carried out in the presence of elders.
In factories and chemical laboratories, glass is obtained from charge- a thoroughly mixed dry mixture of powdered salts, oxides and other compounds. When heated in furnaces to very high temperatures, often above 1500°C, salts decompose to oxides, which, interacting with each other, form silicates, borates, phosphates, and other compounds that are stable at high temperatures. Together they make up glass.
We will prepare the so-called fusible glasses, for which a laboratory electric furnace with a heating temperature of up to 1000°C is sufficient. You will also need crucibles, crucible tongs (so as not to burn yourself) and a small flat plate, steel or cast iron. First we will weld the glass, and then we will find a use for it.
Mix with a spatula on a sheet of paper 10 g of sodium tetraborate (borax), 20 g of lead oxide and 1.5 g of cobalt oxide, sifted through a sieve. This is our burden. Pour it into a small crucible and compact with a spatula so that you get a cone with a top in the center of the crucible. The compacted mixture should occupy no more than three-quarters of the volume in the crucible, then the glass will not spill. Place the crucible with tongs in an electric furnace (crucible or muffle), heated to 800-900 °C, and wait until the mixture melts. This is judged by the release of bubbles: as soon as it has stopped, the glass is ready. Remove the crucible from the oven with tongs and immediately pour the melted glass onto a clean steel or cast iron plate. Cooling on the stove, the glass forms a blue-violet ingot.
To obtain glasses of other colors, replace the cobalt oxide with other coloring oxides. Iron(III) oxide (1-1.5 g) will color the glass brown, copper(II) oxide (0.5-1 g) green, a mixture of 0.3 g of copper oxide with 1 g of cobalt oxide and 1 g iron oxide (III) - black. If we take only boric acid and lead oxide, the glass will remain colorless and transparent. Experiment yourself with other oxides, such as chromium, manganese, nickel, tin.
Crush the glass with a pestle in a porcelain mortar. In order not to injure yourself with fragments, be sure to wrap your hand with a towel, and cover the mortar with a pestle with a clean rag.
Pour fine glass powder onto thick glass, add a little water and grind to a creamy state with a chime - a glass or porcelain disk with a handle. Instead of a chime, you can take a small flat-bottomed mortar or a polished piece of granite - this is what the old masters did when they rubbed paint. The resulting mass is called slip. We will apply it to the aluminum surface in much the same way as they do when making jewelry.
clean aluminum surface sandpaper and degrease by boiling in soda solution. On a clean surface, trace the outline of the pattern with a scalpel or needle. Cover the surface with a slip with an ordinary brush, dry it over a flame, and then heat it in the same flame until the glass melts onto the metal. You will get enamel. If the badge is small, it can be covered with a layer of glass and heated in a flame in its entirety. If the product is larger (say, a plate with an inscription), then it is necessary to break it into sections and apply glass to them one by one. To make the color of the enamel more intense, apply the glass again. In this way, it is possible to obtain not only decorations, but also reliable enamel coatings to protect aluminum parts in various devices and models. Since in this case the enamel bears an additional load, metal surface after degreasing and washing, it is desirable to cover with a dense oxide film; to do this, it is enough to hold the part for 5-10 minutes in an oven with a temperature slightly below 600 ° C.
Of course, on great detail it is more convenient to apply the slip not with a brush, but from a spray bottle or simply by watering (but the layer should be thin). Dry the part in an oven at 50-60°C, and then transfer it to an electric furnace heated to 700-800°C.
And from low-melting glass, you can prepare painted plates for mosaic work. Pieces of a bat porcelain tableware(they will always be given to you in a china shop) pour a thin layer of slip over it, dry at room temperature or in an oven and fuse the glass onto the plates, keeping them in an electric furnace at a temperature not lower than 700°C.
Having mastered the work with glass, you can help your colleagues from the biological circle: they often make stuffed animals there, and stuffed animals need multi-colored eyes.
In a steel plate about 1.5 cm thick, drill a few recesses different sizes with a conical or spherical bottom. In the same way as before, fuse the multi-colored glasses. Gamma, perhaps, is enough, and to change the intensity, slightly increase or decrease the content of the coloring additive.
Place a small drop of bright molten glass into the recess of the steel plate, then pour in the iris-colored glass. The drop will enter the main mass, but will not mix with it - both the pupil and the iris will be reproduced in this way. Cool products slowly, avoiding sudden temperature changes. To do this, remove the hardened, but still hot “eyes” from the mold with heated tweezers, put them in loose asbestos and cool it to room temperature already in it.
Of course, fusible glasses can be found in other applications. But wouldn't it be better if you look for them yourself?
And at the end of the experiments with glass, using the same electric furnace, we will try to turn ordinary glass into colored glass. The natural question is: is it possible in this way to make sunglasses? It is possible, but it is unlikely that you will succeed the first time, because the process is capricious and requires some skills. Therefore, take the glasses only after you have practiced on the pieces of glass and make sure that the result is as expected.
The basis of paint for glass will be rosin. From resinates, acid salts that make up rosin, you previously prepared driers for oil paints. Let us turn again to resinates, because they are able to form a thin, even film on glass and serve as carriers of the coloring matter,
In a solution of caustic soda with a concentration of about 20%, dissolve with stirring and remembering, of course, caution, pieces of rosin until the liquid becomes dark yellow. After filtering, add a little solution of ferric chloride FeCl 3 or other ferric salt. Keep in mind that the concentration of the solution should be small, the salt cannot be taken in excess - the precipitate of iron hydroxide, which is formed in this case, will interfere with us. If the salt concentration is low, then a red precipitate of iron resinate is formed - this is where it is needed.
Filter off the red precipitate and dry it in air, and then dissolve to saturation in pure gasoline (not automobile, but solvent gasoline), it would be even better to use hexane or petroleum ether. Use a brush or a spray gun to paint the surface of the glass with a thin layer, let it dry and put it in an oven heated to about 600 ° C for 5-10 minutes. But rosin belongs to organic substances, and they cannot withstand such a temperature! That's right, but that's exactly what you need - let organic base burn out. Then the thinnest film of iron oxide will remain on the glass, well adhered to the surface. And although the oxide is generally opaque, in such thin layer it transmits part of the light rays, i.e., it can serve as a light filter.
Perhaps the light protection layer will seem too dark or, on the contrary, too light. In this case, vary the conditions of the experiment - slightly increase or decrease the concentration of the rosin solution, change the firing time and temperature. If you are not satisfied with the color in which the glass is painted, replace the iron chloride with another metal chloride, but certainly one whose oxide is brightly colored, such as copper or cobalt chloride.
And when the technology is carefully worked out on pieces of glass, it is possible to make the transformation of ordinary glasses into sunglasses without much risk. Just remember to take the glass out of the frame - the plastic frame will not withstand the heat in the oven in the same way as the rosin base.
How to make glass?
The first glass was made almost 2500 years ago without high-tech devices and materials. Since then, many methods for making glass have been developed. Some of them are quite realizable at home.
How to make glass with your own hands: material preparation
Before proceeding with the glass manufacturing process itself, one should decide on the choice of material for the charge.
Charge - a mixture of components for the manufacture of glass, which is subsequently to be melted. For home experiments should be as small as possible.
It is better to start experimenting with a mixture of borax (sodium tetraborate) and lead oxide in a ratio of 1 to 2. The product from it will not have high strength, but it can also be prepared at low temperatures (up to 900 ° C). However, the glass obtained from such a mixture can be successfully used for the manufacture of various  decorative elements or enameling them.
The mixture for classical glass, with a melting point of 1500-1800°C, should be prepared from quartz sand (silicon dioxide), which should be 70-75% in the mixture. To give the future glass strength and reduce refractoriness, it is also necessary to add 10-12% lime (calcium oxide), 10-12% soda (sodium carbonate) and 5-6% burnt magnesia (magnesium oxide).
If you want to make colored glass yourself, then up to 3% of other salts should be included in the mixture:
- a blue tint will give cobalt oxide;
- green - copper oxide;
- brown - iron oxide.
Therefore, varying and mixing different oxides allows you to get any desired tone.
How to make glass with your own hands: equipment preparation
The kiln plays a key role in glass production. It’s good if you can find one that is capable of maintaining a stable temperature of at least 1500 ° C with the help of electricity or gas, but you can do without it with such a task as making glass with your own hands.
It is enough to purchase a large thick-walled brazier in a hardware store round shape designed to work more than one season. To increase the temperature in it  there will be little passive ventilation. It has to be increased with a compressor or a vacuum cleaner (reverse mode), which, by means of metal pipe should be placed as close as possible to the blower of the brazier.
To melt glass, you will also need a supply of charcoal, metal tongs with long handles, a baking sheet and a crucible.
The crucible is a refractory container. In home experiments, its function can be replaced by a thick-walled steel glass made from a pipe. It is better to avoid large volumes, since the resource of the barbecue oven is not designed for long-term high-temperature loads.
How to make glass with your own hands: the production process
The finished mixture should be poured into the crucible so that it occupies about 70-75% of the total volume in it. After that, it must be placed in the oven (brazier) and overlaid on all sides charcoal. The bulk of the coal should be located below, so that the edges of the "glass" protrude 2-3 cm above the fuel.
Kindling the barbecue can be done by anyone convenient way, including with  using flammable liquids. When the combustion becomes even, you can turn on the compressor (vacuum cleaner).
The complete end of the melting process is determined by the cessation of the appearance of bubbles in the crucible with liquid glass. After that, the "glass" is carefully removed, and its contents are poured onto a preheated baking sheet.
Glass cooling should take place in heat. Otherwise, the product may become cracked or lose transparency.
Throughout all stages of work, precautions must be observed. It will be useful:
- fire extinguisher;
- a box with sand (cannot be extinguished with water);
- heat-resistant clothing;
- protective heat-resistant mask;
- absence of flammable objects near the barbecue;
- watching a video on how glass is made in production.
Fusing at home: a bit of history and a step-by-step master class using a watch as an example, at no extra cost
Fusing at home is real. This, of course, will not be as bright and beautiful as the factory craftsmen, but it will turn out unique and made by hand.

Fusing is a glass baking technique. Using this technique, you can make interesting things from an ordinary bottle, such as decorations, panels or stained glass windows. Products can be made both single-layer and in several layers, and relief compositions can also be created.

This technique was first used in Germany in the early 90s. Pieces of different colors were melted, and at a temperature of 800-900 degrees they merged into one. Now fusing is used in various branches of applied art, such as: art objects, decorative items, jewelry, original design of windows and shop windows, and so on. This type of creativity has become quite diverse.
Method of manufacturing glass products
Pieces are cut out of multi-colored glass plates with a glass cutter or special tweezers right size. They apply to each other, assemble the future composition, and fill the gaps with powder from glass plates (crushed pieces). Put in the oven for 18-22 hours (depending on the thickness and diameter of the glass) and close.

Fusing at home
In order to make something in the fusing style with your own hands, you will need:
- special glass crushed or in the form of plates (for good connection pieces of glass, see that the COE indicator is the same everywhere);
- oil glass cutter (oil is poured into the middle);
- protective glasses;
- tongs 2 pieces;
- PVA glue and brush;
- Sander;
- special oven for fusing.
First you need to decide on the craft. If you are doing this for the first time, then it is better to take something simple, for example, flowers or an abstraction.

Cutting this type of technology is exactly the same as ordinary glass. You need to hold a glass cutter, and then break it. If you have round or complex shapes, then after carrying out the glass cutter, you need to pinch off the excess with tongs and grind the irregularities.
Then the pieces must be glued with glue to the glass base (after baking, there will be no trace of PVA) and sent to the oven for 6 hours at a temperature of 700 degrees.
Unfortunately, this technique does not give clear contours. Therefore, if you want clarity, you will have to decorate the product with cloisonné enamel. And do not forget to erase the traces of the marker with alcohol (if you drew contours with it).
In this way, you can make several tiles and insert them into the bathroom or kitchen, it will look original. Everything that your imagination allows - really do without special efforts, the main thing is to have an oven, material and desire. A lamp, a vase, frames, jewelry, Christmas tree toys, dishes and much more will decorate your home and give it originality.
A step-by-step master class on making fusing watches
For work we need:
Even the most simple job it is worth starting with a sketch, so we make it. Then we select glass by color and compatibility.
- Using a compass, draw a circle on a transparent base.
- The compass is attached like a suction cup, so there shouldn't be any problems with drawing a circle. With the help of wire cutters, remove the circle, biting off the glass little by little.
- And tap on the back side with the handle of the glass cutter.
- The workpiece is ready, now pour some water to make a hole
- Turn on the drill and add water
- Make rays for the sun
- Yellow glass (3 shades) cut into pieces
- Attach them to the base
- Set aside temporarily and make notes for the numbers
- Using wire cutters and a glass cutter, make a palm tree, elements and figures
- Seize everything with glue
- Scatter the frit
- Put the product in the oven and lay out the rays, then put the round blank on top
- Add clear glass between the beams. This will be the fastener
- Close the oven and bake for 5 hours, then 7 hours to cool. Open the oven and take out the product.
Many people think that working with glass is difficult, but this is not so, there would be a desire. This master class is proof that you can do the most amazing things and make any fantasies come true.
There may be options for products with iodine, it looks very chic! And fusing white light (white glass) looks generally incomparable.
Glass products can be made both for yourself (home decoration) and as gifts for loved ones. You will definitely surprise everyone if you give a vase handmade or candy.
Inspiration to you and successful crafts!
To your attention is a video on how to create various products using the fusing technique:
On the topic, how to make glass(and it would be nice strained glass) do-it-yourself feat case. A friend has long wanted to somehow make a side glass in an old, almost retro, car. The search for technologies, led me to such a benefit.
Raw materials for glass production
Of course, most people know that glass is made from quartz sand. Quartz sand is the main ingredient for the production of such products. Glass is a combination of sand, flint, spar, or some other silicic substance with one or more alkali components, and in some cases a metal oxide.
In order for the glass to be transparent, and not greenish (as for bottles), it should not contain iron impurities. For transparency, small amounts of manganese dioxide are added during its manufacture. And then with the finished glass, you can do whatever your heart desires, for example, cover them with ultra-modern decorative films as suggested by this site - globalfilms.com.ua/products/decorative-films.
To make or make glass, sodium carbonate (soda) and quicklime are initially added to quartz sand. Sodium carbonate lowers the temperature required to make a product for industrial production.
For strength, no more than 26-30% magnesium oxide and (or) aluminum are added to the mass.
Let's make decorative glass
How to make decorative glass? To receive decorative glass up to 33% lead oxide is added to the mixture, which ensures the sparkle of the crystal structure of glassware, as well as its softness, and lowering the melting point. However, the more lead oxides in the sweep, the more difficult it is to make molded glass.
The color depends on the special impurities in it. As already noted, a greenish tint is given by an admixture of iron quartz to sand, sulfur imparts a yellowish tint, amber, brownish or even blackish tint, depending on how much carbon or iron is also added to the mixture along with sulfur. Arsenic attaches to glass milky color, borax - improves specularity, lead gives yellow tint, which can be eliminated by adding saltpeter.
This mixture is melted, industrially in a gas furnace, in some cases in electric furnaces or pots.
Quartz sand without additives becomes glass at a temperature of 2300 degrees Celsius. The addition of sodium carbonate (soda) reduces the temperature to 1500 degrees Celsius.
There will be bubbles in the glass. To remove them, sodium sulfate, table salt or antimony oxide are added to the composition, stirring.
Cast glass
Cast glass is formed in one of the ways. The molten mass is poured into the mold and cools slowly. This is how the Egyptians made glass, including the manufacture of lenses, which is also used in modern technologies. (Next, go to the next page, the numbering is below)