Alteration of kitchen chairs on a metal basis. Restoration of chairs at home
Over time, any furniture loses its original view and quality. To solve this problem, it is necessary to carry out restoration work, independently or with the help of specialists. Most often, chairs are restored with their own hands. Master class and step by step photo will help to do it correctly and with the highest quality.
List of materials and tools for restoration
Before starting work, it is necessary to assess the condition of the furniture and identify problem areas– damage to hull elements, deterioration paintwork or defective connecting components. After that, you need to draw up a restoration plan - repairing or replacing parts of the chair, restoring the protective layer or improving the fasteners. Usually these works are performed in a complex.

Depending on the type of restoration measures, the optimal set of tools is selected and Supplies. The minimum configuration should include the following components:
- screwdriver or screwdriver;
- furniture stapler;
- hammer, grinder;
- a sheet of plywood, preferably four-layer;
- varnish and stain;
- set of brushes;
- clamps for fastening chair elements;
- screws, self-tapping screws.

Do-it-yourself chair restoration
You need to get ready that all the work on the restoration of the chair can take from one to five days. Such a long period is due to the drying time of the paintwork. If you connect the parts at once, the probability of an uneven distribution of the protective layer will increase.
Structural disassembly
Removal of the casing is performed if it makes it difficult to access the screws. The brackets are removed using a slotted screwdriver and pliers. Then it is necessary to dismantle all fasteners. To do this, use a screwdriver or screwdriver. If there are wooden dowels in the structure, they are drilled out without damaging the bearing parts.

At this stage, you must adhere to the following rules:
- each part is numbered according to the location on a pre-prepared drawing;
- inspection for cracks or other mechanical damage;
- if necessary, take photos of the disassembly process.
Then you can proceed to the main part of the repair.
Processing with adhesives
To restore damaged parts, use wood glue. If not carried out permanent jobs for wood - it is recommended to buy a small amount adhesive composition. More often they use "PVA-furniture" in aluminum tubes of 50 ml. The average consumption is 100 g / m², the price is from 45 rubles.

The order of gluing parts:
- After applying the composition, you must wait 5-10 minutes.
- With the help of clamps, the parts are connected and are in this state for 1-2 hours.
- Excess glue is removed with a rag.
- After the final drying, the protruding composition is removed. grinder or fine-grained sandpaper.
The adhesive can be used as a filler for deep cracks. It must first be mixed with wood dust. Then the chip is filled with the resulting mass.
Making a new seat
Most often, damage occurs in the seat structure. If they are irreversible, it is necessary to make a new one from plywood in terms of dimensions. Then, foam rubber is cut out according to the same dimensions and placed on upper part seats.

It is best to buy a new fabric base. Its dimensions should be 7-10 cm larger than the dimensions of the seat. Then you should perform the following steps:
- Foam rubber does not need to be rigidly fixed to the glue. It is important that it covers the entire area of the workpiece.
- A tapestry (fabric) is laid on a flat surface, foam rubber is placed on top of it, and then a seat.
- The edges of the fabric are fixed on the back of the wooden shield using a furniture stapler.
Some chair designs have side wooden elements. They are dismantled before the upholstery process and then reinstalled.

Protective coating
To prevent the appearance of fungus or mold, as well as to update the appearance, a paint and varnish composition is applied to the surface of the parts. First, each element is treated with stain, and then, after a day, with varnish. The latter must be applied in 3-4 layers.

Alternatively, consider painting the chair. After the final drying of all layers, the structure is assembled. In the process, it is recommended to refer to the previously drawn up scheme.

It's a shame to throw in the trash a thing that is included in the furniture set. Do-it-yourself restoration of chairs will help not to break the package. Also, do not be upset if something breaks down that plays the role of an exclusive, dear to the heart, memorable item. And here restoration can work wonders.
Chair paintwork
What is your favorite chair? These are wonderful moments of returning to childhood ... Or the memory of close person... Or even a chair can be passed down from generation to generation. Or something else, but so dear, with which you just don’t want to part.
But, unfortunately, a thing cannot be eternal. The furniture is scratched and peeling off. alas, it becomes unpresentable. However, restoring old chairs with your own hands will help keep the item for some more time.

Often, before varnishing, the chair needs to be completely cleaned of old paint or varnish. This process requires patience and perseverance from the master. But the pay for the work will be fully consistent with the efforts invested.
Chair decoration
Sometimes it makes sense to radically change color solution furniture. Chairs painted in white or gold look very creative. Often craftsmen choose other colors for the wooden part of the chair: blue or light blue, pink or bright red. But then the upholstery should be pure white or with a golden ornament. The grace of this design takes people back to the time of Catherine II, reviving the palace luxury.
White furniture can be decorated with gilded ornaments, simply drawn or made in the form of a bas-relief. Blanks for this kind of jewelry can be purchased in stores or cast independently from plaster and glued. Restoration and decoration of chairs with your own hands antique style will bring charm and originality to the design. Sometimes the edges of the upholstery are decorated with beautiful braid, tassels.

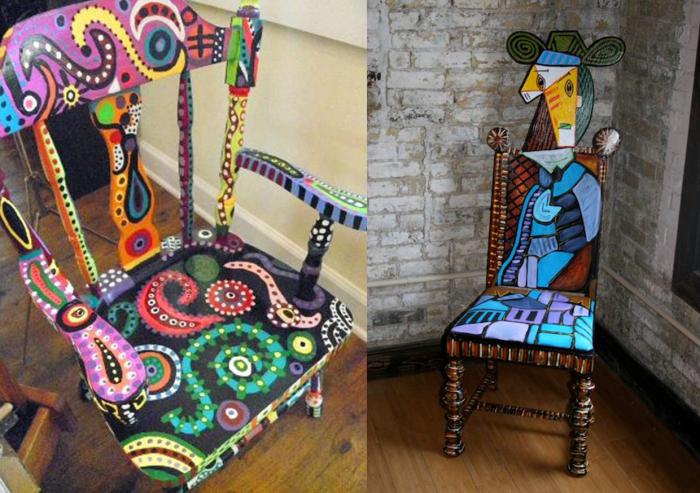
The image of the room will also be changed by chairs painted in a cubic style. And someone will like floral or vegetable colors more. In any case, the surface coating will protect the object from corrosion and increase its service life. Therefore, the practical benefits that such a restoration of chairs with their own hands will bring are also obvious.
Comprehensive instructions for replacing failed parts
In addition to the appearance of products, the owners of beautiful antique chairs are concerned about their functionality. Therefore, the restoration wooden chairs do-it-yourself includes the replacement of some parts in the product. For example, it is difficult to carve a broken rail from the back of a chair absolutely identical to the remaining ones. Therefore, it is recommended to make the necessary number of rails of a different configuration, but of the appropriate size (height and thickness). You can even try to buy them in the store, although it will be very difficult.

Viennese chair repair
Very often, the slats simply fall out of their nests. Viennese chairs usually suffer from such a defect. Do-it-yourself restoration in this case occurs according to the algorithm described above. Only here it is no longer necessary to remove all the rails from the lower grooves. It is enough to clean the vacant hollow from the remnants of dried glue, fill it with an adhesive compound and strengthen the dropped part in it.
Soft chair repair
Furniture in our life plays important role. For example, upholstered chairs look elegant and stylish in the interior. And they are much more comfortable to sit on than regular ones.
The most common repair is the restoration of chairs with your own hands, when it comes to upholstery that has lost its visual appeal. Spots or even holes that cannot be removed by anything often appear on it, ugly scuffs, burn out once bright colours. And sometimes you just want to change the entire design of the room, redo it in a different color scheme.
Restoration of a soft chair with your own hands will not take very much time. Even an inexperienced master, a teenager or a woman can produce it. It is only important to choose a sufficiently strong upholstery fabric and professional furniture foam rubber.
Calculation of fabric when replacing upholstery
Often in the interior use a set of furniture. In this case, the upholstery is usually replaced on all chairs at once. Therefore, it is necessary to calculate in advance the size of the fabric required for the restoration.
First you need to measure the width and length of the seat. Do not forget to add a centimeter on all sides for the hem of the fabric. Most often, this part is square, measuring 50 by 50 centimeters, that is, 50 square centimeters.
Then, if the chair has a soft back, the same must be done with this part of the object. By calculating the amount of upholstery needed to restore one chair, you can calculate the amount of material needed for all chairs. By simply multiplying the result by the number of items (usually 6 pieces), the restorer will get the number of square centimeters. They need to be divided by the width of the upholstery fabric, which was looked after in the store. In the answer to this problem, the number of necessary "linear" centimeters will appear.

Best buy a little more material, with a margin, because otherwise, the master may have to sew the fabric, because in one strip, when cutting, a piece will remain, and in the other - also a piece.
And in order to avoid this, the master will still need the ability to lay out patterns on fabric in such a way that there is as little unused fabric as possible. It will not be difficult to do this if you need to prepare the number of details from the newspaper in advance.
Upholstery replacement
If the restoration of old chairs with your own hands consists only in the fact that the master needs to change the fabric on the soft part of the object, then this will take quite a bit of time.
It is enough just to unscrew all the parts that require repair, that is, the seats and backs. Then the old upholstery is removed from them, a new upholstery is applied, a hem is made, the edges are nailed with small furniture studs with wide hats. In the absence of such, small pieces should be cut out of cardboard or leatherette. Before hammering, you need to put them on nails so that they tightly hold the fabric, and do not slip through the holes punched in the fabric.
First fix the front of the seat. Nails are distributed quite often, after 0.7 centimeters from each other. If necessary, small folds are made, which are permanently fixed.
Then the second symmetrical side is punched, stretching the fabric. After that, work with the sides, leaving free corners. Before stuffing, they should be carefully stretched, straightening the fabric so that there are no wrinkles on the front of the upholstery.
The last step in this repair is fixing the corners of the upholstery with staples. With a thickness of plywood or fiberboard used for the frame of the upholstered part of the chair, equal to 3-4 mm, four-millimeter brackets will be required. Be sure to take this fact into account! Naturally, if the frame is made of a material 10 millimeters thick, then ten millimeter staples are taken.
Replacing the stuffing material in the repair of an upholstered chair
The calculation of the amount of foam rubber is carried out in the same way as for upholstery fabric. Only now it is no longer necessary to add hem allowances. Instead of foam, you can use batting.
Sometimes it makes sense to replace the packing incompletely. Then it’s enough just to apply a “patch” in the place of punching, cover everything from above thin layer wadding or foam rubber.
If the padding is completely replaced, then all parts should be removed from the seat: self-tapping screws, staples, nails. It may be easier to cut a new part of the seat out of plywood or fiberboard, reinforce the padding on it, and cover it with new upholstery on top.
Gluing the joints of chair parts
Loose furniture can be repaired in two ways. One is to tighten the joints with self-tapping screws or bolts. They should not be screwed into the old grooves, but nearby, if possible. Sometimes the craftsman needs to use either a "patch" cut from soft metal.

The second way is gluing. Then the chair is disassembled into parts, the joints are cleaned of old glue. Having carefully missed the joints, the parts are connected and tightened with clamps.

Broken leg repair
The most difficult thing is if the “injury” of the chair consists in a “fracture” of the part. At regular chair you can completely replace the part by turning another one. But it is almost impossible to make a twisted or curved leg at home, which distinguishes, for example, Viennese chairs.
Do-it-yourself restoration in this case is carried out only with the help of glue. Moreover, the contraction of the part must be done not only in the places of gluing, but also at the ends of the leg, so that its size remains the same.

After drying, the joint is processed with sandpaper. For a more reliable fixation of the “fracture”, it is necessary to grind with inside groove, into which then glue the wooden plate, drowning it completely.
You can also use metal part, putting it on self-tapping screws. The excavation site is then carefully covered with putty or a mixture with sawdust, leveled, sanded and processed.
If there are old chairs in the house, do not rush to get rid of them and buy new ones. Any old thing can be given a second life by putting it in order and updating it. The work will not take much time and will not require large cash costs.
Restoration will not only give the chair a second life, but will also allow you to create unique furniture.
Do-it-yourself restoration of chairs will not only revive the memorabilia, but also bring a lot positive emotions, will give you the opportunity to use your creative imagination.
Chair restoration
Restoration of a chair is its restoration. The method of restoration will depend on how damaged the chair is. For example, if it staggers, then restoration requires the connection of parts. If the principle of assembling a chair is “thorn into a groove”, then there can be two reasons: either the groove has expanded, or the thorn has shrunk.

It is because of this that the chair begins to stagger. The solution to this problem boils down to the following: an increase in the stud, sealing the drawer, or a complete replacement of the power jumper. To do this, you will have to almost completely disassemble the chair.
The issue of updating the paintwork is much easier to solve. Cracked paint or varnish is removed, the surface is sanded, and then covered with paint or varnish. This work will require accuracy and attention.
The simplest restoration process is this. By replacing old, worn upholstery fabric with new material you can change the appearance of furniture beyond recognition.
Back to index
Preparing for the process
All work on the restoration of old chairs can be done independently, even if they have become completely unusable: the legs stagger, the paint is cracked, the upholstery is torn and rubbed. First you need to prepare everything you need for work:

Tools for restoring chairs: batting, upholstery fabric, stapler, staples, foam mounting adhesive, cardboard, screwdriver, scissors.
- A hammer.
- Screwdriver and screws.
- Screwdriver (cross-shaped and straight).
- 2-3 clamps and a few clamps.
- Kiyanku.
- Scissors.
- Glue for carpentry.
- Sandpaper.
- Construction stapler and staples.
- Acrylic paint, varnish.
- Brushes.
- Upholstery material.
- Foam rubber.
The work begins with preparation. First, the chair must be washed. For this, any detergent. The washing procedure should not be delayed. Wooden chairs do not tolerate prolonged exposure to water. After washing and drying the chair, you can begin to disassemble it.
Back to index
Dismantling old furniture
To remove the back and seats, special efforts won't be needed. On many chairs, they can be easily detached. Next, the chair frame is disassembled. To ensure that the parts are not completely damaged, you need to use a mallet to disconnect. It is necessary to act carefully, carefully knock out the details. Do not disassemble those connections that are held tight. They will serve for a long time.

Before restoration, the chair must be disassembled.
The chair, assembled with screws and screws, can be easily disassembled. It is enough just to unscrew them. If some kind of thread is difficult to unwind, then a drop of technical oil will correct the situation. All removed parts and fasteners must be marked so as not to experience difficulties during assembly. Some old chairs are glued together epoxy glue. To disassemble such a structure, you need hot water which will soften the adhesive. Places of gluing are covered with a wet cloth or rag and held until the glue softens. After that, it can be easily scraped off with a regular knife. The wood will need to dry. To remove resin from hard to reach place you need to use hot steam. It will soften the resin in minutes. To get a stream of hot steam at home, you need to put on a rubber hose equipped with a metal tip on the spout of the kettle. After the procedure is completed, the wood must be dried.
Back to index
Recovery steps
All details must be carefully examined. Large cracks are glued together and tightened with clamps or clamps for strength. Small ones are easy enough to smear with glue and fasten with masking tape. Chips are filled with a mixture of glue and sawdust. After that, the parts must be left alone until the glue dries completely. This will take at least 2 days.

In order for the upholstery of the chair to look beautiful, you need to attach a finishing fabric in the middle of each of the 4 sides of the seat.
Then comes the turn of grinding. For this, sandpaper with different grain sizes is used. After grinding, all parts of the chair should have a flat and smooth surface.
All bonding points must be carefully examined. If the legs are inserted directly into the seat, then you need to check the condition of the pins (the upper tapered parts of the legs). In case of damage, the pins are wrapped with gauze or bandage. Everything is coated with glue. If the leg has dried up and moves freely in the nest, then a wedge will help in this case. A thin and wide wedge is driven into the end of the trunnion, for this you need to saw through a narrow gap. Thanks to the wedge, the end diameter will become larger, and the leg will “sit” more tightly in the socket.
If you need to restore chairs with drawers under the seat and crossbars between the legs, you will have to work hard. In such designs, all parts are interconnected with spikes that are planted on glue. When loosening the seams, you need to add glue there. To do this, make a hole from the inside with a thin drill and inject a little glue with a syringe. The weakened spike is strengthened with wedges. To do this, you can use matches or small chips. During assembly, the wedges are smeared with glue and hammered into the nest at the same time as the spike.

If the legs stagger very much, then in such chairs you will have to re-glue all the joints. To strengthen the design, you will need wooden blocks in the form of a trapezoid. They should be screwed to the drawers, which connect the corners of the frame inside. Bars and drawers must be perfectly fitted so that there are no gaps. Otherwise, the chair will warp.
When all the details are ready, you can start assembling the chair frame. Each element is installed in its place. The joints are pre-lubricated with glue, and after the connection they are pulled together with clamps or cords. Excess glue is removed with a wet cloth. To provide required pressure to fix the parts on the seat, you need to put a load, for example, a bucket of water. The resulting structure is left alone until the glue dries completely. This is at least 2 days.
The first article of our cozy blog about do-it-yourself old chair restoration. We had 4 old chairs without padded back. We tried them reestablish so that they do not stagger and suit us in color. We also recommend furniture for the hallway to order or in a ready-made version, at a very interesting price and with high quality manufacturing. Here's how they did it and what happened, step by step:
- Since he was staggering all over, that it was impossible to sit, the analysis did not take much strength. The chair was completely disassembled.
2. Then every detail of the chair must be cleaned from the old coating. At hand was only a knife and a skin .... 🙁


3. Cleaning with a knife is, of course, a tin. But here's how it happened. You need to clean everything, the grooves where the parts are inserted is mandatory. Then we assemble the chair, just as we dismantled it. Add glue to the grooves and insert). (we used liquid nails instead of glue, universal quality, the village is so you can beat the hell out 🙂) To assemble the chair evenly, we used a level.

4. We wanted a chair orange color with soft back. I cut a plate from chipboard to the size of the back. Covered with stain color "Maple". Waited 3 hours and covered in one layer of varnish. Lacquer used Yacht.

6. Then they began to fit the podzhopnik). They put foam rubber and covered it with parterre. (of course, it is better to use habilene or calico, but we had a parterre lying around 🙂) We fixed it with a furniture stapler. So that the parterre does not fray at the ends, I walked with a lighter ...


7. Then they put three layers of foam rubber on the back and began to stretch the stalls. Make a seam at the bottom, for the entourage you can still go through the bottom with decorative nails.

8. Here's how the back turned out. Decorative nails were different, but one horseradish is not visible from behind :). The seam goes on the bottom.

9. Well, a chair in front)

The other three chairs turned out better. Only the old coating was removed with a drill, there are special circles with sandpaper. In time, the remaining three chairs came out faster than this first one) Costs for 4 chairs: 100 rubles. stain + 120 rubles. varnish + 250 rubles. parterre fabric. TOTAL: 490 rubles. for 4 chairs.
Unfortunately, over time, chairs, however, like all other furniture, deteriorate, scratch, rub and generally lose their appearance. The swaying legs, the creaking seat, and the worn upholstery - an oil painting, isn't it? But often you don’t want to throw away furniture at all. And there are enough reasons for that. Do not despair if your favorite chair "let us down". Restoring a chair with your own hands will help bring it back to life.
Types of restoration
So, what to do if your favorite furniture is no longer pleasing to the eye? If you do not know the answer to this question, then this do-it-yourself chair restoration master class is designed specifically for you. In many ways, the restoration process is determined depending on the degree of damage to the chair, because the types of updates can be completely different. If it is loosened, then it will be necessary to restore the dried up spike connections. In another case, when the places where the spike enters the groove are weakened, and the connecting elements are loosened to disgrace in the nests, we can say that the chair actually requires rebirth, that is, it will need to be completely disassembled and reassembled. Update varnish coating it will not require so much effort and time, but it should be borne in mind that this is a painstaking task that requires care and accuracy on your part.
The easiest banal option for restoring old chairs with your own hands is to replace the upholstery. Appearance at the same time, it changes almost beyond recognition, the updated fabric seems to “breathe” new life in furniture, in the end, there is no trace of abrasions. Today we will talk about all options and ways to restore your favorite chairs.
Preparatory work
First you will need to stock up on equipment and all necessary materials. To restore chairs with your own hands, the following will come in handy:
- beautiful upholstery;
- a hammer;
- wooden mallet;
- screwdriver;
- screws and screwdriver;
- clamps;
- paint, brushes, solvent;
- clamps (metal);
- synthetic winterizer (foam rubber, latex can be used);
- stapler with brackets;
- scissors, glue;
First of all, the chair must be washed and cleaned. This can be done with a brush and dishwashing detergent. AT in large numbers we breed water soap solution, brush it on the chair. Gently remove dirt. Then wooden frame should be wiped off with a dry cloth. It is not necessary to carry out the “washing” procedure for an especially long time, as excessive contact with water can damage the stool. After drying, we disassemble into separate components.
Chair disassembly
Before you start the restoration of the chair with your own hands, you need to remove backrest and the seat itself. This can be done easily by hand, without the use of any tools. After that, the chair needs to be thoroughly loosened and the bad connecting places are disconnected. If necessary, you can gently knock on the nests with a mallet. But if, nevertheless, the joint cannot be disassembled, leave it, which means that it is still able to serve you in good stead.

Viennese chairs
Do-it-yourself restoration of a Viennese chair is no different from the repair of any other. Such chairs are most often twisted with screws and screws. Therefore, unwinding them is not difficult. In case of difficulties, it is enough to drop technical oil on the “problem” thread. This will help unscrew the part. A little advice: if at the last stages of repair you assemble a chair like a Lego constructor, you must initially sign all the details so that the final assembly of the product does not become a nightmare for you. Representatives of the "soviet" times are assembled using epoxy glue. In this case, hot water will come to the rescue. It is enough to hold the problem areas under the stream until the glue is completely dissolved.

At workshops for the restoration of Viennese chairs with their own hands, in the case when the old resin stubbornly holds back some unreliable flimsy element, it is advised to put on rubber hose with a small narrow tip (mostly metal) on the spout of the kettle and direct the flow of steam to the joint that cannot be separated. Steam perfectly softens the resin, which contributes to easy separation. separate parts. After this procedure, the stool must be properly dried.
Restoration of details
On the initial stage should be removed immediately small defects. Cracks, as well as places bitten by pets, need to be tightened with clamps, all other chips are perfectly removed with paper tape or putty from a mixture of sawdust and wood glue. If the glue gets on unnecessary parts of the chair, there is nothing to worry about. In the future, all flaws can be easily eliminated. For round elements, metal clamps must be used.

The glue must dry properly. It will take at least 48 hours, maybe even more. The next step is to sand all the elements of the chair. To do this, use sandpaper. You need to start with paper with a larger grain, gradually moving to the smallest. Absolutely must be achieved. flat surface all the details. Otherwise, notches will remain on the chair, which clothes will cling to in the future.
Bonding mates
We wrap the damaged parts of the legs with a bandage, carefully applying glue to each layer of the winding. At the end of the leg, we cut out a recess for a couple of centimeters and drive a wooden wedge into it (any small piece of wood will do). After such processing, the leg will “sit down” tightly in the nest and will not stagger.
Do-it-yourself restoration of old chairs will be complicated by the fact that in such models there are tsargs and crossbars under the seat. In this case, all parts are connected to each other with spikes and glue. If the seam is weakened, it is enough to drill a hole and pour glue into it, and if the spike fails, then when assembling, the sliver soaked in glue must be hammered into the nest. A completely loose leg must be disassembled and completely glued.
Chair assembly
Assembly - very important point in the restoration of wooden chairs with their own hands. It is necessary to collect all the elements, be sure to take into account right angles between all parts to avoid possible distortions. "Spare parts" must be glued strictly under pressure. To do this, just pull them with laces.

Excess glue must be removed with a damp cloth. A basin of water placed on the seat of a chair can act as a weighting agent. Then all elements will be fastened directly under load. This whole process will take at least two days. And only after the glue and parts have completely dried, you should do decorative trim. If the glue is not allowed to dry properly, then there is a risk that it will simply break under the weight.
Chair upholstery
We continue our master class on the restoration of an old chair with our own hands. First, all wooden parts should be painted with paint, then apply a layer of varnish. Next, we leave our precious chair to dry again. In the meantime, we move on to finishing work: we will replace the upholstery.
List of follow-up steps for chair reupholstering:
- Filming a worn-out view old upholstery. It is important to try to preserve the integrity of the fabric. She will act as a template. All the little things and shortcomings of the wooden seat must be eliminated first.
- We take the foam rubber, lean the seat against it and draw the contours with a marker as accurately as possible.
- Using ordinary scissors, we cut out the desired area on the foam rubber along the contours
- On the canvas of the future upholstery, using old version fabric as a template, in the same way we draw a seat with a marker, but already taking into account the allowances on the sides, three to four centimeters are enough.
- Next, add up a kind of "sandwich". To do this, we lay a new fabric “face down” on the table with the first layer, followed by foam rubber, and the third layer directly with the seat itself. We straighten well, align and stretch the fabric, tuck the hanging edges under wooden base. We fix it with a stapler or small nails with wide hats.
If a rear end the chair is as soft as the seat, then the above steps will need to be repeated with it. Upholstery fabric can be chosen in any color, the main thing is that the new chairs fit overall design interior.

At the very end, we attach the seat to the chair frame itself. It is best to “plant” it on self-tapping screws using metal corners.
Conclusion
Actually, that's all. You have already noticed that your rarity has noticeably changed, revived and is ready to continue to serve you faithfully. Now that you know firsthand what a chair can look like before and after restoration, you may want to repair all the chairs in the house, as well as help all your friends and relatives.

You can also sell an updated version of your chair as an antique for a decent amount of money. Of course, this is a joke. In fact, you can take this seriously and use your new skills to create your own business, which can bring not only pleasure, but also material benefits. The popularity of original designer items is only gaining momentum. Now you know how to restore any chair. Perhaps, based on this article, someday you yourself will develop your own unique options for fixing other old furniture.