DIY epoxy jewelry. We make souvenirs from epoxy glue Maria Glukhova and her works from epoxy http. Rules for the storage and care of flower decorations
Greetings, brain talents! How about making a painting... a 3D painting? This article will help you create such brain crafts, consisting of several colored layers epoxy resin.
Disclaimer 🙂 3D creation crafts would require even more 4-dimension. All these spaces require patience, but the result is worth it.
Marine: This resin is used for both air and water: it is also used for boat restoration. Electrical systems A: Since it has proven to be a very good insulator, it has many applications in the electrical power sector. It is present in electrical connections and components, and in the manufacture of printed circuits and integrated circuits. This protects them from moisture and dirt and helps prevent short circuits.
Become an expert at turning any object or image into the transparency and brightness of colorless resin such as insects, fish, leaves, flowers, rocks, wood, snails, coins, photographs, photographs and anything else you can imagine. This is an addictive handmade fun that will let you create objects of all kinds and earn money and admire in front of your friends, as your works will look like real works of art.
Step 1: Materials

Let's talk a little about security first.
When working with epoxy, it is important to take the appropriate precautions, namely to read and follow the manufacturer's warnings. I will not retell them, but nevertheless I will note that when working with epoxy, it is necessary to avoid getting brainmixture on the skin and inhalation of its vapors during mixing and curing.
How to make resin for crafting?
Keychain in transparent resin with monumental image inclusion - sea snail decoration - half sphere decoration including fish head and Amazonian stones - teapot in different reliefs including mountain stones - triangular ashtray with inclusions of tropical butterflies, stones and vegetation. Crafts - art arterioisolated works in the sculpture of a man figure of the tower of pisa italy alhajero with a dancer girl.
Polyester resin pigment with the appearance of marble, stone, bone, etc. You can earn money by studying resin castings and at the same time using these methods with a small amount material, practice, and then move on to large structures such as: pools, motor boats, car bumpers and spoilers, domes, winter patio decoration sheets, etc. in addition, you will be able to do work for clients who will bring their own molds from various parts that are currently being built from reinforced plastic.
I use the following security measures:
- eye protection
- rubber gloves
- respirator
- and an isolated room in which the homemade product is left during the curing of the epoxy.
We figured out security, let's move on to materials and tools:
- epoxy resin (such as Parks Super Glaze)
- disposable measuring cups 230ml
- wooden mixing sticks
- a reservoir that will serve as a restrictive circuit
- building hair dryer
- paint brushes
- acrylic paints
Step 2: Preparing the mixture

How to make epoxy glue
All this will bring you a good profit. and a lot of satisfaction. Full program learning for those who want to succeed. Prior knowledge: material, date, use. - thermoplastics and thermostats - industrial designation - epoxy-fluorine-containing coals, teflon - silicones - urethane resins. Introduction: We introduce him to the fascinating world of polyester resin, which makes him a true professional in this field. The Basics: What is Plastic Resin? Your behavior - what is a hardener? How does it work on polyester? - Various types hardeners and resins - polymerization - accelerator function in plastic resin - identification of resin as a material - recommended temperatures for working on polyester - recommendations and precautions when working with plastic resin.


If you are going to be accurate in the thickness of the layers, then you first need to calculate right amount components of the mixture for one layer. To do this, we determine the number of layers that you plan to receive, and divide by this value the depth of your restrictive reservoir, thereby obtaining desired thickness layer. My layers are usually around 3mm thick.
Practical work number one: the materials we will use are a detail of all the materials needed for a good job. Shape Selection: A guide to choosing the right shape for each job you've given. Resin to hardener ratio: specific gravity polyester resin and its proportions when mixed with a hardener - step by step explanations and illustrations of the first practical work - sanding and its procedure - polishing: how to polish your work to achieve a professional finish. Studying Resin Behavior: How Polyester Works That Know Their Behavior in Large Jobs.
Then we multiply the calculated layer thickness by the tank area, and we get the volume of one medulla. One fluid ounce is 29.6cm3.
Divide the number of ounces in one coat by 2 to get the final number of ounces to be measured for each of the resin components, A and B.
Now we put on protective equipment. After that, pour equal amounts of component A and component B into a measuring cup - for my epoxy, the ratio is 1:1 - and mix for at least two minutes. The mixture is quite viscous, so we carefully “scrape” it from the sides and pay attention to places where it could not mix. As a result, the mixture should be homogeneous (although this moment it will have a large number of air bubbles). Now we are ready to fill!
Hardener: how to use this agent correctly. Resin reduction: her possible problems and solutions. curing process. We will teach you how to cure the work of polyester resin by speeding up the hardening process. Objects that can be applied: indicators for applying all kinds of objects to polyester. More accurate calculations for required amount resins: formulas for calculating the exact amount of polyester in each job. How to color resin: how to color resin - the effect of color on resin hardening. Problems that may arise during the dismantling process: its solutions and lung ways extraction from the form.
Step 3: Pouring Resin and Removing Bubbles


Polyester Resin Handling Warnings: Mixing Methods - Workplace Precautions. Accelerator: its function, proportions and method of use. Practical work number two: steps to follow, directions and illustrations. How to glue resin - cleaning work items: recommendations. Elements that can be used in polyester resin- application of animals: how to apply animals in polyester. Vegetable growing: ways to include vegetables in resin. Other possible applications: Apply photos, postcards, etc. resin emptying molds: molds made of different materials- preparation of the form for its emptying.
The following steps must be performed in a dust and hair free space, although dust will be present in your homemade, but we will deal with it later.
fill
Pour the prepared mixture into the restrictive tank, and tilt it in different directions so that it spreads evenly along the bottom. If you like, you can rock it so that the resin coats the walls of the tank, and this will make it easier to scrape off bits of paint that may have been there by accident, without wetting the walls it will be more difficult.
Take-off: its function and form of employment. Reinforced Plastics: Reinforced plastic, its utilities and benefits - the use of fiberglass. Practice number three: necessary materials- details of all materials that we will use. Requires the weight of the felt and the amount of resin. Hardener percentage and cure time - step by step illustrations and illustrations of practical work number three. How to achieve original work: effects in polyester - bubbles in resin - cracks in resins - how to mechanically work with resin - how to make sanding work easier.
Removing bubbles
We turn on the hair dryer at minimum power and heat the tank with the mixture with it, evenly driving it over it. We do not stay in one place for too long, so as not to burn the resin and it does not crack. (Valuable tip: blow out the dust dryer by turning it on and turning it in some other place, not over under the tree).
Most of the large bubbles will come out pretty quickly (and at first glance will look pretty satisfactory), but you should pay more attention to the "crumbs". We highlight the filled layer and look for the presence of small bubbles, if they are present, they will cast shadows.
Ideas: how to advance through the sale of your work in polyester resin and become a real entrepreneur. Index: full list for you to easily find each topic by page number. Application: special molds for statues and figures in relief - plastic putties - plaster - silicone rubber - silicone rubber mold construction. Fiberglass: Precautions for the use of fiberglass - conventional felts - roving roving - woven rovings. Contact molding: lamination of parts or housings - preparation of gel coat - preparation of resin for molding with glass felt - recommendation.
Step 4: "Dusty" Procedures


Application of epoxy resin for fiberglass impregnation
Boat cover - corrugated corrugated sheets - fishing rods. Dental biochemical adhesives used by dental professionals - adhesive resin - adhesive liquid - advantages - uses - final words. Flat laminates: decorative laminates - how to proceed - options - fabrics for black and white screens - precautions - questionnaire. Forming complex parts - pieces with ends. Resin dome resin resin - high relief - products in two and three dimensions. - methods - safety tips - procedures - tools - improve or not improve.
When we highlight the filled layer and look for bubbles, we can see speckles and fibers on the surface of the layer. During the implementation of this brain crafts, short of creating it in a kind of "laboratory environment", these dust particles, hair or fibers are so annoying, but almost impossible to completely get rid of them. However, with correct technique(and good luck) the dust in the 3D picture will be almost imperceptible.
Features of Epoxy Acrylic
Each lesson has an incredible and enjoyable practical work. Crafts of the State of Mexico. Our craftsmanship is an export product highly valued abroad. It covers all major branches of craft and most its derivatives, the product of the work of thousands of craftsmen, distributed over no more than 80 percent of the territory of the state.
To learn about the commercialization of various products made by Mexican artisans, we offer you the following information. Kazart Airport Airport: Toluca City International Airport. The oldest industry is said to be pottery, because when man felt the need to provide utensils not only for war and hunting, but also for his personal comfort, the first thing he did was use clay.
FYI: It's really amazing how much dust and hair is everywhere. They "float" in the air and we breathe them all the time... I think working with epoxy resin will surprise you a lot with how much everything around us is happening at the micro level.
Search for dust and hair
So, highlighting the resin layer, we look at the highlights on its surface. The specks on this surface will be visible due to the "violating" reflection of the surface tension of the resin. Examining the entire surface brainpictures to find those pesky bits. At the same time, we concentrate on larger ones, since too small ones mostly disappear after pouring the next layer, but you should make sure that all large hairs and fibers are found, they will be visible.
Pre-Hispanic cultures practiced utilitarian, ceremonial, and luxurious pottery. From the first expressions, one can see a tendency to create pieces of plastic beauty. Over time, pottery became a full-fledged occupation, then the forms and their decorations were improved to a high aesthetic degree.
In the Toluca Valley, Matlazzinc ceramics stood out, which received Nahuatl influence and appeared in funerary urns, polychrome pots, censers, glasses and dishes. It is true that the ceramics of this area did not display the subtlety and vivid polychrome of Cholula or Mexico, but, as García Payón says, with the influence of the Aztecs, the perfect polychrome and satin department places this type of pottery next to the most beautiful piece of Aztec and Holultec art.
Mote removal
To "catch" the debris, you can use the "bait" of scraps of paper. The corners of the paper are especially good in this business, as they cling nicely to the fibers. You should not use these “baits” again, otherwise you can again “contaminate” the layer with previously caught garbage.
Covering layers
After the resin is cleaned of specks, then during its curing it is worth covering it with something to protect it from debris. For this, I mainly use foil or a board with which I cover the tank. The advantage of metal brain foil the fact that it can tightly wrap the entire tank, because dust is such a “magic” substance that it can seep through the smallest holes ...
During the colonial period, pottery did not disappear like other indigenous expressions, but was transformed by merging firstly with the pottery traditions of the old continent, and then receiving the influence of plastic elements coming from the east; their combination led to the ceramics of our day. At present, the production of ceramics in Mexico is huge, this is due to the customs of our people related to their food and the economic prices of the objects produced, factors that have prevented modern car completely replace the objects of clay prepared by other materials of the industrialized countries.
Actions with "mean" specks
But what if large dust particles, or even worse, hair, are interspersed in the layer, and it has already frozen? You may have to change the concept of the picture to hide them. For example, for this I had to add elements to the paintings more than once. But nevertheless, usually all these additions, caused by initial defects, I liked as a result. Problem solving is one of the most attractive features of art and design. Don't cry over spilled milk, find something more graceful brainsolution! However, if you really need to clean something up, you can sand the epoxy to remove that defect, which is a hassle... but we'll get to that later.
It was born and developed without drastic changes: the preservation and stability of some indigenous and creole decorative designs have been perpetuated from generation to generation. This explains why the pottery produced there differs from that of Tonal and Puebla, although it may be excellent in fantasy and creativity. The pottery of this municipality may be classified, according to its utilitarian purposes, as common or common, which is called pottery, and which includes the production of household articles, chiefly kitchens; sculptural or toy, consisting of ornamental objects and ritual pottery, which is the creation of objects for burning copal at festivals of the dead or other ceremonial acts.
Step 5: Curing the Resin

While the resin is curing, it is necessary to keep the tank in a place where you will not inhale its fumes. The resin curing process itself is due to heat, not exposure to air or evaporation, so do not leave the resin tank in a cold place, as this will significantly slow down the process. On the other hand, you can warm brainwashing to speed up curing, but not too much - follow the manufacturer's recommendations.
As for the pottery that is found in this municipality, it should be noted that it is divided into two categories: ordinary or prepared clay and glazed clay, also called getradada. The former is burned once in the oven, while the latter is burned twice, fixing a crack or lacquer before the second firing.
Of the dishes, the most famous are glazed earthenware, brown background with blue, yellow and white borders. Among contemporary articles stand out beautiful mirror frames and huge two-handed machetes requested for interior decoration. One of the handicraft industries with great importance, is a textile. The textile craft is an example of fusion and cultural continuity, as there are still coexisting looms of pre-Hispanic origin and others dating back to colonial times. large textile industries use mainly machines whose principles are based on the old pedal and waist looms.
Once I left the resin tank in a preheated oven for too long, and it turned out ... really bad (see photo). At room temperature the layer takes about 8 hours to dry, after which it will be possible to paint on it!
Step 6: Drawing


The epoxy layer is ready, the fun begins!
Painting on resin is different from painting on canvas, as the surface of resin is so smooth that the paint doesn't "cling" to it, making it difficult to apply opaque strokes in one go, but at the same time it gives a great opportunity to draw translucent details!
The photo shows a brush stroke, and as you can see it is transparent, if you need to make it opaque, you will have to wait for it to dry brainpaint and apply another layer on top. Another big plus of painting on resin is the ability to wash off the paint without much difficulty if it has not dried out, and if it does dry out, then it can be scraped off. That is, you can create sketches and experiment with a brush, and in case of failure, simply erase or peel off the paint. At the same time, even if you slightly scratched the surface when cleaning, then when pouring a new layer, these small scratches will disappear.
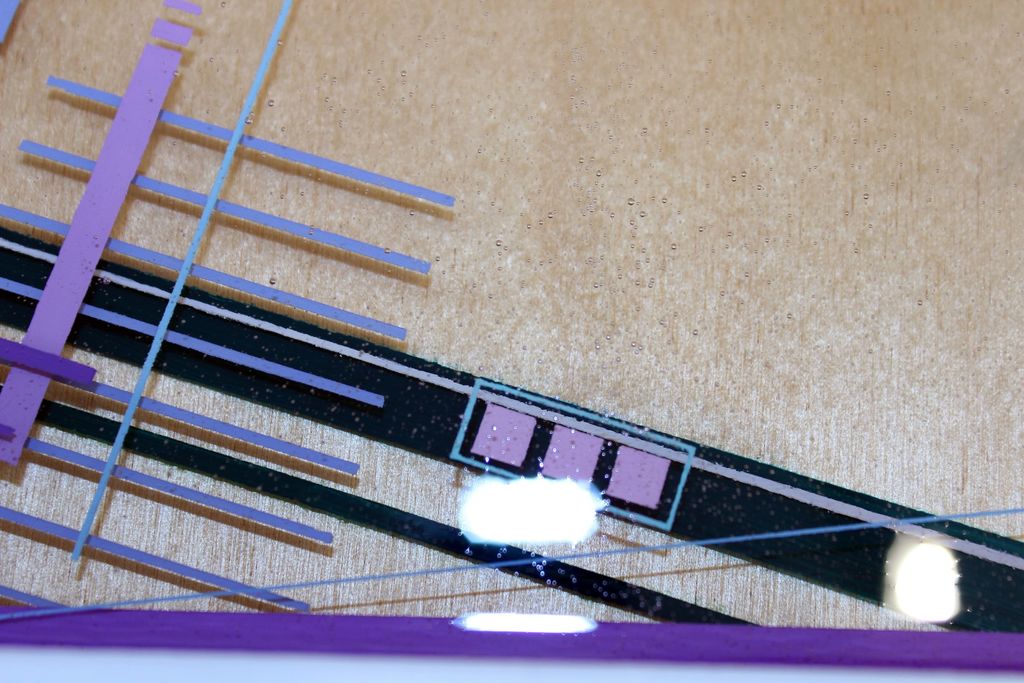
To get crisp, even edges, I sometimes use duct tape, and you can see this in the photos provided, the last 4 of which show the first 4 layers.
Preparation for pouring the next layer
After the painting process is completed, it is necessary to clean the surface in order to brainpicture was crystal clear. I use damp paper towels for this, after which I also wipe with microfiber, and control the process using the same trick of highlighting the surface and observing the reflection, in order to find stains and removable debris. And again, do not worry about small scratches that may appear after cleaning.
When finished with cleaning, return to the previous step and repeat brain procedure pouring a layer, curing and applying a pattern, and so on until the tank is completely filled crafts!
Step 7: Eliminate Large Defects

With your homemade various troubles can happen that can become critical. For example, in the above photo of the top layer of epoxy, I touched the material with which I covered it from dust during curing, and which left an unpleasant mark on the layer in the lower right corner. The flaw was significant, and I needed to somehow fix it ...
Cleanup
If the defect is critical and needs to be eliminated in any case, then you can simply clean the defect completely and fill it again, so that ideally it becomes transparent again. In this case, ALWAYS wear a respirator, yes, and take other precautions so that neither you nor anyone else inhales the dust being cleaned. You don't want to clog your lungs with hard particles, which are essentially very small pieces of plastic.
If the defect being repaired is too deep, then you can use a dremel or other similar tool to clean it up to speed up the process. The next step is to clean up the place. sandpaper coarse grit, and gradually increase it to 600 grit, while wet sanding will significantly reduce the amount of atomized solids.
After finishing sanding with 600 grit sandpaper, it will be possible to fill in a new layer brainpictures, and it will become transparent again. My process of fixing the defect in the above picture is in full swing, but the resin manufacturer assured that everything should work out as it should.
Step 8: Finishing touches


To protect your brain crafts from exposure to UV radiation, due to which the epoxy turns yellow, it is necessary to cover it with a special protective filter. An epoxy 3D painting is quite heavy, so you should use materials to finish it that can support its weight. I cut out the body of my first painting with laser cutter made of white acrylic that holds the UV filter but does not hold itself under the tree. So to hang my 3D painting, I screwed eye hooks into the wooden containment tank and tied a wire to them.
Step 9: Get creative!


Here are some more photos with my masterpieces, and I hope you like them... :) I also started experimenting with glass containers, and such homemade quite elegant, as you can see through them from different angles. Besides, upper layer reflects the interior and looks cool - you can see it in the second photo.
If you are interested, you can check out my other crafts and I can't wait to see what others have created with this 3D painting technique! And let all your bubbles come out, and dust particles be invisible! Good luck to all!
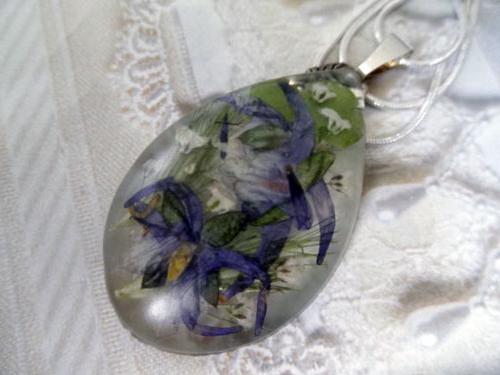
Epoxy resin for jewelry is a modern chemical material, which is very popular among craftsmen who create jewelry handmade. From the plastic mass, you can make products that completely imitate glass. Looks amazingly attractive natural materials(cones, dry flowers, leaves, etc.), filled with a transparent gloss.
People who are indifferent to beautiful decorations and those who are fond of creating all kinds of crafts with their own hands, we invite you to find out together what jewelry epoxy is, what are the rules and subtleties of working with it. As part of the article, we will conduct a small master class on making a pendant.
The word "resin" is usually associated with natural origin substances. But in this case we are talking about a chemical product. Externally, the glaze is a transparent liquid, which consists of two components: resin and hardener.
When combined, substances enter into a chemical reaction, polymerizing with each other. As a result, the resin is completely cured. Before polymerization begins, solid fillers can be added to the glaze, which can change the properties of the resulting plastic in the desired direction.
Varieties of modified plastic
It is made by hand on the basis of well-known brands of glue domestic production- ECF and EDP. You can buy them in stores selling household supplies. A small package of 280 g costs about 70-80 rubles.
The ratio of modified resin to hardener should be between 8:1 and 10:1. chemical process polymerization occurs at room temperature and lasts several hours. It will take at least 12 hours for complete solidification. The hardener for epoxy resin affects the rate of polymerization: the more it is in the composition, the faster the shape of the product will be fixed. The ratio of components must be measured very accurately - this directly affects the final result.
Another product of the domestic chemical industry is epoxy resin ED-20. It is very convenient to work with it at home, and the price looks more attractive (half the price of ECF and EDP). A significant disadvantage is a large packaging: 6 kg of resin and 1 kg of hardener. 
On sale you can also find two-component formulations of foreign production. Based on them, excellent epoxy resin products are obtained. In addition to the main raw materials, protective gloves, plastic measuring cups, wooden stirring sticks can be found in the package. Such sets are much more expensive than domestic analogues. The mixing ratio in them can be very different: 2:1, 1:1 or otherwise. It is possible that the proportions will have to be calculated using a special formula. In any case, the manufacturer's recommendations must be followed.
We are careful at work
Epoxy resin has a wide range of applications in construction, finishing work as well as in the printing industry. Raw materials for technical purposes have a pronounced chemical smell, and fumes irritate the respiratory system. When working with industrial material, protective equipment should be used.
Epoxy resin for jewelry and decorative works proven manufacturers does not harm health. Although safety rules should not be neglected. Usually there is detailed information about them on the factory packaging, but it would be useful to mention this now. So, precautions when working with chemical glaze:
We maintain the temperature
The polymerization process is accompanied by the release of heat. As a result chemical reaction resin can be heated up to 60 degrees. This feature must be taken into account when choosing casting molds, it is desirable that they be heat-resistant.
Preheating of the initial components accelerates the polymerization process. As the temperature rises, the fluidity of the resin increases and its viscosity decreases. Pouring small parts with epoxy resin will be faster and better if the solution is preheated to 25-30 ° C. Then the filler is introduced into it and only after that the hardener.
A decrease in air temperature and an excess of moisture adversely affect polymerization. Under such conditions, the process may take too long or not reach completion at all.
Getting the right consistency
Until the epoxy resin for jewelry has entered the polymerization stage, it retains the properties of a viscous liquid. If a dry filler is introduced into the solution, then it can sink down (cement, gypsum) or rise to the surface (wood chips, cork). This feature of the material must be taken into account when choosing an injection mold and distributing the composition over it. 
The use of aids
The main difficulty that you will have to face in the process of work is air bubbles. If you let the mixture stand a little or warm it up slightly, they will float to the top. To get rid of bubbles stuck to the mold, you can use a regular toothpick. To make the epoxy resin with your own hands the perfect consistency, pour in a thin stream through a fine strainer.
Easy to use with frosting disposable tableware to prepare a separate portion of the mixture. Plastic jars from dairy products (yogurts, curds) are well suited for these purposes. Stir the mixture conveniently with wooden ice cream sticks.
To make an accurate dosage of the components, you can use medical syringes of various capacities. Please note that in this case the epoxy must be poured into the container from above. And the hardener is drawn into the syringe in the usual way.
It is advisable to grease the molds for pouring with a protective solution. It can be replaced by ordinary petroleum jelly or parquet mastic. Apply thin layer and remove excess conveniently with a cotton swab. If the molds are made of silicone, polyethylene or plexiglass, then they do not need pre-lubrication. 
Let's talk about fillers
Solid and liquid additives affect how the final epoxy jewelry will turn out. Most often, alabaster, cement, chalk, wood chips or glitter (sparkles) are used for these purposes. The content of the additive in the total volume of the mixture is not more than 50%.
Dry fillers provide a hard but brittle plastic. Liquid plasticizers are used to neutralize undesirable quality and improve the plasticity of the material. The simplest and most affordable supplement can be Castor oil. Usually one or two drops is sufficient.
Choosing the composition for the manufacture of the pendant
A special transparent epoxy resin for jewelry will help us create an ornament. As an example, we can take the two-component Gedeo composition produced by the French company Pebeo with a capacity of 150 ml.
The material perfectly imitates glass and is used not only in the manufacture of jewelry, but also for multi-layer coatings, surface decoration, restoration of cracks. The basis for the application can be glass, metal, faience, silicone, plastic, painted wood. The icing is exceptionally clear, odorless and easy to prepare. Ready product characterized by increased strength and does not turn yellow over time. 
step by step

If you don't want to wait too long, you can speed up the drying process by slightly warming the mold in the oven. Try not to overheat, otherwise bubbles may form on the surface.
A hole for the lace can be made with wooden stick while the product is in a soft state. If you are late with this - it does not matter, you can carefully drill a hole in the frozen pendant.
Make sure that the surface where the form is located is absolutely smooth. This will prevent the mass from rolling in one direction.
After removing the finished decoration from the mold, sand it with a non-rough sandpaper to smooth the edges. Thread a string through the hole and wear the pendant to your health.