How to remove the rear seat back on 2110
1. First of all, we move the front seat forward until it stops. Using a screwdriver, you need to remove the ends of the torsion bars from the holes in the bracket and remove them.
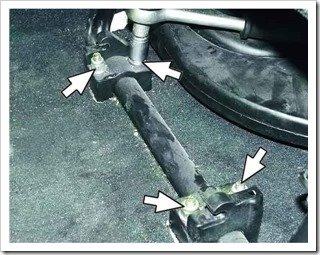
2. After that, we move the seat back until it stops and unscrew the 4 nuts securing the brackets.

3. After the nuts are unscrewed, the brackets can be easily removed from the studs.

4. After removing the brackets, lift the front edge of the seat.
5. And unscrew the 2 front sled mounting bolts.

6. Move the chair all the way forward and unscrew the 3 rear bolts securing the slide to the floor.
7. The chair is free. You can take it out of the cabin.

8. Remove the circlip from the left slide axle.

9. Pull out the axle.

10. Unscrew the lock bolt and remove it.

11. Unhook the release spring from the sled.

12. Unscrew the fastening bolt on the right slide.

13. Remove inner sleeve

14. And the outer sleeve.

15. Everything. Slides can be removed. If they are damaged, they must be replaced. The sled is of a non-separable design and therefore changes completely.

16. The slides are installed in place in reverse order. When installing the seat belt buckle in place, turn its bracket until it stops against the sled mounting bolt. In this position, tighten the seat belt buckle bolt.

17. The seat is installed in place in reverse order. the upper ends of the torsion bars are mirror-curved. 1 - right, and 2 - left torsion bar.

18. When installing the torsion bars, move the seat back and insert the lower end of the right one (1) first, and then the lower end of the left one (2). After that, slide the seat forward and slide the upper ends of the torsion bars over the hooks on the seat base.
Seat removal video:
Detailed guide on how to remove the rear seats on the VAZ 2110 allows you to do everything repair work without outside help. For example, you decide to repair the seats, install new ones instead of the old ones, or reupholster them with leather. But how to remove this element without damaging the mount and other parts? "Ten" is the progenitor of "Priora", but differs from it in separate components. Once it was considered a powerful, modern car, which was equipped with a carburetor with automatic choke.
How to remove the rear seats on the VAZ 2110 when you need to go for goods, transport bulky cargo, and so on? You can do all the work yourself. We will tell you step by step what nuances you should pay attention to, what tool to arm yourself with and what actions to perform.
Removing seats in 9 minutes
It will take exactly 9 minutes for the driver to dismantle the “tens” seats. Don't believe? And you try! Disassembly begins with a slight loosening of the upholstery. Just press the buttons located near the trunk. Then move the lock handle on the right to the side, raise the seat. The procedure for the left side will be the same. The seat cushion can be easily moved forward and removed. You have already done half of the work, and further actions are performed in the following sequence:
- Removing head restraints. Press the fastening buttons, pull the headrest up. We perform similar actions with another section. Make sure that the buttons are not lost anywhere. They will still come in handy when reassembling.
- Completely remove the upholstery so that nothing prevents the removal of the seats. When you see a loop, pull on it. This way you can pull out the locking lock installed at the back of the backrest.
- Slightly lift the right side of the backrest, remove the fastening loops from each hook. They are right on the floor. By analogy with the right side, we remove the left.
- All that remains is to remove the armrests, and if necessary, the seat belts. Armed with a 10 mm socket wrench, unscrew the 2 nuts. This will allow you to remove the armrest.

Here you have completed the task. And it took you no more than 9 minutes to do this. Seats are installed in reverse order. We hope you remember everything.
What to do with the seats of the VAZ 2111 and 2112?
Cars VAZ 2111, 2112 are far from random "guests" of the article. All three cars, including the "ten" described above, belong to the same class of cars. But here's the problem - their seats are removed in completely different ways. Therefore, the removal instructions for the VAZ 2110 are not suitable for motorists who drive 2111, 2112 models. Let's figure out how the dismantling process will look like on the "younger" models.
- The back and seat are divided into two halves. Therefore, you can also remove them separately. For additional safety of the driver and passengers, the seats are equipped with headrests. And you will agree that it is much more convenient to ride with them.
- Let's start disassembly. Pull the loop to raise the seat on the left. Throw it forward. Then unscrew the nuts with a 10 mm ring wrench. Pull the seat out of the passenger compartment. Repeat the operation with another element.
- Take the socket wrench - now 13 mm. Unscrew the nuts that are under the mounting loops of the seat on the left. There are two nuts - you can do it in a couple of minutes. Lift the fastening latch up to fold the backrest forward. It remains to unscrew the last nut and bolt. They are located above the hinges. By analogy with the left side, the right side is also removed.
- The back latches may break. It's okay - you can easily put new ones. The plastic sleeve of the lock may also fail. Plastic is plastic, needs no comment. We just buy a new bushing and put it in place of the old one. More problems with VAZ seats you will not have.

Valuable information about tuning VAZ seats
The reasons for dismantling the seats can be different, and one of them is tuning. The rear passenger seats of the VAZ 2110 are tuned infrequently. In most cases, all work comes down to installing heating. The costs are small, but long-distance trips will be much more comfortable. Especially when it comes to harsh winters.
We recommend Emily. This special kit for heating, which is on sale in any specialized store. And you can save money and install a heating system taken from another car. The best option there will be an element from Lada Priora. It is not necessary to remove the seats completely. Partial dismantling will be enough, since you will put heating under the skin.
Before removing the rear seats on the VAZ 2110 and 2112, check all the nuances of this work. It is not difficult to do this, but there are some peculiarities. This model, although it is the progenitor of several models, from 2111 to Lada Priora, still differs from its counterparts in some elements. True, not too much. Ten at one time was positioned as a completely modern car. For the first time on domestic cars, a carburetor with an auto-choke and many other novelties were used.
How to remove the rear seats on the VAZ 2110 and 2112, a question frequently asked by the owners of this car. The design of the seats and their mounts is as simple as possible, but at the same time reliable. This allows you to dismantle the seats at the right time. At one time, entrepreneurs who used the car for work pulled out the seats when necessary to travel for goods. After that, they were easily and quickly put back.

Withdrawal
Disassembly should begin by loosening the backrest upholstery.. It is attached using buttons located on the side of the trunk. Next, pay attention to the seat. First, the handle of the pillow retainer is retracted to the right. After that, you need to raise the seat with right side. Do the same on the left. Next, move the seat cushion forward and remove it. Half of the work has already been done.
The head restraints are removed from the latches. To do this, press the fastening buttons and pull the headrest up. Do the same with the second section. Don't lose the release buttons. Next, the upholstery is completely removed, otherwise it will not work to remove the seat. The locking seat lock is pulled out by the loop. It is located behind the back. The right side of the backrest is raised, the loops of its fastening are removed from the hooks located on the floor of the car. The left side is removed in the same way.
After that, remove the armrest. You will need a 10mm socket wrench for this. Using a wrench, two fastening nuts are unscrewed. The armrest is then removed. If necessary, you can also remove the seat belts. Installation is carried out in the reverse order.

Other models
On the VAZ 2111 and VAZ 2112, the seat mounts are slightly different in design. Therefore, their dismantling is slightly different from similar work for dozens. Here, the seat and back are divided in half. Each of the parts can be folded independently of the other half. This makes the hatchback and station wagon more comfortable. You can also remove them separately. The seats are equipped with headrests, which increases the safety of the car. Plus, it's just a lot more convenient for passengers.
By pulling on a specially designed loop, we raise the left seat, after which it tips over forward. Using a spanner wrench (10 mm), unscrew the two hinge nuts. After that, you can pull the seat out of the car. The right side is dismantled in the same way.
Using a 13 mm socket wrench, unscrew the nuts located below the fastening loops of the left seat. There are two nuts in total. Next, the latch for fastening the backs rises up. After that, the back folds forward. Unscrew the nut and bolt located at the top of the fastening loops. The right side is removed in the same way.
Possible breakdowns. Sometimes the back latches break. It's easy to replace them. They are attached with three screws to the body. Another common malfunction is the failure of the lock guide bushing. It is plastic and cracks quite easily. The problem is also solved by replacement. Otherwise, there are no problems with the seats.

tuning
Improvements to the rear seat of the VAZ 2110 are not so frequent. In this case, heating of these structural elements is most often done. To do this is quite simple. It turns out that such a refinement in terms of money is not too expensive. And passengers become much more comfortable to ride. Such a thing will seem especially useful to drivers with large families living in the northern regions of the country.
For installation, you can use the commercially available heating kit - "Emelya". You can also use the heating removed from another car. Such an element from Priora is best suited. Heating should have two parts (for the seat and back). For installation, it is not necessary to completely remove the seats, it is enough to do with partial dismantling.
Heating is installed under the skin. Connection is made in the same way as on the front. The power buttons are located on rear doors. It is best to display the power indicators on dashboard. This will allow you to control the operation of the device. You also need to monitor the position of the device. It must not touch the seat springs.