Laying decorative stone - preparation of work surfaces and installation. How to lay decorative stone
Some people who have a desire to decorate the wall with a decorative stone mistakenly think that this material can be laid in exactly the same way as ordinary tiles. This is only partly true. Such a stone has an unusual texture, size and material, so you will need to take into account some of the nuances.
Today, natural decorative stone and artificial are distinguished. The second one is much easier to work with, problems can only arise with its shape. Regarding a real stone, it is worth knowing that it has a very large weight. In this regard, before asking how to lay a decorative stone, you need to make sure that there is sufficient load bearing capacity at the wall on which it is planned to lay. For example, if a wall is fragmentarily covered with putty, after a while it will collapse, losing facing stones one at a time.
In order to give the masonry natural look, it is recommended to purchase corner elements.
List of tools that are needed to lay artificial stone

Styling tools decorative stone: 1 - chisels, 2 - sandpaper, 3 - level, 4 - miter box, 5 - spatulas, 6 - construction mixer, 7 - sponges.
- Wood saw. Artificial stone can be easily cut with an ordinary hacksaw, so you don’t have to use a grinder that can lift a large number of dust.
- Miter box with high sides - used to cut artificial stone from gypsum at 45 and 90 °.
- Spatulas. This tool is used to apply glue. It is recommended to use 3 spatulas: small (7-9 cm), medium (15-17 cm) and medium notched (15-17 cm).
- Putty. It will be applied after the artificial gypsum stone has been laid. It is necessary for filling seams at corners and between joints.
- Paints from the manufacturer gypsum stones required colors. Manufacturers are obliged to give bottles with paint of all colors along with the stones, in which the artificial stone is painted. It is used to paint over white seams after putty and accidental chips.
- Water based varnish. After the paint dries, all the places on the artificial gypsum stone where there were chips and seams will need to be varnished.
- Kitchen sponges. It is quite convenient to use when puttying seams with putty.
- Two brushes with a small diameter. The first brush will be needed in order to apply paint on an artificial stone made of gypsum, and the second - for a water-based varnish.
- Milk sachet. The thing is so ordinary, but it can help to significantly facilitate the sealing of corners and joints with putty. The milk bag must be cut from the side where the hole was already, from edge to edge. On the opposite side, a new small hole is made with a diameter of no more than 4-5 mm. Putty is thrown inside the bag, after which it is gently squeezed out through a small hole into the joints of the decorative stone.
- Sandpaper, file, chisel. does not always pour in a perfectly even shape, this can make styling difficult. Such tools can help you quickly fit stones one to one. It is most convenient to use a chisel, it can gently and quickly remove the layer as big size, and small, and then clean it with sandpaper.
- Tile adhesive (a bag of 5-7 m, consumption should be viewed on the package), liquid nails. Gypsum artificial stone has a small mass, absolutely any glue can hold it without problems, therefore, there is no need to buy any expensive one. Liquid nails are able to support the weight of the stone without any problems. Decorative bricks are quite convenient to lay on these fasteners. They dry quickly and won't smudge the edges.
- Building level. It is necessary to constantly ensure that the laying is not carried out according to the level.
- A simple pencil to be able to distinguish cut lines.
- A mixer for construction or a drill with a nozzle for mixing putty and glue.
Back to index
Surface preparation for laying
Before gluing the decorative stone, you should prepare the surface for laying. The wall must be smooth, strong and clean, not subject to shrinkage, have enough good adhesion. In order to check its degree, it is necessary to sprinkle the wall with water and see if there is an area in which the liquid remains in drops or is not absorbed.
If there are such places, they must be subjected to additional machining. If laying is done on a very dry surface or in hot weather, the working wall will need to be moistened. back side the material to be laid is also recommended to be moistened. After the water has been applied, it is necessary to wait approximately 3 minutes. During this period of time, moisture should have time to be absorbed. Surfaces that are highly absorbent should be treated with a primer.
Back to index
Selection of tiles for the picture that will be laid out

Scheme of correct and incorrect laying of decorative stone.
Before laying the cladding material, it is necessary to remove the cladding stones from several different packages and flat surface lay out at least 2 sq. m of decorative stone. This will enable you to select various elements size, color, thickness and texture. In this way, it will be possible to get a visual idea of how to place the stone and where it will be necessary to make adjustments to the elements that will be joined.
During the laying process, this will help to reduce the concentration and amount of sawn stones in places where the masonry elements will adjoin each other.
Should be divided total area into separate working areas, approximately 5 rows of stones each.
Decorative stone can be laid with or without jointing. Therefore, depending on which type of facing stone is chosen, it is necessary to count the distance to the seams. Most often, the distance between the facing elements is approximately 1-1.2 cm, however, the width of the joints may vary depending on what type and type of masonry is planned to be used.
Back to index
How to lay a decorative gypsum stone with your own hands
First of all, you need to see if the color depends on the viewing side.

It is worth noting that many secrets have already been announced in the description of the list. necessary tools. Therefore, further we will talk about the direct installation process. First of all, it is necessary to consider the facing stone. It can often be the case that the color of the stones will depend on the viewing side. It is very important. Initially, you should ask the manufacturer which side you need to lay it, otherwise the laying process may not be performed correctly. If the color of the stones does not depend on the viewing side, laying should begin.
Laying must be carried out according to the level. Care must be taken to ensure that the joints do not match. The glue is diluted with water, whipped with a mixer to the consistency of a thick paste. Next, you should check the level of the floor, the first tiles must be laid on the level. Decorative stones most often have different sizes (length). Try not to have any overlap.
In the process of laying the second row and all subsequent ones, it is necessary to ensure that the new joint does not coincide with the previous one. If it matches or is close to it, you will need to replace the tile with a different size.
Complex elements should be done correctly with a chisel or other improvised tools.
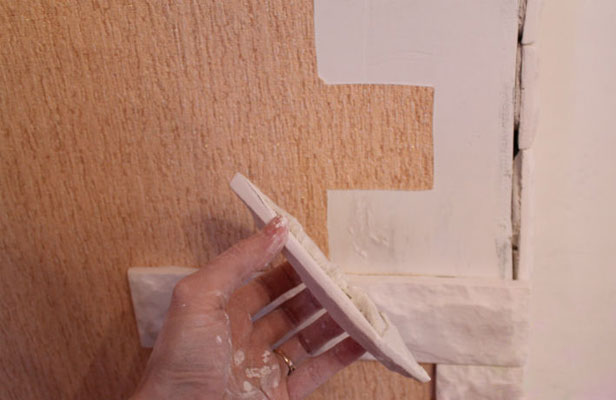
If you need to beautifully bypass, for example, a switch, you need to pick up a simple pencil, chisel, saw and carefully cut off all that is superfluous. After that, the edges will need to be smoothed with sandpaper.
Next, the corners are cut with a miter box. So that the corners can fit well together, you should cut them with a miter box. When laying 2 cut tiles, care must be taken to ensure that they fit snugly against each other. It is also recommended to use a miter box for cutting right angles. If it is not there, you will need to use a corner or an object that has a perfectly right angle.
Curly cutting of the edges is carried out along the contour of the texture. The texture of the decorative stone itself tells you how beautifully you can cut the stone. It should be cut with a hacksaw along the texture lines. This is due to the fact that, firstly, it is thinner there (it will be easier to cut), and secondly, it will turn out more beautiful and natural. After sawing, do not forget about sanding with sandpaper.
Next, the joints, places of figured cutting and corners are sealed with putty. The milk bag is filled with putty, after which it is necessary to carefully squeeze it out through the hole small sizes exactly in the corner, seam, cutting edges or around the switch. After that, you need to take an ordinary sponge for dishes and remove all unnecessary. Do not forget to periodically wash the sponge. You will need to carefully wipe the stone so that no putty remains on it.
Next, paint over the places of putty and cuts with paint from the manufacturer. Only after the putty is completely dry, it is possible to start painting all white places: cut edges of stones, corner joints, switches, and so on. If the stone has several colors, you must be careful and follow the color match.
Probably everyone in childhood dreamed of living in a medieval castle. Realizing such a dream is unlikely to succeed, besides modern man cannot do without such benefits of civilization as heating, bath and shower for a long time. But it is possible to partially make your dreams come true, and wall cladding with decorative artificial stone will help us in this. It can be performed both in an apartment and in a private house, both outside the building and from the inside, both in the hallway and bathroom, and in other rooms. If funds allow, you can.
The content of the article on how to properly lay artificial stone, video
The choice of decorative artificial stone
The edges of the tile should be free of noticeable mortar sagging, which can remain with poor-quality molding. Having opened the boxes with the purchased decorative artificial stone for, carefully lay the material on the floor in order to plan the future masonry. To determine the design of masonry, alternating stones different sizes and flowers, you can sketch on paper.
We bring to your attention catalogs of well-known companies selling artificial stone:
Preliminary work before laying tiles
We work at positive temperatures!
Before you start laying tiles, measure the air temperature. Decorative laying work artificial stone should be carried out at a positive temperature in the range from 5 to 25 degrees, since most adhesive compositions are most efficient under such conditions. More recommendations can be found in
Working conditions when decorating the facade of a house with artificial stone
The use of cement-adhesive mortar
The most popular mixture for laying artificial stone on the wall is cement adhesive solution. The adhesive mastic is applied to the wall in an even layer using a notched trowel. The layer should be 2-5 mm thick, and at a time it should be applied to an area of no more than 0.5-1 sq.m. in order to have time to stick the stone until the cement glue has hardened.
Works on laying artificial stone
Fixing artificial stone to the wall
We adjust the plates to size
A standard decorative artificial stone in the form of a tile does not always fit in its size to the junction of the wall to the door and window openings, so sometimes it needs to be trimmed before laying. Decorative artificial stone is easy to process. You can adjust the stones using a grinder equipped with a special disc for cutting concrete. After processing with a grinder, the sharp edges of the cut are dulled with a file. If it is necessary to break off small pieces of stone, ordinary pliers will be an excellent help in this matter.
The final stage - rustication
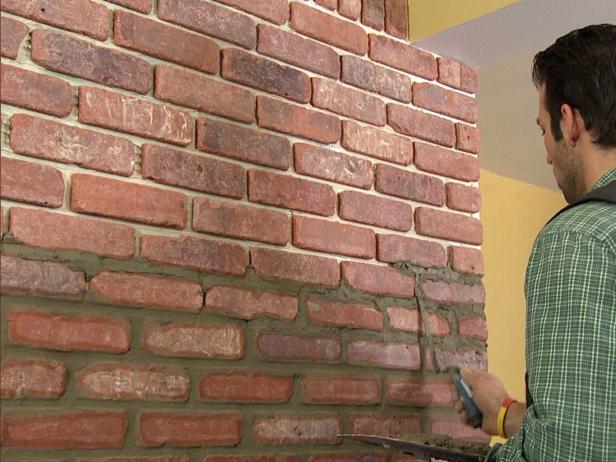
When laying artificial stone on the wall, a seam remains between the tiles, the width of which depends on its type: for slates they do not leave a gap, for rubble stone or boulder - a few centimeters. For brick, the jointing is 12 mm.
When can I start stitching?
Jointing should be done at least 24 hours after laying the artificial stone, that is, after the tiles have completely dried. Jointing is carried out using special grouting compounds with a gun or grout bag. When filling the seams, care must be taken to ensure that there are no voids left in them. The seams are smoothed with a spatula, excess mortar is removed with a rag. An hour after the grout has dried, the seams are processed with a hard plastic brush.
Seam filling
If there is not enough extruded mastic to decorate the rust, or another type of glue was used when laying the stone on the wall, the seam must be filled. To do this, the grout is collected in a special bag, from where it is convenient to squeeze it into the seam space.
Surface cleaning
The last stage is cleaning the surface of the artificial stone, because during the work a solution gets on it. A dry brush is suitable for cleaning.
Protective coating
The technology of laying artificial stone involves the application protective coating. This is not necessary, you can complete the work in the previous step. In addition, you will need.
Choose a protective coating with increased adhesion to gypsum-containing compounds. Hydrophobic compounds are also suitable. Note that solvent-based coatings are more effective than water-based coatings, in particular, armor coatings that form protective film.
A protective coating is necessary in case of frequent contact of the wall with water, people or animals, if it is necessary to color the stone, to increase its durability.
And here is a video about laying artificial stone
And dried it, you can proceed with the installation. Laying a decorative stone made of gypsum is quite an exciting activity for everyone, because it does not require any special tools and experience. You can do all the work yourself and save a lot of money, because. for one square meter installers ask from 1000 to 1500 rubles.
From this article you will learn:
- How to prepare tiles for laying;
- How to glue tiles on walls;
- How to cut stone without dust;
- Is it possible to glue on wallpaper;
- How to grout seams on a brick;
- How to cover the stone
Preparing for installation
The wall on which the stone will be glued must be dry and even. Perfect option: plastered primed wall or drywall. Tiles need to be laid out on the floor and compared; Individual tiles may vary in size. It is often found that the length of the stones is different, if for slates this does not play any role, since it fits closely, then for bricks this is a disaster. Even if the length of some tiles is 1-2 mm longer, then “on the volume” your seams will shift and it will not be beautiful. There are 2 workarounds for this problem:
- File each tile;
- Do the installation "by eye". Usually, when laying bricks, a glazing bead of the same thickness is used to form a seam and laid on horizontal and vertical joints. If the brick is different in length, then this glazing bead is not placed on the vertical seams, but is made “by eye”, slightly narrowing or expanding the seam. If you do this and move a few meters away from the wall, then you won’t even notice anything, it will seem that everything is even.
Mounting
Let's look at the installation with an example decorative brick, because it is harder to lay than slate. Sticker stone is better to start from outer corner and from the second row. How the corner will look like is up to you, some installers file each tile at 45 degrees and join, others overlap. The second option is simpler, because no need to cut tiles, but it is only suitable for stones with simple relief. Laying from the corner means gluing whole tiles without cutting their length, if you do the opposite, it may turn out that you have a 2-3 cm cut to the corner and it will be honest to say “no ice”.
Before starting work, we make marks on opposite sides of the wall, equal height seam tiles. If the height of the brick is 5 cm, and the seam is 1 cm, then we make marks 6 cm from the floor. Then we draw a line with a paint thread and fasten something even over the entire length of the wall: a bar, a rail, a drywall profile, etc. Next, we make a similar markup with a pencil up the wall after 5 and 1 cm. We only draw horizontal lines, they serve as a guide. if you have laser level, then such markup is not needed and you can use it.

We start laying. For gluing, you need to press on the tile slightly shaking on the sides.

Do not forget to lay the glazing beads until the glue has dried.
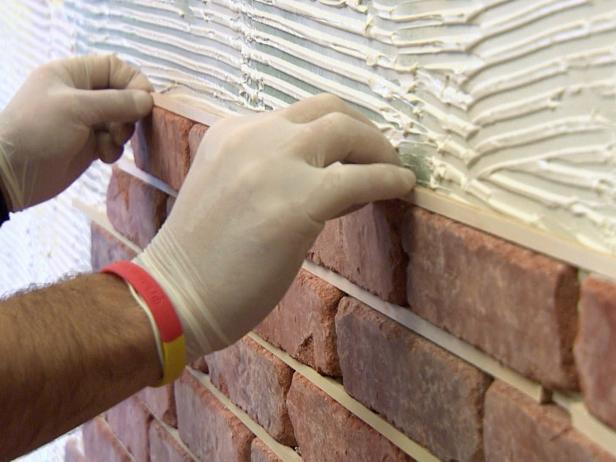

I had only 1 glazing bead 1.5 meters long when I did the installation at the customer's apartment. I laid the first row, then started the second, and as soon as the tile went beyond the length of the glazing bead, I carefully removed it and shifted it further. And so with each subsequent row until you reach the ceiling. Most likely the ceiling will need trimming to length.

There is also another installation method: the glue is applied to the tile itself with an ordinary spatula, then glued to the wall. Thus, there will be no glue between the tiles. Many do not even fill this space, but leave it as it is.
How and with what to cut gypsum tiles?
You can cut tiles with a grinder with a stone disc for dry cutting or with a regular hacksaw. But it seems to me the easiest way is to take a saw for metal and a miter box, put a stone there and saw it. The stone is perfectly cut and there will be no dust like from a grinder. Now you know how to cut an artificial decorative stone at home without dust.
About wallpaper and stone
Frequently asked question: "Is it possible to glue a decorative stone on the wallpaper?" Answer: "no!". The fact is that the wallpaper can get wet from the glue on which you are laying and it is possible to peel them off the wall. Usually in such cases, the wallpaper is cut with 1-2 cm under the tile, as in the photo.
If you want to thank me for sharing my experience with you, then write a comment on this article with any question or suggestion. Perhaps from your comment I will draw a topic for one of the future articles.
Grouting decorative bricks
Grout, or as it is also called "joint", means filling the seam between the tiles and gives natural look brickwork. You can seal the seams different ways and mixtures. You can use special grouts and a narrow spatula, as in the photo.
Or you can take the usual finishing putty(she usually white color), dilute it with water and place it in a milk bag. On the other side of the bag, cut off a corner and squeeze all this mixture into the seams. You can see how this is done in the video.
How to cover the stone after installation?
Finished masonry can be painted water-based paint if there is a need for it. Another frequently asked question: "what kind of varnish to cover a gypsum decorative stone?". There is a special varnish for stone on sale, you can look for one. But you can cover with ordinary water-based acrylic varnish. You can buy this polish at any store. Lacquering is necessary so that the wall can be washed. Of course, it is better to make two layers, but if the budget is limited, then one.
The stone can be performed completely independently. Installation is not difficult, but the result exceeds all expectations. The surface is incredibly beautiful, refined and very original. It should be noted that not only decorative properties, it allows you to get a coating that will have excellent performance properties.
Decorative stone - advantages and disadvantages
Do-it-yourself laying of decorative stone is carried out in any premises. It is actively used for facing various openings, highlighting columns and partitions. Combinations with living plants, fountains look good. Of course, many people think that finishing material used exclusively to create a classic . This is not true, the products look great even with newfangled trends in the design world.
On a note! If a most of the premises are planned to be decorated with stone, then you should think in advance additional lighting. The fact is that such a surface can turn out to be quite gloomy. Although there is another solution - to alternate light and dark shades material.

The advantages of this finishing option a bunch of:
- The work is done without much difficulty. Laying stone is made on a special glue, preparations don't take much time. Naturally, if there are no building skills, then you need to practice a little.
- Environmental friendliness. Indeed, the presence of artificial stone in the apartment does not pose a danger to human health. Therefore, it is used to decorate children's rooms and bedrooms, which are noticeably transformed.
- Durability. If you want to get a coating that will last for decades, then this is the most good option. to mechanical damage and the almost complete absence of burnout - make the material great solution in many situations.
- Large selection of textures and colors. Modern technologies allow the production of products that can mimic any natural coating or be completely individual.
To get the most impressive interior - you need to show imagination. You can glue according to a certain pattern or completely randomly.

Preliminary preparation
Care must be taken when purchasing all necessary materials. Sometimes the question arises: what to glue the decorative stone on the walls? To do the job correctly, it is better to buy a special glue. It is designed to fit such a product.
Choosing a stone is a very responsible process. The fact is that the technology of its production allows it to be stamped even in garage cooperatives. Naturally, this affects the final quality, because many manufacturers use low-quality components. Therefore, it is better to give preference to reliable companies that have proven themselves on the good side.

On a note! Many manufacturers give detailed recommendations for working with their material. In particular, on the label or in the instructions, the adhesive that is most suitable for laying the elements is indicated.
There are two main mounting methods: with or without jointing. According to the first option, the cladding is carried out with products that have the correct shape, for example, brick. The second method is used when working with a material that imitates a complex texture, such as slate.
It should be borne in mind that the stitching option requires a special tool, as well as a mixture that will fill the space. Special attention given to the choice of color. It is necessary for tinting the joint mortar in order to achieve a match in tones or contrast.

Necessary tools and fixtures
Installation of decorative stone requires the following tools:
- Putty knife. It is used to distribute the adhesive on the surface, and if necessary, on the wrong side of the decorative material.
- Rubber mallet. This is a very important device, they tap the stacked fragments. Many masters believe that such a process is best done with a fist.
On a note! You can not use a simple hammer, it can damage the surface. But if there is no other option, then a wooden plate is necessarily enclosed.
- Container for mixing solution. It is better to choose a container that will be convenient for scooping.
- Bulgarian with a suitable disc (for concrete). Cutting is carried out in compliance with elementary safety standards. Trimming is carried out in order to lay a decorative stone in the corners.
- Sander. This device is necessary when working with natural stone who has facial defects.
The tool is prepared in advance so that during the facing activities - everything is at hand.
Working with the base
Do-it-yourself artificial stone laying begins with careful surface preparation. This process is of great importance. Of course, the technology of mounting a stone on a wall suggests that the base may have some irregularities that will be leveled. decorative material. But you can’t get carried away, because if you allow for significant damage, then the collapse of the structure is possible.
Preparation work is divided into several stages:
- The old decorative layer is removed. The surface is thoroughly cleaned.
- The wall is tapped for voids and hidden cracks. Such defects must be corrected. Gypsum or acrylic putty is used for coating.
On a note! If we are talking about "bare" bases, then they are pre-coated with a primer and two layers: starting and finishing.
- Using a metal brush, they pass well over the surface. This is done in order to leave numerous scratches that will serve as a better adhesive adhesion.
- Next, a primer is applied, which will increase adhesion and reduce the absorbency of the solution.

To get a more streamlined laying pattern, the elements are first laid out on the floor.
Installation of decorative stone
Exist general rules, which allow you to lay artificial stone on the wall. They are as follows:
- It is necessary to lay the material subject to certain indicators. The temperature should be between five and thirty degrees. If this range is exceeded, it is advisable to pre-wet the contact surfaces.
- Preliminary markup is in progress. Conventionally, it looks like this: lines are drawn in increments of 45-50 cm. This will allow you to more accurately determine the order of placement and fit, if docking is expected.
Advice! When working with some products, a difficulty arises - both sides of the fragment can serve as the front. But often the manufacturer indicates which side should be used as a decorative one.
Laying technology
Installation is carried out as follows:
- being prepared right amount solution: if it is supposed to use a dry version. This is done very simply. Water is poured into the container, it should be room temperature. Next, fall asleep dry matter and mix well.
- Decorative stones are mounted on the walls, starting from the corner. Gluing begins with the first fragment, which fits at the very bottom. The order is:
- the mixture is applied to the wall and washed well;
- if required, then cover the wrong side of the decorative product with a small layer;
- the fragment is applied to the surface, well pressed;
- with a mallet they tap on the element;
- further, you can glue the next fragment.

On a note! If there is too much solution, then it begins to go beyond the edges of the material. Such surpluses are immediately removed. It is necessary to prevent them from getting on the front part, otherwise there is a high probability of damage.
Some products vary in size and are stacked with great care. First, you must follow the chosen scheme. Secondly, if we immediately put large plot, then it can slide.
To make the work go much faster, the elements are pre-numbered. This is done at the time of drawing up the schema.
Some styling features:
- The seamless styling option is considered the simplest. Fragments fit as tightly as possible. You should get a surface that will look completely monolithic. The main thing is to immediately remove excess glue. If this is not done, problems may arise.
- Stitching the seams suggests that more effort will have to be made. After all, it is necessary to form joints. Looks good options where the seams have a more uniform size.
Laying with the formation of seams is as follows:
- The fragment is laid on the wall, the order completely repeats the standard technology.
- The next element is glued at some distance. To achieve uniformity - use a spacer. It can be pieces of plastic, hardboard, chipboard. Thus, it is possible to form the desired joints.
- A day later, the laid material is processed. To do this, the seams are filled with a mixture, which is preliminarily or subsequently tinted.
If required, the artificial stone walls are coated with paints and varnishes.

From the foregoing, it becomes clear that the work is done quite simply. The main thing is to do it carefully and in compliance with the rules.
Today, there are a huge number of options for how and with what to finish the wall outside and inside. One of the most popular and sought-after methods is wall decoration with decorative stone. With the help of decorative stone, you can create beautiful facade, which will complement the overall exterior of the building, in harmony with the landscape design. You can use decorative stone for interior wall decoration. In order for the decorative stone to hold securely, a certain technology should be followed when gluing it. We will take a closer look at how to glue a decorative stone on a wall, from preparation to finishing work.
What is needed for work?
To make your work go as quickly as possible, and you do not have to be distracted, it is recommended to prepare all construction material and tool. To stick a decorative stone with your own hands, you will need:
- square,
- drill / mixer for the manufacture of adhesive mixture,
- grinder with a cutting disc for stone,
- spatula, trowel or trowel,
- level,
- rubber mallet,
- paint brush,
- metal brush,
- wooden block,
- roulette,
- container for grout and glue,
- medium hard brush for smoothing seams,
- syringe gun,
- sprayer for water repellent,
- adhesive mixtures.
You need to have everything you need at hand, then the work will not seem tedious, although this process is quite painstaking! So, the first step is to complete all the preparatory work.
Good preparation is the key to success!
In most cases, indoor walls are plastered, concrete or brick. If you have a similar wall, then preparatory work will be few. It is much more difficult if there are remnants of old wallpaper or paint on the wall surface. Before gluing the decorative stone, all remnants of the previous finish should be carefully removed. To do this, you can use a metal brush or spatula. The surface should be cleaned so that the adhesive has good contact with the wall base. A metal brush will scratch the surface, and a spatula will cleanly remove all possible contaminants. After that, you need to properly prime the wall with a primer, preferably water-based acrylic. To do this, use a roller or brush.

If the surface of the walls is wooden or plasterboard, then similar work should be done with these surfaces. However, if the decorative tile will be glued to the adhesive composition, which contains cement, then you will first need to fill a special masking mesh, for example, based on fiberglass, then treat the surface by applying a layer of plaster.

When the walls are ready, it is necessary to prepare the decorative stone itself. If the stone of your choice is made on the basis of gypsum, then it is also advisable to treat the back surface of the tile with an acrylic primer. All these preparatory, it would seem, simple work, are able to speed up and facilitate the process of work several times. Now you need to choose the right adhesive for decorative stone.
Choosing the Right Adhesive
Today there are two types of glue, namely:
- Based on cement.
- On the plaster base.

One of the most popular and in demand is Ceresit CM11 glue. However, if the decorative stone is to be glued from the outside, CM17 or 117 is required. As a rule, the packaging of the adhesive indicates what kind of work it is intended for: for external or internal. Be prepared for the fact that outdoor glue will cost more.
There are two more brands that are in great demand due to their quality, namely Perlfix and Knauf. These adhesives are great for decorative tiles plaster based. There are other less well-known brands, but you should not take too cheap ones, because there is a risk of acquiring low-quality glue.
Installation of decorative tiles. Stages!

All work on the installation of decorative tiles can be divided into several stages, namely:
- Application of the adhesive layer.
- Decorative stone laying.
- Applying a protective coating.
Each of these stages must be carried out with the highest quality, in accordance with all technological requirements and regulations. Now we will cover the basics, step by step, step by step.
Applying the adhesive

If you purchased a gypsum-based decorative stone, then it can be glued to almost any adhesive, for example, PVA or even gypsum. Some practice the use of liquid nails, water-acrylic mounting adhesive etc. The weight of such a tile is small, unlike sand-concrete artificial stone. Accordingly, there is every chance that it will hold on to the wall surface for a long time and firmly. In some cases, it makes no sense to apply a layer of plaster, as we indicated above, speaking of drywall and wooden surface. But only in cases where the stone is mounted without a seam. In all other cases, the surface should be treated with glue. The adhesive composition is applied to the wall with a spatula. It is important to ensure that the application layer is uniform.

Note! It is not recommended to apply the adhesive immediately to the entire wall where the decorative stone will be mounted. It is best to cover a wall area up to 1 m2. Otherwise, the glue may dry before the stone is glued.
Decorative stone laying

So, this process is divided into four consecutive steps, the observance of which will lead to a positive result.
At this stage, it is important to carry out the correct kneading adhesive composition. It should be sufficiently elastic and thick, but in no case crumbly. When gluing an artificial stone, it should be well pressed. This is especially important when the stone is placed on cement mortar. Press down in moderation, so that the remaining glue comes out around the entire perimeter of the tile. This will avoid voids and also provide excellent sealing. At the next stage, all connections and joints will be rusticated.

If the stone needs to be cut, then you can use a hacksaw or grinder. If the stone is gypsum-based, then it is better not to use the grinder, as there is a risk of splitting the stone. At the same time, try to lay the cut edge in places that do not catch your eye. In this case appearance finished wall will be more aesthetic.
If the stone you bought must have seams, then strive to ensure that they are uniform. Watch the width and parallelism of the rows. However, one should not achieve such accuracy as when laying tiles, where every millimeter is taken into account. Some negligence can only be beneficial.

Installation of decorative stone is best to start from the corner. This is due to the fact that corner elements are not provided in this technology. Stone laying should be carried out sequentially, row by row. At the same time, go from bottom to top. If you want to start laying from the middle of the wall, then you can fill the guide rail. It could be aluminum profile. This process will avoid getting glue on the tiles, as each row will rest against each other.


In most cases, decorative stone is placed under the jointing. This implies a certain removal of the tiles from each other. These seams, in the process of pressing the stone, can be filled with glue. Therefore, it should be carefully removed. After these seams are filled with a special jointing. If the joint mixture consists of the same adhesive composition, then there is no point in removing adhesive residue from the joints. When the mastic completely hardens, it can be tinted in a different color, which will enhance the expressiveness of the decorative stone. As for the width of the seam, everything here will depend on the tile you have chosen. The seam can be millimetric or have a width of several centimeters. For example, when a brick is placed under the jointing, then standard width seam 1.2 cm. In the case when there should be no seams between the stones in the masonry, it should be placed as close as possible to each other. If the process of gluing the tiles was carried out correctly, then the adhesive that came out into the seams may be enough to form a seam. To arrange it, you should wait a bit for the mixture to harden slightly. Shaping can be done with a special wooden spatula, which should have certain form and the corresponding thickness under the seam.

If the squeezed out glue is not enough for beautiful formation seam, then you should prepare an additional mixture. To apply it, you will need a special bag from which it will be convenient to squeeze the mixture into the seam. So, there is less risk that you will stain the tile. When the seams are dry, and the mixture has a crumbly character, the surface of the stone can be cleaned of any adhesive residue that could have got on it. This can be done with a dry brush, but never with a wet and stiff brush. This can bring irreparable damage to the decorative stone.

At the final stage, it remains to apply a special protective compound. This action is required. It can significantly increase the life of the cladding. In addition, with the help of a protective layer, you can give a different shade. Protective coating is required:
- in places where there is a risk of moisture ingress or, conversely, the room is consistently damp;
- if there are pets or children in the house;
- if the stone has a surface layer of paint;
- if the purchased gypsum is of poor quality.
In all these cases protective layer special composition will reliably protect the finished surface from possible damage. With regard to the choice of protective coating, it must also comply with certain important features. For example, it should have increased adhesion, and have gypsum in its composition. When using it, there should not be any traces after drying.
Note! If you want to purchase a water-repellent composition, then the best one will be the one that has water base. Such formulations are better than those that contain solvents. Although in some cases coatings that are based on a solvent are more effective. This is due to the fact that they form a protective film on the surface, figuratively speaking, “concrete” the surface.

Note! The protective coating should only be applied when the cladding is ready and the grout is completely dry. It is applied with a spray gun or roller / brush.
If the wall decoration will be carried out outside, then it is desirable to carry out the work in dry weather.
As you can see, laying a decorative stone with your own hands is quite within the power of everyone. There are no intricate technological processes. If you have already completed this work, or had a similar experience in the past, then please share your impressions at the end of this article by leaving comments.
Video
Laying technology without filling intermediate seams. Given detailed instructions for marking and calculating masonry:
For those who are used to doing everything with their own hands, instructions for self-manufacturing decorative stone: