Decorative tile for walls under a stone. Stone effect tiles: a luxurious finish at a bargain price
The catalog presents branded products to the attention of buyers. The Russian factory White Hills has long been recognized as a leader in the manufacture of high-quality and attractive clinker for facade and interior work. We note the advantages:
- Ecological cleanliness is due to production based on gypsum, cement and natural minerals;
- Decors, textures, colors are presented in a variety of options;
- The texture and uniform coloration leave chips invisible if and when they occur;
- It is intended for operation in normal conditions, at the increased humidity and at changeable temperatures.
We invite you to buy the best for your home!
Artificial finishing stone accurately imitates natural building materials or brickwork. But the price is more profitable: even luxury items can be purchased inexpensively during sales periods. Each product card on the site is accompanied by a photo, the cost is per square meter.It doesn't matter how you want to use the tile in the future - for a countertop or for a building facade. The range of Tiles-SDVK allows you to find any product in two clicks. Delivery in Moscow is made in 1 day!
Stone-effect gypsum tiles for interior decoration are used to decorate apartments, private houses, as well as restaurants, shops, offices, hotels and other premises. What is this material, what types is it and how to use it?
Compound
Decorative gypsum tiles for interior decoration are composed of gypsum, water, sand, modifier and surfactants. Modifiers improve the quality of the finishing material, making it stronger and more durable.
The tile is available in the form of imitation brick, wild stone or cobblestone, as well as smooth.

Advantages and disadvantages
Gypsum tiles, especially those imitating brick or stone, are widely used. Its advantages are:
- ease of installation,
- low weight, which allows you to stick it even on drywall,
- relatively low price
- environmental cleanliness,
- small thickness,
- the material is warm to the touch, has heat and sound insulating properties,
- safety - it weighs little, does not conduct current,
- fire safety,
- the ability to apply decorative coatings on top.
It is also important that such an artificial stone can be restored and made independently.
Of course, it also has disadvantages:
- strongly absorbs water, therefore it is used only in dry rooms,
- does not have great frost resistance,
- low strength, impact and abrasion resistance,
- there is a risk of buying low-quality material that will quickly collapse,
- difficult to keep clean due to the complex relief, therefore it is recommended to cover the surface with a special varnish after installation.
The hygroscopicity of the tile can also be a positive quality - it allows you to regulate the humidity in the room.

Application
Artificial stone or gypsum bricks can be used to decorate the entire room, as well as one wall or a small section of it. Often with the help of this material they create accents in the interior: they trim niches, fireplaces, columns.

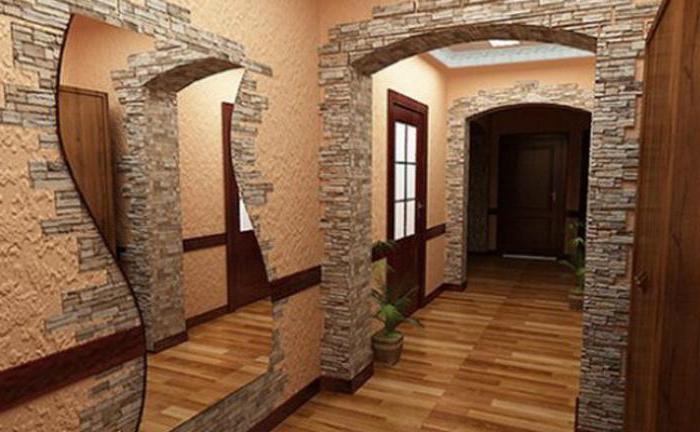
Brick-like tiles are popular for decorating loft-style interiors, as in the photo, because it is not always possible to build a real brick wall in an apartment. Its rough texture is well suited for this direction. Stone effect tiles are used in various architectural styles.
Advice! Before laying the tile, lay a sample out of it and see how it will look.
For stone tiles, the direction from which the light falls is very important. Side lighting will be beneficial to emphasize the relief, and front lighting is best avoided.

As in the case of other finishing materials, light cladding visually expands the room, while dark cladding makes it smaller. In small rooms, such as small rooms, balconies, loggias, it is better to tile not the entire wall, but individual fragments. It is better to veneer large areas in large rooms: living rooms, halls. Most often, individual elements are decorated with stone-like tiles: niches, fireplaces, stoves (in this case, its refractory properties are very useful), ventilation ducts, stairs. You can see an example of finishing in the photo.

Mounting technology
Gypsum tiles are best glued on concrete, gypsum, brick, drywall, and plastered substrates. Facing is carried out at a temperature above +10 degrees.

If gypsum tiles are glued to some non-standard surface, for example, to an old tile, it makes sense to make a layer of a material that connects well with both the cladding and the base. For a tile base, this can be a high-quality strong tile adhesive.
To decorate a wall with gypsum stone, from the tools you will need:
- level - water or laser;
- drill with mixer attachment,
- hacksaw or grinder for sawing,
- miter box,
- foam sponges,
- spatula for grouting,
- straight and notched trowel
- tassels,
- sandpaper or whetstone,
- construction gun or a regular plastic bag.
Also useful materials such as:
- glue - if it came with a stone, you need to use it; tile adhesive or gypsum compounds (Knauf Perflix, Volma Montazh) are also suitable,
- wall primer,
- grout for seams,
- if necessary - paint for seams and the tile itself,
- varnish (water-based).
As an adhesive, you can use silicone sealant, cement adhesive, gypsum plaster, PVA glue, mastic.
To stick the tiles, you first need to mark the wall. So the lining will turn out even. To do this, you need to mark the horizontal and vertical lines, relative to which the stone will be laid. Usually they start to mount it from the corner, so the markup is tied to it.

Gypsum tiles under the stone can be of different shapes, so when marking, select the elements so that they do not repeat. Brick-like gypsum tiles are simpler in this regard, they are the same in shape. To accurately mark out, you need a water or laser level. The latter is easier to use, including alone, but it is more expensive.

Next, start gluing. Before this, the base is primed. The glue is kneaded with a drill with a mixer nozzle according to the instructions; in terms of consistency, it should be close to thick sour cream. Apply glue to the base with a smooth trowel with a layer of about 5 mm, remove excess with a notched trowel. At one time, a plot is smeared for 3-5 elements. The stone is pressed tightly to the base, adjusting its position.

If the gypsum tile is made to look like a brick, then they must do the jointing. To do this, use special "crosses" or any suitable material at hand. For multi-format artificial stone, seams are not required.

Advice! The gypsum tiles under the brick are laid with an offset so that the vertical seams are not located one above the other.
Gypsum is quite easily sawn with both a regular hacksaw and a grinder. The latter is easier to give the elements the necessary shape, but this tool makes a lot of noise and dust. It is best to cut along the relief line, but if you use a grinder, you can cut the tile along any desired contour.

It is important to carefully arrange the connections of switches, sockets, floors, adjacent walls. To make external corners, the gypsum tiles are cut with a grinder at an angle of 45 degrees.
The seams are rubbed with gypsum glue or a special mixture. For this, a spatula or a construction gun is used, it can also be made from a plastic bag (dense, like milk) like a confectionery syringe, and squeeze out the glue with a strip 4-5 mm thick. The grout is poured into a gun or bag up to half.

Advice! Do not squeeze out a large amount of grout at once, otherwise it will seize before you have time to distribute it. Make sure that the composition does not get on the tile - porous gypsum is difficult to wash off traces of putty.
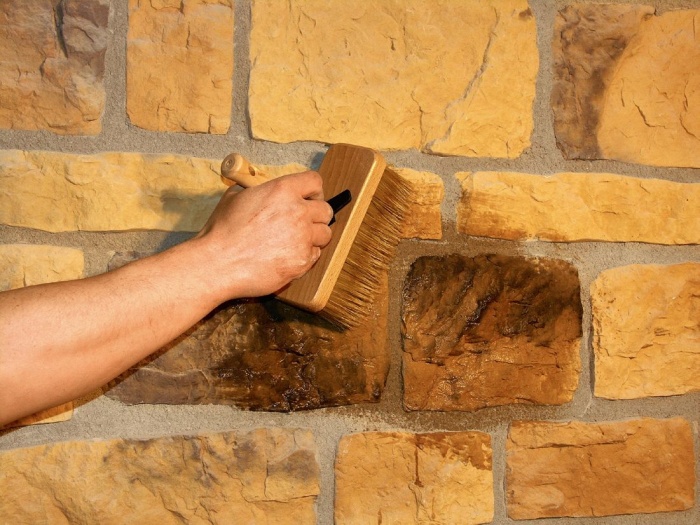
Some design choices involve a contrast between gypsum tiles and grouting. If the color of the tile is different from the color of the grout, and this is not included in your project, then the seams are painted over with dyes after the fugue has set. Also, dyes can mask chipped tiles. After the glue has dried, the tile under the stone is coated with a water-based varnish.
Independent production of gypsum tiles
Gypsum stone tiles can be made independently. For this you will need:
- building gypsum, better grade GF10 - 6 parts;
- slaked lime - 1 part;
- water - 10:7 in relation to gypsum.
Watch the video on how to make your own gypsum stone for interior decoration.
You can cast it both in ready-made silicone molds, and in self-made ones. For example, you can make shapes in the form of a stone, as in the photo. Molds can be cast from liquid polyurethane. To do this, a matrix is first made, and then a layer of liquid polyurethane is poured into it.

Gypsum mortar is prepared at one time and immediately poured into the mold. Gypsum is poured into the water and mixed with a construction mixer, then lime is added. The solution is not stirred for long so that the gypsum does not begin to set. The solution is poured into the mold, leveled with a spatula and left to harden. Forms are placed on a strictly horizontal surface. To release air bubbles, use a vibrating table.

Gypsum sets in 15-20 minutes, but it takes about a day to completely solidify. The tile under a stone has to be at the room temperature in the room without drafts. Then the gypsum tiles are removed from the mold and left to dry. You can use a drying chamber, but you should not expose products to the sun.

Gypsum stone can be painted. To do this, either color is added immediately to the gypsum mortar, or individual parts of the mold are painted with a brush before pouring. You can also apply paint with a spray gun to the finished tile, and this can be done both before laying and after. When the paint dries, the facing material is covered with acrylic varnish in two layers.

Conclusion
Brick or stone gypsum tiles are a finishing material that can be used in a variety of rooms. It can be painted, applied on top of other decorative coatings, you can make your own tiles of the desired size, shape and color. This gives ample opportunities for its use, but it is important to remember its weak points - fragility, instability to shock and moisture.
Modern and lightweight "stone-like" tiles for interior decoration are usually used when repairing walls. Of course, if you wish, you can veneer the ceiling and even the floor with it, but the convex and rough nature of such a surface will be excessively original with the most futuristic design. The walls of the kitchen, corridor, hall and balcony are the most natural and promising place for "deployment" for artificial stone.
Stone wall tiles - advantages and disadvantages of stone imitation
The advantages of tiles imitating natural granite, basalt and further on the stone list are quite extensive:
- Profitability. Compared to natural stone, its factory imitation is 3-5 times cheaper;
- Resistance to moisture, sunlight and artificial light, chemical reagents and strong mechanical stress at a quite decent, really "stone" level;
- Light weight - when wall mounted, the mass of a square meter of cladding is approximately 25-30 kg. A natural stone of such an area will be several times heavier, which will significantly complicate its installation.;
- Durability comparable to the service life of the entire house or apartment (only subject to high-quality installation!);
- A significant variety of color, depth and relief textures. Imitation of not only stone, but also marble, ordinary and petrified wood, interiors of ancient caves, pirate catacombs, etc.
A unique advantage of artificial stone tiles is the possibility of partial wall decoration. This material looks great in the form of separate "islands", "chains" and patterns on a smoothly plastered base - other finishing materials must be erected in a continuous canvas. "Stone" tiles can be tiled on one or more walls, trimmed with a decorative stand, or used at the final stage. do-it-yourself fireplace masonry. Design options for using artificial stone cannot be described in the largest article, it is better to familiarize yourself with them in professional repair catalogs or on specialized sites.
However, this material also has disadvantages (as without them):
- Due to the embossed outer surface, cutting such a tile is much more difficult than a real one. To fit the elements to size, you will have to use special and rather bulky machines or a grinder - a diamond glass cutter will be powerless here. The cut will have to be carefully polished;
- A whimsically bumpy wall looks unusual and stylish, but you can’t hang furniture or other bulky household items on it. First, there will be wide and unaesthetic gaps. Secondly, why hide the unique decorative beauty with a standard kitchen set?
- Any stone - both natural and artificial - belongs to the so-called. "cold" coatings. Constantly or often leaning your head against it or leaning your back on it is unreasonable. For contact with the human body, “warm” materials are better suited - wood, natural wallpaper, cork, etc.
Tiles of own production
Indeed, it is not necessary to purchase an artificial stone in a store or on the construction market; if desired, you can “sculpt” it yourself. However, home-made "stone-like" tiles will be much less strong and durable than factory-made ones, even if the manufacturer is located in an artisanal corner of the Chinese province. In addition, it will not be easy to select high-quality pigments for coloring pseudo-stone blocks, as well as special hardeners-thickeners. Additionally, you will need to purchase resistant polyurethane molds for casting work.
Therefore, self-production of artificial tiles is relevant in the presence of excess cement in the household. For example, when large-scale construction works strip foundation for the fence ended, but solid stocks of cement (brands not lower than 300!) remained. The best cement in a year or two will turn into a ossified mass on the shelves of a garage, in a cellar or a barn. It is better to experiment with its non-standard uses than to throw away cement fossils for nothing.
Other ingredients for "stone kneading" are simple and cheap. For 1 kg of cement, you need to add 1.5 kg of pure sifted sand and 1.5 kg of marble or granite chips (if possible, the size of the pebbles is similar). Mixing of the dry mix is carried out in a large container; a manual concrete mixer is very convenient for this operation. In another bucket (trough, tub), an aqueous solution is diluted with coloring pigments and thickening reagents. The dry and water components of the artificial stone are mixed as thoroughly as possible, using vibrators or drills with special nozzles. The mixture will turn out thick, it will have to be mixed for a long time and carefully.
The finished mass is poured into several molds, their inner surface is pre-treated with silicone or soapy water for ease of subsequent extraction of the finished blocks. The still liquid stone is leveled with a notched trowel, with simultaneous vibration of the form. This is how air is removed from the internal space of our bricks, and their back surface is rough for good contact with mounting mortar or glue.
From the casting molds, stone-like finishing tiles for interior decoration are removed after 24-36 hours. At least another day should pass until the blocks dry already without contact with polyurethane, freely placed on a clean floor. Only after that you can proceed to the wall installation of our casting works. It is carried out according to the same procedure by which a purchased artificial stone is mounted.
Stone effect tiles - every step is important for interior decoration
Embossed tiles for walls under the stone goes through the following stages of installation installation:
How to tile relief tiles under a stone - step by step diagram
Step 1: Preparation
All stone blocks must be inspected before mixing the first batch of adhesive. It is best to lay them on the floor and carefully examine them for chipped corners, damage to the facade surface, color uniformity, etc. It is very disappointing to first cut or plant a stone on the mounting site, and then find out its poor quality. Such repair collisions are prevented by careful preliminary inspection.
Step 2: Getting Ready Again
The base of the walls must be solid. No peeling of plaster, no cracks, rust stains or dampness. When laying a continuous sheet on the wall, grooves can be applied crosswise, for deep penetration of the adhesive. With partial (designer) installation, the viscosity of the adhesive composition should be higher, because. it is applied to a smooth base.
Tiles are always laid out from top to bottom and from the corner - this is an unshakable rule of stone repair. For the first row, auxiliary lines are drawn on the wall surface, according to the position of the plumb line and level. The success of the entire installation procedure depends on the accuracy of the first row.
Step 3: Now the lining
Glue for artificial stone is better to buy a special one, the composition recommended by the manufacturer is desirable. The underside of the block and the section of the wall are lubricated with adhesive, after which the tile is pressed exactly in place. High-quality glue will "grab" a weighty element in 10-20 seconds, this time is enough to level it. Excess glue is removed with a spatula back into a bucket or other container.
The entire wall (selected surface) is fully tiled with solid tiles. As with ceramics, labor-intensive tie-ins are left over for the next day. However, if the amount of work is small (several square meters), they can be glued in one day.
Step 4: Cuts and Seams
Precisely cut and polished from the visible ends of the tiles are glued to the remaining places. When this rather tedious procedure is completed, it remains to wipe the gaps between the stones with a special fugue. Dyes are added to it to color match the relief stone - only now the work is finished, you can start admiring its contemplation.
The decorative materials for renovation and interior design are now very large. One of the most popular types of flooring that creates a great look for any room is stone-look wall tiles. This coating is different in that it has a lot of varieties, both in terms of design, texture and color, and in the materials of manufacture, so anyone can choose the right option for themselves according to price, preferences and the type of room they need. This is a strong, beautiful, durable coating that can withstand most aggressive influences while maintaining its excellent appearance. We will tell you how stone-like finishing tiles are selected, what you need for laying, and, of course, how the installation is carried out.
What is this article about
What is it made from?
A decorative stone-like tile is created from a very diverse material, which can be divided into natural and artificial. The first differ in price, which is several times higher than that of the second group, and, of course, in the natural look, color and texture of the stone. The second group includes a large number of materials that do not cost as much as natural ones, but their appearance is different from real stone. This difference in appearance is not very noticeable, but still natural stone can be distinguished with the naked eye.
We want to talk about the main materials from which stone tiles are made. We will divide them into groups to make it easier to understand. Each material has its own characteristics, pros and cons, which you need to know in order to choose the right material for the room that will withstand all the operating conditions in this place.
artificial materials
Gypsum
A coating of this material can be found in almost any store, as it is quite versatile, easy to use, suitable for most rooms. It can be said for sure that such decorative coatings will be afraid of water, since it is gypsum, therefore, in no case should it be laid in the kitchen or bathroom. It is also not very durable, it can easily split, but if installed correctly, it can last for decades.
Gypsum stone tiles have many advantages, which include its weight. It is very light, which allows you to use any type of glue for laying it. So low weight makes it possible to lay it on almost any surface, since it will be very, very difficult to fall under its own weight. This is an environmentally friendly material, it does not emit harmful substances when ignited, nothing passes with it from time to time, so it can be used in most types of premises.
Ceramics
Many people know that ceramics is a natural material that has a considerable cost and looks great. But we are talking about stone tiles, and ceramics are not stone. Natural types of stone include only natural minerals.

Ceramics will provide you with just perfect cleanliness in the room, as it is very difficult to get dirty and easy to clean, this is just a hostess's dream. Stone-look ceramic tiles for interior decoration are ideal for kitchen interiors, as this is where the highest level of pollution and rather difficult operating conditions are. This is a very durable coating that is difficult to damage, but break quite easily. But when it is laid, its durability will allow you to serve you for several decades.
Exposure to acids, water, steam and unstable temperatures has absolutely no effect on tiles made of this material. Based on this, you can understand that you can use the ceramic version of stone tiles in many places. It has noble cracks and abrasions, a pleasant texture that is created only on ceramics. This is definitely the best floor tile, and it is for this surface that ceramic tiles are most often purchased.
Porcelain stoneware
This coverage is not much different from the previous one. Its most obvious difference is its strength, which is several times higher than that of pure ceramics. Natural stone tiles made of porcelain stoneware are very often used outdoors, since this material can easily withstand street conditions, you just need to choose an adhesive that will also not be affected by cold, different temperatures and other aggressive street factors.
It is also very convenient for laying on the floor, as it has a large thickness and size. Porcelain stoneware tiles most often come in large enough pieces that can be easily used to create outdoor paths and indoor floors.
Clinker

Clinker decorative stone is undoubtedly the most durable element of the indoor flooring. This is a special type of clay that is processed at very high temperatures, due to which it acquires incredible strength and durability. Clinker tiles will withstand not tens, but hundreds of years even without maintenance, in difficult operating conditions. If you need to create a coating that you won’t change at all later or somehow worry about it, then choose a stone in the interior, which will be made of clinker.
natural materials
This is already a real stone, which is mined in different parts of the world, then processed, it is given the desired shape. Most often, natural stone is not cut, but split, it is faster, and the appearance of the crushed stone coating is more stylish. If necessary, the stone is fired to slightly change its shade. After all the procedures, the stone is given the necessary texture, sorted by size, and then collected in a single collection of coatings.

Stone tiles are also divided into those for interior decoration and those for exterior. It is worth noting that natural stone is most often used for exterior decoration, as it looks stylish, gives nobility to the general appearance of the house, and is not subject to any natural elemental influence.
For interior decoration, these types of materials are used:
- Natural stone tiles are made in most cases from marble. This is a very expensive material and is most often used to create a coating on a small, most visible surface area in a room. It is durable, has a noble appearance, which gives any room an atmosphere of high cost and luxury. We note that marble has a lot of varieties, there are those that have a cost comparable to ceramics, so it is quite possible to replace ceramic tiles with marble.
- Many are familiar with the unique shade of this material. It is very often used when the design of floor areas indoors is carried out. Often it is used in the kitchen, and even more often in the living room, to show the luxury of this material to as many people as possible.
- A material that has even more variation in different textures than marble is onyx. This tile is made of stone that has a pleasant sheen and smooth texture. It can be used to finish columns or walls, as it is too slippery for the floor, but there are other variations of it that are great for the floor. Its cost is not much different from the cost of marble, so you should choose only in appearance, although, as already mentioned, there are enough variations to choose a tile for everyone in any room.
Areas of use
Wall tiles for interior decoration under the stone are used in various areas of repair and design. First of all, such a huge choice is provided by different materials, different ways of processing the product and a wide range of decorative solutions. Proper combination of all this allows you to make a decorative stone for any room.

Also, the area of \u200b\u200buse determines the purpose of the tile itself. There are stone coverings that are made specifically for the floor. This includes natural marble and onyx, as well as ceramics, as they all have a smooth texture and are intended for interior decoration. The clinker material from which the tile is made is especially good for use on the floor.
It is worth noting that the floor stone should have a very even, not rough surface so that the feet are comfortable, but the tone should not be slippery either. For this, there are special types of tiles, which often indicate that they are made for the floor. For walls, columns and ceilings, marble is ideal, which, although it has sufficient weight, looks very attractive. It is most often issued in the form of impressive sheets, for which you need to choose the right glue, but if you install it correctly, then this coating will withstand any impact and will last you at least 40-50 years.
Gypsum cladding material is also excellent on the walls. It is simply not suitable for the floor, as it has a very uneven texture, many sharp corners. But on the walls, it shows itself perfectly, gives the necessary atmosphere to the room. If you need to create a stylish and beautiful coating that will be very reliable and of high quality, then we advise you to use stone tiles.
Now that we have given you all the information you need to choose a flooring, we can explain the process of laying it. It is not much different from the standard procedure, but there are some things you need to know to make a really high-quality coating that will last you a very, very long time.
Laying
It should be understood that laying decorative tiles under a stone is a rather complicated process, and since the tiles are also heavy, you have to additionally strengthen the base. As always, it is necessary to clean the surface of all contaminants and the old coating, if any. Treat the substrate with an antifungal agent, then apply a deep primer to improve adhesive adhesion and prevent moisture absorption into the substrate. But before that, if the surface is not even, you need to level it with putty or cement mixture.

Also, on a very uneven surface, drywall can be applied, on which a PVC mesh will need to be applied. PVC mesh must also be applied to any other base so that the glue can reliably hold a heavy stone. It is necessary to use a cement or polymer-based adhesive. It is applied both on the base, in a thin layer, and on the tile. Excess glue must be removed with a rag and sponge.
In general, all extra layers must be removed immediately, otherwise they will simply dry out later, and it will be very difficult to separate them from valuable tiles. Apply a thin layer of adhesive to the base, then a slightly thicker layer to the tile itself. Try to alternate the color and size of the tiles so that there are no concentrations of the coating of the same size in a certain place. You need to properly distribute them. After a day, you need to embroider the seams with sealants or putty. To make them have a certain size, use crosses.
Most often, decorative stone-like tiles decorate the entrance hall, trying to create an original finish, and the living room in separate fragments. . Elements from natural minerals expensive - this is due to the complexity of their processing, and for the production of facing surfaces imitating nature, waste from stone crushing technologies is used, which significantly reduces the cost of production.
Varieties of slab artificial stones
 Working with artificial stone is no more difficult than with ordinary ceramic tiles, and anyone who wants to master the craft of a tiler can comprehend the technology of laying a wall covering. The difference lies only in the adhesive compositions used for the installation of the cladding. The result of using decorative tiles under the stone will be an improvement in the hygienic conditions of the room, the beauty and durability of the coating.
Decorative plates p One natural stone is gaining more and more popularity for the interior decoration of apartments, and when there is a demand, there are many offers. This is expressed in various types of decorative tiles on the wall under the stone:

- Acrylic - fake diamond is not afraid of moisture and is considered one of the most resistant to impact. The maintenance of such a cladding is quite normal: wipe the fragments of the coating with a cloth soaked in water without adding any chemicals.
- Porcelain stoneware type of elements - obtained by high-temperature (over 1000 ºС) firing after pressing a dry mixture of clay and crumbs of natural rocks - granite, marble. Such an artificial stone easily withstands temperature changes and is suitable for exterior cladding of buildings. Often it is used as a floor covering.
- Agglomerate type - similar in composition to the previous type of tiles, but the components of the dry mix are fastened into a monolith not by firing, but by polymer resins or cement. The range of rocks included in the composition is expanded by the inclusion of quartzite, and pigments are added for a bright color. Such decorative stone tiles are used for interior decoration.
From the latest technological developments, a liquid type of artificial tiles is known - it is obtained from polymeric materials. Plates made according to the new scheme are resistant to external influences, are presented in a variety of shades, wash well and are versatile in creating an interior of any style. From liquid stone, which has an external resemblance to granite, facing tiles for interior decoration, bar counters, sinks and countertops are made.
Do-it-yourself installation of a stone wall
 To begin with, you should choose an artificial stone, the material of which is most suitable for the parameters of the room: in conditions of high humidity, it is better to use porcelain stoneware, for a living room - gypsum stone, and the hallway can be finished with acrylic decorative tiles. After that calculate the need for materials, including ready-made glue or dry mix for mortar preparation, as well as the number of facing artificial stones. The order of work is as follows:
- preparation of the bearing surface;
- stacking fragments;
- filling of seams and final operations.
Specialists with experience in installing decorative tiles first mentally compose a composition, where and how to rotate individual fragments of the pattern. Some use design computer programs or a sheet of graph paper with a pencil for this. In any scenario, the thickness of the seam is taken into account: it can be very small (seamless installation) or reach a width of 1 cm.
Preparing the base for decorative stone
The surface for laying is leveled, but small caverns are allowed, which will be covered with lining. The wall is selected in such a way that it has sufficient strength for holding additional load from coverage. Preparation procedure:

Wooden walls are pre-coated with a waterproofing compound, primed and attached with a paint grid, plastered over it. Upon completion of surface preparation, proceed to the next stage of work.
Fixing decorative tiles
 The elements of the rocky ledge are fixed on the surface of the partition to be finished by means of ready-made glue or a self-prepared solution. On drywall, artificial stones are attached to liquid nails. The tiles are laid in two ways - with the application of a binder composition on each individual plate or with the entire wall glued at once, and the stones are installed without spreading mortar on them. The laying rules are similar to work with tiles:
- On the surface to be decorated, markings are applied with a paint cord or pencil using a building level.
- Tiles are glued starting from the bottom row of one of the corners - some collections of decorative elements include samples with beveled edges for installation on mates or at the end of a line, with a painted end.
- Before laying the stone, inspect its back for the presence of a light foamy build-up. Remove plaque with a stiff brush.
- Tiles are moistened with water before gluing if the room temperature is high or the air is too dry. The fragment is pressed very tightly with the adhesive side and set in the required position by tapping with a mallet or rubber mallet. The squeezed out solution is removed from the front surface immediately, until it has seized.
- Distance between tiles kept constant with the help of plastic or wooden planks and crosses. If the leaving of the seams was not planned, the elements are laid end-to-end. The bookmarks are removed from the inter-tile space after the mortar has dried.
The final stage is the filling of the joints with a special composition, which can imitate the color of the masonry mortar or be in contrast to the general background of the decorative stone. To seal the gaps, use a large syringe with a needle of about 1 cm or a bag with a cut off corner of the same size. While the grout has not hardened, the jointing gives the mass embedded in the seam a flat, convex or concave shape. To make the lined wall more attractive, it is covered with a transparent varnish, which will also protect the artificial rock from contamination and accidental mechanical damage.