Insulation of the bath from the inside: thermal insulation of concrete, stone, brick structures. How and how to insulate a bath, sauna, steam room from the inside and out How to properly insulate the walls in a wooden bath
In order for the bathhouse to please with warmth, the absence of drafts and dampness, it is necessary to properly insulate the walls, floor and ceiling. You also need to know which insulation is best to use for outdoor or indoor work.
Basic requirements for the material for warming the bath.
- Moisture resistance.
- Fire resistance.
- High vapor barrier.
- Rot resistance.
- Resistant to deformation with a sharp change in temperature.
Materials that can be used for indoor and outdoor use are divided into three types.

Also, heaters can be divided by composition and content.

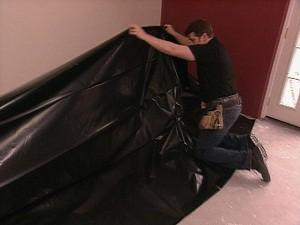
When insulating a bath, it is required to sheathe all planes of the room with insulation: floor, walls and ceiling. Only in this case there will be no heat leaks and water procedures will be as comfortable and enjoyable as possible.

Insulation of the bath must begin from the floor. As a rule, in rooms with high humidity, the arrangement of two types of floors is practiced: leaking and solid. Solid structures are supplemented with a central drain, and leaking ones are equipped with a crate, under which water flows into a drain mounted below the level of the finished floor.

The floor under the wooden crate, through which water escapes, resembles a multi-layered sandwich made of various materials. All insulation materials must be installed in series.
Step 1
To equip leaking floors with insulation, you need to dig a hole 60 cm deep. The size of the hole should match the perimeter of the washing room or steam room.
Step 2
The bottom of the pit should be flat and dry. At the bottom, you need to pour a pillow of sand and carefully tamp it down. Pillow height - 5-6 cm.
Step 3
Styrofoam slabs are laid on top of the sand. The material must be at least 20 cm wide. The joints of the plates must be carefully fitted to each other, there should be no gaps.
Step 4
A solution is poured over the plates, consisting of a mixture of cement and finely crushed foam plastic, 50-60 mm thick. The solution must dry.
Step 5
A waterproofing material is laid on top of the concrete screed; ordinary roofing material can be used. The edges of the roofing material should be overlapped on the walls.
Step 6
A cement screed is poured onto the roofing material, in which vermiculite is added 1 to 1. Screed thickness - 50 mm.
Step 7
Reinforcement. For these purposes, a reinforcing mesh is laid on the screed.
Step 8
On top of the grid, a concrete screed is again poured, into which small gravel is added, the recommended layer thickness is 50 mm.
Step 9
Installation of posts to support a wooden floor.
Step 10
Flooring with technical gaps through which water will escape.
Important: the installation of the drain pipe must be carried out before the start of insulation. The last layer of screed should be poured at a slight slope towards the drain so that water does not accumulate on the concrete floor.

Insulation of solid floors in the bathhouse is carried out in the same way as in residential buildings.
Laying insulation is best done during construction work. It is optimal to build a double floor structure: rough and finish.
The insulation that is most suitable in terms of technical characteristics and price, for example, mineral wool, is located between the finishing and rough layer of boards. It is recommended to lay a waterproofing material on top, which will prevent the insulation from getting wet.

It is important to know! In the sink, it is best to lay ceramic tiles that are resistant to high humidity.
Internal wall insulation in baths built from various materials
Brick baths are insulated during construction. You can use both bulk and material in the form of plates. Loose insulation, such as expanded clay, is covered in layers, between which lime mortar is poured. Layered pouring reduces the thermal conductivity of the walls by filling voids with mortar.

Insulation in the form of plates is attached to the walls with the help of special fittings. On top of the plates, it is recommended to additionally mount a vapor barrier that protects the insulation from moisture and high temperatures.

Panel and frame baths are insulated with lightweight materials that do not create additional load on the frame. Styrofoam, expanded polystyrene, reed or fiberboard plates are the best heaters for frame structures. The material is attached to the walls, there should be no gaps between the plates. A layer of vapor barrier is necessarily mounted on top of the insulation, which prevents the absorption of moisture by the plates.

To insulate walls and ceilings made of natural wood, glass wool mats or mineral slabs are the most successful option.
Also, plates with a one-sided layer of foil - isover, ursa - are in special demand - these materials perform two functions at once: they are a vapor barrier and a heater.

In regions with a cold climate, the use of several types of insulation materials at once is practiced, which helps to minimize heat loss.

For internal insulation of a bath from a bar, the following materials and tools are required:
- insulation in the form of plates;
- vapor barrier film or isover;
- construction tape;
- beams with a section of 50 by 50 mm for a double frame;
- lining for finishing walls;
- self-tapping screws;
- screwdriver;
- a hammer.
Step 1
Assembling a frame from timber. Mats with insulation will be attached inside the frame. The recommended batten spacing is 50 by 50 cm. The beams are screwed to the log walls and ceiling of the bath with self-tapping screws.
Step 2
Placement of insulation inside the frame. Plates should fit snugly to the beams. It is important that the thickness of the insulation is no more than 5 cm.
Step 3
All plates placed inside the frame must be fixed. For walls, construction wide adhesive tape is best suited for these purposes. All joints between the timber and the insulation are sealed with adhesive tape. To fix the plates to the ceiling, you need to purchase plastic plate-type dowels. Seams are also recommended to be sealed with tape.
Step 4
An isover or other vapor barrier with foil is mounted on top of the main insulation.
Step 5
A crate of timber is stuffed over the isover. The second crate will perform 2 functions: provide an air gap and serve as a frame for fastening the lining.
Step 6
Wagon fastening.

Video - Ways to warm the bath from the inside
It is recommended to install insulation material from the side of the street on the walls of the bath in several cases: if the air temperature in winter is constantly below 20 degrees (regions with a cold climate) or if the bath room is connected to the heating system of the house. It is also recommended to additionally insulate structures that are built of blocks or bricks.

It is considered impractical to attach insulation to the walls of a bathhouse made of logs or beams, especially in regions with a temperate and warm climate, but it is imperative to seal all the cracks and joints between wooden crowns and beams. For these purposes, felt, jute ropes, moss or special silicone sealants are used.
Bricks and blocks are affordable building materials, so they are often used to build baths.
The thermal conductivity of bricks and blocks is quite high, due to which they do not retain heat well. Accordingly, in baths built from these materials, it is recommended to carry out double insulation: outside and inside.
Step 1
Frame fastening. For the frame, you can use a wooden beam or a metal profile. The frame is attached to the anchors.
Step 2
A heater is placed between the crates of the frame: mineral wool, polystyrene foam or expanded polystyrene.

Step 3
All joints between the insulation and the frame are sealed with reinforcing tape.
Ideally, two layers of insulation are required. The second layer of material should overlap the seams of the first. Thus, heat loss is absolutely minimized and drafts in the washing room and steam room are prevented. But this method is not popular due to the additional cost of the material.
Step 4
Installation of waterproofing film. Moisture and windproof protection is attached on top of the insulation.
Step 5
Planks or special brackets are stuffed over the film. Finishing material is attached to them: siding or lining. Between the film and the finish, it is required to leave a technical gap (5-6 cm) for air circulation. The air cushion will prevent the accumulation of condensate and the appearance of mold on the inside of the finishing finishing material.

A properly insulated bath retains heat well for a long time. With proper selection and consistent fastening of all materials, there are no drafts, dampness and unpleasant odors in the rooms.
Video - Expanded polystyrene. Advantages and disadvantages.
Eh, bath-bath, how good it is, sometimes to sit in the steam room, relax, but this will not be possible if it is difficult to maintain the desired temperature in it. This happens in most cases due to poor thermal insulation or a violation of technology during its installation. How to insulate the walls of the bath from the inside, so that nothing could overshadow the joy of visiting the steam room? I am going to give the answer to this question in this article. Read, don't get distracted.
Benefits of internal insulation
Yes, yes, we will talk specifically about internal insulation, since this method has fundamental advantages over warming the bath from the outside. There are at least three such benefits that come to mind.
The first is the ability to reduce heat loss in an already built bath, but during the erection of which, mistakes were made during the insulation of the foundation. This defect cannot be corrected by insulating the building from the outside, since the heat will escape through the floor, and it can only be insulated from the inside.
The second advantage is purely economic. Thermal insulation of the bath from the inside requires much less materials than full sheathing with thermal insulation and cladding of the entire building - the area of \u200b\u200bwork is much smaller. In addition, when insulating the bath from the inside, often the main work is carried out only in the steam room, which is even smaller in size.
Of course, other rooms, such as a locker room, a shower room, also need to be insulated, but the degree of material consumption for them is several times less than for a steam room, therefore, it takes an order of magnitude less money for all this.
The third advantage comes into play only if the winters in your area are particularly severe. In this case, the bath must be insulated both outside and inside, especially if the building is built of brick or aerated concrete. Even log cabin saunas, which are known for their heat-insulating properties without special treatment, cannot do without additional internal thermal insulation in such winters.
The choice of material for insulation
At the moment, a huge number of different heaters for walls are presented on the construction market. But not all of them are suitable for a bath. Choosing thermal insulation, you need to proceed from two facts:
- Conditions in which the thermal insulation will fall;
- Characteristics of the thermal insulation material itself.
The first fact is the operating conditions. In the bath, they are more than aggressive, high humidity and temperature. Its large differences, especially in winter. From the side of the street, frost will "press" on the insulation, and on the other hand, heat. This combination will inevitably lead to condensation.
In addition, high temperatures turn many popular heaters into hazardous to human health. Also, do not forget that the bathhouse is a building with an increased risk of fire, so you do not need to insulate it with materials that burn well.

As for the characteristics of the material, they must correspond, again, to the operating conditions. To make it clearer, I will give an example of thermal insulation, which should not be used when warming a bath. This material is ecowool. Yes, it is an excellent heat insulator, but its tendency to accumulate moisture spoils everything. When ecowool is wet, it loses its properties.
What materials can not be used to insulate the bath?
In addition to ecowool, it should be taboo for you to insulate the walls of the bath from the inside using foam, other materials based on it, such as foam plastic, and also forget about using classic mineral wool as a heater. Explain why they don't work.
Styrofoam and all its derivatives at high temperatures begin to release harmful substances that can lead to suffocation, in a steam room this may not even be noticed. In addition, the foam burns perfectly, which is not good.

As a binder in classic mineral wool, formaldehyde resins are used, their vapors are harmful to humans. Yes, all manufacturers claim that these fumes do not exceed the norm. But who cares if this is the norm of poison. And besides, this norm stands out under normal conditions, and the bath does not differ as such.
What materials are suitable for insulation?
- Peat blocks;
- Sawdust;
- Foam glass;
- Acrylic-based mineral wool.
Peat blocks. This is ordinary peat mixed with natural filler such as sawdust or straw. These materials are used to make "porridge" by diluting it in water, with the help of molds and a press, blocks are produced. They do not rot, do not burn, perfectly absorb, and also give moisture back. They have good heat and sound insulation.
Sawdust is a common waste product when sawing wood. Despite its small size, it is still wood, and it has good thermal insulation. The wall in the bath is insulated with slips, filling them into niches that are previously covered with a vapor barrier and waterproofing.

Fiberboard - wood fiber boards, are nothing more than pressed wood chips. They have a rather mediocre thermal insulation, but at the same time they are inexpensive.
Foam glass. As the name suggests, foam glass is foamed glass with excellent thermal insulation properties. Does not emit harmful substances, does not burn, indifferent to moisture. In my opinion, foam glass is the best option for warming a bath, but there is a drawback, like any other good product, the price of it “bites”. But if the issue of saving is not an edge for you, then choose foam glass, you will not regret it.
Acrylic-based mineral wool. These are the same mineral wool slabs, with almost the same characteristics, but do not emit harmful substances. This is because the binder is not formaldehyde, but acrylic resin, which is absolutely inert to any chemical compounds and temperature extremes.
Insulation technology "Pie"
This technology has such a name because of the several layers that make up the wall after the completion of the insulation work. The first layer is the load-bearing wall, the second is the insulation, the third is the vapor barrier, and the fourth is the wall cladding, which is usually a wooden lining in the bath. To make it clear how to proceed with this technology, I will give an example of how a bath can be insulated with mineral wool on acrylic resin.
The technology provides for starting insulation from the ceiling and ending with the floor. "Pie" begins with the installation of wooden bars on the surface. They will serve as the basis for mounting mineral wool slabs, which, by the way, will be fastened by surprise, without the use of any additional fasteners.

In order for the insulation plates to securely fall into place, the distance between the wooden frame bars must be 1 cm less than the width of the insulation, only in this case you can be sure that the insulation will not fall out. After the frame is ready, you can start stuffing it with thermal insulation. Make sure that during installation, the edges of the mats are not crushed, as this may adversely affect its properties.
Important: When installing the insulation, all its components must fit snugly against each other. This is also necessary because if there is a gap between the plates, then moisture will accumulate in this place, and a so-called cold bridge will form, through which heat will escape.
After installing the insulation, it must be covered with a vapor barrier. In its role can be a traditional roofing material or more modern foil vapor barriers. The side that is covered with foil should “look inward to reflect the heat back. All seams and joints of the vapor barrier must be sealed with aluminum tape.

Further, after all the seams of the vapor barrier have become airtight, you can begin to make a crate, on top of the vapor barrier, on the protruding bars of the frame. During installation, keep in mind that the distance between the vapor barrier and the future lining must be at least 5 cm. This is necessary so that the condensate drains freely, otherwise it will fall on the lining, which will quickly rot because of this.
Features of steam room insulation
The main feature of steam room insulation is the concentration of insulation in this room compared to others. Since the steam room is the main room of the bath, it is necessary to create conditions here so that as much heat as possible remains in the room, and at the same time ensure good ventilation.
To insulate the steam room in good conscience, as already mentioned, you need to use high-quality thermal insulation, and follow the technology of its installation at all stages, from surface preparation and installation of the frame, to the last stage, wall cladding with wooden clapboard. Once again, I would like to emphasize the importance of good sealing of the vapor barrier joints and tight laying of the insulation.

Sometimes it is acceptable to use several layers of insulation, but even in this case, do not forget to leave an air space between the vapor barrier and the finishing wall cladding.
Floor and roof ceiling insulation
The thermal insulation of all surfaces in the bath, technologically, has a few differences. They consist of only a few nuances, and the basic rules are relevant for both walls and floors with a roof.
For example, as already mentioned, the warming of the bath starts from above, that is, from the roof and ends with the floor, there are several reasons for this. Firstly, it’s more convenient, you see, it’s easier to systematically go down than to rush from the wall to the roof, and then to the floor.
Secondly, all surfaces must have uniform thermal insulation. That is, heat-insulating materials should fit snugly against the same elements, but on a different surface, and the vapor barrier should also overlap on the next surface.

For example, the thermal insulation of the roof and ceiling should be adjacent to each other, the vapor barrier on the ceiling overlaps the walls in order to later connect it to the vapor barrier on the wall using aluminum tape.
In turn, the thermal insulation and vapor barrier of the walls are connected to the floor in the same way. Observing this technology, it turns out to achieve uniformity of thermal insulation and complete sealing of the room so that the steam does not leave the room. The latter is especially true for the steam room.
Video "We sheathe the bath from the inside"
A video explaining the stages of work using the example of a bathhouse with an already mounted frame and almost ready-made surfaces for the installation of insulation.
Thermal insulation of the bath is necessary in order to reduce the consumption of energy and firewood. In an uninsulated structure, the temperature drops quickly, and it is much more difficult to heat it up. Therefore, when planning a building, it is necessary to plan insulation at the same time. After all, the process begins even when the foundation is laid. Various impregnations for these purposes are not suitable. Especially when it comes to the interior of the building. They evaporate quickly due to high temperatures. Therefore, it is necessary to immediately select the necessary materials.
In this article we will tell you how to finish the structure from the inside, we will give explanatory photos and video instructions.
Materials used
First you need to choose the material, and not everyone will fit. After all, it must meet a number of requirements in order to be used here.
Requirements:
- non-hygroscopicity;
- environmental friendliness;
- resistance to high temperatures;
- resistance to steam and moisture;
- incombustibility;
- the ability to keep the shape.
One of the most important requirements for materials is non-toxicity. Because under the influence of temperatures, toxic materials can easily cause poisoning. Non-hygroscopicity is also important, the insulation should in no case absorb moisture.
All materials can be conditionally divided into mineral, organic and chemical.


The optimal ratio of price and quality is one of the main criteria that guides most owners when choosing materials. Fiberglass mats are one of the materials that fits all the criteria.
- First you need to install wooden blocks on the walls. The distance between them should be about 60 cm.
- On the bars you need to strengthen the mats (or other material).
- If the mats do not have a foil vapor barrier, then you need to install it on top. Of course, it is better to buy material with a ready-made vapor barrier. The foil mat should face inward.
- From above, everything is decorated with clapboard. It is nailed right over the mats.
Ceiling insulation
 Thermal insulation of the ceiling is best done with stone (basalt) wool. This material is well suited for walls. It can be used both in the dressing room and in the steam room. Additionally, you need to purchase a foil vapor barrier.
- First you need to install the crate.
- Between the rails it is necessary to strengthen the roll paper. Fastening is made with an overlap.
- A layer of basalt material is placed on the paper.
- Put foil on top.
- Next, you need to install facing rails on the crate.
- Now it remains only to strengthen the cladding on the ceiling.
After finishing work with the ceiling, you can finish the walls in the same way.
Roof insulation

If after some time condensation was found on the surface, then it is necessary to additionally carry out thermal insulation of the ceiling with expanded clay. Expanded clay - bulk material, it is placed in the attic between the boards. From above, you can cover the material with glassine.

In order to be able to walk freely in the attic, the coating must be coated with clay. You can also put a layer of boards on top. Expanded clay is a good means for thermal insulation of the roof.
Floor insulation

A lot of heat can also escape through the floor. Before you isolate the floor in the bath, you need to choose the best material. Well, the same expanded clay that was used for the roof and ceiling is suitable for this. It eliminates not only the rapid drop in temperature inside the room, but also the appearance of condensation and mold. You can also put slag instead of expanded clay. The material must be placed between the floor joists.
This method is also suitable for concrete floors. However, it is desirable to isolate the concrete itself additionally.
A concrete floor has one main advantage: it lasts 3-4 times longer than a wooden one. If the wooden one will have to be changed after 10 years, then concrete - only after 30.
Expanded clay is placed between layers of concrete.
- First, the first layer of concrete is made.
- Then you have to wait until it hardens.
- After that, a layer of expanded clay 8 cm thick is poured onto the first layer.
- Then expanded clay is poured from above with a second layer of concrete. This layer must be reinforced. To do this, you can use reinforcement or a simple chain-link mesh.
- Next, you need to carry out a cement-sand screed from above.
A concrete floor can be cold and unaesthetic. Therefore, it is better to put a tile on top of it.

Windows and doors also need to be insulated. Slots can cause the room to always see through. In order to minimize losses, it is necessary to think over the very design of windows and doors at the construction stage.
window openings

- To reduce heat leakage from windows, you can install them slightly lower.
- Another way to insulate windows is to order sealed double-glazed windows.
- If it is not possible to insert double-glazed windows, then it is necessary to monitor the tightness of the structure when inserting glasses. It is better to use a good silicone sealant for the job.
When installing windows, one should not forget that there must be air exchange in the room. Therefore, the window should always be present. This is important not only for human health, but also for materials. After all, lack of ventilation can lead to the formation of fungus.
door blocks

Entrance doors can be insulated with various materials. As for the doors of the steam room, there is one method: you need to make this opening small. If you look at the structure of most baths, you will notice that in some places the door to the steam room is very small and low.
Everything must be carried out comprehensively. You can not insulate some parts of the building, and at the same time forget about others. If the whole process is done correctly, then the room will perfectly maintain the temperature.
The steam room is isolated more carefully, usually the floor is additionally raised in it. In other parts of the building, this is not done.
Video
The method of thermal insulation is described in the following video:
The internal insulation of the bath is one of the most important stages in the arrangement of this building. Without high-quality thermal insulation, the owner will have to spend much more resources on heating the steam room, and the very situation in the bath without properly installed protection will leave much to be desired.
Since ancient times in Russia, moss, felt and even flax have been used to insulate baths, mainly due to the lack of other heaters - vegetable fiber either rots or dries, therefore today it is not used for basic thermal insulation.

Red moss - insulation
The main difference between warming a bathhouse and a similar event in an ordinary house is simple: in the steam room you need to keep the heat for as long as possible, i.e. high temperatures should remain indoors for as long as possible.

Thermal insulation work in the bath can be carried out using a wide variety of materials. For example, an ideal solution is a modern insulation based on stone wool with a foil coating - it does not burn, withstanding temperatures up to 750 degrees, effectively retains heat, does not rot, and is not of interest to rodents.
After reviewing the information below, you will get a complete theoretical understanding of the process of performing the internal insulation of a steam room, as well as study the step-by-step instructions for self-installation of heat-insulating materials.
Any construction, repair and finishing activities begin with the preparation of materials, without which the implementation of the planned work will simply be impossible. Pay due attention to studying the list below: it is better to spend a little time reading and buy everything you need right away than to return to the store and buy more of what you forgot.
insulation
The main component of the list under consideration. The modern market offers the widest range of thermal insulation materials, but not every one of them is suitable for use in a steam room - humidity and temperature can be too tough. For warming the bath, the most commonly used are: expanded clay (floor insulation), materials based on stone wool, and expanded polystyrene.
Important! It is strongly not recommended to use foam plastic for warming the steam room directly - at high temperatures, a material of dubious quality can most likely release substances harmful to human health.
Comparative characteristics of the mentioned materials are given in the following table.
Table. Comparison of popular bath heaters
| Evaluation criterion | |||
|---|---|---|---|
| Structure | Bulk material of natural origin. Presented in the form of granules with a cellular structure. | fibrous structure. The arrangement of fibers is both vertical and horizontal, disordered. | Open cell structure. |
| moisture permeability | The material does not pass water. | Mineral wool insulation has practically no tendency to absorb moisture. | Moisture permeability is extremely low. |
| The weight | Easy | Medium-light | Easy |
| Strength | High | Medium | Medium |
| Compressive strength | High | From low to medium, depending on the specific type of material and manufacturer's technologies. | Medium |
| Toxicity | The material is safe | No toxic properties | Over time, it begins to release harmful substances |
| Can be used under high load conditions | Suitable | Depending on the brand of material | not suitable |
| prone to decay | The material retains its original integrity for a long time | Durable insulation | Has a tendency to break down |
| UV resistance | Doesn't react to sunlight | Features high UV resistance | Long-term direct contact with sunlight has an extremely negative effect on the performance of the material. |
As noted, expanded clay is suitable for warming bath floors. Bulk material allows you to provide the required thermal insulation of both wooden and concrete structures. Mineral wool insulation is optimally suited for insulating both walls and ceilings. The best option, as noted, is a stone wool-based heat-insulating material equipped with an additional foil coating - the key characteristics of such heaters are at a higher level.
Mineral wool prices
mineral wool


In accordance with the current provisions of the technology for carrying out the work in question, the joints of the insulation boards must be glued with foil tape. This will create a sealed surface with the highest possible thermal insulation properties.
foil tape prices
foil tape

The elements of the heat-insulating coating are placed in the cells of a pre-mounted crate, for the assembly of which wooden bars are used. Select the cross section of the bars in accordance with the thickness of the thermal insulation. For example, if you are equipping a 10 cm thermal insulation layer, use bars with a similar thickness or width to assemble the frame.
Choose the distance between the bars 1-2 cm less than the width of the plates or the insulation roll. For bulk materials, the optimal distance between the bars is 45-60 cm.

Fixing the elements of the crate (bars) is carried out using dowels / self-tapping screws (if the surface is wooden) or anchors (if the base is stone). The length of the fasteners is also selected in accordance with the base material: for wood - 2-2.5 cm, for capital structures - from 4 cm.
The specific length of fasteners is determined in accordance with the characteristics of their use. For example, during the installation of the crate, the fasteners must be of such length that high-quality fixation of the timber / profile of the selected section is ensured. The cross section of the beam itself, as well as the profile parameters, are determined in accordance with the thickness of the heat-insulating layer to be equipped.
Additional materials
If the bath is insulated with a material other than foil mineral wool, you will additionally have to purchase a hydro-vapor barrier film.

If a concrete screed is planned to be poured, the work set will increase to include the items listed below:
- reinforcing mesh;
- mixture for pouring the screed or materials for its self-preparation (cement, sand, water);
- lighthouses;
- damper tape;
- polyethylene.
Prices for waterproofing film
hydro vapor barrier film

The floors in the bath can be wooden or concrete. The technology for arranging the directly heat-insulating layer does not have any special differences depending on the material for making the floor, except that in the case of a concrete structure, more expanded clay will have to be poured.
The thickness of the backfill is usually determined in accordance with the thickness of the walls. On average, a layer of expanded clay is poured at least 2 times thicker than the walls. If the height of the room allows, the thickness of the backfill can be further increased - this will help increase the efficiency of insulation.
Previously, for greater convenience of work and subsequently more accurate control of the evenness of the backfill, mark the base. To do this, it is enough to divide it with parallel lines into sections up to 1 m wide or along the length of the rule you use.
Important! If you are insulating the floor on the ground, at the very beginning, even before marking, you must do the following:
- carefully tamp the ground inside the base (if the foundation design assumes the presence of “free” soil, for example, in the case of strip supports);
- cover the walls with impregnation for waterproofing;
- fill the soil with a 10-centimeter layer of sand, spill it with water and carefully tamp;
- cover the sand with roofing material with a 15-centimeter overlap on the walls. Lay individual sheets of roofing material also with a 15 cm overlap. For fastening, use waterproof construction tape.
Directly the procedure for warming the floor with expanded clay with illustrations and the necessary explanations is given in the following table.
Table. Bath floor insulation with expanded clay
| Stage | Illustration | Necessary explanations |
|---|---|---|
| The film must be stretched so that its edges along the wall are above the floor level. If the base is already covered with roofing material, there is no need to lay the film. |
|
| For example, a profile for drywall is well suited. The guides are set in accordance with the previously applied markings and fixed in a suitable way, for example, screws or nails. | |
| Set the beacons according to the level. In the future, these accessories will help you fill the most even layer of expanded clay, which will ensure the best quality of further planned work. Determine the installation height of the guides in accordance with the required thickness of the heat-insulating layer. Many developers do without guides, but this is a less convenient and accurate option. |
|
| We pour expanded clay |
| The previously installed guides will help to do this as efficiently as possible. |
| For leveling, we use a rule or an ordinary rail of a suitable length. | |
| For greater convenience of leveling the insulation, we can use various auxiliary devices. For example, in large areas, a rake will come in handy. |


The floor is insulated and ready for further development in accordance with the developer's plans. At the discretion of the owner, additional heat-insulating material, for example, mineral wool or expanded polystyrene, can be laid on top of expanded clay.
As an example, a diagram of a concrete floor, equipped with expanded clay for thermal insulation, is given.

Video - Floor insulation with expanded clay
Insulation of bath walls and ceiling
Wall insulation schemes will vary somewhat depending on the material of manufacture. Information about this is presented in the following table.
Table. Wall insulation schemes
| Production material | Scheme |
|---|---|
|
|
1 - wall, 2 - thermal insulation, 3 - lathing, 4 - sheathing, 5 - ventilation gap. |
|
|
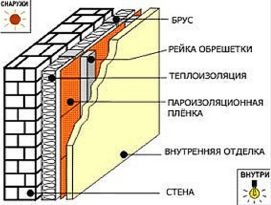


The sequence of thermal insulation work remains the same for walls made of any materials: if necessary, a hydrovapor barrier film is attached, lathing bars are mounted, insulation is placed in the formed cells, another layer of hydrovapor barrier is fixed on top (if necessary), lathing laths are nailed for finishing sheathing (at the same time they will provide the necessary ventilation gap), the selected finishing material is mounted (usually lining).
The ceiling is insulated in a similar sequence. An example of a ceiling thermal insulation scheme is shown in the following image.


Information regarding the step-by-step insulation of the walls and ceiling of the bath is given in the following table.
Important! Insulation will be carried out with a mineral wool material with a foil layer, which eliminates the need for preliminary fastening of a hydrovapor barrier material to the surface. The order of work is considered on the example of wooden surfaces. For concrete walls and floors, the recommendations are the same, the only thing is that you need to use other fasteners and for greater convenience, wooden guides can be replaced with a metal profile.
Table. The procedure for insulating walls and ceilings in the bath from the inside
| Stage of work | Illustration | Necessary explanations |
|---|---|---|
| Information regarding the elements used to arrange the frame, as well as fasteners for fixing the guides in different cases, was given earlier. The installation step of the guides is selected in accordance with the width of the insulation. As a standard, this is about 60 cm, it can be reduced to 59-59.5 cm so that the heat-insulating elements lie as tightly as possible. |
|
| Slab laying rules |
| We must first put on gloves - the contact of “bare” skin with mineral wool does not deliver the most pleasant sensations. The foil material is laid with foil inside the room - thanks to this, the heat will not only be retained, but also additionally reflected into the steam room. |
| The slabs are installed by surprise into the frame and do not require additional mechanical fastening. | |
| Installation of plates on the wall |
Installation of plates on the wall | The sequence and recommendations for wall and ceiling insulation are similar. To insulate the partition separating the steam room from the adjacent room, a layer 50 mm thick is usually sufficient. |
| The thermal insulation of the outer wall requires a thicker layer - 100-150 mm (in regions with a particularly cold climate - up to 200 mm). | |
| In order to save money, the insulation can be made two-layer, equipping one layer of ordinary mineral wool, and the second, which will “look” into the room, from a foil-coated material. | |
| The use of such a heater, as noted, eliminates the need for additional waterproofing materials. |
|
| Having filled the frame with heat-insulating plates, we glue the seams and joints with foil tape. | |
| A 1-2 cm gap is enough. The outer trim will be attached to the same crate in the future. Important! The order of further installation of the lining depends on the location of the rails: if the rails are fixed vertically, the lining must be fixed horizontally, and vice versa. |
|
| The best material for the interior lining of the bath is lining. The choice of material for the manufacture of the skin is at the discretion of the owner. The fixing of the cladding elements is traditionally performed using screws / self-tapping screws. |


Video - Insulation of walls and ceiling from the inside
Now you know everything about how to properly insulate a bath with your own hands using the most optimal heat-insulating materials for this. The information obtained will help you cope with the planned events on your own, eliminating the need to contact third-party masters and saving significantly.
Successful work!
Video - Insulation of the bath from the inside scheme
Warming the bath from the inside with your own hands is one of the most important stages in the alteration or repair of this structure. Without paying special attention to the issue of high-quality thermal insulation, the owner of the bath should be prepared for the fact that his heating costs for the same steam room will be much higher, and after a very short time he will again have to think about how to insulate the walls in the bath.
As for the environment itself: in order for it to be truly pleasant and comfortable, well-mounted thermal insulation is necessary. This is the main requirement in order to insulate the bath inside.
The thermal insulation of the bath from the inside and the outside in the old days differed from the modern one in that then the question of how to insulate the walls in the bath from the inside was solved by using such heaters as, for example, felt, linen or red moss. Yes, these are all natural materials of plant origin. However, their disadvantages are that they either rot or dry very quickly. And their use was explained only by the lack of more suitable and reliable heaters in those days. And, nevertheless, a bath and thermal insulation are inseparable concepts. That is why for lovers of a good steam bath, the eternal question was how to insulate the bath from the inside.
How does the insulation of a bath differ from a similar process, for example, in a house, and what is the best way to insulate this room? A bathhouse is a room in which a sufficiently high temperature (heat) should remain as long as possible. And this, in turn, requires better insulation from, so to speak, the outside world.

Carrying out the insulation of the bath with your own hands, it is possible to use a variety of insulation materials. The best option, for example, could be foil stone wool or extruded polystyrene foam(thermoplex). This modern thermal insulation for a bath is able to withstand a temperature of 750 degrees, that is, it is completely fireproof, perfectly stores heat, does not rot, and neither insects nor rodents are interested in this material.

In order for the bath to be truly hot, it is necessary, first of all, to correctly select the most appropriate heat-insulating materials for this. In addition, depending on what the building is built from, it may be necessary to insulate such bath walls from the inside with your own hands to a greater or lesser extent. Based on this information, it will be possible to answer the most important questions with confidence: how to insulate the walls in the bath? What wall insulation to choose? Is it better to insulate this room?
So, what is the building made of?
- brick,
- concrete,
- a rock.
Concrete or brick walls
If the basis of the bath is concrete, stone or brickwork, warming the bath will be a mandatory procedure. Moreover, the preservation of heat is not the only reason for this. The sauna interior is a humid room. And wet walls subject to large temperature changes (and in baths and saunas it is exactly like that) tend to collapse quite quickly.
The selection of the thickness of the insulating material for a bath with stone, concrete or brick walls is influenced by two main factors: the thickness of the walls themselves; climatic zone in which the bath or sauna building is located. A good specialist in this matter in most cases will recommend warming the bath with a ten-centimeter layer of insulation.
Wooden walls
How to insulate a wooden bath and is it necessary to do it at all? The question is highly controversial. On the one hand, the walls made of logs or timber are quite warm in themselves, they perfectly keep the temperature in the steam room and dressing room. On the other hand, from additional insulation, definitely, it will not get worse. On the contrary, it will give additional protection to the walls from the aggressive effects of high temperatures and moisture, which bath rooms abound in.
Usually baths made of timber or logs are recommended to be insulated only in case when the thickness of the walls does not exceed 15 centimeters. In this case, in order to insulate the bath from the inside, it is simply necessary to put an insulating layer. A log house is insulated only if the diameter of the log is less than 20 centimeters. Walls and walls, which are thicker, are either not insulated at all, or only waterproofing and lining are used as protection. The crate is performed only if there are noticeable blockages in the walls.
Vapor barrier for a bath consists in laying the appropriate material in strips.

These strips are sewn together with a stapler and overlaps of 5 centimeters are maintained.

First, the canvases located below are hemmed. Overlaps are made to prevent water and steam from getting under the material.
Attention! Since the bath is a room with an elevated temperature, it is strictly forbidden for the steam insulation for the bath to include polyethylene.
Thermal insulation materials
In order to understand how to properly insulate a bath, you must first understand the materials that are most suitable for these purposes. The optimal insulation in this case is, as mentioned above, foil stone wool. It is the best suited for these purposes in the vast majority of cases.
The thickness of this material should be within 10 centimeters. Ceiling ceilings are insulated with foil stone wool 15-20 cm thickness, since the lion's share of the heat from the steam room disappears through the ceiling and roof.
Additional requirements
Lathing. The profile frame is the most durable option for a brick or stone bath. The most commonly used ceiling-type CD profile; the perimeter of the ceiling is edging with a guide profile of the UD type; with a step of 0.6-0.8 meters, direct suspensions are attached; steps between profiles are made 1-2 centimeters less than the width of the insulation material plates.

As for wooden baths: warming the steam room of a log cabin allows you to save a little. Since the cost per linear meter of timber is an order of magnitude lower than that of profiles; at the same time, the durability of such insulation remains at the same level and is limited solely by the durability of the materials of the walls themselves.
Foil waterproofing bath. To implement this task, not only water and vapor impermeable, but also heat-resistant material is required. I am glad that the modern market is replete with materials of this kind and it will not be difficult to decide how to insulate the walls of the bath: an example of such a material is the foamed foam type Penotherm NPP LF, designed for a temperature load of up to 150 degrees Celsius. This material is not only excellent protection of walls and ceilings from moisture. It is also an excellent reflector of so-called radiant heat and, being a foam material, further reduces heat loss. As the manufacturers assure, Penotherm with a thickness of 3 millimeters is quite capable of providing thermal insulation at the same level as a bar with a thickness of 150 millimeters.
Clean finish. Any thermal insulation for saunas and baths should always be hidden with a layer of finishing material. To date, the role of such material is traditionally played by wooden lining made of aspen or linden.
These types of wood, even in very, very hot rooms, do not burn themselves. They are also resistant to decay and practically not subject to corrosion, which makes it possible to use such lining in baths and sheathe even steam rooms with it.
Weakness
When deciding how to insulate a sauna from the inside, one should also not forget about cold floors and drafts, which take away a very considerable amount of heat. How to solve these problems?
The door to the steam room, or rather, the perimeter of this door should be framed with thick felt. It will reliably clog the cracks through which such precious heat escapes.
Wooden windows of the washing department, steam room and dressing room should be insulated with cotton wool. If plastic windows are installed in these rooms, which, by the way, is not recommended, then here the problem is solved by gluing with self-adhesive foam rubber strips.
Floor
When warming a sauna or a bath, the floor requires special attention. And here the course of work depends on the type of this very floor.
The wooden leaking floor is covered with expanded clay. Carefully filled and leveled expanded clay backfill is covered with wooden flooring.

Insulation of a leaking concrete floor begins by digging a foundation pit half a meter deep. Then, from bottom to top, the following “sandwich” is applied: 5 cm layer of sand; 20 cm layer of foam; 5 cm layer of a mixture of foam chips and concrete (proportion 1: 1); waterproofing from roofing felt or polyethylene; 5 cm layer of vermiculite with concrete (proportion 1: 1); 5 cm reinforced screed.
Then the screed is poured (at the same stage, it is necessary to form a slope for unimpeded water flow. The screed is covered with wooden flooring on the logs.
The solid floor, which has a rough screed, is covered with a 10-20 cm insulating layer of mineral wool or foam. Waterproofing is laid on top of it (always with small overlaps on the walls). The next 5-10 cm layer is a reinforced screed, on which a tiled floor is most often laid.
Ceiling and walls
When the steam and thermal insulation of the bath room is performed from the inside, very interesting questions arise: in what order is the walls in the bath insulated from the inside with your own hands? Does this process have any special nuances that differ from the insulation of some other premises? To tell the truth, no, it doesn't. Thermal insulation for baths and saunas, or rather for their ceiling (ceiling) and walls, is carried out in the same manner as for any other room.

The main differences are only in the increased attention to the reliability of the vapor barrier, and in the fact that it is necessary to use non-combustible materials for a bath or sauna.
The question is also quite frequent: is it possible to insulate the bath with foam plastic? It is categorically not recommended to make foam insulation, since this material is quite afraid of high temperatures, and when melted, it also begins to release toxic substances, which is fraught with poisoning. Especially this can not be done in the immediate vicinity of the sauna stove. The use of this material is only permissible if this room is insulated with foam from the outside.
crate
Before installing the crate, all cracks (both inside and outside) are filled with mounting foam. The distance between the surface of the crate and the draft wall or ceiling should be slightly more than the thickness of the insulation. When galvanized profiles are used, this distance can be adjusted with hangers. Wooden beams through the gasket, for example, from pieces of the same beam.
Working with drywall
When we carry out the insulation of the walls of the bath from the inside with our own hands, one of the final stages of this process is the laying of the rough sheathing. An excellent material for these purposes is drywall. When working with this material, it is necessary to take into account several rules:
- The guide profile type UD is fixed along the perimeter of the ceiling or wall. The step of such fastening should not exceed 600 millimeters. Such a profile is fixed to a beam or logs with self-tapping screws, and to a concrete or brick wall - with screws and plastic dowels.
- The axes of the CD-profile are marked and then suspensions are attached along these axes at a distance of 600-800 millimeters one from one..
- Installation and fastening of CD-profiles is carried out with self-tapping screws for metal, the length of which is 9 millimeters. Then the protruding edges of the suspensions are bent.
- On the entire resulting structure, under which the insulation is located, and we fix our drywall.
As you can see, warming the bath inside and out is not a daunting process, and the thermal insulation of the sauna does not require a builder's diploma. All this is within the power of almost anyone. If you need a clear example of how and how to insulate a bath from the inside with your own hands, on the pages of our site you can find a video of a thematic focus.