How for a beginner to plaster walls with his own hands: video and recommendations for work. Plaster application technology
I hope you liked it and that you were able to take something useful for yourself. Well, kneading plaster is one thing, but it still needs to be properly applied to the wall. Here we are with you and consider in this article about the right one on the surface of a wall or ceiling.

Let me remind you that we plaster the wooden surfaces of the walls with lime-gypsum or simply lime mortar, and brick and concrete - with cement or cement-lime mortar.
Before applying the plaster on the surface to be plastered, we moisten it with a fly brush or spray gun to prevent the layers of spatter from moving off, which in no case should be smoothed. So it will better grab with the layer of soil applied to it.
splatter we make it liquid (according to the density of kefir), applying it to the surface with a trowel or a plaster ladle.
We scoop up the plaster from the bucket and throw it on the wall. We don't smear but sketch. Have you ever played table tennis? With exactly the same movements, we must apply the plaster so that it sticks. Moreover, it should not be thrown too weakly, but not too strongly. So that the plaster adheres to the surface and does not splatter to the sides. We leave the unsmoothed applied solution to dry on the wall, as it is. Spray is the first layer of plaster basting. Its thickness should not be less than 2 mm, but not more than 5 mm. The plaster mortar is applied by lightly spreading in a continuous layer, without gaps. Its function, when - filling all the roughness and irregularities, and when plastering wooden surfaces- get under the shingle and cling to it.
Priming plaster is applied by throwing it with a ladle from a bucket, or with a trowel from a falcon. The primer is the next layer of stucco basting applied to the splatter after it has lightly hardened or set. The solution should have the density of sour cream. This is the main layer of plaster. It is applied in one, two, and sometimes in several layers. It depends on the called thickness of the plaster layer. We smooth each layer, especially the last one, on which we will apply a thin layer of coating in the future.
Decorative plaster, the technology of applying it to the surface of the walls is of great interest to the owners of their homes. This is one of the most fashionable wall coverings in the renovation of premises.
If earlier plaster was finishing material, which is applied to the surface under the final coating, now it is used for finish coat. Application technique decorative plaster, video of the process, this article will show.
The composition of the material includes:
- Watery base.
- bonding polymers.
- Filler, which can be:
- sand;
- lime mixture;
- marble chips (see).
Decorative plaster perfectly levels the surface and can be applied to many building materials.
In this case, the walls can be:
- Brick.
- Plasterboard.
- Wooden and others.

A feature of the material is its high plasticity, which makes it possible to obtain various images from it. By adding small stones and shells, you can create a panoramic pattern.
Tip: Pasty or dry decorative plaster goes on sale. Specifications she has different things to keep in mind when purchasing material for wall decoration in a room.
The material, according to the type of connecting element and the composition of the filler, can be:
- Mineral plaster. Consists of lime or cement, based on water. Its price is the lowest, but there are a number of disadvantages, of which the most basic is low vibration resistance. Such material can begin to crack even with slight vibration in houses located next to the railway track, which must be taken into account.
- silicate plaster. It has a high resistance to vibrating movements, however, not the highest. In this case, the binding element is liquid potassium glass. The main advantage of the material is not a high tendency to contamination.
- . More quality coating compared to the previous two. The technology of decorative plaster is based on water dispersion acrylic resins. Such material is made internal walls rooms and facades of houses. Its main advantages:
- moisture resistance;
- heat resistance.
In addition, it is very easy to wash. This type of coating for the bathroom and kitchen is unrivaled.
- Exactly this expensive coverage. The binding element here are polymers. When applying such decorative coating with your own hands on the wall, it is easy to understand what excellent plastic properties the material has, which allows it to be applied even to a non-professional worker. In addition, the surface is perfectly washable.

Different fillers determine the type of plaster.
She may be:
- Textured (see). This is an inexpensive and fairly popular type of coverage. As a filler in it are:
- wood fibers;
- mica;
- small stones;
- crumb mineral.
With such fillers, you can get a three-dimensional pattern of the effect, and the walls, under such plaster, take on the appearance of a real work of art.
- Structural. Here, stone and mineral chips are used as a filler. Quartz elements are also used in the coating.
Tip: Before applying this coating, it is necessary to get acquainted with its structural uniformity. In this case, the wall will look like the bark of a tree.
- Venetian (see). The filler in this material is marble chips. This is very beautiful plaster decorative, the technology of its application is quite complicated. The material is used, most often, in antique or classical interiors.
- Front. It is mainly used when performing facade finishing. However, when using small granules, it can also be used indoors. Fillers in the material can be very different. Its advantages:
- moisture resistance;
- good soundproofing;
- resistance to temperature fluctuations.
- gypsum. In this case, gypsum is taken as a filler. Material advantages:
- high environmental friendliness;
- high-quality leveling properties;
- strength;
- increased plasticity.
What tools are needed for the job
The type of material, the technology for applying decorative plaster, the video on creating a unique ornament or a kind of texture shows the whole process in detail.

To apply the coating, you will need special tools:
- Steel trowel. It is a special spatula, which is mainly intended for applying the Venetian type of mixture. Coating of metal elements by special means prevents rust formation. Patterns on structural and textured views can be very different, which allows you to perform tools of different sizes.
- A plastic trowel is used to create a relief for structural compositions such as:
- "bark beetle";
- "fur coat".
- A decorative brush allows the surface to be roughened. With a brush, the surface is “combed”, leaving furrows. The result depends on the direction of movement of the tool along the wall. Movements can be:
- vertical stripes;
- arcs.
It all depends on the imagination of the owner of the premises.
- Applicator. Designed to give a comfortable texture to the tree.
- Sea sponge. With its help, paint is applied, which gives the coating an interesting effect.
- A roller with a “marbled” surface is purchased to work with a Venetian surface. Helps mimic natural stone.
- A porous roller will be needed to create a surface of an unusual texture. It is used not only for painting with decorative paints.
- Textured roller (see). Such tools are made on different dies. They are convenient to use for applying repeating patterns, as on wallpaper. When carrying out work, it is necessary to move from bottom to top, it is necessary to carry out a roller on the surface in one motion, imprinting the ornament on the wall.
- Stamp for "Safari". They can make the surface under the skin of a crocodile, using a special Safari mixture for this, which will give the surface a very expensive and respectable look.
Methods for covering decorative plaster
The technology of applying the material depends on its type, which determines the consistency of the material.
Before decorative plaster is covered, the technology takes into account such factors:
- It is not very convenient to work with a liquid mass; it cannot be further diluted with water.
- If there is a large aggregate or crumb in the material, the coating can only be applied manually.
- Compositions in which crumbs of different fractions are difficult to apply manually.
- Water-soluble materials have little toxicity, but they are more susceptible to negative environmental influences.
Several important points about applying decorative plaster:
- On the plastic oil paint, polyurethane foam material dries much longer than on concrete with pores or plaster.
- When working on OSB, chipboard, plywood, wood, the surface may be deformed from the application of a decorative coating made on a water basis.
- In case of defects on the basis of the surface, a thicker layer of material will be required, which will increase material consumption.
- When coating aqueous compounds on ferrous metals, rust spots may appear.
Tip: Almost all types of decorative plaster have the same curing period. The setting of the material occurs in about 4 hours, it will take up to 36 hours to dry, and up to 9 days for complete hardening. The first two days the surface should be protected from changes in humidity and air temperature.
How to prepare the surface
To prepare the walls of the room for decorative plaster, you must:
- Clear walls.
- Dry surfaces well.
- Remove dust.
- Fill cracks and large defects.
Tip: Walls must be primed with a special compound that creates a layer located between the base of the wall and the coating.
The primer softens the negative effects of air changes, which deform stresses and strengthen the carrier layer.
Under different types of plaster are made special types primers. crumbling, weak bases must be treated with a strengthening composition. Before applying decorative plaster, drywall should be treated with a special deep penetration primer.
In the manufacture of a primer layer, several features must be taken into account:
- It should be over 20 mm thick.
- The smoothing of the soil should be done with strong compaction so that the uniformity of the texture is not subsequently disturbed.
- The surface is kept wet for about 10 days. To do this, it is wetted with water up to three times in 24 hours.
Application technology

What is the technology for applying decorative plaster, the video will tell you in detail. Different types Coatings are made with various tools.
It can be:
- Tassels.
- Embossed roller.
- Master OK.
- Putty knife.
- Spatulas.
The most common way to level a wall with plaster is to stretch it.
Wherein:
- A trowel or steel float is used.
- The operation is performed from the bottom up.
- The grater is placed to the wall surface at an angle of 60°. The thickness of the coating layer must correspond to the fractionation of the filler.
- The final texture and pattern of the coating is formed with a plastic trowel after the mortar has adhered to the tool.
Instructions for applying decorative plaster of different types:
- A coating with a uniform rough texture, which looks like pebbles of the same size and densely packed, is formed by small movements in a circle directed in one direction.

- Coating with a "bark beetle" structure, may have grooves:
- horizontal;
- vertical;
- cross;
- circular.
It depends on the path and amplitude of the tool movement.
- Create various kinds textures helps sand and lime coating. It is done with molding tools.
How decorative plaster is performed, application technology - the video will tell you how to apply it efficiently and beautifully.
Examples of applying different textured patterns:
- Wave. For this:
- notches are made on a pre-wiped, fresh surface;
- the area is wetted with water;
- a layer of solution is applied in strips. Stripes are made straight or zigzag. By smoothing the surface with a spatula, waviness is attached.
- boulders. In this case:
- a sufficiently plastic colored solution is applied to the soil layer;
- leveled with half;
- with a hard brush, which is located at an angle of 90 ° to the wall, the surface is trimmed. The harder the brush, the more contrast the boulders will look.
- Travertine. A multi-colored solution is applied to the surface with a thin layer of throws and smoothed out with a trowel or spatula.
- Furrows. To complete this texture, you will need a semicircular malka, sharply sharpened, with teeth, their width is three centimeters, and the gaps between them are 1.5 centimeters. Further:
- applied to primed surface a small amount of moving plaster;
- smoothed out with a half;
- the rule is applied and at an angle of 45 °, furrows are formed with the sharpened part of the bevel, the shape of which depends on the configuration of the teeth.
- Fur coat. Usually created by spraying or throwing through the mesh, by shaking off the brush. Wherein:
- the grid is selected with a section of cells of about one centimeter;
- stretched on a frame, the dimensions of which are 1 × 1 meter;
- the frame leans against the ground;
- the mixture is thrown onto it with a spatula through the mesh.
The application of the solution must be carried out with equal force, which will allow the coating to be fairly uniform.
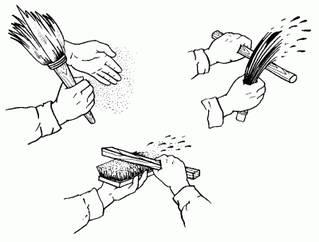
- related technology. In this case, the solution is collected with a broom, the broom hits the stick so that the plaster is sprayed on the wall.
- Flakes. Spraying is performed with a plastic and liquid mass, the texture after that resembles flakes different sizes and forms.
- Sponge. The solution has the consistency of sour cream, is applied to the primer and carefully leveled. A sponge moistened with soapy water is leaned against it at certain intervals to prevent the mixture from sticking.
- The texture of the strokes can be given to terrazite plaster. To obtain it, a fine-grained set solution is used. Material processing can be started after an interval that ranges from one to five hours. The comb forms the texture. To do this, notches are made on the surface.
- Broken stone. This texture is obtained by driving the tongue into the hardened mortar. In this case, pieces of the coating will break off, and the resulting recesses will create graininess in the coating.
The application of decorative plaster is shown in detail in the video in this article.
How to spray decorative plaster
This method allows the composition to be applied to slopes, decorative details or complex geometric surfaces. With the help of spraying, the aesthetic effect of applying artistic plasters of various fractions increases.
It could be:
- The composition is three millimeters thick, selected to cover the main surfaces.
- A layer of one millimeter is sprayed onto slopes and decorative elements.
To apply decorative plaster by this method, you need to purchase a special apparatus.
On one wall, the spraying should be carried out continuously, starting from the top and following the rule that the work is done “wet on wet”. If it is necessary to interrupt work, a masking tape is glued along the line of the end of the decorative layer. After applying the plaster, its structure is formed and only then the tape is removed.
These are the most common ways of applying decorative plasters.
Decorative plaster compositions - most popular material for unusual wall decoration. They allow you to create truly original interiors. The cost of such plasters is quite high. But we can quite save the budget for repairs if we apply them ourselves. It is not so difficult.
The main thing about decorative mixtures - what you need to know?
Decorative plaster (DSh) is a composition for finishing wall surfaces, consisting of a binder and special fillers. As the first, mineral (lime or cement) and synthetic (various resins - acrylic, polyvinyl acetate and others) components can be used. The function of fillers is usually performed by marble or granite chips, quartz, white sand, as well as combinations of these materials. LH with a mineral binder and coarse-grained additives are recommended for processing walls from the outside. But synthetic-based compositions and fine fraction fillers are more suitable for interior finishing activities.
Also in the described decorative compositions there is a pigment. It gives the mixture the desired color. The pigment is also synthetic and mineral (natural). Natural additives - indigo, ocher, cochineal, red lead, azurite, ground malachite, vivianite, charcoal and others, are prone to rapid burnout of LH. In addition, compositions with natural pigments are expensive. For this reason, plasters with synthetic coloring additives have become more widespread.
The texture of the described coating is formed using all kinds of granules, fibers, flakes, small gold balls. The most popular types of LH among home craftsmen are considered to be:
- Venetian compositions;
- flock mixes (coating with silk effect);
- bark beetle (walls after applying plaster become like tree bark);
- coatings with the texture of rain and rock;
- compositions with marble chips;
- texture compositions under the stone.
DSh is available in the form of dry mixes (they are diluted with water before use) or ready-to-use without any additional steps. The effect of using both types of plaster is the same. At the same time, ready-to-use compositions are more convenient for home craftsmen who decide to decorate the walls with their own hands.
Rules for processing walls with plaster - we are preparing thoroughly
Before using LH for its intended purpose, you need to understand the features of working with such compositions. First of all, let's find out what tools we need. Everything is simple here. We buy a scraper, a trowel, a drill with a mixing nozzle, a trowel, brushes, baths, rollers, combs, spatulas of various sizes. You may need other tools used for finishing work.
Then we proceed to prepare the walls for plastering. Their surfaces must be absolutely clean, dust-free and dry. If the walls are dotted with cracks, you will have to repair all existing defects. If necessary, we knock down the protrusions on the surface to be decorated and fill the depressions with a suitable composition. After that, we prime the cleaned base. This operation will protect the coating from moisture, deforming stresses, temperature changes, and strengthen the carrier layer.
We choose the primer taking into account what kind of decorative composition we use. Carefully read the instructions for the plaster! It indicates the recommended type of soil. A few more important points. The primer layer should have a thickness of no more than 20 mm. It should be very well compacted. If this is not done, the uniformity of the texture of the applied LH will be violated. In some cases, a layer of soil must be kept on the wall for several days, periodically spraying it with water.
If the plaster will be applied to drywall, wood, plywood sheets, wood boards(chipboard, OSB), they must be treated with deep penetration primers. Such bases are prone to deformation when decorative mixtures are applied to them. Also note that most modern LHs set within a few hours. However, they take 24-36 hours to dry. A complete hardening of the decorative composition is observed after 7-8 days.
How can a decorative composition be applied?
There are several options for processing the walls of the LH. The most popular ways of applying the composition are given below:
- spray technique;
- spraying;
- stretching (creating a relief with a trowel).
It is easiest for craftsmen to form the required spray coating. This technology is simple and clear. We take a suitable tool (for example, a brush or even an ordinary broom) in one hand. We dip it in a decorative composition. In the second hand we take a stick. We bring a broom (brush) to the treated surface. We hit the tool with a stick. As a result of the impact, splashes of the decorative mixture fly onto the wall. We get splatter and flake coverage different sizes. We are waiting for this layer to dry. Then repeat the above procedure. We impose as many layers as we need, smoothing each of them with a roller or other device.
A variation of the classic spraying technique is the so-called Italian plastering. The order of work will be similar to that described above. But when decorating in Italian, we do not need to wait for the previous layers to dry. The next portion of the solution is applied to a damp surface. Note! This method of decoration involves the application of layers different shades. That is, if we first use blue plaster, a mixture of a different color is applied on top of it. The result is original decor, capable of becoming an ornament to any home.
Spray technology – fast and effective method wall decoration with a decorative mixture. But for its implementation it is required to rent or purchase a special installation. LH is poured into such equipment, and it applies plaster to the surface.
Spraying is carried out continuously. Work always starts at the top of the wall.
The spraying technique is indispensable when we use LH of different fractions and want to achieve a unique aesthetic effect. With its help, you can finish the walls in one tone, and the slopes on the windows and other architectural details- in another. Nuance. On the main surfaces, the composition is applied with a layer of about 3 mm, on auxiliary surfaces - no more than 1 mm in thickness.
Plaster mortar is often applied by pulling. This is an easy way to decorate walls. It is performed using a steel grater or a conventional trowel. Finishing is done strictly from the bottom up. We hold the tool in relation to the surface to be treated at a 60-degree angle. After applying the composition, we form the required pattern and texture using a plastic grater.
In the next section, we will look at common techniques for decorating walls with decorative mixtures. With their help, we can easily make the interior of your home individual and very attractive.
Rocks and rain on the walls of the dwelling - we will do it ourselves
Now let's see what techniques are used to create decorative relief surfaces with the help of DS. There are many of them. A common option is the formation of a rock texture. This technique is ideal for beginners. The procedure is as follows:
- 1. We prepare the wall according to the algorithm we already know.
- 2. We process the surface with a decorative composition. We apply it with a layer of up to 3 mm using a trowel.
- 3. We distribute the LH along the wall (as evenly as possible). We create the drawing we need using the same ironing board.
The movements of the tool can be very different - horizontal, crosswise, herringbone, vertical and so on. We ourselves choose the appropriate relief and form it. In the case when the planned drawing does not work out, we quickly smooth out our art and try to create the original rock again. Note! The float should be rinsed after each treatment. a separate section. Otherwise, it will simply stick to the plaster.

It is a little more difficult to apply LSH with rain. But this technique guarantees a more spectacular picture. The technology for creating rain is as follows. We mark the walls. We draw lines on them under a certain slope. They must have the same angle of inclination. And we take the distance between them within the size of three trowels. Stick masking tape on the line. Starting to apply plaster upper corner decorated surface with inclined stripes. We fill the space limited by two masking tapes. The working tool needs to be pressed against the wall a little.

As a result, we get a decor that looks like a hedgehog. But we want rain. Everything is elementary here. We wash the tool. We apply it to the plastered surface and smooth the mixture in one direction. Then, by analogy, we cover the remaining strips with a solution. When the LH dries, we remove the remaining minor defects and irregularities from the wall with a sandpaper or abrasive mesh. At the end of the work, we admire the rain that decorated our room.
5 Other Relief Image Techniques
The application of various types of decorative plaster can be performed using other methods. Let us briefly describe the commonly encountered types of wall treatment with the compositions in question:
- 1. Boulders. To create such a picture, we need to apply a trowel to the primed surface with a trowel. And then finish it with a brush. We hold the latter with respect to the wall at an inclination of 90 °. If you want to get sharply defined boulders, take a hard brush. The soft bristle tool allows you to make more blurry drawings.
- 2. Wave. We make notches on the wall, sprinkle it with water. We apply plaster in zigzag stripes. Then we smooth the resulting waves with a spatula or a trowel. This technique is often used when using Venetian plaster.
- 3. Travertine. We collect portions of the finishing tinted mixture in a certain color on a spatula. We throw them on the wall. After that, smooth the surface.
- 4. Broken stones. We process the walls with plaster. We are waiting for it to harden. We drive the tongues into the coating, chipping off small pieces of it. We get stones with crevices.
- 5. Furrows. The technique involves the use of bevels with semicircular teeth. The distance between the latter should be 1.5 cm. Before applying the LH, we must sharpen the teeth. We apply the plaster composition to the wall. Smooth it out right away. We apply the rule to the mixture and at an angle of 45 ° the bevel (sharpened part). We create furrows. The type of the latter will depend on what kind of malka (with what shape of cloves we use).
You can try more difficult ways applying DSh. For example, hatching-bouffant.

This technique is performed only on a fresh coating, which is processed with a metal brush. After using it, we wait a day and remove poorly fixed pieces of plaster from the wall. Remove excess parts with a rag, spatula or ordinary sponge.
We apply a decorative mixture with a roller - features of the operation
Wall decoration of the LH can also be done with a paint roller. Although this tool is rarely used for decoration. It is not used when working with Venetian plaster. But for others decorative compositions(structural, textural) it is quite suitable. The algorithm for finishing with a roller is as follows:
- 1. We repair and clean the walls. We prime them twice.
- 2. We prepare the solution. Pour it into a wide container.
- 3. Dip the roller into the bath with the solution.
- 4. With sliding smooth movements, we apply the composition to the wall. Be sure to leave small indents from the ceiling, adjacent walls and floor.
The plaster is applied in strips at a time. The movement of the roller is from top to bottom. If the LH does not adhere well to the surface being trimmed, we wet painting tool water. By pressing the roller with different efforts, we obtain one or another coating structure. Its final form, in addition, depends on the speed of movement of the tool on the surface.

Choose suitable way and the technique of applying decorative compositions and feel free to get to work. You will succeed!
One of the essential steps repair work- this is applying plaster to walls (plastering). Today the Land of Soviets will tell you how to apply plaster.
There are three types of monolithic (ordinary) plaster. simple plaster has two layers (spray and primer), its thickness is 12 mm. Improved plaster has three layers (splash, primer and coating), the thickness of such plaster is 15 mm. High quality plaster has a layer of spray, several layers of soil and a layer of coating. Its thickness should not exceed 20 mm.
Before applying plaster, prepare the walls. Any old finish(tile, wallpaper, whitewash). Clean the walls of dust, dirt, etc. If there is old plaster, check its strength by tapping the areas covered with plaster. It is better to remove fragile old plaster.
Before applying plaster, the surface of the walls must prime. The strengthening primer is applied with a paint roller and brush. The roller is used to uniformly apply the primer to the wall surface, and the brush is used to hard-to-reach places. If the surface has good absorbent properties, several coats of primer should be applied.
Then breed dry plaster mixture . In residential areas, it is better to apply plaster on plaster base, and in rooms with high humidity- on cement. Gypsum mortar is not recommended to be applied to concrete walls; it is better to give preference to lime mortar.
Dry plaster is diluted in accordance with the instructions manufacturer. To dilute the plaster you need to use clean water. To mix the plaster mortar, you can use the mixer attachment for an electric drill. If the solution is too thick, add water to it. If the solution is too liquid, put a brick in it - it will absorb excess moisture.
Then you can start applying plaster. We will talk about applying improved plaster, simple and high-quality plaster are applied in a similar way, the only difference is in the number of layers. Need to apply plaster thin layers otherwise it will crack when dry. The thickness of the overall layer of plaster depends on the material of the walls: up to 5 mm for concrete, 5-10 mm for brick and at least 20 mm for wood. The smoother the surface, the smaller the layer of plaster.
The first layer of plaster is splatter. Plaster mortar for spraying should have a creamy consistency. The solution is thrown onto the wall in a continuous layer, there should be no gaps. Spraying is needed to fill the irregularities.
Priming is the main plaster. The consistency of the soil solution is thicker and resembles dough. There may be several layers of soil, depending on the desired thickness of the plaster and the degree of surface roughness. Each layer of soil (especially the last one) must be carefully leveled.
The third layer of plaster ( covering) has the same consistency as the spray. The coating is applied to wet soil - it should have time to grab, but not have time to dry. This promotes better grip. Dry soil and covering are moistened with a brush.
After applying the coating, the plaster is overwritten. Grout produced on a set, but not dried plaster. Grouting is done in a circular motion using a wooden grater. After the plaster has completely dried, it is primed, and putty is applied on top.
Plaster setting time depends on composition plaster mortar, porosity and humidity of the walls, air temperature and thickness of the plaster layer. Lime-gypsum mortar sets in 7-15 minutes, cement mortar- after 2-6 hours. Plaster should not be dried with heating: it will begin to crack and fall off. Better to just ventilate the room well.
Plaster must be applied in compliance with safety regulations. Before applying plaster, remove all nails from the surface to be plastered. If you are applying plaster over a reinforcing mesh, be sure to wear safety goggles: when applying the plaster, the mesh may vibrate, then the mortar will begin to scatter, and there is a chance that the mortar will get into your eyes.
We hope that now you will no longer have a question during the repair.

- The wallpaper is abundantly moistened with a wide paint brush and peeled off with a spatula.
- old paint removed with a scraper or burned out using blowtorch. A steel brush and abrasive paper can also be used to clean the base.
- Heavily soiled areas are washed using alkaline detergent. Then the surface is washed cold water.
- Grease stains are treated with a solvent or removed mechanically.
- metal parts remove rust and treat special formulations for corrosion protection.
- The influxes are cut down using a chisel or a double-pointed hammer.
- At the final stage, the surface is either dedusted compressed air, or processed sandpaper and then wipe with a rag.
Before you start plastering, make sure that the surface is sufficiently smooth, stable (does not crumble if scraped with a sharp object) and does not wobble anywhere. Examine the base, make sure that there are no chips or cracks on it, tap the surface with a mallet. Seal the seams so that they do not stand out, then clean up the seals, rub them finishing putty and treat with an alkaline solution.
Padding
Before plastering, the surface must be primed. The application of a primer improves the adhesion of the coating to the base, promotes uniform distribution of the solution, provides high-quality dust removal, and helps prevent the development of fungus and mold.
The primer is applied to the surface with a roller or brush in 1-2 layers. When processing intensively absorbent surfaces (foam concrete, aerated concrete, gas silicate), the number of layers should be increased.
Reinforcing mesh and shingles

Plaster mesh provides retention of the coating on the wall, increases its mechanical strength, prevents the formation of cracks. Its use is especially relevant when plastering ceilings, block and brick walls, as well as with a large thickness of the plaster layer.
With a plaster layer thickness of less than 3 cm, a mesh of synthetic or glass fibers is used, which is shot to the base using a construction stapler. If the thickness of the plaster layer exceeds 3 cm, it is recommended to install metal mesh with anti-corrosion coating, fixed to the wall with self-tapping screws.
Shingles are used for plastering wooden walls. It consists of narrow thin strips made of coniferous wood, which are stuffed onto the base crosswise at an angle of 45 degrees so that they form cells of the same size (40 * 40 cm for the ceiling and 45 * 45 cm for the walls). To increase the strength of the plaster layer, insulate and improve sound insulation, wood-fiber boards, matting, felt and other materials are placed under the shingles.
Lighthouse Alignment
Lighthouse plastering allows you to create a smooth and even surface that looks like a solid slab. As beacons, strips of hardened gypsum applied to the wall can be used, aluminum structures, thin wooden blocks and even trim drywall. The simplest and convenient option– use of metal (aluminum) beacons.
Beacon installation technology

Drill a hole in the corner of the wall, 10 cm away from the other wall and from the ceiling. Insert a self-tapping screw into the hole. Using a plumb line, draw from this point vertical line. Repeat the operation, stepping back from the first line (the distance between the lines should be 20-30 cm less than the length of the rule). Mark the entire wall in this way.
Sketch the plaster along the extreme marking line. Attach the beacon to the plaster, level it with a level, make sure it is level both vertically and horizontally. Repeat the operation by installing the last beacon on the other side.
At the top and bottom of the wall, stretch the cords between the beacons, placing them horizontally parallel to each other.
Sketch plaster at the locations of intermediate beacons. Install the beacons and align their position with the cords.
At the end of the plastering work (after the solution has completely dried), the beacons can be removed, and the remaining holes can be sealed with plaster mortar. Some masters prefer to leave beacons in the wall.
To work, you will need a falcon, a spatula or trowel, a grater, a trowel and a rule.
Choose the composition taking into account the characteristics of the surface. For curved walls with broken geometry, coarse-grained plaster is suitable, which allows you to smooth out irregularities and large defects.
On block or brick base a reinforcing mesh is pre-pasted to prevent cracking of the plaster. The thickness of the plaster must be at least 5 mm, otherwise the masonry seams will be visible through it.
flat concrete wall can be plastered in one layer using fine-grained (finish) plaster. The layer thickness is about 5 mm. For better adhesion the surface is pre-primed with concrete contact.
In order for the coating to be of high quality and durable, several rules must be observed:
- Plastering must be carried out at a temperature of +5 to +30 ºС. In the cold season this temperature regime indoors should be installed in advance (so that the base has time to warm up) and stored for 3 days after plastering. Relative air humidity should be no more than 60%. Study the information on the package of the mixture in advance - some formulations may require special conditions.
- Do the work from top to bottom. Start from the ceiling and then move on to the walls.
- Thoroughly clean and rinse tools after each work step.
- Apply the next layer of plaster only after the previous one has completely dried.
splatter

This layer of plaster ensures adhesion of the coating to the wall. To create it, a not too thick solution is used, resembling sour cream in consistency. The layer thickness is about 0.5 cm.
Scoop up the solution and place it on the center of the falcon. Do not take too much material so that it does not fall off the surface of the tool. Bring the falcon to the base, tilting it slightly towards the wall. Take a small amount of mortar with a trowel and throw it on the surface, making a sharp movement away from you.
Cover the base with mortar gradually, in strips, moving from bottom to top. Try to throw material from the same distance all the time. When finished, remove any protruding areas, if necessary. It is not necessary to level the coating.
Wait until the layer of plaster hardens. After making sure that the material does not crumble and does not burst when pressed, proceed to the next step.
Priming

This layer makes it possible to align walls with broken geometry, ensures the strength of the coating and gives it heat-shielding properties. To create it, use a thicker solution. The layer thickness should not exceed 1.5-2 cm, otherwise the material will begin to slide. If it is necessary to create a soil of great thickness, the solution should be applied in several layers.
Apply the solution to the base between the two beacons. Set the rule on the protruding parts of the lighthouses, and then move it with a sharp movement from top to bottom. Repeat the operation until flat surface located flush with the edges of the lighthouses. Do not try to eliminate small shells and small roughness - their alignment will be done in the next step.
Level each layer of soil. Particular care should be taken when leveling the top layer. Let the soil harden.
Nakryvka

The cover is upper layer plaster, which will subsequently be rubbed to create a flat and smooth surface. To create it, a liquid solution of a creamy consistency is used. The layer thickness should not exceed 2 mm.
Before preparing the solution, sift the components of the mixture through a sieve with cells no larger than 1.5 mm.
Wet the soil with water using paint brush. Apply the solution with a trowel, and then level the surface with a trowel, making circular or undulating movements.
Rubbing (grouting)

This operation is performed immediately after the end of the previous stage, when the solution can still be processed, but no longer sticks to the grater. Mashing can be done round or overclocking.
When grouting round with a grater, they make circular movements counterclockwise, firmly pressing the tool to the surface.
Razgonka grout allows you to create a more even and smooth coating. It is usually performed after grouting in a circle, pressing the grater to the surface and making straight, sharp strokes.
If some areas of the coating have already hardened and are difficult to machine, they should be moistened with water using a paint brush.
In order to make the surface even smoother, it can be finished with a grater upholstered with a soft cloth (felt or felt).