Venetian plaster application technology materials. Venetian plaster: application technology, video
Probably every owner of an apartment or house dreams of a beautiful, luxurious and cozy interior. Many also want a unique design, and some are relatively inexpensive. All these criteria are met by Venetian plaster, which is popularly called simply Venetian.
Venetian is named after the fact that it gained very wide popularity during the Renaissance in Venice, where it was widely used in the design of palaces and castles. Decorate with it both residential and public buildings. It will fit perfectly in both classic design and modern interiors.
Selection, production and application
Venetian plaster is a way of decorative design and imitation of the surface under a stone (quartz, onyx, lapis lazuli, etc.) or popular marble of different shades. Its main component is stone chips, which are mixed with acrylic. But you can also make the effect of copper, silver, gold, bronze, imitate leather, wood and fabric (silk, burlap, etc.), using various types of application techniques. It is used as an internal and external element of decor.
It is worth knowing that Venetian plaster can decorate not only walls, partitions, ceilings, giving them a textured look. Stucco flooring is extremely rare. As an element of interior decor, it can be used in the living room, kitchen, bathroom and any other room.
The choice of the future color and texture of the Venetian is the business of the owner of the house. The plaster itself is transparent, which allows it to play beautifully with shine in the sun, and the dye is already added before application. It can be applied both to concrete and brick, and to wood. Only the methods of preparing the surface on which it will be applied differ. It is also possible to apply a pattern on the plaster, which will give it a relief look and uniqueness. It can also be matte or glossy. A matte or glossy surface can be obtained by applying various types of wax.
Advantages and disadvantages of the Venetian
The advantages are obvious:
- durable
- Water and moisture resistant
- Easy care
- Environmentally friendly
- Long service life (at least 20 years)
- Doesn't get moldy
- Resistant to temperature changes

The only downside is the cost. It's not exactly a budget option. But this cannot be attributed to shortcomings, since the end result fully justifies itself. Such luxury and sophistication is not achieved by other materials. How to make Venetian plaster with your own hands from ordinary putty will be described further. To make Venetian plaster with your own hands, we need:
- very fine stone chips or marble flour (for marble walls)
- slaked lime (putty) or acrylic additives
- dyes (colours)
- pure water
The recipe is simple: you need to properly mix the composition in equal proportions of stone chips and slaked lime, then add a little soap and mix well. At the end, add dyes. It is necessary to choose the desired color of the Venetian, this stage is called tinting. Tinting Venetian plaster is an important step in the preparation. It is from the future color that the comfort of an apartment or house and the state of mind of the owner will depend. In stores you will be provided with a huge range of various colors and shades of colors. And it is important to know that when dried, the color becomes lighter by a tone, and sometimes by two tones.
It should be remembered that when preparing a Venetian, the temperature in the room should be above 10 degrees Celsius. You can also buy ready-made plaster to make your task easier. After all, it is worth remembering that in the manufacture of plaster it is necessary to clearly know the ratio of materials, and dilute the paint only in a clear and correct proportion, since the shade of the surface may differ in the future.
Do-it-yourself Venetian plaster (video)
Wax helps to color the plaster in the desired color, when using dyes. It can also be used to repaint the same surface. It also helps with restoration. The consumption of the Venetian depends on the area and the number of layers to be applied. On average, the consumption is 0.5 kg of material per 1 square meter of surface.
Required Tools
Materials and tools for the preparation and application of the Venetian:
- finished plaster
- water emulsion
- putty
- primer
- dye
- drill with mixing attachment
- trowel for Venetian
- narrow spatula
- japanese spatula
- crafts of various types for decoration
- trowel
- abrasive sponges and rags
- coarse and fine sandpaper
- mixing containers
Surface preparation and application

- We plaster or clean the walls (or ceiling) from wallpaper, paint, etc.
- In the presence of cracks, holes, potholes, it is necessary to repair them with putty
- We clean the walls of roughness and ledges
- We process the surface first with the starting putty, let it dry and then putty the finish.
- Next, we process the walls with coarse sandpaper.
- The last stage of preparation is the application of a primer to the surface. After drying (3-4 hours), the procedure must be repeated. Sometimes a third layer is applied, applied to the tone of the future Venetian.

It is important to know that working with this material is a laborious and painstaking process. The best master spends 5-6 times more time than finishing with ordinary plaster. Therefore, in order to get the hang of applying it, it is recommended that you first practice on the panels or individual sections of the walls. Basic rules and technology for applying a Venetian:
- The first layer must cover the entire surface area. The layer must be thin
- Next, the layers are applied with spatulas or a trowel in an arc to form the desired pattern (the number of layers is on average from 4 to 12, depending on the desired texture)
- Apply layers with short breaks, the plaster has had time to dry.
- Each subsequent tone should differ from the previous one in tone in order to create the necessary pattern and perspective. You can also put different (contrasting) colors. The spatula must be wiped well after each stroke.
- Next, a thin layer of wax should be applied to the walls to make it water resistant and create a matte or glossy surface. And after the wax has completely dried, the smooth surface is polished with a soft flannel
Wax dries quickly, within 30-40 minutes. But touching the surface is strictly prohibited within 6 hours after opening with wax. To avoid dents, scratches and marks on the wall. There are several techniques for applying Venetian plaster with your own hands:
- Application of classic plaster
- Applying plaster in two tones
- Applying marble plaster
A master class in a video lesson on the technique of applying marbled plaster can be viewed in the video:
Modern building materials help to create a variety of interiors, with the help of them it is easy to implement specific tasks. So, for example, the application of Venetian plaster allows you to turn an ordinary standard apartment into a luxurious palace. The technology for creating the original coating is extremely simple. You can master it yourself if you wish. There are several ways to apply a decorative coating. It makes sense to get to know each of them. Then it will be easier to choose the most suitable option and make repairs in the apartment with your own hands.
How to apply Venetian plaster
Before you start working, it is important to take into account one circumstance: different ways of applying Venetian plaster to the walls help to form a different decorative effect. The basis of the technology is the same stages of work, and only the finishing layer can be carried out taking into account existing expectations.
What is Venetian Plaster? This is a multi-layer coating that helps to mimic the surfaces created by various natural materials. You can create on the wall the effect of natural marble, the wall of a farm hut, cork wood, complex textured volume. The color of the new coating is created using a tint. The finishing layer is often additionally processed with wax or mother-of-pearl. These components help to enhance the decorative component and make the interiors exclusive.
In order for the new finish to serve for a long time, it is important to follow all the technological steps. A step-by-step instruction will help you do this, telling you how Venetian plaster is applied.
Surface preparation.
In order for the multilayer coating not to crack or crumble in the future, the walls must be carefully prepared before decorating. The order of work is as follows:
- First, carefully dismantle the old finish.
- The walls are cleaned with a spatula.
- Then plastered.
- Putty.
- Treated with sandpaper.
- They are primed.
Note! Alignment of the walls helps to save on the consumption of the finishing decorative coating.
Today, Venetian plaster is quite expensive, ignoring the need for preliminary work with the surface leads to the fact that the consumption of multi-layer plaster increases three times.
Carrying out tinting of Venetian plaster

The Venetian plaster itself is white. If it is necessary to give it color shades, color is used - special coloring additives. They are simply added to the already prepared diluted solution, after which the mixture is thoroughly mixed with a construction mixer. It will not be possible to stir the color evenly without it manually: it will be difficult to achieve a uniform color mass.
Applying Venetian plaster to walls

Any Venetian plaster helps to create or imitate a cut of natural stones or any other natural materials. To create this or that effect, a certain technique for performing the finishing layer helps.
marble effect

The marble effect is created as follows:
- Using a wide spatula and sweeping movements, the first layer is applied.
- Ten minutes later, a special trowel is taken into the hands and with the help of it the necessary relief is formed.
- Two hours later, a second layer is applied to the wall. It is made with a wide spatula. A multi-colored composition is laid out on it, stirred to a homogeneous mass. What colors to use to create a marble pattern will tell the video tutorials published in the article. A multi-colored mass is applied to the dried first layer with pulling movements. In this case, the Venetian should lie down in different directions. Five minutes after the end of the work, the applied plaster is leveled with a trowel.
- The applied layers must dry for a day, then the new coating is ground with a special grinder, and then polished with a stainless steel spatula. Applying wax on marble Venetian plaster helps to enhance the decorative effect.
The following video helps to see in more detail all the stages of creating a marble effect.
Classic Venetian effect

The effect of a classic Venetian is created a little differently. To form it, it will be necessary to apply several layers of textured putty to the wall (from three to five). In addition, each layer has its own color or shade.
Note! Since even professional decorators cannot repeat the chosen combination of colors twice, it is important to prepare all the necessary volume of Venetian plaster in advance, and dilute different colors in different containers.
The order of work is as follows:
- The first layer is applied with arbitrary strokes using a wide spatula.
- Ten minutes later, the necessary relief is formed with a trowel.
- Two hours later, the convex scallops are cut off with the same tool and the first layer is leveled.
- The second layer, like all subsequent ones, is applied using the same technology after the first layer has completely dried.
- At the very end, the surface is polished with a fur cloth. To give shine, Venetian plaster is treated with wax.
Demonstration lessons of application help to visually see how classic Venetian plaster is realized.
cork tree effect

The way to create a cork tree effect is quite difficult. But you can also master it if you wish. If it is necessary to apply Venetian plaster to the walls without a do-it-yourself master, it is important to realistically assess the howling potential. Otherwise, any alteration will be very expensive.
- The effect of creating an imitation cork tree begins with a selection of the right colors. As a rule, there are several of them: brown, coffee with milk, gold, bright burgundy. The first layer is applied with a mixture of these colors (note that they do not need to be pre-mixed for a homogeneous mass).
- The first layer of Venetian plaster is applied quite thickly.
- The secret to creating the balsa wood effect is to force-dry the Venetian. Therefore, immediately after application, we pick up a building hair dryer and dry the first thick layer of the coating with it. At the same time, the nozzle of the hair dryer is periodically brought close, then removed to a distance.
- When exposed to heat, Venetian plaster cracks. It is the cracks that help to imitate the surface of the cork pattern.
- After treatment with a hairdryer, the wall surface is left to dry. Finally, Venetian plaster will dry in two days.
- After the specified time, a second layer is applied. As it is used water-dispersion materials. They are tinted in a different color (it is better to choose bronze or gold). Apply in a thin layer.
The surface dries for a day, then it is processed by a grinder. Only after that, the finished Venetian plaster with the effect of cork wood is treated with wax (you need to apply it with a soft cloth). The following videos clearly demonstrate the above description.
Textured coating

Today, Venetian plaster allows you to apply a special textured layer to the wall surface, which also looks very decorative. But it is performed in a slightly different way than the technologies described above.
- After leveling, the walls are impregnated first with a deep penetration primer, and then, after it dries, they are treated with a covering primer. Re-treatment of the surface helps to increase the adhesive properties of the substrate. Such impregnation dries within one and a half hours, after which you can start laying the Venetian plaster solution.
- The material is applied not with a spatula, but with a roller. It allows you to form a thin layer. It dries within two hours, after which the surface is treated with a spatula. The main task is to remove the sharp protrusions of the frozen layer.
- After the first layer dries, you can arm yourself with a trowel. She and the ready-made solution form a relief that looks like a collection of small islands. The thickness of the second layer should not exceed one millimeter. The bumpy surface dries for five hours.
- We again take a spatula in our hands and clean the protruding parts.
- As a finishing layer, Venetian plaster is applied into which a special finishing varnish is mixed.
- The final stage is the implementation of ironing - processing with a special trowel. This operation helps to give the finish a metallic sheen.
And this video will allow you to see how you can create the effect of wet silk with the help of Venetian plaster
.
Conclusion
As you can see, Venetian plaster is a rather malleable material, the application technology of which is easy to master on your own. Different application methods help to solve different design problems.
Choosing a material for wall decoration is not easy. It must be beautiful, practical, durable and, preferably, inexpensive. Venetian plaster meets almost all of these requirements. It is beautiful - it looks like natural marble, it is practical - the waxed surface can be washed repeatedly, it is durable - if it is not scratched on purpose, it is not damaged, it can be applied to any surface - even, curved. Just the perfect finish. But, as usual, there is a "but". She is expensive. This is the first negative. The second is that it is difficult to apply it with your own hands. Rather, it is easy to apply, it is difficult to get a beautiful surface without experience. But you can try or hire a master. But before concluding a contract, ask for customer contacts. If you succeed, see the results of the work yourself, or call and ask about your impressions.
What is Venetian plaster and its composition
If the wall resembles a marble surface in appearance, but there are no seams on it, it is finished with Venetian plaster. This finishing material was invented centuries ago in ancient Rome. When someone came up with the idea of mixing marble dust and slaked lime. The result was an elastic composition that looked like natural marble on the walls. For a clearer pattern, natural dyes were added to the mixture.
Clay was the most popular. The walls had reddish or pinkish (depending on the color of the clay) stains, which made the decoration more similar to natural marble. To make the coating durable, the plastered surface was covered with a layer of wax, which was then polished. The walls were indistinguishable from marble. Only there were no seams.
And only centuries later, during the Renaissance, Venetian plaster appeared in Venice, where it began to be used instead of marble slabs. The technique of its application was not simple, but working with Venetian plaster is much easier than fitting and polishing marble slabs. Because this type of finish has become very popular. She trimmed walls, ceilings, columns in palaces. The finish was beautiful and durable, weakly reacting to changes in humidity and temperature, which, in the conditions of high humidity of the Venetian canals, led to the widespread use of this material. Contributed to the popularity and the fact that marble dust is easier to bring, and it costs less. The remaining components were added locally mined. The fame of the most beautiful finishing material was quickly spread by merchants, and they called it Venetian plaster. Since then, this has been the case.

The composition of Venetian plaster described above - marble dust, slaked lime and coloring additives - is still used today. Completely natural finish. But there are compositions in which synthetic dyes (acrylic) are added or modern binders are used instead of lime. There may also be rubber tree sap, crushed granite. All or some additives are contained - it depends on the manufacturer, but this material is also called Venetian plaster, since the main component - marble dust - remains the same.
Application technology
Applying Venetian plaster with your own hands is a difficult task. The problem is that this is a creative process and there are a lot of ways to apply it. From different movements, a surface of different appearance is obtained. Without experience, it is impossible to predict what you will succeed. To find out which movement will lead to which result is possible only experimentally, that is, one must try. But. Venetian plaster is not cheap at all, so the experience is expensive. Although, you need to study somehow ...

The only thing that can be advised is to plaster a piece of plywood with an area of at least 1 square, and preferably 2, sand it, cover it with a primer and try to apply Venetian plaster on this surface, honing the technique. It is not recommended to start finishing immediately. Most likely, you will have to remove everything and redo it again, which is insulting, expensive, long. If you're lucky, you can get to dealers who teach how to work with Venetian plaster. They provide material and a stand for work, show how to do it. But, this rarely happens.
Preparatory work
The base on which the Venetian plaster is applied must be perfectly even. It is pre-puttied and leveled to absolute smoothness. Use latex putty. If you apply the composition on an uneven wall, it will only emphasize the flaws and increase the consumption of the Venetian. Alignment can be done with a base layer, but such alignment will be very expensive.

A flat wall is coated with a deep penetration primer. Preferably two layers. This will ensure good adhesion of the finish, remove the dust that remains after grinding the plaster, and prevent the development of fungi. After the wall dries, work can begin.
Mixing and coloring
Sold Venetian plaster in buckets, the appearance is pasty. The basic version is white, colors are added to obtain color, for various effects there are decorative additives - mother-of-pearl, sparkles, etc. You can tint the composition in the store or on your own.
For self-tinting, you will need a drill with a mixing nozzle. In some cases, Venetian plaster is covered with a layer of water to prevent it from drying out. In this case, before using or tinting, the water is drained. Then, using a nozzle on a drill, the composition is mixed until a homogeneous state. And only after that, the dye is poured into the mass, mixed for several minutes (5-10) with a drill and a nozzle.

When mixing, be careful: near the walls of the bucket, the composition often does not stain. After removing the nozzle, take a clean wooden block of small section, run it along the walls. Most likely, there are places where the dye did not get. Run the bar several times along the walls, making sure that the walls have painted material. Re-mix the composition with a drill until a uniform color is obtained. This procedure can be repeated again - for greater certainty. There is one more nuance: some manufacturers recommend waiting 12 hours after staining.
When self-tinting, it must be remembered that in some compositions the color changes when dried (not all). Therefore, to determine the future color, it is necessary to make samples: apply a couple of strokes and wait until it dries. According to the results, either add a dye, or - an untinted composition.
Also remember that with manual tinting, the same color cannot be repeated. The new batch will be different. Therefore, the material must be painted in a larger quantity than the expected consumption: it is better to have something left than not enough.
Layer rules
Layers when applying Venetian plaster can be from two to a dozen. It all depends on the desired result. And the correspondence between the “desired result” and the actual one is a matter of experience.

You can make such beauty with your own hands ... if you practice before that
Layers are applied in different ways, but each of them is leveled and polished to smoothness, each must be allowed to dry. And only after applying and drying the latter, the surface can be covered with wax - bees or synthetic. Depending on the type of wax, either a glossy surface (beeswax) or a matte (synthetic-based) surface is obtained. The walls covered with a synthetic protective compound also become water and moisture resistant, so if you want to finish the walls in the bathroom with Venetian plaster, take synthetic wax.
Base
The first layer is the base. It is applied evenly, according to the rules for applying ordinary plaster - it must be even. It can be tinted, it can not. Depends on what kind of background you want to have - white or colored. If 2-3 layers of material are applied, it will shine through them. If there are 5 or more layers, most likely it will not be visible (again, it depends on the type of composition).

Second and subsequent
The second layer of Venetian plaster, and all subsequent ones, are applied in chaotic strokes. The composition is taken on a flexible thin metal spatula or a special Venetian trowel. The composition is applied to the edge of the spatula / trowel, applied to the wall with small strokes in different directions. At the same time, one should try not to see the trace from the first touch of the surface tool. The subsequent smear, as it were, closes, lubricates this place. Moreover, it is not necessary to achieve uniformity. The whole point is in the randomness of directions, shapes, lines, bends. Approximately the same as in natural marble.

Application of the second layer - chaotic or in one direction - depends on the desire
Venetian plaster dries 1-10 hours - depending on the composition, manufacturer, temperature and humidity. See the packaging for the exact time. After drying, the surface is rubbed with a dry trowel. At the same time, all the differences that remain after applying the layer are smoothed out. The next layer is applied to the cleaned surface, dries, smoothes. And so on until you get the desired result. And the result - usually this - darker stripes shine through thin layers in those places where, during application, the composition lay more densely. The depth and brightness with which the stripes “shine through” depends on the number of applied layers.
Finishing
The last layer of Venetian plaster must be applied with a thin metal spatula. The technique is called "on a strip" and the layer is almost transparent. They take a little composition on a spatula, apply it to the wall, firmly pressing the blade, collect the composition from the wall back. At the same time, a very thin layer of material remains on the wall. Here at this stage it is necessary to try to make the surface even. Small irregularities will be removed during grouting, but you need to try.

This is a tool for applying Venetian plaster - a special trowel
Ironing
We do not completely dry the last thin layer of Venetian plaster. After 20-50 minutes, we begin ironing the surface. Please note that some compositions must be ironed in small sections. Venetian plaster was applied to a small area (about half a square meter), rubbed off. Other manufacturers allow a longer period of time. You should definitely look at the packaging or ask the manufacturers.
The ironing process itself is a grout with a dry, clean metal surface. We take a Venetian trowel clean, without stripes, scratches or other defects and smooth the surface in a circular motion. In the process, a pattern appears, shine appears, gradually the Venetian plaster acquires “depth” and layering, which distinguishes natural marble.

When ironing Venetian plaster, care must be taken to ensure that scratches and rips do not form. To do this, there should be no grains of sand, grains of material, etc. on the trowel. It is also necessary to iron the wall with the plane of the trowel, without touching its edges. We process a small area at a time, when a drawing appears on it, we move to another area, not forgetting to pay attention to the boundaries of the two areas.
Ironing Venetian plaster may be the last step. In this state, you can leave the walls or ceiling in the rooms. For corridors, baths, kitchens, a protective wax coating is required.
Wax application
Wax is applied after the Venetian plaster is completely dry. To be sure, it is better to wait a day. Wax is applied with a wide spatula in a thin layer “on the sdir”. A thick layer begins to flake off and peel off over time, so we leave a minimum on the wall.

Approximately 30-50 minutes after application, we begin to polish the wax. For this, a fleecy nozzle on a drill or grinder is suitable. The pile of the nozzle should be short and soft, should not crumble. We set the speed to no more than 3000 rpm. At higher RPMs, the wax is rubbed off rather than polished. Polishing lasts until you get the desired degree of gloss (depending on the type of wax).

Complete drying of wax - about two weeks. Only after this time it is possible to wipe/wash/rub. When it comes to the bathroom, it's best not to use it too much (if possible).
Several application methods
Self-stuffing cones with a case of Venetian plaster is an expensive business. At the same time, it is almost impossible to understand from the description what and how to do, how to apply strokes is incomprehensible, the phrase “in a chaotic order” explains absolutely nothing, because there is still no complete chaos. There is some order or bias of application. So, to make it easier to find your own way, we will tell you at what angle to apply strokes in each layer. So there is a possibility that after a couple of tests “on plywood”, self-laid Venetian plaster will please you.

Method one: the drawing is not too bright, not very clear, smooth lines, without sharp transitions. Apply layers like this:

A good option with a good effect. Not too heavy technique gives hope that the Venetian plaster will look normal even if it was applied by a beginner without skills. But first test everything on plywood.
Method two: with a color base, multidirectional strokes in each layer. The application order is:

This method is also not bad if you can master multidirectional movements. At the same time, do not forget that the strokes should be thin. In general, we try.
Venetian plaster: video tutorials on application techniques
Among the various options for finishing materials and plastering techniques, we want to highlight Venetian plaster. Thanks to this plaster, you can create an original, beautiful and rich design of your room. No wonder the Venetian is so popular at the moment. Unlike other finishing materials, it has a lot of advantages. For example, Venetian plaster will not crack, lag behind the surface, and will not change its original color over time. If we talk about the appearance of the material, then it imitates natural stones.
It is noteworthy that Venetian plaster is used where simple materials will not work. What is the technology for applying Venetian plaster? What tools are needed for the job? How to treat the surface correctly and efficiently? The answers to these questions are revealed in this article. With step-by-step instructions, DIY Venetian Stucco will be a real goal for you.
A bit about Venetian plaster
Before you start considering the technique of applying Venetian plaster, you should pay attention to the material itself. The usual version of Venetian plaster is a finishing mortar based on slaked lime. This versatile material has been known for centuries.

Lime is very plastic and also creates a very durable layer of finish on the surface. It is noteworthy that over time, the Venetian will gain more and more strength, due to the fact that the lime carbonization process will take place in it. And if we talk about the color scheme of Venetian plaster, then different shades can be obtained by tinting the mixture. They will give the Venetian plaster the necessary color, the coating will shine, and also convey the play of shadows.

It is important to note that the current versions of the material have additives of components that make the plaster even more plastic. These are acrylic binders. By adding acrylic to the composition, the finish coating becomes stronger, and on top of that, more plastic. Thanks to this, the technology for applying Venetian plaster is improving. So, before we get to work on covering Venetian plaster, let's look at the components and materials required for the job.
Preparing the tools
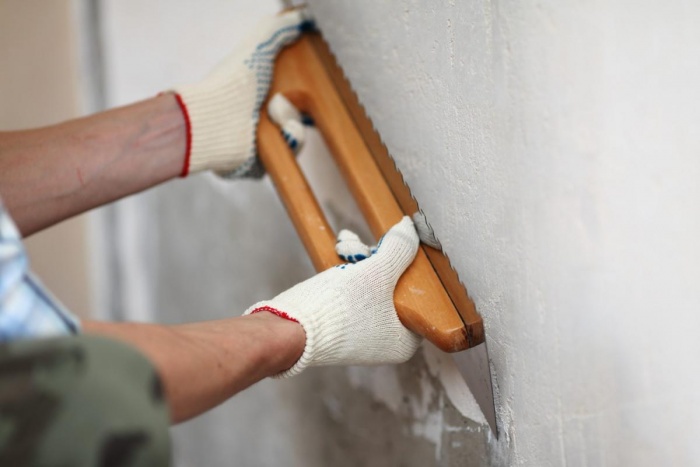
If you go to the hardware store for Venetian plaster, then be prepared for the fact that there are two types of material. One is the powder form, which you will have to knead on site yourself. The second type is a ready-made mixture, sold in buckets. Everything is already done for you, it remains only to give the mixture the desired color and apply it to the wall. What is the job to do? The technology of applying plaster is carried out manually, so the main working device, which is simply irreplaceable, is the Venetian trowel. Thanks to it, you can make high-quality strokes, correct color transitions and the necessary texture.

As you can see in the photo, the trowel is rectangular and has rounded edges. The material for manufacturing is metal, and the working surface is polished. To reduce the contact of the edges with the wall, they are slightly bent, as they can damage the surface to be treated. Thanks to this, applying Venetian plaster with your own hands is quite convenient and comfortable.
But, this is not all that is required. Prepare the following tools:
- Narrow spatula To mix plaster and draw it on a trowel.
- Sandpaper to remove all rough areas at the end of the work.
- Suede fabric or mitten (similar material is possible).

Note! Before performing work, you need to make sure that you have a grinding tool with nozzles for polishing and grinding the surface.
In the event that you purchased a powder mixture, you will additionally need:
- drill with mixer or construction mixer;
- socket for connecting an electrical appliance;
- roller or brush for primer;
- mixing tank (bucket, basin).
Do-it-yourself Venetian plaster, application technology
When the materials and tools are prepared, you can begin to work. First, let's look at the 5 steps you will need to go through to finish the walls.
- Preparatory work.
- Surface priming.
- Applying material to the wall.
- Ironing process.
- Finishing processing.

We invite you to watch the technique of applying Venetian plaster from this video in order to evaluate the amount of work, its complexity and the process itself.
As you can see from the video, the work is quite laborious, but if you have all the tools, some skills, desire and detailed instructions, then you can do all the work yourself.
Stage 1: preparatory work
According to the technology of applying plaster, it is required to carefully prepare the base surface. You can apply the material on any wall, but there is one condition - the surface must be perfectly flat. This can be done by applying a rough layer of ordinary putty. After that, the surface is cleaned and processed with a grater and sandpaper.

The whole process is quite lengthy, especially when it comes to curved walls with cracks. It takes time and effort to process them. It is much easier to work with drywall surfaces, as their preparation is much easier. The drywall is already smooth, it remains only to seal the joints, screws and apply one layer of putty.

The result is a perfectly flat surface, ready for covering with Venetian plaster.
Advice! As a basis for the Venetian, it is recommended to use latex putty. It is the most plastic, and is able to provide the best adhesion both to the wall surface and to the Venetian.
Stage 2: priming the surface
After the walls are ready, they need to be further treated with a primer. This way you can ensure the best adhesion to the surface. You will have to work with a roller with a bath or a brush. The first option is more efficient and faster. The task is to cover all the walls with the mixture, preferably in 2 layers. It is important that no untreated areas remain.

The first layer is the main one. After it dries, you can apply a second one. In this case, the primer must be tinted in a color that can be combined with the color of the Venetian.
Stage 3: Applying the material to the wall
Depending on the type of Venetian plaster, it needs to be prepared. If it is a powder, then by mixing with water and kneading, based on the instructions on the package. And when it is a ready-made mixture, then you need to add a dye to it. An important point: since you will have to mix the mixture more than once, you may not guess with a shade. Differences will be visible only after drying. That's why you need to mix as much Venetian plaster as you need to completely cover the surface.

The person applying the material must do so with confidence. The work is done in several layers. The first is done with a trowel so that some free areas remain. Then you need to apply a second and third layer. In this case, the tool must change the direction of movement. The final layer is made with a spatula, based on the technology "for cider". So you can provide a certain texture and internal volume. Optional: Venetian plaster application technology video:
Stage 4: ironing process
After the material dries, you will see some irregularities. They need to be removed with a trowel. After that, the ironing process is performed, in which it is necessary to forcefully draw a metal trowel over the surface. The trowel should have rounded edges. Then the surface will become glossy.

Stage 5: Finishing
To obtain the desired gloss and volume, the surface must be treated with a special wax. And you can also use a special transparent varnish or paint, which will emphasize the texture of the Venetian. As soon as the wax hardens, the surface must be polished with a polishing machine or a drill with a special nozzle.
Conclusion
After all the processing steps, you can get your result. If everything is done correctly, the surface will look exactly the same as in the photo below. You will get a perfect finish that will last a long time and please your eye.

The ancient technique of wall decoration is also popular in modern design. Exquisite do-it-yourself Venetian plaster is performed by the same methods as hundreds of years ago, only materials have become different. This does not make the decorative coating worse, but the work previously available only to professionals can be done by an amateur plasterer. The final result will depend only on his artistic taste and the accuracy of each stage of the work.
The birthplace of technology is medieval Venice. During the extraction and processing of marble for wall decoration, a lot of waste remained. Fine fractions, crumbs and dust from polishing were used as a filler for lime adhesive mortar in much the same way that sand is used for cement plaster in modern construction. In the Middle Ages, such a composition was used to create the basis for frescoes.
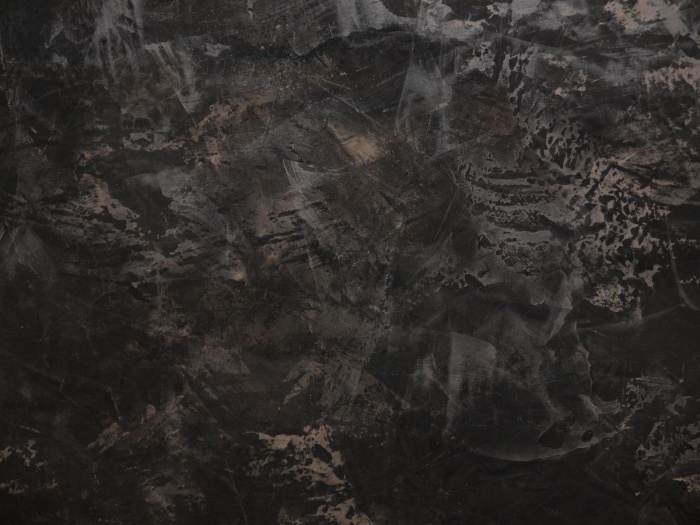
The technology is characterized by a unique pattern. It imitates a marble surface and is formed as a result of simple movements with a spatula. The brilliance characteristic of a polished stone is achieved with the help of a special wax, which gives the coating completeness and protects it from moisture.
In the modern world, the composition of Venetian plaster includes the same marble dust that was used by medieval plasterers. And lime, gypsum, modern polymers or acrylic can be used as a binder. In any case, the material remains a beautiful and environmentally friendly coating, suitable for different rooms and almost any surface. The ease of applying the mixture allows you to decorate the ceiling, columns, walls with arched and other complex openings and niches.
The only requirement that applies to the preparation of surfaces for the application of Venetian plaster is their perfect smoothness. The coating is applied in a very thin layer, so even small defects will be noticeable. Before making Venetian plaster, the walls must be plastered and puttied with finishing gypsum compounds such as rotband or ceresite.
Preparation for work
Cover the leveled wall with a primer liquid. For Venetian plaster, you can use Kwarc primer and similar special compounds. If it is not possible to find a primer, then white acrylic paint can be diluted with water (1: 1). Using a roller, apply primer to the surface, dry it in accordance with the instructions, then repeat the treatment.
Prepare the following tools and materials:
- construction metal spatula;
- Japanese spatula, or trowel;
- sandpaper with very fine grain;
- clean soft cloth;
- Venetian plaster (dry or ready mix);
- color (special or for acrylic paints);
- wax for finishing.
When choosing spatulas and trowels, it is important to pay attention to their working surface. It must be completely smooth, even small burrs on the edges that will come into contact with a thin layer of plaster are unacceptable. The result of the work depends on the state of the tool.
When choosing, you need to give preference to such spatulas that have rounded corners. If there is nowhere to buy a quality tool, then you can process the corners of an ordinary steel spatula with a large sandpaper, and then sand the edges with fine sandpaper.
Application technology in different versions
For an amateur plasterer, 3 varieties of how to make Venetian plaster with your own hands are available. For the classic version, or "Venetto Classic", you will need to tint the composition in only one color. If the mixture is purchased in ready-made liquid form, then this can be done directly at the trade organization using the available samples and computer selection of the desired shade.
When preparing plaster from a dry mix at home, you need to pour water into the container in the proportion indicated in the instructions on the package, and then pour the powder into it. Stir, let stand for 5 minutes. After that, a secondary mixing of the finished solution is carried out, to which color is added. When painting plaster, it must be borne in mind that its color in dry form will be much lighter.
Apply the first layer of plaster on the prepared wall:
- Take a little mixture with a spatula and put it on the edge of the trowel in an even strip.
- Holding the tool at a slight angle to the plane of the wall, make an arcuate movement with the hand, rubbing the plaster into the surface with constant pressure. Repeat the same movements, filling the entire surface.
When applying the first layer, you can combine short and long strokes, make wavy lines in different directions. The edges of each next stroke should slightly overlap the previous one. This will give the surface a greater resemblance to polished stone. When the entire wall has been treated, it should be allowed to dry for several hours.
Apply another layer on the dried layer, performing the same movements, trying to cover the seams on the previous coating with a stroke. After the finish is completed, dry the plaster again. The time for drying each layer is usually indicated on the packaging of the composition, but not less than 2-3 hours. Wipe the dried wall with a fine emery cloth, removing too pronounced irregularities.
The glazing layer is applied a little differently:
- Pick up plaster on a spatula.
- Holding the tool almost perpendicular to the wall, make a smear with strong pressure, leaving a very thin layer of mortar.
- Draw a spatula over the finished smear with the same effort, removing all irregularities.
The movements at this stage can be more sweeping than when applying the main layers of plaster. Glazing is done in small areas, approximately 0.5 m² each. After finishing each section, smooth the wet layer of plaster with a spatula. Its edge must be very clean, so it must be constantly wiped with a damp cloth. When the polishing of the wall is completed, the dried surface can be rubbed with fine sandpaper if any defects remain.
Clean the surface from dust. Wax for the Venetian should be applied to the wall with the same movements as when glazed: rub in, then remove the excess. Perform in small sections that can be waxed in 20-30 minutes. By the time wax is applied to the next area, the previous one has already had time to dry. You need to go over it with a spatula again, finally leveling the layer. After the entire wall is finished, it should be polished with a soft, lint-free cloth.
Polishing is carried out in circular motions with a small radius. Without tearing off the rags from the wall, you need to gradually bring its plane to a shine. During this procedure, the Venetian reveals all the beauty of the color transitions caused by the application of plaster strokes at different times.
Colored Venetian plaster

When performing decorative finishing, you can use different shades and colors of the plaster mix. Tinting is done according to the same principle as for the classic version. If you make a solution in 2 shades of the same color (lighter and darker), then you can finish in the style of Trevignano. Having tinted part of the composition in one color, part in another (usually dark brown, almost black) and leaving another part white, the home master will be able to finish the wall under the Byzantine stone with his own hands. This style is called marmorino.
Master classes with a description of the process will help to master these styles of Venetian plaster. So, for the Trevignano variant, you will need a solution painted in a light and dark shade of the same color. The stages of work are as follows:
- The application of the base with a light plaster mixture is carried out in the same way as for the classical style. Dry the layer for about 3 hours.
- Take a little dark solution on a spatula and randomly apply chaotic spots and stains. This layer should not be continuous, and the master determines the size of the spots and their number, focusing on his taste. The drying time of the layer is 2-3 hours.
- Take a light solution on a spatula and cover the wall with arcuate movements. The layer should only fill the depressions between the dark areas, so when applying the plaster, you need to press hard on the tool, rubbing the mixture into the coating. Perform in small areas, immediately after application, remove excess mortar with a strong pressure of the spatula.
- Venetian plaster should be allowed to dry for 24 hours, if necessary, treated with fine sandpaper. Remove dust and apply a layer of wax.
Due to the use of different shades, Trevignano plaster looks more voluminous than a single-color version. But in general, technologies repeat each other. Having mastered a simpler classic version, you can easily perform two-color plaster.
How to imitate marble with plaster

Marmorino style is not much more complicated than the 2 technologies proposed above. Doing it will be especially easy for those who imagine what a polished marble slab looks like. The drawing on it is formed by long layers of limestone of different shades.
You need to tint the solution in the color that the master himself wants, because marble comes with gray, brownish, pink and even green veins. This part of the plaster should be painted darker than the desired overall color of the wall. Among the layers that form the color of marble, inclusions of black or dark gray, dark brown and other colors often come across. Very little solution is tinted into black or other dark color, since the number of veins is usually small.
The work will be creative, because the master actually draws Venetian marble. The mortar is usually applied diagonally to the wall or at a slight angle, but always obliquely. You need to follow these steps:
- Pick up a white and colored solution on the edge of a wide spatula or trowel. To get a marble pattern, do not make even layers of these colors.
- Apply the plaster to the wall with a continuous long line. White and colored compositions are mixed in a unique pattern and create many shades of color. Gradually cover the entire surface with approximately parallel strokes. Dry for about 3 hours.
- The second layer practically repeats the previous one: you need to pick up a white and colored solution on a spatula in an arbitrary ratio. Add some black makeup. Drops of the black mixture will smear into fine lines and individual dots, creating dark areas. Draw lines with smooth, slow movements, slightly shaking the tool. You can add dark or light accents to the resulting pattern at any time.
- After drying, the surface must be treated with a fine sandpaper, overwriting all the irregularities. Shake off the dust and cover the wall with wax according to general principles.
When brushing the second layer, you can bend the line a little, make a fork that looks like a tree branch. The process is artistic, but after training on a piece of drywall, the master can fully master the material and understand how the composition behaves under the spatula at the time of application to the wall.
Despite the complexity, the results with a properly executed Venetian finish are always pleasing. When applying Venetian plaster, one should not forget that this work is largely creative and, most importantly, avoid the geometric correctness of strokes. All joints and transitions of color shades should not be strict, therefore, when applying layers, both the randomness of strokes and the unevenness of their thickness are welcome.