Insulating the balcony with insulation. Proper insulation of balconies and loggias from the inside
A loggia is a part of the apartment that requires high-quality insulation. If you leave it in its original state, then in winter the cold will penetrate into the rest of the rooms, and this will mean extra money spent on heating. Owners who do not know how or how to insulate a balcony on their own invite workers, whose services cost a lot of money. And it’s good if the hired craftsmen turn out to be professionals, because contractors with a lack of qualifications often come to the call.
Show all

 If we take professionals as an example, they first visually assess the condition of the balcony and take into account what year it was built apartment house. Then they pay attention to the frame (whether it is metal or wood) and evaluate the dilapidation of the cladding. Lastly, experienced workers compare neighboring loggias and can suggest that the owner make a structure in the same style.
Because of the old-style balconies, all work becomes more complicated, especially if this building is not closed, but open type. In this case, the craftsmen are engaged in additional strengthening of the structure and replacement of rotten parts: they cut off the rusted metal elements of the frame and reconstruct the concrete platform. Upper and Bottom part The balcony must be strengthened.
how to insulate a balcony with your own hands
It is after the measures to restore the structure that specialists are engaged in cladding and internal thermal insulation premises. Often, owners prefer to equip their balconies with foam blocks and double-glazed windows. The stones are laid out at half the total height of the loggia, and the open space is covered with windows. As a result, not only an attractive appearance building, but its strength also increases significantly. By the way, a double-glazed window will significantly insulate the room.
If the owner of an apartment replaces the windows with plastic ones, then it is advisable for him to purchase products with double glass, since single glass retains heat by only 30% in the cold season.


Without preparing the balcony you cannot take the next drastic steps. Before purchasing materials for insulating a loggia, specialists carry out the following work indoors:

The interior arrangement of the loggia concerns not only the ceiling and walls. It is equally important to insulate the floor, for example, with penofol.


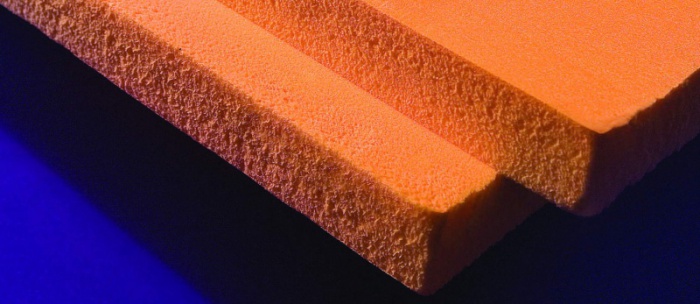
 Expanded polystyrene is widely used for internal insulation of almost all structures. His low cost does not affect the quality. It is sold in the form of slabs 5 cm thick or more. If the apartment is located in the north, then it is better to use sheets 15 cm thick. To install polystyrene foam, a sheathing with identical cells is made. Expanded polystyrene is convenient in that it can be easily cut with an ordinary knife.
The positive aspects of this insulation are that it has no odor and does not emit harmful substances, environmentally friendly and does not affect human health. Sheets are usually fixed with special “umbrellas” or construction glue. To save money, it is better to insulate the balcony inside with it.
Mineral wool is also quite popular. Such insulation is slightly more expensive than polystyrene foam, but this is due to the additional sound insulation that the material has. Therefore, by using mineral wool, you can not only efficiently insulate the structure, but also eliminate street noise. It is sold in the form of yellow rolls.
Insulation of the loggia Secrets of craftsmanship from Alexey Zemskov

 The fire safety of this insulation is at a high level, and the absence of a specific odor makes mineral wool one of the most popular. The material begins to melt at a temperature of 1000 degrees. It is also necessary to make a sheathing for such rolls. Another plus is that it is easy to cut. The disadvantage is due to the composition, which includes powdered glass, which penetrates into the skin during operation and causes itching and redness.
Penoplex is a new insulation that has appeared on the market building materials relatively recently and has already become popular. It is lightweight, making it easy to work with. Penoplex is produced in the form of rectangular sheets, which can be cut even with a stationery knife. According to the method of fastening, it is similar to foam plastic, which is glued or fixed with fasteners. The surface of the material is rough, so it does not slip in your hands.


 Granulated expanded clay is often laid on the floor. This kind of insulation for a balcony inside has a porous structure and consists of baked clay, so it is environmentally friendly. Builders use it to insulate floors and ceilings.
The work process is simple, just create a layer of expanded clay and pour liquid cement so that the granules are held together. But we must take into account that such material will take away 15-20 cm of height from floor to ceiling. In addition, you will have to pour a thin-layer screed on top of the expanded clay, because relief surface will not be suitable for laying, for example, parquet or laminate.
Another insulation option - penofol. It is made from foamed polyethylene. The material is especially suitable for water-heated floors, as it has a foil coating with a heat-reflecting effect. This insulation has 4 advantages: it does not allow wind to pass through, retains heat, prevents the penetration of water and has vapor barrier properties. Penofol is flexible and easy to cut, and environmentally friendly substances do not harm human health. The insulation is produced in the form of rolls, therefore, it is convenient to work with it. The installation process takes no more than 1 hour.
Insulation of balconies and loggias: eight mistakes of finishers
As previously mentioned, polystyrene foam is cheap, but nevertheless it is practical, and many builders use it. What is the best way to insulate a balcony from the inside with polystyrene foam:

Wall thickness from edge interior decoration to the outside, taking into account the foam block, should be 30 cm. This is enough to retain heat and prevent cold from penetrating into the room.
Pouring concrete, expanded clay layer and similar methods cost a lot of money. You can do similar insulation, but at the same time save money. An option for cheap wood and foam finishing could be like this:

How to insulate a balcony? Choice of insulation.
Specialists always start finishing the walls and ceiling, and finish with the floor. If you do everything the other way around, the base will be damaged and the front surface will be scratched.
It is very difficult to calculate the total amount as there are many factors that influence it. Firstly, you must first decide whether the loggia will be a living room. If yes, then you will have to spend money on double-glazed windows. Secondly, prices for insulation change almost every day. Thirdly, you need to decide what kind of furniture the room will be furnished with. Therefore, you should not allocate a strictly fixed amount for such an event; it is better to prepare additional funds just in case in case unforeseen expenses arise.
It is also recommended to prepare an estimate in advance and find a cheaper source of sales for the material, for example, not through intermediaries, but directly buy building materials at the base. If you turn to specialists for help, they will take into account the following points:

You may also have to spend money on furniture and other interior items.
Arranging a loggia with the help of specialists will cost a large amount, which will significantly hit your wallet. But if you insulate the balcony inside with your own hands, the final cost will be approximately 10 thousand rubles.
The value of additional square meters in a city apartment is difficult to overestimate. The loggia can be a cold island for storing things or warm room for life. But, in order for it to be fully used, care must be taken to ensure an acceptable temperature in this room.
It has become the main task for those who want to expand the usable area of the apartment.
The degree of insulation depends on the purpose of the room, as a living room or storage space.
And if the question of whether it is necessary to insulate the loggia has long been resolved, then there is still no consensus on the place of insulation.
Three directions for insulating a loggia
- insulation of the loggia from the outside– the preferred option. In this case, the freezing point shifts to outer side, i.e. towards the insulation installed outside the loggia. This will not only insulate the surface of the wall, but also preserve the load-bearing properties of the material from which it is built. In addition, it saves inner space loggias.
The only drawback of insulation from the street is the cost of high-altitude work (industrial mountaineering). For external insulation, rigid thermal insulation material (expanded polystyrene, polystyrene) is used, which is covered with a polymer mesh and protected with strong cement mortar and/or decorative plaster;
Note. In some cases, the decision on whether it is possible to insulate a loggia from the outside is determined by the City Council. For example, if the house is of architectural value, carry out external works, changing the appearance of the building is prohibited.
- double-sided insulation and finishing of the loggia. Involves installation of thermal insulation material outside and inside the loggia. Such a solution is inappropriate in principle, because From the point of view of thermal efficiency, it does not matter which side the work is carried out on.
- insulation of the loggia from the inside. Internal insulation the most popular option, because There is an opportunity to do the work yourself. However, in this case, the usable space of the loggia is reduced. Nevertheless, we will dwell on this option in more detail.
Do-it-yourself insulation of loggias - step-by-step instructions with photos
Simple technology for beginners without construction experience.
Step 1 – Determining the need for insulation
Depending on the future purpose of the room, a decision is made on whether it is necessary to insulate the loggia from the inside or outside, what type of insulation and what thickness will be used.
By definition, a loggia is a room in a building with one open side. This specificity allows owners to carry out insulation with lower financial costs compared to insulating a balcony.
The fact is that only one side will need to be insulated - the parapet of the loggia. As for the other sides, if they border the heated rooms of the apartment, there is no need to perform insulation.
Step 2 – Degree of insulation of the loggia
It is a mistake to think that glazing a loggia with double-glazed windows is sufficient. reliable way save heat in the room. In order to ensure the desired temperature in the room with minimal costs, you need to take care of the thermal insulation of all surfaces: walls, floors, ceilings. It is better to do the work simultaneously, but you can also do it in parts, the main thing is to follow the order.
Step 3 – Selecting insulation for the loggia
At first glance, the selection is not difficult. However, the variety of thermal insulation materials makes you wonder what is the best way to insulate a loggia from the inside.
- penofol(40-50 rub./sq.m.). Belongs to the group of semi-rigid insulation materials. It is distinguished by the presence of two layers: foamed polyethylene and foil, which will serve as a reflector (reflects up to 97% of thermal energy). Insulating a loggia with penofol is more justified than insulating a balcony with it, but despite this, the use of penofol alone is quite rare;
- Styrofoam(2560-3200 rub./cub.). Optimal price/quality ratio. Has excellent thermal insulation properties, non-hygroscopic, does not require the use of films, and is easy to install. Foam plastic with different densities(15, 25, 35 kg/m3) and different thicknesses sheet – 20-100 mm, which makes it possible to vary the thickness;
- expanded polystyrene(extruded foam plastic or penoplex) (3500-5000 rub./cube). Newer generation of foam plastics. While maintaining the advantages of polystyrene foam, it is distinguished by high density(40, 100, 150 kg/m3) and a tongue-and-groove fastening system, which makes it possible to avoid cold bridges. Insulating a loggia with penoplex is one of the most effective methods of thermal insulation, but widespread use limits its cost;
Note. Insulating a loggia with polystyrene foam is advisable if you need to minimize space loss during the thermal insulation process.
- cotton wool. Representative of soft insulation materials. Mineral (400-500 RUR/pack = 5.76 sq.m.) or basalt wool(650-720 rub./pack = 5.76 sq. m.) are good because they make it possible to insulate a surface with unevenness or cracks. The line of insulation of this type includes materials with different densities and prices. However, the general disadvantage of mineral wool is its susceptibility to moisture. This requires the use of waterproofing films;
- polyurethane foam. Thermal insulation material that is sprayed onto the surface under pressure, allowing you to fill the smallest cracks. Work on insulating a loggia is carried out quickly, but is expensive;
- expanded clay. Bulk insulation. It has significant weight and can only be used for floor insulation;
- aerated concrete. Allows you to level the walls and insulate them, but the usable area is reduced.
With the exception of expanded clay and aerated concrete, each of the insulation materials can be used to insulate a loggia.
Factors influencing the choice of insulation:
- technical condition of surfaces to be insulated: their configurations, the height of the floor/ceiling, the condition of the ceiling;
- number of surfaces to be insulated. Often the wall adjacent to the room is not insulated;
- climate. In regions with high humidity, it is undesirable to use soft insulation;
- environmental friendliness. Polystyrene foam is considered the least environmentally friendly material, basalt wool - the most;
- ease of installation. Rigid insulation is easier to install. When using them, you can do without forming a lath for laying soft wool. There is also no need to use films. Best qualities from the point of view of installation, polystyrene foam has, thanks to the tongue-and-groove system;
- type of finishing coating;
- cost of the project: insulation of the loggia on a turnkey basis or with your own hands.
Step 4 – Preparing materials and tools
For the work you need to prepare: thermal insulation material, polyurethane foam, primer, wooden beams (50x50, for the floor) and slats (50x30, for installing lathing under soft insulation), vapor and waterproofing film (for soft insulation), hardware, metallized tape, Decoration Materials.
Tools: hammer drill, drill, level, hammer, tape measure, foam gun, vacuum cleaner, stapler, pliers, pencil.
Note. Wooden beam can be replaced with a profile for plasterboard. The dimensions of the timber are determined by the thickness of the insulation.
Step 5 – Glazing the loggia
Glazing and insulation of loggias are two interdependent actions. Installing plastic windows you need to give preference to a 4-chamber profile and a 2-chamber double-glazed window. During installation, you need to ensure the tight fit of all structures. It is obligatory to install a low tide outside to prevent water from flowing in. A window sill is installed inside, taking into account the thickness of the insulation.
Installing PVC windows makes it possible to increase the temperature on the loggia by 2-3 degrees compared to the temperature outside the window.
If it is not possible to replace old windows, they can be sealed. It is better to insulate loggia windows using Swedish technology. It makes it possible to increase the thermal insulation properties of windows without changing their functional characteristics.
Step 6 – Surface Preparation
Whatever type of insulation is carried out on the loggia, due to its small area, it must be freed from everything extraneous. It is for this reason that it is advisable to insulate the entire loggia at the same time.
Then the actions necessary for further work are performed:
- removing protruding parts that can be dismantled;
- punching and drilling walls. If necessary, electrify the loggia;
- processing of elements that cannot be dismantled. The metal is cleaned and coated with a primer;
- primer treatment of all surfaces of the loggia. This will prevent the development of fungus;
- cleaning.
Step 7 – Insulating the floor on the loggia
It is advisable to start insulation work from the floor.
Regardless of the material, it is carried out using logs. An exception is when laying insulation followed by screeding under tiles or when installing a heated floor system. The work is carried out in several stages:
- installation of penofol. This is not necessary, but experts advise laying penofol with the reflective side up. Due to the reflective ability of penofol, almost all the heat that comes from the wall adjacent to the room or from a heating source remains in the room;
- installation of logs. Before installation, the timber must be cut to size and treated with a primer. The longitudinal beam is laid at a distance of 50-70 mm from the walls, and the transverse beam with a pitch equal to the width of the insulation (for foam plastic 500 mm, for wool and expanded clay - 600 mm). The beams are attached to the floor with dowels. When installing the joists, make sure they are fastened correctly; in the future, they will serve as a guide for arranging the floor and installing the finished floor covering.
Note. Installing joists close to the wall increases the risk of wood deformation if it gets wet.
- installation of insulation. Rigid insulation is placed between the joists. When insulating a loggia with foam plastic or polystyrene, it is not recommended to use thick material. Craftsmen advise purchasing thinner sheets and laying them offset. This minimizes the surface of cold bridges. Cotton wool is also placed between the joists so that the material is laid freely, without knocking down. A vapor barrier film is placed on top of the wool to prevent it from getting wet.
- seam sealing. If rigid insulation is laid with gaps, they need to be blown in with polyurethane foam, which is a good insulator.
- arrangement of the subfloor. It is not recommended to lay laminate or linoleum until the work is completed. If the floor is finished with tiles, it is installed immediately and protected (covered) with cardboard.
Note. Using a heated floor system will ensure heating of the loggia, because it is prohibited to remove central heating radiators, and the use of a heater does not provide a long-term effect.


Step 8 – Insulating the ceiling on the loggia
This stage can be eliminated if the floor of the neighbors above is insulated. If not, then the most simple solution The loggia will be insulated with polyurethane foam. It adheres well to any surface, and the work can be completed in a day.
Often, the insulation of the ceiling on a loggia is done with rigid insulation, or less often with cotton wool. The order of work may vary.
Option 1 - frame method of thermal insulation of the ceiling on the loggia
- installation of penofol. From physics course we know that warm air rises. And in order not to heat the floor of the neighbors above, it is advisable to install penofol on the ceiling;
- arrangement of the frame. For work, wooden slats are used, with a thickness equal to the thickness of the insulation;
- the insulation is placed in the cells of the frame. If cotton wool is used, a vapor barrier film is additionally installed;
- The ceiling is being finished.
Option 2 - “wet” method of insulating the ceiling on the loggia
If the base of the ceiling is flat, you can glue rigid insulation to it. Additional fixation will be provided by the use of dowels with a large head. The junctions of the insulation sheets are foamed with foam. For additional effect, penofol is installed.
Option 3 – insulation of a suspended ceiling on a loggia
Place insulation (usually cotton wool) on the finishing material of the ceiling. Suitable for suspended ceiling or finishing the ceiling with laminate or plastic panels.


Step 9 – Insulating the wall on the loggia
Insulating the walls of the loggia is the easiest step. However, it has an important feature, namely: the walls of the loggia are insulated in different ways.
- the wall adjacent to the room is insulated in one layer;
- the outer wall is insulated in two layers or a thicker thermal insulation material is used. Moreover, it is laid in pieces, and always with an offset.
Similar to work on the ceiling, there are two methods of insulation: “wet” and frame:
- "wet"– suitable for rigid insulation and the only one possible for aerated concrete. Often this method is used to insulate the loggia with penoplex.
- frame– required for soft materials. Without a frame, it is impossible to insulate a loggia with cotton wool. The frame can be made of wood or metal profile. The technology for laying wool on a wall is no different from installing it on a ceiling or floor. The protection of the cotton wool is ensured by the installation of the film.


4.67/5 (3 ratings)
Who wouldn't want extra space on the balcony? This is a space that never gets in the way.
Some people will need it to store seasonal items. After all, in an apartment, as a rule, everyone square meter has its purpose. Others do redevelopment and arrange it.
And still others even acquire cozy corner where you can relax. All this can be realized if this room is insulated. Otherwise, it will be damp, cold, unattractive.
Many people think that insulating a balcony is an expensive, labor-intensive process and requires the involvement of specialists. In fact, you can do everything yourself if you know how it works. Let's consider below how to insulate a balcony yourself, without making any mistakes.
Mistakes when insulating a balcony
As already mentioned, in order to properly insulate a balcony and not reap the consequences of incorrectly performed work, you need to act according to a clear algorithm. It starts with preparatory work. You need to remove all unnecessary things from the balcony, remove old frames with glass and take them out, clean the surface for work.
But which of the old structures should be left and which should be dismantled? If railings or partitions remain of normal strength on the balcony, they will be useful for subsequent insulation. On the outside they can be hidden under plastic and lined with insulation on the inside. This will be an excellent base for giving the structure greater rigidity. But if there are tiles on the walls of the balcony, they should be removed, they will only interfere with installation.
After the surface is cleaned, it is checked for cracks. All damage to the ceilings is first covered with classic cement mortar, and the cracks between concrete slabs blown with polyurethane foam.
Strengthening the balcony parapet
The most important thing in insulating a balcony is installing metal-plastic glazing. But if ordinary windows can be safely inserted into the opening, with a balcony the situation is different. The parapet on which they place bulky window frames, is not always ready for such loads, so it is better to strengthen it before replacing windows. At the same time, in order to ensure a rigid structure and not increase the overall weight, it is better to use reinforced mesh and cement, since brickwork It will be both heavy and cumbersome.
Window installation
As soon as preparatory work completed, they begin to actually install the windows. And here lies the mistake for many balcony owners. Assessing that it's old wooden frame in excellent condition and will last for a long time, the decision is made that it is not worth replacing yet. This is a cost-saving mistake. In fact, even if old wooden window in excellent condition, it is not able to provide the heat retention qualities that a plastic frame has. New design will last a long time, will maintain the same temperature at high humidity, temperature changes. And due to affordable price window designs Almost everyone can afford PVC. Therefore, insulation should occur exclusively with the replacement of old glazing.
Selection of material for insulation
The next most important factor influencing the quality of insulation is the choice of insulation. They will have to sheathe the walls, ceiling, and floor. Most often, polystyrene foam or mineral wool are chosen as insulation, depending on the budget. These are the most successful materials in terms of thermal conductivity. Of course, it is best to choose extruded polystyrene foam. It is easy to use, easy to cut and glue. In addition, the material lasts a long time in conditions of high humidity. But such excellent characteristics come at a high price.
You can save money by choosing regular foam. It has the same characteristics as the above material, but it has a slightly shorter service life.
Sealing cracks
Having chosen the insulation and installed double-glazed windows, we move on to the next element of insulating the balcony - sealing the cracks. There is no escape from them, since all old balconies have this problem. But you need to eliminate the cracks, because even if you use all the most modern materials, all the heat will escape through these holes.
To eliminate cracks I use special sealants or mastics. They are highly resistant to changes in temperature, humidity, and other atmospheric phenomena. They blow out the sealant with a special gun, then wait for it to dry completely, and only then install the insulation on the walls.
Insulation of balcony walls and parapets
When the material for insulation has been selected and all preparatory work has been completed, installation can begin. By this time the following materials should be available:
- polystyrene foam or penoplex;
- penofol;
- polyurethane foam;
- dowels with special caps;
- foil tape.
The installation principle is as follows: foam plastic or penoplex is prepared for installation by choosing right size and, if necessary, trimming it. Then onto the wall and the insulation sheet itself thin layer apply foam, not forgetting to lubricate the foam joints with it. Using a level, install the first sheets so that they stand level, and then attach them tightly to the wall with dowels. In this case, the dowels should be of such length as not to pierce the wall through.
The next stage is installing a heat insulator. To do this, take penofol (a material covered on one side with foil that reflects heat and does not allow it to escape from the room) and paste it over the insulation using foil tape. At the same time, you should not spare the heat insulator - you need to glue it not joint to joint, but with an overlap of 3-5 centimeters.
Floor insulation
When the walls are insulated, move on to the floor. It requires the following materials:
- penoplex;
- polyurethane foam;
- wooden slats(thickness corresponding to the thickness of penoplex, usually 50 mm);
- self-tapping screws
Wooden slats are laid on the floor along the balcony, the distance between which should correspond to the width of the penoplex + 1 cm. They are screwed to the floor using anchors or self-tapping screws. In this case, the self-tapping screw should go through every 30-40 cm of the slats. To ensure that the workpiece is level, laying must be done using a level. And if some floor elements are a little lower than necessary, you can put a piece of plastic under them.
Then, penoplex is installed in the openings between the slats and all the cracks in the structure are filled with polyurethane foam to completely ensure thermal insulation.
As soon as the installation of insulation is completed, do decorative finishing floor. First, chipboard or plywood 2 cm thick is laid on top of it so that the floor can withstand the load. The canvas is screwed to the beams with self-tapping screws every 10-15 centimeters. The canvas on the balcony should be mounted across, and a gap should be left between the sheets, since then they can rub against each other and creak.
When installing chipboard on slats, you should not step on it, as this can deform the canvas and the floor will be uneven. This common mistake when installing the floor. Until the canvas is completely secured, you cannot walk on it.
Do you need a heated floor on the balcony?
Warm floors are a popular solution today. They are installed in office rooms And living rooms. They are economical and practical. But is it possible to do such heating on the balcony? Yes, this will be the most best option. The fact is that a radiator, if installed on a balcony, will only warm the air, but the floor will remain cold. And the warm floor will completely warm the entire room. But only specialists can install it. It’s better not to do the installation yourself, as there are a lot of subtleties that can be overlooked without experience.
Is it possible to insulate a balcony in winter?
Some people are faced with the problem of a cold balcony already in winter, when it is very difficult to insulate it. But is this real? After all, any construction works It is better to do it in the summer, and some materials do not tolerate frost at all during installation. If you use insulation and foam that can withstand low temperatures, you can carry out insulation in winter time. But this will be more difficult to do, and the installation itself will cost more, so it is better to do everything in advance.
But if you had to insulate it in winter, what should you do? It should be understood that the cement used to seal cracks freezes quickly in winter without having time to set. Therefore, you need to purchase either special additives that allow the solution to maintain plasticity, or use winter glue. Otherwise cement mortar will lose its strength and quickly collapse.
Polyurethane foam also depends on temperature fluctuations. Therefore, you need to purchase a special version that can be used for installation during frost. It should be remembered that foam is the same insulation as polystyrene foam. And if it does not perform its functions because the owner saved money and bought “summer” foam in winter, you can’t even dream of a warm balcony.
Thus, warm balcony although it is done in the summer, but in extreme cases (unless there is very severe frosts) it can be done in winter. But it should be remembered that all materials used must be frost-resistant (the characteristics must indicate the possibility of installation with low temperatures), and it is better to entrust the work itself to professionals so that no violation of technology affects the final result.
Balcony finishing
The last stage of balcony insulation is decorative. When the walls are insulated and the floors are installed, all that remains is to decorate and put it all in a finished state. For this you need the following materials:
- wooden slats;
- laminated panels;
- decorative guides;
- polyurethane foam;
- construction stapler;
- self-tapping screws;
- staples for the stapler.
First, install wooden slats using self-tapping screws. This is convenient to do because wooden frame already available. In this case, you need to use a level so that the workpiece looks even. The slats are placed on the ceiling and walls. In the latter case, their thickness should be at least 20 mm. They are screwed to the walls with self-tapping screws, and if the wall is made of concrete, dowels are used. In order for the slats to be firmly attached to the wall, it is recommended to first apply mounting foam to them, and make the distance between the slats no more than 35-40 cm.
If you decide to insulate the wall between the balcony and the room, which is not at all necessary, secure the slats as described above.
Once the wooden frame is assembled, installation begins decorative elements. To do this, prepare laminated panels and attach them with a construction stapler directly to the slats. To prevent the ends from spoiling the appearance of the wall, they are hidden behind decorative guides. First the ceiling is sheathed, then the walls follow the same principle.
Once the main room is insulated and decorated, all that remains is to complete the work on the parapet and complete the flooring. First, the parapet is finished. To do this, the same wooden slats 20 mm thick are stuffed onto the parapet itself, creating such a frame when there is sufficient distance between the window sill and the slats to install decorative panel. Having installed the frame, staple the laminated panels onto the parapet. The joints are hidden under decorative guides, and the slopes are trimmed with the remains of the panels. At the bottom, the panels are hidden not under the guides, but under the baseboard. And on slopes they are fixed to polyurethane foam, additionally using the remains of the guides and a stapler. To ensure that the slopes are clearly separated from the rest of the wall, it is recommended to install decorative corners. They complete the work by sealing all seams and joints with a special sealant.
An alternative type of installation of insulation on a balcony can be seen in the video material.
In the category | with tags , |
To create a comfortable functional room in the loggia, it is necessary to carry out work on its high-quality insulation. On the market today there are the most different materials, therefore, it is possible to insulate the loggia with mineral wool, expanded polystyrene, polystyrene foam and other types of insulation. The choice of insulation depends on many factors. It is very good if you have the opportunity to consult with specialists on this matter.
Mineral wool
Insulation with mineral wool is the traditional and most common option.
This material can provide enough high level thermal insulation and sound insulation.
At the same time, it is recommended to use mineral wool for insulation only if there is no load on the insulation. In addition, the insulation material must be protected as best as possible from exposure to moisture and the formation of condensation on it.
Mineral wool insulation work is carried out in the following sequence:
- First, all surfaces insulated from the inside are waterproofed. This stage is preliminary. To create a high-quality waterproofing layer before insulating the inside with mineral wool, it is best to use special insulating impregnations. They can be bitumen and polyurethane mastic, special paints and varnishes. In addition, rolled polyethylene materials (sold at any hardware store) are often used as an insulator. What kind of insulator will be used is not particularly important.
- Then you need to install the sheathing. The installation step of the wooden blocks should be approximately 1 cm less than the width of the mineral wool sheets. In addition, you need to select the bars so that their thickness is slightly greater than the thickness of the slab of heat-insulating material. The sheathing elements can be fastened to rough surfaces using dowels and self-tapping screws.
- For installing slabs mineral wool you need to select and dilute a suitable adhesive composition (which one is not important). It is applied to the surface of the slab from the inside, after which it is placed in the cell formed by the sheathing. The slabs need to be adjusted so that they are slightly larger in size than the dimensions of the cell. This will avoid unnecessary voids.
- As soon as the adhesive composition has dried, it is recommended to additionally secure the heat-insulating material with your own hands using mushroom dowels.
- Surface finishing can be done using any suitable materials. Any type of finishing that will not create a large load is suitable for this - plastic panels, plywood sheets, lining...
- At the end it is carried out fine finishing surfaces and decorative works. In this case, the work can be done with any finish.
ISOVER material gives good results and reviews.
Expanded polystyrene
Insulating your loggia inside with polystyrene foam gives enough good results. This material is produced by mixing polystyrene and special foaming components. The mixture is heated, subjected to high pressure, then foamed and carbon dioxide added.
To insulate a loggia with polystyrene foam, slabs 45-50 mm thick are perfect.
- They are fastened using dowels, double-sided tape and glue (which type of fastening to choose depends on the material of the walls). When insulating a loggia from the inside with polystyrene foam, it is best to place the material slabs in a checkerboard pattern so that they do not move under their own weight during operation.
- To prevent the occurrence of cold bridges, seams, gaps and joining areas must be filled with your own hands. construction foam(when insulating with expanded polystyrene and polystyrene foam, the problem of cold bridges is especially relevant).
- As soon as the polyurethane foam has dried, you need to cut off the excess with your own hands.
- To provide additional insulation, which is required when insulating with expanded polystyrene and polystyrene foam, it is imperative to lay a layer of special foamed polyethylene 5-8 mm thick. In this case, the layer with foil should be located inside the loggia. This approach will allow you to create a high-quality vapor barrier layer with your own hands and ensure heat reflection. The seams must be taped with construction tape yourself.
- You can attach a wooden sheathing to the heat-insulating layer (for this it is better to use small-sized bars that have been pre-treated with antiseptic compounds). In addition, instead of lathing from the inside, the loggia is often finished with plasterboard sheets.
- On wooden sheathing or plasterboard sheets, you can apply any finishing materials yourself.
You can do without lathing and use mesh for reinforcement for finishing.
Penoplex and penofol
Very often, penoplex and penofol for insulation are used in one insulation system.
One of the best materials.
These are high-quality insulating materials that have a lot of positive performance and technical characteristics. Many experts recommend using them specifically for insulating loggias from the inside. The use of such insulation for a loggia will allow you to create indoors comfortable environment and on the coldest days maintain an optimal microclimate.

Penofol for loggia.
Insulation work using these materials is carried out in the following sequence:
- First, you prepare all insulated surfaces with your own hands: floor, ceiling, walls, parapet. The old one is completely removed finishing material, all traces and debris are removed. After this, you need to carefully check the integrity of the structures from the inside to ensure that there are no cracks, holes or other defects through which cold air can penetrate into the room. It is important that the loggia is completely sealed on all sides.
- Then, vertical logs are installed. The material must be fastened in a certain increment, the size of which will depend on the thickness of the insulation used.
- Next, penofol is attached directly to the joists. For this you can use any suitable adhesive compositions, which are suitable for indoor use. During the installation of the initial layer of penofol, it is necessary to direct the foil outward.
- After this, penoplex is installed (the best option for a loggia is material with a thickness of 20 - 25 mm). Laying slabs from the inside of the loggia can be done independently - there is nothing complicated in this process.
- Finally, you need to glue another layer of penofol. In this case, the material must be positioned so that the foil layer is directed inward. As a result, we will get a kind of pie in which the main thermal insulation material (penoplex) will be protected by penofol on both sides.
- All the joints that arose during the process installation work from the inside of the loggia, it is necessary to glue it with construction adhesive tape.
What thermal insulation material should I choose to insulate my loggia?
You need to understand that work on insulating a loggia with your own hands can be done from the inside and outside. Of course, it is much easier to do insulation inside the loggia. For this purpose, a variety of different thermal insulation materials. Their choice will depend on the design features, operating conditions, and the nuances of installation work, so in each case, special attention must be paid to the choice of insulation.
It will not always be justified to purchase the most expensive insulation on the market.
For example, if the loggia has high-quality glazing, high-quality construction, and no defects are observed, then you can use the most simple materials. In addition, the choice of insulation for the loggia will depend on whether heating is planned.
Insulating the loggia with your own hands will allow you to significantly expand the living space of the apartment: a room previously used as a storage room or drying room will turn into a full-fledged room.
Insulating a loggia means creating a so-called thermal effect around the entire perimeter of the room. This process involves carrying out a whole range of work:
- glazing;
- preparatory stage;
- floor insulation;
- ceiling insulation;
- wall insulation;
- installation of waterproofing;
- insulation of external surfaces;
- fine finishing.
Each stage is discussed in more detail below.
Glazing of the loggia
Obviously, insulating an open, unglazed loggia makes no sense, so the process should begin with the installation of windows.
Glazing of the room is carried out according to the standard algorithm, but using an additional (additional) profile to change the dimensions window opening. Framing the entire structure around the perimeter, it is intended to ensure that subsequently the surfaces thickened with insulation (walls and ceiling) do not cover the glass.
Important! Do not try to save money when choosing profiles and double-glazed windows: “cold” glazing using inexpensive structures can protect the loggia from precipitation, but will not cope with the drop in temperature outside.
Learn how to choose and install correctly plastic frame on the loggia, you can by watching this video.
Insulation of the loggia from the inside
After installing the double-glazed windows, you can begin insulating the loggia floors. However, this stage also requires a number of preparatory work.
Preparatory stage
First of all, you must determine which surfaces on the loggia require insulation and which do not. As a rule, only “cold” floors are covered with thermal insulation, while “warm” ones are used to save usable space not "processed".
“Warm” floors are surfaces bordering heated rooms.
The next step is choosing a material for thermal insulation of the room. and its thickness is selected based on their climatic conditions. A description of the materials on the market, their characteristics, advantages and disadvantages is given in the next section.
Important! In cold climates, it is better to give preference to tiled thermal insulation, which is connected using a tongue-and-groove system.
The final stage of preparation is foaming the cracks and voids in the ceilings. This procedure is necessary: it will help protect the future from negative impact natural factors.
Materials for thermal insulation
When choosing thermal insulation materials, pay attention not only to their thermal conductivity, but also to their thickness: in a small loggia area, saving space also means a lot.
Many people who insulate balconies and loggias still use traditional, but already obsolete materials, while modern industry offers a large assortment insulation materials.
Extruded (extruded) polystyrene foam. This material is available for sale in the form of panels (slabs) or rolled fabric. He has excellent thermal insulation characteristics, low specific gravity and provides a good level of moisture insulation. The only drawback of polystyrene foam is its mediocre vapor permeability. This circumstance presents Additional requirements to the organization of room ventilation: if condensation from under the thermal insulation is not removed, the loggia has every chance of “moldy” from the inside. Due to the low vapor permeability of the material, before insulation with polystyrene foam, the surface should be treated with a special antifungal compound, and a vapor barrier material should be attached to the thermal insulation itself with tape.
When insulating a loggia with polystyrene foam, you must remember that it belongs to flammable materials and when burned, releases toxins.
Expanded polystyrene in the form of panels and slabs is sold under the name “Penoplex”; it is most convenient for them to insulate the ceiling and walls, while roll material can also be used for the floor.
Thanks to standard sizes It is very easy to calculate the required number of panels. Insulating a loggia with penoplex yourself will not cause any difficulties: holes for dowels are drilled in the slabs, and the material is fixed. The hole is filled with foam, the excess of which is cut off with a knife (then the surface in this area is sanded with sandpaper).
Polyethylene foam. This material is characterized by a porous internal structure and, due to this, has excellent thermal insulation characteristics. The surface of the polyethylene foam is smooth: this circumstance prevents moisture from getting inside. This type insulation provides not only heat retention, but also good sound insulation; Available in the form of slabs (panels) or rolls.
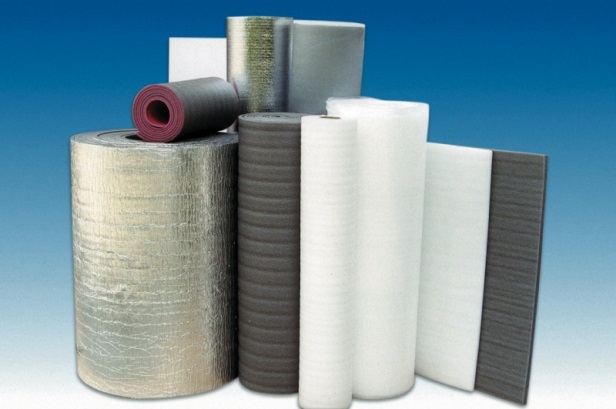
Today, it is easy to find improved polyethylene foam on sale, which has even higher heat and moisture protection properties. Laminated with a layer of foil on one or both sides, it is produced in rolls under the names “Penofol” or “Izolon”.
Penofol is indispensable in humid climates, as it is an excellent vapor barrier and moisture insulator.
Polyurethane foam. This material is widely known as foam rubber or PPU. It has a low specific gravity, is characterized by high thermal insulation properties, good protection from noise and moisture. One of the main advantages of polyurethane foam is the presence of a continuous film on the surface. This is what prevents the penetration of moisture.
Today you can use a progressive technology for insulating a loggia with polyurethane foam - spraying. The material is not mounted, but sprayed with water high pressure on the wall in the form of a powder, which immediately after hitting the surface sticks together and forms a solid heat-insulating layer.
Advantages this method are obvious: work on insulating a loggia of any size can be done in as soon as possible. In addition, the use of this method can significantly save usable space: the thickness of the insulating coating is minimal.

Styrofoam . One of the most common and available materials is foam plastic. It exhibits high heat and soundproofing properties, is not susceptible to fungi and can be used even in humid climates. The only disadvantage of this material is its absolute instability to chemical liquids. However, they are not used in everyday life, so this property will have to be taken into account only during repairs on the loggia.
Insulating a loggia with polystyrene foam is quite simple: the slabs of material are attached to dowels.
Important! In addition to insulation, you will need a number of other materials. Before you start work, prepare polyurethane foam and a cleaner for it, foil tape, an antiseptic (antifungal composition), dowels with plastic and metal core, self-tapping screws, nails, timber for joists and linings for joists, metallic profile and drywall.
Tools needed: level and tape measure, foam gun, screwdriver, pliers, hand construction tool, metal scissors, shoemaker or stationery knife.
Insulation of the vertical surfaces of the loggia (parapet, area above the windows and walls)
Let's consider one of the most simple options- insulation of the loggia with penoplex in slabs or rolls. This material is really easy to install and does not require any special skills. The algorithm of necessary actions is below.
First of all, treat the surface of the walls with a special antifungal compound and a layer of waterproofing. While the applied layers are drying, we will prepare the material.
According to his calculations made on preparatory stage, cut the insulation. To do this you will need an ordinary stationery or shoe knife.
It is advisable to make grooves at the ends of the slabs. Making them is very simple: cut the plane and the end, and then remove the unnecessary piece.
If you live in a cold climate, prepare the material based on the fact that it will be attached in 2 layers, and the seams of the first should overlap the panels of the second by at least 5 cm.
Important ! The minimum width of the insulation strip (if you purchased Penoplex in a roll) should be at least 30 cm, the length should be the height of the wall.
Proceed with the installation of Penoplex. The first layer of insulation is attached to mushroom dowels, “targeted” with a special hand tools. The second layer is placed on the mounting foam or also “targeted” to the first.
Insulation of the loggia with polystyrene foam is carried out according to the same principle.
Insulation of the loggia ceiling
- Insulation of the loggia ceiling begins with the installation of suspensions.
- Then galvanized profile guides are installed.
- Before fixing the insulation boards to the ceiling, the holes necessary for hanging are cut in it.
It’s okay if the slots turn out to be larger than necessary: a little later their size can be changed using polyurethane foam or pieces of insulation.
- Insulation boards are mounted using polyurethane foam or dowels. Depending on the specific gravity material, dowels with a plastic (for lightweight panels) or metal (for heavier panels) core are chosen.

Insulating the loggia floor
It is the floor of the room that is considered the “coldest” surface and needs maximum insulation. Even if the insulation on the walls of the loggia was installed in one layer, the floor is made “double”.
The technology for insulating the loggia floor is as follows.

Vapor barrier
After completing the thermal insulation of all surfaces of the loggia, the already insulated surface must be covered with a continuous layer of vapor barrier. This will protect the materials from moisture and, as a result, the formation of mold and rot.
Penofol, previously discussed, can be used as a vapor barrier material. You can attach it with glue (by the way, you can also find a self-adhesive version on sale) or using a special stapler with the foil surface to the living space.