Garden sculptures and crafts from polyurethane foam. Mounting foam
Polyurethane foam has firmly won its place in the construction industry. This handy sealant is able to alleviate assembly work and the range of its application is unusually high. But now, more and more often, polyurethane foam has begun to receive unusual use as a material for creating crafts. To figure out how to do this, you first need to know what polyurethane foam is and what features it has.
What is foam and what is it used for?
First of all, mounting foam is effective remedy, capable of providing reliable sealing of seams and the correct position of installed parts in a matter of minutes. In fact, it is a combination of two components: isocyanate and polyol, which are produced from oil. Foam is sold in cylinders, which, in addition to the polymer compound, also include a propellant gas that displaces the mixture from the nozzle. Upon contact with air, the mixture begins to significantly increase in volume and polymerization of the substance occurs.
Initially, foam found its use in providing a secure fixation of installed window frames and door formwork, as well as filling voids. It is characterized by the following properties:
- Significant amount of covered area. When leaving the cylinder, the foam expands its volume, the difference of which in relation to the initial one is 40 times.
- Good adhesion. The foam adheres strongly to most materials, except for oily and polymeric coatings.
- The ability to fill all hard-to-reach places.
- Ensuring a good degree of sound and heat insulation.
You need to know that foam, despite its simplicity, requires special attention when working with it:
- foam should be handled at temperatures above +5°C,
- any work must be carried out with gloves to exclude the possibility of foam getting on unprotected areas of the body,
- before starting work, shake the container thoroughly for a minute so that the contents acquire a homogeneous structure,
- the cylinder during the entire operation should be kept upside down, that is, with the cap down, so that the gas that displaces the mixture from the cylinder can freely exit, since it is lighter than other components,
- any product must be covered protective layer paint, since the mounting foam is afraid of direct exposure to ultraviolet rays.
- complete hardening of the surface occurs after 8 hours; before the specified period, the material should not be subjected to loads.
Thanks to unique properties foam, many crafts made from this versatile sealant began to appear.
What tools will you need to create crafts from polyurethane foam
To get started, you need a simple set: the mounting foam itself in cylinders and a special gun for it, the cost of which starts from $ 5. In addition, the job will require the following tools in order to create crafts for the garden:
- stationery knife,
- artistic brushes different sizes: 4.8, 10 and 25 mm wide brush for decorative work,
- foam cleaner,
- Oil paint,
- weighting agents. Since the foam has a low weight, only 20 kg per m³, products should be equipped with simple cargo, the role of which is played by a container with sand - plastic bottle or a small bank
- colorless protective varnish. Simple varnishes are not always suitable due to the fact that the resulting products will become yellow,
- several pairs of household gloves: cotton or rubber. The latter are preferable, since household gloves sometimes provide insufficient protection for hands. It is important to remember that the foam is difficult to remove if it comes into contact with the skin, so the use of gloves is mandatory.
When these tools are prepared and the necessary stock of foam is available, work should begin.
Where does the work on the manufacture of crafts from polyurethane foam begin?
Because it's hard to keep in mind artistic image crafts, you should first have photographs or pictures that reflect the essence of the future product and its prototype. Next, you need to build a frame with a weighting agent, on which mounting foam will be applied in layers. For the construction of the frame, plastic containers are most often used, which are filled with sand to provide weight. In addition, there is another method that is structurally more efficient, when the frame for the future product is either welded from thin reinforcement with a diameter of 5 mm, or twisted from thick wire. To ensure the stability of the craft, if it is located on the ground, you should leave the steel parts protruding 20 cm outside. For example, if a deer figurine is created in a standing position, the rods should be passed from the hooves.
In this way, better stability of the figurine against the wind will be achieved, as well as a more evenly distributed load on all parts of the product.
In the event that work on creating garden foam crafts is carried out indoors, a respirator should be used. The mounting foam itself is not toxic, but has an unpleasant odor.
The process of creating crafts for the garden, according to novice sculptors, is not difficult. It is only necessary to act carefully and allow the foam layer to harden in time before proceeding with the application of the next layer.
Creating figures for the garden from polyurethane foam
The process of creating a figurine is technically simple. You need to follow the steps:
- Creation of the frame of the figurine. If the craft is squat, then it is enough to use it as a base plastic container with sand, which, with the help of improvised materials, should be adjusted to the required dimensions of the form.
- Next, foam is applied using a mounting gun. The use of this tool will allow you to accurately dose the amount of material.
- Allow 20 minutes for each layer to dry.
- With the help of a brush and a clerical knife, when hardening a layer of foam, give the craft required dimensions and form.
- After all the layers of foam have been applied, and the figure has acquired a finished look, it is worth puttingtying the entire base so that there are no cracks.
- After that, the product is painted with acrylic paints, applying at least two layers to the figure.
- At the end of the work, the figurine is varnished to ensure better preservation and resistance to weather conditions.
The finished craft should be left for several days so that all materials acquire the final degree of hardening.
Foam lamps and lanterns
A real master class can be shown by those specialists who create not only beautiful, but also functional things from polyurethane foam. Working lights on the site will be a beautiful and eye-catching addition to the overall picture. And what is nice, making them is not much more difficult than a simple figure.
To create a lamp, a base is made in the form of a stool made of chipboard or OSB, since the latter is more durable. Then the following actions are performed:
- the base is carefully foamed with a mounting gun,
- further complemented by others wooden elements, which are also treated with foam,
- in the upper part of the wooden structure, it is necessary to make a cover for inserting a lantern,
- after that top part covered with a layer of foam and additional decorative elements(wooden lintels, forged fittings),
- the final stage is painting the finished structure, after which the lantern is placed through the cover on the body.
If the flashlight is powered by solar battery, then you should fix it on the side. But this will break the aesthetic appearance, so you should consider installing a flashlight that runs on batteries.
Ready workers lighting covered with several layers of foam, followed by decoration. In this case, if the lamp has a supply power cable- an aesthetically pleasing design. Even if the lamp is old-style and does not differ in sophistication of style, such a procedure will breathe new life into an old thing.
Decorating dishes with polyurethane foam
In the event that the initial skills are not enough to carry out such work, it makes sense to practice on the dishes. Decorating is not difficult, just a few steps:
- clean the surface of the selected object from contamination,
- apply a layer of foam using a mounting gun,
- at the time of its polymerization, use a brush and a knife to correct the resulting mass to give it a more regular shape,
- after hardening, cover the surface with a layer of paint.

As you can see, the process of decorating dishes does not have significant differences compared to the creation of a figurine. The presence of the selected dishes as an element of the base will allow you to conduct experiments without being distracted by the construction of the frame. A similar method is used for any vases, cabinets or baskets.
Creation of panels and ornaments from polyurethane foam
Mounting foam is also suitable for creating entire decorative panels. For example, a simple steel grating will gain the new kind thanks to the application of foam on each of the rods, followed by the creation of artistic elements that imitate forging. With the help of the form it is quite possible to create simple decorative panels cladding, the purpose of which will be to give the building or its individual elements greater external appeal. In general, the possibility of using polyurethane foam is limited only by imagination.
It is not difficult to create crafts for the garden with your own hands. The foam itself is light and easy to use material, which, in addition to many advantages, also attracts with the price. The cost of a balloon of polyurethane foam with a volume of 850 ml starts from $ 3, which allows you to special costs create whole artistic compositions. To ready product pleased with its appearance, you should use a few practical tips in your work:
- after the foam layers have hardened, the finished product should be allowed to “rest” for 3-4 days to achieve maximum strength,
- for the safety and integrity of the coating, after applying several layers of paint, it is advisable to apply varnish to the coating. It is recommended to use a colorless protective lacquer, because, unlike the usual one, it will not impart a yellowish tint to the painted products,
- before painting, make sure that the selected paint does not contain a nitrocellulose base. Otherwise, the foam structure will be softened,
- the clerical knife used should have a good blade sharpness in order to effortlessly cut the foam. Otherwise, the blade will tear the viscous base, which will violate appearance crafts,
- cheap polyurethane foam does not hold its shape well, so when working, you should refrain from buying inexpensive bottles up to $ 3, the optimal choice would be foam from the manufacturer Tytan, at a price of $ 5.5 for a bottle of 850 ml,
- simple crafts of small sizes do not require the creation of a frame.
As can be seen from what has been written, learning to create beautiful compositions if you have an understanding of the final image, it is not difficult, although it will take time. If you want to use only professional polyurethane foam to create high-quality crafts, then you should trust the choice of specialists.

According to the bench tests, polyurethane foam Tytan Professional 65 O2 is the leader among the proposed mixtures:
- film formation time takes 4 minutes,
- initial hardening of the material occurs after 25 minutes,
- the volume of material during the initial expansion was 51 liters, which is twice as high as most of the tested competitors,
- mixture output mass - 900 g.
- retail price from $ 5.5 per cylinder, which, together with large quantity foam at the outlet can significantly reduce the cost of buying new cylinders.
This foam is well suited not only for masters, but also for beginners. Blowing occurs slowly, which gives time for processing the layer to give the desired shape. Budget foam M70 from the manufacturer Hercul will also become good choice, since it has average performance and a low price of $ 3, at the same time, it significantly outperforms the leader in terms of hygroscopic properties.
Mounting foam, crafts for the garden from which you do not need to make - is:
- Makroflex
- Houser
- Expert
- storehouse
- Ultima
- Bau Master
- Baumax
- Cyclone
All manufacturers listed sell foam Low quality, which after 5-6 months begins to lose shape.
For most owners, the dacha is a place to relax. However, in order to arrange the site properly, you need to spend quite a lot of money. In this regard, some summer residents are looking for opportunities to save money, which is why they are trying to create crafts from polyurethane foam that look no less aesthetically pleasing than figures made of plastic, metal and wood. And today, this option continues to compete with another equally common method - creating crafts from plastic bottles.
Every person who does not have special skills and knowledge is able to make his own household plot more attractive. The main thing is to have abstract thinking be patient and prepare minimum set of tools. All this will be enough for cheerful gnomes, frogs, lambs and Christmas trees to appear on the backyard territory, the creation of which will require quite available materials.
Manufacturing technology
The first issue that must be resolved by the summer resident is the preparation of materials and tools, without which it will be impossible to make crafts from polyurethane foam. Moreover, you should not neglect any element of the list, since this will subsequently affect the quality of the work and the time that they will require.
To make a product frame, you can use plastic bottles, which are pre-filled with sand, boards, metal objects and thick wire. In some cases, you can use ordinary brick to create the basis for the future mushroom on your site.
- mounting foam;
- foam gun;
- gun cleaner.
It's a good idea to use sculpture for growing flowers. But for this, in its center you will have to install a certain container, like a bucket, a can or the aforementioned plastic bottle.
- varnish, paint and brushes for them;
- clerical or other knife;
- several pairs of gloves. They must be present with you, as this will help protect your hands from mounting foam, which quickly and firmly sticks to your hands.
If we consider in more detail the process of manufacturing garden figures from polyurethane foam, then two stages can be distinguished in it, which are carried out in a certain sequence.
- work begins with covering the base with a layer of foam, after which they wait for a pause, which is necessary for the material to harden;
- then we apply the next layer of foam and so on until we achieve the desired shape of the product.
When the desired result is achieved, we take an ordinary clerical knife and use it to cut off the extra protrusions. In the process of such work, we give the sculpture the desired contour, after which you can proceed to its coloring. To complete all the work, you will have to spend from 1 hour to several days. The specific period is determined by the size of the product and the thickness of the applied layer.
It is recommended to engage in the manufacture of garden figures from polyurethane foam in a separate dry room which must be clean and have limited access for children. Otherwise, you will have to spend a lot of time and effort to remove the mounting foam from the surfaces, and for this you will need gasoline or acetone.
Manufacturing examples with instructions
Next, examples of various foam garden figures that can be made without even having experience in this matter will be considered. But in order to achieve the desired result, it is necessary to perform all operations in the exact sequence. It will take a couple of hours, and you will feel like a real creator, in whose hands an ordinary polyurethane foam turns into real masterpieces of art.
Christmas tree
The master class on making a Christmas tree from polyurethane foam is quite simple and understandable. Pre-required prepare twigs to be attached to iron pipe. As a fixer, you can use tape or wire.
Then, using a spray gun, the preform is moistened, which will improve the adhesive properties of the foam when it is applied to the base.
After that, we proceed to the processing of the structure with mounting foam, in this matter you can completely rely on your imagination.
Having at hand such affordable things as cutting sticks, twigs, mounting foam and fishing line, it will not be difficult for you to make a Christmas tree with your own hands. And to give a natural look, the Christmas tree can be painted with green acrylic paint.
Ball
If you are afraid to take complex garden figures from polyurethane foam, then you can choose the simplest product, which is a ball. For those who do not have experience in making figures from polyurethane foam with their own hands for decorating a garden, it is recommended to take the first steps in creating this particular figure. And, having stuffed your hand, you can try to create more complex decorations and sculptures.
The master class itself includes the following actions:
- first we need a paint can in which we need to pour sand;
- then we take mounting foam and cover our blank in layers;
- when the product acquires the required dimensions, and the initial shape changes to a spherical one, we take a knife and cut off the excess parts;
- we process our ball with varnish;
- we complete the work on making the ball by coloring, for which you can use the colorful material that you like best.
Ram and sheep
 A master class on the manufacture of this garden figure from polyurethane foam with our own hands begins with the creation of a frame. To do this, we need several plastic bottles that need to be connected to each other. with tape. As a result, the craft should resemble something like the “skeleton” of an animal. To give our figure greater stability, the lower limbs can be filled with sand.
After that, you can begin to process the craft with foam. To avoid waste of material, it is recommended to wrap the frame with isolon or other polymeric material. After covering the figure with the first layer of mounting foam, it should already be clear to you what should happen upon completion of this work.
To create the ears, we use pieces of skin. You can also use plastic bottles for their manufacture, which will first have to be heated and bent.
To make a muzzle, you will have to use a knife, forming the necessary features with it.
To make our animals look beautiful, they need to varnish.
Goat
To make the frame, you will need a thick wire, which you need to wrap several plastic bottles around.
To make a frame for the legs, it is recommended to use metal pipes. They are attached to the pedestal by welding, after which they are fixed to the ground, or they can simply be bolted. Make sure that the base of the figure is firmly fixed, otherwise it will fall to the ground from wind or rain.
Then the craft is necessary cover with 1-2 layers of polyurethane foam.
To make horns and a tail, we take wooden shelves or we use plastic cuts and fasten them to the base.
Having finished applying the last layer, it is necessary to remove the excess parts, after which we wrap the product with a sickle or fishing line.
We finish the work with staining, but first you need to apply a layer of primer. When choosing a color, you can completely rely on your own preferences, because this is your creation and you can show all your imagination here.
We use buttons to make eyes.
Now our goat is ready and can be installed where you see fit - next to a pond, in a clearing, surrounded by other design elements.
Keep in mind that the process of making this craft will take you 1-2 weeks, since you will have to wait for a pause so that each layer of foam can harden. Thus, using orphan pipes, plastic bottles, pieces of wire and other debris and a couple of cans of mounting foam, you can easily create beautiful decorative elements for your summer cottage.
New Year crafts
 If you only have wire and a balloon of mounting foam at your disposal, then only with their help are you able to make beautiful New Year's decorations for the garden. These materials will be enough to make a variety of ornaments, Christmas decorations, as well as crafts of varying degrees of complexity.
A good idea is to create a snowflake. For it, you need to take a wire of a certain thickness so that you can easily bend it. It will serve as material for creating the frame of the future snowflake. We begin to cover it with 1-2 layers of foam. Immediately needed correct the shape, giving it a flat and smooth surface, and this must be done before the foam hardens. If some part of the figure turned out wrong, then at any time you can add a large number of prices and remove excess parts with a clerical knife.
You will have even less difficulties when making a Christmas ball. The master class on the implementation of this idea will boil down to the following. For him, you need to take a tennis ball and apply a layer of foam. When the material hardens, we paint the craft, adding bright and positive colors to create a New Year's mood.
You can offer a simpler version of making a Christmas tree. It will require cardboard or isolon, which is wound on a rigid base, giving it the shape of a cone. You can easily apply a couple of layers of mounting foam. Next, it remains to give the craft a flat surface, paint and find a suitable place for the Christmas tree.
Conclusion
 In order to make your backyard more attractive, it is not necessary to go to the store and buy special decorative ornaments. It is within the power of any site owner to make their own beautiful crafts for garden. Moreover, for this you can use the most affordable materials, one of which can be polyurethane foam.
It's easy enough to work with her., so even the owner, who has never had to deal with such a thing, can easily cope with this task. It is enough to study the master class on creating figures for the garden, and you will succeed.
Without much effort and material costs, foam crafts will be an excellent decor and decoration for any summer cottage. It's no secret that for many, a dacha is a place where people come to relax from the city noise, rhythm and bustle. Therefore, it is very important that the dacha is exactly the place where a person can truly enjoy life and relax the soul. Often the maintenance of a summer cottage and its decoration require considerable Money, patience and time, but with foam everything is different.
In order to make any crafts from polyurethane foam with your own hands, you do not need to have any special education- absolutely everyone can cope with this task, it is enough to have good imagination and imagination.
In construction, polyurethane foam is used very often and in large quantities. It is used to seal small gaps and has the ability to expand, while filling all the voids.
Important! The curing of the foam depends on what brand of foam it is, but on average it takes from 15 to 25 minutes.

You can cut off excess parts from finished products only after the foam has completely hardened.
You can cut off excess parts from finished products only after the foam has completely hardened.
From construction foam you can make any crafts, since foam is an unpretentious material, and when frozen, it can withstand any temperature, in addition, foam crafts do not undergo any serious changes when atmospheric precipitation hits them.
The material is lightweight and does not have sharp corners, so crafts from mounting foam are often made for kindergarten or platforms. Such crafts can have both large and small size, but the weight of the craft will be small.

When working with polyurethane foam, it is necessary to use a foam gun, which is put on the can, and at the end of the work, a cleaner for the gun is used
How to work with mounting foam?
To work with polyurethane foam, a minimal set of tools and accessories may be required - several pairs of gloves, preferably rubber - the fact is that the foam has such unpleasant abilities, quickly sticking to hands, so it is simply impossible to do without gloves. In addition, you will need 2 or 3 knives of different sizes - they are needed after the foam has dried in order to give the products the necessary shape and to cut through small details, such as eyes, nose, mouth. When working with polyurethane foam, it is necessary to use a foam gun, which is put on the can, and at the end of the work, a cleaner for the gun is used. For painting finished products, you will need paints and brushes. In order for foam crafts to last as long as possible, it is recommended to varnish them.
Important! Polyurethane foam is a very light material, so every time before doing some new craft it is important to take care of its weighting, otherwise the structure will not hold.
Therefore, it is necessary to place something heavy inside each structure - it can be a container with sand, a piece of iron, a plastic bottle of water. You can use anything, the main thing is that the thing should at least fit the shape of the future craft (if the finished product is small in size or volume), and be weighty.
It is important to remember that all work performed with mounting foam should be carried out only in a well-ventilated area. The temperature should be at room temperature. If work is carried out on fresh air, then you need to do it in good weather, but you can’t work in direct sunlight, you need to move into the shade.
During operation, it is important not to forget to shake the foam can before each use.
Finished foam products must be coated with paint, but it is important to remember that the content of nitrocellulose is unacceptable, since this substance adversely affects the foam, as a result, the craft softens, and the entire structure may lose its shape.

Hedgehog figurine made of polyurethane foam
Foam crafts
Animal figures are especially popular among polyurethane foam crafts. You can place them in any part of the garden, placing a lonely figure by the pond or on the lawn, or create a whole composition. In the manufacture of crafts from polyurethane foam for kindergarten, figurines of fairy-tale characters are mainly created:
- Hedgehog. This figurine is very easy to make and perfect for beginners. Any material can be used as a frame, it all depends on the preferences of the master. When the foam has hardened, with a knife you need to carefully cut off all the excess and give the product the desired shape. Hedgehog needles are made from toothpicks, which must first be prepared for work - they must be painted black, leaving a small distance intact. The part that needs to be stuck into the figure remains unpainted. If desired, the other end of the toothpick can be painted in golden color. Before sticking toothpicks into a hedgehog, the figure must first be painted and allowed to dry. In these photos you can see step by step manufacturing such crafts from polyurethane foam as a hedgehog.

Foam Goat
- Sheep and lamb. A master class on the manufacture of such crafts from polyurethane foam, such as a ram and a sheep, should begin with the manufacture of a frame. The frame can be made from several plastic bottles interconnected with adhesive tape. In order for the design to be stable, the bottles that will be used as lower limbs must be filled with sand or water. After the frame is completely ready, you can proceed to the main work - to process it with mounting foam. Foaming should be done gradually, in layers. Each applied layer should dry thoroughly (15-20 minutes), and only after that you can apply the next one. What the craft will be after the final processing becomes visible after the first layer. After the final layer has been applied and dried, with a knife you need to give the figure its final shape, and then paint it.
- Goat. These photos show step-by-step instruction to make such crafts with your own hands from polyurethane foam, like a goat. For the frame of the body, you need to use plastic bottles, previously wrapped with tape or wire. Remains are used for the leg frame metal pipes, which should be the same length and thickness. The resulting structure must be securely fixed to the ground, and care must be taken to ensure that the base of the body is securely fastened to the legs. The product is covered with one or two layers of polyurethane foam. In order to make horns and a tail, you can use scraps of thick branches, securely fasten them and apply another layer of foam to the goat. One thin coat of primer should be applied to the goat before painting. Large buttons can be used to make eyes.

Kolobok from polyurethane foam
- Kolobok. This photo shows a craft in the form of a kolobok, made by hand using mounting foam. As a frame, you can use a medium-sized plastic ball. The ball must be covered with foam in several layers, while not forgetting to dry each layer. The hands of the kolobok are made of a plastic tube with a wire stretched inside. Hands need to be fixed on the kolobok and treated with foam. For the legs, small wooden blocks are used, which must also be fixed and foamed on them. The scarf is also made of foam. And as a frame for the ears on the scarf, you can use cardboard. The finished kolobok needs to be painted, varnished and planted on some kind of stump.
- Figure for growing flowers. In order to make an original flower pot, you can make any foam craft. But it is important to remember that in the middle part of the figure you need to fix a container for growing flowers - these can be: a deep basin, a tin bucket, a large plastic bottle with a cut neck.
- New Year's crafts. Such foam crafts can be made as on suburban area as well as in the kindergarten. A Christmas tree ball can be made from a tennis ball by covering it with a layer of foam and painting it with bright colors.
In order to make a Christmas tree, you must first make a frame. The frame is made from a cone made of cardboard. The foam is applied in several layers on a cone-shaped frame. As it dries with a knife, the figure is shaped like a Christmas tree and painted in the appropriate color.
Of course, everyone who often spends time in the garden wants to decorate and diversify the space around them. The easiest way to purchase professionally made animal figures in the store. However, you have to pay for them, and it is difficult to overcome the desire to compose something unusual with your own hands. Highly interesting option- make a craft yourself from mounting foam for the garden.
Foam crafts: what is good and what is bad?
Foam is a special material. From it you can make figurines of any size. The job does not require significant physical activity and subject to women's hands. When working with the material, it is easy to remove excess or add missing details, correct errors. A well-made craft looks professional and does not show signs of reuse, such as crafts made from tires or plastic bottles. The foam craft is not afraid of rain and snow, but it will have to be protected from exposure to solar ultraviolet radiation.
It is convenient to make a variety of figures from foam
There is another side of the coin. First of all, it should be understood that three-dimensional figures are made from foam, which are not easy to copy without having a sense of proportion. It is even more difficult to create something new, having only a flat picture in front of you.
If you have not yet appreciated the abilities of a sculptor and do not have experience with building foam, it is better to start with a simpler craft and create a bun, mushroom or ladybug.
Material freezes in air long time, so be patient while waiting for the next layer to be ready. It will take a week to build a large craft. The foam gets very dirty, and work is best done with gloves, in a special place and in the open air.
The most interesting and characteristic foam figures
Of course, first of all, you need to "get acquainted with the assortment." By carefully studying the samples of existing creations, we can conditionally divide all crafts into two groups. Some have a smooth surface, others have an almost unfinished surface.
 The surface of these figurines is carefully processed
 Using the alignment of the dried foam, you can make a figure of any animal and many other crafts. In this option, your work is well protected from ultraviolet rays sun. At the same time, a lot of time and materials are required.
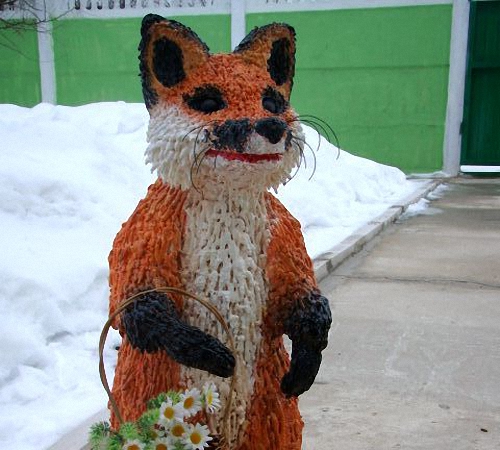
 The fox and the wolf have a “natural fur coat” made of foam
 Of particular interest is the imitation of animal hair using raw foam. This type of texture is difficult to make from any other material. With careful execution, animals literally come to life. In this embodiment, you do not need to spend a lot of time leveling the surface.
 uneven surface foam suits these characters well
 The manufacture of inanimate objects from polyurethane foam is less popular, with the exception of imitation mushrooms. However, as follows from the photo below, using building foam, you can make a flowerpot, garden lantern and flower pots different types.
 All items are made of polyurethane foam
 According to this scheme, you can build any craft
Almost any craft from polyurethane foam for the yard and garden can be built according to general rules. Below is a set of basic tools. Note that regular cans with a straw or pistol foam can be used. It is much more convenient to work with a pistol. When making a complex figure or a large number of products, it is better to purchase a gun.
 The material is of different quality, and cans provide different volumes of foam, which is directly related to the price of the can. The materials will also require paint, varnish and putty for outdoor use. For the manufacture of the frame, a variety of auxiliary materials are suitable: plastic bottles, wire, pieces of wood, and so on.
In the manufacture of almost any foam figure, a frame will be required. The more the shape of the frame corresponds to the type of future crafts, the better the end result will be. It is convenient to use adhesive tape to mount the frame. Separate parts of the frame can be added to the structure sequentially, as the next layer is applied. In addition to the above material, a roll of paper, fabric or foam rubber wrapped with tape can be used for the frame.
Foam craft weighs very little. To prevent the wind from knocking it down, sand can be poured into plastic bottles. To attach the figurine to the ground, you can also provide thick wires that will protrude from the legs of the animals.
 Frames from different materials correspond in shape to future crafts
 Before starting work, be sure to read the instructions for use of the foam available on the can. It is highly recommended to purchase a foam cleaner to quickly solve "dirty" problems. Work should be carried out at a positive temperature in the open air, or in a well-ventilated area. Use gloves. When working, it is convenient to use a bedding made of polyethylene film to which the foam does not stick.
In the can, the foam is in the form of a liquid. The material hardens on contact with air. Shake the bottle before use. During operation, the can is kept cap down. If this is not done, all the gas will come out and some of the material will not be usable. The foam gains sufficient strength within one hour. Completely the material hardens approximately 10 hours.
 Polyurethane foam: regular and pistol
 You should not try to apply a large amount of material at once, as the foam will fall off. It is better to apply a layer of foam on horizontal surfaces, let it harden for half an hour, and then turn the workpiece so that when applying the next layer, the foam again lies horizontally.
If possible, evenly apply foam to the frame, taking into account the shape of the future craft. To receive good result useful to read the content of the article
After the material has hardened, you can add foam to those places where it is not enough in accordance with the outlines of the craft. Excessively protruding parts should be cut off with a sharp knife that will not tear the material. Smooth surfaces can be provided with emery cloth wrapped around the bar.
A layer of putty for outdoor use will improve the protection of crafts from solar radiation and provide additional alignment. Now you can paint the craft.
Please note that paint can damage the surface of insufficiently cured foam!
It is recommended to use exterior paints and paint in two coats. Convenient to work with acrylic paints. For additional protection the figure is varnished, preferably “yacht”. Please note that varnish will give yellowness to white paint. The finished craft can be further decorated various elements decor: buttons, glass, cord and other products of rich imagination. Pay attention to the fungus, which is made of polyurethane foam,  Do not limit your imagination when decorating
Master class: making a curly lamb together
The foam lamb seemed to me the most suitable for the first experience with the material:
- the figurine is relatively uncomplicated, but not small in size;
- lamb curls are very similar to frozen foam;
- I can decorate my DIY with a new element and make lamb's hooves out of small brown plastic bottles.
 The sequence of actions of the master class coincides with the sequence of photos:
- First of all, you need to make a frame. For the torso and neck, a five-liter and regular bottles fit well.
- To simulate hooves, I used small brown bottles. To prevent the lamb's legs from getting too thick, I had to reduce the thickness of the brown bottles. To do this, their bodies were cut lengthwise several times, and then wrapped with tape.

- To attach the legs in a five-liter container cut out round holes into which he inserted the necks of small bottles. I cut off the bottle for the neck and secured it with tape.
- To make the structure heavier, the frame body was half-filled with sand and the hole in the container was sealed with adhesive tape. To make the tail, I inserted a wooden stick into the slot in the bottle.
- The foam was applied in several layers, with intermediate drying for half an hour. It took two bottles of 600 ml.
- To prevent the foam from falling off, the workpiece was turned over several times.

- The workpiece became strong and acquired the outlines of a lamb.
- To form the ears and muzzle stuck wooden sticks. They also had to be done in several passes.
- The result is a workpiece that remains to be corrected with a knife. In some places I had to add foam.

- When performing trimming with a knife, I studied a large number of photos. He regretted that there was no living "photo model". The work is hard, but interesting. See what happened.

- The whole figure was first painted with white paint. After it dried, I finished drawing other elements with pleasure. Added eyes - you can admire the result.
 Concluding the description, I want to add that the process of making a garden figure for a summer residence with your own hands turned out to be very exciting. I wish you the same results! Maybe the video will help you.
garden figures it is quite easy to make it with your own hands from polyurethane foam, for this you will need a minimum of improvised materials. Armed with a can of polyurethane foam, you can make almost any figure that will become a real decoration of your garden.
Using a plastic bottle and polyurethane foam, you can independently make an original garden figure.
How to make a stork from polyurethane foam?
You will need:
- plastic eggplant from under the water;
- thick wire;
- Styrofoam;
- stationery tape;
- mounting foam;
- wood chip;
- electrodes (for bird legs);
- sharp knife;
- poultry feathers;
- paint and varnish for facade works.

A stork made of polyurethane foam with your own hands will be the highlight of your garden. The first step is to build a frame, which will subsequently be covered with foam. The basis of the frame is a plastic eggplant from under the water for 5 liters. From the side of the bottom is placed the head of a bird, the neck serves as a tail.
The stork's neck is made of thick wire: a small piece of foam plastic is applied to the bottle, it is pierced with a wire at an angle so that the wire rests against the wall of the eggplant. To make a bird's head, take a small piece of rounded foam, put it on the end of the wire. The nose is made from a piece of wood or a small piece of wire.
The legs of a bird are made from electrodes that are out of order, you can also use metal fittings. At the junction of the legs with the body, pieces of foam are placed, since the stork's legs have a thickening at the top. The stork will be inserted into the ground with electrodes, so the figure does not need additional weighting, but if desired, you can fill the eggplant with sand.
For the wings, flat pieces of polystyrene in the form of a semicircle are suitable - they are attached with wire to the sides of the eggplant. In order to give the frame the necessary strength, it is wrapped with tape. Work begins with the head, gradually moving to the base of the legs of the bird. It is not necessary to wrap the electrodes with adhesive tape.

PVA glue is used to prime the figure.
After all the parts are fastened, proceed to shaping with foam. The foam is squeezed out in small zigzags or stripes, and there is no need to try to accurately repeat the contours of the bird, since everything superfluous will then be cut off. Important: the foam is laid thin layers with obligatory intermediate drying. The construction material dries quickly enough, so the next layer can be applied after 15-30 minutes.
After the foam hardens, they begin to form a sculpture: using sharp knife cut off all excess. It remains only to paint the stork. In order to reduce paint consumption, it is necessary to apply a primer that forms protective film and will not allow the porous foam to absorb the paint. As a primer, you can use PVA glue diluted with water in a ratio of 1: 2. The neck and body of the bird are painted in White color, the tips of the wings and the tail are black, the nose and legs are covered with red paint. The result is fixed with any facade varnish. At the end of the work, a bunch of real goose, duck or rooster feathers is inserted into the tail hole (bottle neck). The figurine of a stork is placed on a flower bed, deepening the electrodes (legs) into the ground.
How to make a donkey out of polyurethane foam?
You will need:

- eggplant from under the water for 10 l;
- can;
- wire;
- sharp knife;
- mounting foam;
- glue gun or double-sided tape;
- wooden boards (for legs);
- facade putty;
- primer;
- facade paint and varnish.
Foam figures can be small or large, it all depends on your imagination and the materials available. To make a donkey, you need a plastic eggplant from under the water for 10 liters. A tin can is perfect for the head, and if there is none on the farm, then you can use a cropped 5-liter eggplant. The legs of the donkey are made of wooden planks, the tail is made of wire or glazing bead. The head and legs are glued with a glue gun or double-sided tape, the tail is inserted at a slight angle into the hole made in advance.
In order to make the figure heavier, it is necessary to fill the eggplant with dry sand - it is better to do this after the glue has dried.

In the manufacture of garden figures, a special gun for polyurethane foam is used.
Layers of polyurethane foam are applied to the prepared frame. It is necessary to allow the previous layer to dry for 15-20 minutes, only after that the next layer of foam is applied.
Donkey ears are made of wire, which is bent in the form of a semicircle. Then the wire frame is wrapped with tape or paper, inserted into the donkey's head, and then foam is applied to the ears. Next, the foam is cut with a knife in such a way as to give the figure the desired shape.
In order for the sculpture to look believable, it is necessary to apply facade putty on top of the mounting foam, having previously primed the product. The primer improves the adhesion of materials, so this process should not be ignored. Small details are worked out on raw putty: nostrils are cut out, animal eyes are made. After drying, the putty is passed over the surface sandpaper with fine grain. The donkey figurine is painted with acrylic facade paint, and then covered with waterproof varnish.
Foam mushrooms
You will need:

- plastic bottle;
- Styrofoam;
- wire;
- stationery knife;
- primer;
- facade putty;
- acrylic facade paint and varnish.
Even a child can make mushrooms from polyurethane foam, for this you do not need to have the talent of a sculptor or artist. To make a mushroom leg, you will need a plastic bottle. To give the figurine stability, the bottle is filled with pebbles or dry sand. Foam is applied to the bottle in such a way that a thickening characteristic of the fungus is obtained at the bottom. The foam is distributed in thin layers with intermediate drying.
To make a mushroom cap, they take foam plastic, cut a circle out of it, and you don’t need to try to repeat the exact shape, since in nature there are no mushrooms with perfectly round hats. Foam is applied to the foam in such a way that a cone is gradually formed. A strong wire is inserted into the leg of the mushroom, a cap is put on it, the junction of the parts can be smeared with glue. Next, apply the last layer of foam, let it harden, and then cut off all the excess.
Polyurethane foam is a porous material that easily absorbs moisture, so the product must be primed. If this is not done, then the moisture from the putty will turn into foam, which will finishing material drier, and this may subsequently lead to cracking of the surface. If the farm does not have a primer, then it can be replaced with gelatin. Gelatin is soaked in cold water(15 g per 100 ml), let it swell, and then melt it in a water bath. Melted gelatin diluted warm water. The figure is treated with this solution 2-3 times with intermediate drying.
Next, facade putty is applied to the fungus (can be replaced with plaster) and left to dry completely. The surface is first sanded with medium-grain sandpaper, then fine-grained paper is used. The product is primed again - if this is not done, then the paint consumption will double. The mushroom cap is dyed Brown color, for the legs use white with the addition of ocher. The work is covered with facade or yacht varnish in 2-3 layers.
Garden figures made of polyurethane foam will bring an atmosphere of comfort, make the estate individual and unique. Everyone can make a fungus, a stork or a donkey, if you show a little imagination and acquire the necessary materials.