Features of the production of windows with a wooden frame. Do-it-yourself wooden window and step-by-step instructions for dummies Making window frames for double-glazed windows with your own hands
In the manufacture of wooden windows with your own hands, it is necessary to observe accuracy in work. A discrepancy of a few millimeters can lead to a distortion of the entire structure during its installation. As a result - the risk of violation of thermal insulation.
However, if plastic double-glazed windows are produced only at the factory, then wood products, if you have the necessary tools and work experience, can be made independently. Especially this design is in demand in country houses and cottages.
Profile selection
Khrushchev and long-built private houses are especially in need of replacing window frames. Replacing old shutters with wooden windows is the best option. It is important to make the right choice of product profile. Sometimes single glass is used. Another method is double-glazed windows.
If in the first case the advantage is low cost, then double glass provides better heat retention due to low thermal conductivity. This is especially important for those areas where frosty weather sets in in winter. An inert gas is pumped into the gap. Over time, it comes out, but from this the double-glazed window does not lose its characteristics.
There is another type of window - a Finnish 3-chamber double-glazed window. On the one hand, a system of 2 glasses is installed, and on the other, a single version.
Selection of wood type
Before starting work on the manufacture of a wooden structure with your own hands, you need to make the right choice of the type of wood:
- 1. Oak. A good material for these types of work, but very expensive.
- 2. Birch. Is the best option. Wood is well processed and has a low price. The disadvantage is the difficulty of acquisition.
- 3. Pine. With proper use, it lasts a long time. The material is inexpensive. Given its accessibility, even a beginner can work with it.
Making a wooden product
Before starting work, a drawing of the future window structure is created with your own hands. Then materials and tools are prepared:
- wooden beam;
- boards;
- glass;
- glazing beads;
- self-tapping screws;
- PVA glue;
- a hammer;
- drill;
- glass cutter;
- milling machine with a set of cutters;
- saw.
Step by step instructions for the manufacture of wooden windows consists of the following steps:
- 1. Formation of the box.
- 2. Making a frame.
- 3. Glazing.
It should be remembered that the wooden material is selected with precise geometry and without cracks.
Box formation
The manufacture of the box is carried out when it is absent in the structure of the house. The need for it is to take on the main load and unload the frame.
Stages of its manufacture:
- 1. An L-shaped groove is made in a board with a section of 15x5 cm. Its depth is 1.5 cm.
- 2. Four boards are connected in the form of a box.
- 3. Holes are drilled in the corners to a depth of 3 cm.
- 4. Wooden pins are hammered into them. This gives the structure rigidity.
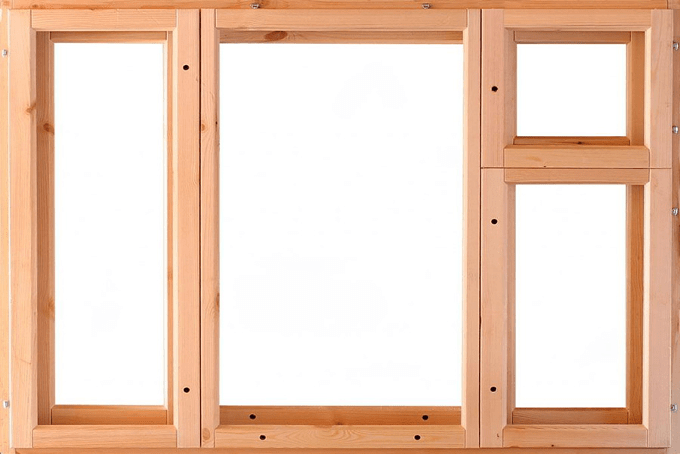
Frame manufacturing
In the manufacture of the frame, the drawing provides assistance.

A quarter is taken on the side and intermediate slats. This is a sample of wood where the glass will be inserted.

At the end of the bars, grooves are made according to the type of thorn-groove. For this, an end mill is used. If it is absent, then the usual chisel is used.

Places are filled with PVA glue, fastened and pressed.

A sash is placed in one part of the frame. To do this, samples are made in the bars. The sash is made according to the same principle as the frame. It should fit snugly into its intended place. After that, marking is carried out for fastening the loops.

Holes are drilled in marked places, loops are fixed. Then comes the installation of handles. To do this, a groove is milled in the sash rail and a mechanism is inserted. In the response part, a place is formed for the tongue to enter.

Glazing
When installing glass, it is required to cut it accurately with a tolerance of no more than 0.5 mm. For this, a diamond screw is used. The final polishing is done with sandpaper.

If the deviation in size reaches 1 mm, then a cold bridge is formed. The window will not perform its function.
Glazing work requires compliance with safety regulations:
- 1. In order not to injure your hands, put on gloves.
- 2. Be sure to have glasses. The eyes are protected from glass microparticles entering them.
- 3. It is not recommended to breathe through the mouth and talk. Together with air, glass crumbs settle on the mucous membrane of the throat.
The order of work is as follows:
- 1. The glass to be cut is pre-measured. For this, a meter ruler is used that exceeds the dimensions of the material.
- 2. A line is drawn with a diamond glass cutter.
- 3. A plank is applied to the glass so that its cut coincides with the line, and it is well pressed.
- 4. By pressing the hand, the glass breaks off with a characteristic crack along the fracture line.
- 5. Fitting is underway. If the cut is made accurately, then the glass is installed and pressed with glazing beads, into which thin nails are driven in.
- 6. When installing double panes, a beam with selected grooves is attached between them.
In recent years, the demand for PVC windows has been growing rapidly, they are most often used for office premises, shopping centers, and PVC windows are also quite often installed in residential premises. But this does not mean that wooden windows have ceased to be popular, rather, on the contrary, they have moved into the elite category. In addition, wooden windows are environmentally friendly.
From the point of view of technical and operational characteristics, wooden windows are in no way inferior to metal-plastic ones. Another advantage is that you can make them yourself.
What you need to make a wooden window
Work on the manufacture of wooden windows can be classified as medium complexity, to ensure the required accuracy it is desirable to have special equipment, with the help of a conventional ruler and a hacksaw it will be quite difficult to observe the geometry of individual elements. You can go the second way - buy a finished window, for example, for a summer residence and install it yourself.
The most difficult thing in the manufacture of a wooden window is the creation of a profile, this work requires special equipment and certain skills.

But in the manufacture of a wooden window for a summer residence, the design can be simplified as much as possible. In this case, to perform work on the manufacture and installation of the window, you will need:
- for the box, it is best to stay on glued beams. You can also use a solid beam, but in this case, the likelihood of warping increases.
The box will be subjected to loads, so you need to use oak or pine for its manufacture. Soft woods will not work.
- the dimensions of the timber for the manufacture of the frame are determined by the thickness of the window, as well as by whether permanent residence is planned in the house. The main requirement in determining the thickness is that the window does not fog up. This can only be achieved if the dew point is placed between the panes;
- electric planer;
- cutter;

- measuring instruments (square, ruler, tape measure);
- glue;
- glazing beads;

- sealant;
- dowels.
In the manufacture of wooden windows for summer cottages, if the house will be used for irregular living in the warm season, you can stop at the option with a thin double-glazed window, glazing beads and putty.
Making a wooden window with your own hands
For the manufacture of the frame, you will need a bar measuring at least 6x4 cm, it all depends on the thickness of the window. As for the profile, it also depends on the design of the window, for example, in a double-glazed profile, a second groove must be provided for installing a second glass. To make grooves, you can use a conventional milling cutter or an electric planer.

With a selection of grooves, it is better to experiment on unnecessary trimming of the board.
The creation of a wooden window is performed in the following sequence:
- careful marking of lumber;
- end processing - they must be cut at an angle of 45%;

A deviation of even a couple of degrees will nullify all the work done. For sawing, it is best to use a pendulum saw.
- when assembling the frame, its elements are connected according to the tenon-groove pattern, so grooves must be selected at the ends. For greater strength of the connection, the frame elements can be drilled at the junction and a wooden spike inserted into the resulting hole, having previously lubricated the hole with glue;

For the same purpose, a double dovetail key can be used, but this is associated with certain difficulties when selecting a groove.
To install the key, the groove at the ends should look like this.

- after that the frame is assembled, the joints should be carefully coated with glue;

- after the glue dries, its remnants are cut off, and the joints are carefully polished.
If the window is with a sash, then the installation of fittings must be added to the above actions.
When the box and window frame are assembled, all wooden surfaces must be carefully treated with an antiseptic, after which you can proceed with the glazing and installation of a wooden window. The installation of glass can only be carried out after the final installation of the frame.

Double-glazed windows can be purchased directly from the factory, but for a country house, ordinary glass is most often used, which is cut on site. The size of the glass should be somewhat smaller than the opening under it, after trying on the glass, a sealant is applied to the groove, the glass is applied to it, the bead prevents the glass from falling out of the frame. The glazing bead itself is attached to the frame with thin nails.
Wooden window installation technology
When installing wooden windows, you must follow 2 rules:
- in no case should loads from the overlying part of the wall be transferred to the window block;

- during installation, the window geometry should not be disturbed, the angles should be strictly equal to 90 °, and the difference in diagonals should not exceed 10 mm. As for evenness, deviations of 1 mm per 1 m of the length of the window block are allowed.
In order for the window not to warp over time, and the glass does not burst due to excessive load, even at the measurement stage, it must be taken into account that the dimensions of the window block should be 10-20 mm smaller than the window opening.
To ensure horizontality when installing a wooden window, mounting pads are most often used. After carefully adjusting the position of the window, it is fixed in the desired position with wedges.

For the final fastening of the window, mounting plates (purchased or homemade) are often used. They are attached to the window block at a distance of 25 cm from each corner. After attaching the mounting plates to the wall and to the window unit, the wedges are removed.

The free space around the perimeter of the window is filled with mounting foam.

If the window size exceeds 1.5 m, then one of the mounting plates must also be attached in the middle.
The window unit can also be fixed with dowels. To do this, a series of holes are first drilled in the wall (the distance between them should not exceed 80 cm), then the window is finally fixed in the design position using self-tapping screws. The heads must be recessed into the surface of the wood.
If desired, the heads of the self-tapping screws can be masked by preparing a mixture of glue and sawdust.
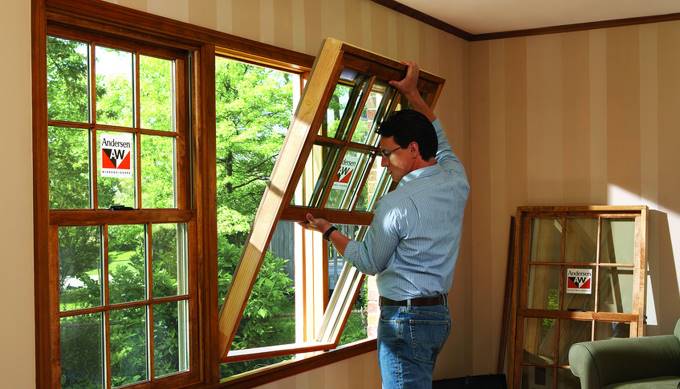
On this we can consider the installation of a wooden window completed. It remains only to install the glass and complete the final finish, which includes the installation of trim and window sills. These works can be started after the completion of the hardening of the mounting foam (that is, not earlier than after 12 hours).

Installing a wooden window is a fairly simple process. In terms of time, even for an inexperienced person, installing 1 window is unlikely to take more than 1-2 hours. About the same amount will be needed for glazing and installation of the window sill and trim.

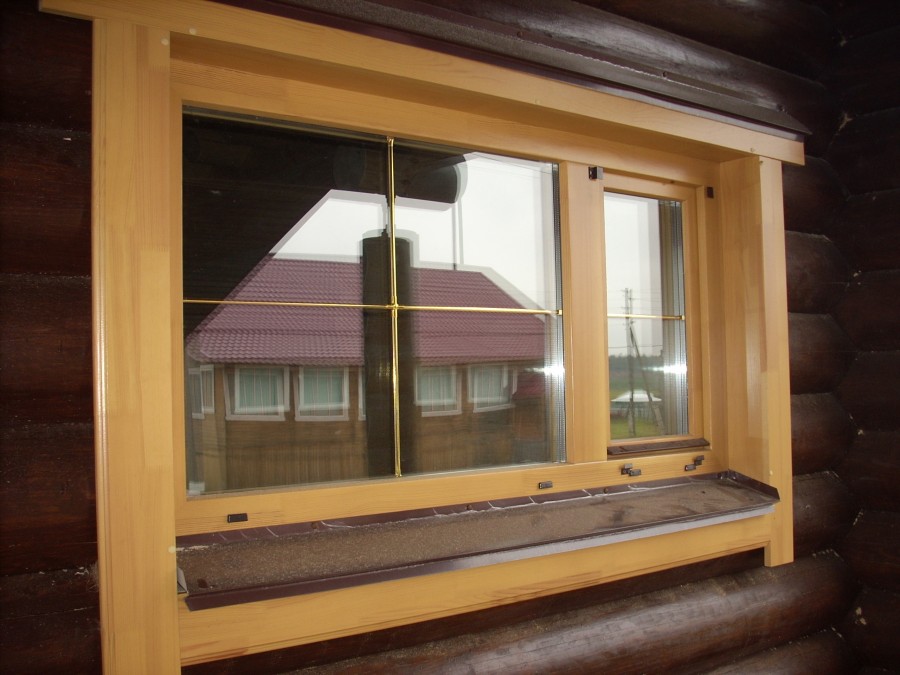
It is common to see double-glazed windows in windows that are assembled from a metal-plastic profile. But not everyone has the desire to install just such structures in their home. Someone prefers wooden windows due to the large number of advantages that they have.
In fact, there is a way to combine the two technologies and build wooden windows with double-glazed windows. How this can be done will be discussed in the article.

Preparatory stage
Making a wooden window yourself will require not only the basic carpentry tools, but also the skills to work with them, since high accuracy will be required. From the main you will need:
- roulette;
- square;
- screwdriver;
- drill;
- plane;
- chisel.

You can also use machines if they are available. The process of direct manufacturing is preceded by a preparatory one, which includes the creation of a drawing of future structures. To compose them, you must first determine what exactly the window design will be:
- deaf;
- with two doors;
- with one sash.
Depending on the installed fittings, there can be various ways of interacting with the sash. Wooden windows with double-glazed windows do not exclude the presence of vents, so you should also think about them. Measurements for the window are made directly at the place where it will be mounted. Even with visually identical dimensions, there may be differences in the size of the openings, which will create problems during installation.
If the work will be done independently, then the drawing can be done in free form. It is better if the scale is observed, and this is easier to do on a sheet in a cage. This approach will allow you to more accurately calculate the required material, which includes not only wood, but also fittings in the form of hinges, hecks and bolts.
Advice! Accessories for your window can be purchased at a specialized store or from those who assemble metal-plastic structures.

You can use any wood as the basis for the window, the only question will be the ease of processing and service life. Due to cheapness and availability, many opt for pine. There is also an option to assemble an oak window frame. Don't do this if this is your first window project, as working with oak can be a real hassle.

Self-drying wood should be done with sufficient experience. Otherwise, it is better to purchase ready-made dried boards. This is due to the fact that if the drying technology is violated, cracks may appear in the wood or the boards will deform. It is also worth paying attention to the presence of knots. It’s good if they don’t exist at all, because during the operation it is from them that the process of decay can begin.

The next step is the preparation of blanks, which are cut out according to the drawing of the window. In the process of sawing, gaps of a few millimeters can be left, which will later be processed by a milling machine. If it is not possible to use a solid board, then glued laminated timber is also suitable. It will be quite easy to work with a board with a section of 15 by 5 cm.
Assembly process
After completing the preparatory process, you can proceed to the assembly of the window, which begins with the box.
box

The frame serves as the basis for the construction of the window. Since the blanks for it are already ready, you can start connecting them. To do this, it is best to use a proven tenon-groove joint. To implement it, spikes are cut out at the end of one of the parts, which in width must correspond to the width of the board. In the counterpart, in places of the spikes of the previous one, recesses are made into which they must go. The illustration shows an example of such a connection. After the window frame parts are fitted, you can fix them. To do this, PVA glue or other suitable wood glue is applied to the joint. You need to wait a few minutes for it to soak in a little. After that, the details of the window frame are fixed.
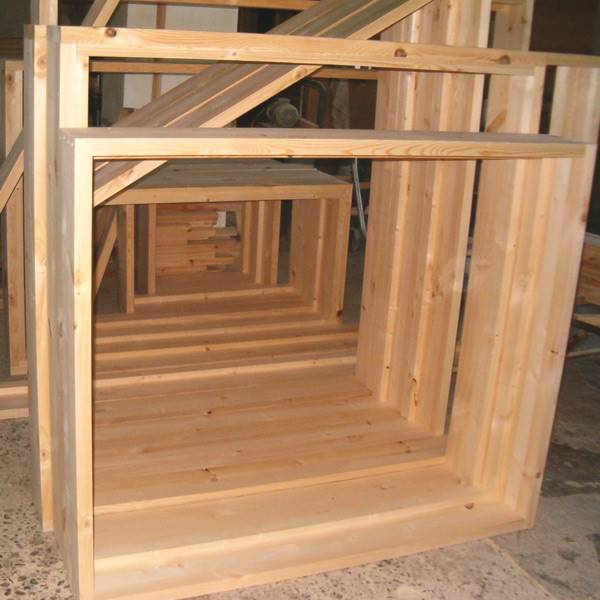
If you leave everything in this form, then the frame is easy to loosen, and it is deformed. To prevent this from happening, you will need to further strengthen the joint. To do this, you need to use a dowel. A hole is drilled exactly in the center of the junction. A wooden cylinder is inserted into it according to the diameter of the hole. It must also be impregnated with glue first. To prevent the window frames from losing their configuration during the drying process, they can be clamped with clamps.
Frame

According to the finished window box, it is easier to make a frame for it, since measurements are already taken after the fact. It is better to entrust the measurement process to someone who has experience in making windows, because there are a significant number of nuances that are difficult to take into account during the first experience. The minimum size of the beam, which will be the easiest to process in the manufacture of the window frame, has a section of 60 by 40 mm. Under the windows into which the double-glazed unit will be inserted, the moisture content of the wood should not exceed 12 percent. If we talk about the breed, it is better if it is beech, oak or hornbeam.

Pay attention! It is better to assemble a window frame from a solid bar or from one that was glued not in length, but in thickness. This is necessary for greater rigidity of the window, which is especially important for sashes that will open.

In the case of installing a double-glazed window, a groove will be required as for a single-pane structure, but in this case it is made deeper, and its size is determined by the thickness of the double-glazed window. In order for the groove under the double-glazed window to turn out to be even and meet the required characteristics, it is better to process it with a milling cutter, and not with a chisel. It should also be understood that the double-glazed window will be fixed with a glazing bead, so a gap should also be provided for it. When all the blanks for the frame are ready, you can begin to connect them. But it will not be performed in the same way as for the box. In this case, you will need to make a wash down of the ends at an angle of 45 degrees, while making a spike and a groove. The joints are glued and set aside until completely dry.

After the frame has dried, all fittings are installed. At the same time, you need to be careful, because in the appropriate places you will need to make cuts and select the necessary recesses in the box into which the window frame will be installed. A video on assembling an affordable window design is below.
Window installation
The installation process of the fabricated structure begins with the preparation of the opening. If necessary, it can be expanded or, conversely, made smaller. All surfaces are cleaned of debris and made as smooth as possible. Cracks can be sealed with tile adhesive, which will subsequently be covered with putty. The next step is to fix the manufactured box. It must be placed in the opening along the vertical and horizontal levels. To level it, you can make lining of wooden pegs. Next, markings are made and holes are drilled both in the wood and in the wall. It is better to fix the box with a frame anchor, for the head of the self-tapping screw it is necessary to make a sweat so that the window frame stands up without a hitch.

A frame is installed on the box. It must be well fitted so that no air enters through the cracks. For additional fixation and sealing, special compounds can be used. The next step is to hang the sash, if provided. Loops are pre-hung if this has not been done before. The last step is the installation of double-glazed windows. They are fixed in their places with glazing beads. Typically, the design of an insulating glass unit provides for the presence of a sealing tape that closes the space between the glass and the frame. Next, you can install the handles in their place.

The last step is to eliminate the gaps between the box and the window opening. This is done with mounting foam. In this case, the frames should be closed, and the foam should not be applied much, because when it expands, it can deform the wooden structure of the window. When the foam dries, it must be cut off. The next step is to install the window sill. The part that will protrude above the radiator should not have an overhang of more than 5 cm, as it will be easily damaged. The window sill sits on the mounting foam, after which it must be pressed down well. The final stage of window installation is the decorative trim of the slopes. It can be done with drywall or putty.
Production of double-glazed windows
A double-glazed window for a wooden window can also be assembled independently. All components can be purchased at a specialized store. To work you will need the following:
- glass;
- remote profile;
- dryer;
- butyl tape;
- corners.

The first step is to cut the glass for the future window. You can order cutting from the masters or do it yourself if you have a good glass cutter. The number of glasses will depend on the desired number of chambers in the double-glazed window. If there are two cameras, then there should be three glasses. Next, a blank of a remote profile for a double-glazed window is made. The size of the frame that will separate the glass should be 5 mm smaller on each side. This is required to attach the seal. Before assembling the spacer frame, it must be filled with desiccant. To do this, one side is closed with a connecting corner, and backfilling is made through the other end. The fill should be 40%. A dehumidifier is needed to eliminate moisture between the panes, which can lead to mold.

Now you can start assembling the double-glazed window for the window. The degreasing of the glass surface on which the distance frame will be mounted is carried out. Butyl tape is glued to the distance frame for the double-glazed window. After that, the frame is laid on the glass. From above, the frame is once again covered with butyl tape and covered with another glass. The operation must be repeated if the double-glazed window for the window is two-chamber. Now it remains to fill the space between the ends of the glass and the remote frame. For this, a polyurethane or polysulfide composition is used. They can be applied with a spatula. You have to be careful not to leave bubbles. The drying process can take up to 12 hours. You can see the assembly sequence of a double-glazed window for a window in the video below.
Summary

As you can see, it is really do-it-yourself to make a wooden window with a double-glazed window. For greater tightness of the window, it is better to use factory double-glazed windows. This is due to the fact that some of them are produced filled with an inert gas, which reduces heat loss. When assembling the window frame, it is worth practicing on blanks, which will allow you to acquire the necessary skill before assembling the finishing structure. The work of making a window does not tolerate haste, which often leads to errors.
Repair of minor defects
Additionally, you can fasten the docking points with self-tapping screws, however, the holes for them must be drilled in advance, so that later, when assembling the window frame from wood with your own hands, the elements do not split.
Treatment
After the glue has dried, you can start processing the frame. To do this, it is sanded, and then covered with a primer with a brush, which raises the pile.
This is necessary so that the villi rise, you sand them, and then, after varnishing, they do not rise again. Wooden elements treated in this way will be smooth and neat.
So, after the pile has risen, pick up the skin or use the “bee” to clean off the pile, then re-cover, wait for it to dry and sand again.
The final step will be varnishing the frame. It is important to apply an even layer so that there are no smudges on the frame. We also recommend applying at least two coats so that everything is covered perfectly.
So, the frame for the windows made of wood with your own hands is ready.
Sealing a conventional wooden frame
double glazing
Frame making
First, we measure the inner contour of the sashes that will need to be inserted into the frame. Now subtract 10 mm in length and width, and in such dimensions you cut off the elements you need from the existing remote profile using a hacksaw.
Fasten the two elements together with a plastic corner. Pour silica gel into one of the parts, then put the corner back on and pour silica gel again, with which you must fill each side of the frame. So there is a frame.
Now take double-sided tape in your hands, and glue it along the frame in such a way that the glass then stands on it (that is, along the contour).
Cutting and pasting glass
So, let's move on to the crucial moment of answering the question of how to make a window with your own hands, to cutting and inserting glass into a double-glazed window.
Glass is cut with a glass cutter. You draw along the line with a tool with pressure, and then break along it. The dimensions of the glass must be clearly defined along the inner contour of the frame (do not subtract 10 mm as for the frame).
Fastening and sealing
Now put the glass on the frame you made earlier, only in such a way that 5 mm protrude beyond this frame just on all sides.
Important! Fasten carefully, it will be difficult to rearrange the glass later!
Perform similar actions on the reverse side. You should get such a double-glazed window on a frame, beyond which about 5 mm of attached glass protrudes on all sides.
Today, plastic windows are in the greatest demand among consumers, but this does not mean that wooden models have lost their relevance. The main advantage of such structures is as follows: almost anyone can make wooden windows with their own hands.
Advantages
Today, wooden windows with double-glazed windows are considered an elite option that not every homeowner can afford. In terms of their technical and operational characteristics, they are in no way inferior to PVC structures, and in terms of environmental safety they are in many ways superior.
The undoubted advantages of wood models include:
- naturalness;
- safety in use (they do not emit toxins during temperature changes, with high-quality installation they do not change their parameters);
- ease and convenience of installation, repair work;
- aesthetic appeal (dirt is almost invisible on wooden models);
- several opening options, mosquito net.
Of course, such designs are by no means cheap. But making them yourself is a way to save money.
Wooden windows made on special machines are distinguished by the accuracy of assembly. But compliance with all technological features of the process of connecting various structural elements will make it high-quality and reliable.

Instruments
To make a similar window with your own hands, you will need the following tools:
- drill;
- a hammer;
- screwdriver;
- milling machine;
- roulette;
- ruler;
- glazing bead;
- glue;
- sealant;
- fasteners.

box
The most popular among the materials for the manufacture of the box among middle-class consumers is pine. It is affordable and practical to use.
An oak window will be of better quality. But this material is quite expensive, so experts do not recommend making a window structure from it for the first time. Also, do not use soft woods.
Pine boards that will be used for the box must be properly dried.
When buying a board, choose material without knots, cracks, undeformed. The box experiences the greatest load, so it must be made of high-quality board.
If glued laminated timber was chosen, then, subject to high-quality installation, you are guaranteed to receive a high-strength window, it will not change its parameters during operation.
To avoid subsequent deformation, the window block should be a couple of centimeters smaller than the opening.
Depending on the thickness of the window, a bar of a certain size is selected. The minimum indicator is 6 * 4 cm.
Grooves in the timber can be made using a milling cutter or an electric planer. Before carrying out this stage of work, it is best to practice on a separate piece of the board.
First you need to make measurements, according to which it will be possible to make a box. In the blanks for it, to a depth of 1.5 cm, grooves should be made in the shape of the letter G. The ends of the bars are cut down at an angle of 45˚. After that, all the elements of the window box must be connected with carpentry glue, make holes in them, through which insert wooden rods 3 cm long.
Do not forget to grease the holes for the wooden rods with glue.
Thus, the resulting structure will become fixed and rigidly fixed at a right angle.
The opening in which the box will be mounted must first be prepared: cleaned of debris and dirt, leveled. Holes should be drilled in the walls (in increments of no more than 80 cm), into which dowels should be driven. The box is fixed with self-tapping screws.
After that, with the help of mounting foam, it is necessary to close up all the gaps between the walls and the box. The advantage of this fixation is as follows: the design does not depend on temperature changes.
It must be remembered that the geometry of the window must be strictly observed: corners - 90˚, diagonal difference - no more than 10 mm, deviations in evenness - no more than 1 mm per 1 m of the length of the window block.

Frame
Experts advise to invite professional craftsmen to measure the frame, since the slightest mistake in the calculations can lead to undesirable consequences. It is best to make a frame from a bar with a cross section of at least 6 * 4 cm. For euro-windows, a bar is needed, the humidity of which does not exceed 12%. Oak, hornbeam, beech are ideal for such structures.
It is worth using whole pieces of timber for the manufacture of frames, it is better to make it from several boards in several layers, connecting each of them with wood glue; make sure that the fibers of each layer are perpendicular to the fibers of the previous one.
The number and thickness of glass, the parameters of the glazing bead depend on the shape of the frame profile. The single glass model has a pair of rectangular slots. The double-glazed window has an additional groove for the second glass.
The profile is shaped using a milling cutter or an electric planer. In this case, glass with a thickness of 4 mm and a glazing bead with a thickness of 10 mm are used.
The prepared boards are sawn, the sawing angle along the edges should be 45˚. They are connected according to the type of thorn-groove and fixed on self-tapping screws so that their hats are recessed into the tree (if desired, they can be “hidden” under a mixture of glue and sawdust).
Then the entire structure is assembled, the joints are carefully coated with carpentry glue. After the frame is dry, the joints are sanded.
Window models with a sash need to install fittings.
Do not forget to treat all wooden components with an antiseptic composition before installing both the box and the frame.
Glasses can be mounted only after the frames are installed.

Installation Features
In order for a wooden window to be installed strictly horizontally, it is necessary to use mounting blocks. The window is carefully adjusted beforehand, then fixed with wedges.
If your window is more than 1.5 m, then install an additional mounting plate in the middle of the structure.

glass
It is important to correctly calculate the size of the glass, this will avoid the formation of cold bridges. Measurements are taken with an accuracy of 1 mm. When cutting glass with a diamond self-tapping screw, you must take care of safety precautions (use gloves to protect your hands, goggles to protect your eyes).
Prepared pieces of glass are inserted into the frame for fitting, then they are removed. Sealant is applied to the grooves and the glass is inserted again. Then the whole structure is fixed with a glazing bead using small nails.

Finishing touches
A fully prepared do-it-yourself structure is installed in the grooves and fixed on self-tapping screws.
Self-tapping screws must go through the box, a mounting gun will help you do this.
At the last stage, it is necessary to close up all the cracks with mounting foam, let it dry and plaster the surface of the walls.
After that, you can mount the ebbs and the window sill.
As you can see, making wooden windows with your own hands is quite possible. Of course, for this it is necessary to adhere to a certain sequence of work and observe some technological subtleties.
If you doubt that you can make such designs yourself, seek help from professional craftsmen. They will manufacture and install wooden windows quickly and efficiently.