Drip irrigation in the greenhouse and in the garden with your own hands. Components and layout options
Manual watering of the site eventually turns into a burdensome task, which you want to do less and less. Automatic or automated irrigation will help solve the problem. The design of the system and the installation of all its components can be handled on your own. How? Read on.
We provide installation instructions for two irrigation systems: a large-scale automatic using a programmable controller and a modest manual, equipped on the basis of a barrel.
Before proceeding with the arrangement of any of the two systems under consideration, you need to choose a source of water and suitable for a particular situation. pump equipment. Water can be taken from:

Table. Pump Malysh used for pumping water from open reservoirs, wells and wells. Characteristics
| Pump Kid, characteristics | Indicators |
|---|---|
| Pump type | Household vibrating submersible |
| Current consumption | 3 A |
| Power | 165 W |
| Water intake | Lower |
| pressure | 40 m |
| Performance | 432 l/min |
| Length of cable | 10-40 m |
| Continuous work | No more than 12 consecutive hours |
| The need to turn off the power for 15-20 minutes | Every 2 hours |
| Connection | To flexible hose |
We do full automatic watering

We draw a plan
Let's start with the design of the site plan. On a scale, we will mark on it the main elements of our estate: a house, a veranda, an entrance, an outdoor stove, etc. - so we can determine the permissible area of \u200b\u200bsprinklers.

On the diagram we mark the point of water intake. If there are several water sources and they are located in different places plot, select a crane located approximately in the middle. In such a situation, we will be able to provide approximately equal length of irrigation lines
Choosing an irrigation method

In this example, the system is set up to irrigate a large lawn and several beds, as well as an area with shrubs and trees. You can also adjust the layout to suit your site.

The part with the lawn and flower beds will be watered with the help of retractable sprinklers. When turned on, they rise above the surface, and after watering is completed, they fall and become almost invisible.
For the second part of our plot, this irrigation option is not suitable: the plantations are too high, and the plot width is small.

Important note! The use of sprinklers to irrigate areas less than 2 m wide is not recommended. Such devices have too large a range, which can cause a number of inconveniences.

To irrigate this part of the plantations, we lay a drip line. It is a pipe of the required length with holes arranged along the entire length. Such a pipe can be buried or simply laid between the beds.
We draw up an irrigation scheme
We mark on the plan of our site the points of installation of sprinklers and the radii of their coverage. We adhere to the following design order:
- at the corners of the site we install sprinklers for irrigation at 90 degrees;
- along the boundaries of the territory we install devices that irrigate the space 180 degrees around them;
- at the corners of the site near various buildings and structures, we install sprinklers at 270 degrees;
- on the area we install devices that water 360 degrees.
We select the number of sprinklers so that the coverage radii of devices installed next to each other intersect. With this placement of devices, not a single plant will be deprived of moisture. However, this method is relevant only for large areas that have the correct shape.
In our example, the plot area is relatively small, while it has a narrow strip along a residential building. Therefore, we draw up a project in the following order:
- First, we mark the installation sites of sprinklers with the largest radius of action. We will use them to water the main part of the garden;
- on the narrow side of the site we mark places for sprinklers with a more modest irrigation radius;
- in places where sprinklers do not reach, we plan to lay a drip line.
Important! Check the project. Ensure that all plantings will receive water.
We check the water intake for throughput
The finished plan allows us to set right amount sprinklers. However, before installing the system, we must find out whether the performance of the water supply source is sufficient to effectively service the system being built. We do it like this:

Now we determine whether the water intake can ensure the simultaneous operation of all planned irrigation lines. The need for sprinklers remains the same and is determined according to the area covered. In our example, we set:
- devices for 180 degrees with a coverage area of up to 200 m 2 - 2 pieces. The water requirement of each appliance is 12, totaling 24;
- sprinklers at 270 degrees with a coverage area of up to 200 m 2 - 2 pieces. The need of each is 14, total - 28;
- 180 degree device with coverage up to 50 m 2 - 1 piece. Need - 7;
- device for 270 degrees with coverage up to 50 m 2 - 1. Demand - 9;
- sprinkler at 90 degrees with a coverage area of up to 50 m 2 - 1. Water requirement - 6.
In total, the water requirement of our irrigation devices is 74. The water intake is only able to give out 60. It will not be possible to connect all devices to one line for simultaneous use. To solve the problem, we make two lines of sprinklers. One will be used for maintenance large devices, the other is for the little ones.
For drip irrigation, we make a third line. It requires individual management, as the main lines are turned on for about half an hour every day, and the drip lines should work for at least 40-50 minutes, depending on the characteristics of the soil and the needs of the plantations.
It is impossible to connect a drip line and sprinklers to a common line. With such an arrangement of the system, the area served by sprinklers will either be watered too abundantly, or the area with drip irrigation will not be able to receive liquid in sufficient volume.
We automate the system

To regulate the operation of the system, we install a programmable controller. With this device, we can set the time to turn on and turn off irrigation. For the safety of the device, it is recommended to install it indoors, for example, in the basement.
Near the water supply tap, we install an inlet column for connecting the system, as well as a special mounting box for placing shut-off valves according to the number of irrigation lines. We have 3 of them. Each valve is connected to the controller using a two-wire cable. From the valves we divert one irrigation line. Such an arrangement of the system will allow it to be programmed to turn on each irrigation line separately.

We set up the lines as follows:
- one was taken to feed the large sprinklers. For the manufacture of the line itself, 19 mm pipes were used, for branches to sprinklers - pipes of 16 mm diameter;
- the second was used for small sprinklers serving an area of up to 50 m 2 . Pipes used similar;
- the third line was allocated for drip irrigation. For the manufacture of this line, a 19 mm pipe was used. Next, we connected a special drip pipe to it. It is made in the form of two closed loops. End drip pipe we connected to the supply pipe.
To improve irrigation efficiency, we have included a rain sensor in the system. It will not allow watering to turn on during rainfall. We connect the sensor to the controller according to the attached instructions. In most cases, the controllers themselves are plugged into an ordinary outlet, which is very convenient.
Connecting and configuring irrigation
First step. We place irrigation elements on the site and connect them to each other using special connectors and splitters. We make sure that no earth gets into the pipes.


The design of the connectors is very simple - even a woman can easily cope with the work
Second step. We connect assembled system to the water supply and do a test run. We expose sprinklers in the right directions. If everything is in order, we proceed to earthworks.
Third step. We dig a 200-250 mm ditch along the pipeline.
Fourth step. We fill the bottom of the trench with a layer of gravel. The backfill will take on the functions of a drainage cushion, which ensures the removal of residual water.
Fifth step.

Sixth step. We carry out backfilling of the trench.
Seventh step. We turn on the system for verification. Adjusting sprinklers.
Eighth step. We program the controller to turn irrigation on and off at the required time. Remember: the lines must work alternately, it is possible to turn them on simultaneously only with sufficient water intake capacity.


Irrigation is connected and configured. We can accept it for permanent operation. In the future, we regularly check the condition and correct operation of the elements of the irrigation system.
Irrigation on a budget


No need for large-scale automatic irrigation? Then use a simple budget option based on the barrel.
First step
We make a stand for the barrel. We use a profiled pipe or channel. Optimal Height supports - 1.5-2 m. The support posts should be tilted to each other at such an angle that the dimensions of the upper frame make it possible to stably lay our barrel. We connect the supports with horizontal jumpers at the bottom, in the middle and at the top. We swarm 70-80 cm pits for the installation of supports, expose the structure, fill 10-15 cm of the height of each pit with crushed stone and pour concrete. Important! At the time of concrete hardening, we fix the supports with spacers.


Drip irrigation - water tank
Second step
Preparing a container for water. Any whole and not rusty barrel will do. At the top of the barrel we cut a pipe for connecting a hose. Through it, the barrel will be filled with water. Connect the other end of this hose to the water intake. In the lower part we also equip the pipe. We connect a hose for irrigation to it. We complete both hoses with taps for turning the water supply on and off. We put the barrel on the support. For greater reliability, we fix it with clamps, bolts and nuts.
Third step
On the site plan indicate the places that need watering. We draw a diagram of the irrigation system indicating all the splitters, connectors, plugs, taps, pipes, hoses and other elements.
Fourth step
We assemble the irrigation system. The simplest and convenient option- buy ready kit for drip irrigation. Also, such a system can be done independently. To do this, it is enough to prepare the required number of pipes or hoses, make holes along their length, connect the elements into a single system using connectors and splitters, and then connect to the hose coming out of the barrel.


In today's issue, we will look at the drip irrigation system. All gardeners know that plants need moisture to grow properly. Yes, of course ... you can run a hose into the greenhouse or beds, but such a procedure requires additional time and money.
By the way. About greenhouses and a variety of greenhouses
Now, in a period of unstable economic situation in the country, people are trying to save family budget and reduce all costs. Savings not only in order to make an irrigation system from improvised materials, but above all, to save on water and get a rich harvest as a result.
That is why, you can take care of the crop with the help of drip irrigation. And honestly, this is a new trend!
The system can be made independently, and it does not require large cash outlays. In addition, installation is quite simple, so any summer resident can easily cope with this task.
If you make the wrong water supply on the land, you may encounter uneven distribution of moisture. Water will absorb, mostly only the first plants due to the pressure in the hose.

A significant advantage of such a system is that only the roots of the plant are moistened, while the earth and leaves remain dry, this avoids sunburn. In addition, such watering prevents the rapid growth of weeds.
Experts note that gardeners can save up to 80% on water consumption. At the same time, all plants receive a sufficient amount of moisture necessary for normal growth.
To make such a system at your site, you need to flat surface, at a height of 1 m, install a container with clean water. After that mount necessary elements and start irrigation.
Irrigation system maintenance:
- If possible, the container should only be filled with clean water.
- Clean filters regularly.
- Before polis work, flush the pipes.
- To avoid clogging the system, it is recommended to use only liquid fertilizers.
- With the onset of autumn, dismantle all the details of drip irrigation.
Subject to these simple rules, the system can be operated for several seasons.
How to make drip irrigation with your own hands without high costs?

The system of such watering plants was developed in arid regions in the last century. To date, manufacturers offer expensive and complex irrigation systems. Therefore, not every gardener can afford to buy it. But you can do it yourself. In this case, the system will perform fewer functions compared to industrial counterparts, however, with correct use will effectively water the plants.
The easiest option is to use a flexible hose for each plant. First of all, you need to install a barrel or canister with a volume of more than 100 liters. The container must be installed at a height of at least 1 m. drainpipes, the container will always be filled when it rains.

To prevent dirt from entering the hoses, they are installed at a height of at least 5 cm from the bottom of the container. Before that, you need to do the wiring, and decide on the places of the droppers.
Impossible to do accurate calculations, therefore, the number of holes in the hose and the length are recommended to be done with a small margin. If they are redundant, then it is easy to turn them off.
At the next stage, you need to make the wiring and mount the cranes, the number of which depends on the characteristics of the system. It is enough to purchase the simplest options, they will be enough to perform basic functions.

How to perform drips?
To do this, you can use one of the methods:
- Buy a special sleeve from an agricultural store with holes.
- Heat the nail and make the required number of holes.
- Insert small bends up to 30 cm long into the main hose. A rubber or plastic hose is suitable for this.
Make holes with a drill to avoid torn edges. And preheat the main hose in hot water.

After that, you need to connect all the elements into an integral system, then make the first launch and check its effect.
Drip irrigation from plastic bottles?

With the help of ordinary plastic bottles, with a volume of 1.5-2 liters, you can make the simplest irrigation system. Several holes should be made in the lid of each vessel, the diameter of which should not exceed 2 mm.
Small holes can be made with a heated nail. You can also purchase special pegs that are put on the neck of a plastic bottle.
Cut the bottom of the plastic bottle to prevent moisture from evaporating. Then dig a hole, approximately 15 cm deep, and insert the bottle there, at an angle of 45 degrees. At this stage, you need to be careful not to damage the roots of the plants.
Fill the container with water, which will flow to the root system, through the holes made. In addition, with the help of drip irrigation with plastic bottles, you can fertilize plants with liquid solutions.
Such a simple system will feed the sprouts for several days. This method is suitable for summer residents who do not have the opportunity to water the garden daily.
Drip irrigation from polypropylene pipes

Unlike metal pipes, polypropylene counterparts have great advantages. In addition, the material is quite cheap, and is suitable for assembling a drip irrigation system.
Before assembly, you need to prepare the following:
- Capacity with a volume of 100 l. Water will be heated under the action of sunlight, which has a beneficial effect on plants.
- Ball valve.
- Filter for water purification. Otherwise, the system will quickly fail.
- Capacity for nutrient fertilizers.
- Pipeline
- Branches from polypropylene pipes or special tapes that are connected using special tees.
To determine the size of the materials, you need to mark the land. For watering 1m2, you will need about 30 liters of liquid per day, depending on the type of planting. You also need to calculate the number of taps and the distance between the installed droppers.
To ensure the necessary pressure, it is recommended to install the tank at a height of 1-2 m. This will be enough to provide irrigation of 50m2. The container is established on a strong and equal support.
The tap is installed in a hole made in a container with water, at a height of 10 cm from the bottom. On the other hand, make a connection with country water supply. To fill the container to a certain level, it is recommended to use a float valve.
For cutting polypropylene pipes for bends, special scissors are used. You can also use a construction knife or a hacksaw for metal.
Pipes can be fixed to fittings by cold welding, soldering or crimping. The most reliable option is soldering, for this you need a special tool with nozzles.
The polypropylene material is connected to the main line at the surface or at a depth of 75 cm. The filter is installed directly to the tank. Make a plug at the end of the main pipe.
The next step is to make droppers. To do this, in the tap do required amount holes. At the end of the outlet pipe, it is also necessary to install a plug.
At the last stage of assembling the system, you need to connect the water supply to the water tank, fill it, and start drip irrigation.
Or is it better to buy a drip irrigation system in an online store?

As can be seen from the examples above, it is not at all difficult to make a watering system on your own. But if financial condition allows, then you can order it in the online store. Today, there are many companies that sell components via the Internet.
In this case, you can purchase a ready-made kit at a price of 1,000 - 4,000. The cost depends on the functionality. If the system works in automatic mode, then the summer resident can practically not participate in the irrigation process.
Therefore, each person chooses for himself, to make equipment with his own hands, while you will need to buy the necessary components or take advantage of the offers of online stores.
Drip irrigation is considered one of the most modern ways of moistening beds in greenhouses and open ground. How to make a drip irrigation system with your own hands is of interest to many greenhouse owners, because this method of watering plants is cost-effective and convenient. This is due to the fact that plants receive the necessary moisture with little or no human intervention.
Methods for installing a drip irrigation system and do-it-yourself manufacturing options are described in this article.
How to make a drip irrigation system with your own hands
It is possible to do such irrigation with your own hands, but it is much faster and more convenient to buy a finished structure and assemble it on the spot.
How to assemble the structure with your own hands will be described below, but first we will try to figure out which preparatory work needs to be done in order for it to function smoothly.
Territory preparation
Before you do this irrigation, you need to prepare the site. In our case, we consider the installation of irrigation in a greenhouse, so we will take as an example the construction of a closed ground (Figure 1).
Automatic irrigation involves the installation of a reservoir for storing water and distributing tapes among the beds. It is important that you need to mount the structure immediately after ready-made beds, and it is not recommended to change their location in the future. Of course, you can increase or decrease the number and size of the beds, but in this case you will need to re-assemble.
 Figure 1. Preparing the premises for the installation of an irrigation system
 The tapes are laid out in the beds so that the droppers are near the main plants. Plugs are installed at the ends of the pipes to prevent water loss. They must be removable so that during the cleaning of the system the water can be quickly drained.
Tank installation
The water storage tank should be located at the beginning of the building. It must be placed on an elevation (about 2 meters above the ground) so that water enters the pipes under the action of gravity (Figure 2).
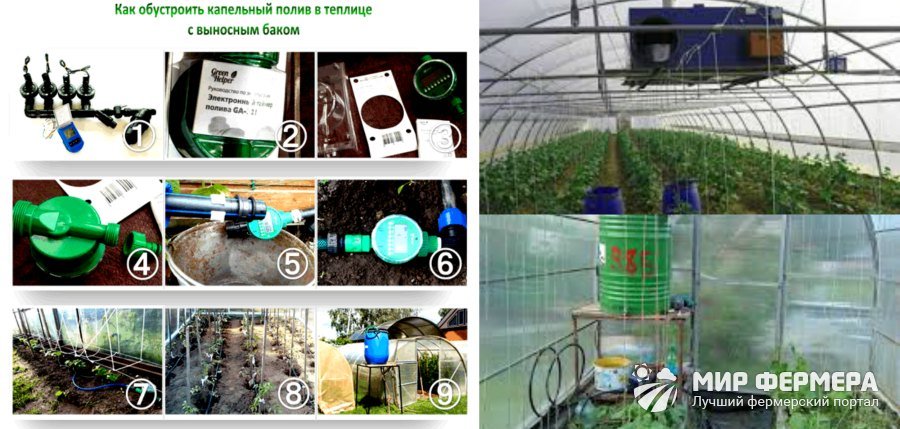 Figure 2. Installing a water storage tank
 If there is not enough space for the tank in the room itself, it can also be installed outside the structure by laying pipes on the ground. But in this case, the water must be drained for the winter so that it does not damage the tank when it freezes.
Starter installation
In ready-made kits, all the necessary elements (except for the tank) are provided in the complex. On site, you only need to connect the hose to the tank, install the starter on the tank and program it to automatic switch on and switch off with a sensor.
The starter is connected to the tank by drilling a hole with a diameter of approximately 14 mm in the main pipe. It is this device that starts the water and stops it if necessary. If you are not buying a finished product, but only parts of it, choose your starter carefully. It must be powerful enough to provide water to all plants, therefore, when buying, be sure to take into account the number of beds and the area of \u200b\u200bthe room itself.
How to calculate drip irrigation for your site
In order for the soil moistening design to exactly match the size of your greenhouse, you need to accurately calculate the length of the tapes and their number.
To do this, you need to measure the length of the beds. For example, if you have 10 beds of 15 meters in length, you need to buy a little over 150 meters of tape. The reserve is needed in order to eliminate possible losses during installation. Plugs must be installed at the end of each tape, and fine filters near the water tank so that the hoses do not become clogged with debris, sand or plant residues.
How to make drip irrigation yourself
How to make drip irrigation in a greenhouse yourself without large financial costs, the tips below will tell you.
From bottles
For small buildings, homemade designs from plastic bottles are perfect.
To do watering yourself in the country or in the greenhouse this method, you need to use this step by step instructions(picture 3):
- A hose is laid out along the beds and holes are drilled in it. The hose can be laid out both on the surface of the earth and underground. The last way more suitable for closed ground structures.
- A plastic bottle with holes in the bottom is placed near each plant.
- A medical dropper is inserted into the neck of each bottle, which is connected to a hose.
 Figure 3. Installation of bottle irrigation
 This design will ensure a constant supply of moisture directly to the roots of the plant. But for this it is necessary that it has a stable water pressure, the tank is installed on a hill, and the main pipe is supplied with a starter.
The video shows how you can make a similar design from plastic bottles.
From medical droppers
You can make such watering in the greenhouse yourself with the help of medical droppers. The principle remains the same as for the installation of a bottle structure (Figure 4).
Lay out along the entire length of the beds flexible hose, which is attached to the main pipe and water storage tanks. Holes are drilled in the hose into which droppers with special valves are inserted through which water will flow to the plants.
 Figure 4. Scheme of installation of irrigation from medical droppers
 The main difference between such a system is that water does not flow to the roots, but to the surface of the soil, and the number of droppers can be any.
Automatic drip irrigation
Automation of the introduction of moisture greatly facilitates the care of plants, since the saturation of the soil with moisture is carried out practically without human intervention.
To mount a similar design, a controller operating on an autonomous battery is installed on the water tank. The tank, in turn, is connected to the water supply, and when it is empty, it is automatically filled. Automation also involves the installation of sensors that will start and turn off soil moisture in time.
How to make drip irrigation in a greenhouse
Assembling a spot irrigation system yourself is quite a feasible task. To do this, you need to buy a ready-made kit and simply mount it on the spot.
Note: At the moment, Dusya and AquaDusya are considered the most popular products. The latter is fully automated, while the former is considered simple and suitable even for small greenhouses.
To properly install, you need to follow some recommendations:
- Make an installation plan and schematically draw the location of hoses and drippers;
- Install a water tank above the ground to maintain a stable pressure in the pipes;
- Lay out pipes or flexible hoses for water supply on the beds;
- Install starter and electronic sensors on the main pipe and water tank to automate watering.
At the final stage, the finished structure in without fail tested to check if the water is flowing normally and if the hoses are leaking.
From the central water supply system
If your property has running water, automatic watering in the greenhouse is not difficult. To do this, just connect the water storage tank to the central water supply and install a special sensor that will fill the tank.
This design allows you to almost completely automate watering, but it should be remembered that for the winter all its elements are dried and removed.
How does a drip irrigation system for a greenhouse work?
Principle of operation similar structures in a greenhouse is quite simple. Water is constantly stored in a special tank and enters pipes or hoses under pressure.
Holes are made in all hoses into which droppers are inserted. Through them, water seeps in small drops and enters the soil. It is this method of providing moisture that is considered the most convenient, since all plants, without exception, receive the right amount of water. However, it is also impossible to leave the irrigation structure unattended: valves, hoses and droppers must be checked periodically in order to eliminate a blockage or malfunction in time.
Greenhouses often grow not only vegetables, fruits and herbs, but also houseplants in pots, which also need high-quality watering (Figure 5).
 Figure 5. Scheme and example of installation of an irrigation structure for closed beds and indoor plants
 In this case, the system will be beneficial for several reasons. Firstly, it can be installed not only on the ground, but also on vertical racks. Secondly, the design allows you to bring tubes to each pot and plant.
How to choose drip irrigation for a greenhouse
The success of soil moistening largely depends on the quality of the system chosen. To buy a really good product, pay attention to several important parameters (Figure 6):
- Pump power and its functions: in quality products, it not only starts the system itself, but also creates the desired pressure level.
- The walls of the hoses must be strong so that during operation the water does not break through them.
- Sensors should be easy to manage: the ease of use will depend on this.
 Figure 6. Do-it-yourself system assembly tools
 As a rule, quality products are more expensive, but since their operation lasts for years, it is not worth saving on such an acquisition.
How to choose a drip tape for watering
A key role in the use of such irrigation is played by a tape - a flexible hose that is laid out in the beds and brought to the plants.
When buying, carefully inspect the tape. It must be strong enough, but at the same time flexible, so that creases form on it, due to which the entire system may fail in the future.
The assembly technology of such irrigation structures is shown in the video.
Providing water to plants and plantings is one of the concerns of homeowners. Someone waters vegetable beds, someone flower beds and lawns, and someone needs to provide water to the garden. In any case, the procedure takes a lot of time. But that's not all: with the usual way a crust is formed on the surface, which prevents plants from developing, so the soil has to be loosened. All these problems are solved by drip irrigation of plants. You can buy ready-made kits, order turnkey development and installation, or you can do everything yourself. Here's how to make drip irrigation yourself and will be discussed in this article.
Principle of operation and varieties
This technology was tested several decades ago. Its results were so impressive that the system was widely adopted. The basic idea is that water is supplied to the roots of plants. There are two ways:
- poured onto the surface near the stem;
- is fed underground into the root formation zone.
The first method is easier to install, the second is more expensive: you need a special hose or drip tape for underground installation, a decent volume land works. For temperate climate there is not much difference - both methods work well. But in regions with very hot summers, it showed itself better underground laying: less water evaporates and more of it gets to the plants.
There are gravity-fed systems - they require a water tank installed at a height of at least 1.5 meters, there are systems with stable pressure. They have a pump and a control group - pressure gauges and valves that create the required force. There is completely. In the very simple version This is a valve with a timer that opens the water supply for a given period of time. More complex systems can separately control the flow rate for each of the water supply lines, testing the soil moisture and determining the weather. These systems operate under the guidance of processors, operating modes can be set from the control panel or computer.
Advantages and disadvantages
Drip irrigation has many advantages and all of them are significant:
- Significantly reduced labor intensity. The system can be fully automated, but even in the simplest version, irrigation requires literally a few minutes of your attention.
- Reduced water consumption. This happens due to the fact that moisture is supplied only under the roots, other zones are excluded.
- Eliminates the need for frequent loosening. With a dosed supply of water to a small area, a crust does not form on the soil, respectively, it does not need to be broken.
- Plants develop better, yield increases. Due to the fact that water is supplied to one zone, root system develops in this area. She has large quantity thin roots, becomes more lumpy, absorbs moisture faster. All this contributes to rapid growth and more abundant fruiting.
- It is possible to organize root top dressing . Moreover, the consumption of fertilizers due to the point supply is also minimal.
The economic efficiency of drip irrigation systems has been proven repeatedly even in industrial scale. In private greenhouses and gardens, the effect will be no less significant: the cost of creating a system can be reduced to a small amount, and all the pluses will remain.

There are also disadvantages, but they are very few:
- For normal operation water filtration required, which is an additional cost. The system can function without filters, but then it is necessary to consider a purge / flush system to eliminate blockages.
- Droppers get clogged over time and need to be cleaned or replaced.
- If thin-walled belts are used, they can be damaged by birds, insects or rodents. There are places of unscheduled water consumption.
- The device requires an investment of time and money.
- Periodic maintenance required- blow out the pipes or clean the droppers, check the fastening of the hoses, change the filters.
As you can see, the list of shortcomings is rather big, but they are not very serious. This is a really useful thing in the garden, in the garden, flower bed or.
Components and layout options
Drip irrigation systems can be organized with any source of water. Suitable well, well, river, lake, centralized water supply, even rainwater in tanks. The main thing is that there is enough water.
A main pipeline is connected to the source, which brings water to the irrigation site. Then it goes along one of the sides of the irrigated area, at the end it is muffled.
Opposite the beds, tees are inserted into the pipeline, to the side outlet of which drip hoses (pipes) or tapes are attached. They have special droppers through which water is supplied to the plants.

Between the outlet from the source and the first branch to the garden, it is desirable to install a filter or filter system. They are not needed if the system is powered by domestic plumbing. If you pump water from a lake, river, rainwater tank, filters are required: there can be a lot of pollution and the system will clog too often. Types of filters and their number is determined depending on the condition of the water.
Drip Hoses
Hoses for drip irrigation are sold in bays from 50 to 1000 meters. They already have water points built in: labyrinths through which water flows before entering the outlet. These oozing hoses provide the same amount of water throughout the line, regardless of terrain. Due to this labyrinth, the flow rate at any point of irrigation is almost the same.
They differ in the following characteristics:
- Tube stiffness. Drip hoses - there are hard, there are soft. The soft ones are called tapes, the hard ones are called hoses. Hard ones can be used up to 10 seasons, soft ones - up to 3-4. Ribbons are:
- Thin-walled - with a wall thickness of 0.1-0.3 mm. They are laid only on the surface, their service life is 1 season.
- Thick-walled tapes have a wall of 0.31-0.81 mm, the service life is up to 3-4 seasons, they are available for both ground and underground laying.
- Tube stiffness. Drip hoses - there are hard, there are soft. The soft ones are called tapes, the hard ones are called hoses. Hard ones can be used up to 10 seasons, soft ones - up to 3-4. Ribbons are:

Watering can be organized with tapes or hoses

The maximum length of the irrigation line is determined so that the unevenness of the water output at the beginning and at the end of the tape does not exceed 10-15%. For hoses, it can be 1500 meters, for tapes - 600 meters. For private use, such values \u200b\u200bare not in demand, but it is useful to know)).
Droppers
Sometimes it is more convenient to use not tapes, but droppers. These are separate devices that are inserted into the hole in the hose and through which water is supplied under the root of the plant. They can be installed in arbitrary steps - put a few pieces in one place, and then a few in another. This is convenient when drip irrigation of shrubs or trees is organized.

There are two types - with a normalized (constant) and adjustable release of water. The body is usually plastic, on the one hand there is a fitting, which is inserted with force into the hole made in the hose (sometimes rubber rings are used for sealing).
There are also compensated droppers - and non-compensated ones. When using compensated at any point in the irrigation line, the water output will be the same (approximately), regardless of the terrain and location (at the beginning or at the end of the line).
There are also spider-type devices. This is when several thin tubes are connected to one outlet. This makes it possible to simultaneously water several plants from one water outlet (reduces the number of droppers).

Spider-type dripper - you can water several plants from one point of water distribution
Main pipes and fittings
When creating a system for laying main pipeline from the water source to the irrigation zone, plastic pipes and fittings are used from:
- polypropylene (PPR);
- polyvinyl chloride (PVC);
- polyethylene:
- high pressure (HPV);
- low pressure (LPD).
All of these pipes tolerate contact with water well, do not corrode, are chemically neutral and do not react to fertilization. For watering a small greenhouse, garden, lawn, a diameter of 32 mm is most often used.

Main pipes are plastic. Specifically, choose any type: PPR, HDPE, PVD, PVC
Tees are installed at the outlets of the lines, to the side outlet of which a drip hose or tape is connected. Since they are smaller in diameter, adapters may be needed, and their outside diameter should be equal to the inner diameter of the hose (or slightly less). You can attach tapes / hoses to fittings using metal clamps.
Also, taps can be made through special fittings, which are installed in a hole of the required diameter made in the hose (as in the photo above).
Sometimes, after the tee, a tap is installed on each water distribution line, which allows you to turn off the lines. This is convenient if drip irrigation is diluted for moisture-loving plants and those that do not like excess water.
If you are reluctant to choose components and select sizes, fitting diameters, you can buy ready-made ones from various manufacturers.
Do-it-yourself drip irrigation: device examples
There are many options for the device of the system - it easily adapts to any conditions. Most often, the question arises of how to organize irrigation independent of electricity. This can be done if you install a sufficiently voluminous water tank at a height of at least 1.5 meters. This creates a minimum pressure of approximately 0.2 atm. It is enough for watering a small area of \u200b\u200bthe garden or garden.

Water can be supplied to the tank from the water supply, pumped up by a pump, drained from the roofs, even filled with buckets. A tap is made at the bottom of the tank, to which the main pipeline is connected. Further, the system is standard: a filter (or a cascade of filters) is installed on the pipeline before the first branch to the irrigation line, and then the wiring goes through the beds.
For the convenience of introducing fertilizers on the highway, it is possible to provide for the installation of a special unit. In the simplest case, this is, as in the photo above, it can be a container with legs, in the bottom of which a hole is made and a hose is inserted. A shut-off valve (faucet) is also needed. It cuts into the pipeline through a tee.
Shrubs can be watered as needed. fruit trees. The whole difference lies in the fact that the tape or hose is laid around the barrel at some distance. One line is assigned to each tree, bushes can be watered several pieces on one line. Only in this case, you need to use a regular hose, into which droppers with the required water flow should be inserted.
If the low pressure in the system does not suit you, you can install it on the main water supply (see the photo below) or a full one. They will provide water even far located areas.

Can water be supplied directly from the source? It is possible, but not desirable. And this is not due to technical difficulties - there are not so many of them, but due to the fact that plants cold water do not like. That is why most small-scale drip irrigation systems - for greenhouses, vegetable gardens, orchards and vineyards - use storage tanks. In them, the water is heated, and then diluted around the site.
Drip irrigation: how to calculate the system
The capacity from which water is supplied to the system can be one - common, as in the picture above, or separate for each section. With a significant distance between the irrigation objects, this can be more profitable than pulling the main pipeline.
The required volume is calculated depending on the number of plants and the volume of water for their normal development. How much water is needed for watering vegetables depends on the climate and soils. On average, you can take 1 liter per plant, 5 liters per bush and 10 liters per tree. But this is the same as the “average temperature in the hospital”, although it is suitable for approximate calculations. Count the number of plants, multiply by the consumption per day, sum everything up. To the resulting figure, add 20-25% of the stock and you know the required volume of capacity.
There are no problems with calculating the length of the line and drip hoses. The main is the distance from the tap on the tank to the ground, then along the ground to the place of irrigation, and then along the end side of the beds. Adding all these lengths, the required length of the main pipeline is obtained. The length of the tubes depends on the length of the beds and on whether water will be distributed from one tube to one or two rows (for example, using spider droppers, you can dilute water for two to four rows at the same time).

By the number of tubes, the number of tees or fittings and taps (if you install them) is determined. For each branch using tees, we take three clamps: press the hose against the fitting.
The most complex and expensive part is the filters. If water is pumped from an open source - a lake or a river - a filter is needed first coarse cleaning- gravel. Then there should be fine filters. Their type and quantity depend on the state of the water. When using water from a well or a well, a coarse filter can be omitted: primary filtration occurs on the suction hose (if used). In general, there are so many cases, so many solutions, but filters are needed, otherwise the droppers will quickly clog.
Homemade drip hoses and drippers
One of the most significant cost items for an independent device of a system from ready-made components is droppers or drip tapes. They, of course, provide the supply of the same amount of water throughout and the flow is stable, but in small areas this is not so necessary. It is possible to regulate the supply and flow with taps built into the beginning of the irrigation line. Therefore, there are many ideas that allow you to distribute water under plants using ordinary hoses. See one of them in the video.
It is difficult to call this system drip irrigation. It is rather root watering: water is brought under the root in a trickle, but it works, maybe only a little worse and is more suitable for plants with a root system developed in depth. This method will be good for trees, fruit bushes, grapes. They require a significant amount of water, which must go deep into a decent distance, and this homemade system drip irrigation can provide this.
In the second video, really drip irrigation is organized. This was done with the help of medical droppers. If you have the opportunity to stock up on such used material, it will turn out to be very cheap.
The amount of water supplied is regulated by a wheel. From one hose, you can supply water to three and four rows - if you take a hose of sufficient diameter, you can connect not three devices to it, but more. The length of the dropper tubes makes it possible to water two rows on each side. So the costs will be really small.
Droppers can be used almost without altering. This is if the system was with a bag. An example is in the photo.

Waste into income - watering for young plants is provided
You can almost also do drip irrigation for houseplants. It is suitable for those flowers that like constant moisture.

Constantly moisturizing your flowers on the balcony? Easily! Watering from a drip
The cheapest drip irrigation: from plastic bottles
There is the cheapest and fast way organize the supply of water to plants without hoses and large containers. You will only need plastic bottles and small lengths - 10-15 cm each - thin tubes.
Cut off the bottom of the bottles. So that a cover is obtained from the bottom. So the water will not evaporate. But you can cut off the bottom and completely. At a distance of 7-8 cm from the cap in the bottle, make a hole into which a thin tube is inserted at a slight angle. Dig the bottle with the cork down or tie it to the peg, and stick the peg into the ground next to the plant, pointing the tube to the root. If there is water in the bottle, it will run down the tube and drip under the plant.
The same design can be done by turning the bottle upside down. But this option is less convenient: it is more difficult to fill in water, you will need a watering can. How it looks like, see the picture below.

As you can see, there is a second option for drip irrigation from plastic bottles. A wire is stretched over the bed, bottles are tied to it in the bottom or lid of which holes are made.
There is another photo option for using bottles, but with standard drippers for irrigation. They are fixed on the neck of the bottles and in this form are installed under the bush.

This option, of course, is not ideal, but it will enable plants to develop better if you can rarely visit the country house. And two liters from a bottle can be decisive in the battle for the harvest.
Good watering in a summer cottage is a guarantee of high yields of vegetables and fruit crops, accelerated flower growth. What caring summer resident does not dream of having the most effective, not requiring high costs on installation, irrigation system?
Drip irrigation systems are widely available and inexpensive means of amelioration. The use of drip irrigation systems makes it possible to achieve early growth and ripening of plant fruits, to increase the yield of seeds, seedlings, planting material or trees by 2-2.5 times. Thanks to spot watering of the root system, the growth of weeds is slowed down, the spread of pests is prevented. cultivated plants and diseases.
As an alternative to traditional watering equipment, hoses and sprinklers, drip irrigation in the country reduces water consumption by half during irrigation. For those who want to automate the process of water supply, there are modern innovative developments. They allow you to program in the given parameters the operation of drip irrigation in time with the required sequence of functions. Arrange drip irrigation in the country or make drip irrigation in the garden under the force of anyone home master who does not have special knowledge of hydraulic engineering. It is enough to understand the principle of operation of the system under consideration and to have the initial skills of designing pipelines from plastic materials.
Drip irrigation system in the country. A photo
Types of drip irrigation
To arrange drip irrigation, you must first choose one of the most suitable types for irrigation:
The main element of this design is a thick-walled pipe. It is made, as a rule, of polyethylene and withstands pressure up to 3 atm. This allows water supply over a distance of hundreds of meters. At regular intervals, emitters or droppers are mounted in the hose sheath. They are designed for a certain flow of water. Usually it makes 1-2 l/hour. The system is mounted using plastic fittings. The system is convenient for use on the ground in private household plots. It is possible to disassemble the system in winter period for closed storage until the next watering season.

Connected to the main hose. It is a thin-walled (0.12-0.6 mm) flexible tube with an internal diameter, most often OE16 or OE22 mm. It is sold in a folded state in the form of coils or small windings. Fittings and connectors of standard diameters 1/2 and 3/4 inches are suitable for such tapes. The length of the irrigation line from the tape can reach 400-450 m. The throughput of the tapes is up to 500 l / h.

With help external microdroppers(nozzles or various models of sprinklers) with a certain standard of water consumption. They provide irrigation with drops or micro-streams, the intensity of which, in some models, is adjustable. Droppers are placed on the outside plastic pipes or attached tubular - branches. They can be installed on a non-perforated (without holes) hose at any distance using self-piercing fittings.

How does gravity drip irrigation work?
Drip irrigation in the country can be carried out by gravity type of supply by gravity from the water tank. You can arrange drip irrigation using a barrel, tank or other reservoir filled from a network water supply, natural water intake or settled rainwater. Drip irrigation systems are susceptible to clogging by algae, zooplankton and particulate matter, including rust. Therefore, you can use water not from every open reservoir, but choose a container from a material that is not subject to corrosion or destruction. It can be a used barrel or tank made of synthetic material, plastic, galvanized iron, covered from the ingress of leaves, debris or dust, with a lid. The volume of the drum is selected according to the needs in order to provide sufficient watering without constant replenishment of moisture reserves. Water must flow continuously from the tank. Required flow for irrigation of each suburban area is individual, but each summer resident must know the required daily water consumption in his garden, garden or greenhouse. Based on the consumption standard, 1 tomato bush needs 1.5 l of water, cucumbers and potatoes 2 l, cabbage 2.5 l daily, etc. Knowing the number of seedling bushes / tree trunks of growing crops, you can calculate the total water requirement. It will also be required to choose the right suitable model drip irrigation systems in relation to a specific suburban area.

It is better to place the tank at a height of 1.0-2.0 m from the ground in order to ensure the water pressure in the water supply network is 0.1-0.2 atm. From the tank, water should flow as clean as possible. It is better to cut a drain hole at a height of 10 cm from the bottom so that the accumulated sediment does not get into the hose. Such a home-made water intake unit should be equipped with a mesh, or other design, filter. When using herbicides and fertilizers, it is allowed to breed liquid forms preparations in a special fertigation unit. After fertigation, the irrigation system must be filled with clean water and allowed to run for a few minutes to clear it. The condition of the filter should be monitored, it should be cleaned and washed once a week. Gravity systems, due to low pressure, have a limitation - only non-compensated droppers can be used in them. Compensated drippers that maintain constant water pressure are not used due to low pressure.
Drip irrigation on a small area with your own hands. Video
Recommendations for installation and maintenance of the drip irrigation system
Any drip irrigation system consists of constituent parts and components, without which the normal functioning of irrigation devices is impossible. When constructing a drip irrigation system for a summer residence, they are sequentially assembled and mounted:
- Water intake unit from a water supply system, tank, well / well. Components OE 3/4" are required for assembly and connection to the water tank: outlet with external thread and tap with internal thread.
- Filter mesh / disc, if the water contains hydrobionts or impurities with a particle size of more than 0.13 mm.
- Water saturation fertigation unit treaters and fertilizers or supplying nutrient solutions for hydroponics. Represents the container in which drugs are diluted. It is connected in the right place to the irrigation system through a tube with a dispenser - injector.
- Main distribution pipeline from a plastic pipe polyethylene HDPE OE from 32 mm or other durable material that meets the requirements of the system.
- Distribution network from lines - microtubules or tapes with droppers / without droppers.

- A wide variety of accessories are additionally used as fasteners for connecting linear sections during the installation of a drip irrigation system. These are fittings - adapters or start - connectors for drip tape, corners and spurs. In more complex systems, tees, splitters or "spiders", as they are commonly called, minifolds are used. When laying drip irrigation with your own hands, important points should be considered:
- The main HDPE pipe is laid perpendicular to the rows of beds for the convenience of connecting branches.
- To make the drip irrigation system resistant to contamination, a plug is installed at the end of the HDPE pipe of the irrigation pipeline, which is removed when flushing / purging the main line.
- Using tape construction, the start-connector is first screwed into the drilled holes of the pipe, and then the tape itself is tightly put on it. From the opposite end, it is muffled. To do this, a strip in the form of a ring 1 cm wide is cut off from the tape. The end of the tape is tucked up and this removable ring is tightly put on it. This is done for the same reason - sealing with the possibility of washing or purging clogged sections of the tapes.
Choosing a Tape for Drip Irrigation
When choosing a tape to make drip irrigation in the garden, one must take into account the features inherent in different types of tape devices.
So, a feature of tapes like " labyrinth» is the presence on the surface of the material embedded structural element- labyrinth. It slows down the movement of water in the tape barrel and streamlines its outflow through the outlet holes. However this technology manufacturing with an external location of the labyrinth has significant disadvantage. There is a high probability of damage to the labyrinth when laying the tape.

In tapes slot type Holes for water seepage are cut out by laser on the walls every 20-100 cm. A labyrinth is built in along the entire length of the tape to eliminate the turbulence of the moving water flow. When unwinding, the tape is installed "labyrinth up" to ensure uniform outflow of water through the water outlets. These tapes provide the easiest and most inexpensive way to water. Please note that slotted tapes require good filtration up to 0.08 mm.

emitter type tapes are distinguished by the additional equipment of the holes with built-in flat droppers, "facing inward". This is a feature of this type: droppers are not localized outside, but placed on inner surface conduit walls. Arising from such design whirling turbulent flow of water inside the tape, contributes to the self-cleaning of droppers.

Tape conduits with a wall thickness of up to 0.16-0.2 mm are used when drip irrigation is required on the soil surface. For underground laying, tapes with a sheath thickness of more than 0.2 mm are used.
DIY drip irrigation system
Consider, on the example of a plot of 1.5 acres, installation homemade design drip irrigation with your own hands. It has 8 rows of planted plants 15 meters long. It will take 120-130 m of drip tape with a perforation / emitter pitch of 0.3 m, providing throughput 3.8 l/h. It should be noted that this water flow parameter corresponds to a pressure of 1 atm, which is unrealistic to create using a water tank in the country. It would be necessary to raise the container to a height of 10 m. Therefore, we focus on the pressure in the irrigation system of 0.1 atm, provided by installing the tank at a height of one meter. Weir due low head will decrease three times and will be 1.2 l / h. This will require an increase in watering time by 3 times. To make drip irrigation, we perform the following steps in sequence:
- To the hose coming out of the tank, we connect a fitting with an external thread 3/4 ".
- We connect in series a tap with a 3/4" internal thread, then a filter. We use, if necessary, a fitting to switch from an internal to an external thread.
- We connect the main pipe through the PE coupling and lay it perpendicular to the irrigation strips. For an irrigated area up to 3 acres, an OE pipe diameter of 32 mm is sufficient. Usually it is laid along the fence or next to the wall of the greenhouse. We pay attention to the features of the relief: the main pipe is laid horizontally, and the drip tapes are sloped. Pipe end at the other end land plot we plug the PE with an end cap with a handle or install a valve for preventive flushing.
- We drill holes in the pipe at each of the 8 beds, screw fittings with rubber gaskets. Instead of fittings, it is recommended to use taps that allow you to turn off any irrigation line. When making drip irrigation with your own hands, you can avoid this operation. In the assortment of trade there are models of pipes for drip irrigation, already equipped with start-connectors.
- We cut off segments from the emitter tape and lay them along the length of the beds. One end of the line is put on the fitting, the other is muffled by the previously discussed method.
- To use one dropper for watering several bushes, we attach the minifold pipe splitters to the dropper and lay the tubes in the root zone of the plants.

Drip irrigation with your own hands. Assembly: video
Drip irrigation in a greenhouse
A feature of greenhouses is the cultivation of crops with greater density planting: parsley, celery, dill and other herbs. And a denser way of sowing or planting vegetables compared to growing in open ground. Greenhouse cultivation, often, is distinguished by a small distance between plantings in the ridges and a narrow row spacing. Plants in greenhouses grow much faster, bushier and produce more shoots. It is important that some types of crops bring 2-4 crops per year. Therefore, drip irrigation should be laid taking into account the increased water consumption per m? glaze. It is required to adhere to the required dosage of water and the supply schedule, which varies greatly during the growing season and is individual for each of the crops.
When constructing drip irrigation with your own hands in a greenhouse, it is recommended:
- Decrease step connection of external droppers. If you cannot find a pipe with a standard 15 or 30 cm emitter arrangement, you can purchase a "blind" drip hose. It is used as a watering main, there are no water outlets on it, droppers can be inserted anywhere.
- Apply droppers, the design of which is designed for watering, at the same time, 2-4 consumers. To do this, you need to connect segments of tubes to each outlet and bring them to the plant boles. More often use tees and minifolds to feed several plants at once from droppers designed for watering one bush.
- Apply special pegs- holders or needles with tubes that are stuck in the right place and supply water to the substrate. Set water shutdown timers after a specified period of time or equip with automation systems.

How to organize a drip poly in a greenhouse. Video
How to organize automatic drip irrigation
Drip irrigation systems have become popular among summer residents not only due to the recognition by the owners of the irrigation method as a method of intensive farming. Or the general availability of systems - the ability to make a drip irrigation system with my own hands without spending too much money on accessories. They have also become a civilized part of the agrarian culture, due to being equipped with automation tools.
The control system using a pressure gauge and a reduction gear allows you to protect the irrigation structure from pressure surges when connected to the water supply network. Since the beginning of popularization, it has become an indisputable rule to complete models of drip systems with timers. At first, mechanical, and then electronic timers with valves and shutoff valves. This allowed the summer resident, for example, to set the watering time for several hours and go about his business. The system automatically turned off after a specified period of time. The presence of a controller in modern programmable systems allows you to change the intensity and time of water supply according to a complex algorithm. Convenience lies in the non-interference of a person in the process of functioning for a long period, the possibility, for example, to go on vacation. More complex automation systems are equipped with sensors and allow you to control the flow of water along the lines, to heat irrigation, to test soil moisture, to turn off the system during rain. To organize automatic watering, it is required to ensure the autonomy of the system as much as possible: connect to water supply network or supplement with a well with centrifugal pump for uninterrupted supply. After installing the drip irrigation system, the timer, controller and electrical devices must be powered by independent batteries or backup / uninterruptible power sources.

Drip irrigation in a greenhouse from a central water supply system: installation example
When powered from a drip irrigation water supply, it is necessary to choose a method of connecting to the water supply network. The system can be connected directly to a valve cock or via a storage tank. Regulatory pressure in the network central water supply is 4 atm. And in fact, taking into account pressure surges and water hammer, it can be 2-7.5 atm. However, low-pressure drip tapes of 0.2-1.5 atm are used in mass application. To prevent water under such pressure from breaking the drip irrigation system, a reduction pressure reducer is installed between the tap and the main pipe. A way to reduce the pressure for drip irrigation from the water supply to working values can be to connect the system through a storage tank equipped with a bypass valve. Water from the water supply fills the tank to a certain level, the float valve is activated and shuts off the mains supply. Water from a filled tank located on a hill at any time flows by gravity through the water outlet into the drip irrigation system. Consider the most simple design for giving. Drip irrigation should be laid in the following sequence:
- We assemble a filtration unit from 2 filters: a mud filter and a fine filter. We connect the filters with couplings and wind the connectors, connect the device to the main hose.
- An OE20 mm hose is laid along the central path of the site. Next to each bed, it is cut, you get a series of separate segments.
- The segments are connected to each other in a pipeline in series by tees having one OE15 mm outlet each.
- Drip irrigation tapes are put on these outlets and fixed with metal clamps. The far end of the hose is also connected with a 20/15 connector. The open ends of the tapes are twisted and fixed with plastic clamps.

How to make drip irrigation in the garden: making droppers with your own hands
The design of home-made drip irrigation in the garden may include elements that are not directly intended for irrigation, but successfully replace components specially designed for it. First of all, these are disposable medical droppers designed for dosed supply of infusion solutions. They have a significant advantage. By means of a roller clip it is possible to regulate pouring speed - from drop to jet. Used for drip irrigation systems serving crops that differ in dosage and irrigation schedule. In the garden, they are hung from portable pegs in vertical position water enters the soil through pipes.