How to make raised beds: useful ideas for a great harvest. Do-it-yourself high beds in the country: photo and manufacturing technology
This article describes all the intricacies of the process during which high beds are created in the country with their own hands: photos and detailed descriptions technologies, types of structures, their purpose and features, advantages and disadvantages. Specificity vertical products intended for growing strawberries, cucumbers and other crops, recommendations for their production.
Do-it-yourself high beds in the country: photoand design features
The construction of high beds opens up new opportunities for growing crops in the garden. A similar approach to organizing landings allows you to create on the site interesting design, effectively grow berries, fruits and vegetables. It becomes possible to get an excellent harvest from a site whose soil is not particularly fertile.

warming up high structures occurs much faster than conventional beds. The process of caring for plants is simplified because a person does not need to bend too low.
Note! Organic matter is used as a filler for high beds. Due to the fact that the roots of plants are located in a nutrient medium, crops grow faster and give a rich harvest.
Features of high beds: the pros and cons of designs
The construction of such structures is accompanied minimal cost, so summer residents prefer to make high beds for strawberries and vegetable crops.

Advantages of raised structures:
- the availability of a crop does not depend on the quality and composition of the soil on the site. Thanks to this, summer residents and gardeners can grow plants in areas with a rocky surface or heavy clay soil;
- beds simplify the process of cultivating the land, do not require enhanced care. You only need to dig the ground twice. The first time in the spring, when the plant is planted, the second time the procedure is done in the fall after harvesting;
- for processing, it is not necessary to dig deep into the soil, it is enough to stir the soil with a garden fork;

- the manufacture of high beds is as simple as possible, as is the procedure for dismantling them. The placement of structures can be easily changed if you want to create new design Location on;
- the space inside the product is limited, so it is not difficult to remove weeds;
- the accelerated ripening of vegetables in high beds is facilitated by a good drainage system, which is organized inside the structure;
- the soil in the high beds is protected from freezing, which often happens in the spring when frosts return. During early autumn frosts, it is enough just to cover the plantings with tarpaulin or polyethylene so that they do not die;
- the construction of high beds for strawberries allows you to save the berries from being washed away by downpours, which often destroy the crop.

There are few design flaws. They are the need for enhanced mineral supplement and frequent watering. You will also need to keep an eye on the bear. This pest loves to settle on high beds.
How to make a high bed in the country with your own hands: common technologies
The following types of beds are most in demand among the owners of summer cottages:
- bulk gardens of a triangular shape;
- multi-tiered structures;
- bulk beds of a trapezoidal shape;
- decorative gardens.

Note! For the arrangement of high beds does not require large expenses. Many summer residents use improvised materials for these purposes. In most cases, it is enough to buy bricks to create high beds, as well as a mixture that improves soil quality and drainage.
For the construction of a high bulk garden of a triangular shape, only a shovel is needed. Dimensional parameters of the beds are selected taking into account which plants will be grown. The size of the root system of crops is taken into account. Maximum allowable height bulk garden is 0.3 m, width - about 0.7 m. In the process of how the garden bed is filled with soil, it is not necessary to compact the ground.

A similar scheme is used to create a trapezoidal bed. Top part bulk garden should not exceed 0.3 m in width. Boards can be used to cover the upper slopes. It is also allowed to use mulch, which will positively affect the condition of the soil.
To make a multi-tiered bed for strawberries with your own hands fit profile pipe or armature. Metal structural elements are fastened by welding or by bolting. Containers or boxes filled with soil are put on the finished frame base.

Making high beds: photo and material selection
Fences on high beds are needed so that the soil with plants is inside the structure. Most often, beams or boards are used for construction. Do-it-yourself technologies for making high beds from slate are also popular.
Wood is considered traditional material, allowing you to create practical and reliable designs of high beds. Slate is also popular, but less environmentally friendly. In addition, it has one significant drawback - a fragile structure. During the construction of the garden, this material can be damaged if the rules for handling it are neglected.

The most durable and strong beds are made of brick or stone. Large elements are connected using concrete mortar. Concrete itself is often used, while working with which you should carefully consider the shape, size parameters and location of the garden, since the garden bed in this case will be stationary and it will not be possible to move it over time. In the manufacture of structures made of concrete, stone or brick, it is important not to overdo it with the thickness and width of the frame. In massive products, the earth will not be able to warm up quickly.
Summer residents also use other budget materials:
- empty bottles;
- old plastic boxes;
- finished structures in the form of plastic fences.

Note! The construction of high beds from plastic panels is the most budget way get a garden. In the assortment of individual stores you can even find plastic slate.
Features of high beds by Igor Lyadov: design of beds, photos and parameters
The beds of Igor Lyadov are based on a technology invented at the end of the 20th century by Jacob Mittlider. The American worked on the creation of optimal structures for growing strawberries. These products are distinguished from ordinary beds-boxes by their reduced width - only 45 cm. Any material can be used to make the sides, but boards are most often used.
As a filler, fertile soil and a layer of sawdust are used. Mittlider took a width of 0.9 m to the paths between the structures. To prevent the growth of weeds in this area, the vegetable grower spread agrofiber.

Unlike his American colleague, Igor Lyadov proposes to use not mineral additives, but organic matter. He became the author of several recipes, which include such traditional fertilizers as bird droppings and manure, as well as herbs. The design of the beds looks somewhat different in the photo. The high beds of Lyadov have a width of 0.6-1 m.
Passages 0.6-0.8 m wide remain between the structures. This zone can be covered with roofing material, sand, tiles or sawdust, so that it is easier to move along the plantings and not think about weeds. The space of paths between the beds is often sown lawn grass. But in this case, you will have to periodically mow the vegetation so that the passages look neat and do not go beyond their boundaries.

Note! Igor Lyadov strictly outlined the placement of the beds. Landings should be placed from the north side to the south. Only in this way will the plants be provided with the necessary level of illumination by the sun.
Do-it-yourself high garden: how to makewooden structure
The technology provides for the construction of a garden bed, the width of which is 180 cm, length - 3 m, height - 40 cm. However, the dimensional parameters of the structure can be changed taking into account the area of \u200b\u200bthe summer cottage. At the first stage of construction, optimal location for a vegetable garden. It is better if the selected area is illuminated during the day by the sun for at least 5 hours. For this purpose, even a place unsuitable for growing crops, for example, a wasteland, is suitable.
Related article:

After that, the design of the beds is developed on suburban area, a photo interesting options placements can be found online or in gardening magazines. Before construction begins, the site is cleared of debris, stones and rhizomes of perennial weeds. Annual weeds can not be removed, since the need for this procedure is eliminated during the initial digging of the territory.

First, the fences are prepared. To do this, you will need to cut the material so that you get 4 boards 1.8 m long and 4 boards 3 m long. In addition, you should prepare wooden blocks, each 40 cm high. At the ends of the boards intended for assembling the frame, a cut should be made at an angle of 45 °.
Before proceeding with the assembly of the frame, it is necessary to process the wooden elements special impregnation or an antiseptic to stop the processes of decay and prevent rapid deterioration of the material, which can be caused by exposure to moisture. From the outside, the boards can be painted or varnished. AT decorative purposes patterns can be applied to the surface. After waiting for complete drying, you can start assembling the box. If the design of the beds provides for two levels, each of the tiers is fastened with bars.

Helpful advice! To protect plantings from moles and rodents, it is recommended to nail a net at the bottom.
How to fill a do-it-yourself high bed of boards
Filling the high beds is carried out in the following order:
- the first layer is laid drainage system, for its organization is used tree bark, which needs to be crushed, fallen leaves, small twigs and wood shavings;
- the second layer is formed from fertilizers, manure is well suited for organizing this layer, it is better if it is rotted;
- as the third layer, a permeable material is used, it is performed by analogy with the first layer;
- the basis for the fourth layer is organic, this layer can be supplemented mineral fertilizer complex purpose;
- fertile land is laid in the fifth layer, the composition of the soil depends on the plants that will be grown in the garden, minimum thickness fertile layer - 10 cm.

After the bed is filled, it should be watered abundantly and let it brew for 2-3 days so that all layers can settle. It is not recommended to immediately start sowing or planting seedlings. It is better to withstand the bed for some more time so that it has time to warm up well. To do this, cover the structure with black material. Polyethylene will do.
Helpful advice! If the construction of beds is carried out at the end of summer or autumn, the structure must be left covered until spring.
Making vertical beds with your own hands: photo and technology
Vertically arranged beds are used for growing spices and berries. The advantages of such structures are associated with a decorative appearance, saving space and protecting the crop from birds and various pests.

The construction of vertical beds will be an excellent solution for planting crops that require a lot of space on the site. These designs are ideal for growing herbs, strawberries, flowers, strawberries. Moreover, the owners of summer cottages can not only build their own, but also buy ready-made vertical beds in one of the specialized stores.
Why is it profitable to create or buy a vertical bed for strawberries
There are many design options for vertical beds, but their main advantage lies in compact size. Moreover, this advantage of products will be beneficial not only to owners of small summer cottages, but also to people who want to grow herbs or berries on their balcony. A light bed made from plastic bottles is best suited for these purposes.

Vertically installed beds do not require complex maintenance. Plantings are at a sufficient height so that weeding or harvesting can be carried out in convenient conditions. This does not require you to bend low and endure back pain. At the same time, plants and their roots are raised high above the ground, where rodents and small pests cannot reach. Pyramid or cylindrical beds prevent birds from landing comfortably to eat the berries.
Prices for finished structures:
| product name | price, rub. |
| Bed of agrotextile | 150 |
| Plastic mesh bed | 490 |
| Pipe with holes | 1500 |
| Pipe with holes | 3200 |
| vertical ladder | 4700 |
Making a pyramid-bed for strawberries with your own hands: dimensions and technology
For work you will need the following tools and materials:
- jigsaw or hacksaw;
- edged board size 40 × 5 × 20 cm (11 pcs.);

- screwdriver and a set of screws;
- pencil and tape measure;
- seedlings and soil.
To create the base, 4 support boards are used. For their manufacture, you can cut a board 2 m long. It is recommended to make cuts at an acute angle, so that later it would be convenient to connect the pieces.
Helpful advice! To increase the rigidity of the structure in the central part of the pyramidal beds, an additional pillar should be placed, which acts as a support.

After that, a pair of boards 2 m long, having an angular cut along the edges, is laid on a horizontal plane and connected to each other. A rail is mounted at the base to organize the future beds and is fixed on both sides. The dimensions of this element are 5x40x5 cm. The resulting side of the pyramid should be installed vertically and the second and third sides should be fixed on it. They are made in a similar way.
When the frame part of the pyramid is ready, using a tape measure, the length of the rails intended for the manufacture of beds is measured. They should be placed in increments of 25-30 cm. To fix the rails, you will need to cut the ends at an angle of 30 ° so that the shelf is raised. At the end of the assembly, the structure is filled with soil, which should be compacted. Products can be successfully used for growing vegetables and herbs.

Technology for the manufacture of vertical beds for strawberries from plastic pipes
This design option is great not only for growing strawberries, but also for greens.
List of required tools and materials:
- plastic pipes of the required length with a large diameter;
- steel cable (can be replaced with thick fishing line);
- construction knife for cutting pipes.

The large diameter of the pipes is necessary so that the pipe cut in half can accommodate the amount of soil needed to grow plants. The incision of the product is carried out along. To fix the beds in vertical position holes should be made on both sides of each of the halves. A steel cable or a thick fishing line is passed through them. The halves are placed one above the other according to the principle of a ladder. The number of such halves-levels can be unlimited.
Note! Since the structure, while suspended, can sway, it is recommended to install the bed in places protected from the wind.

Do-it-yourself construction of vertical beds from a building grid
Small gardens created on the basis of a construction grid are suitable for growing strawberries, flowers, herbs or potatoes. For work you will need:
- construction metal mesh;
- the soil;
- straw;
- tool for cutting metal wire.

To create a bed, you will need to bend a rectangular piece of mesh in the shape of a pipe, the diameter of which is 0.9 m. Using wire or other devices, the edges of the segment must be fastened in this position. Straw is laid on the sides inside the structure. Thanks to this, the soil will not spill out. Free space is being filled.
If potatoes are to be grown, the first level of plants should be at a height of 50 cm from the ground. About 10 cm should be left between crops. After that, the first layer is shed, 50 cm of earth is laid again and plants are planted. A bed in the form of a tower can be of any height. To give the vertical bed a more attractive appearance, you can use black film instead of straw.

Technologies for making vertical beds for strawberries with your own hands from pots
Flower pots can be successfully used to grow strawberries. Such designs have a decorative appearance. Suitable for work clay or plastic products. As a result, the design is multi-level. The number of such levels is limited only by personal wishes. Pots are selected so that each subsequent one has a smaller diameter than the previous one. It is desirable that the difference in size between each pair of pots be approximately the same.
The largest pot is set in the selected location and filled with soil. After that, a smaller pot is placed in it, etc. When the structure is ready, plants are planted in the soil and watered.

The next option is based on pots of the same diameter. Only one of them should be big. It will be installed at the very base of the structure. A metal rod or wooden stick should be placed inside a large pot.
Note! The size of the rod must be chosen so that its diameter is slightly smaller than the diameter of the hole located at the base of the pot.

The pot is filled with soil. The remaining products are alternately strung on a rod through a hole in the bottom. The result is a multi-tiered structure with pots that seem to balance each other. They are filled with soil, where plants are then planted.
If the site has a high stump or pole, the pots can be fixed on it. In no case should you do this on a living tree. Products are fixed around the circumference in any order. The spiral looks beautiful from the side. You can also use the technique of placing pots in a checkerboard pattern. The only negative of this bed is an inconvenient irrigation system.
Manufacturing technology and photo of do-it-yourself vertical beds for strawberries from tires
The tower of car tires is made in the same way as the construction of flower pots. Tires of different diameters are selected for construction. This material has a significant drawback. old car tires are not environmentally friendly. Therefore, it is recommended to create such beds for one-time use, and in a year to build new ones from other tires.

Before starting work, car tires need to be prepared:
- thoroughly clean them from dirt and stones;
- dry;
- paint if necessary.
After that, the largest tire should be laid on one side. On the other hand, cut side part with disc hole. finished item filled with soil and planted with plants. Similarly, you should do with other tires and install them one on top of the other so that the size of each next one is smaller than the size of the previous one.

Helpful advice! Car tires can be beautifully decorated, as is usually done with flower beds made from this material. For these purposes, you can use bright colors, patterns, or make decorative cuts.
Making high beds for strawberries with your own hands from improvised materials
On a bed made from a bag, the plants will look great. This design can be conveniently placed on the fence, the wall of the gazebo, house, barn or any other stationary building. To work, you need a bag made of plastic or natural fabric. Burlap in the operational sense is much better. It is environmentally friendly and, unlike plastic, is reusable. The fact is that artificial materials are subject to rapid destruction under the influence of the sun.

On the other hand, the burlap has a good capacity, providing air access to the plants. So that the bottom and sides of the bag do not break through over time under the influence of gravity, it is recommended to stitch them several times. At the top of the product is a loop for hanging. On one side of the bag, holes are made for planting plants. After that, the bed can be filled with earth and planted.
Tiered structures can be made of wood or plastic boxes different sizes. They are stacked one on top of the other with a gradual decrease in dimensional parameters. Such a ladder of boxes can be painted in bright color and lay around a tree or pole.

Helpful advice! To create a bed, you can use an old chest of drawers by pushing its drawers forward and filling them with earth. For these purposes, other unnecessary furniture is also suitable.
Recommendations for creating vertical beds for strawberries
Before you start making a garden, it will be useful to take into account some tips on optimal construction designs:
- if the bed has big size, the assembly must be carried out right at the place of its installation, otherwise there may be problems with transportation, during which the product can be damaged;

- a decorative garden with berries should be placed strictly in the sun. If the vertical bed will be used for growing greens, then its design can be located near the kitchen;
- the soil for filling the beds should be prepared in advance. For berries, sandy loamy soil is suitable, mixed with peat, fertilizer and hydrogel. Quail compost is optimal as a feed;
- you need to think in advance of a system that will protect the beds from frost in the winter. Will the structure be covered or brought into the room;
- the garden is recommended to be located closer to the source of water, so that it is more convenient to carry out regular watering of plants.

Note! The construction of vertical beds for cucumbers is also welcomed by many gardeners. Most of designs are made by analogy with products for strawberries. Since cucumbers belong to the category of climbing crops, the bed should be supplemented with supports for which the plants will cling.
Making vertical beds for cucumbers with your own hands: photos of interesting designs
Vertical garden for cucumbers can be presented various options structures. Most often, bags or products made of plastic are used to grow these crops. The walls of buildings, nets or shields, as well as all kinds of partitions can serve as a surface for fixing the beds. vertical garden for cucumbers with your own hands, you can arrange inside a plastic pipe. Such a product closes on one side and is hung vertically on the crossbars.

A mesh made of plastic is considered the simplest option for organizing an ornamental garden for cucumbers. The product is positioned vertically and as the plants grow, they rise along the grid. A similar version of the beds can be bought ready-made or made by yourself. This will require a thick fishing line and straight tree branches that will serve as supports. They are arranged around the circumference with an equal step and at the top are connected at one point so that a kind of hut is obtained.
With the help of a thick fishing line, you need to walk around the circle, forming a vertical base to secure the plants as they grow. If it is planned to build a bed in the form of a grid for cucumbers, it is strictly forbidden to use for these purposes hardware. Such structures will overheat in hot weather. summer days, and injure plants, leaving burns on them. Bags or canvas bags are a safe option for growing cucumbers.

For the construction of vertical structures, it is allowed to use unusual materials such as pallets, old furniture, empty stumps, etc. An unusual approach to decor will allow you to create a garden on the territory, but a beautiful decorative composition, which will optimally fit into the space of the suburban area.
For many summer residents, all work in the garden begins with a vegetable garden. Well, they also end there. And if the soil over the years is still not the same as we would like, but wants to be better? Then we choose the materials for the fence, gather our strength, and proceed to the installation of stationary high beds with our own hands!
How to make stationary high beds with your own hands
Fencing for high beds is made from various materials: from impregnated boards, slate, bricks, metal sheets and even plastic bottles. We took the path of least resistance, put in 2 layers concrete bricks 20 × 40 × 12 cm. 5 bricks were laid along the beds, and 2 bricks across. Thus, the size of the high beds turned out to be 2 × 0.7 meters, the height is 0.4 m.
How to fill a high bed
But the most important thing in such stationary beds is not their walls, but the filling, so we proceed to stuffing. We start the device of high beds from the very bottom, from the ground. Directly on the turf, without weeding or digging anything, we lay cardboard or several layers of newspapers, but thicker, thicker, so that even bindweed does not leak out. Then we bring all kinds of saw cuts of fruit trees - branches with a diameter of 1.5 to 7 cm.
Such a woody bookmark in our south performs the function of a moisture accumulator more than insulation. In the northern regions or for greenhouse farms, empty can be laid on the bottom plastic bottles with closed lids - they will not interfere with the roots, and the insulation from them is simply gorgeous.
Next, to fill the high beds, we exfoliate organic matter. Everything that is at hand will do here: blackberry cut shoots, fruit drop, mowed grass, garden tops, foliage. When laying high beds in the fall, of course, there is some advantage in the selection of organic residues. But in spring and summer, you can also find something to fill your plot with: kitchen waste, unripe compost from last year, grass. For warm beds, fresh manure is also poured there, then in the first year pumpkin is best on such a bed.

an example of how to fill high beds
But it’s still timid to take manure on unknown farms, you don’t want to pour a bunch of antibiotics and helminths into your own garden bed. Therefore, you can safely refuse it, and improve the humification of the pledged organics EM-solution. If there is no EMok, calmly breed mature compost and water it.

we continue filling the high beds with organics, then we spill with EMS
Next, we continue to pour layers of high beds from the soil, spilling each layer with EMs. But we follow safety precautions! We have only one back. We don’t carry heavy buckets around the dacha village with our hands, but we take a garden wheelbarrow! Or slowly, in small portions, still with buckets, but without strain, we fill our high beds.

filling high beds - pour a layer of soil
When we layer the soil, it is better to pour mature compost after a 10-centimeter layer of earth. If your own land is well, oh, very dense, before laying it in the garden, right in the wheelbarrow, we interfere with it with sand and compost, and if there is riding peat at hand, add it. Then the carrot in such a bed will be a meter long. And in sandy soils, in addition to compost, add clay.

when forming layers of high beds, we observe TB
We pour the last layer, spill it, and voila: a high bed, created by our own hands, is ready for wintering and spring plantings. During the winter, the soil will settle down, compact, and this will have a beneficial effect on plantings. In those areas where the soil will shrink more, it will be necessary to pour the substrate. Well, the beds laid out in this way in spring or summer period it will be necessary not only to shed, but also to trample down and tamp down (with feet, a log, a mallet). Plants can be planted only after compaction of the soil.
Well, we have finished filling the high beds, only outdoor work remains - our design of the beds also provides for the external facing of bricks with flagstone, the connection of a fountain and drippers for irrigation. But it can be done next year as well. But the photo of the finished beds is no longer interesting - there are a lot of them on the Internet for every taste and color.
What are the benefits of raised beds?
It is clear that at a height of 40 cm they are unlikely to save knee joints, you still have to bend over. So the main advantage of high stationary beds is a radical improvement in soil structure. And I am glad that such work is being done once and for all. Then they don’t walk on this soil, they don’t dig it. However, even without high beds, the garden should not be dug (for more details, see).
Every year it will only be necessary to add compost, and sow green manure twice a season. And if the main crops are planted in such beds, then instead of compost it will be enough to add organic mulch. But it is planned to place greenery in our beds, but you can’t mulch it much.
In addition to excellent structured soil, high stationary beds warm up earlier in the spring, and a run of 2 weeks significantly affects the yield. Especially if combined plantings are used in the garden. In addition, water does not stagnate on such raised beds, and this is especially important for areas where floods accumulate. Well, no flood will take your wonderfully structured soil out of the box-bed to the neighbors, right? So there are a lot of pluses in high beds, and perhaps one minus is the laboriousness of filling.
When you are planning to make such stationary beds, carefully calculate the resources, since making high beds with your own hands is still a very costly undertaking. Not so much in terms of arranging the outer walls, but in terms of labor intensity - for our 2 beds, we had to drag and shovel about 1 cubic meter of earth. And if you are already using raised beds, we would love to hear your feedback in the comments.
Ecology of life. Manor: You will be surprised at your past doubts - whether to make high beds in the country ... Your back will be grateful to you - you just bend over a little to care for the garden. Your knees will thank you - you can just sit on the edge of the garden and work on your garden.
You will be surprised at your past doubts - whether to make high beds in the country ... Your back will be grateful to you - you just bend down a little to care for the garden. Your knees will thank you - you can just sit on the edge of the garden and work on your garden.
Your plants will thank you - no more competition from weeds or nearby fruit trees. Your land will be grateful to you - you do not trample it down and ennoble it with humus. Your high-bed garden can look beautiful, comfortable, and reward you with a generous harvest.
How to make high beds with your own hands.
1. First we must mark out the place for the beds. The usual width of the beds is 1.2 m, the length can be any. We mark the rectangles of the desired size on the ground with sand.
2. We collect high beds. The high bed has no bottom and consists of posts with grooves on all four sides and boards with corresponding grooves. You can buy ready-made garden fences or make your own. For fences, it is better to take hardwood, because. conifers emit resin, which can have an unnecessary effect on soil composition. We check the horizontal installation of the garden box with a level.
3. We lengthen the high beds. Because Our beds are modular, we can extend our beds from any side with another module.
4. How to protect a high bed from rodents. Even if you have not encountered moles and other underground garden pests in your summer cottage, it is better to provide protection for your garden right now than to unsuccessfully fight these rodents later. At the bottom of each box we put a metal mesh so that it goes a little to the edges of the fences.
5. How to protect the soil on a high bed from being washed out into the main soil. To do this, we use ordinary packing cardboard in two layers so that it covers the entire bottom of our garden box. If there are not enough whole pieces, we use cardboard scraps - we fasten them with a stapler with the main piece so that the cardboard at the bottom of the box does not move when the soil is poured.
6. The soil for high beds should be light, crumbly and "fluffy". You can easily check its quality by poking your finger into the ground - if it sinks to the third joint - this is the norm. To improve the composition of the soil, you can add peat or compost. We pour the soil into the garden box, check it horizontal level, water to compact a little. During the season, we will need to add a little soil.
7. Irrigation system for high beds. Along the contour of the high beds, it is planned to fix a garden hose with watering nozzles: we need 90 and 180 degree splitters.
8. Trellis for high beds. Because the earth in the high bed is loose, then it will not be possible to install a trellis in it, so we fix the trellis from pvc pipes into the ground next to the garden box. We stretch nets on the trellises for climbing plants- cucumbers and beans. For tomatoes, we install light supports made of steel rod.
What you need to know when arranging a high bed.
1. Try to protect high beds from strong wind and heat, creating partial shade for them with trellises of flowers or tall shrubs.
2. The long side of the bed should face south - so the plants will be evenly lit, otherwise, more tall plants others will obscure.
3. Planting density on a high bed is twice as high as on a regular bed. So plants fight weeds and create a humid microclimate with foliage.
4. High beds with sides will make it possible for older people or people with back problems to take care of the garden.
5. High bed - warm bed. Such a bed warms up faster in the spring, and if you make a mini greenhouse on its basis, it will surprise you with an early and generous harvest.
6. Divide a long high bed with cross braces into square segments - this way you will reduce the pressure of the soil on side walls beds.
Fences for high beds.
1. Most often, wooden fences are used for understandable beds. There are several points here - do not use boo wood, especially sleepers, which may contain harmful chemical substances. Do not treat fresh wood with wood preservatives unless you are sure they are completely environmentally friendly.
2. Wattle as a fence for a high bed. For all its environmental friendliness, such a fence has three significant shortcomings- the soil in the bed dries quickly from the wind, proper thermal insulation of the bed is not provided, the soil can spill out through the cracks. Everything is fixable - use a layer of double cardboard around the inner perimeter of the fence. Eco-friendly air layer between the sheets serves as thermal insulation, the earth no longer spills out.
3. As a fence for a high bed, you can use a metal profile, including from an old roof or fence.
5. You can make fences for a high bed with your own hands from brick or concrete. This is a very good option, but keep in mind that concrete will affect the acidity of the soil in the garden for 2-3 years.
6. The best raised bed railings are plastic. They do not emit anything of their own into the soil, excellent thermal insulation, long service life and the ability to set any shape of the beds, unlike standard rectangles of beds with wooden fences.
7. Fences for high beds from improvised materials. You can make the sides of the beds from bottles laid like bricks on a concrete mortar.
Why do we need high beds.
High beds allow you to increase the area under the garden. you can use inconvenient slopes or poor or weedy soil. Raised beds provide an environmentally friendly way to deal with weeds and soil erosion.
Such beds warm up faster and give an earlier harvest. They allow more economical use of moisture for irrigation.
Various types of high beds.
In addition to the traditional raised bed with high sides, there are several other types of raised beds.
1. Circular high bed. It consists of a round frame, in which there is a path to the center of the garden. This form of high beds is also called the "keyhole".
Branches, roots, paper, compost are placed at the bottom of the beds. In the middle of the bed there is a tunnel for fresh organic waste and water.
This design of the beds provides the necessary moisture and constant enrichment of the soil.
2. High bed without fences. When arranging such a bed, the trunks of trees (not conifers), branches, roots, snags are laid in the ground at a shallow depth; the second layer is this sod removed from the place where you make the bed, laid with grass down; the third layer is 20-30 cm of the main soil mixed with humus.
For irrigation of bulk high beds, an irrigation irrigation system is used when water comes from a ditch between the beds - a good option for vegetable gardens flooded in the spring, or you can use drip option irrigation, when water enters the garden from mini terraces.
The paths between the beds are covered with straw or large sawdust. Never step on the ground in a high bed - this way you compact it, and it will be more difficult for plants to receive moisture and nutrients.
High beds of this type can be used not only for a vegetable garden, but also for growing shrubs and fruit trees, if you have problematic soil for them in your summer cottage. The service life of such a bed (until the first tree layer with trunks completely rots) is 20-25 years - this period is enough for any fruit tree.
Spare no space for paths between high beds - so you can always drive there with a garden wheelbarrow both for harvesting and with a new portion of humus. Have pity on your back - use a wheelbarrow.
If your raised beds are located next to fruit trees you may need to install a root barrier before laying out the beds - dig a trench, cut the root at the approach to the beds, install a metal sheet in the trench that will prevent the root from growing in this direction and cover the trench with soil.
Learn more about raised beds through your own experience. There are many interesting finds, experiments and new discoveries in this topic for every gardener.
Gardening has always taken a lot of time and effort. A large piece of land needs to be cultivated, although a significant part of it is not even used for growing vegetables. Regular digging, weeding and protection from underground pests - these regular problems are a chore for an ordinary gardener. However, as an alternative, high beds are used, which save the owner from these problems.

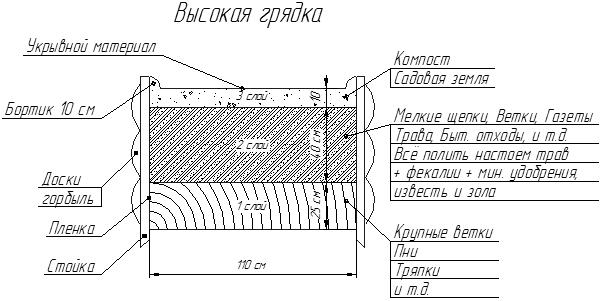
The structure consists of several layers, which is why it is sometimes called lasagna. As you can see in the photo, among them only a few are used for plant nutrition. There are five layers in total:
- wood chocks;
- Branches and bark of trees;
- Paper;
- Leaves and grass;
- Earth.
Another layer is also noted - a metal network, but it does not play any role in plant nutrition and is necessary only for protection. The presence of the grid prevents the access of various pests to the ground, protecting the roots.

Fertile land is used only for the top filling of the beds. The plant itself sits in it, which further develops, increases in size and takes layers of roots into the next layer. The combination of leaves and grass is the nutrient layer needed to supply the roots of the plant with useful substances. Next come midfield components like bark, chocks, and paper scraps. They are necessary for the exchange of substances with the surrounding earth, as well as for moisture filtration.

All these components of the beds are limited on the sides by a brick or wooden frame. This design provides the plant with a complete complex useful substances and contribute to its accelerated growth. And the safety here is extremely high, which will allow the use of high beds with an abundance of pests.
The benefits of this garden
The ease of use of the beds has made them a very popular solution. They are practical, simple and reliable, and maintenance is minimal. Although the process of creating them is extremely simple, it saves a lot of effort and money that could later be spent on caring for a conventional garden.

Among the main advantages of high beds it is worth noting:
On a high bed, it is much more convenient to remove various weeds. The reason for this is not only high location but also loose earth. To do this, there is no need to use special tools, just take gloves and work with your hands.

Navigation and marking is greatly simplified, because the plantations are already divided into blocks. This allows plants to be planted in different season, easy to share and tag them. In addition, the design provides for the possibility of covering with a tarpaulin or other material. This allows you to shelter young plants from too strong sun or create an impromptu greenhouse during the cold season.

It is also worth noting that such planting can be done even where the land is completely unsuitable for growing plants. The installation of this design does not depend on the main soil, but for further work you can use the purchased soil. This allows you not to worry about the composition of the earth, the presence of stones and other debris.
Interesting ! Since the soil can be purchased, it is allowed to use different types of it for different beds. This will allow you to choose suitable option for certain culture plants.
Weeding for such areas is also not required. Easily loosening the soil can easily replace it. The same applies to pre-digging. Therefore, such regular procedures are no longer needed, which saves a lot of time and effort. In addition, if necessary, a high bed can be dismantled by returning to original form vegetable garden.
Disadvantages of high beds
However, there are also disadvantages to this planting method. It is not used everywhere, because in certain situations it is extremely inconvenient. Among the main disadvantages it is worth noting:
- drying out of the soil;
- The need for regular feeding;
- Favorable conditions for the development of microflora harmful to plants;
- Building beds takes time and effort;
- Not recommended for growing cold hardy crops.
The first drawback is the drying of the soil. Since the structure is located at a height and has drainage holes for ventilation, the soil dries and weathers quickly. This results in the need for regular watering as well as more frequent fertilization of the plants.

Fertilizer is another drawback. Plants are not able to draw nutrients from the surrounding land, so they are forced to limit themselves only to the nutrient layer of a high bed. This leads to the fact that for further growth they need additional feeding.
Advice ! Watering and fertilizing can be automated through special systems.
This greatly simplifies the care of a high bed, so it is recommended everywhere. Also, these problems can be dealt with by deepening the beds into the soil.
Since the remains of trees, leaves and grass are used for the beds, such conditions are quite suitable for the development of various fungi. This can destroy the plant from the root, completely removing the entire crop. Therefore, such a nuance should also be monitored, focusing on the health of the seedlings.
Another problem when using this kind of beds is the rapid heating of the soil. Although he contributes better development many plants, it is harmful to cold-resistant crops. If such a culture is subjected to overheating, it can shoot itself.
These were the main disadvantages of high beds. There may be problems with them during the construction process, however, all the previously mentioned advantages more than cover such disadvantages. And yet it is better to evaluate the feasibility of such beds in your garden.
What materials are used for high beds
For high beds, various materials can be used. Their diversity is not limited to brick or wood, it is not so important. After all, they are used only as a fence, so they can also play a purely decorative role.
Among the most common options for such beds:
- Wood;
- Vine;
- Brick and stone;
- Metal;
- Plastic;
- Slate;
- Concrete.

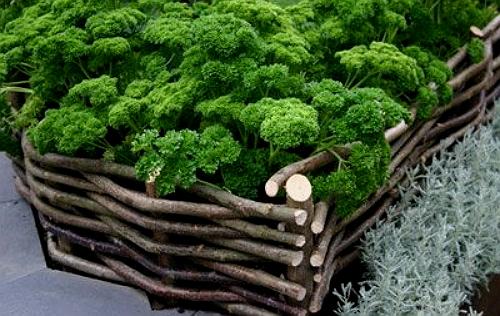
Vine could be an alternative. It has a pleasant appearance, while it can be easily replaced as it ages. The disadvantage is the extremely short life of the beds, often not exceeding one year.

Next comes brick and stone. These durable materials are more commonly used for ornamental plants, but they can also be placed in the garden. They are durable and reliable, while not changing their appearance during operation. However, their construction requires special skills, a lot of time and effort. In addition, the further dismantling of the high beds is significantly complicated.
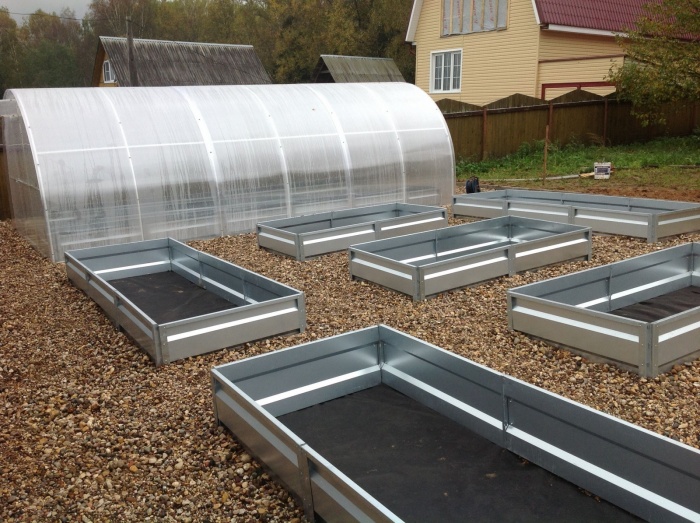
Metal is a good option for a high bed. It is comfortable, simple and durable. If necessary, it can be easily moved to another place, because thin layer metal is light. But it also has disadvantages, including the need for welding, as well as surface treatment from corrosion.

Plastic is a good option to replace wood or metal. It is lightweight, comfortable, and its strength is quite high. A particular advantage is that plastic is practically indestructible chemically, so it can serve for a long time.
Important ! When choosing plastic, you should pay attention to its appearance. Some types of this material may be unsafe, releasing harmful substances into the soil.
Concrete and slate are the simplest and most practical solutions for garden beds. They are reliable, require low costs, and their service life is calculated in years. However, slate is quite fragile, and concrete requires a long time for installation.
All these materials are used for arranging high beds. They are practical, but each has its own advantages and disadvantages. This should be taken into account when choosing further.
How to make raised beds
The process of building high beds is quite simple. It is only necessary to understand the general idea of \u200b\u200bthe design and act in accordance with it. The example will be disassembled wooden garden, because wood is much easier to work with.
The following elements are required for operation:
- Shovel;
- Drill;
- Roulette;
- Saw;
- Level;
- self-tapping screws;
- Primer;
- Construction grid.
Wood will need two types. These are boards 50x200 mm, as well as timber 50x50 mm. The work is carried out in several stages, including:
- Wood processing.
- Site selection and preparation.
- Frame assembly.
- Installation.
- Filling.
The first step is to process the wood. Having previously cut it, work is carried out on impregnation, as well as drying the material. Wood should be cut in accordance with the future size of the high bed.
Advice ! Sizes are selected individually.
Having cut the boards in accordance with the preliminary marking, you need to prescribe them with an antiseptic. Particular attention should be paid to the side that will be in contact with the ground. After that, the material must be dried.
The plot for the beds should be light enough and not contain perennials. It is recommended to dig up the earth so that it passes water better. In the process, various debris such as stones and branches are removed.
Next, the process of assembling a high bed begins. The boards are knocked into the walls, connected by means of a beam. After completion of the work, it is recommended to prime the structure again. Then it is installed in the future place and fixed by means of wooden stakes. Fixation is needed only now, in the future the frame will adhere to the ground.
- wood shavings;
- Small branches and leaves;
- Paper scraps;
- Fertilizer layer;
- Fertile land.
Instead of branches and shavings, some additional layer of plant fertilizer can be placed, but it is important to install a protective barrier for the bed. It can be both a natural component and geotextiles.
Important ! The thickness of each layer is approximately 10 cm.
As a result, it remains only to plant the plants in the garden and grow them. It is necessary to remember about regular care and watering, because similar designs especially demanding.
These tips will make it easy to make a good high bed for the garden. Plants in them will develop quickly and give a good harvest. And for a better understanding of the design of high beds, it is recommended to watch the following video:
Traditional cultivation of the land requires a lot of time and physical strength, and the harvest is not always as expected. That is why more and more gardeners are equipping high beds on their plots, allowing without special efforts get an excellent harvest of vegetables every year. Anyone can make high beds with their own hands, because this does not require special skills or special equipment.

Compared to conventional beds, bulk beds have many more advantages:
- a vegetable garden can be set up even on a plot that is completely unsuitable for agriculture;
- digging and weeding the garden are replaced by light loosening of the soil;
- on the confined space easier to remove weeds;
- a high bed is easy to mount and just as easy to disassemble;
- between the beds you can lay out paths and walk along them in any weather;
- plants ripen faster, which is especially important for cold regions;
- when arranging a high bed, good drainage is provided;
- crops in the beds are easy to protect from frost by covering with a tarpaulin or agrofibre.
In addition, the vegetable garden bulk beds can be very decorative, so you can break it near the house.

Fencing materials
A high bed is a frame of a certain size, inner space which is filled with soil, compost and fertilizers. Most often, the frame is made rectangular shape, and collect it from boards, slate, branches, plastic and other materials.
Wood is the most affordable, easy to install and eco-friendly material. To assemble the beds, boards, timber, small logs are used. Disadvantages: wood requires, quickly darkens and loses its attractiveness, short-lived.

Vine and rods - inexpensive and original solution. Wicker walls look very attractive, you can give the garden any shape. Disadvantages: weaving a vine requires skills, the service life of such a frame is very short.
Stone and brick - an option for sites with classical architecture. Very reliable and durable material, gives the beds decorative look. Disadvantages: high price, it will take more time to create a bed, it is difficult to dismantle.

Plastic is a great alternative to wood. Sheet plastic is easy to assemble and disassemble, it is strong enough, has attractive appearance very durable and relatively inexpensive. Disadvantages: certain types of plastic contain harmful substances, so they are not suitable for the garden. Ecologically safe material has an appropriate certificate, which must be presented at the time of purchase.

Metal is a convenient and durable material, ideal for curly beds. If necessary, it will not be difficult to move the metal frame, as well as dismantle it. Appearance neat metal walls, they can be painted in any color or painted with ornaments. Disadvantages: metal curb assembly requires welder skills, sheet metal price is quite high, corrosion protection requires high-quality processing surfaces.

– perfect solution for multi-tiered beds or arranging a garden on a slope. The walls can be made monolithic or assembled from separate ones. concrete surface easy to decorate, it is as strong as possible, durable, has a neat appearance. Disadvantages: lengthy installation process, high cost of materials, Additional requirements to the drainage system.
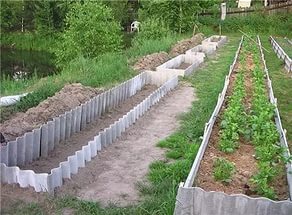
Making beds with slate is quite a budget and simple option. You can install the walls very quickly, such material lasts for a long time, for decorativeness the slate can be painted in any color. The main disadvantage is the fragility of the material, so when installing it should be handled with care.


Each gardener selects the size and shape of the bulk beds at his own discretion. And yet, there are optimal parameters for which the garden bed will be most effective:
- height from the ground 15-50 cm;
- width 90-120 cm;

If the bed is poured on fertile soil, it is made 15-20 cm high. This is quite enough for good harvest. If the soil on the site is not suitable for farming, the bed is raised up to 30 cm. Compost beds are made even higher - up to 0.5 m. Sometimes the walls are raised very high, which allows you not to bend down during tillage and planting, but this increases material consumption and takes more time to arrange the garden. In addition, with a large width of the frame, it is inconvenient to cultivate the soil at such a height.

The bed should be wide enough for two rows of plants. With this planting, all plants will receive the same amount of air and sunlight, which has a very positive effect on productivity. Large quantity rows causes medium plants to get less air, shade, stretch upwards, and yields drop. Process the garden standard width is also much easier than being too wide.
The length of the bulk bed does not play a special role, therefore it is limited only by the size of the plot. The most common option is beds with a length of 1.5 to 3 m; they are compact, look neat in the garden.
The right arrangement of a high bed
For example, a garden bed with a fence made of boards is taken; this option is the most convenient and inexpensive.
In the process of work you will need:
- bayonet shovel;
- roulette;
- drill or screwdriver;
- building level;
- circular saw or jigsaw;
- self-tapping screws;
- boards 50x200 mm;
- timber 50x50 mm;
- primer;
- building network.
Step 1. Wood processing

The boards are cut to the size of the frame, after which they are coated on all sides with antiseptic impregnation. You can use used oil for these purposes, and so that harmful substances do not penetrate the soil, after processing, it is recommended to cover the tree on one side with a film. Especially carefully process the lower edges of the boards that will be in contact with the ground. The beam is sawn into pieces 50 cm long and also impregnated protective agent. After that construction material laid out to dry.

Step 2. Site preparation
The plot under the bed should be illuminated by the sun for at least 5 hours a day. Mark the boundaries of the beds, remove stones and branches, dig perennials. If desired, you can dig the soil along with fine grass - this will increase the permeability of the soil. If the soil is very dense, trampled down, it is enough to remove the turf layer along the marking perimeter to a shallow depth in order to more conveniently expose the frame.
Step 3. Assembling the frame for the beds


Dried boards are knocked down in pairs into shields and interconnected with the help of bars. The height of the shields is equal to the height of the beds, the long sides of the frame are additionally reinforced with transverse bars in the center. Since the length of the bars is greater than the height of the walls, they should protrude 10 cm above the frame. These will be the legs of the frame. To improve the appearance of the structure, boards laid flat are stuffed along the perimeter of the frame, the edges of which are cut at an angle of 45 degrees. In conclusion, the frame can be painted from the outside.

Step 4. Installation of the structure

The finished frame is transferred to the installation site; expose the structure according to the markup, make recesses for the legs, check the location of the beds with a building level. If necessary, put pegs in or, conversely, take them out excess soil. The structure should stand as evenly as possible, all corners on the same level. Finally, soil is poured around the perimeter of the walls and compacted so that there are no gaps left.
Step 5. Filling the beds
First close the bottom construction mesh and nail it along the edges to the walls of the frame. The mesh will protect the structure from the penetration of moles and mice. Then geotextiles are laid, which will not allow weeds to germinate. Next, filling the beds is performed in layers:
- small branches, bark, large chips, leaves;
- bird droppings, rotted manure or;
- fallen leaves, branches, bark, grass;
- mineral fertilizer;
- fertile land.

The thickness of each layer is 10 cm. It is not necessary to mix the layers, but it is necessary to level and compact well. If the soil on the site is not of very good quality, it is better to use purchased soil. After filling, the bed is well spilled with water and left for a couple of days. During this time, the layers will settle a little and compact. From above, it is recommended to cover the frame with black agrofibre, which provides better heating of the soil and prevents weeds from germinating.

It is recommended to make high beds in the fall or at the end of summer, so that the layers are well rotted and the roots of the plants receive a maximum of useful substances. If the beds are mounted in the spring, it is necessary to fill them at least a month before planting and pour plenty of water several times to compact. It is easy to turn such a design into a greenhouse: for this, plastic or metal arcs are installed above the frame, the ends of which are fixed to the walls with bolts. A plastic film or a special agrofibre is attached to the arcs from above.

The device of beds from slate
For the device of bulk beds, you can use both flat and wavy slate. The technology of mounting the beds in this way is very simple and everyone can do it.

Table. wave slate

For work you will need:
- slate sheets;
- Bulgarian;
- bayonet shovel;
- a piece of chalk or a pencil;
- roulette;
- level;
- rubber mallet;
- drill;
- wooden pegs or metal rods.
Step 1. Markup
On the selected site, the boundaries of the beds are marked and beacons are installed. Narrow grooves are dug around the perimeter to the depth of the bayonet. If the soil is good, then they remove the entire fertile layer inside the markup, pouring it out not far from future beds.
Step 2. Material preparation


Slate sheets are laid on flat surface, measure the desired length and draw a line across the waves with chalk. After that, the grinder cuts the slate along the lines. The pegs are impregnated bituminous mastic or waste oil, and if scraps of metal rods are used as racks, they are treated with anti-corrosion compounds.
Step 3 Installing the Frame

The first sheet of slate is installed vertically in the groove from the marking angle. Then they put the next sheet with an overlap in one wave, level it, knock it out on top with a rubber mallet so that both sheets are at the same height. Check the location of the upper edge of the slate with a building level, if necessary, add or remove soil from below. The walls are reinforced with metal rods or pegs, which are driven in on both sides to a depth of 0.5 m. So, all the sheets of the frame are placed in turn, the trench is covered and the horizontal level is checked again. After that, the soil at the walls is rammed, the excess is removed.
Step 4. Filling the beds

At the very bottom, you can lay old newspapers, cardboard, pieces of wallpaper, the next layer is chopped brushwood, tree bark, sawdust. After that, small chips are poured, plant waste, peat or compost are laid. And from above all this is sprinkled with the soil that was taken out at the very beginning. Plentifully water the bed to wet all the layers, and leave for several days. When the bed is compacted, you can start planting.
Garden care
When the plants sprout, plantings should be well watered and mulched. Weeds that have broken through the mulch layer are immediately removed. After harvesting, the surface is loosened and sown with green manure. Before the onset of cold weather, all vegetation is mowed, leveled in the garden, covered with a layer of earth on top and covered with a black film for the winter. Periodically, it is necessary to inspect the walls of the frame, replace or repair individual sections.
The soil between the beds is most often covered with small gravel, gravel, straw, sometimes sown with lawn grass. In such conditions, the garden always remains well-groomed, weeds do not grow, dirt does not stick to shoes. At will it is possible from a tile and a brick, or to fill in concrete.
Video - Do-it-yourself high beds
Video - High slate beds