How to plant a vine in the spring. Grape cuttings: harvesting, cutting, planting, care
So, when to plant grape cuttings in spring? Planting cuttings of grapes in open ground is carried out from May to June, depending on the climatic features of the region. It is during this period that favorable weather conditions for planting are established in most regions, and there is no threat of night frosts that can destroy seedlings.

Properly harvested grape cuttings that have been stored in the winter and germinated in the spring with a high probability will quickly be accepted and begin to produce crops within a few years.

In some regions, early planting is used with covering the cuttings with a film. When warm stable weather is established, the film is removed.
Self-propagation of grapes by cuttings at home does not present any particular difficulties if you follow these simple rules.
Propagation of grapes by cuttings at home is the stage of rooting and germination.

Immediately, before the onset of the planting season, it is required to get the prepared cuttings and prepare them for planting in the ground.

For propagation of grapes by cuttings in the spring, it will be necessary to carry out a germination procedure - placing the cuttings in a moist nutrient medium to form the initial root system.
Before germination, all cuttings should be inspected in places of cuts, they should all have a bright green color with protruding moisture. If the cut of the cutting is dry, then it is rejected, because this means that the plant has died or will not give roots when planted. Germination of such a cutting is also possible, but it will be painful and weak in development.

After that, all the cuttings are soaked in water (thawed or settled) for 1-2 days, water from the tap should not be used, due to the presence of chlorine and various substances used for cleaning. Growth stimulants sold in specialized stores can be added to the water, they will help the cuttings recover faster and gain the required amount of nutrients. This procedure helps to replenish moisture lost during storage.
Before soaking, all sections should be renewed for better moisture absorption.
There are several ways in which cuttings are rooted before planting:

After soaking, all cuttings are placed in a container with water, so that about half the length of the cutting is in the water. The most convenient for this is a transparent container, since in this case you can visually control the purity of the water and the appearance of roots. As a rule, roots appear on healthy cuttings after 2 weeks.

Germination in containers with soil - after soaking, each cutting is planted in a separate container with soil. The main disadvantage when propagating grapes by cuttings in the spring of this method is the need for a large number of containers for planting.

To do this, you can use the planting of grape cuttings in the spring in bottles (glasses). Since they are in abundance in almost every home, due to the fairly large number of modern refreshing drinks, it is enough to cut off the neck and the container for planting the cutting is ready.

Germination of cuttings using peat tablets - each cutting is stuck into such a peat tablet, the peat is poured abundantly with water and wrapped in polyethylene or a wet rag. In this form, the cuttings are left for 2-3 weeks in a warm, humid place, after which they can be planted in open ground.
For those who have an aquarium or a large container that is constantly filled with water, you can use the option with a foam float, through the holes in which the cuttings are installed for germination.
These are only the main, most commonly used methods, in fact, a lot here depends on the fantasies of the amateur gardener. The main factors that are required for successful germination are the presence of moisture, a constant warm ambient temperature.

Some gardeners practice planting cuttings in open ground immediately after soaking, thereby bypassing the stage of germination and rooting. This method has some drawbacks, but is the simplest. Of the main disadvantages, a much lower percentage of rooting can be noted than when planting already germinated and rooted material.
Planting cuttings

When planting grape cuttings in the spring, at the very stage of planting, you will need to choose containers of a suitable size. Rooting seedlings for germination can be done in different ways:
In the bottom of a large plastic cup, you need to make several holes and pour a little mixture of earth with compost or a substrate for grapes into it.
At the second glass of a smaller size, it is necessary to remove the bottom, insert it into a large glass with soil and fill it with sand.
After a good watering, you can stick the stalk in the sand. Then it is recommended to cover the seedling with polyethylene to keep warm..
Pour a little drainage into a plastic bottle, then a thick layer of compost, peat or grape substrate. A cutting is placed in the prepared soil. It is important that it is not much longer than the bottle, as it must be covered with a plastic cup until green shoots begin to form.
Good growth of grape cuttings depends on regular, but not excessive watering and good lighting. It is allowed to feed seedlings.

After the formation of a strong root system and the formation of the first green leaves, the plant can be planted in open ground.

Before planting grapes, you should first determine the place. When choosing a place, it is important to know about the increased sensitivity of grapes to heat and light.
For planting a vineyard, areas open to the south and southwest with good sunlight are quite suitable.
Places protected from cold northern winds by the walls of buildings or houses with ornamental or fruit vegetation, as well as the southern, southwestern or southeastern border of a household or summer cottage, free from the shade of trees or houses, are well suited for planting a vineyard.

Properly planted and skillfully placed varieties provide a good harvest and high quality grapes, as well as serve as a good decoration for home gardens. It is impossible to plant grapes in the shade of fruit and other trees, near manure heaps, as well as near pits with coal slag and various types of garbage. Grapes do not tolerate proximity to poplar and walnut, as well as other tree species with a strong root system, which dries up the soil and creates a large shady space.

Grape cuttings ready for planting
When planting, cuttings that do not have callus, are overdried and incapable of further development, are removed. The better the choice of cuttings during planting, the greater the likelihood of good seedlings. The cuttings are placed at an angle relative to the side of the ditch, given the distance between them of about 13 cm, one or two eyes should also remain above the ground. Next, the pit is half filled with fertile soil, well tamped and filled with water. As soon as the water is completely absorbed, you can fill the hole with earth.
Cuttings are one of the methods of reproduction of grape crops, effective, fast and widespread. Grapes are considered an unpretentious culture; they endure pruning and grafting steadfastly.
Germinated cuttings for growing grapes are otherwise called chibouks. For them, a green or lignified vine is used. From the green vine, cuttings are prepared in early spring, before the juices of the plant begin to move. The harvest time for lignified options is autumn.
The process of cuttings is considered time-consuming, but justifies itself.
Procurement terms
Cuttings are harvested, lignified and green, at different times.
green cuttings
Collection is carried out in the spring (early summer). The weather should preferably be overcast. Spring chibouks take root better.
lignified cuttings
Planting material is prepared in the fall, during the pruning of the vine. It is important to carry out the procedure before the onset of frost. At the end of autumn (beginning of winter), the vine contains a maximum of nutrients.
The advantages of using lignified material are explained, among other things, by a shorter period of harvesting, storage and a rooting probability of about 100%. The preparation of such cuttings begins 15 days after the fall of the bulk of the grape leaves.
How to determine the right vine
Grape bushes with the best taste and high yield are selected for cuttings. The vine should be brown in color, 8-12 mm thick, with 10 cm internodes. It is important to exclude the presence of dark spots, other damage and signs of disease.
It is better to use a vine from healthy bushes of varieties that bear fruit in your area. She must be mature, with healthy kidneys.
Proper cutting of cuttings
Properly cut cuttings will produce good quality planting material.
Green (spring) options
The middle and lower parts of the shoot are optimally suited for rooting. The upper parts are subject to decay, so it is not recommended to use them.

Rules for cutting spring vines:
- the cutting must have 2 leaves or more;
- the bottom sheet is removed;
- half of the plate of the top sheet is removed;
- oblique cut from below (approximately 45 °);
- top cut straight;
- cutting length - 30-40 cm;
- thickness - up to 1 cm;
- 2-4 buds (eyes) are present.
Green chibouks are cut at the very beginning of the flowering of the vine. An oblique cut helps to further distinguish the bottom from the top. At the end of cutting, the shoots are placed in a container (bucket), covered with a damp cloth on top to prevent drying.
Lignified (autumn) options
Harvested from the middle parts of the shoot. It is not recommended to use damaged, crooked shank - this will adversely affect the quality of the seedling. 2-4 buds should contain each stalk from which the whiskers and leaves have been removed. On the sides of the planted branches, grooves are drawn with a sharp object (needle, nail).
A high-quality cutting is considered if it is characterized by:
- hardness to the touch, characteristic crackling when bent;
- lack of mechanical damage;
- brown color without brown specks;
- green at the cut level;
- appropriate sizes.
Grapes are able to develop the root system well on both lignified and green shoots.

Preparing cuttings for planting
Prepared shank are sorted and processed. Processing consists of the following steps:
- daily soaking in water;
- pickling (disinfection) with copper sulphate 5%;
- drying;
- sorting, tying into bundles;
- wrapping with polyethylene film;
- determination in a cool storage place.

The temperature in the storage room should not exceed 5° throughout the winter. Excessive moisture in the storage area can cause rotting. The culling should be carried out in a timely manner.
Stages of preparation
- The preparatory period includes several stages:
- Proper storage after trimming
- If the storage rules are observed, the amount of rejected material is reduced significantly.
It should be provided:
- cleansing from mustaches, small stepchildren, foliage;
- the formation of bundles when tied with a rope (non-solid wire);
- content in the wet sand of the basement (or in an equipped trench).
Trench Equipment Rules
The hole should correspond to the length of the shank. It cannot be located near groundwater. About 9-10 cm of sand is poured onto its bottom. The layer of soil above the cuttings must be provided up to 40 cm. To avoid freezing, insulate with leaves, straw, sawdust and cover with polyethylene film.
In the refrigerator, the optimal temperature place for storing material for planting is the door. Before laying for storage, the material is soaked for up to 2 days in cold water, placed in a polyethylene bag. They are obtained from the storage of chibouks in February (possible from the end of January).

Processing and furrowing
After removal from storage, washing is carried out in a solution of potassium permanganate of low concentration. The cut points are lightly trimmed with a pre-disinfected knife to light green skin.
At the bottom, longitudinal grooves are made with a sharp object on both sides. They and sections are processed by Kornevin. This is a kind of stimulation of root formation (furrowing).
Soak
The material is placed in water for 1-2 days. Refreshing of sections is practiced, removal of eyes, except for the top 2. Top up with water as it dries.
For the formation of the root system, the cuttings are placed in a sunny place. After 14-18 days, roots or their rudiments from 3 to 7 cm are formed. Shoots up to 5 cm are formed from the eyes. The cuttings are ready for planting.
If there are several varieties, do not forget to label (sign) them.

To maintain the quality of the material, you need to take the following actions:
- when dry - moisten, place in water;
- when covered with mold - wipe with potassium permanganate.
In the absence of visible damage, diseases, the viability of the chibouks is confirmed by cutting the bark and ascertaining living wood of a bright green color. The kidneys should be green and firm in cross section. Brown color means eye death.
If there are already leaves, but the roots have not yet formed, such shoots should not be rooted. They do not differ in viability and will quickly wither, because all the strength and energy is spent on the development of leaves.
The material selected after culling must be treated with potassium permanganate, cut from 2 sides, soaked in a growth stimulator for up to 2 days.
Growth stimulator can be prepared independently. To do this, add honey and aloe to the water, 1 tablespoon per 10 liters. Apply the grooves vertically by rubbing the stimulant into them.
Planting cuttings
The quality of planting largely determines the entire subsequent process of growing a plant. There are several ways of rooting: in sawdust, in the ground, in water.
in sawdust
Sawdust, slightly moistened, is placed in the container, in which bunches of cuttings are located. The container is placed in a warm place. Sawdust is moistened every 5 days. The period before the appearance of the root system is 3 weeks.

in the ground
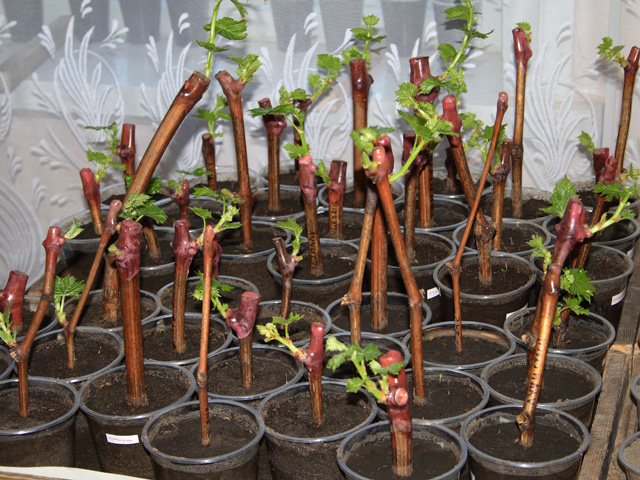
The prepared container (plastic pots, glasses) is filled with the prepared nutrient substrate.
The substrate is prepared by mixing:
- garden land - 35%;
- humus - 25%;
- rotted sawdust - 25%;
- sand - 15%.
A drainage layer (expanded clay, pebbles) is equipped at the bottom of the tank. When adding the soil mixture, the cutting is set at a slight slope, so that only the upper eye is on the surface.

In water
Chubuki are simply placed in a glass jar of water.
Chubuks with regrown roots are planted in a special cardboard or plastic container with soil (containers, boxes, pots, bags). Holes are made in them to remove excess fluid. Preferred container sizes: height up to 25 cm, diameter up to 10 cm.
For subsequent transportation to the vineyard, it is convenient to place small containers in larger boxes.
With a large amount of planting material, greenhouses are used. The soil for rooting must be fertile. The thickness of the soil layer is up to 12-15 cm. Above - up to 5 cm of river sand. Before planting, the soil is moistened until it is completely impregnated.

Landing requirements:
- landing depth - 3-5 cm;
- planting frequency - after 10 cm;
- moistening, film coating is provided;
- the need for kilching.
The stalk is placed in the soil mixture, fall asleep, watered.
Kilchevanie - this is the placement of chibouks in a plastic dish with wet sawdust over a radiator. Goal: Keep the bottom warm and the top cool.
Cutting Care
Care of seedlings involves regular watering, spraying.
When caring for them, you should follow the rules:
- Maintain moderate soil moisture.
- Do not forget to carry out the fight against emerging weeds.
- Use complex fertilizers for feeding seedlings. A week later, planted plants are fed with potassium, wood ash.
- Observe the lighting regime.
- Carry out periodic pest control.
The correctness of rooting is indicated by the development of the root system earlier, the appearance of greenery (leaves). The opposite scheme indicates a violation of the process.

Humidity and watering
Care rules provide for high humidity. For this purpose, spraying with warm water (20-25 °) is recommended up to 5 times a day. Starting from 10-12 days, when the rudiments of roots appear, reduce the number of sprays to 3 per day.
Watering is carried out as the soil mixture dries out (1-2 waterings per week). It is produced through a pallet in order to avoid rotting of the root system.

Temperature regime
For the germination of cuttings in water, the temperature outside requires about 20 °, and inside the jar - up to 38 °. At high temperatures during the storage of germinated cuttings, the intensity of nutrient consumption increases. This is fraught with loss of viability by the time of rooting. And extremely low temperatures lead to freezing, drying up of the eyes. The optimum temperature for the preservation of cuttings is from 0 to 5 °.
Light for cuttings
Containers with chibouks should be kept in a bright place, but direct sunlight should be excluded. They can provoke burns of grape leaves.
The use of fluorescent lamps is considered effective.
Preparing for landing in open ground
In the spring, the material prepared earlier is processed, the rejects, rotten, dried chibouks are removed. When cut, the stalk should be light green and secrete juice. Otherwise, the material is unsuitable for planting in open ground.
To prepare for planting, seedlings should be hardened off (about a week before planting). To do this, when the formation of the root system is completed (in a few weeks), you need to open the container for 10-12 minutes, adding time until it is fully opened. Hardened seedlings are ready for planting in a permanent place. You can start it in the presence of 2-3 sheets and formed white roots (formed root system).

Chubuki are ready for landing if:
- they are light green in color at the site of the cuts;
- when pressed, a liquid is released that is transparent.
If the sections have darkened, cuttings should not be used for rooting. As a rule, they are ready for transplanting into open ground by May-June.
Grape cuttings provide gardeners with planting material in large quantities, at no particular cost and in a short time.
Many methods of propagation of grapes have long been known. Planting with cuttings, or chibouks, is the most common of them. This process is simple, but requires a lot of time and knowledge. This article provides all aspects of planting grapes with chibouks that even beginners will understand.
When is the best time to plant grapes from cuttings?
Procurement and storage of planting material
Shanks (chubuks) are segments of a one-year-old fruit-bearing vine. They can be purchased on the market, in specialized nurseries, or, if possible, prepared independently. In the first case, there is a risk of being deceived by unscrupulous sellers and buying grapes of the wrong variety or cuttings spoiled as a result of improper storage (the method for checking the suitability of the cutting for planting will be described below).
Pipes are harvested at the time of autumn pruning of grapes - after leaf fall until the first frost. Spring is not suitable for this process, since shoots do not develop during hibernation.
In the southern regions, leaves from a grape plant do not always have time to crumble before the onset of frost. Therefore, cuttings can be harvested earlier than this time. You just need to make sure that the vine is ripe. This period begins approximately in the second half of October - early November.

The tool used to cut the twigs (knife or secateurs) must be sterile so as not to infect the plant
As a donor, an annual well-ripened, even, disease-free vine that does not have mechanical damage on the surface is selected. Cuttings are cut from its lower and middle parts. Branch diameter from 6 to 12 mm (it is necessary to take into account the grape variety). The length of the twig can vary from 20 to 50 cm, the main thing is that there are at least 2-3 developed buds on the handle.
From below, the cutting is cut off 1 cm before the kidney, from above the stem should recede from the kidney by about 2 cm.
It is believed that long cuttings give the best breeding results. And experienced growers note that longer cuttings, for example, with 6 buds, are also easier to keep until spring (they are cut in half before planting).
A 1% iodine solution will help assess the maturity of the vine. It is necessary to analyze how the color of the cut on the vine changes when immersed in iodine: a light green color will indicate that the vine is not ripe; purple-black shade - about the full maturation of the branch.
Chopped chibouks are formed into bundles marked with the name of the variety, wrapped in a plastic bag and sent for storage. The main task of the storage process is to ensure that the cuttings do not wake up and grow before the desired time. Therefore, they should spend the winter in a dark, cool place at temperatures from 0 to +5 0 C. As a storage place, you can choose:
- refrigerator (suitable if there are few cuttings);
- cellar or cellar;
- a hole under the ground with a depth of 25–30 cm (in this case, the bundles are shifted with straw and covered with soil).
Several times a month, it is advisable to revise the cuttings for the presence of mold and rot. Rotten specimens should be discarded immediately. And twigs with signs of mold can be washed in a solution of potassium permanganate, dried and returned to storage.
Video: harvesting and storage of grape cuttings
Planting grapes with cuttings in the classic way
Planting chibouks in the ground is a simple, but time-consuming procedure, which includes several stages:
- Awakening and rooting cuttings.
- Organization of the landing pit.
- The process of planting chibouks in the ground.
- Feeding young seedlings.
- Watering after planting.
Each of these stages has a number of features, and requires the implementation of certain rules.
Preparing cuttings for planting
This process begins in late winter or early March, depending on the expected time of planting in open ground, and involves removing the cuttings from dormancy and rooting them. Preparing chibouks for planting increases survival rate and allows active growth to begin earlier.
Preparing chibouks for planting includes several phases:

The main principle of operation of the kilchevator is based on the fact that the bottom of the chibouk must be heated, and the upper part must be kept cold so that it does not bloom before the roots appear.
In my opinion, one of the most effective and, most importantly, affordable root formation stimulants is honey. I insist the cuttings in a honey solution (1 tablespoon per 10 liters of water) for 12-24 hours. But first I leave them for two days in rainwater and make notches under the lower kidney. Moreover, experience shows that scratches in the lower part of the shank really facilitate and accelerate the process of root formation, if they are made on cuttings with at least three buds. Such interference harms short twigs - very few took root.
Selection and preparation of a place for planting grapes
One of the conditions for high yields is the choice of the right place for planting. Grapes are a heat-loving plant that does not tolerate stagnant water. Therefore, determining the place of residence of this plant on the site, you need to focus on the climatic conditions of the region.
In the northern regions and the middle lane, it is necessary to provide the grapes with as much heat as possible, so a spacious area is suitable, protected from the cold wind by trees and shrubs growing along the edges.
In areas with frequent summer rains, it is important to protect the grapes from excessive moisture and organize good ventilation. To do this, it is better to place the shrub on a slope or bulk mound.
In arid regions, the plant must be provided with systematic watering or placed in a place with close groundwater (but not closer than 2.5 m from the surface). Mulching the soil with grass or covering it with a black film will also help retain moisture.
On flat areas, bushes are planted in a north-south direction. It is believed that in this case the grapes will receive more sun. Shrub shading by tall trees should be avoided.

The south wall of the building is ideal for growing grapes.
Grapes do not tolerate neighborhood with walnuts. Many other plants also affect its vital activity:
- harmful neighbors: dandelion, wormwood, wheatgrass, plantain, bindweed, nightshade, yarrow, wormwood, nettle, clematis, cornflower, as well as lawn grass, horseradish, corn, tomato, sunflower, cut onions, lettuce;
- useful neighbors: sorrel, carrots, peas, cabbage, cauliflower, radish, table beets, melon, radish, strawberries, cucumber, dill, beans, onions.
At the chalet for planting is prepared in advance: they are leveled and cleaned of old trees and shrubs. Grapes do not like very acidic and alkaline soils, so you should take care of its structure. Enrich the soil will help planting and embedding green manure (mainly legumes) in the soil, which are held a year before the proposed planting of grapes.
The planting hole must be prepared at least 2 months before planting: dig and fertilize.
Video: the perfect place to plant grapes
Scheme and depth of planting grapes
- on black soil - 60x60x60 cm;
- on loam - 80x80x80 cm;
- on sand 100x100x100 cm.

For sprouted chibouks, the following is used in the pits:
- Fertilizers are placed at the bottom of the pit with a layer of 20–30 cm (1 level) and lightly tamped (the composition and proportions are described below).
- A seedling is installed as shown in the figure: the upper eye is 5 cm below ground level.
- They fall asleep with earth at level 2 and lightly trample.
- Pour 40-50 liters of water.
- After the water has been absorbed, the pit is covered with earth without compaction and moisture up to level 3.
- When planting in the fall, they form a mound, and in the spring they leave a small hole (15–20 cm).
In parallel, you should organize a support for each bush. After planting, plants should be protected from direct sunlight for the first two weeks..
When planning the placement of a large number of bushes, it is necessary to correctly choose the distance between the bushes in a row. It will depend on several factors:
- trellis type;
- the presence of drip irrigation;
- soil fertility;
- characteristics of a particular grape variety.
Most often, growers use 2 types of vertical trellis: single-plane and two-plane. It is believed that the second allows you to significantly reduce the distance between seedlings in a row without harm to their life.
There is an opinion that grapes growing on poor soils without the provision of drip irrigation will have weak and thin vines. For this reason, bushes can be planted much more densely than on fertile land with regular watering.
- for vigorous ones - at least 3–3.5 m;
- for medium height - 3 m;
- for undersized - 2.5 m.
The width of the row spacing should allow ventilation of the bushes, free passage for chemical treatments, as well as minimal shading of neighboring trellises by the previous ones. 2.5–3 m is considered optimal.
Video: a proven way to plant grapes
Fertilizers applied at planting
For normal development, a young seedling needs to be fed. The first time fertilizers are applied directly into the planting pits. As a rule, organic fertilizers in the form of humus are used for the initial nutrition of grapes. Its advantage lies in the fact that the nutrients are released from it gradually, over a period of about three years. However, there is an opinion that humus provides a slight excess of nitrogen nutrition, so it is recommended to add phosphorus (superphosphate) and potash fertilizers (for example, wood ash).
When planting grapes with cuttings in the fall, make sure that the humus is sufficiently rotted. Otherwise, it will begin to decompose and release heat, which will warm the roots of the seedling and cause the buds to awaken. Such a bush will die in winter.
Fertilizers are applied to the planting pit measuring 80x80x80 cm in the following proportions:
- humus - about 7 buckets;
- superphosphate - about 1 cup;
- wood ash - 300 g (1-2 liter jars).
Humus and superphosphate are mixed and dug up with clay at the bottom of the pit. Ash is buried in the soil around the seedling, and does not mix with humus.
Watering after planting
For young grapes, watering is vital, since undeveloped roots are not yet able to provide the plant with a water supply. At the time of planting, 40–50 liters of warm water are poured into the pit. Subsequently, irrigation is carried out approximately three times a week, and then reduced to once every 7–10 days until the end of summer (at least 30–50 liters per well). During precipitation, watering is not carried out. After each moistening, the soil needs to be loosened to improve its aeration.

Drip irrigation provides young seedlings with ideal conditions for development
Planting cuttings without roots
You can plant grapes in the spring with unrooted cuttings. However, in this case, the likelihood of survival is reduced. The plant will develop in open ground much more slowly than when planting germinated cuttings. Leaf formation will occur later, as the plant needs time to form the root system.

Grape chubuki can not be rooted and planted in open ground in the spring after preparatory measures
Planting with chibouks without roots is possible only if the following conditions are met:
- warm weather has set in without the risk of frost;
- harvested twigs have a thickness of at least 8–10 mm;
- the cuttings are pre-prepared for planting (according to the technology described above without sprouting in the kilchivat).
Planting cuttings of grapes without roots is carried out, as a rule, in the classical way in planting pits. For greater certainty, it is recommended to plant two cuttings in each hole. If both take root, then the weaker one must be removed or carefully dug up and transplanted. It is often practiced to plant unrooted chibouks in a school or garden, with their subsequent relocation to a permanent place after the formation of the root system.
I have a healthy skepticism about this. It is rather illogical to spend your time and labor on harvesting and storing chibouks, preparing them, on arranging a pit and simply sticking twigs without roots into it. As a result, if they take root, then the future viability of the bush still remains in question. I prefer, after kilchevaniya, to germinate the cuttings in plastic cups with soil mixture and plant a healthy seedling in the ground.
For the successful cultivation of grapes in summer cottages, several factors must be taken into account that determine the success of this undertaking:
Non-traditional ways of planting grapes with cuttings
The desire to get a rich harvest in a shorter time makes gardeners experiment and apply various grape planting techniques that differ from the traditional one described. Consider the most common of them.
Planting in glasses, containers and bottles
After preparing the cuttings in the kilchevator, many gardeners plant them in the soil to germinate and get a real seedling. The container for this can be plastic glasses, bags, containers or cut plastic bottles, which are filled with a mixture of garden soil, sand and humus (3: 1: 1). Chubuks are placed on the soil, carefully covered with the remnants of the soil mixture and watered. It is important that improvised pots have drainage holes to remove excess moisture.
Sprouting chibouks in the soil allows you to grow a full-fledged grape seedling
With the onset of heat, a hardening procedure is carried out, that is, a container with seedlings is taken out into the fresh air for several hours a day, gradually increasing the duration of walks. The need for this event is justified by the fact that young plants are very sensitive to temperature changes, and hardening prepares them for life in the open field.
This method is used for growing grapes of late varieties, because it allows you to speed up the ripening of the fruit.
Video: planting grape cuttings in cups
Video: planting grape cuttings in a bottle
Planting in the beds
To obtain healthy grape seedlings from chubuks, it is often practiced to plant them on a temporary bed (school). With this method of planting, seedlings grow with a powerful root system with several strong shoots. This is due to the fact that the roots of plants are always in a sufficiently warmed upper soil layer with good air access.

Growing seedlings in a school requires mandatory plant nutrition, frequent watering and loosening of the soil, persistent weed control, shading in too hot weather
The planting of cuttings in the school is completed no later than the first decade of May. At the same time, seedlings grow in the garden until mid-autumn, and then dug up and sorted. Those seedlings that have an increase in shoots of more than 30 cm and at least 3–4 sufficiently developed roots are considered to be of high quality, the rest are discarded.
You can plant them in a permanent place right away, or you can transfer the planting until spring, providing the right conditions for storing seedlings (the same as when storing chibouks).
To plant chibouks on a temporary bed, you must:
- Dig grooves 40 cm deep and a shovel wide.
- Install the cuttings along one of the walls of the groove at a distance of 12-15 cm from each other and in such a way that 1-2 eyes of the cutting remain above the soil surface.
- Fill the groove with earth up to half, tamp tightly with a foot or a rammer, pour plenty of water and, after it has been absorbed into the soil, completely fill the ditch.
- From above, make an earthen roller of loose earth 10-12 cm high above the upper kidney.
- Immediately after planting the cuttings, loosen the soil again.
Video: planting grape cuttings in school
Planting in a greenhouse
Recently, the greenhouse method of growing grapes has been practiced not only in cold regions. This is explained by the fact that planting in a greenhouse has its advantages:
- microclimate favorable for plant development;
- protection against frost and temperature extremes;
- acceleration of fruiting by at least half a month.
In the greenhouse, you should not grow varieties with dense clusters - due to poor ventilation, they are often affected by fungal diseases.
Before planting in the greenhouse, the cuttings must be germinated and rooted in special containers, growing seedlings from them. At the same time, the preparation and kilching of cuttings begin already in mid-January, in order to continue growing seedlings in a container with soil in a month.
Video: growing grapes in a greenhouse from 0
Hill Landing
This method of planting is often practiced in the middle lane and northern regions, where it is necessary to improve the warming of the soil and accelerate the start of the plant's vegetation. Landing on a hill also allows you to solve the problem with the close occurrence of groundwater.
To plant grapes in this way, you should:
- Dig a hole about 50 cm deep, with a diameter of 60 to 80 cm.
- Put drainage on the bottom (pebbles, broken brick, gravel).
- Fill it with fertile soil (your land mixed with humus, sand, peat). It should be noted that the soil must be rammed (poured 20 cm - rammed).
- In the center, drive in a peg to which it is necessary to tie a rooted cutting in advance.
- Pour a small hill of earth with gentle slopes about 20-30 cm high, leaving only the top eye.
- Cover the kidney with grass and organic mulch.
It is better to place the cutting at a slight slope to facilitate the process of sheltering it for the winter.
Video: planting a garden on a hill
Landing along buildings and fences
Grapes are often planted along various structures. The main reason for this decision is that during the day the walls warm up, and at night they give off their heat to the grapes growing nearby. This effect allows you to accelerate the ripening of berries by 5-10 days. It is impossible to place landings close to the wall, since its surface will not be able to warm up and the desired result will not be achieved. In addition, the very close proximity of grapes has a negative impact on the foundation and the condition of the walls of the building.
Landing in the Moldovan way
A variety of cuttings is planting grapes in the old Moldavian way (kalachik).
The method lies in the fact that planting is carried out with the help of not a short cutting, but a large part of the vine, from 60 cm to 2 m long. The principle of choosing and autumn harvesting of the vine is the same as that of the shank. Planting in this way is carried out in the spring.
The Moldovan landing method involves the following steps:

A rich supply of nutrients contained in the wood of the vine will quickly develop a powerful root system along the entire length of such a cutting and provide nutrition for the first shoots.
One of the disadvantages of planting grapes in a ball is the need for a large amount of planting material.
This technique is not suitable for planting vineyards on large areas using machines, but for amateur viticulture it is quite acceptable.
Every gardener dreams of growing grapes on his site. The simplest and most effective way is the spring planting of grapes with cuttings. This article will tell you how to properly prepare planting material, how to plant it outdoors, and how to avoid common beginner mistakes, as a result of which you can equip a garden at home without outside help.
Timing

The timing of the spring planting of chibouks (orin which month to plant) depend on the region:
- in the Southern Federal District (Stavropol, Krasnodar Territory) it is recommended to plant a plant in March or April;
- in the Central region - in April or May;
- in the northern corners of Russia, it is about June.
At the same time, it is necessary to start germinating cuttings in February.

When the soil warms up to +10 ° C, then you can plant planting material in the ground.
Harvesting, storage and germination of chibouks

Important! You can not keep planting material in the light. Excessive lighting will affect the premature budding of grapes.
Training
You can not plant a plant immediately in open ground. Grapes should be hardened, and gradually: first take out to fresh air for 20 minutes, then for 40 minutes and so on. The procedure is carried out within 7-10 days.
You can plant material together with peat containers. But first, you should shorten the “luxurious beard” - carefully trim the roots by 15-20 cm.
Earth
The selected site should be well lit, not near groundwater and other fruit trees. - light and fertile soil (chernozem). To achieve good success in growing vines, you should prepare:
- Landing plan. The distance between the bushes for technical varieties of grapes should be 80 cm, and for table varieties - 1.5 m. The row spacing can be from 2 to 2.5 m.
- Pit. The hole should be 80 cm wide and 40-80 cm deep.
- trench. If you need to plant several bushes, then it makes sense to do it too, while the width of the ridge is 1 m, the depth is 80 cm, and the height is 0.3 m.
- Pillow in a hole or trench. It is recommended to fill the bottom of the hole with broken bricks, rubble or construction waste. This will preserve the fertile layer of organic matter.

Brick, crushed stone or construction waste (otherwise called stone litter) contribute to the appearance of worms and various insects in the soil.
On the one hand, the worms help loosen the soil.
But on the other side Some pests feed on plant roots. Therefore, when creating a pillow, this should be taken into account.
Some gardeners prefer to fill the hole 10-15 cm with a layer of unrotted fertilizer to improve root aeration.
Step by step instructions at home
Next, we will consider in the form of step-by-step instructions how to plant rooted and rootless chubuks at home. To do everything right, you need to know how to prepare the ground, how to plant deeply, about watering after planting in the ground and about shelter if necessary.
Rootless
- Dig a hole and pour a bucket of sand into it, then on top - 1-2 buckets of humus, and 4 more buckets of earth.
- Set the grape chubuk so that the top eye is 5 cm below the ground.
- Cover with a little more soil. Then water each planting with about 40-50 liters of water.
- Close the planting from the sun and possible frosts.
rooted

- Dig a hole, pour gravel, crushed stone or broken brick into it. Then pour about 10 cm layer of sand.
- Pour fertile soil: 1/3 humus and 2/3 soil. It is recommended to add 3 tbsp. wood ash for prevention.
- Place the cutting in the hole so that the buds face north and the roots face south. The top kidney should remain on the surface.
- Cover with soil, but do not tamp. So fresh air and freely flowing water will accelerate the growth of grapes.
- After the work done, water the plant abundantly.
Care
Timely and competent care of vine plantations is the key to good plant health, obtaining a rich and tasty harvest. The soil around the seedlings must be weeded from weeds, loosen to improve aeration. It is also necessary to perform other manipulations.
Important! During the flowering of the bush and the ripening of the berries, pests appear. Therefore, do not forget about the timely inspection of the grapes. If necessary, treat the bushes with fungicides.
Watering
When planting, pour 20 liters of water under each bush. Then each running meter of beds will require 25-35 liters of water. During the growing season, the volume and number of waterings should be doubled.
top dressing
Mineral and organic fertilizers can increase the yield of grapes several times. It is necessary to feed young plants several times:
- the first top dressing is required 2 weeks after planting the cuttings: add 200 g of superphosphate and 100 g of ammonium sulfate under the bush to a depth of 40 cm;
- the second - before bud break: each bush requires 30 g of phosphorus and nitrogen fertilizers;
- the third - during the ripening of berries: add 20 g of phosphorus and potash fertilizers;
- also throughout the growing season, it is desirable to add 15 kg of humus to the soil 2-3 times.
pruning
Pruning will allow you to regulate the development of the bush. She happens:

- Short. Here you need to leave 2-3 eyes. The processed plant will look like a bowl. For example, professionals form grapes according to the type of the Crimean bowl.
- long. Here you should cut the shoots with a well-ground pruner. Leave on the vine from 6 or more buds. For example, a bush can be made in the form of a large fan.
- Mixed. Cut one part of the vine short and the other long. Leave fruit shoots. This procedure is the most common, and it is called "pruning to the fruit link."
shading
You can create a nook for grapes with your own hands from improvised means. To do this, you should install supports along the edges of the ridge, pull on them not bright and not too dark matter. Leave one half of the fabric free, and support the other with other supports. The overall design will look like an inferior tent.
For stability, you can fix the material with bricks.
Common Mistakes
Beginning growers make many mistakes when growing grapes in the spring. The most common are:
You should also cover young bushes for the winter. Warm protection will allow the grapes to overwinter, and next year they will thank the person with a delicious harvest.
Growing grapes by planting cuttings in open ground is easy and simple. It is enough to take into account all the recommendations and advice, do not neglect top dressing and timely treatments of bushes from pests and diseases. Only in this way the painstaking work of a person will be rewarded with a juicy and tasty grape harvest.
Useful video
Articles written
You may be interested in other articles
Any gardener dreams of having a well-groomed vineyard. At the moment, grapes have many varieties that are suitable for growing in various areas. Grapes can grow both in areas with a short summer period and in warm areas. To select the right one for a certain climatic zone, it is necessary to propagate this berry by cuttings. Such work is quite responsible, but in the end the gardener will get the result that is needed.
Advantages of growing from cuttings
A cutting is a part of a stem with several buds. For breeding at home, lignified twigs are taken from a mature vine. Their other name is cuttings or chubuki.
Any gardener, even a beginner, can grow grapes from cuttings. This method has many advantages:
- the possibility of obtaining a large number of seedlings;
- seedlings are easy to transport, mail and store;
- ease of processing from pests and diseases;
- low cost seedlings.
Lignified cuttings are planted in open ground (in autumn or spring), but at the end of winter or spring they make home rooting.
Growing grapes from cuttings at home provides a good opportunity to get full-fledged seedlings in regions where sheltered viticulture is widely used (Urals, Siberia, Moscow region).
Advantages of growing from cuttings at home:
- the process of development and acceleration is controlled;
- absence of negative weather factors;
- occupies a small space;
- a good run in time, which will allow you to build planting bushes in the current season.
Procurement of planting material
For germination in the winter-spring period, cuttings are selected from a mature (brown, crackling when bent, lignified) annual vine. Their harvesting takes place under vine bushes (approximate time - October, before the onset of the first frost). In uncovered areas, chibouks for reproduction are pruned at the end of November and in winter - from the vine, without any symptoms of drying or freezing.
Propagation material is best obtained from the most healthy and productive bushes that have typical varietal characteristics. These are bushes with even branches, without defects and spots. For cuttings, the middle part of the shoots is selected, which have sprouted from the central buds of two-year-old branches.
The normal thickness of the cuttings is considered to be from 0.5 to 1 centimeter (for a variety with a thin vine, this norm may be less). Greasing and thick stems have loose wood, so they are not suitable for propagation.
Dimensions and cutting cuttings
The length of the handle is measured not in centimeters, but in the number of eyes (buds) located on it.
Two-eye and three-eye are most commonly used, although one-eye and four-eye are also suitable. When cutting branches, stepchildren, antennae and the remains of foliage are cut off. It happens that long vines (50-100-170 cm) are stored in winter, and cutting is carried out before rooting itself.
 The upper cut is made straight, the height above the upper kidney is 2-4 centimeters. The lower cut is made oblique under the lower kidney, while the indentation should be small. Beginning gardeners at first cannot determine where the upper part is and where the lower one is. It is by the method of cutting that you can deal with this issue.
Chubuks are tied into bundles and tied in two places. Tags with the name of the variety are attached to the bundles. After that, the bundles should be stored for several months. Before that, they are processed.
Preparing cuttings for storage
Chubuki is necessary:
- soak in water for 12 hours, while laying horizontally so that the water completely covers them with a small layer;
- disinfect: dip for 15 seconds in a solution of copper sulfate (400 grams per 10 liters of water) or iron sulfate (300 grams per 10 liters of water). After treatment with iron sulphate, the vine will turn black - this is a normal reaction;
- dry for several hours on cloth or paper;
- wax sections (tips). Dip in paraffin, which is melted in a water bath and slightly cooled (the method is not used by all gardeners);
- before storing, wrap in cling film or a plastic bag.
If all these steps are followed, the cuttings will be well preserved.
Watch the video! Harvesting and storage of cuttings of grapes
Saving cuttings until planting
For storage, the ideal conditions are:
- air humidity - from 80 to 95%;
- temperature - from 1 to 4 degrees (but not higher than +8).
Planting material should be stored in a refrigerator or basement, as well as on the street - in a trench or in a snowdrift.
Storage locations for cuttings:

Processing before rooting
Before rooting, it is necessary to check the condition of the materials for planting: good - prepare for germination, bad - throw away. If traces of mold appear on the seedlings, then they must be treated with a solution of potassium permanganate.
Safety check:
- The bark is examined: healthy - without blackening and wrinkles;
- A transverse incision is made on the stem. All wood and cambium under the bark should have a light green tint. A brown, white or black shade is an indicator of death;
- When pressing on the cut, a little moisture should be released. If there is no or a lot of it, then the rooting process will be low.
Soak
 After checking for, the pipes are placed in a container of water for a period of 12 hours to 2 days. It is necessary to soak both overdried and normal shank. The room temperature is approximately +20 degrees. Water is changed every 12 hours. There are times when honey is added to the water (1 tablespoon per 10 liters of water).
pruning
The long vine is cut into chibouks with 2-3 buds. If pruning was done in the fall, then the lower sections are updated before rooting. They are made under the lowest nodes - on a wedge or obliquely. The work is carried out with a sharp knife to avoid squeezing the tissues. Cut branches are immediately placed in a container with water at the bottom.
Furrowing
The best place for the formation of roots is the place where the callus flows onto the wound surfaces. This phenomenon can be triggered manually. The lower part of the cuttings is scratched with a knife, making several longitudinal grooves. It is necessary to go deeper to wood or cambium. The length of the scratches is approximately 3-6 centimeters.
Simulator Processing
 The lower part of the cuttings is soaked in one of the liquid root formation stimulators (solution of Zircon, Heteroauxin, Potassium Humate - according to the instructions) or processed with Kornevin.
After processing, the chibouks must be put into the water by 3 - 4 centimeters until the time for planting approaches.
After two weeks, the upper bud will begin to bloom, and the seedling will absorb water, so it needs to be topped up.
Rooting seedlings
After 10 days, as the first bud has blossomed, the first roots will appear. With the development of the root system, the pipes are planted in a container with a special substrate. A special drainage is laid at the bottom of the container, and then a grape substrate. The seedling is filled up to the top so that the upper bud remains on the surface. After rooting, the seedling is watered and placed on the sunny side for productive growth. For survival, some gardeners feed young grapes. Grapes are grown from cuttings only with the rooting process.
Watch the video! How to root a grape cutting
Kilchevanie grapes
Kilchevanie is the process of creating a temperature difference in the lower and upper parts of the shank: below - warm, above - cool. Kilchevanie increases the chance of rooting.
When sprouting, there is a problem of sprouting buds before the growth of roots. There are times when greenery appears on a seedling and, without having time to take root, it is depleted and dies. It is kilchevanie that can solve this problem. At home, in practice, it is carried out in the following ways:
- Containers with cuttings are placed on a battery or in a special kilchevator, for bottom heating (temperature from +20 to +27 degrees). The temperature in the upper part should be from +5 to +10 degrees. To create such conditions, the kilchevator must be placed in a cool room. In the absence of a kilchevator, the containers are kept on the battery, while a protective curtain-screen is constructed between the warm air of the room and the cool window;
- High productivity gives kilchevanie "upside down". Moistened material is placed at the top, which is covered with a heated lid. This method does not allow the kidney to bloom before the root system.
Planting seedlings in school
Shkolka is a pre-prepared piece of soil where grapes are planted with seedlings. This should be an area well lit by the sun. School boarding is carried out as follows:
- In spring, the soil is dug up to a depth of 40 centimeters;
- One bucket of humus is introduced per square meter of the site, two - sand and a scoop of wood ash;
- The soil is dug up again;
- They make small mounds in which the seedlings will be planted, having previously waxed the buds.

School care
During the period of germination of the seedling at home, the soil of the school must be kept loose, without weeds. After rain or each watering, the soil is fluffed up. With each watering, you can use organic fertilizers. In August, chasing is done for better maturation of the vine. In autumn, when 1-2 mature shoots appear, the chubuk will be ready for transplanting to a permanent place.
Growing grape seedlings in spring
It is easier to grow grapes from seedlings in spring, but not everyone will be able to do this due to weather conditions. When growing, a special technique is observed:
- Cut stiff and healthy shoots. They should be even and have swelling buds. Ready cuts are infused in water;
- The shoots are cut and distributed into chibouks with 2-3 buds. The lower sections are made oblique;
- Each chubuk is planted in a jar or cup. Cultivation must be carried out in a warm, dark place until the seedling begins to develop its root system and take root;
- Such cultivation of seedlings takes place all summer, and in the fall they are sent for conservation;
- The following spring, landing is made in a temporary place, and in the fall - in a permanent one.
Conclusion
Grapes are a berry with a special taste that can be grown using cuttings. Compliance with all the rules and recommendations will allow any gardener to achieve the desired result. This method of planting grapes will result in a healthy plant with high yields. Everyone knows that when buying seedlings, you can get defective and unsuitable for a particular area. Therefore, growing by cuttings allows you to avoid such problems, and grow the variety that is needed. The instructional video in our article will show you how to grow grapes the right way.
Watch the video! Growing seedlings from cuttings