Tool box from a canister by hand. Do-it-yourself fishing box from a plastic canister
Do not rush to throw away used plastic containers, because you can still find a useful use for it. In a new review, the author has collected the most interesting and practical examples of what else you can use unnecessary plastic bottles for.
1. Decoration in a marine style

To create a unique nautical-style jewelry, you will need a small plastic or glass bottle, which should be filled with plain water and seabed attributes: sand, shells, large pearl-like beads, coins, shiny beads and glass shards. When all the components of the composition are folded, drop a drop of blue food coloring, a few drops of vegetable oil and some sparkles into the bottle. It remains only to tighten the cork well and the stunning decoration is ready.
2. Stand for books and magazines

Simple manipulations will allow you to turn an unnecessary canister of milk or juice into a convenient stand for books, newspapers and magazines.
3. Faucet attachment

A handy faucet nozzle can be cut out of the shampoo bottle, which will allow the child to wash their hands or wash their hands without outside help without flooding the entire floor.
4. Napkin holder

A detergent bottle can be used to create a bright and practical napkin holder, the design of which is limited only by your imagination.
5. Stationery organizer

Instead of just throwing away the next bottles of shampoo and shower gel, make bright and cheerful coasters out of them in the form of funny monsters. To get started, just cut off the necks of the bottles and mark the places for future cuts. From colored paper or fabric, you can cut out a variety of decorative elements, such as eyes, teeth and ears, and attach them to bottles using superglue. Finished products are best attached to the wall using double-sided tape.
6. Containers for cosmetics

Cut plastic bottles are great for making adorable storage containers for makeup brushes, make-up, ear sticks and more.
7. Pouf

From a large number of plastic containers, you can make a charming pouffe, the process of creating which is quite simple and understandable. First you need to make a circle of plastic bottles of the same height and secure it with tape. The resulting structure must be well wrapped with a sheet of foamed polyethylene, securing all joints with adhesive tape. The base of the ottoman is ready, it remains only to sew a suitable cover for it.
8. Bracelets

Plastic bottles are an excellent basis for creating original bracelets. Use fabric, thread, leather, and any other materials to decorate the unsightly plastic base.
9. Stand for sweets

The bottoms of plastic bottles of different sizes, painted in the desired shade, can be used to create a spectacular multi-level stand for convenient and beautiful storage of sweets.
10. Scoop and spatula

Plastic milk and juice canisters can be used to create a practical scoop and a handy little spatula.
11. Protective cap

A simple cap that can be made from a regular plastic bottle will help protect your phone from snow or rain.
12. Lamp

A small plastic canister can be a wonderful base for creating an original lamp.
13. Jewelry Organizer

A stunning multi-level organizer that can be made from several plastic bottle bottoms strung on a metal needle.
14. Planters
Storage containers for spare parts.
Spacious containers made from waste plastic canisters will help to put things in order and maintain order in the garage, which are perfect for storing small parts, nails, screws and other small things.
17. Toy

Armed with scissors, felt-tip pens and paints, you can turn unnecessary plastic containers into fun toys, the process of creating which, as well as the result itself, will undoubtedly attract the attention of children.
Continuing the topic with your own hands.
Many owners of suburban areas and cottages are faced with the fact that by the end of the season they have accumulated a lot of unnecessary canisters and plastic bottles.
Such things should not be thrown away: from them you can create a wide variety of crafts for the garden, cottage or garage, which can perform both a practical and decorative function.
Most of these items can be built with minimal effort in 10-20 minutes, and they can make the area more interesting and original.
 Depending on the characteristics, such containers classified according to the following parameters:
- Volume - from 1-2 to 50-80 liters.
- The form. Canisters can be flat and rounded, oval, rectangular or square in section, have a handle with a lid.
- Colour. Plastic products are most often white or translucent, there are also cans of green, blue, red and other shades.
For creating decorative items and practical devices suitable containers for food, water, fuels and lubricants, fertilizers, other liquid products.
Before you start making crafts, it is advisable to inspect the canister for damage, thoroughly clean and degrease it.
How to make a washbasin?
A 5 liter plastic container is ideal for creating country or camping device for washing.
The filler hole of the canister will be used to fill with water, and in the bottom you need to make a hole and insert a tap or valve.
To do this, you need to use a pair of seals in the form of rubber gaskets and a fixing nut so that the water does not leak out, and the tap is firmly fixed.
Washbasin or washbasin can be hung on a crossbar, hook, attach to a vertical surface with a belt or even tape. A funnel can be inserted into the filler hole for convenience: this way, when filling the canister, water will not spill onto the ground.
If you put a simple faucet, you can adjust the pressure by turning the handle.

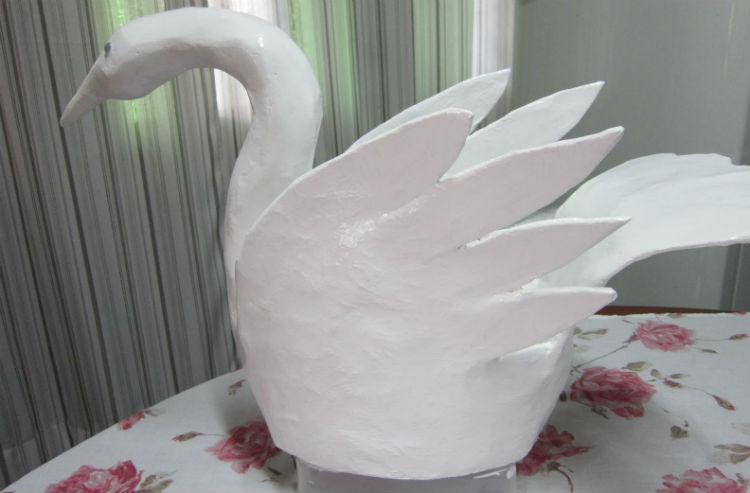
Master class on creating a swan
Sculptures of birds to decorate a suburban area are often made of plastic. We present to your attention a small master class on making a swan from an old canister.
For this purpose 5 liter containers required. It is necessary to cut the product so that the body, tail and long neck are immediately cut.

Then you need to prepare the wings from thick cardboard.
Neck worth cover with newspaper and tape, then do the same for the entire workpiece.
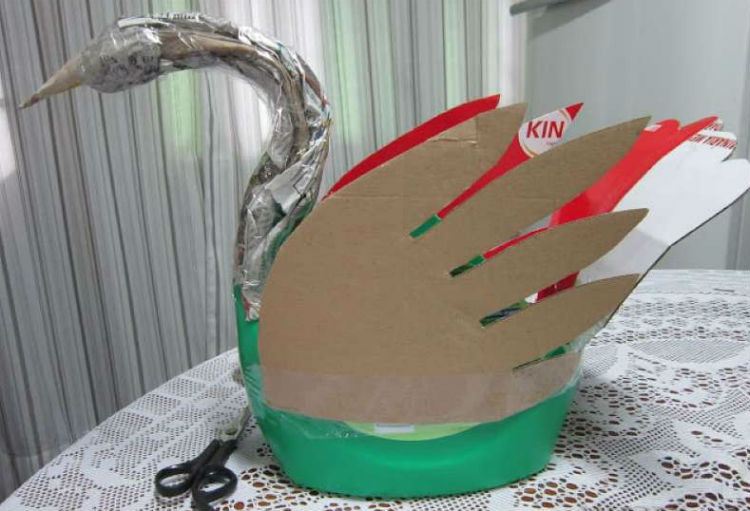
After you need apply a layer of plain napkins and coat the future sculpture with plaster mortar.

As they dry, the surfaces are sanded, painted and decorate with additional elements(for example, the eyes of a bird can be made from colored stones or glass).
Garden flowerbed
Many owners equip flower beds in the garden or front garden, and plastic canisters can be used for two purposes:
- Container for planting flowers. You will need to cut the product, turning it into two halves, and dig it into the ground, then pour the prepared soil with fertilizers inside and sow flowers. The canisters themselves can be optionally decorated with colored paper, paint, and in other ways. In addition, the mini-flower beds themselves can be lifted off the ground, as shown in the photo below: this is especially true if the soil is initially not suitable for specific varieties or it is too wet.
- fencing for the finished flower bed. The option is great for large flower plantings: canisters are dug around the perimeter, blocking the plants. This design is rather decorative, for her it is better to use colored containers of the same shade or alternate 2-3, then the fence will look aesthetically pleasing.

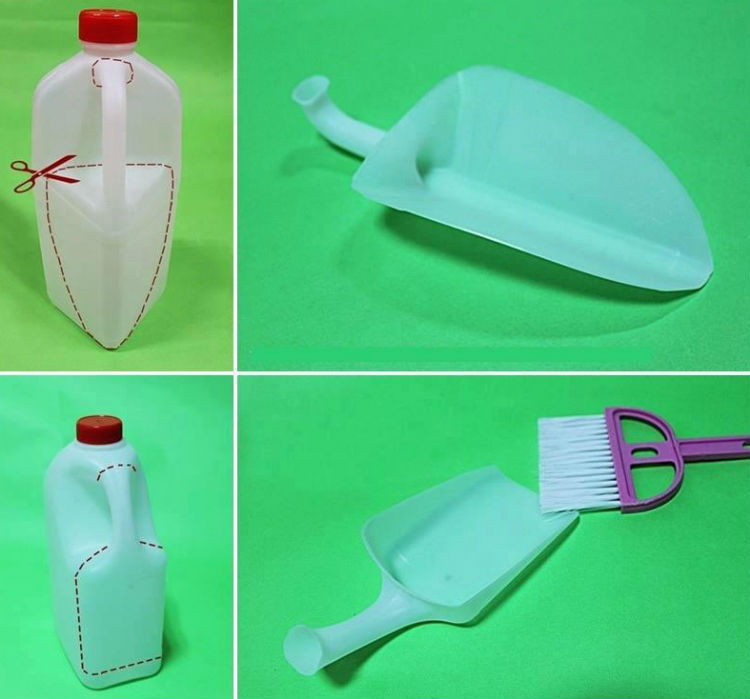
plastic scoop
If the canister is small (1.5-2 liters), a scoop can be made from it for cleaning or garden work.
You will need to mark the future product on the surface and cut it out; the handle matches the container handle. The bow can be made both triangular and square.
In the first case, it is convenient to use a scoop for digging up plants with a small root system from soft soil, and in the second case, for collecting garbage.
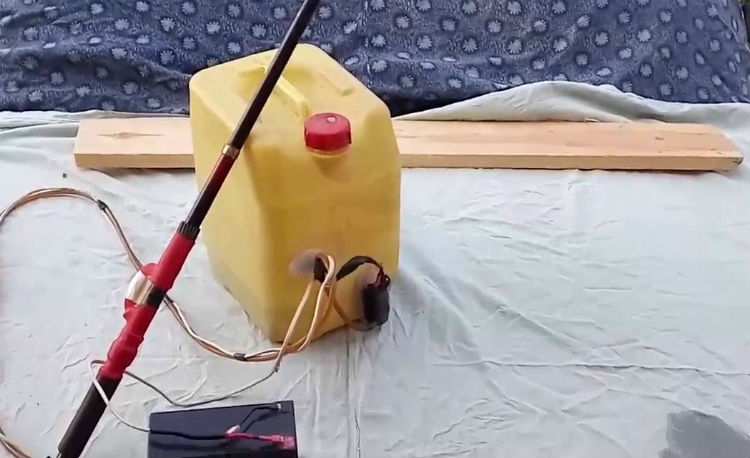
Sprayer
A large capacity (10-30 liters) can be adapted for spraying plants with chemicals that protect plantings from pests.
canister equipped with a manual or electric pump for ease of spraying. For carrying, you can adapt the handle or straps to carry it on your back.
The hose, spray nozzles, and rod can be purchased at any hardware or plumbing store.
A rubber nipple can be used to install the valve.
Such a sprayer is suitable for processing small gardens and front gardens, for larger areas an extension may be required.
Most often a device made of a plastic canister used for spraying chemicals against pest beetles, cabbage, as well as mold and fungus. You can also use products prepared according to folk recipes, from soap solution to urea.
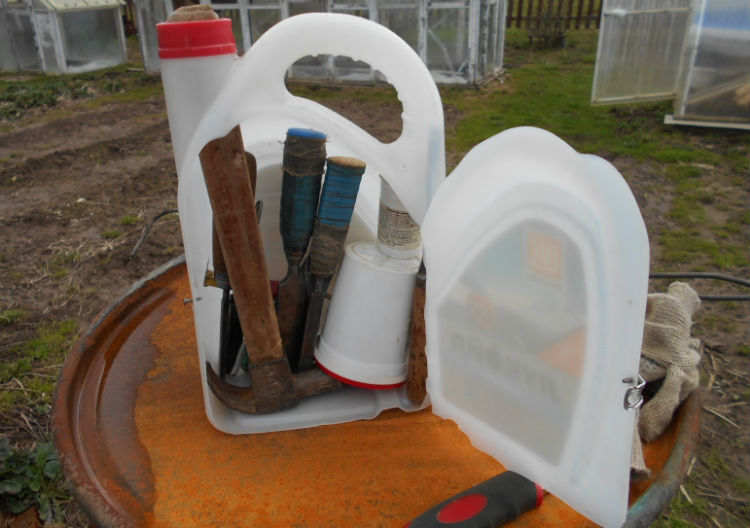
Tool box in the garage
To create such a device, you can use cans of different sizes, the choice depends on how many things you plan to put inside.
The most commonly used containers are 10-20 liters from under water, food, chemical, combustible products. The shape should be rectangular, in the middle at the top is the handle.
Manufacturing instructions:
- make a vertical cut on the side of the neck and handle, leaving the wall intact from the narrow part of the canister;
- bend the resulting "door", opening the container. Inside you can place sections of plastic cups or boxes, any other fasteners. In such a box, you can store small items (nails, screws, paper clips, electrical tape, etc.) or tools directly (hammer, pliers, pliers, etc.).
In order to make the tool box stronger and more airtight, the sides can be reinforced with metal plates, for this, the walls will need to be drilled and fixed with bolts and nuts.
Watering can
For such a product, it is optimal to take a canister from under the detergent or other products that have slightly flattened shape and comfortable handle.
It is necessary to thoroughly wash the internal parts from liquid residues, then drill thin holes in the lid. The optimal size is 1-1.5 mm. Just above the handle, you need to make a larger hole for air supply: if this is not done, it will be more difficult to water the beds due to the pressure drop.
If necessary, you can equip the watering can with a plastic tube, which is purchased in household goods or plumbing stores: it will increase the spray range.
The water is poured through the cork, for this convenient to use a funnel or hose so that the liquid does not spill.
You can also cut a wider lid, then the use of a funnel when filling with a regular bucket is not necessary. However, in this case, care should be taken to ensure that when watering the plants, water from the watering can does not flow to the ground through the lid.

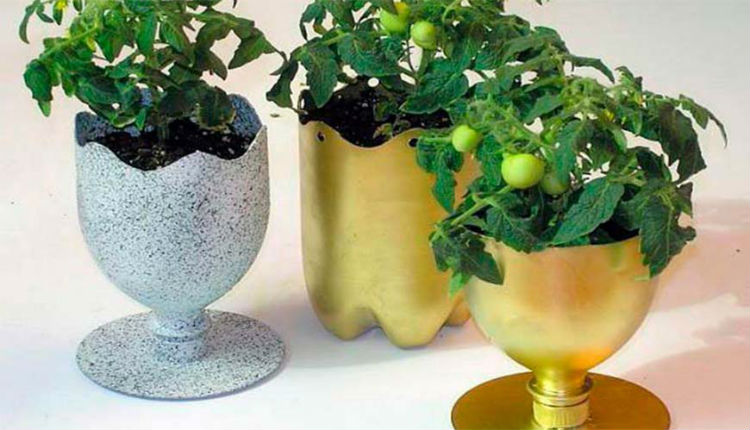
We create a planter
Hanging or stationary flower pots can also be made from plastic containers.
canister can cut in half horizontally, then process the edge of the medium so that it is not sharp: grinding will be required. After that, holes are made 0.5-1 cm from the edge, into which a cord or rope of small thickness is inserted, fastened with an allowance of 20-40 cm (the size depends on which plant the pots will be used for).
Then a single suspension is formed, it can be made in the form of a loop. The planter can be hung on hooks, wire, nails.
If the products are to be placed on a stand, making holes for fasteners is optional.
In any case, small cuts are needed in the bottom: they allow you to create a competent soil microclimate and remove excess moisture.
The surface of finished planters can be braided into knitted covers, decorated with appliqué or painted - a sample of such crafts is shown in the photo below.
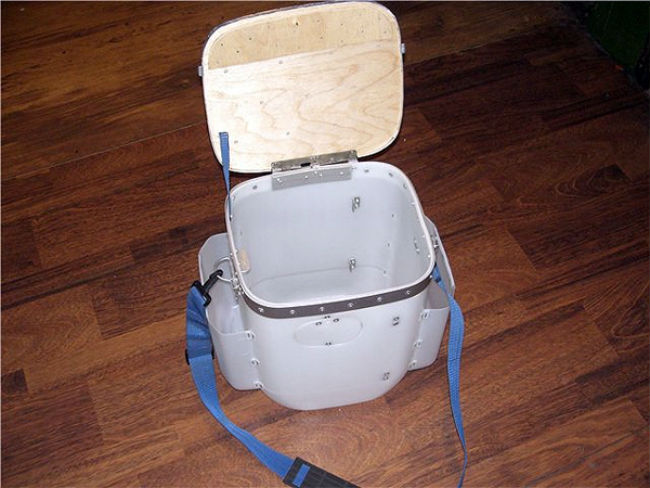
fishing box
For this purpose, 20 liter oil cans can be used; side pockets, if necessary, are made from less capacious containers.
The canister is cut off, leaving the height at which the fisherman will sit comfortably for a long time, reinforce the cut with an aluminum strip with rivet fastening.
Inside you need to place a partition made of thick plastic: it not only divides the object into compartments, but also serves as an auxiliary stiffener and prevents the lid from deforming.
The lid is cut out of a thick plywood sheet and attached to the hinges. The top part is usually Lined with soft material for comfort.
A strap is attached to the sides of the canister so that the fishing box can be carried on the shoulder. The inner tool compartment can be divided into smaller segments (for rigging, rods, donks, circles, etc.).
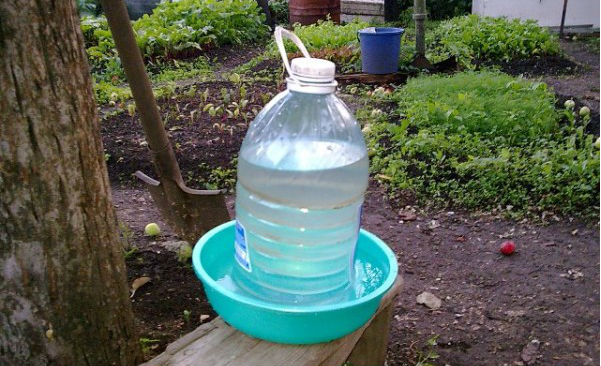
Drinker for chickens
A device for providing poultry with fresh water can also be made from a 20-30 liter canister.
Would need prepare a wide pallet impervious to moisture. Make cuts in the bottom, then put the canister in the pan, leaving a gap between it and the bottom of 1-2 cm (for this, you can make coasters along the edge under the container).
The structure should be fixed so that the water container does not turn over from an accidental push.
After filling the liquid will flow evenly into the pallet where the chickens can drink from.
Such a drinker for chickens is good not only for its simplicity, but also for the absence of the need to manually adjust the water flow.
Flowerpots
It is very simple to make such products: just cut off the upper part and make holes in the bottom to remove excess moisture. Canisters are placed on stands, soil is poured inside and seeds or seedlings of flowers are planted.
Such flowerpots can be decorated or processed with moisture-resistant paint, decorated with appliqué.
Most often they are placed on terraces and in gazebos, turning the place of rest into a piece of paradise filled with greenery.

A raft of empty containers
This design is suitable for crossing the river, fishing, mobile bridges on the pond.
The frame of the raft is made from a 3 mm board, knocking it down with nails or screws.
A raft is made from empty canisters with a volume of 40-50 liters, they are attached to the frame with packing tape or a special darkened film.
The second option is interesting in that it protects plastic surfaces from fading under the rays of the sun. The frame must first be coated with antifungal agents and varnish to protect it from decay upon contact with water.
Finished construction can be equipped with the following equipment:
- mooring ladder;
- feeders for luring fish;
- seats, loungers;
- shelter from the sun;
- anchor.
Shower for giving
The procedure for creating such a structure includes the following steps:
- Creating a handle. To do this, you can use a simple rope, passing it through the handle of the container and tying it around a tree or other structure where the shower will be attached.
- Installing the nozzle. A lot of small holes should be made in the lid, blow through them, then insert it into the container faucet. The joint should be sealed so that moisture does not leak.
- Building a stopcock regulating water pressure. Such a product can be found in the plumbing department. Rubber seals are required for installation.
- Cover arrangement where the water will flow. It is better to make it closed so that dirt, foliage and insects do not get into the canister.
- The sides are covered with black tape. so that the water inside warms up faster: black walls absorb ultraviolet better.

Useful video
Another idea for using a plastic canister is the toilet paper holder plus shelf in this video:
Conclusion
If you still have unnecessary plastic canisters and you cannot find a use for them, you should not throw them in the trash.
Recycling plastic with reuse in industry is the best option, allowing rational use of resources without harm to the environment.
In addition, the containers themselves can be used both for decorative and practical purposes - the choice depends only on the owner's imagination.
From the article, you learned what can be made from 10-50 liter canisters for a garden or garage, got acquainted with how to make a washbasin, a swan, a watering can, a raft, garage boxes and other useful tools.
In contact with
Many fishermen, to store their fishing gear, purchase special fishing boxes. However, this box is available for various reasons, alas, not for everyone. To the rescue of fishermen who are keen on winter fishing, ingenuity and the ability to create and do something with their own hands come.Do-it-yourself fishing box from a plastic canister
Now you can find a lot of articles on how to make a freezer box from a Soviet refrigerator, or a wooden, plywood or even completely foam winter fishing box. But not everyone has a freezer either, and sometimes it is impossible to find it.
Styrofoam is needed very strong and solid, but it will get wet in winter fishing conditions, and it is heavy. You should not be upset, because you can make a box from a plastic canister, which is quite easy to find in your garage. We take two canisters of the size you need. Naturally, the volume of canisters determines the volume and dimensions of your future fishing box.
The sequence of making a box for winter fishing with your own hands

We take a knife and cut off the top of a large canister to get such a container. First you need to measure the height of the future box. The comfort of your sitting while fishing will depend on this and whether your back will get very tired or not. It is better to determine the height of the fishing seat by the old box or chair, on which it was comfortable for you to sit and fish.

At a small canister, cut off as in the photo. To get such a container in the form of a patch pocket.

Now you need to fasten the small canister to the side of the large canister to get an extra pocket. Fastening methods can be different, both with rivets and with bolts. You can also use a furniture stapler, as I did. With the help of a furniture stapler, we attach a small canister to a large one.

Bend the staples inside the large canister.

We cut out the lid for the box from plywood, 6 mm thick. After the cover was sawn and adjusted to size, I decided to attach foam rubber to it and cover it with leatherette. We attach hinges to the lid, you can attach them to self-tapping screws or other fasteners. The lid will not be attached to the plastic of the canister, but to the edge reinforcement.

The top of the canister is quite flexible and needs to be reinforced. This can be done using a 4 * 2 mm aluminum corner. or reinforced with fiberglass and epoxy.

Now that the edge of the canister is reinforced, we need to attach the lid to our box.

We just have to do it with our own hands, just a belt mount. We drill two holes and fix the wire in the form of loops there. We attach the belt. for easy portability.
Homemade fishing box from a plastic canister is ready

I would advise making the internal partitions of the box from plywood, because. plywood will further strengthen your box and give additional rigidity in the transverse and vertical direction. If you have little space (and there is always little), you can make several pockets on the drawer. You can also make lids on the pockets. The undoubted advantage and main advantage of this box is its lightness.
Belskikh Nikolai Viktorovichwith. Virgin Altai Territory - Specially for Samodelki FISH
On sale you can find a variety of things made by skilled people from improvised means. For example, a very interesting idea is a canister converted into a bar cabinet. Looks impressive and worth the same. At the same time, such a thing can be done by yourself, so that it satisfies exactly your requests and needs. In bars, the door, as a rule, opens down, which may not always be convenient.
Below is an instruction on how to make your own canister cabinet with height-adjustable shelves. The layout of the shelves depends on the purpose for which the cabinet is intended, for example, the combination below is suitable for photographic equipment, but you can adjust it to your needs.
Necessary materials and equipment
To work, you will need the following:Materials:
- Old washed or new canister.
- Boards.
- Loops.
- Pen.
- Rubber compressor.
- Screws, bolts and nuts.
- Dremel with cutting disc.
- Angle grinder with cutting disc (Bulgarian).
- Band saw (or jigsaw).
- File.
- Marker, pen.
- Angle ruler (optional, a ruler will work too).
- Sandpaper.
- Plane.
- Bench drill press or drill and drill bit.
Decide on door size


Before you start cutting a door in a canister, you should decide what size it should be. Using a marker attached to the square, you can mark the doors of different sizes and choose the most suitable one. In the example shown, this is 30 mm from the edge of the canister.
In order not to accidentally erase the line drawn with a marker, you can stick it with a translucent adhesive tape, and draw a thinner line on top with a pen, along which it will be more convenient to cut.
Cut out the door


The door can be cut with a dremel or grinder.
The second option may be faster, while the grinder leaves a wider slot, because. she has a wider disc. Since it is planned to stick a rubber seal on the door and the edges of the opening, this would be a more suitable option. When working with a grinder, you will most likely need help to fix the canister.
At the final stage, it is more convenient to use a dremel to cut rounded corners. When cutting metal, you must be very careful with sharp edges in the cut. Use gloves and file the edges with a file.
Rubber seal on the door and sizing


Glue the rubber seal around the edge of the door and check if the door fits snugly. If necessary, cut and adjust the corners with a dremel and a file.
Determine the dimensions and location of the shelves inside the canister


Now you need to make the internal shelves for the locker. Depending on what you plan to store in it, consider its design. The picture shows a layout suitable for photographic equipment, while the entire structure can be further disassembled and redone, since the assembly uses a locking connection.
The internal dimensions of the canister may vary slightly depending on the manufacturer, so you'd better use your own measurements. You can use a design software like Autodesk Inventor to simulate the end result and imagine what it will look like.
Making shelves


First of all, sand the boards. In this case, the boards turned out to be 12 mm thick. Then, using the templates, mark out the details for the shelves on the boards. To cut them, it is best to use a band saw. Because this canister has a notch in the middle along the narrow side, it was necessary to cut a hole in the shelf using a drilling machine. Drill also a hole for connection to the support posts in each corner, 6mm from the edges 3mm wide and 8mm deep. When securing a shelf with a clip, put a piece of wood between the clip and the shelf itself so as not to damage it.
To precisely fit all the parts to each other and to the dimensions of the canister, careful grinding of the edges and joints will be required. Remember that sanding is best along the grain of the wood.
Finally, you need to cut out the vertical posts. To connect to the shelves using dowels, make holes 12 mm deep, 3 mm in diameter at the ends of the posts (then the fastening should be 20 mm in length).
Preparation and installation of the door


Choose the right hinge design. After measuring the width of the loops and determining where you want to attach them, make a mark using a nail or something sharp. One of the options: loops at a distance of 15 mm from the edge of the canister, at a height of 100 and 270 mm.
In order not to make a mistake with the location of the hole, start drilling using a thin drill bit, preferably 1 or 2 mm in diameter, and then install a thicker one that matches the purchased bolts.
Install the hinges and trim the seal if necessary. It is now easy to determine the location of the holes on the door by attaching the door and placing it in the desired position. Drill holes in the door as described above and attach the hinges to it.
Last but not least, attach the doorknob to the desired location. In this case, it is installed 45 mm from the edge and 180 mm from the lower edge of the door.
Shelf assembly


Finally, you need to assemble the shelves for the locker. Whether it will be easy or difficult depends on how intricate the design you come up with.
Fill your locker and enjoy


Think about where you will store the amazing locker. The most important thing, of course, is to find a place where it will be in full view, and you can proudly show everyone the creation of your hands.
Not only plastic bottles, but also canisters sometimes accumulate in a suburban area. They also have interesting uses. For example, make a wardrobe or shoe cabinet out of them, which, if necessary, will serve as a good alternative to ordinary furniture.
The cabinet shown in the photos is made from 40 plastic canisters (four rows of ten canisters), but you can use as many as you like. To make, you will need a knife, large scissors and rope, as well as paper and a marker.
Since the canisters are stronger than ordinary plastic bottles, we first pierce them with a knife in the upper part, then cut holes with large scissors. But if you want all the holes to be cut perfectly even, you can first cut out a stencil from paper, then attach it to the top of the canister and circle it with a marker. Then cut out according to the resulting markup.
After that, we put the canisters in a row and tie them together, prying the rope under the handles. If you plan to make several rows, then it is better to tie each row first, and then tie the entire canister cabinet around the perimeter so that it is stronger.

If the cabinet will stand in a change house or where you do not feel sorry for the walls, you can simply drill it to the wall. We also note that this design is light, and it can be knocked over, for example, by a jumping cat, so it is recommended to put something heavy in the bottom row. If there are no heavy objects, then just stones or bricks will do (one at a time in both extreme canisters of the bottom row).
In such a cabinet made of plastic canisters, it is convenient to store both clothes or shoes, and, for example, various tools.


Efficiently equip the garden with your own hands under the power of everyone.
You don't need impressive money or fancy materials to do this. The highlight of every garden can be products from old tires, barrels, spoons, various kitchen utensils, wooden beams, glass and plastic bottles. Now let's talk about how to make good hands crafts for garden from mayonnaise spoons.
If you suffer from fantasy, many of the articles in this article will help you create a real masterpiece.
Plastic fans can be used as elements to create funny animals or little men that will decorate your garden later. However, this requires good aesthetic taste and wild imagination, otherwise crafts it might not be funny or scary.
We will live on simpler versions that almost every gardener can easily master. For example, how do you like such a birdhouse? from mayonnaise spoons?


birdhouse from plastic buckets in the garden
Such a craft will not only decorate the garden, but also its useful element.
Therefore, the birds that come with peas can help control garden plant pests. A special personality created by your own handicrafts can be done by drawing and using simple embellishments.
How to wrap a bucket of mayonnaise in a beautiful way or a garden with a chest
The most current use of a jar of mayonnaise is to make elegant flower pots or containers for small garden supplies, seeds or fruit.
How to use old plastic jars?
We can hang them on the construction of the garden or on the terrace or outdoors. Depending on the from Whether they are under cover or outside, the appropriate material is selected for registration.
Materials for processing mayonnaise buckets without fear of adverse factors in the garden
The easiest option is to color the bucket with bright colors and use some embellishments. For example, you can draw beautiful contrasting color schemes. If you have enough talent, you can draw numbers or pictures of your own invention.
Another option for processing mayonnaise canopies for pots or garden containers is to glue pieces of colored labels together. Self-adhesive materials of different colors are cut into circles, squares or other shapes and into a chaotic sequence glued to the surface of the bucket.
An example of this form is shown in the photo.

decoration crafts with self-adhesive
Gardeners with special creative inclinations realized that as a decor, spoons from mayonnaise.
Decorate the fence or facade of the building. Does not interfere with coloring in bright, suitable colors. It might look like this.

Decorate the garden with a lid of mayonnaise
decoration spoonsfrom-below mayonnaise decorate the garden with felt for old clothes
Such a product will be an excellent decoration of a garden or terrace, which will create an unusually comfortable atmosphere.
Let it not be as difficult as it might seem at first. First you need to dismantle the old wooden clothes in two parts.

After that, it should be glued into a bucket of mayonnaise with a superclan.

Now all that remains is the fabric of the bag inside and the cute tie stripes.

baskets from clothes hooks
original craftsfrom plastic spoons for closed areas in the garden
If you want to create a real masterpiece of art with your own hands, then you cannot make colors or self-adhesive backgrounds.
Great idea that doesn't require it from you have special abilities or abilities - decoupage. It has become very popular lately, so it is understandable why this is so. crafts Surprise with its elegance and beauty.
They will fill your terrace or balcony with romance. Look how beautiful this is. 
How to create such a ship with your own hands?
In fact, there is nothing special about this. The work plan itself should take into account:
1. Treat the spoon with a degreaser.
2. Use a layer of acrylic varnish.
3. Without waiting for drying, glue is applied.
4. Go back again with polish.
5. Dried.
These simple steps will become the owner of a very original garden decor. If you are a pot, it is important to remember to make a drainage hole in the bottom of the bucket.
Look, isn't this a masterpiece? 

Decoupage is a great idea
Also read: How to make pots with your own hands from materials?
Bucket completion from-below mayonnaise rope
To get an interesting trunk for small things, seeds, fruits, you can lay out a plastic bucket, apply a layer of sticky PVA and wrap thick ropes of any color.
Continue decorating the bucket as you wish, using stripes, balls, balls, buttons, or any other material. Examples of such crafts are shown in the photo.


planter from thick threads and a bucket of mayonnaise
You can simply wrap a mayonnaise bucket in a beautiful cloth and get an original vase.
But don't forget it's like open skies crafts The exhibition is not worth it.

pot decoration from bucket with cloth
fittings from plastic spoons own hands
Only transparent mayonnaise spoons will be installed in the garden for the production of small light bulbs for the bulb.
It is effective to see if they are glued with multicolored glass or herbarium release. In principle, the successful design of such a ceiling is the result of good taste and imagination.
If they are not enough, such a light device can look very beautiful. It will take a lot of time, because plastic is not afraid of snow, wind, rain. If the spoon disappears, then after eating another part mayonnaise you can make a new almost free copy.

light in the garden

crafts for garden from Mayonnaise spoons will be an original and charming decoration. The main thing is that you believe in yourself and tell all your fantasies. Now before you throw the empty bucket in the trash from-below mayonnaise, Think carefully.
As you saw from can make a beautiful garden ornament that will make you feel like a real artist who will hear enthusiastic criticism of your work.
Summer photos, descriptions, ratings
On our Do-It-Yourself Dacha website, we collect useful tips, tutorials and interesting ideas that everyone can make for their summer residence.
Regarding cooperation issues and copyright holders to apply for the following contacts:
mail: [email protected]
 Competition: do-it-yourself kitten FORM ISLANDS
  Covers from covers will be an interesting time for the whole family
  Garden courts with mayonnaise
  What can be made from a can of mayonnaise
  Garden lumber for mayonnaise
  Garden crafts from.
- m  Happy birthday Congratulations!
  Children's sandbox for their own dacha
  Eggplant caviar - eggplant caviar recipe The interior of a hand puppet: how to sew with your own hands


Handmade from plastic jars

Index: [hide]
- express bucket
- Flowerpot "Happy Train"
- lamp light
- Plates for things or tools
- decorative masks
Garden banks will not only decorate the cottage, but also bring real benefits to the farm.
After all, during the season, a lot of unnecessary things accumulate in the summer house, which are either burned or put aside for a while. Most problems with glasses.

From points, you can get wonderful strong garden crafts.
Many of these things can be achieved by hand in literally 5-10 minutes and will last much longer. All you need is a set of tools available in every dacha and a little humor.
express bucket
Plastic buckets for summer cottages are a necessary and useful thing. However, for various reasons, its service life may be shorter than expected. One wrong move, a blow - and plastic cracks.
What if I can't get to the store and now I need a bucket? This can be done manually within minutes.

You can build a bucket from a container that you can use as you see fit.
For work you will need:
- container with a capacity of 5-10 liters;
- knife knife;
- Handle from an old bucket.
Take a bowl and use a knife to cut the top off the neck. Make two holes on the sides and insert the handle that remains from the broken bucket.
Your quick bucket is ready!
This hack is good because you can adjust the bucket volume. To do this, the excess part must be divided so that only the necessary part remains. If necessary, you can create a bucket of different capacities. In particular, they will be useful if construction work is to be carried out and the exact quantity of granular substances or liquids must be measured.
And also for preparing various dressings for vegetables and protective compositions against pests that every garden and orchard needs.
Flowerpot "Happy Train"
If several identical plastic jars were bought indoors that will not be used in the future, we can make a decorative flower insert from them.
The easiest way is to cut off the tops and place them in the garden, fill them with soil or nutrient mixture and plant flowers.

Their jars can be made as garden art in the form of locomotives whose cars can be used as vases.
One of the most complex compositional solutions will be "Funny Train". To do this, you will need:
- 5-6 containers of the same capacity;
- Cutting knife:
- outdoor paints;
- brush paint;
- Earth or a mixture of nutrients.
Canisters of the same size are needed to make our "train" look as good as a proper train. But if strict adherence to the original does not concern the owner of the cottage, you can safely take containers of different sizes.
For "cars", containers are used in which the side part is cut to length. They are placed on their side. The amount left for planting is chosen according to what the plant will be in that pot and how much land will be needed for normal development.
The locomotive is made of two cans. One is mounted vertically - this is the "driver's cab", and the other is the "engine room". The wheels are made from round caps from old containers or wooden waffles.
If you want to represent the image of a real "Happy Wine", you need to draw it. Color is just a matter of personal taste. You need to do this before you go to sleep and plant flowers.
In the fall, before the cold weather sets in, the flowers should be covered with cellophane or tarpaulins so they don't accumulate moisture, as this will freeze and break the plastic when cold.
lamp light
In order not to buy new lamps for summer cottages, you can do it yourself.

From jars you can make a simple night light that will bring you diffused light.
To do this, you may need to:
- white tank;
- knife knife;
- lamp holder;
- wire with plug and switch;
- glue (transparent);
- fabric for decoration;
- paper napkins for decoupage.
First, the neck part of the container is exceeded. The hole is made for the wire, after which you can continue to decorate the future lamp fixture.
To do this, it is wrapped with or without fabric, depending on the wearer's settings. The fabric can be fixed with colorless glue, so there are no ugly stains.
And you can make fashionable things you will give in decoupage style. To do this, the surface of the container is smeared with transparent glue, and glued onto the top adhesive colored napkins.
You can buy them at all stores or craft stores. When the adhesive dries, a hole is formed, the wire is inserted into the lamp housing, to which the lamp holder is attached. If necessary, you can set up a wooden stand. It is nice to place a lamp in the garden and read a book under its light.
By the way, using the same technology, the lamp is made of plastic sheets for a chandelier.
Plates for things or tools

You can build a locker from a large number of containers.
Master gardeners know how it is when a farm uses many small tools. But you still need somewhere to keep your nails, screws, various small parts...
You can get out of the situation with old cabinets. Depending on their size, you will get a tool box or a shoe and storage locker.
For work you will need:
- banks;
- knife knife;
- fastening.
The container is better to choose one size, so the cabinet is flat and stable.
Yes, and it looks more attractive.
Plastic plates cut off the tops, but so that they stay away (3-5 cm), which begins to taper from the neck to the walls.
He will not leave things and tools from the cells.
Finished containers are fixed together. The number of cells can be arbitrary, integer or odd. The cabinet can be in the form of a rectangle or a pyramid, stairs, depending on the size of the room and its functional purpose.
The structure had to be attached to the wall, because the cabinet was light enough and could be affected by the awkward movement of the contents.
Also from plastic boats you can make shelves for shoes and wall boxes for various useful little things.
decorative masks
After many national dachas, there will always be leftovers that are usually discarded or burned in the garden.
For example, a door made of cans. But with a little imagination and ingenuity, you can find them and use them.
If you look at such a throat, you will see a funny face in which the hole is the mouth, the handle is the nose. The rest is to make your eyes and hair, and the decorative mask will be ready!

Canned children's carnival masks or other holidays can be made from cans.
This is best done in children, in a large company.
You will need:
- jar neck;
- glue;
- rope;
- drops of colored fabrics;
- buttons;
- thin wire;
- scissors;
The work can be organized as a competition in the game, giving a prize for the most unusual or funniest mask.
Use rope to attach hair.
They are designed to protect holes in the plastic field. It can also be created from a multicolor tab pack. Glasses can be very different: from classic braids to African "arrows of freedom".
The eyes are made of buttons fastened with wire. And if there are no suitable buttons at hand, your eyes are painted with a sign or color.
The final touch on the mask will be an exotic projectile necklace collected by the river or old balls, as well as other decorations.
What are handmade crafts from plastic bottles and jars for oil or cottages (photo)?
Such masks nicely diversify the interior of the villa. And if you bring a wire on them and fasten a light bulb inside, you can make decorative lamps. They can be made in the garden as a festive lamp.
This is far from the idea of using old plastic cans.
We can turn them into a container for cereals and fresh produce, into a flower pot, no matter what. They show ingenuity and imagination, a trained craftsman can find an application for plastic containers that gives them a new life in the form of useful and functional things.
Related articles
- Craft and decoration


Canister testing
Scope of testing
According to international certification according to the methodology UN 2-228 / 67-2000, the following tests were carried out for the transportation of dangerous goods in canisters in accordance with the model rules for UN recommendations for packing groups:
- Checking the availability of regulatory documentation for polyethylene canisters.
- Sampling.
- Inspection of samples to identify compliance with design documentation.
- Sample preparation.
- Sample testing for:
- testing of canisters for impact during free fall from a height on all planes and at all angles;
- stacking strength;
- tightness;
- hydraulic strength.
Free-fall impact tests on canister specimens
Testing the strength of samples of canisters when stacked
The tests were carried out in a chamber where a temperature of +400C was maintained using a heating device. A platform with a mass of 378 kg for canisters of 21.5 dm3 and a mass of 366 kg for canisters with a volume of 31.5 dm3 was used as a load.
The duration of the tests was 28 days.
Leak testing of samples of canisters
| To carry out the test, a fitting was inserted into the stopper of the canister sample to connect the compressed air supply hose. Tests of canister samples for tightness were carried out in a metal container with a capacity of 50 liters using a compressor that provides the necessary overpressure, a pressure gauge, a compressed air supply hose and shutoff valves. The test pressure was 25 kPa, which was maintained for 5 minutes after the stop valves were closed. The canisters were immersed in a container with water in a vertical position, and compressed air was supplied from the compressor through a hose into the canisters until an overpressure of 25 kPa was reached. After reaching the required pressure, with the help of valves, the access of air into the canisters was blocked. Writes krac0tka.ru. |
 |
The canisters were held under overpressure for 5 minutes, and the changes that occurred were recorded. To immerse the canisters in water and maintain them in this position, a load was placed on top of the canisters. After exposure to excessive pressure, there was a slight swelling of the canisters and their acquisition of a more rounded shape.
In this case, no air bubbles were observed; the lid provided the necessary tightness of the canisters.
Testing samples of canisters for hydraulic strength
To test the hydraulic strength, the canisters were filled with water to their full capacity (21.5 dm3 and 31.5 dm3), closed with a lid with a fitting, and then an excess pressure of 250 kPa was applied, which was controlled by a pressure gauge. What can be made from plastic bottles: workshops and ideas for a noteAfter reaching the required pressure, the air supply inside the canisters was blocked with the help of shutoff valves. Within 30 minutes, the change in pressure inside the canisters and their behavior under pressure were monitored. |
 |
| As a result of exposure to excess pressure at the initial moment, the canisters lost their clear edges and turned into spherical shapes. At the initial moment, as a result of the fluidity of the material, the pressure decreased to a value of 200 kPa. With the help of a compressor, the pressure was brought to its original value. For 30 minutes, the canisters withstood an overpressure of 250 kPa, with a slight change in their appearance. There were no leaks of water from the canisters |
 |

Many items that we consider unnecessary in everyday life can be useful for creativity.
The most common plastic vessels will be a suitable basis for bright products. With simple manipulations, you can create toys, pictures, garden figures for landscape design, flower pots and crafts in the shape of animals.
Crafts from plastic bottles for the garden
You can easily decorate your backyard with plastic bottle crafts for the garden. Designing such figures is not difficult, you just need to use your imagination.
With them, the site will acquire originality and brightness. You can connect children to work: they will like to create beautiful, interesting figures from simple materials that are stored in every home.
How to make a palm tree
To form a craft from plastic bottles with your own hands in the form of a palm tree, you will need:
- brown containers - 10-15 pcs.;
- awl or drill;
- green plastic vessels - 3-4 pcs.;
- sharp scissors;
- a metal or willow rod.
- Bottles with a capacity of one and a half liters must be washed, stickers and cap rings removed from them.
- Form the leaves of the tree from a green container.
To make them lush and long, cut the bottom as low as possible.
- Cut the bottle lengthwise into 3 identical parts to the neck. On the sides of each resulting sheet, make a fringe. Form cuts closer to each other, then the crown of the palm tree will be more beautiful.
- Leave 1-2 cm in the center of the sheet.
To make the vegetation look realistic, put their central part under the candle, but not too close so that the green part does not smoke.
- Proceed to the creation of the trunk. It must be formed from a brown container. Cut the bottom at a height of 10-15 cm.
- Cut each part along the edge with cloves, bend them to the outside.
- In the central part of the blanks for the barrel, create holes with a drill or a red-hot awl.
- Start assembling the palm tree.
To do this, stick a metal or wood rod into the ground. On it, assemble the barrel structure from brown parts, inserting them inside each other.
- The crown of the tree is fixed as follows:
- leave the lid in the last green blank;
- make a hole in it;
- put the received part on top, it will press the lower sheet plates.
DIY plastic bottle flowers

You can make products from plastic bottles shaped like flowers using the following materials:
- plastic containers;
- marker
- scissors;
- lighters.
How to make crafts from plastic bottles with your own hands:
- Using a marker, draw outlines of flowers on the surface of the bottles.
To make them voluminous, do it from the bottom. Cut out the flower blanks along the lines.
- Bend each petal to one side. Shape with a lighter.
- Connect the blanks by placing them inside each other. For fastening, you can use wire, glue or heat plastic.
- Decorate the core with beads or a finished plastic flower.
- Using this idea, you can create different flowers: lilies of the valley, daisies, times.
Make a whole flower bed in the country yard by enclosing artificial plants with a car tire.
Swan for giving

Crafts from plastic bottles for the playground are suitable for installation in your garden.
Make a beautiful swan using materials:
- plastic bottle (five liter);
- wire-based hose;
- white half-liter bottles;
- wire;
- paint;
- scissors;
- a candle;
- marker.
Instructions on how to create a craft:
- Take a five-liter container and mark the shape of the bird's body on it with a marker. The contours should look like a boat, while the neck of the base should not be cut off.
Cut the plastic along the line.
- The neck of a swan is formed if a hose is placed in the neck.
- Form bird feathers from milk vessels. Remove the necks and bottoms, and cut the remaining material into pieces to get plumage, give each part a fringe, melt with a candle. Take 2 feathers by tying them together with wire. Attach to the body using glue.
- Leave the rest of the small bottles to form the neck. Cut off the bottom of them, start stringing on the hose.
Create the bird's head using the top of the white vessel.
Portable box-container from an old canister
Create holes on both sides in the container and hose. Connect 2 parts with wire, screw the lid.
- Caps from bath products are suitable for the beak. Cut in half and glue to the lid. Color the beak and draw the eyes.
DIY Christmas decorations from plastic bottles

You can prepare Christmas decorations from the following set:
- glue "Moment Crystal";
- liter plastic bottle;
- tapes;
- scissors;
- plastic beads on a string.
Instruction:
- Divide the bottle into 4 rings 5 mm wide.
Coat each with glue, let dry a little.
- Place segments from the beads on the adhesive surface so that there are gaps for assembly at the top and bottom of the ring.
- After drying, connect the rings by inserting one into the other.
- Tie a thin ribbon to the top of the resulting ball to create a loop. Hide an ugly knot by decorating with a bow from a thicker ribbon.
Crafts from plastic bottles for kindergarten
Kids in kindergarten are given a lot of room for creativity.
Products are unusual and bright, and the process of joint work will captivate children and adults. However, sometimes parents have to puzzle over what crafts to do with a child in kindergarten. A simple solution would be plastic bottles. This material is easy to find and use because it freely takes on any shape.
butterflies

To make a butterfly, a child will need:
- marker;
- plastic bottle;
- paints;
- scissors.
Step-by-step instructions for creating crafts from plastic bottles:
- Find a flat part of the container, cut out the cylinder.
Cut the resulting shape in half.
- Draw a butterfly on the resulting part, cut it out along the contour.
- To give naturalness, make bends on the wings.
- You can color and decorate the butterfly as you wish.
- They can decorate an apartment or street decor elements, for example, a weather vane, a railing, a flower bed.
Ladybug from plastic bottles

Required materials:
- small plastic containers;
- chestnuts or beads;
- glue;
- scissors;
- marker;
- acrylic paints;
- wire.
How to make crafts from plastic bottles with your own hands:
- First, make the body of the ladybug.
It will turn out if you cut off the bottom of the bottle and take it as a basis.
- To give it a similar look, paint the part with paint and draw black circles with a marker.
- Glue a chestnut or a large bead to the body to make a head.
Draw eyes on it.
- Make the antennae out of wire by gluing or sticking them into the head blank.
- According to this scheme, you can make other insects, for example, a bee.
DIY plastic vase

Materials that will help you design an original vase:
- a vessel of the required volume;
- scissors;
- stationery knife;
- glue;
- magazine.
How to make crafts from plastic bottles with your own hands:
- Cut the container to the height you need.
Roll up the bright pages of the magazine into tubes with a diameter of 0.1 cm. Attach them to the base of the future vase, cut off just above the neck.
- Wrap the cut bottle with paper and glue it.
- Glue the tubes along the perimeter of the future vase so that each one is tightly glued to the next one.
Crafts from plastic bottle caps

Fridge Alphabet Magnets can be obtained using caps and other materials.
Take:
- traffic jams;
- small magnets;
- double-sided adhesive tape (glue);
- medical alcohol;
- colored paper;
- markers.
How to do:
- Degrease the surface of the plugs with alcohol.
- Glue the magnet with glue or tape to its surface.
- Cut out paper circles that match the size of the bottle cap.
- On each circle, write a letter with a felt-tip pen.
Glue the resulting workpiece inside the lid.
Video about what can be made from a bottle
If you have accumulated a lot of unnecessary containers, think about what you can do with plastic bottles with your own hands. All kinds of crafts will help decorate the house, garden, Christmas tree.
Creating products using the material is convenient and exciting for adults and children. The formation process develops imagination, fine motor skills. In addition, you can usefully use the plastic you do not need.
Peacock from plastic bottles
Do-it-yourself frog for the garden
Do-it-yourself planters from plastic bottles
28.5.2015 04:12
Various plastic jars
Currently, plastic cans are widely used in various industries: construction, food, chemical, paints and varnishes, agricultural and others.
This versatile container is made of polymers and is used to transport and store liquid and oily materials.
Technological production processes
There are two ways to make plastic containers: spraying and blowing.
The molding process takes place in pressure mode: steel molds mounted on a spray machine are filled with a polymer mass obtained from a granule under the influence of high temperature.
After the water-cooled stage, the product automatically comes out of the mold and is inspected.
The blowing method is carried out using an extruder, a special printing plate that operates at high temperatures.
The blocks are released through an extruder in which a homogeneous mass of molten polymer is prepared. Then, under the influence of compressed air, the containers are released, which are then sent for quality control.
Canned types
In order to buy a cannon ball for the required purpose, you need to know the types of products produced.
Plastic containers are mainly intended for use in manufacturing plants and are called industrial. In addition, they are classified according to their volume and the possibility of compact transport (folded and not folded) with an integrated lever and an external one.
industrial
They have a concise design that aims for: comfort, relatively low cost, low weight.
Make a power supply from a plastic container
Industrial cans are made from relatively affordable translucent polyethylene with a minimum quantity of 5 liters. The design is based on saving the weight of the product, which is 170-180 g.
sphere
You can buy plastic jars any desired volume - from 5 to 50 liters.
Of these, the most popular 20L plastic container, because it is very suitable for transportation, manual transmission, storage. The capacity of this volume was marked by the beginning of modern plastic sheets, which are produced in the form of a parallelepiped and a cube with a different handle arrangement.
 Canisters of various sizes
It also turned out that the 10-liter tank is an increase in demand with a lot of changes compared to other capacities.
With integrated and external lever
Industrial cans with a built-in lever make it possible to rationally use transport during transportation and the surface of the premises during storage.
 You can with handle notch
Containers with an external handle are more popular in everyday life than in industry.
The process of their production is the most rational, the product has the smallest weight and the lowest price.
 It can be with external handle
Foldable and incompatible
The most important characteristic of canisters is their compliance, which depends on the location of the handle.
Collapsible containers with an external handle are cubic in shape and have a slot at the bottom that includes the handle of an adjacent container during transport and storage.
 Collapsible cans
The most suitable version of storage containers - with a recess, which is most often of this type, can be 20 liters.
In this design, the handle is placed in a recess in the top of the container, without interfering with the formation of not only cubic sheets, but also in the form of a parallelepiped.
During warehousing and storage in a warehouse, the container is attached to each other, the upper part of the body is provided with pins, the lower part with grooves.
The non-sterile containers are simple in shape (with rectangular sides), have a protruding handle, and have a maximum capacity of 10 liters.
Due to their advantages, plastic containers are practically indispensable for the transportation and storage of liquid substances.