How to install a ceiling made of plastic panels. DIY plastic ceiling
Application of plastic for interior decoration premises is becoming widespread. It is used for both walls and ceilings. will solve many problems associated with the quality of the ceiling.
Plastic panels have excellent performance characteristics and attractive appearance.
Plastic panels have many positive qualities. They are quite technologically advanced and beautiful. From a huge assortment you can always choose what you like. Suspended ceiling made of plastic with your own hands - it’s convenient, fast and practical.
Features of material selection
A suspended ceiling can be made of different materials (wood, chipboard, foam, etc.). One of the most common designs is a suspended ceiling made of plastic. Such a surface has a number of advantages: ease of installation, light weight, wide range of colors, low cost. The most important thing is that the plastic ceiling has high moisture resistance. It can be easily washed with water. Plastic does not deform due to changes in humidity and temperature.
Most optimal material for plastic ceilings is polyvinyl chloride. It can be used in the form of tiles or panels. Long PVC panels are most widely used. They are made in two types - seamless and embossed. Seamless panels have a continuous flat surface, and smooth edges allow you to seamlessly join the panels together.

U relief panel the edge on one side ends with a groove, and the other edge has a longitudinal tenon. When joining the panels, the tenon fits into the groove, and an even rectangular groove is formed along the joint.
The panel is made in the form of two layers of plastic, between which stiffening ribs are formed, which ensures sufficient mechanical strength. The front surface of the panel is polished (varnished). Standard PVC panels are sold in widths of 25 cm and lengths of 2.7 or 3 m.
Return to contents
Choosing a ceiling design
A plastic ceiling can have two main designs - suspended and suspended. Stretch plastic ceilings are made from vinyl film. During installation of such a ceiling, the film must be heated to 70º, which requires the use of special heat guns. Installation suspended ceilings, as a rule, are produced by professionals.
Most suitable for installing a plastic ceiling with your own hands suspended structure from PVC panels. A suspended ceiling is a horizontal surface formed from a glossy layer of PVC panels mounted on a metal frame. In this case, the frame is fixed to the wall and ceiling, at a certain distance from the surface of the ceiling.

The frame is a firmly connected mounting structure in the form of a lattice. The frame is made from metal profiles. The frame is attached to the wall using a U-shaped guide profile. Typically, a profile of type PN 28x27, 28 mm wide and 27 mm high, is used. The main one is the ceiling profile, which has a C-shape. The profile type PS60x27 is used. A lattice frame structure is created from this profile.
The frame is attached to the ceiling using hangers, which secure the profiles to the ceiling. For cross-shaped connection of profiles, a “crab” fastening is used. The ceiling profiles are connected to each other using a U-shaped connector with a length of 30-40 mm.
When installing PVC panels, the lengthwise connection is made using a plastic joining profile (H-shaped molding). In addition, when completing the installation of plastic, they can be used to hide the initial gaps. plastic skirting boards, starting profiles, cornice profiles, corners (external and internal), clamps.
Return to contents
Preparatory work

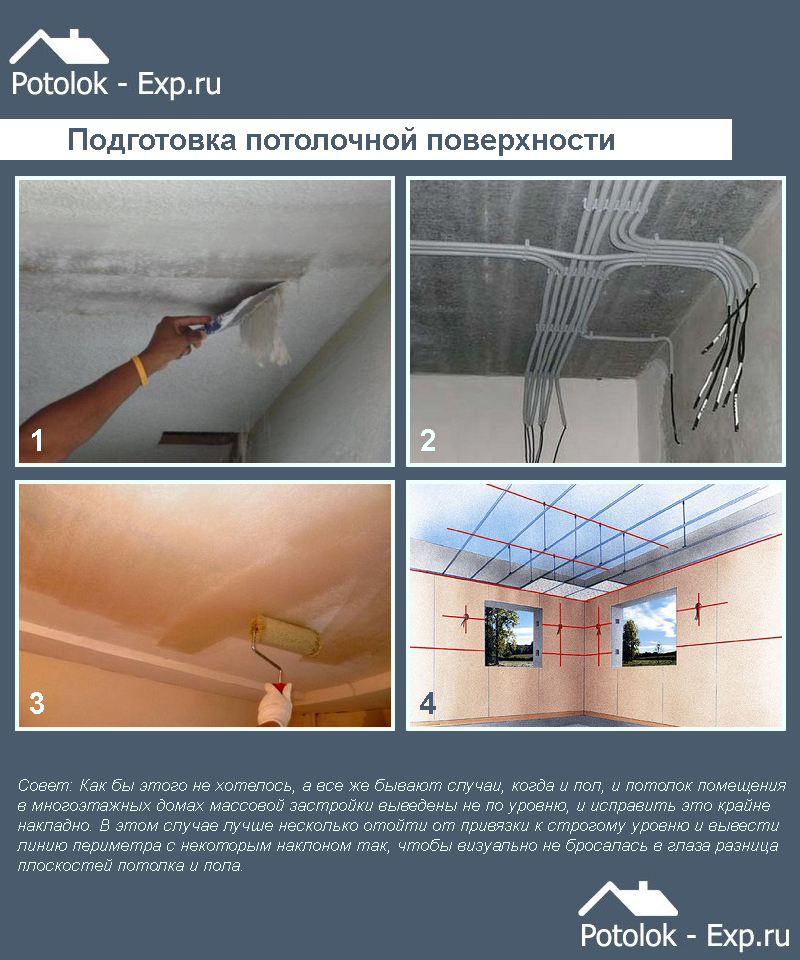
After installing the suspended ceiling, the main ceiling will be hidden from prying eyes, therefore, no increased demands are placed on its surface. However, it must not be allowed to crumble, and most importantly, traces of mold or mildew remain on it after flooding. The surface of the ceiling should be primed and plastered so that there are no cracks or chips left on it. Areas with mold must first be treated with an antiseptic, for example, a solution of copper sulfate.
Return to contents
Surface marking
Important preparatory stage, which affects the quality of the entire suspended ceiling, is the marking. First, the true height of the main ceiling is clarified different points premises. To do this, the height of the wall is measured with a tape measure at at least three points - in the corners and in the center. In the corner with the lowest wall height, a mark is made at the height of the frame profile suspension, that is, at a distance of 5-10 cm from the ceiling. The distance is determined by the need for communications.
If it is planned to install built-in (spot) lamps or run pipes along the ceiling, then this distance is 8-10 cm; if nothing extra is planned, then 5-6 cm is enough. Then a mark is made on the wall in another corner, but taking into account the actual height of the wall. The suspended ceiling should be parallel to the floor. A straight line is struck through the marks in the corners using a well-stretched and pre-painted construction cord. The opposite wall is marked in the same way. The lines are connected to each other by marking other walls. Thus, a line is drawn along the entire perimeter of the room - it is the lower boundary of the frame guide profile.

Marking ceiling profiles carried out on the ceiling surface. To do this, first, beat off with a cord parallel lines in the longitudinal direction. The first and last lines are drawn at a distance of 15-20 cm from the wall. Parallel lines are drawn between them in increments of 30-40 cm. Lines are marked in the transverse direction in the same way. A grid must be applied to the ceiling, which indicates the location of the center line of the ceiling profiles. The installation of hangers is marked along these lines. The first marks are made at a distance of 25-30 cm from each wall, and all subsequent marks are made in increments of 50-60 cm. The marks should not coincide with the crosshairs of the lines - they must be offset by at least 5 cm from the crosshairs.
Return to contents
Installation of the guide profile
Installation of the suspended ceiling frame begins with the installation of a U-shaped profile on the wall along the marking line. First, holes are drilled at the base of the profiles for fastening to the wall: the first at a distance of 10-15 cm from the edge, the subsequent ones at 30-40 cm from each other. Then it is applied to the wall and marks are made on it. Using the marks, holes with a diameter of 8 mm are made in the wall using a hammer drill or electric drill. Plastic dowels are inserted into the holes. The PN profile is attached to dowels with screws. In this way, guides are installed around the entire perimeter of the room. The horizontal installation should be checked with a level.
Return to contents
Installation of ceiling profiles and installation of communications

First, profiles are installed that are directed along the short wall. These profiles should extend from wall to wall. If it is not possible to choose a profile of the required length, then it is joined from two segments. The connection must be reliable and rigid - using a U-shaped standard fastener or a metal strip. Installation of PS profiles is carried out in accordance with the markings on the ceiling. The ends are attached inside a guide profile fixed to the wall. The profiles are positioned bottom down. PS profiles in the perpendicular direction are mounted from segments, the length of which is equal to the distance between the installed PS profiles. They are attached using a “crab” fastening.
The PS profiles are secured to the ceiling using hangers. The pendants bend to form a U-shape. The height of the side rack must strictly correspond to the distance from the ceiling to the PS profile. The suspension platform is fastened with screws into dowels on the main ceiling in the marked places. The suspension legs are attached to the sides of the profile with self-tapping screws.
Before fastening plastic panels, it is necessary to place the entire communication system inside the frame (if necessary). First of all, this concerns electrical wires– for a chandelier or system spotlights. The wires must be collected in a bundle and placed inside a corrugated hose. Wiring is carried out to the mounting location of the lighting equipment. The wires are carefully attached to the frame profiles.
Plastic, as a finishing material for ceilings, is now becoming increasingly widespread. When compared to other types ceiling decoration, this method will cost more than materials and installation work, used in other cases. However, the subsequent cost of operating the plastic ceiling covering itself will be significantly lower.
The concept of plastic ceilings includes specific types of ceiling coverings - Armstrong, Grilyato and others similar. Installation diagrams and suspended structures assembled from simple load-bearing elements and plastic panels of various sizes and colors have been specially developed for them. There are a huge number of different instructions explaining the correctness and sequence of assembling such ceilings.
Plastic after installation does not require any additional processing of the front surface. Even if very heavily polluted soot and soot from gas stoves In kitchen areas, plastic easily restores its original decorative qualities and color scheme. This is ensured by simple washing with plain water and soapy water.
PVC plastic It is hygienic, under normal conditions it does not emit any chemical fumes harmful to humans, and is resistant to biological contaminants in the form of rot, mold and fungus. Its destruction begins to occur at temperatures not lower than 120 degrees Celsius.
Using plastic for finishing ceilings
Until recently, square or rectangular panels with deep relief made of polystyrene foam (often used for packaging household appliances) were used to improve ceiling coverings.
The porous surface of these panels had low resistance to contamination in the form of dust, cobwebs, grease and soot, absorbed well and released such unpleasant odors, How tobacco smoke. Washing such cladding did not give any effect, and the front surface was covered with dirty stains that could not be removed. The only way to deal with these troubles was to completely replace the ceiling covering.
Therefore, rectangular ones are most often used for ceiling systems. plastic pvc panels measuring 0.25 x 3 m, thickness 7.5...8.0 mm. These panels, produced by extrusion, consist of two flat plates connected to each other by longitudinal stiffeners, the distance between which does not exceed 1 cm.
The longitudinal sides of the panels are equipped with locks in the form of grooves and tenons. They also have a special protruding flap for attaching to the surface to be tiled. When installed, they create a force that attracts adjacent panels, as a result, the seams between them become invisible.
Seams are camouflaged especially well on panels with a glossy work surface, as well as with periodic patterns or ornaments applied to them. The seams between the panels will become even more invisible when they are installed perpendicular to the wall in which the window openings are located.
The placement of the seams along the eye looking at the ceiling visually makes the room longer, and across - wider.
In some cases, the seams are specially made visible, and they serve as one of the elements of a specially designed decor. Plastic PVC panels with visible seams are called eurolining.
Sometimes solid PVC sheets up to 5 mm thick with various colors or printed patterns are used for plastic cladding. These sheets, resembling very hard linoleum, can be rectangular or square in shape.
The seams between such sheets are usually closed using decorative overlays made of PVC or foam plastic, simulating wooden elements rafter beams or roof system trusses.
PVC ceiling panels, unlike wall panels, have less thickness, weight and strength.
The price of ceiling panels can be significantly lower than wall panels. Very rarely, plastic PVC panels are installed using glue. To choose this method, you need a smoothly leveled surface of the base, cleaned of chalk and other stains. The adhesive mastic must ensure reliable adhesion between the planes being glued.
When ceiling made of wood, plastic panels can be installed directly on it without the use of frames and guide rails using nails, screws or staple gun staples. Horizontal level This covering is provided using wooden or cardboard wedges and pads.
Plastic panels can be combined in color, pattern, and combined with other types of ceiling finishing - plasterboard, decorative plaster, stretch fabric. PVC plastic can be used in the most daring vintage design projects when decorating residential and work spaces. Multi-level ceiling systems of stepped design with elements of straight or complex curved shapes with the installation of lamps of an original shape are increasingly being used.
Plastic panels hide defective areas and irregularities in wood and concrete floors, various engineering communications. These may be losses and peeling of the old plaster coating, ledges between lower surfaces adjacent reinforced concrete slabs.
Utilities may consist of pipes for hot and cold water supply, heating and sewerage. Even higher than the plastic panels, wiring for electrical networks, telephone, Internet, and antenna television cables can be installed.
Access to them for maintenance repairs is easy.
To do this, most often it may be necessary to dismantle one or more plastic panels, the subsequent return to their place seems to be quite simple.
Lighting of rooms with ceilings made of plastic panels can be done using built-in spotlights or other methods agreed with the customer or owner of the room. Sometimes, if the height of the room is suitable, equipment for ventilation and air cooling is installed above the plastic level.
The price of covering ceilings with plastic panels is comparable to the price of covering with plasterboard. Moreover, plastic does not require puttying, sanding, wallpapering or painting after installation.
Facing
- direct fastening of panels to the ceiling;
- the use of intermediate guide rails, pre-set, leveled and connected to the ceiling;
- preliminary assembly of frames made of wooden or metal parts and aligning them horizontally using the floor level is The best way, suitable for any ceiling.
Wooden frames are made from slats with dimensions 50 x 20 mm. They are connected to each other with corners bent from tin, or wooden shorts with screws. Metal frames are most easily assembled from stock bent galvanized tin profiles used for plasterboard sheathing.
The flat frame structure is pre-assembled with alignment on the floor, then, after hanging, it is fixed in a horizontal plane using water or bubble building level. The frame is attached to the ceiling using nails or self-tapping screws.
Advice
When hanging and leveling, it is better to use galvanized tin perforated strips, bent in the desired configuration.
The panels are attached to the frame in a standard way.
Additional attention should be paid to the design of transverse seams between panels, right and reverse corners at junctions with walls, doors, window openings. For this purpose, elements called moldings are produced.
To make frame slats, you need to take well-dried wood coniferous species- pine, larch. This will make it possible to avoid warping and distortions of the ceiling surface during its operation. Before installing a wooden frame, its elements must be protected with antiseptics from rotting and fire retardants from fire. There are special deep penetration impregnations that combine these two most important protections for wood.
The voids formed between panels, ceilings and frame elements are sometimes filled with mats made of mineral wool or foam sheets. This increases the sound impermeability and heat-insulating properties of the premises.
Self-installation
Installing plastic ceilings with your own hands can be done by a contractor who does not have any experience in performing such work. Self-cladding of any type of ceiling with plastic does not require specially purchased tools. Screwdrivers, drills, hacksaws, hammers, levels and plumb lines are always at hand for any home craftsman. All materials traditionally used for this purpose can be easily processed and adjusted to the required dimensions.
- To install plastic, it is enough to familiarize yourself with the work technology and study the recommended order of operations.
- Next, you need to prepare materials and get your tool into working condition.
- In order to minimize overspending and limit leftovers in the form of scraps, a preliminary calculation of the required amount of materials is performed. This is done using concepts from a high school geometry course. These include - width, length, height, methods for measuring the areas of plane figures, their addition and subtraction, the Pythagorean theorem of sines (cosines).
- Further, the contractor who performs the work on cladding and finishing ceilings with plastic will only need exact calculation and accuracy.
Advice
Don't forget about using protective equipment– glasses, respirators, workwear. To protect your head from falling objects from above, you will need a standard construction helmet. And in general, when finishing the ceiling with plastic, one cannot ignore safety requirements and fire safety measures.
Reliable stepladders and scaffolding must be in demand. During the work, it is recommended to invite an assistant who, in addition to providing services in auxiliary work, will be able, if necessary, to provide first aid during accidental mechanical injuries or damage electric shock.
Application and operation
Plastic ceiling coverings can be used in residential and public spaces. Since the purposes of such premises usually differ, plastic ceilings in them may have their own characteristics. Let's look at these features in more detail. The aesthetic qualities of ceilings can be maintained in proper condition for decades; it all depends on their care and regular maintenance.
Plastic ceiling in the kitchen
Advice
You can restore shine by wiping the surface with a weak (1...3%) solution ammonia or ammonia. The process of cleaning from dirt can be organized using an ordinary mop with a rag or using a washing vacuum cleaner.
In bathroom
The use of plastic when installing a ceiling in a bathroom is one of the most progressive finishing methods. The bathroom area is intended for reception water procedures, and, therefore, is characterized high humidity. The PVC plastic panels themselves are very resistant to splashes of water or high humidity.
Elements wooden frames must be additionally protected with waterproof paint and varnish coatings based on polymer resins - acrylic, epoxy, polyurethane.
It is better to use metal frames with parts made of galvanized sheet. For better protection against corrosion, you can use coatings based on red lead or chromium oxide diluted in natural drying oil. Good results gives a coating with bitumen or coal tar varnish. Slots, gaps at junctions with walls and engineering communications It is better to insulate with polyurethane foam or silicone mastic.
Installation, connection, and insulation of electrical lighting devices must be performed by a certified electrician. It is better to remove all switches and sockets from the wine room. These steps will help avoid electric shock during operation.
In the corridor
Ceilings in corridors and hallways are also often finished with plastic panels. Instead of one lamp in the form of a chandelier, sconce or shade, several built-in spotlights are used. The device of an individual connection console will allow you to select separate zones or spaces in the room.
If walk-through rooms have built-in wardrobes or mezzanines, it is also very convenient to finish their internal surfaces with hygienic PVC panels.
In the toilet room
Nothing better than plastic has been invented for finishing the ceilings of isolated toilet rooms. PVC panels do not absorb or retain any odors for a long time, unlike plaster, drywall, and fabric. Plastic well hides a variety of ceiling connections for engineering and other communications, as well as normal building operation systems.
In houses built from the 30s to the 50s of the last century, you can still find toilets with a vertical flush. In this case, the outlet pipe comes out of the ceiling of the toilet room on the lower floor and crashes at a right angle into the sewer riser located here. Alteration of such a structure requires replacement of toilets, sewer risers and reinforcement interfloor ceilings. If this is not possible, such a structure can be hidden behind a suspended plastic ceiling.
Ceilings in bedrooms with a height of 2.20...2.50 m can be made of ordinary three-meter plastic panels on wooden or metal frames. As design solutions You can alternate the order of colors and patterns of adjacent panels. They can be installed either to match the pattern of adjacent sheets or in an opposite contrasting version.
Advice
When experimenting with colors and patterns of panels, you should avoid harsh combinations that cause overexcitation and insomnia. This especially applies to bedrooms and children's rooms. It is better to use sedatives, so-called pastel shades, allowing you to induce a deep, relaxing sleep.
Like other finishing building materials, plastic, including in the form of PVC panels, for ceilings has its advantages and disadvantages.


Polyvinyl chloride is a material widely used in a variety of fields of activity; it also finds its application in construction. Panels for finishing walls and ceilings are made from PVC. Due to their low cost, resistance to adverse external influences and durability, such panels are well suited for finishing bathroom ceilings. Installation here does not require high qualifications and expensive equipment; you just need to familiarize yourself with the algorithm for its implementation, which will be outlined in this material.
Advantages and disadvantages

Prices for plastic ceiling panels
plastic ceiling panels
But there are a number of disadvantages that should also be kept in mind.
- If the bathroom is too large, such a ceiling may look inorganic, since the panels have a limited length (3 meters).
- Installation on a metal frame lowers the ceiling height by several centimeters.
- Complex design solutions, such as multi-level ceilings and curves, are not feasible here.
As you can see, the disadvantages of this type of ceiling are insignificant and outweighed by its advantages.

Necessary equipment
To install a PVC ceiling yourself, you will need the following set of materials.

Decorative profiles are used to give the ceiling a preferred edging; their varieties are presented in the table.
Table. Types of decorative profiles for suspended ceilings made of plastic panels.
| Types of profiles | Purpose |
|---|---|
| Hides the ends of the panels |
| Hides corner joints |
| Connects two standard profiles if their length is not enough |
| Completely hides all ends |


Ceiling profile prices
ceiling profile
Execution of work
Step 1. Draw up a work plan. It is not necessary to strictly comply with all the rules of technical design of drawings, but it is important to accurately record all dimensions and intervals.

Reference! There is an option for decorating a PVC ceiling that does not require the creation of an iron frame. In this case, the fastening of the plastic blocks will go directly to the rough ceiling. The clear advantage of this method is maintaining the same height of the room.

Fastening plastic panels to the ceiling with “liquid nails”
But such work is only possible if the rough ceiling is in very good condition, if it is perfectly smooth and free of roughness and fungal damage. Here the fastening will be carried out using construction adhesive for plastic or liquid nails.
Step 2. Next are preparatory activities. If lime is falling off from the rough ceiling, then such areas need to be removed. All loose wires must be wrapped in corrugated plastic pipes, leaving them free exit only in those places where they will go into lighting fixtures. Old ceiling treated with an antifungal solution.
Step 3. Then it is carried out horizontal line along the perimeter of all walls. It will indicate the mounting height of the panels. The line must be at a certain distance from the ceiling, which depends on the planned use of the resulting empty space. If nothing will be placed there, then a five-centimeter indentation is enough. If you plan to place ventilation or massive lighting fixtures, then the distance can increase to two to three tens of centimeters.
Step 4. The line is drawn using a level. If the bathroom is already tiled, then you can use its outer seams as a ruler.
Frame installation
Step 1. Before starting work, the tiles are covered with polyethylene or cardboard.

Step 2. Installed first starting profile, that is, UD forms. You need to attach it to the wall so that the lower border coincides with the drawn lines. Cut into pieces the length of the entire wall.

When the profile is attached to the wall, holes are drilled in it every fifty centimeters to insert dowels there; the depth of the hole is equal to the length of the dowel with a margin of 10-20 mm. There are dowels that can be driven in and those that can be screwed in with a screwdriver; the first type is more convenient to use. Before drilling a wall, you must check it for wiring using a detector device.


Step 3. Then the CD profile is laid out. It is inserted perpendicular to the UD into its grooves. There are two ways to lay these elements: along a long wall or across it. They have different aesthetic effects: if when laid lengthwise the room seems more spacious, then when laid across it looks more compact. The longitudinal design has one drawback: since the profile sags between two grooves at a fairly large distance, it requires additional fastening to the ceiling in the form of suspended structures.

The hangers are fixed before installing the CD forms. To correctly calculate their future location, when installing the UD, make marks on them that will help you determine both the location of the suspensions and the location of the CD mounting.
Step 4. If a chandelier is used for lighting, then it is necessary to run one strip across all the others in the place where it will hang.
Chandelier prices

Installation of panels
Along the perimeter of the wall directly below basic profile a plinth is installed; liquid nails or glue are used for fastening. The plinth is made of the same material as the panels themselves, differing from them only in their shape. Some types of skirting boards are fixed without help special means, mechanically attached to the UD panel. This includes F-shaped skirting boards.

On a note! When arranging a plastic ceiling, you will probably be puzzled by the problem of creating correct angles. It is not necessary to do them for a wall panel, since this element is not striking anyway. But for skirting boards that are in plain sight and represent the edging of the ceiling, the design of the corners is necessary.

The most labor-intensive way is to cut them out using a miter box from standard products. But a miter box is not always at hand, and not everyone knows how to work with it. In this case, you can purchase special corner attachments that can easily be attached to the junction of two baseboards.

The panels are cut according to the dimensions of the wall. For convenience, you can make them a little shorter than necessary, but with a difference of no more than 5 mm. A profile strip is taken, one end of it is threaded into the groove between the UD form and the baseboard and fastened there. The other end of the strip is attached to the opposite groove; so that you can thread it there, you need to bend the strip slightly, but be careful, because at this moment it is easy to break. Each strip has fastening locks. The first inserted panel is secured to the baseboard using a screw. Subsequent panels are connected to each other using press washers. The latter has a half width, for which standard panel cut into two parts. This panel is attached to the groove of the profile and baseboard without using bolts and washers.
Prices for ceiling plinths
ceiling plinth

Please note that the plastic panels are laid perpendicular to the direction of the CD forms. In other words, if the CDs were stacked along the long side of the room, then the plastic panel should go across it.
Reference! In addition to parallel and perpendicular, there is also a diagonal direction for fastening the frame. It requires more precise calculations for its implementation, but a rough guideline for planning is the parallel direction rather than the perpendicular one.

Lighting
Space for lamps is allocated in advance. The functionality and safety of all wiring is checked. When laying plastic blocks, do not forget to move the ends of the wires away from the filled areas so that they do not become “walled up” between the ceilings. You should not spare the wires; even if they are carried out with a spare length, the risk of not reaching the planned location can jeopardize the entire arrangement plan.
Holes shaped like yours are drilled into the required panels. lighting fixture. Easiest to do round holes, for which it is enough to put a special attachment on the hammer drill. The lamp is installed after the panels are installed.

At this point, the process of installing a plastic ceiling can be considered complete. And this is another advantage of this material - it does not require any additional cladding. After completion of the main work, such a ceiling is a full-fledged element home interior, and with its help the bathroom can change beyond recognition.
Video - Finishing the ceiling in the bathroom with plastic panels
Reading time ≈ 9 minutes
Ceiling repair is a fascinating and labor-intensive process, but sometimes it takes a lot of time and effort. It’s always a shame when a plastered ceiling begins to crumble and become covered with cracks over time. For changing this species finishing comes with polymer surfaces. Plastic panels are very popular today among both experienced builders and beginners.
The modern market is overflowing with various types of finishing materials. Buyers especially appreciate the simplicity and efficiency of installation, as well as quality and reliability. All these requirements are met by finishing the ceiling with PVC panels, with which you can easily sheathe ceiling surface in any room. With them you can forget about thorough preparation of the base and leveling. In this article, we will look at how to make it yourself from plastic panels, without having much experience in repair work.

Features of the material
Today construction stores offer huge selection models of PVC panels, they can differ in size, shape, manufacturing technique (matte, glossy, varnished) and decor (wood, stone). However, it is very important not to confuse them with wall ones. Ceiling panels are lighter and softer than wall panels, weigh less and are more fragile. They are easy to install, but require careful handling, so a dent can be made by hand.
Plastic panels have a number of advantages:

What are PVC panels
Plastic sheets are lightweight, porous products made from polyvinyl chloride. They are smooth and flat; on the cut of the long end, internal locks are visible for fixation during assembly, like a laminate. The panels consist of two sheets connected to each other by plastic ribs.  How to lay out a ceiling made of plastic panels is shown in the video below.
Installation of PVC sheets is possible on a frame made of wood or metal, and for cladding it is necessary to use several types of profiles.

Types of profiles:
- Starters. They are used most often to cover the ends of the sheets along the perimeter of the ceiling.
- F-profiles. They also hide the outer ends of the panels.
- H-profiles. This connecting view profiles to increase length.
- Corners made of plastic (external and internal). Hides external and internal ends.
- Plastic plinth for ceiling.
- Universal plastic corner. Suitable for all angles.
The disadvantage of a PVC suspended ceiling is the limited choice of shapes and the impossibility of assembling a multi-level structure. And also the presence of joints between plastic sheets is always noticeable. It's better not to buy cheap panels, as it will ruin general form ceiling, because lighting fixtures can shine through through low-quality sheets.
It is important to note that there are two technologies for installing plastic ceiling panels:
- For glue.
- On the profile sheathing.
Choosing the right one
What are the criteria for choosing PVC sheets:

The tools we will need are:
- Drill (slow-speed) or hammer drill.
- Screwdriver.
- Roulette.
- Sharp knife and metal scissors.
- Hacksaw.
- Miter box for cutting.
- Hammer.
- Water and bubble level.
- Steel plumbs (for a frame made of plastic or metal).

Types of PVC sheets:
- Suture. The joints on such panels are immediately noticeable.
- Seamless. The junctions of the strips on the ceiling are practically invisible.
- Glossy. They reflect light well and can visually enlarge and expand the space.
- Matte texture. A more budget option, it can imitate a white paint finish.
- Plain.
- With drawings and other decor.
Finishing the ceiling with plastic panels is shown step by step in this video.
Let's start installation
All work on installing a suspended ceiling made of PVC panels can be divided into several stages:
- Preparatory stage.
- Installation of the frame (made of metal, plastic or wood).
- Installation of the panels themselves.
- Finishing the ceiling.
Preparation stage
The ceiling surface must be prepared for repair work. Although it will not be visible, the ceiling must be cleaned of dust, dirt, traces old paint, plasters, whitewash or putty. Then we prime the surface and wait for it to dry completely.
Now we begin marking for the future frame: on all the walls in the room we draw a line using a laser and water level, which determines the level of our future suspended ceiling. In this case, you can use twine that has been pre-colored with chalk. bright color. Lightly press the string against the wall so that the chalk remains on it. For wiring from lamps or fixtures, leave gaps from the frame to the ceiling up to 2 centimeters in size.

After we have finished outlining the perimeter, we begin marking the frame. The frame profiles should be positioned strictly perpendicular to the PVC sheets at a distance of 40-60 centimeters. How to properly make a ceiling from plastic panels is shown in this video.
Frame installation
Wood
Using dowels, we mount wooden slats into the ceiling, screwing in screws every 60 centimeters. Wooden pads can be placed between the beams and the ceiling for leveling. The disadvantage of a frame made of this material can be considered the possibility of deformation when the wood gets wet and dries during operation.

Plastic
We make this frame from U-shaped plastic guides. We install suspensions in the ceiling in increments of up to 60 centimeters, and profile guides in increments of 50 centimeters. We attach the starting profile to the guides using self-tapping screws at a distance of 50 centimeters from each other.  The lower border of the frame should follow the line drawn at the marking stage. To join the profiles in the corners, use a miter box or carefully cut with a hacksaw. The disadvantage of this type of frame is its inability to withstand heavy loads.

Metal
This frame is considered the most reliable, since it cannot be deformed and serves as the basis for a perfectly flat plane. The galvanized metal frame has the most complex technology installation, however, the same U-shaped profiles are used (every 60-80 centimeters). After lines are drawn on the surface to determine the level of the future ceiling, we make marks for installing plumb lines. How to cover a ceiling with plastic panels metal frame, shown in the video below.
Using a hammer drill, we make holes on the walls and ceiling for the placement of plastic dowels. We mount the supporting guides of the profile to the wall, and the suspensions to the ceiling. IN load-bearing installations We mount the transverse profiles, and then level their horizontal position using a building level.
Once the frame is installed, don't forget about the wiring to ensure future operation of the lighting equipment.

Cladding with PVC panels
We mount plastic sheets across the installed profiles. The first sheet must be cut so that it is 5 mm shorter than the width of the room. Using a jigsaw, grinder or hacksaw, cut off the excess material. We sand the edges. 
We push the finished first sheet into the starting U-shaped profile, making sure that the panel falls into place. Now we fix it using clips, self-tapping screws or screws to all support profiles on the frame. 
The second and subsequent sheets are mounted in the same way, except for the last one. We cut the finishing panel along a length 1 mm less than the distance from the wall to the starting guide profile of the opposite wall. We push the strip all the way in the very corner of the ceiling towards the profile. We push the other end out a little from the first corner and also insert it until it stops.

A small gap may form between the last two sheets, which can be easily eliminated with masking tape. Apply tape across the finishing panel and move it in the direction of the second to last one.  The suspended ceiling made of plastic panels is ready. Now you can begin finishing the surface. Holes for lamps can be cut at any stage, as shown in the video.
Assembling a suspended ceiling from PVC sheets with your own hands is not at all difficult. The main thing is to take into account the characteristics of the material and strictly follow the instructions.
More recently, people did not have many options for finishing the ceiling - whitewashing, painting, wallpapering or foam tiles. However, progress does not stand still; people are striving to come up with new, more multifunctional types of finishing. Thereby, modern market building materials ready to offer consumers the most different variants finishes - for every taste and income. The arsenal of modern design solutions offers: stretch fabrics, suspended multi-tiered structures, perforated ceilings, wooden ceiling panels, and this is not the whole list.
Plastic ceiling panels also occupy a worthy place in this list. This finishing method is attractive due to its optimal price-quality ratio. At a fairly low cost, such cladding looks original and expensive.
In an effort to decorate your home in an original way, it is important not to go overboard. It is better to choose neutral panels for the suspended ceiling pastel colors. They will not irritate the eyes, and will make the room visually more spacious. Which is not at all superfluous when usually low ceilings in standard apartments.
Advantages of plastic in the interior

PVC panels for the ceiling is a wonderful option for finishing a room, which has many positive characteristics, namely:
- Inexpensive. This is one of the most inexpensive options suspended structure. In this case, not only the cost of the finishing itself is taken into account, but also the materials necessary for installation.
- Hides the imperfections of the base ceiling. To install the panel on the ceiling, the base ceiling does not need to be leveled; everything will be hidden by the suspended structure.
- Hides electrical wiring and other communications. Under such a ceiling structure you can hide all the wires, making only the lamps visible
- Ease of installation. It is quite possible to install a plastic ceiling yourself. Even if you have not encountered such work before, after reading this article it will become clear to you what and how to do.
- Easy to use. This ceiling is very easy to maintain - the plastic can be easily washed with ordinary detergents.
- Ease of reconstruction. If one panel is damaged, simply replace it, leaving the rest of the ceiling area untouched.
- Moisture resistance. Due to its high resistance to moisture, this finish is ideal for the bathroom and other rooms with high humidity. Even if you are flooded from above, you can remove the panels, dry them, and reinstall them, and they will not lose their appearance at all!
- Doesn't fade. On long years retains its original color.
- Aesthetically. This type of cladding perfectly complements the interior, decorated in the most different styles. When choosing panels with a glossy surface, you can also visually enlarge the room
- Wide variety of colors and textures. This finishing material is produced in a wide variety of colors. There are both single-color options and models with patterns, imitation of mosaics, marble, wood and other textures. All this makes it possible to select panels to suit any interior.
- Noise and heat insulation. Like any suspended structure, such a ceiling additionally insulates the room and also muffles sounds.
- Eco-friendly. Does not emit unpleasant odors.
The disadvantage of finishing is the same as with all hanging structures - it eats up 5-10 cm of the room’s height.
The difference between ceiling panels and wall panels

The choice of plastic finishing materials today is very wide. There are slats different lengths and width, color, texture, and purpose. The main thing is not to confuse ceiling panels with wall panels. The difference is their weight. Wall plastic is heavier and stiffer, ceiling plastic is lighter and more fragile. Therefore, during installation you need to be careful, since it is quite easy to make a dent on the bar even with your finger if you press too hard.
Types of plastic products
This finishing material is widely used in the construction industry. It is used for cladding different surfaces.
Depending on the type of connection, there are the following types of panels:
- Seamless. The joints in them are practically invisible; they can only be seen from a short distance.
- Embossed. This surface looks like clapboard.
- With chamfer. These planks are similar to seamless models, but they have a decorative hole at the ends.
According to the type of front surface, plastic panels are:
- Glossy. The planks have a perfectly smooth lacquered surface, partially reflecting the interior items.
- Matte. They have no shine.
- Colored. They can be plain or have a pattern. IN inexpensive models The design is applied using thermal film; in expensive ones, direct printing is used.

It’s easy to get very confused among the current variety of plastic panels, so it’s important to know how to choose a quality material. There are several rules:
- The plank must have the correct geometric shape, the pattern must be applied clearly, the surface must not have scratches or other defects.
- The location of the stiffeners should not be visible from the front side.
- Check the level of joining of the planks. High-quality products fit tightly together.
- High quality plastic does not emit a pungent odor.
On finishing materials There is no point in saving for your home. High quality material will serve you much longer and will delight you with beauty. It is imperative to check product certification and make purchases from trusted suppliers.
When choosing ceiling panels, you also need to consider the following factors:
- A light ceiling will make the room more spacious, while a dark one, on the contrary, will visually reduce the height.
- The glossy surface also helps visual increase spaciousness of the room.
- Do not use more than 3 colors in the interior of the ceiling.
- On plastic, imitation wood or stone looks unpresentable (especially when the seams are visible), so it is better to choose other prints.
Ceiling installation

How to make a ceiling from plastic panels? This is a question asked by many people who have decided to make their ceiling from panels. This process It’s quite simple, and for beginners we’ve outlined everything step by step.
A suspended ceiling made of plastic panels is installed in several stages:
Step one. Using a building level, the location for fastening the guide profiles laid around the perimeter of the room is outlined. The profile is tightly attached to the wall with dowels.
Step two. At the level of the supporting profiles, we install transverse strips to which the ceiling panels will be attached.
Step three. We make the sheathing - from wooden beam or metal profiles - at your own discretion, hangers are screwed on. If you want to install spotlights, then at this stage you do all the wiring and prepare the mounting locations for the lamps.
Step four. We carefully cut the panel to the required length and attach it to the transverse profiles as close to the corner as possible, securing it with self-tapping screws. Each subsequent panel is inserted into the groove of the previous one, and is also fixed with self-tapping screws. 
Step five. Installation of the last plank. It usually needs to be cut to width, carefully measuring the distance, and then carefully inserted into the ceiling structure.
Step six. Installation ceiling plinth, which is glued to liquid nails. Press the baguette to the surface for a few seconds and remove excess glue with a rag.
Plastic panels in the bathroom and kitchen

Since suspended plastic ceilings have excellent moisture resistance, they are widely used for bathroom cladding. They can even be installed on walls, provided that you take exactly Wall panels with greater rigidity.
Suspended ceilings made of plastic panels have also taken root in many kitchens. In this case, this type of cladding is attractive not only for its moisture resistance, but also for its ease of use. Plastic can be washed off soot without any problems using ordinary detergents, but it is necessary to wash it in the kitchen much more often than in other rooms.
Brief essence of the article
- A suspended ceiling made of plastic panels is a popular and practical type of decoration that allows you to decorate any room in an original way.
- Plastic has a lot of advantages: it is inexpensive, tolerates moisture well, is durable, hanging structure You can hide all the wiring and install quickly.
- This finish has a rich range of colors, and also has different prints and imitations. natural materials.
- If you are wondering: how to do suspended ceiling made of plastic panels, then you definitely need to read the “Installation” section, and you will understand that anyone can do this task. All you need to do is assemble the frame and attach the plastic to it.
- Plastic is especially popular in bathroom and kitchen interiors, as it is not afraid of moisture and can be easily washed with ordinary detergents.