Plastic ceiling panels for the toilet. Finishing with plastic panels: toilet decoration
Plastic panels are one of the easiest and most convenient ways to finish a bathroom. However, many of those who plan to make repairs in the toilet do not even consider using this material. Most often, plastic panels are neglected because they seem to people not beautiful enough and aesthetically pleasing.
PVC panel production technologies make it possible to produce products of excellent quality and appearance. Potential buyers have a choice among hundreds of possible options, so the design of a toilet finished with plastic panels can be very stylish and modern.


Advantages
Let's start the story about the design features of the bathroom, in which plastic panels are used as the main finishing material, with a description of the advantages of this finishing method. These include:
- strength and durability material;
- ease of maintenance, good tolerance to various cleaning agents;
- quick and easy installation, does not require experience in repair work;
- low cost;
- resistance to high humidity and temperature fluctuations
- choice among the many options for colors and textures;
- no need for rough wall finishing;
- thermal and soundproof material characteristics.


Minuses
Like any other finishing material, plastic panels, in addition to a number of positive aspects, also have negative ones. The most significant disadvantages of finishing the toilet with PVC panels are:
- material susceptibility to fire: plastic not only melts and deforms when heated, but also ignites easily when in contact with open flames;
- resistance to mechanical damage: despite the fact that PVC panels are strong enough, they can crack or split from a strong impact;
- installation of plastic panels is made on the frame, which eats up several square centimeters of usable area in addition, the panels themselves can be quite thick.


Color solutions
There are several popular color options for plastic panels. Which one to choose for decorating a bathroom depends, first of all, on the future style of the interior.
Plain panels are a universal solution. They will become the backdrop for furniture, plumbing and other decorative elements. For small rooms, it is recommended to choose neutral, light shades, and in spacious toilets it is quite possible to use bright or dark colors.


Panels with a pattern will appeal to those who want to make the design of the bathroom more expressive. Floral and floral ornaments are in great demand, as well as abstract geometry - patterns of circles, lines, etc. For the design of toilets, the theme of the sea and the underwater world is also often chosen, therefore, a large assortment of PVC panels with the image of shells, sandy beaches or marine life is presented in hardware stores.


Panels imitating natural textures look very impressive. However, so that such an interior does not look cheap, you should choose high-quality products with an impeccably applied pattern. Wooden beams, marble, stone and brickwork - these colors are most popular with buyers. In the toilet, such panels must be combined with matching interior items and sanitary equipment.

A bathroom is a very important room in any apartment, which is why many people are concerned about the question of how to finish the toilet. What is this room? As a rule, we are talking about a small, separate room for sanitary purposes, however, someone loves to retire here in order to be alone, just to read. That is why it is very important that the bathroom is distinguished not only by convenience, but also by cosiness, comfort, beauty.
Finishing steps
How to finish the toilet in the apartment? The scheme is something like this:
- First work with the walls;
- Then they make the ceiling;
- After the floor covering is equipped.
A fairly common question is how to decorate a toilet other than tiles. In fact, the choice of finishing materials is great, but when working, it is important to take into account the fact that the level of humidity in this room is very high.
Like it or not, the main finishing material for bathrooms is still ceramic tiles. The tile is used for wall cladding, it is also chosen to cover the floors.
It is not difficult to explain such popularity - the tile responds perfectly to moisture, as well as open water, therefore, this is a very big plus. If you want to use some other option, you should pay attention to the plastic panels for finishing the toilet, but we will talk about this a little later.
Wall covering
Before talking about how to decorate a toilet other than tiles, let's talk about trends in this area. Bathrooms that look bright, beautiful, and tasteful are considered a good tone in our time. Tiling - this option can be called aesthetic, practical. However, if you pay attention to the cost, such a solution will not be cheap, the work will be quite time-consuming. It is important to remember when choosing tiles for the toilet that the room is not too spacious, therefore, it is worth abandoning dark colors - in order to prevent visual reduction of space. The ideal way: buying light-colored tiles - the dimensions will increase visually, as if “opening up” towards visitors.
What is also good, in our time, manufacturers make tiles of various characteristics - the choice is rich both in terms of texture and in shades, there are many decorative elements for tiles. To make the bathroom look cozier, it is recommended to select some combined options - to look bright, but not too catchy.
It is important to remember that the tile in the toilet often comes into contact with certain chemicals, therefore, the material must have moisture resistance, acid resistance.
An excellent option, for example, is a tile with high chemical resistance. A simpler solution, at the same time the most optimal and cheapest, is to decorate the toilet with plastic panels. To do this work, you do not need any serious skills. Let's talk about how to panel the toilet, what work needs to be done for this.

Wall decoration with plastic panels
How to finish the toilet with plastic panels? This is not difficult - first they make a crate: wooden blocks are attached to the walls of the bathroom, they should be 0.2 by 0.3 cm or so.
When the crate is completed, plastic panels are installed on it. For fastening, they usually choose a construction stapler - in this case, it turns out to work very conveniently and quickly.
Special transitional plastic corners are installed at the corners. You can choose plastic panels both by pattern and color, but the main advantage of this material is its excellent resistance to moisture. Of course, there are other finishing options - you can, for example, choose MDF lining: in this case, the bathroom will be decorated "under the wood."
The fact is that repair is a rather acute, painful topic for any modern person. It becomes especially disturbing in the soul when the repair will be carried out in the toilet or bathroom. If you choose traditional tiling, you will need a large amount of money - it is unlikely that the budget of an ordinary family will cope with such a “damage”.
If finances are limited, it's time to finish the toilet with PVC panels - this method is being chosen more and more often today when the question arises of how to finish the toilet other than tiles.

What are the advantages of PVC
In recent years, this finishing material has gained great popularity, but what is most interesting is that not every person knows about all its advantages.
- For example, the panels will not rot - even after a few years the material will not change its properties.
- Also, the panels are very beautiful, especially in modern design. You can hardly find anything better for the same price.
- Fast installation work: it does not take a lot of time to finish the toilet with PVC panels.
If the bathroom has a standard shape, and you have all the necessary materials and tools at hand, you can finish the cladding, if desired, in one day (of course, this does not include finishing). What can I say - efficiency today is a priority for many works, all the more you can forget about cement, tiles, and other tedious procedures.
What you need to work with PVC panels
First, select the panels themselves. Here everything can be done in accordance with your own tastes - the choice of color schemes is rich today, so everyone will find something interesting for themselves. It should also be remembered that it is imperative to purchase the necessary consumables, the necessary tools - without all this, it will hardly be possible to sheathe the walls of the toilet with plastic panels. What do you need to buy for cladding?
- A quality utility knife: you need to make sure that it can cut panels optimally, without any effort. Thinking of using a kitchen knife for this job? It is possible and so, but at your own peril and risk - plastic, as a rule, quickly blunts metal, cut lines will also turn out to be crooked.
- Self-tapping screws, screwdriver: during work, you will have to fasten panels to the crate. Dowels may also be required.
- You need bars with a cross section of 3 by 10 cm, or you can choose an aluminum profile, the main thing is that it has a similar configuration.
- If you plan to throw panels directly on the wall, you need to get liquid nails, a gun for their application, mounting foam.
- Repair work should not be started without a tape measure, a building level, decorative skirting boards and profile corners.

Choice of paneling method
If the decision is made, it's time to find out how to panel the toilet. To begin with, it is worth understanding which method of fixing the panels to the walls to use. There are two possible ways:
- On a crate made of wood or a metal profile;
- With foam.
If the second option is chosen, it is worth buying cylinders on which the expiration date is “fresh”. In this case, the foam output will be much greater. Which method should you personally choose? If the bathroom in the apartment is spacious enough, there are even brick or concrete walls, it makes no sense to work on the crate. Plastic panels are best attached to liquid nails.
Be sure to keep in mind - in the process of work you will have to be patient, in a matter of seconds PVC does not stick. Moreover, you will need to either hold the panels yourself, or install spacers between the walls.
Gluing panels on liquid nails is nothing complicated in such work, so let's talk about how to work with the crate correctly.
Preparing for paneling
Before starting work, the toilet needs to be prepared - all trim elements that may interfere are removed, sockets and lighting devices are removed. If the work can be complicated by hoses or pipes, in an ideal situation it is better to dismantle it all, otherwise it will be much more difficult to finish the toilet with PVC panels.
There is another relevant remark - you can often stumble upon messages on the net, as if timber is not the best material for lathing. They write that it can deform, swell - because of this, the wall will immediately begin to look not very attractive. If indeed the humidity level in the room rises regularly, it is worth considering such statements: there is some common sense in them. But there is also a way out - just before sheathing the toilet with plastic panels, the timber is carefully processed: any antiseptic for wood is suitable for this. If the humidity level is normal, there is no reason to worry at all.

Starting work on finishing the bathroom with PVC panels
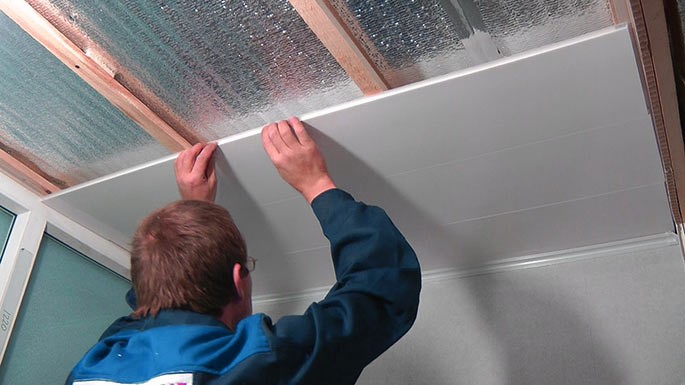
First, the crate is attached. Since almost always the panels will be located from top to bottom, it is necessary to fix the bars perpendicular to the floor. To do this job, dowels are usually used. Since something will also need to be done with the ceiling, the crate is also attached to it.
It is recommended to maintain a distance of up to 400-500 mm between individual bars. The correctness of fixing the bars is constantly monitored - this is done using the building level.
Before sheathing the toilet with plastic panels, you need to fix decorative profiles in the corners - the very ones where the corner panels will then be inserted.
Get to work from the corner. One edge of the PVC panel is inserted into the profile, after which the second side is attached to the screws.
The screw must be screwed into the lock, which is flexible and large.
How to cut plastic panels– many people ask this question. In fact, there is nothing complicated here: the panels are turned over with the wrong side out, laid on some solid base, then an incision is made with a clerical knife. It turns out a line, the panel breaks along it, the thin layer of plastic that remains is cut off with the same knife.
Already with the next panel, everything will be easier: it must be inserted until a distinct click occurs. Then re-attach with screws. You can finish the ceiling in the PVC toilet in the same way (if these works are in the plans, a profile should be installed on its surface). Further, you can take on decorative linings and skirting boards, with which you can easily hide defects, various technological gaps.
Something like this, everyone can finish the toilet with plastic panels. There are no special, insoluble difficulties in the work. The main thing in the process of execution is to carefully fasten the panels to each other - so that there are no gaps. It is better to put ceiling plinths on glue - they are needed only for decoration.

Finishing MDF panels (lining)
We have analyzed in detail how to panel a toilet, now a few words about MDF panels. These are very thin, light panels, the facing layer of which imitates expensive wood species. Often this finishing option is chosen for large toilets, or for those cases when you want to get a room decorated in a classic style.
What is good lining? The panels are moisture resistant, perfectly tolerate the effects of various microorganisms, harmful fungi - thanks to all this, MDF panels can be called hygienic, safe for domestic use.
Yes, this option in terms of cost will cost more than tile, but there is significant savings when compared with natural wood. In general, the walls in the bathroom can be whatever you want - the most important thing is that they are water resistant and smooth.

Wallpapering bathroom walls
If we consider the decoration of the walls of the toilet with wallpaper, we can say that this is the cheapest, fastest way to decorate the room. The main basic condition for such work is even, smooth walls. But there is one drawback - many wallpapers are very susceptible to a wet wall. If you choose wallpaper for finishing the toilet, then only moisture resistant or vinyl.

How to finish the ceiling of the toilet
Facing the ceiling of the bathroom is the second stage of repair work in this room. Everyone knows that the toilet is the place where you need to regularly perform wet cleaning. That is, the ideal solution for the top is a moisture-resistant ceiling. There are several options for finishing this place:
- Moisture resistant drywall;
- Plastic plates;
- Suspended structures made of aluminium.
Today, stretch ceilings are often chosen. This tool is very attractive. What is most interesting, spotlights can be installed in a similar design. This is a big plus for small spaces - the fact is that light from the lamps is reflected on shiny surfaces, thanks to which the space can be optically expanded.
An alternative solution that will tell you how to finish the toilet is to equip the ceiling with foam plastic decorative plates. However, you can just paint the surface in some pretty color. Shelves in the bathroom, made of PVC panels - a really good, practical solution.

Floor cladding
Processing the floor begins at the final stage of repair in the toilet. Of course, the best suggestion is to tile the floor in the bathroom. This method looks great, it is very easy to clean if you use certain cleaning products. On the floor, the tiles are selected taking into account some requirements, for example, it should be well combined with the coating that is on the walls. The design, which was carefully chosen for laying tiles on the floor surface, will make the toilet more voluminous visually.
The floor in the toilet is often exposed to temperature changes, and high humidity is also observed here. In the toilet (when compared with the bathroom), only waterproofing can be performed - it is usually applied not only to the floor, but also to the surface of the walls - at least 20 cm.
The ideal solution is tiles in the toilet, both for the floor and for the walls. But there are also more economical, practical options, for example, linoleum. To carry out the laying of this material, special skills are not needed; these floors are easy to equip on their own. If you want the toilet to have a film underfloor heating, you should definitely implement it - it will be very comfortable in the room. At the end of laying the floor, skirting boards are installed. What is also interesting is that various communications usually lie in the toilet: sewer, water pipes, and so on. It is important to make the finish so that all these elements are hidden from view. But access to them should always be - if necessary, special doors are mounted so that you can quickly get to one or another communication node. Boxes are often made of plastic or moisture-resistant drywall, it is also finished - usually the same material is chosen as for wall cladding. This is the only way to achieve the ultimate goal - a practical, comfortable, comfortable bathroom in the apartment.
Video: toilet finishing
We bring to your attention an excellent video - how to decorate the toilet with your own hands. After viewing, everyone will understand that such works are not too complicated, so it is not so important to seek help from specialists.
Do-it-yourself repairs in an apartment are always the pride of any home master. But what if there is absolutely no experience in construction and decoration?
In this case, it is better not to touch complex rooms, such as a living room or a kitchen, but you can work out, quite well, on the decoration of the toilet. Firstly, this is the smallest room in the apartment and there is not a wide variety of finishing materials. In addition, if in the end nothing happens, you can turn to specialists, and they will redo everything, without tangible damage to the wallet.

The most common material for finishing the toilet is plastic panels, and it's not just about the ease of installation, there are a number of advantages that speak in favor of this option:
- A wide variety of colors and patterns that are great for decorating the toilet.
- Ease of aftercare. Plastic panels are absolutely not afraid of water and detergents.
- Minimum financial costs for finishing work, even when taking into account all the necessary components.
- There is no need for a huge number of tools. Everything you need to finish the toilet with plastic panels can be found at any home master.
The choice of plastic panels for finishing the toilet

As is often the case, due to the high demand for plastic panels, many unscrupulous manufacturers have appeared on the market. It is very difficult to determine the quality of plastic by eye, and to the average buyer they all seem the same. But this is not so, and in order not to become a victim of scammers who save on the quality of their products, you need to follow a few simple tips:

The right choice of panels for the toilet is already 50 percent the key to a successful repair. It's much easier to spend an extra hour in the store than redoing all the decoration next year, or even earlier.
Important ! When buying plastic panels for finishing the toilet, you should always take two to three segments in stock.
If at the end of the repair it turns out that the initial calculations were incorrect, there may no longer be exactly the same panels in the store.
Preparation for the installation of plastic panels

A good master, any repair begins with preparatory work and making lists of everything you need. If this is not done, you may have to run to the hardware store more than once for the missing materials or tools. Often, this takes much more time than the entire renovation, especially when it comes to such a small room as a toilet.
List of necessary materials for finishing the toilet

- Plastic panels with a small margin.
- Decorative elements: corners, plinths. It is also necessary to take with a margin.
- Wooden beam with a thickness of not more than 2 cm. The quantity is determined based on the installation horizontally, with a distance of approximately 30-50 cm.
- Impregnation for wood, preventing rotting, and a brush for its application.
- Wall primer with antibacterial effect and roller for its application.
- Dowels with a diameter of 6 mm and a length of 60-80 mm.
- Staples for a construction stapler.
- Glue for plastic. It will be needed to install external decorative corners.
- Wood screws. Needed to finish the riser in the toilet with plastic panels.
- Plastic wrap or thick cloth to protect the plumbing in the toilet.
Advice ! No need to save on consumables such as screws or staples. Fasteners are never superfluous in the economy, and in finishing work, its lack can affect the service life of the entire repair.
List of necessary tools for finishing the toilet

- Perforator or drill with impact mode, as well as a drill for them, corresponding to the selected dowels.
- A hammer.
- Pencil, tape measure.
- Hacksaws for wood and plastic, or electric jigsaw.
- Sharp construction knife.
- Metal spatula. You will need to remove old paint from the walls, if any.
- Construction stapler.
- Level with horizontal and vertical indicators.
A warning ! you should not cut the bar and plastic panels with a grinder. As a result, a lot of acrid smoke is formed, which the neighbors can take for a fire, and then they will have to explain for a long time.
When both lists are collected and everything you need to finish the toilet is at hand, you can get to work.
Preparation of the base for plastic panels
The quality and durability of any finish largely depends on the preparation of the base. Unlike more complex rooms in an apartment, decorating a toilet does not take much time and effort, so each step needs to be given special attention. It's better to spend two extra hours today than to redo everything later.
First of all, it is necessary to completely clean the walls and ceiling in the toilet from old finishes or paint. This is done with a spatula and a light hammer, which tap the surface. Coating that has become unusable will immediately disappear.

Next, the bars are prepared. They must be cut to the desired length based on the horizontal fastening to the wall. When all the wooden elements are ready, they are treated with impregnations and taken out to dry on a balcony or stairwell.
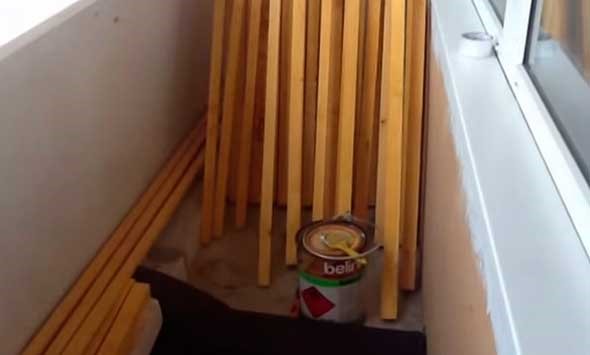
Important ! The size of the bars should be a few centimeters smaller than the toilet room. This is necessary so that the tree has the ability to expand.
In the meantime, the bars are drying, there is time to continue preparing the walls in the toilet for finishing. They need to be plentifully passed with a primer-antiseptic, it prevents the formation of mold and harmful fungus. Impregnation is done using a foam roller. It takes about an hour to dry completely, at room temperature, which means you can take a short break and take a breath.

Installation of wooden crates under plastic panels

When the walls in the toilet and the wood are completely dry, you can proceed with the fastening. First of all, a bar is fixed a couple of centimeters above the floor, around the entire perimeter of the toilet room. In the same way, a beam is passed under the ceiling.

If the ceiling in the toilet will also be finished with plastic panels, then the crate is also needed on it, the fastening technology is no different from the wall:
- The bar is applied to the surface, and a hole is drilled through the tree into the hay using a perforator. The first fastening should be about five cm from the edge. A dowel is driven into the hole. The second edge is attached in the same way. Now, when the bar is fixed, it is additionally strengthened, with a step of 30-50 cm between the dowels.
- When the bars around the perimeter of the toilet room are installed, using a tape measure, the distance between the lower and upper bar is measured. It is divided into two, and another bar is attached exactly in the middle of the wall.
- The resulting two sections are once again divided in half, and the timber is placed again. Do this until the distance between the guides is about 50 cm.
- Certain difficulties may arise with communications, which also need to be finished with plastic panels. To do this, boxes are made from the same bar as the crate, which are attached to the wall and floor of the toilet. You can connect the bars to each other with wood screws.
Advice ! if spotlights are planned as ceiling lighting in the toilet, the bar must be mounted below the ceiling, at least 15 cm. Do this with the help of profile fasteners.
For more details on how this is done, see the video.
Installation of plastic panels in the toilet
Before installing plastic panels, it is necessary to attach guide moldings to the corners of the toilet and to the ceiling.

All finishing strips are fastened with staplers to the bars
Do-it-yourself installation of plastic panels in the toilet always start from the left edge and ridge to the corner. With the help of a construction stapler, fastening brackets are driven into the corner groove and ridge on the other side of the panel.
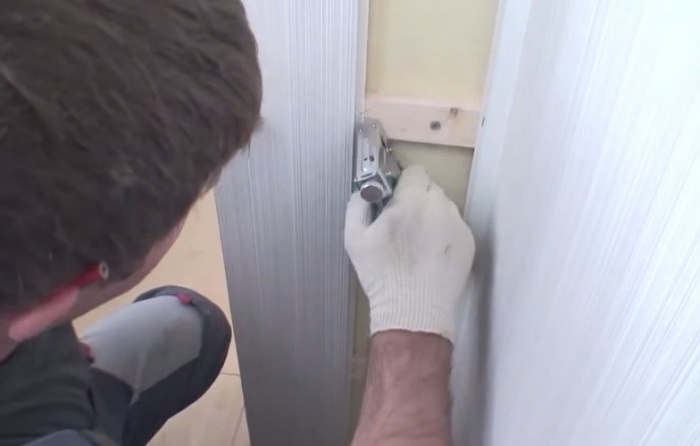
Important ! The first panel must be installed strictly according to the level. All other trim elements will be guided by it.
The second plastic panel is inserted into the groove of the first and its ridge is also fixed with staples on each wooden rail. All installation steps are clearly shown in the video
After the walls of the toilet are completely covered with panels, they finish the boxes that close the communications. Here, perhaps, each panel will have to be cut to length, subsequently these places will be closed with decorative corners.

In the same way, plastic panels are mounted on the ceiling of the toilet. But here it is important to immediately make holes in the places of the lamps, and bring out the electrical wires.
Installation of decorative elements on plastic panels
The easiest way is to use the outer corners in the decoration of the toilet, they are much more convenient to install and are not inferior in quality to those into which plastic panels must be inserted.

Glue for plastic is applied to the corner and applied to the junction of the panels. Good glue sets in a few seconds, so it is important to have time to glue the corner before it dries.
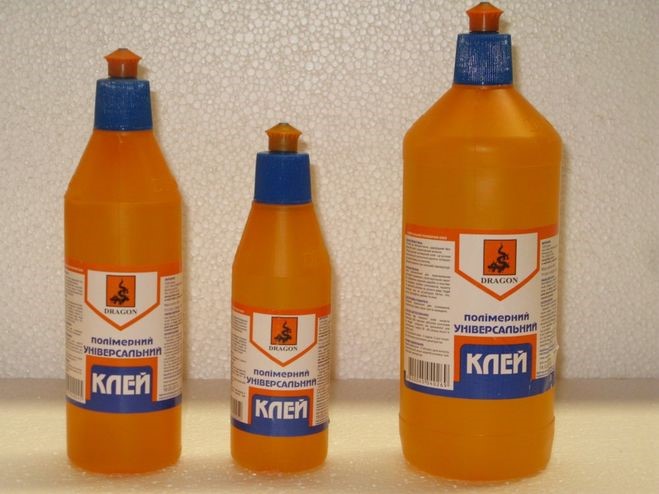
Using the same glue, floor and ceiling plinths are fixed. Possible excess glue is removed with a soft cloth, and on this, finishing the toilet with plastic panels with your own hands can be considered finished.
The matter remains for the installation of the necessary accessories and fixtures, but this is a topic for a separate discussion.
Conclusion
As you can see, there is nothing complicated in decorating a toilet with do-it-yourself panels. All stages of repair will take a maximum of two days. Even if this is the first independent repair in the apartment, it will allow you to gain invaluable experience, and perhaps the next step will be more complex premises that also require repair and decoration.

And in order to avoid the most common mistakes when repairing a bathroom, you can watch the video
Not a single family in our country and abroad could do without such an important event as repair. In any case, it is inevitable that it is necessary to carry out repair and finishing work, both in the bathroom and in the toilet. And here there is not such a wide spread in methods and materials, as, for example, in the living room or bedroom, but even a small separate toilet can be turned into a stylish and cozy place.
Plastic panels for bathroom and toilet walls
Many have heard about the wonderful and beautiful PVC panels that can be used both for the walls of a bathroom or bathroom, and for the ceiling, and some types of such panels can also be laid on the floor surface. It all depends on the personal wishes of the person and his material capabilities.
In today's market rich in building materials, you can find a wide range of types of plastic panels that can harmoniously decorate any bathroom and merge into the concept of almost any design.

Material types:
- Wall panels made of plastic, decorated with a decorative frieze;
- Sheet plastic panels of sheet type;
- PVC panels imitating wood;
- Photo panels;
- Plastic panels with a pattern applied by a laser;
- PVC panels with thermal printing.
Photo-panels - decorative panels with photo printing applied to them. They allow you to design wall panels with almost any image, whether it is a view of a fantasy world, a magnificent waterfall or the face of an unloved boss.
It all depends on the wishes of the customer and the ideas of the design specialist.
Each of these types of panels for finishing a toilet or bathroom can be used in an interior of any complexity and theme, whether it is a hint of a Victorian house, or an imitation of Provence or Art Nouveau style.
Option to finish the toilet with PVC panels: examples and photos
Despite the fact that many people have long seen what beauty can be done with plastic wall panels, what the most interesting and exclusive ideas can be brought to life, they still do not understand why friends or relatives gave their preference for just this type of panels, if there are many other materials, for example, MDF panels.

The whole secret lies in the advantages of PVC panels over other decorative wall materials:
- In the case of finishing the walls of the toilet with plastic panels, a person does not have such a question as a special preparation of the working surface of the walls. Panels can be mounted even on not the smoothest surface. This, as practice shows, allows you to save material resources, which usually go to additional work to level the walls. In addition, the panels allow you to hide defects and uneven walls.
- Lightweight plastic panels can be installed by one person, which is also a big plus, because in the bathroom or, especially, the toilet, there is not much space for several masters to turn around.
- PVC panels are an exclusively environmentally friendly finishing material. For all the time of its service, plastic under any temperature conditions remains safe for people and animals. A toilet finished with such wall panels does not rot, mold or fungus does not form on it even at the highest humidity, which makes the plastic material ideal for use in the bathroom.
- Finishing with such plates guarantees easy cleaning. Any housewife will confirm that this is a big plus when you don’t need to think about how best to carry out wet cleaning in a particular room.
- Ease of installation allows installation even for a novice master.
- Excellent looking material. Any picture can be displayed on the panels. It all looks beautiful and impressive.
- Long service life. With proper care, plastic panels can last for many decades.
- Wall cladding with PVC panels is quite cheap due to the availability of prices for the material itself.
All these advantages of plastic panels allow them to become an increasingly popular and popular material for use in the interior of a toilet or bathroom. And yet, as practice shows, there can be no pluses alone. PVC wall panels have a minus - they can be quite fragile, and break through if you lean on them or throw something heavy or sharp at the wall.
The use of panels in the toilet: photos and decor methods
Design solutions of specialists may involve the use of plastic panels on completely different surfaces and planes. By themselves, plastic panels, depending on the thickness and maximum load, can be installed on different surfaces.

Namely:
- On the walls. The classic use of plastic panels. Here, the choice of the type and quality of the material depends only on the wishes of the person himself, the idea of the designer or the amount of available funds.
- On the ceiling. Often used to visually enlarge the space. For example, with the help of panels, you can turn the ceiling into a sunny clear sky, or a starry night sky. A ceiling sheathed in this way in a large toilet can make the human brain perceive the bathroom on a larger scale.
- On the floor. The floor version of the panels is not used so often, but is also quite popular. With the help of panels, you can make the bottom of the ocean out of an ordinary boring toilet floor or simply space floor, that is, everything your soul desires.
In addition, it is worth mentioning that at this stage in the market of building and finishing materials there is an extensive selection of panel colors for any purpose. You can find red, black, white panels, colorful or with drawings.
Panels using photo printing are very popular.
For example, this method can allow you to recreate in the bathroom or toilet the atmosphere of being on a paradise island or in outer space or the ocean, where you will create a complete feeling that the owner is among exotic fish, especially if the walls, floor, and ceiling are made in the same style.
Repair in the toilet with plastic panels: photos and examples
When the choice is made according to the place of installation of the panels, their appearance, colors and all the nuances are clarified, the question arises before the person “how to install plastic panels?”. There are the following options - contact a finishing work specialist, pay him a certain amount and enjoy the work done, or do everything yourself. The latter option is more economical, besides, if you make repairs with your own hands, it will be much more pleasant.
If you decide to carry out extensive installation yourself, then you first need to decide on the type and features of installation work with plastic tiles. If self-adhesive PVC tiles are used, then the work will not take much time. It will be necessary to remove the protective layer and glue the finishing material to the surface. It should be understood that in this case it is better to glue on a flat surface. Installation with glue - the back surface of the tile is treated with a thin layer of glue. Then it is glued to the surface of the wall of the bathroom or toilet. Installation work using crates - in this case, a perfectly smooth surface is not required. A plastic or metal batten system is attached to the wall, to which plastic panels are subsequently glued. Tiles and panels are fixed with adhesive solutions.
Finishing the toilet with plastic panels: design (video)
Someone prefers to make repairs all at once in the whole house or apartment at the same time, someone prefers a leisurely gradual repair, when you are first busy with one room in your home, then another, and gradually the whole house is repaired, but having done everything according to your ideas, turns out very nice.
When choosing a cladding for the walls and ceiling of the toilet, one has to be guided by considerations not only of aesthetics, but also of hygiene: ideally, the coating should be smooth and easy to clean. Accordingly, moisture resistance is also required.
Today, in addition to expensive ceramic tiles, only PVC plastic panels for the toilet satisfy these requirements.
As for the ceiling, here they generally act as the only truly acceptable cladding option. Let's see how the toilet is finished with plastic panels (PVC plastic) and how to choose the right material.
Cladding with plastic panels can be done in two ways:
- The material is glued to the wall and ceiling like ceramic tiles. In this case, the room almost does not lose in volume, but you can resort to this method only with perfectly flat surfaces. Tile glue or "liquid nails" are used.
- The panels are attached to the frame. A method in demand for uneven walls. The cladding will turn out to be perfectly even without laborious “wet” processes - plastering, puttying, etc. But the volume of the room will decrease more than in the first version.

Toilet is paneled
We will consider the option with the frame - as more complex.
Preparation for finishing work
So, there is no need to align the walls and ceiling. However, you still have to do some work in advance. Let's consider them all in order.
Taking measurements
First of all, you need to find out what and how much you need to purchase to complete the cladding. Let's go through the list:
PVC panels
The amount of the base material is determined quite simply: the area of the walls and ceiling to be finished is calculated, after which a margin of 15% is added to the result. It is imperative to provide for a margin: some of the panels will go to waste when trimmed, some of them may be damaged.

Ready repair with plastic panels
It would seem that the missing elements, in which case, could be bought in addition, but there is one thing: parts from another batch will most likely have a slightly different shade in comparison with those already purchased. Therefore, everything must be bought in one approach in a known sufficient quantity.
Profiles
These are additional elements with which the corners and edges of the finish are formed. There are several varieties:
- Starting bar: frames the finish in the place where it adjoins the unfinished surface, and forms an internal corner with it.
- Ceiling plinth: this is the same starting bar, only having a more interesting shape. Used for framing ceiling cladding.
- F profile: frames the edge of the finish in the place where it adjoins the unlined surface, and forms an outer corner with it.
- Corner: is external, internal and universal. This detail forms the joint of two lined surfaces.
- H profile: used for lengthening short panels.

Accessories for plastic panels
In general, the total length of the ceiling plinth is equal to the perimeter of the toilet ceiling. You will need an internal corner, the total length is equal to the height of the room multiplied by 4. Other details must be selected according to the situation.
frame details
The frame for the installation of plastic panels is assembled both from profiles specially designed for them, and from profiles for the installation of plasterboard structures. In the first case, structural elements can be made on the profiles, to which plastic panels are snapped - then they will not need to be screwed with self-tapping screws.
When assembling the frame, two types of elements are used:
- Guide profile (U-shaped): is screwed around the perimeter of the surface to be trimmed and serves to fasten fittings (starting bar or corner) and intermediate frame profiles.
- Rack profile (C-shaped): the same intermediate elements are made from it, which are installed with equal pitch over the entire surface and to which plastic panels will be screwed.
The required number of rack profiles is taken on the basis that they will be fastened in increments of 50 - 60 cm.
Hangers
Used for ceiling lining. The hangers are screwed to the ceiling, after which intermediate frame profiles are attached to them. It is impossible to fasten the profiles directly to the ceiling - there will be no place behind the cladding for installing built-in lamps.
Suspensions are installed along each intermediate profile with a step of 45 - 50 cm.
Dowels and screws

- Dowels. With their help, suspensions and frame profiles are screwed to capital structures. We calculate the quantity based on the installation step of 40 - 50 cm.
- Self-tapping screws 15 - 20 mm long. With their help, the panels are screwed to the frame. The optimal pitch is specified by the panel manufacturer.
The choice of material for construction
First of all, you need to know that plastic panels are divided into two types:
- Wall: they are distinguished by increased strength and cost accordingly.
- Ceiling: they are less durable, since it is almost impossible to damage the lining on the ceiling by negligence. They are cheaper than wall tiles.
The panels also vary in size. In a small room, narrow panels should be used, which are called slats or plastic lining. If you do the opposite and apply large details, then the toilet will seem very small and cramped.

The walls of the toilet are finished with PVC
Those who pay special attention to design will surely find it interesting to install special decorative inserts between the panels.
An important issue is the quality of the panels. Here's what to look out for:
- Stiffeners inside the product should be located as often as possible.
- The front side must be absolutely smooth. If stiffening ribs are guessed under it, you have a low-quality material in front of you.
- The thicker the plastic, the better. Please note: this is not about the thickness of the panel as a whole, but about the thickness of all its components - outer sheets and inner ribs. To check, you need to squeeze the panel with two fingers. If the ribs are bent at the same time, and dents remain on the surface, it is better to refuse to buy this brand.
- Plastic should not be brittle, for which special additives are added to it. Manufacturers of cheap species tend to save on such an additive. Bend the strip at the edge of the panel that is used to snap the adjacent piece. If a dent remains in the bend area, and even more so if the plastic is cracked, it is clearly of poor quality.
- Discard material with a strong odor immediately. It indicates that plastic is gassing, that is, it emits volatile substances that adversely affect health.
- The appearance of the panels must be impeccable: the color is uniform, the pattern is clearly printed.
If in any doubt, do not hesitate to ask for a certificate.
Required Tools
In addition to the finishing material for work, you need to prepare the following:

- plumb;
- level: it is desirable to have both bubble and water;
- perforator or impact drill;
- screwdriver or screwdriver;
- hacksaw or jigsaw;
- metal scissors;
- roulette;
- roller and brush;
- spool of kapron threads;
Stock up on a marker or pencil.
Surface preparation for finishing
The purpose of this stage is to prevent the development of mold and mildew on the surfaces hidden under the lining.
Here's what to do:
- Old finishes that may present a potential hazard are removed. This concept refers to any wallpaper, areas of painted surfaces on which the paint has peeled off. If the wallpaper is still holding tightly, they need to be soaked with warm water (it is convenient to do this with a roller), after which it will be quite easy to remove them.
- Next, an antiseptic primer is applied to the surface with a roller.
Sheathing
How to sheathe (finish) the toilet with plastic panels?

Finishing is mounted as follows:
- The frame is installed first. To clad the ceiling on the walls around the entire perimeter, a guide profile is screwed, stepping back from the ceiling the required distance. These elements must be in the same horizontal plane, so the markings for them must be applied using a water level.
- Next, nylon threads are pulled between the guide profiles to indicate the horizontal plane, and then, guided by them, intermediate profiles are installed on hangers.
- When finishing the wall, you first need to designate a vertical plane with the help of nylon threads, for which a plumb line is used. Next, segments of the rack profile are screwed to the wall, so that their faces lie in the designated plane. In places where the wall surface has deflections, linings must be installed under the profile.
- Next, starting strips are attached to the frame (for wall cladding) or ceiling plinths (for the ceiling).
- Having freed the first plastic panel from the protective film and cut it to length, it is brought on one side under the starting profile and screwed to the frame with self-tapping screws.
- The rest of the panels are installed in the same way. Luminaires must be installed and checked during installation, so that later, if the lighting system does not work, you do not have to disassemble the ceiling.
- The last panel is also cut in width, after which a starting profile is put on it on one side. The panel must be cut along the length so that it can be inserted end-to-end into the starting profiles without bending. Next, the guide profile is lubricated with “liquid nails” glue, the last panel is put in place, snapped to the previous one, and the starting profile put on it is glued to the frame guide profile.

An example of finishing a toilet with do-it-yourself plastic panels
Before cutting each panel to the correct length, check the actual dimension between the profiles at the location where it will be installed.
Related video