How the rafters are placed. Important metrics to consider
During the construction of private houses, the roof is most often made gable. There are reasons for this. First, it is reliable. Handles wind and snow loads well. The second - it is compatible with any roofing. The third is relatively inexpensive. The fourth is a simple design that is difficult to spoil. Fifth - it looks attractive. All this, and also the fact that a do-it-yourself gable roof is built without special knowledge, determines its popularity.
Do-it-yourself assembled gable roof ready for installation of roofing
Step-by-step installation of a gable roof
As you saw above, there are a lot of truss systems. Accordingly, when assembling each has its own characteristics, but in general order same. It is necessary to say about the general step: pre-drying and processing of wood. This step is required if you bought fresh lumber, not dried.
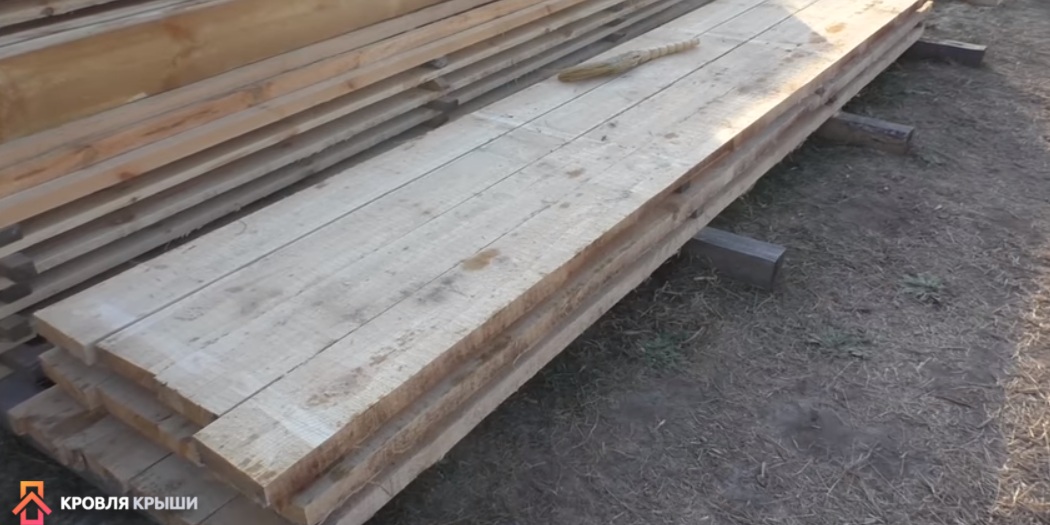
The use of raw wood in the construction of the roof natural humidity will lead to problems: the beams will bend, they will dry out, the geometry will change. All this will lead to stress points and at the slightest sign of overload (lots of snow, strong wind or rain) negative processes. Their elimination is a complex and costly undertaking. Therefore, either buy dry wood (no more than 20%, ideally chamber drying 8-12%), or buy material for a couple of months, put it in ventilated piles. After that, treat with the necessary impregnations (from fungal attack and to reduce flammability) and only after that use in installation truss system.

Timber must be dried in ventilated stacks. To do this, they are laid in short pieces of boards. They are placed a meter from the edges and further through the meter. Spacers must be installed under the bottom
About the main stages of assembly, about how to make gable roof we will tell you in this section.
Mauerlat
The assembly of the gable roof truss system begins with the installation of the Mauerlat. It must be set strictly horizontally, therefore, before starting installation, the horizontalness of the wall to which it is attached is carefully checked, if necessary, it is leveled cement mortar. You can continue work after the solution gains 50% strength.
Depending on the system, this is a beam with a section of 150 * 150 mm or a board with dimensions of 50 * 150 mm. It is attached to top row wall masonry. If the house is wooden, its role is played by the upper crown. If the walls are made of light building blocks - foam concrete or aerated concrete and others - their rigidity is not enough to redistribute the load. In this case, a reinforced concrete belt is made over the last row of masonry, into which embedded fasteners are embedded - wire or studs. A bar or board is then mounted on them.

There are several ways to connect walls and Mauerlat:
- In the masonry (in the reinforced concrete belt) a smooth rolled wire of large diameter is fixed (two ends stick up). The board is then rendered in necessary places holes through which the wire is threaded. She then twists and bends.
- Studs with a diameter of at least 12 mm are immured in the wall. Under them, holes are made in the Mauerlat, a beam / board is placed) and tightened with nuts with wide washers.
- Having aligned the beam or board along the outer or inner edge of the wall, they take a drill with a diameter of 12 mm to make holes for the anchor bolts. They (the same diameter of 12 mm) are hammered to the very hat, then tightened with a key.
The distance between the studs (wire) should not be more than 120 cm. Cut-off waterproofing must be laid on the wall (belt) under the Mauerlat. It can be rolled roofing felt or hydroisol in two layers, it can be smeared with bituminous mastic.
Rafter installation
There are more than a dozen types of gable roof truss systems. First of all, you need to choose what yours will look like. Further, in order to make it easier to work, a template is made from thin boards for all cuts, cuts and other similar details. To do this, you may need to assemble the first form on the roof, and then make templates for the finished one.

The assembly order depends on the type of truss system. If the rafters are layered, they are installed gradually, assembling from the elements directly on the roof. In this case, it is convenient if the beams of the ceiling are laid and, if possible, the draft flooring of the attic or attic.
In systems with hanging rafters, a farm is assembled on the ground - a ready-made triangle of puffs and rafter legs with all the required struts, racks. The required number of farms is assembled at once. Then they are lifted to the roof, placed vertically there and attached to the Mauerlat.
On the one hand, this is convenient - it is easier to work on the ground, with a high assembly speed, the accuracy is high: one farm is not much different from the other, which simplifies the procedure. But raise finished trusses can be difficult, especially for large buildings. To make this easier, two inclined boards are installed, which at one end rest against the ground, and the other sticks out a little above the wall. Farms are brought closer to this “lift”, one by one they are installed below, ropes are tied and pulled along the boards to the roof. In the absence of a winch or crane, this is the most acceptable method.
The assembly of rafters requires certain knowledge: how and in what order to mount them, how to mark and make cuts. See the video for the assembly of one of the schemes with a headstock.
Assembly order of the truss system

All, gable roof hand-assembled and ready for installation of roofing material.
The process of installing the rafters itself raises enough questions, but there are many ways and it is impossible to tell about them all. See one of them in the video. The system is large and went up to the roof in parts, and there it was already going to single structure. For big houses it's comfortable.
Features of the installation of the truss system of a wooden house
difference wooden houses consists in the fact that the frame shrinks, and this leads to a change in the geometry of the truss system. If the elements are fixed rigidly, the roof may fall apart. Therefore, the mounts are made floating. There are special sliding mounts, with which in this case the rafters are attached to the upper crown and to the runs, if any (see photo).

In order for the rafter to move freely during shrinkage, its long part is fixed strictly parallel to its edge, and the support is placed strictly perpendicular. If necessary, a platform is cut out under it. Mark the mount so that the hook is in the lowest position or near it. They are mounted on special self-tapping screws that come with the kit (ordinary ones do not fit). If the installation is done on a log, so that the rafter leg does not slip along it, a semicircular hole is cut out in the lower part, on which it will rest.
Such fasteners are sold on any construction market, it is called "slippery". How to attach the slippery to the beam, see the video.
Video on assembling and installing a gable roof truss system
Building a gable roof with your own hands is not easy: there are a lot of subtleties and nuances, there are different ways fixings, extensions. Describing them in words is a thankless task. This is the case when it is better to see. Below is a selection of videos that you might find helpful.
Video report on how a gable roof is made
The story of the owner of the house about the stages of construction. There are interesting technical points that may be useful.
Two types of rafter connection: rigid and sliding
Video about the two most problematic types of connections.
How to determine the angle of the rafters
Full video report on the assembly of the truss system
This movie is just under an hour long, but the entire process is shown from start to finish with plenty of detail. The roof is placed on, but when installed on buildings of a different type (except for wooden houses), there is no difference.
The most responsible and difficult stage is the installation of the truss system. The operation of the roof is associated with constant and periodic loads in the form of snow or gusts of wind.
To figure out how to make a truss system with your own hands, you need to decide on its components. truss frame used for any type of roof, it differs in the level of complexity during installation. Shed and gable roofs are considered simple designs. Hip or hipped roofs provide a reliable roof, but are difficult to calculate and install rafters.
When choosing the size of the material for the frame, there are many factors to consider. The cross section of the rafters and bearing base must withstand the weight of the roof, climatic loads, the mass of appliances installed on the roof (if any).
Main elements
For the skeleton gable roof the following elements are required:
- Mauerlat - a beam of significant size 150 × 150 mm or 200 × 200 mm, which is laid and fixed along the perimeter of the walls. It connects the truss system and the building structure in overall structure, distributes the load exerted on the walls.
- Ridge - the highest point of the roof, at which they are connected rafter legs. The longitudinal beam helps to hold the structure, provides stability under wind loads.
- Rafters - made of boards with a section of 70 × 150 mm, they bear the entire load. Rafter legs are created from the boards, which are attached in increments of at least 60 cm.
- Lying - a beam that is parallel to the ridge. Its dimensions are equal to Mauerlat. The bed is a support for racks and other elements.
- Puffs - crossbars from boards connecting the rafter leg.
- Racks - bars installed vertically, they are installed to support the ridge run.
- Overhangs - parts of the rafters protruding beyond the border of the walls. They allow rainfall to be removed from the house.
- Struts - serve to strengthen the rafters, allow you to create durable structures.
- Sheathing - boards necessary for tying rafters and laying roofing material.
- Filly - when the length of the rafters is not enough for the overhang, fill the additional "filly" boards.
Varieties of truss systems

Several types of truss systems are used to construct a gable roof frame.
Layered - the choice of this design implies the presence of a support in the form of a wall in the center of the building. They receive three points of support and experience only bending load. Top part the rafter leg rests on the girder, and the lower one on the Mauerlat. This system allows the use of thinner lumber, lower costs and lighter construction.
Hanging - rafter legs rest only on the walls, therefore they experience a large load. To give strength, they are connected by tightening. Such rafters are usually assembled at the bottom and fed straight for installation.
Complex roof shapes require non-standard solutions, for them combinations of hanging and layered rafters are used.
When installing a hipped roof, the basis of the frame is the diagonal rafters connecting ridge run and building corners. They are supported by sprigs - short rafters, which, together with ordinary side rafters, form the basis of the roof slope.
Material preparation

The service life of the roof structure depends on the quality of the lumber and its processing. For structural elements, it is necessary to select dry wood, with a moisture level below 22%. It should be smooth and without knots. Before installation, all parts are treated with two layers of antiseptic and flame retardant. When processing, it is worth using a brush, not a spray, then the composition is better absorbed. When choosing lumber, preference is given to wood conifers.
Fastening

The stability of the structure will ensure the competent installation of the truss system with your own hands. To connect the rafters use different kinds fasteners: staples, nails, shaped steel parts - corners and platinum, which are screwed with self-tapping screws.
Rafter section

The dimensions of the timber used for rafters are influenced by:
- span size;
- the impact of climatic features;
- the angle of the slope and the step of attaching the rafter legs.
The constant load is calculated from the total weight of the roofing material, insulation and waterproofing. With an increase in the distance between the rafters, a larger section of material is required. The coefficient of wind and snow load must be included in the calculation of the cross section. Common rafter sizes are 50x150mm and 60x200mm.
Rafter length

The base of a symmetrical gable roof is an isosceles triangle. Knowing the height of the ridge, you can calculate the length of the rafter using the Pythagorean theorem. In this case, it is the hypotenuse, and half the width of the lady and the height of the roof are the legs.
Rafter installation

The first step in the installation of the truss system for any type of roof is the laying and fastening of the Mauerlat. Under it, waterproofing in the form of roofing material is necessarily laid. This beam requires drilling holes along the length, into which the studs embedded in the masonry are inserted and tightened with a nut.

Having created the basis for the frame, a template is made according to which all the rafter legs are assembled on the ground for hanging system. To create a sample, take two thin boards equal in length to the rafter and fasten at the ends with a nail. This workpiece is set to the width of the run, and the resulting angle is fixed by pieces of the board.
A second template is used to mark the mounting cuts at the top and bottom of the rafters. Its basis is plywood. When assembling the legs, you need to strictly follow the template so that you do not have to redo the design. The upper part of the rafters is connected by a wooden or metal plate.
If the assembled roof trusses are of considerable weight, you will have to use lifting equipment or devices.
The first pair of rafters is installed on opposite gables. It is fixed with temporary struts and set according to the level. A cord is stretched between the legs, as a guide for installing the rest roof trusses. The structure is connected by crossbars, struts and supports.
With a small span, the rafters are not fastened with a ridge run. A roof with a width of more than five meters requires strengthening the structure with a ridge beam. This beam is attached both under the rafters and above them. The connection occurs with a gash and plates. With a large length of rafters are installed support posts preventing sagging.

The completion of the installation of the truss system will be the fastening of the crate.
To know how to properly perform the truss structure, you can watch a video that tells about the stages of work.
Video
1.
2.
3.
4.
5.
6.
The roof has great importance for the integrity of the whole house. Therefore, many are interested in how to properly assemble the rafter system so that it is reliable and does not have to be repaired soon. There are many types of roofs, some of them can be seen in the photo, but the most popular are shed and gable structures. Let's figure out how to make the truss system correctly.
Roof types
Before moving on to how to make a truss system, you need to figure out what the common types of roofs are.
Shed roof - the simplest, even a person who does not have much experience in construction can handle its creation. However, this type of roofing is mainly used in the construction of outbuildings. For residential buildings, gable or mansard (broken) roofs are usually made. These designs are more complex, but you can easily deal with them on your own if you know how to make gable roof rafters and follow all the recommendations of specialists (read: "").
The most reliable roofs are hip ones, they can withstand even huge loads. They are recommended to be done in those regions where there is a lot of snow and often blow strong winds. But their design is also very complex, so it is better to entrust their construction to professionals.
A hipped (four-pitched) roof is used in the construction of square buildings; in its design, it is a kind of hip roof.
The most complex roof is a cross. In its construction, complex structural elements- valleys (grooves). These diagonal auxiliary rafters are installed as additional elements. During the construction of such complicated roof haste is unacceptable. Most of the snow accumulates in the area of the grooves, and the reliability of the roof depends on how to make rafters in these places.
Each type of roof consists of rafters and roofing. The rafters are the load-bearing part of the roof, and the roof surface is the enclosing part.
Types of rafters
Before you put the rafters, you need to find out about them design features and decide on the installation option.
There are two types of rafters: layered and hanging .
hanging rafters - This inclined beams mounted on supports with different heights. Support can be the outer walls of the house (in the case shed roof) or both internal and external walls (with a gable roof). Rafter legs do not have to be laid in the same plane opposite the slopes. They can be mounted alternately on the ridge run. Alternate laying of rafters in the ridge area makes it possible to create a truss truss. To this end, all parts are interconnected into a single rigid structure.
Materials for rafters
As for the rafters from the boards, they are not heavy, and they are convenient to install. You can easily work with this material on your own without resorting to outside help. Many experts do not advise making connections with nails - it is better to use self-tapping screws. If the work will be carried out with the help of nails, do not forget about the lining and liners.
As for how to build a truss system, it is better to use cuttings to connect racks with a run or a bed.
Do-it-yourself installation of the truss system, in detail on the video:
Rafter system connection options
The rafter system can be connected in three ways:
- struts;
- racks;
- at the same time struts and racks.
How to properly make the rafters depends on the span between the outer walls. A beam of 10x10 centimeters is used to create a ridge run. Lezhen and Mauerlat can be made from logs, hewn them into two edges, or by taking a beam of 10x10 centimeters.
When making ridge knot it is necessary to nail special clamps made of steel strip to the Mauerlat and run with large nails, taking into account. You can not use steel clamps, but then you need twists of thick wire with a diameter of 6 millimeters.
Regarding how to make a brick or stone house, then a Mauerlat must be laid on the masonry. For its reliable fastening, it is recommended to place a piece of log or timber about 50 centimeters under each rafter leg. Then they are attached with clamps to metal hooks that were previously installed 30 centimeters below the Mauerlat.

Many people have a question about how to make rafters on the roof of wooden houses. rafters in wooden buildings laid on the top crown of the wall. A plank truss truss can be created using a crossbar or with spans (6-8 centimeters). Its structural elements are equipped in the following way. Make a single puff with the help of boards, the thickness of which is equal to the thickness of the rafters. For double tightening, thinner boards are used (thickness from 40 millimeters). For the crossbar and overlays, 30 mm parts are taken.
How to determine the cross section of the rafters
Before you properly lay the rafters, you need to decide on their cross section.
This setting depends on:
- span dimensions;
- expected load (wind force, weight of snow cover and roofing material);
- step and angle of installation of rafters (roof slope).
There is a dependence of the cross section of the rafters on the length of the rafter leg.
It is expressed as follows:
- with a step of 300 centimeters, bars with a section of 10x12 centimeters or boards with a section of 6x14, 8x14 or 4x18 centimeters are used;
- with a step of 400 centimeters, bars with a section of 10x16 centimeters or boards with a section of 6x20, 8x20 centimeters are used;
- with a step of 500 centimeters, bars with a section of 10x20 centimeters or boards with a section of 8x22 centimeters are used.
").Roofing must be selected taking into account the slope of the roof. Also, the choice of material for the roof depends on financial capabilities. The greater the angle of the roof slope, the more funds will be required to create the roof - this is due to the increased consumption of materials. However, steep roofs are better rain water and snow, so they are more reliable and will last longer. But considering huge selection roofing materials on the market, there will be no problems with this.
Creating a truss system for a bath
As for how to make rafters for a bath, it is better to choose a gable roof - then there will be an attic in the building, which can be used to store brooms and other bath accessories (read: ""). Thus, it is desirable to create a truss system for a gable roof, it is easier and more practical.
The construction of a truss system is a rather complicated and responsible business. However, it can be done independently if you follow certain rules.
This article will talk about the elements roof structure, as well as how to put rafters on the roof.
Before you put the rafters on a gable roof, you need to find out what elements the roof structure consists of. It consists of:

- Mauerlat. This is a beam rigidly fixed along the load-bearing walls of the building. For its manufacture, as a rule, a bar with a section of 15 by 15 centimeters is used. serves as the bottom, and also evenly distributes the load created by the roof structure on the walls of the building. Between bearing wall and Mauerlat beam should be located waterproofing material, for example, roofing material. If the roof frame is made of metal, channels or I-beams are used as Mauerlat.
- Rafter legs. are the main element roof frame. Their size is taken in accordance with the design calculations. The lower parts are based on the Mauerlat beam, and the upper ones on ridge beam. For their manufacture, regardless of the type of structure being erected, it is recommended to use pine board section 150 by 50 mm or 200 by 50 millimeters.
- Run. It is a horizontally located beam that perpendicularly crosses the rafter legs along the entire length of the roof. There are three types of runs in the truss structure: side, ridge and Mauerlat.
- Sill. It is a horizontal bar that is mounted on an internal load-bearing wall. This element serves as a support for the racks and evenly distributes the load they create. Beds install complex truss systems. In other words, this roof element is optional and is applied where necessary.
- Puff. It is an element of a hanging rafter system. The puff forms a triangular truss with rafter legs. This element reduces the expansion force created by the hanging rafters on the walls of the building. The location of the tightening depends on the type of roof structure being erected.
- Rigel. This element, like the puff, connects the rafters. The crossbar makes the structure more durable and stable. For its manufacture, a bar with a section of 10 by 15 centimeters is usually used. On the crossbar, in contrast to the tightening, there is a compressive load, and not a tensile one.
- Racks. It is a bar installed vertically. It is used if the width of the building is large enough. This element strengthens the truss system from the inside. Runs supported by struts are installed on the racks.
- Struts. They are inclined beams supporting horizontal elements. Struts reinforce the structure of the truss and counteract the distortion and compression of the roof structure.
- Roof overhang. This is part of the rafter legs protruding beyond external walls buildings by about 40 centimeters. The overhang protects the outer walls of the building from rain and melt water rolling down from the roof.
- Filly. It is a piece of board. Used to lengthen the lower part of the rafter leg.
Tools and materials
The roof structure should be made of coniferous wood. The moisture content of the wood used should be less than two percent. Before use, the material must be treated with special protective equipment.
For the manufacture of hanging rafters and puffs are made of wood of the first grade. Rafter legs are made of wood of the first and second grade. It is possible to use a tree of the third grade only for the manufacture of struts and racks.
The strength of the roof structure depends on:
- Reliability of connections;
- The quality of the material used;
- Correctness of the performed calculations.

Before you put the rafters on the roof, you need to prepare the following tools and materials:
- Axe;
- A hammer;
- Level;
- fasteners;
- waterproofing material;
- boards;
- Pencil;
- Chainsaw;
- Electric drill;
- A set of drills for an electric drill;
- Nails or screws;
- Roulette;
- Cord.
For the manufacture of stops, a bar or edged board. Wood elements should be treated with bio-protective and fire-retardant materials.
Before installation, it is necessary to choose the type of ridge connection and the method of fixing the rafters to the beams or mauerlat.
Calculation of the pitch of the rafters
This issue must be given special attention, because the strength of the roofing system depends on their cross section.
When calculating the distance between the rafters, the permanent and temporary loads on the roof being erected should be taken into account. The following elements create a constant load:
- roofing material;
- rafter system;
- roofing pie (vapor barrier, insulation, waterproofing);
- elements of decoration of the attic or residential attic.
- the weight of a worker performing roof repairs or maintenance.

To perform calculations (section and step of the rafter legs), theoretical knowledge is required, as well as practical skills. You can determine the approximate parameters of the roof structure using the following table:
When choosing a rafter pitch, it is necessary to take into account the type thermal insulation material. It is important to remember that the span between adjacent rafters should be 10 - 15 millimeters less than the width of the cotton insulation.
Also, when choosing the distance between the rafters, it is necessary to take into account the recommendations for laying the selected roofing material.
Types of truss system
There are two types of rafters: hanging and layered. Each type will be considered separately.
hanging
Hanging truss systems are used in cases where there are no internal supports (columns, walls) in the house. This design is supported by external retaining walls.

In this case, the rafters work in compression and bending. exert a bursting force on the outer walls of the house. To reduce it, use a puff.
The brace is made from wooden beam or metal. Its location depends on the design of the roof being built.
For example, when building a roof attic type the puff is located at the base. In this case, it performs the functions of a floor beam. The higher the puff is located, the greater the load on it.
A hanging truss structure is used if the distance between the supports is less than 6.5 meters. For the manufacture of these rafters, boards, logs, or timber are used. To connect elements to each other, use:
- steel profiles;
- cuts;
- bolts;
- nails;
- pins.
Rafters
Rafters of this type are used in buildings with capital inner wall. These elements are usually made of wood.

The internal elements (column, wall) serve as a support for the layered truss system. This is their main difference from the rafters of the layered type.
rafters of this type work only for bending. Layered roof structures compared to hanging ones, they are more cost-effective and lighter.
How to put rafters on the roof
Installation of gable roof rafters consists of the following steps:
- Making a truss truss template. It is necessary to lift two boards on ceiling, and then connect them together from one edge with nails. Next, you need to install the free ends of the boards on support beam and fix the angle between the boards. To do this, you need to nail the transverse jumper. Then you need to lower the resulting template onto the support beam and mark the angle of trimming the rafter legs with a pencil. It should be noted that the strength and reliability of the entire roof structure will depend on the quality of the template made.
- Lower the made template down and start making rafters. The template must be well fastened so that when it is lowered, the angle between the rafters is not disturbed. The first manufactured truss truss is lifted onto the building and installed on the base.
- Mark the cut point on the Mauerlat and rafter legs and cut with a chainsaw. Next, you need to start assembling the next truss truss.
- Install the first two roof trusses on the Mauerlat beam along the edges of the building. The rafters installed along the edge of the Mauerlat beam are fixed on both sides with the help of props. Then pull a cord between them to determine the level. Rafter trusses must be installed perpendicular to the base of the ceiling.
- It is necessary to assemble the remaining roof trusses after the level is set and all fasteners are checked. The rafters will not move if two boards are hammered between them. Next, you need to fix the cross bars and supports.
- Perform installation of a vapor barrier, heat-insulating and waterproofing layer. Roofing material is attached to the crate. Its step depends on the chosen material for the roof.
This video shows how to put the rafters on the roof:
The roof is a complex and important architectural element of any building. Its construction should be treated with special attention, it must be remembered that the installation of the truss system requires considerable experience in performing such work and a special tool. It is not worth taking on the creation of a roof for those who hold a carpentry and measuring tool in their hands for the first time - the results of the activity can be very negative.
There are two types of roofs, depending on the number and placement of rafter support points, but each developer can, at his own discretion, slightly change the specific design of the truss system. This takes into account the operating conditions of the building, the purpose of the attic space, the climatic zone of location, the technical parameters of lumber and roofing. Of course, the appearance of the truss system is influenced personal experience and developer preferences.
Before proceeding with the manufacture of rafters, you should decide on their type, method of attachment and linear dimensions. Only in this case, you can be sure of the strength and safety of the structure.
How do they influence various factors on the parameters of the rafters?
| physical factor | Brief description of the influence on the parameters of the rafters |
|---|---|
| Rafters must withstand snow and wind loads. During calculations, you need to take from the tables building codes and rules for the actual maximum values of snow cover, take into account the strength and rose of the winds. The data allows you to find out the total load on the roof slope, depending on its area and angle of inclination. Further, it is already possible to determine the dimensions of the rafters, their number and step. In this case, a safety factor is necessarily laid down. The fact is that lumber does not have stable and the same values strength, too many unforeseen factors affect these indicators. For most cases, 50 × 150 mm or 50 × 200 mm boards are used for the manufacture of rafter legs. |
| Gable roofs can be layered and hanging. For hanging roofs, you need to make rafters from more durable boards. This takes into account the method of fixing the elements to the Mauerlat. If a cut is made, then the width of the boards should increase by the size of the cut. The fact is that the cut in this place automatically reduces the width of the material that receives the load. If a cross cut 60 mm long is made on a board with a thickness of 200 mm, then only the remaining width of 140 mm is taken into account. Accordingly, if rafters from 200 mm boards are selected when calculating loads, but unforeseen cuts of 60 mm are made during fastening, then the width of the blanks for rafters increases to 260 mm. This remark is made for those who like to abuse various notches and cuts for the thrust areas of the ends of the rafters. There are currently many special devices, allowing you to firmly fix the rafter in the desired position without sawing. |
| For residential buildings, rafters must have a safety margin of at least 1.4 of the calculated values. For non-residential structures, the coefficient is reduced to 1.2. Conclusion - the dimensions of the rafters on the houses are larger than on garages and other outbuildings. |
| Residential attic space(mansards) must have an insulated roof. The width of the rafters must correspond to the thickness of the insulation layer. At the same time, you need to adjust the step between the rafter legs, depending on standard width insulation. If in this climate zone optimum thickness roof insulation 200mm, then it is recommended to choose the same width for rafters. Various extensions of narrow rafter legs during roof insulation are not considered the right solution. |


This knowledge will help right decisions both during the manufacture of rafters, and during their fixation directly in place. Mistakes in the construction of the truss system are too expensive, you should not show excessive self-confidence.
What influences the choicesizes andwaysmountsrafter
Highly important point. The task of any fixation is to ensure the stability of the connection node, while it can be fixed or have one or more degrees of freedom. This cannot be achieved without knowledge of the loads affecting the rafter legs. Loads can be permanent and temporary, dynamic and static, unidirectional and multidirectional.
- Constant vertical forces. Occur due to the impact of roofing and insulation materials roofs. Due to the fact that the rafter legs are located at an angle to the vertical force, they are subject to bending and bursting loads. The magnitude of the forces is determined after the construction of the diagram, on the basis of specific bending and bursting forces, the thickness and width of the boards for the rafters are selected. Fasteners must prevent the spreading of the truss system.
- Variable vertical forces. Appear in winter, the value depends on the height of the snow cover.
- Lifting wind forces. As a result of gusts of wind, lifting forces act on the roof. They do not affect the dimensions of the rafter legs, efforts are taken into account only when choosing the type of fixation, it must provide for and hold such loads.
- Lateral efforts. The value depends on the windage of the roof. As a result of gusts of wind, lateral forces act on the truss system. They increase bending and tearing loads. This feature must also be taken into account during the manufacture and installation of rafter legs.

There are options for rigid fastenings of truss trusses; for this, metal plates, corners, self-tapping screws and nails are used.

Sometimes it is required to use floating rafter connections to compensate for changes in the size of wooden houses. For floating connections, special fasteners and bolts are used. The second allows the rafter legs at the top to turn a little.

Another example of a free rafter connection is a sliding one. Used on log cabins and makes it possible to compensate for the natural shrinkage of the house.

What elements are used to increase the stability and bearing capacity of the rafters
As a result right choice rafter system and methods of fixing its elements, the structure must be stable, compensate for natural fluctuations in linear parameters and withstand various loads that occur during operation. To fulfill the conditions during fixation of the rafters can be used additional elements fixation.
Runs
Most often they are mounted in the ridge part of the system, the upper ends of the rafter legs rest on them. To increase stability, cuts may be provided. The top connection is rigid or floating on bolts. On large roofs, girders can be installed in the middle of the rafter legs or in other places with critical loads.

vertikaflax racks
They are installed to strengthen the rafters; due to the use of racks, elements can be made from thinner lumber. Vertical racks the upper end abuts against the rafters, and the lower end against the bed or ceiling beams overlap.

corneraboutpores
Hold bending and expansion forces, universal use. Corner stops can be placed in any places of the rafter leg that cause concerns about strength. Due to such stops, the resistance of the rafters to bending and tearing forces is significantly increased.

Puffs(crossbars)
Purpose - to keep the rafter legs from sprawling, they are used on hanging rafter systems. Most often they are placed in the upper part of the truss; boards with a thickness of about 20–25 mm can be used for manufacturing. The fact is that they work in tension, lumber holds such efforts well. Boards do not work well in compression, quickly bend and lose their original strength indicators.

Knuckleadki
They are used in the upper ridge part of the rafters, due to the use of puffs, the strength of the knot connection increases. Puffs can be made of wood, plywood, OSB or metal.


Bosses(stops)
They have many specific names. They are ordinary pieces of boards 30–40 cm long and 40–50 mm thick, fixed at the bottom of the rafters. They rest against the Mauerlat and do not allow the structure to slip. The use of bosses allows you to perform a rigid connection of elements without sawing the rafters. We talked about the problems that arise in connection with sawing in this article above.

Options for connecting the ridge knot of the rafter legs
The horse is one of the main and most loaded elements of the truss system. The node has several connection options, you should choose a specific one depending on the general parameters of the roof.

With a large length of slopes, it is better not to use a ridge beam, but instead to put two parallel runs and puff crossbars. This design is easier to do, it is more stable and safe.
For hanging roof you should choose the most reliable ways to connect the rafter legs, these systems have a minimum number of additional stops.
step by stepwithtruction of the mouthanew rafters
For rafter legs, coniferous boards 50 × 200 mm, first-class lumber, are used. The boards must not have traces of rot or fungus, significant malformations and deep cracks. It is strictly forbidden to use low-quality lumber for the manufacture of the truss system.
To increase the protection of roof elements from decay, it is recommended to use fire protection.

Rafter blanks should be impregnated at least twice, while the material must be dry and clean. Processing is done on a flat area in dry and clear weather.

It can be impregnated with a roller, brush or air gun. It is not recommended to use household hand sprayers - too long and hard. Boards can be lifted up after complete drying of the impregnation.


Our gable roof has a ridge run, vertical supports rest against a bed located on bearing wall in the middle of the building.
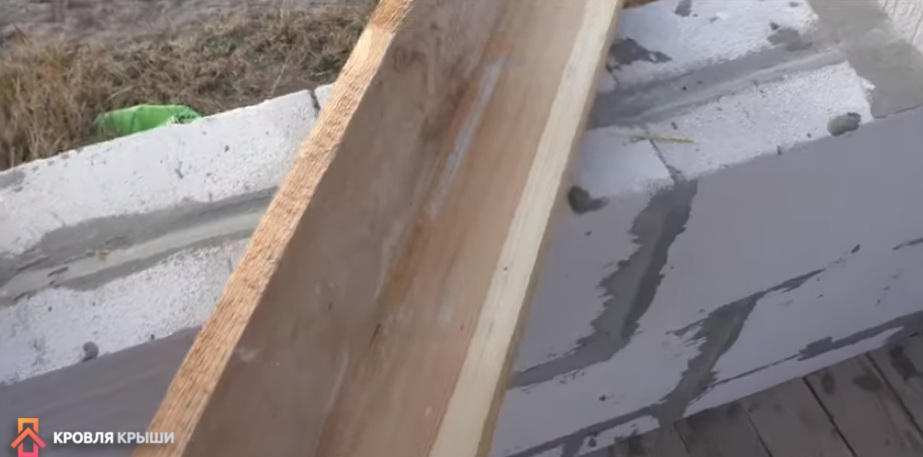
Practical advice. If the house is quite high and the boards are heavy, then it is recommended to protect window openings from damage to make an elementary device. To do this, two boards are knocked down in the form of a square, the length and width are selected taking into account the parameters of the opening. The device is installed on the windowsill, and the rafter boards do not damage the foam blocks during lifting.
Preparatory operations
The manufacture of rafters begins with preparatory operations.
Step 1. Raise the rafter boards into the attic. For convenience, place them evenly along the length of the building, put one end on the Mauerlat, and the other on the run bed. First you need to install the extreme rafters on both sides of the roof of the house, pull the thread between them and install and align all the remaining ones along it.
Step 2 Check again the position of the ridge run. It should be located exactly in the middle of the roof. Its displacement by 1–2 centimeters will not affect the strength of the roof as a whole, but it will somewhat complicate the manufacture of rafters and the laying of roofing materials. In addition, an experienced builder may notice a mismatch in the size of the slopes and, accordingly, the asymmetry of the roof. It is recommended to achieve a situation so that the ridge run is located along the line of symmetry, if this is not associated with great difficulties. The final decision is made by the foreman on site and depends on the magnitude of the offset and the amount of work to correct the error.

How to straighten a run?
- Attach a batten board to the Mauerlat, it is lighter, easier to lift and fix. The second end should lie on the run. The board is nailed to the Mauerlat with an ordinary smooth nail or screwed with a self-tapping screw.
- Climb to the top of the run and check the distance from the edge of the run to the Mauerlats installed on opposite walls with a tape measure. Work very carefully, it is advisable to use insurance. Unfortunately, in practice, few people follow the safety rules, but in vain. Falls from height can cause very serious injury.
- Align the purlin to the center and secure the board. To increase rigidity, fix the same board on the other side of the run.

Now everything is ready, you can proceed to the manufacture and installation of rafters.
Installationrafter legs
If you work alone, then you need to fasten a piece of rail to the run at the place where the first rafter is fixed. A rafter board will be temporarily fixed to it to prevent it from slipping down.

And at this time, you can perform work on the manufacture and preparation for connecting the upper part of the rafters.
Step 1. Lift and install the rafter board in place, clamp it to the previously fixed rail with a clamp.

Step 2 Draw lines to cut out the thrust pad. This is done in two stages. First - spend horizontal line. To do this, press the rail, square or other even object firmly against horizontal surface run.

Second, draw a vertical line. Now the ruler or square should be pressed against the side surface of the run.

Important. The width of the ruler should be no more than 2-3 cm, it is not necessary to make deep cuts and significantly reduce the width of the rafter leg, it loses its maximum design strength.
Make the same markup at the bottom of the rafter. Only now the ruler needs to be pressed against the Mauerlat surfaces.
Step 3 Remove board and carefully cut seats. You can work with a hacksaw or an electric circular hand saw.

Practical advice. If the cuts are made electrically circular saw, then it is better to cut in two steps. First cut to the mark, then turn the board over reverse side and again cut to the mark. Knock out the cut piece with a hammer, and remove the remaining protrusion with a chisel or chisel. No need to go behind the line with a saw and try to cut off the ledge in one go. This method increases the cut by 3–5 cm, depending on the diameter of the disk, which significantly reduces the bearing performance of the rafter.
Step 4 Install the prepared rafter in place and check the correctness of its manufacture. Do the same operations with the second leg of the farm.


Step 5 Place the rafters with an emphasis on the Mauerlat and the run, pull them together with a clamp in the upper part. Find the middle of the run and transfer the line to the rafters, use a level or building square (only if the plane of the run is strictly horizontal).


Step 6 Saw through two rafters at the same time vertical line. The boards must be tightly clamped with a clamp. Pay maximum attention, the saw blade should be perpendicular to the plane of the rafters. If you cut it obliquely, then the ridge joint will not fit tightly, and this reduces the stability of the truss system and is considered an obvious construction defect.
Docking rafters With a lack practical experience performing such work, the first leg may have a gap in the ridge part, if it is within 1–2 mm, then there is nothing to worry about. If it is more than 4 millimeters, then you need to correct the element. See which planes of the thrust pads do not allow the upper cut to fit tightly. Approximately indicate the amount of additional cut. Remove the rafter and remove the interfering protrusions. Check the connection again, if there are gaps, repeat the operation. As practice shows, experience appears on the second or third rafter and no further corrections need to be made. Step 8 Secure the rafter legs firmly in place. For this, it is recommended to use metal plates and corners, it is simple and easy to work with them, the strength fully meets the requirements for the truss system.
For each pair of rafters, you will need one large reshaped plate to connect the ridge knot, two 50x50mm corners for fixing to the run and two 60x80mm corners for screwing to the Mauerlat. The thickness of the metal is at least two millimeters.


In the same way, install the extreme rafters on the other side of the house, pull the threads between them. One at the top and bottom and one in the middle. So that they do not interfere during the manufacture of rafters, make a gap between the thread and the plane of about one centimeter.
Real professionals never make one rafter in the attic of a house. Such an algorithm of work significantly increases the construction time, complicates the process itself and makes it unsafe. Work electric tools on unsuitable sites it is very dangerous, the injuries from them are severe, often causing disability.

If the house is delivered with high quality with exact observance of dimensions and rules, then the rafter legs are made according to one template on the ground. Finished items gather on the roof. This technology increases labor productivity by 3-5 times, at the same time the quality of the rafter system is improved, it is more reliable and durable. Of course, the wages of builders also increase proportionally. They work from the development and receive money not for the time spent in the attic, but for the assembled roof.
Video - Manufacturing and installation of rafters on a gable roof