How to cover the roof of the bath: metal tile, ondulin or roofing material. Roof for a bath: types, designs, roofing materials, building technologies Do-it-yourself bath roof gable
A bath is a complex engineering structure, the construction of which is feasible with your own hands, but it will require engineering knowledge and time. The roof requires special attention and calculation, since the greatest heat loss occurs through the coating - from 30 to 45%. The construction of a roof requires a balanced approach and an accurate idea of the type, construction of the roof and the material of its coating even before construction begins.
Stages of building a roof over a bath
Work on the installation of the roof on the bath, taking into account all the standards and rules, is carried out in several stages:
- The choice of roofing option, coating material and supporting structure.
- Collection of loads, execution of drawings and calculations of the supporting structure, preparation of estimates and a list of necessary materials.
- Purchase of material, preparation of the construction site and necessary tools.
- Construction.
Choosing a roof option
The choice of roof structure is influenced by the coating material, the purpose of the attic space - whether it will be heated with a residential attic or cold, as well as the level of wind and snow load in the region where the construction is being carried out.
Types of pitched roofs used in individual construction:
- Shed. Sloped roofs with a single slope are often used to cover small structures such as bathhouses when needed to be built quickly and inexpensively.
Shed roof has the simplest design and is built very quickly
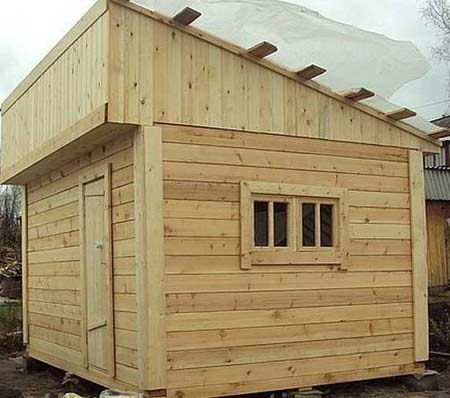
- Gable. If you need a larger roof slope and want to have a full-fledged attic, they construct a more complex gable roof.
The gable roof is more difficult to install, but it allows you to get a full-fledged attic for storing bath accessories
- Hip and semi-hip. Such roofs have 4 slopes - instead of gables on the ends of the house, they also cover with a slope. Roofs of this type are built in climatic regions with a large wind load. The roof, in which the end slopes - hips - descend half the length of the main roofing, are called semi-hip.
The hip roof resists strong winds well due to the installation of additional slopes instead of end gables
- Tent. This is a special case of a hip roof, which is built over houses that are square in plan, as well as over bases that fit into a circle.
The hipped roof is arranged in the same way as the hip roof, but does not have a ridge, since all the hips converge at one point
- Multipliers and combined. Multi-gable roofs are used to shelter L-shaped or U-shaped buildings that are complex in terms of structures, and at the same time different types of roof shapes can be used in coatings.
Multi-gable roofs consist of several roof structures combined into one
- Attic. This is a very popular type of roof for residential buildings. They come in a variety of shapes, but what unites them is the presence of a warm living space in the attic space. There are such roofs in the baths.
The device of the mansard roof allows you to get a full-fledged living space on the second floor
The easiest option for construction is a pitched roof. It is often used when the bathhouse is attached to the main house, and with small coating slopes. When building a free-standing bath, the gable roof shape is most in demand.
Roof design
Factors affecting the design of the roof:
- snow load on the roof, which is determined based on the geographical location of the construction area;
- normalized resistance to heat transfer, also depending on the climatic region. This parameter affects the choice of insulation thickness;
- structure weight. It depends on the material of the roof;
- choice between attic and attic. Insulation of the roof above the attic affects its design and gives an additional load on the rafters;
- type of bath - an attached room or a separate building: the extension can be covered with a shed structure, while it is more economical to complete a separate building with a gable roof;
- roof slope. His choice is influenced by the material of the roof, as well as the intended purpose of the under-roof space and the personal preferences of the owners.
Collection of loads on load-bearing elements of the roof
Snow and climatic regions are determined individually according to the maps attached to SP 50.13330.2010 "Thermal protection of buildings" SNiP 23-02-2003, updated edition. These maps are used to determine the specific snow load on the roof in winter. The load from the weight of the coating varies from 6 kg / m 2 (Ondulin) to 55 kg / m 2 (ceramic and cement-sand tiles).
Having planned a warm attic above the bath, the weight of the insulation, the vapor barrier layer and the interior cladding of the room is added to the weight of the roof - from 30 to 55 kg / m 2, depending on the type of insulation and facing material. If the attic above the bath is not heated, then only the weight of the roofing membrane is added, which can be neglected.
The weight of coniferous wood (pine, spruce, larch), from which roof structures are most often made, is determined as the product of density and volume. The density of wood is 600 kg/m 3 .
Table: specific snow load depending on the region
| region number | 1 | 2 | 3 | 4 | 5 | 6 | 7 | 8 | 80 | 120 | 180 | 230 | 320 | 400 | 480 | 560 |
The region number is determined by the snow load distribution map issued by Roshydromet.
Each region of our country is assigned a number depending on the average snow load intensity.
The height of the passage under the roof slope is normalized and should be at least 1.6 m to be able to perform periodic inspection of the technical condition of the structures.
When choosing a roof slope of up to 20 o, the coating can be made of metal profiled sheets, including metal tiles, with a slope of 20 to 40 o, any roofing material can be used, except for rolled roofing bitumen-polymer materials.
Table: roof slope depending on the coating material
Structural calculation of rafters
The calculation of roof structures is carried out in accordance with SP 64.13330.2011 "Wooden structures", but tables with averaged data can be used. This method is much simpler, although the result will be slightly higher than the design minimum, since the tables are designed taking into account the maximum loads from snow and the weight of the roof. To determine the section of the rafter, it is enough to know the span of the building and set the distance between the rafters.
Table: the length and size of the section of the rafters, depending on the distance between them
| Rafter length, m | Distance between rafters, cm | Rafter section size, cm |
| until 3 | 120 | 8 x 10 |
| until 3 | 180 | 9 x 10 |
| up to 4 | 100 | 8 x 16 |
| up to 4 | 140 | 8 x 18 |
| up to 4 | 180 | 9 x 18 |
| until 6 | 100 | 8 x 20 |
| until 6 | 140 | 10 x 20 |
When purchasing material, remember that the length of the rafters in this case is the size from support to support, that is, in fact, the rafters will be longer for the overhang of the roof eaves and trimming in the tong.
Lathing design
The design of the crate depends on the coating material:
- covering of metal tiles on the eaves and ridge of the roof requires a continuous flooring to a width of 450 mm, the step of the intermediate lathing corresponds to the transverse profile of the corrugations and is assigned by the manufacturer of the material;
- Roofing from bituminous tiles (for example, "Shingles"), tiles, small slopes of roofing from corrugated sheets (Euroslate Ondulin) require continuous flooring from boards or moisture-resistant board materials (OSB, DSP).
The Roof Rules (SNiP II-26-76) standardizes the minimum size of the lathing elements at 30x50 mm.
Execution of a set of drawings
Roof drawing set includes:
- roofing design;
- wiring diagrams of load-bearing elements;
- detailed drawings of each structural element;
- attachment points;
- roof section with a flag, which displays the layered composition of the roof;
- material requirements list;
- general data on drawings with instructions for installation and requirements for materials.
The most commonly used sections of the timber truss system
When calculating the distance between the rafters, it is necessary to take into account the presence of vertical structures, for example, a chimney.
It is impossible to complete drawings without an engineering education, so individual builders draw elements by hand or print out detailing of nodes from technical literature and specialized Internet sites. However, the best solution is to order a roofing project from companies specializing in this type of work. In this way, all the requirements of current regulations will be met, which guarantees the durability of the roof structure.
Video: gable roof design
Photo gallery: gable roof drawings
 On the wiring diagram of the rafters indicate all dimensions in horizontal projection
  The sections show the required dimensions, elevations, marked elements of the system and nodes
  On the drawings of the nodes, the designs for connecting elements are worked out
  The required dimensions, the layered composition of the roof are given on the node, individual elements are marked
  According to the drawings, element-by-element statements are made indicating the quantity / volume / weight
Installation of a roofing system for a bath
We will analyze the sequence of the roof device for the bath using the example of a gable roof structure.
Required Tools
To build a roof, you will need a set of measuring, cutting and carpentry tools:
- roulettes of different lengths from 5 to 20 meters;
- marker, pencil;
- cord along the length of the skate;
- hammer nail puller;
- metal scissors;
- roofing knife;
- putty knife;
- scotch;
- a hacksaw, an electric saw, an electric drill and a screwdriver, various drills and nozzles for them;
- horizontal and vertical level;
- rail, ruler;
- mounting foam and silicone sealant.
Tools must be kept in the tool bag while working on the roof.
For the safety of work, it is necessary:
- safety belt, rope;
- protective glasses;
- mittens;
- overalls set.
Step-by-step instructions for installing a gable roof
Roofing begins when the attic floor beams are mounted. Before starting work on the beams, running decks are made of boards or chipboard, DSP, OSB boards that can withstand the load from a person and the structure being mounted. All wooden roof structures are impregnated with a flame retardant, antiseptic and fungicide or a complex protection against fire, decay and fungus.
All elements of the coating are prepared for installation on the ground according to the template. Finished roof trusses are lifted to the installation site and temporarily fixed with boards.
Assembly work is carried out in the following sequence:
- Installation of the support beam - Mauerlat. Mauerlat, which ensures the stability of the roof and transfers the load from the roof to the walls of the house, is preferably made of dense hardwood that is resistant to decay (oak, maple, larch). The minimum size of a beam is 100x100 mm, most often a beam with a size of 100x150 mm is used, placing it at least 5 cm from the outer edge of the wall. The beam is fixed to the wall through a gasket made of waterproofing material on the studs laid during the construction of the wall. The holes for the studs are evenly spaced along the length of the beam, not combining with the attachment points of the rafters. The holes for the studs are marked and drilled before the beam is raised to the design position.
Mauerlat is attached to the wall with evenly spaced studs, previously embedded in the frame
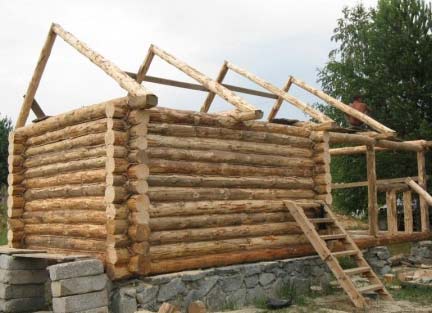
- Assembling the truss system. The assembly of a structure consisting of a pair of rafter legs and a puff is easier to perform on the ground according to a template. In this case, all roof trusses will have identical dimensions. True, the weight of the structure can be significant, and a crane is required to lift it.
Rafter trusses are easier to assemble on the ground and then lift to the roof
- Installation of roof trusses. First, structures are installed at the ends of the house, temporarily fixing them with mounting boards, racks and struts. For ease of installation of subsequent elements in the ridge, a cord can be pulled between the installed trusses. Then intermediate trusses are mounted. After all the elements of the truss system are installed, they are finally fixed at all points and temporary supports are removed.
To simplify the installation of intermediate trusses between the extreme rafters, you can pull the cord
- Installation of a superdiffusion membrane using a counter-lattice, installation of the main batten. With the help of a counter-lattice, we attach a superdiffusion membrane to the rafters. Depending on the selected coating material, we mount the crate - sparse or slab flooring.
When installing a roofing pie, it is imperative to observe a ventilated gap between the membrane and the roofing
- Cover installation. The laying of the coating material is carried out from the bottom up from the left corner. The work is carried out according to the manufacturer's instructions. Perform all necessary connections to vertical structures (for example, a chimney), The roof ridge is closed with a special ridge element.
Sheets of metal tiles are attached to the crate with self-tapping screws with a neoprene gasket
- Installation of a drainage system (if provided by the project). The drainage system protects the walls from excessive moisture. With a cornice height of up to 4 meters, its device is not necessary, but the presence of a gutter and pipes will increase the life of the building, and the costs will pay off handsomely. It is better to purchase a set of gutter systems at the same time as buying a roofing material, in the color of the roof or in a contrasting color, depending on the taste of the owner. The drainage system includes:

- Installation of building gables, filing of cornices. In buildings made of masonry material, gables are usually made of wall material. In houses made of timber or logs, the pediments are sewn up after the installation of the rafters, fixing racks and girders on the end pairs of trusses, along which they are sewn with boards or metal profiles.
The pediments of the baths are usually sewn up with siding or wooden clapboard along the crate fixed on the end truss truss
Lastly, the cornices are hemmed and spotlights are mounted in the cornice overhang.
Video: roof, attic and rough ceiling of the bath
If you do not feel able to correctly calculate the truss system, complete the drawings and build the roof - entrust this part of the work to professionals. If you decide to overcome difficulties on your own, remember that the construction of the roof will take more than one week, because all work requires accuracy and consistency.
The construction of baths involves the arrangement of the roof, the options for its creation may be different, but provided that one of them corresponds to this structure. The question of which bath roof design is preferable in this particular case worries many owners of private households, especially when the work is done on their own.
A bathhouse is usually built on its own in a personal or suburban area, so you need to know not only how to make a roof, but also how to properly waterproof it and lay a heat-insulating layer, which roofing materials to prefer and other aspects of solving the problem. The fact is that the ceilings on this building have significant differences from the roofs on buildings for other purposes: the main load on its supporting structure is created from the inside of the room, and not from the outside.
As you know, the humidity and temperature conditions in the bath during the adoption of procedures are significantly increased and therefore a large amount of steam enters the attic space, after which it settles on the roof structure elements.
What are the roofs for baths
To help make a decision on how to make a roof for a bath, a construction project and applicable domestic building codes can help. First of all, when choosing the type of roof, the technical parameters of the structure are taken into account.
An important factor is the type of area where construction work is being carried out:
- a simple bathhouse near a residential building is usually built with a gable roof, such as in the photo;
- if significant precipitation is observed in the region in winter, then roofs with a large angle of inclination are chosen, but not more than 45 degrees. Such a structural solution allows the snow mass not to linger on the roof, and it rolls down;
- in the steppe or forest-steppe natural zone, where frequent gusts of strong wind are observed, the choice is stopped at a minimum slope, due to which the roof structure has such aerodynamic properties that allow avoiding heavy loads on it;
- in the case when the building is attached to a residential building, the problem of how to make the roof of the bath is simply solved - it is created as a shed in accordance with the technical characteristics of the house (in more detail: "").

The term of its operation without repair or restoration will depend on which roof arrangement option is chosen and the material for its creation, how reliably the installation work is performed. Multi-pitched roofs have the most presentable appearance, they have a more complex structure and they provide the building with an original look. But they are not always a reasonable solution, since they are expensive for the owners.
Features of creating bath roofs
Each of the options for how to make a roof in a bath has its own characteristics and advantages. So the presence of an attic improves the appearance of the building and ensures the creation of effective thermal insulation, and this factor is very important, since the bath is most often used in the cold season.

Regarding what material is best in the bath, it depends on its slope. When using a metal roof, this parameter should be approximately 20 degrees, and if a slate roof is to be created, then about 30 degrees. Roll coating requires the roof slope to be within 5 degrees.
In the absence of an attic, the slope, regardless of the roofing material used, cannot be more than 10 degrees.
Rafter system for the roof of the bath
Before making the roof of the bath, it is necessary to equip a supporting truss structure for it, consisting of separate trusses. They also carry out the crate and select the material for laying on the roof.
In the upper part of the strapping there are floor beams. Before that, to support the legs of the truss system, a beam called a Mauerlat is mounted. At the same time, special nests are made in the walls of the building, which are necessary to comply with the strictly horizontal location of the floor beams, which are produced outside the outer perimeter of the bath. The size of the release is regulated depending on the design solution, but if it is more than 50 centimeters, the installation of support poles will be required.

Before you put the roof on the bath, before fixing the rafter trusses to the required places, you need to make sure that they are fully consistent with each other. To do this, you can put them all in one pile, and if there are deviations, it is desirable to correct such elements, and, if necessary, redo them. Otherwise, if the imperfections are not eliminated, the reliability of the truss structure will be violated.
After that, on the overlapping beams or on the Mauerlat, the corresponding markup is performed. It is possible, to give greater reliability, to nail the trimmings of the bars in such a way that the supporting parts of the rafter legs are located in the space between the trimmings. This method of installing the truss system allows you to significantly speed up the work and prevent errors and miscalculations in the size and location of trusses.
How to insulate the ceiling in the bath, in detail on the video:
At the same time, front trusses are attached to the center of the roof at a very small angle, which gives the supporting structure the necessary rigidity and allows it to withstand significant wind loads during operation. All other roof trusses are mounted at the same distance, which should be one meter, and fixed in place by stitching with a ridge board.
After the installation of the truss structure is completed, they begin to create a crate, which is made solid or sparse, depending on the roofing material that is decided to be used to cover the roof.
The choice of thermal insulation for the roof of the bath
The choice of how to make the roof of the bath involves the purchase of high-quality heat-insulating material, since the reliability and strength of the roof is affected by the increased temperature from the steam room. If you do not do the right insulation, in winter, the integrity of the roof will be threatened by the formation of condensate, which will certainly cause irreparable damage.

- the insulation is fixed under the rafter system;
- thermal insulation is laid on the roof structure;
- thermal insulation products are placed in the gaps between the trusses. This option is the most preferable because it is easy to implement and requires a minimum of time.
The construction of a bathhouse for permanent operation cannot be completed without roof insulation, because the safety of the wood materials that were used over a long period depends on this. The insulation is laid as close as possible to all planes of the truss structure. Even small holes and cracks are not allowed.

Most often, mineral wool is used for insulation, which, as a building material, has excellent thermal insulation characteristics, low price and environmental safety. Some property owners use foam as a heater, which is less often chosen due to its poor environmental friendliness.
In addition to thermal insulation, when creating a roof for a bath building, one must remember to provide hydro and vapor barriers, which provide the interior with the opportunity to "breathe".
An important stage in the construction of a private bath is the construction of a roof structure that can provide reliable protection from the negative effects of precipitation and perform an aesthetic function.
In order for the bath roof to last for many years, you will need the right choice of design configuration, calculation of the angle of inclination and the length of the overhang. Of course, you can turn to professionals to carry out the work, but self-erection of the roof will significantly save money.
Types of construction of bath roofs
The modern bath roof is a functional and reliable design, which can be of two types.
shed roof
This type of roof is the most affordable for installation and cost-effective. The design provides for the installation of rafters with emphasis on opposite walls. At the same time, it is important to correctly calculate the appropriate angle of inclination of the slope to protect the roof from possible damage and deformation.
A shed type of structure should be erected in a site with a high wind load in order to prevent stagnation of rainwater and snow cover on the surface.
gable roof
Such a roof has a number of advantages: reliability, durability, heat capacity, the possibility of arranging an attic space. In addition, precipitation does not linger on it, but its cost is much higher than that of a single-sided counterpart.
The gable version of the roof is made in one of two ways:
- Inclined rafters.
- Hanging rafters.
The angle between the installed rafters determines the slope of the slopes: the smaller it is, the steeper the slopes.
Most often, gable roofs are:
- Attic. Roof structures that provide for the presence of free space between two slopes and load-bearing beams for arranging a utility room. A prerequisite is the presence of a ceiling that separates the lower floors from the roof.
- Atticless. Structures in which the space under the roof is not separated from the main functional rooms of the bath by a ceiling. The difference lies in the height of the ridge, which is much smaller than that of attic structures.
How is the roof structure
In order to competently build a roof on a bathhouse with your own hands, it is necessary to study in detail its device, which provides for the following functional elements:
- Rafters and runs.
- crate.
- Steam and waterproofing.
- Roof covering.
truss construction
It is intended for the correct distribution of loads over the entire surface of the roof. The rafters on the bath are mounted using crossbars, ties and spacers to ensure the strength of the finished structure.
The rafter system can be assembled on a finished building or on the ground with subsequent installation on a bathhouse. Rafter supports must be securely fixed with load-bearing walls and supports in order to prevent deformation or failure of the roof when exposed to strong air masses.
Wooden crate
The crate can be assembled with a solid shield or a cellular base of wooden beams. The choice of a suitable batten option depends on the type of roofing material. Under the rolled roofing felt, a continuous crate is required, for corrugated board - cellular.
Vapor barrier and waterproof protection
A mandatory stage in the arrangement of the roof in the bath is to ensure protection against the penetration of moisture and steam. To create a waterproofing layer, tiles or slate sheets are used, for a vapor barrier layer - roofing material or parchment paper.
Roof covering
Practical and safe materials are used as roofing: rolled roofing material, metal tiles, ondulin, asbestos cement or bitumen slate, roofing steel.
Pitched roof construction standards
The roof for a bath is a building envelope, which is designed to protect the building from negative atmospheric effects, as well as to maintain comfortable conditions in the premises. Therefore, modern roofs must meet a number of requirements:
- High weather resistance.
- Waterproof.
- Thermal efficiency.
- Wear resistance and increased strength.
- Fire safety.
- Biological resistance.
- Environmental friendliness.
- Durability.
When building pitched roofs, it is important to comply with certain standards and norms. If the bath building is adjacent to a residential building, then it is rational to install a shed roof - a more affordable and cheaper option. In this case, the height of the roof can be arbitrary, but taking into account the height of the residential building.
For full-fledged bath complexes or private baths equipped with an attic, gable roofs are the best option. With the right approach to heat and waterproofing, such a structure can be used for living. When organizing a gable structure, it is important to choose the right location for the ridge and calculate its height.
The choice of roofing material
The modern construction market offers a wide range of reliable and durable roofing materials. The following materials are suitable for covering a bath roof.
Decking
Non-ferrous metals (zinc, aluminum, titanium alloy) or galvanized steel are used for the production of corrugated board. The main difference between the material is the thickness of the metal base. The professional flooring differs in the high durability, wear resistance, small weight and reasonable cost.
metal tile
Suitable for organizing a gable roof, subject to an angle of inclination of 35 degrees. The metal tile is resistant to corrosion, provides good sound absorption, has a long service life (over 45 years) and an attractive appearance.
Soft tiles
Roofing material based on ceramic and bitumen is suitable for creating one- and two-slope structures, easy to use, practical and durable. Roofs made of soft tiles look aesthetically pleasing and attractive.
Ruberoid
Affordable material for roofing, it is cheap, easy to install and has a short service life (no more than 15 years). Roofing felt is laid subject to an inclination angle of 5 degrees. This is the most budget option for roofing material.
Slate and euroslate
Ordinary sheet slate is an affordable and cheap material used for roofing. It has a long service life (up to 40 years), does not require special care. Sheet stacking is quick and easy. The disadvantages of the material include high moisture absorption and brittleness.
Euroslate is a more expensive and practical roofing material, which has an attractive appearance, good performance and high cost.
Ondulin
A popular material with high ductility, strength, wear resistance and durability. It is ideal for covering curved roofs. In addition, ondulin is easy to install and affordable.
Roof construction technology with one slope
The most popular is a bath with a pitched roof. A roof structure with one slope can be easily built with your own hands from available materials. One of the load-bearing walls should be several rows higher than the others to create the desired slope of the slope - from 20 to 45 degrees.
For construction work, tools and materials will be required:
- Beam with a section of 6 × 8 cm.
- Support beams for flooring.
- Boards 25×3 cm.
- membrane for waterproofing.
- Thermal insulation material.
- Roof covering.
- Fasteners (screws, nails).
- A hammer.
- Primer with antiseptic properties.
- Level.
- Hacksaw.
According to the working instructions, a shed roof for a bath is built in stages:
Stage 1. Installation of the bearing beam (Mauerlat)
The load-bearing beam is laid along the perimeter of the outer walls and is intended for mounting the rafter system. In log cabins, the upper row is the Mauerlat; in brick and block buildings, it is equipped additionally. Beams are fixed with wire, anchor bolts or studs.
Studs are inserted into the upper wall rows to a depth of 40 cm in increments of 65 cm between each other so that the upper part of the thread rises 3.5 cm above the supporting beams.
The rolled roofing material is laid on top with pricking on the studs in the places of their installation. Next, the beam is laid on the tip and hammered to make small serifs. Holes are made along the serifs, after which the beam is installed on the studs, over which the nuts are screwed.
Stage 2. Installation of beams for the ceiling
Grooves are made in the load-bearing beams for overlapping in increments of 65 cm. After installing the ceiling beams at the ends, they must be indented 32 cm outside the load-bearing walls. Ceiling ceilings perform the function of rafters, therefore they are fixed to the Mauerlat with nails or wire. After installation is completed, all elements are treated with an antiseptic primer.
Stage 3. Hydro and thermal insulation
The lower part of the floor structure is hemmed with boards. Over the installed rafters, an overlapping film is laid, the joints are glued with adhesive tape. Next, heat-insulating material is mounted - rolled or slab. The gaps are filled with mounting foam, an overlapping membrane is installed on top with fixing the joints with construction tape.
Stage 4. Installation of the roof
Beams are stuffed onto the rafters through a film for waterproofing, after which the finished frame is sheathed with boards. The width between the bars can be from 1.5 to 14 cm, depending on the type of roofing material. A finishing coating is mounted on the finished crate - slate, metal tile, ondulin or corrugated board. Sheet roofing is fixed with self-tapping screws with gaskets to prevent moisture from penetrating through the inlets.
Roof construction technology with two slopes
For an overall bath, it is better to equip a gable roof with an attic room for storing bath accessories and inventory. The assembly of the rafter system is carried out in stages.
To assemble the roof structure, you will need:
- Beams with a section of 10 × 8 cm.
- Bar with a section of 5 × 5 and 5 × 10 cm.
- Board.
- Level and plumb.
- Iron nails and screws.
- A hammer.
- Electric drill.
- Primer composition.
A step-by-step guide to building a gable roof includes the following steps:
Stage 1. Installation of ceiling beams
In the load-bearing beams of the structure, grooves are made for the installation of beams for the ceiling. The step between the grooves is 100 cm, the depth is up to 8 cm. The beams are pre-treated with an antiseptic composition, dried and mounted with an edge into the grooves. Additional fixation on nails.
Stage 2. Assembly of the truss structure
A gable roof consists of triangular truss structures - trusses, each of which is made of the same bars - legs, bases and lintels. The elements are fixed to each other using screws.
For the legs, boards of 5 × 10 cm are used, the length of which is 2.8 m. At the edges of the board, they are cut at an angle of 45 degrees, holes for screws are made, after which the elements are securely connected to each other. From the junction of the truss structure, an indent of 50 cm is made for the groove for the jumper. Rectangular cuts are cut at the ends of the jumper, thanks to which it is mounted in the rafters. Screws are screwed in at the junction of the jumper and rafters. Other farms are assembled in a similar way.
Two roof trusses, located on top of the side walls, are sheathed. For this, 5 × 5 bars are used, installed in a horizontal position with a step of 35 cm. To reinforce the structure, additional bars are installed in a diagonal direction.
Stage 3. Installation of rafters
Finished structures must be placed on the ceiling beams. Fixation on spacers in compliance with the geometry of the structure. Farms along the edges are mounted first. For additional strengthening of the installed structure, jibs are used - beams exposed between the supporting beam of the wall and the rafters at the level of the lintels.
Next, the installation of the remaining rafters is carried out in compliance with the vertical level. The technological distance between the individual rafters should be 100 cm. All elements of the rafter system are connected by a canopy of two boards nailed to the upper beams on both sides of the roof.
Stage 4. Installing the crate
For the lathing, a board is used with a length sufficient to cover the roof and protrude beyond the rafter system by 25 cm. Technological gaps between individual boards can range from 2 to 48 cm, depending on the type of roofing material.
At the exit of the chimney, a hole of the required size is made with the installation of a continuous crate around the perimeter.
Stage 5. Installation of the finish coat
A counter-lattice of 5 × 5 cm bars is installed on the waterproofing with pre-treatment with an antiseptic composition. The selected finishing coating is mounted on the counter-lattice from the edge of the eaves. A hole is made under the chimney, and after installing the pipe, the joints are carefully sealed with bituminous impregnation or adhesive mixture, closed with a protective apron.
Stage 6. Roof insulation
At the final stage, the roof structure is insulated. The insulation is laid from the inside between the beams with minimal gaps. The joints between the insulation are filled with mounting foam. Gables are insulated separately. From the inside, they are upholstered with waterproofing material, then the crate is fixed, after which the insulation and vapor barrier are mounted.
For the inner lining of the insulated roof surface, you can use clapboard, board or plywood.
Only compliance with construction technology and the use of high-quality materials will make it possible to build a reliable and durable roof for a bath that can withstand wind loads and various environmental conditions.
The construction of a roof for a bath is one of the last stages of construction, which is designed to protect the building from climatic influences. The roof of the bath can give the structure a personality, but most often, it is a simple structure that can be made with your own hands.
Finished project of a bath with a gable roof
For those who wondered how to build the roof of the bath, it is necessary to carefully study all the nuances of construction, and then the bath will not only become an ornament to the backyard, but will also allow you not to be afraid for comfort when taking water procedures.
The bath roof consists of two main elements:
- The truss system, which is the power part of the roof.
- Flooring, which is intended for the installation of protective elements (insulating and roofing materials).
It is worth noting that some baths are built with an attic or attic. The presence of this element is optional, because there are options for the execution of baths with flat roofs without usable space under the roof. Whatever bath is planned on the site, it is most likely that it will have a shed or gable roof.
 The project of a wooden bath with a pitched roof
 In addition, there are options for roofs with four slopes, as well as more complex options with numerous kinks.
Surely those who are thinking about how to make a bath roof with their own hands are tormented by a choice: which is better, a shed roof for a bath or a gable one. We will figure out in which cases one or another option will be preferable.

Roof slope angle
As a rule, the angle of inclination of the slopes is in the range of 2.5 - 60 degrees. Steeper slopes contribute to better removal of precipitation from the roof surface. However, you should carefully consider the choice of high structures if construction is carried out in an area for which strong gusts of wind are the norm.
 Scheme of the construction of a gable roof for a bath
 For the steppe area, with a characteristic strong wind and little precipitation in winter, it is most preferable to build a flat roof of a frame bath. In the northern regions, which are characterized by a large amount of snow, a high roof with a slope angle of 45 degrees is best suited for a bath. It should be noted that with an increase in the height of the roof, the cost of the structure being built, as well as the complexity of its installation, also increases.
Roof base
The support for the gable roof structure is the top floor or mauerlat, fixed at the top of the building. Mauerlat is mounted, as a rule, on brick walls and walls of various blocks. When installing a roof for wooden baths from a profiled beam or a log house, recesses are provided in the upper crown of the structure for mounting floor beams.
 An example of a roof base for a bath from a bar
 It is worth noting that floor beams can go beyond the boundaries of the log house, however, there is a rule: a beam that extends more than half a meter must rest on a reinforcing structure or pillar.
The construction of baths with a shed type of roof suggests that the roof frame will be held on walls with different heights.
In order to fix the truss trusses on such a structure, it is necessary to use girders and rafters.
Methods for mounting rafters
The rafter is a link in the truss structure, which rests on the Mauerlat or the upper crown, depending on which bath is being built: from brick and aerated concrete blocks, or from profiled timber and a log house. Taking on the load of the roof, the rafters work on compression and bending.
In order to assemble the structure with your own hands, you can purchase ready-made parts or make them yourself from the following material:
Installation of a truss truss will be simple if you use ready-made parts or material from a bar or board. To fasten the elements, you can use self-tapping screws or nails.
Let's analyze what the rafters can be, and what is best suited:

Gable roof truss
The farm is the same rafters installed at a certain distance. The resulting structure is necessary for the location of roofing material, insulation, as well as other types of insulating coatings (waterproofing, vapor barrier) on it. Usually the roof is made in the form of an isosceles triangle. The presence of overlays, struts, beams and other parts necessary to strengthen the roof will depend on how complex the design of the future roof will be and what the pitch of the rafters will be.
It is possible to assemble a roof truss on the ground.
It should be noted that assembling the structure directly on the floor is not so convenient and carries a certain danger.
The disadvantage of assembling a roof truss on the ground is the need to transport it upstairs, which will entail unnecessary expenses in the form of renting special equipment.
 Various truss designs for a bath roof
 Whether the choice will be made in the direction of safety or in the direction of saving money is up to everyone to decide. However, if the construction of a frame bath, exactly like the construction of other types of baths (from blocks, bricks), is done by hand, it is best to choose a safer option.
For the convenience of building a roof, it is recommended to make a template. In this case, all elements of the farm will be completely identical. The template is made as follows: two rafters are fastened at the top point, and their lower points are placed on a support and fixed with a crossbar.
After installing two roof trusses at opposite ends of the bath, a level is stretched between them. At this level, the rest of the elements are set with a certain step. It is very important to observe the vertical installation of the rafters, for this it is best to use plumb lines.
 Installation of roofing material on the truss system
 Shed roof truss
In cases where the distance between the supports of a shed roof is less than four and a half meters, additional support posts are not used. Rafters are recommended to be laid at a distance of half a meter from each other. For reliable fastening of truss trusses, in the Mauerlat, on the one hand, and in the beam on the other, a groove is cut out, with the expectation that the rafters go there tightly. Rafters can extend beyond the perimeter of the building by 500 mm, thereby creating cornices.
The roof sheathing can be made using timber or boards. Depending on what type of roofing material will be used, the section of the material for the crate and the step of its installation are selected. Soft roofing involves the installation of battens with gaps of one centimeter.
 Schemes of truss trusses of shed roofs for a bath
 If sheet material is used, then you can save on the crate, because the gap between its individual parts can be up to half a meter. Installation of the lathing should begin with the roof ridge, followed by advancement to the cornices using self-tapping screws or screws.
The construction of the bath begins with the construction of the foundation, then you need to do it, and only after that comes the time to build the roof of the bath. The roof protects the room from atmospheric precipitation, and also gives it a complete look.
Bath roof: features, design
The main feature of the bath roof is simplicity. If roofs of complex construction are often erected for a house, then for a bath - the simpler the better.
The roof consists of several elements: a frame (rafter system), lathing and flooring (roofing and waterproofing materials). If you plan to additionally make an attic, then you will also need an attic floor. It is worth doing if you have a budget, and you often go to the bathhouse. If it is used only in summer, then it is better to limit yourself to a simple bathhouse without an attic - it is easier to build and cheaper.
The angle of the roof can be different - from 2 to 60 degrees. The higher it is, the more efficiently and faster the precipitation will roll. But making a too high roof is not recommended in regions with strong winds.
Please note that the higher the roof, the greater the consumption of materials, and, consequently, the more expensive the structure. Therefore, too large a roof angle is also irrelevant if you want to save money and build a budget bath.

Types of roofs for a bath, their advantages and disadvantages
The bath roof project usually provides for one or two slopes.
A bath with a shed roof is a simple and budget option. Usually this type of roof is chosen for summer or. The main advantage of a shed roof is the low cost of construction.

A gable roof is the most common type of roof. It is chosen if the bath area is more than 12 square meters. Such a roof looks more aesthetically pleasing and has high functionality.

If the bath is an extension to the house, then the best choice is a pitched roof. In case you want to make a spacious attic or additional living space, then stop at a gable roof.
Below are photos of bath roof projects:


Do-it-yourself bath roof construction
This process includes several stages: first you need to build a frame, then make waterproofing and install a roof.
Stage 1. Installing the support for the roof structure
The roofing system will be based on a mauerlat - a load-bearing beam laid on top of the walls around the entire perimeter of the bath. If you are building a wooden bath, then there is no need to install a Mauerlat, the top row of the log house will play its role, but if you are building it from aerated concrete, then you need to fix the beams to the wall with steel wire, anchor bolts or construction studs.

Stage 2. Installation of ceiling beams
To install them in the Mauerlat, special seats are made, which are needed in order for the ceiling to lie strictly perpendicular to the walls. The distance between the grooves should be about 0.6-0.7 m. Next, beams should be laid in them, which should protrude 0.3 m beyond the walls of the bath. If they protrude by more than 0.5 m, then you need to install additional external support column.
A waterproofing material is laid on the floor.

Stage 3. Construction of the roof structure
To install a roof truss, it is permissible to use logs with a diameter of at least 12 cm, a bar with a section of 0.6 square meters or boards 40x150 mm. The easiest option is trusses made of glued or edged timber.
The truss truss is a truss leg resting on a Mauerlat. According to the method of fastening, construction legs are of two types:
- Hanging. In this case, there is no central support, and the rafters rest on the wall with their lower end, and on the opposite rafters with their upper end. For fixing parts, metal plates or slotted spikes are used. This type of truss system is chosen if the length of the roof exceeds 7 m, since the entire load of the structure falls on the load-bearing walls, in order to reduce it, a puff is used - a lower belt made of metal and timber that connects the structural elements.
- Layered. Unlike hanging ones, they have an internal support. This design has the advantage of being able to transfer only bending loads, and it requires less materials to install. Rafter rafters are usually chosen for the construction of a shed roof. To install them, puffs are not needed, it is enough to mount them along the slope supported by the Mauerlat and fix them on parallel walls with screws or thick wire.
It is possible to use two types of rafters if you are making a common roof over several spans.

The rafter system does not have to be erected by climbing onto the building. It will be safer, easier and faster to assemble the roof truss on the ground. But keep in mind that in this case it will be more difficult to lift it - this will require the help of several people or a crane.
First you need to build the side rafters, and then the front ones.
If you plan to make an attic, then in one of the front rafters you need to prepare a window frame, and in the other make a doorway.

Stage 4. Roof insulation and waterproofing
The purpose of the roof is to protect the premises from external influences, so this stage is of great importance. To ensure waterproofing, a vapor barrier film must be overlapped on the rafters, the joints must be connected with adhesive tape.
The most popular material for thermal insulation is mineral wool - it is fire resistant, durable and has high thermal insulation properties. You can use roll and slab insulation, the latter is more convenient. Between the rafters, you need to tightly lay the insulating material, seal all the gaps with foam. It is also recommended to overlap it, and close the seams with foam.
But try not to compress or bend the edges of the material too much. Any deformation significantly reduces the properties of the insulation.

Stage 5. Installing the crate of the truss system
It is permissible to use different materials for construction: beams, boards, etc. The crate can be in the form of a solid shield or with gaps between the beams - it all depends on which roofing material you choose. If you plan to install a soft roof, then the crate is best done from boards with gaps of 1 cm.

