Projects of open and closed summer kitchen. The most economically equipped summer kitchen on the plot, economy summer kitchen projects All-season kitchen in the country house from foam blocks
Cooking is a process that should be enjoyable. But here a lot depends on the conditions in which you cook. The atmosphere should inspire and encourage the creation of delicious and healthy meals filled with your good energy. In the summer, in the closeness and the smoke of the closed space of the kitchen, you are unlikely to be able to easily tune in to a pleasant cooking process. But if you have a dacha and a couple skillful hands, you will be able to solve this problem. By building a summer kitchen in your country house, you will not only save your main room from excess fumes and stove heat, but also get the opportunity to cook outdoors in a pleasant environment, surrounded by greenery and blown by the breeze. In addition, an open summer kitchen can be equipped with a barbecue, barbecue or fireplace and have cozy picnics surrounded by people you love.
Where to begin
When planning the construction of a summer kitchen for a summer residence, first of all, it is worth finding answers to a number of important questions that will determine your further actions:
- Appointment. Will you use the summer kitchen only during the warm season or all year round? Do you want to cook on it often and a lot, or will it become a place for occasional gatherings with friends and family?
- Dimensions. Will the space of the summer kitchen become a working place for the hostess for the period of closing home preparations and cooking, or will it be organized in the form of a kitchen-dining room, designed for a certain amount of of people?
- Accommodation. Will the kitchen be implemented as an extension to the main room of your cottage or will it be a separate house? How will your facility be positioned in relation to the sun, wind, green spaces, communications and roadways?
- Project's budget. The materials that you choose for the summer kitchen, the design of the room and the time spent on implementing your ideas will largely depend on it.

Advice ! Examine the ready-made projects of summer kitchens for summer cottages offered by construction companies, and independently adjust them to your scale and needs.
After analyzing all the significant points, you will need to accurately establish for yourself the following:
- Open or closed type suits you;
- Will you build a stove or will you limit yourself to installing a stove, do you plan to use a barbecue and grill;
- How will water supply, sewerage, electricity supply be organized in your project;
- What design are you planning to do?
Open summer kitchen
An open type of summer kitchen usually has one to three walls, a canopy as a roof, and in its appearance is more like a gazebo.

Advantages of an open view of summer kitchens:
- Such an open-type summer kitchen design can be built quite quickly and without much effort.
- It is economical in terms of production costs.
- When cooking outdoors, you will not suffer from the stuffiness, fumes and burning that are characteristic of indoors.
However, there are a number of significant drawbacks to be aware of:
- In the open summer kitchen, you can cook and relax only while it is warm outside;
- You can't leave food on it;
- Kitchen furniture for the winter must be removed into the house so that it does not deteriorate from dampness;
- The room is poorly protected from drafts, showers and insects.
Outdoor summer kitchen on the veranda
Organize open type summer kitchen can be on the veranda of your country house.

Advice ! To make the open summer kitchen look good, try to equip it in the same style with your summer cottage.
First of all, you will need to lay the foundation. Its depth should match the depth of the foundation of the house. Next, you form the frame of the walls, perform their sheathing and build the roof. It is better if the roof is the same for the house and the veranda. The open summer kitchen looks good, the front or side wall of which is glazed.
Open summer kitchen
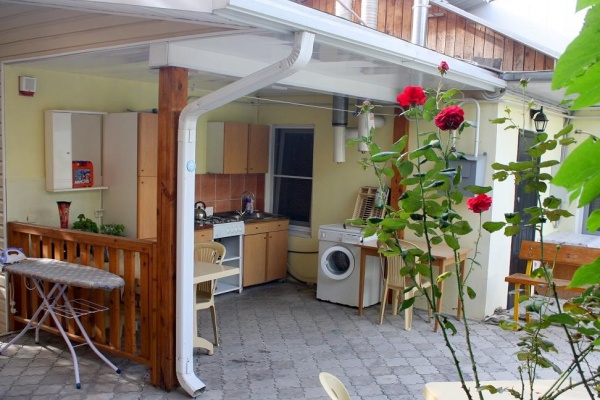
An open summer kitchen can be organized as an extension and connected to a summer house or to any utility room, for example, with a bath.

Such an extension is created by expanding the porch and is a kind of terrace with all the necessary kitchen attributes: gas or electric stove, furniture, sink, etc. During the construction process, support structures are mounted along the wall of the cottage, on which a canopy is attached. The floor can be laid out with paving slabs directly on the ground, having previously leveled it. This is possible if the water in this area is not collected after rain. You can protect an open summer kitchen from bad weather with the help of sliding or removable side partitions, tarps, roller blinds. The walls can be covered with plants that will please the eye and create coolness in the heat.
This open summer kitchen project is cheaper and easier to implement than the foundation option, but it is less reliable, because when the soil subsides, the kitchen may begin to tilt.
Open summer kitchen-gazebo
Such an open summer kitchen project is especially good when you want to install a fireplace, a barbecue in the kitchen and use it for a pleasant pastime in the company of friends and relatives. Even in such a gazebo it will be convenient to process the harvest harvested in the country.


Decide what foundation to open kitchen- gazebos - tape or columnar - will suit you more. The roof is recommended to be made of bitumen or ondulin. When creating a frame, materials such as stone, brick, timber are usually used. Any wall can be made closed to be placed along it kitchen set and other necessary attributes. Leave the rest of the openings open so that you can breathe fresh air freely. If necessary, they can be draped with fabric curtains and roller blinds, decorated with lattice panels, entwined with plants, or organize various partitions.
Closed summer kitchen
The closed summer kitchen is a full-fledged house, standing separately or attached to another building: a country house, a bathhouse, utility room. This option is well suited for areas where the climate is characterized by strong winds, rains, early frosts. You may like this design if you like to relax in the country in winter and prefer to cook in a separate room. It needs more capital investments, a serious approach to design, it is more difficult to build. But in the end you can build a house with comfortable conditions, including the availability of heating, running water, sewerage and electricity. Often, closed kitchens in the country are equipped with a cellar, a fireplace, and utility rooms.

Advice ! When it is impossible to conduct electricity to the summer kitchen, you can buy a country diesel generator and feed everything kitchen appliances From him.

In this project of a closed summer kitchen: 1 - the kitchen itself, 2 - the dining area. Numbers 3, 4 and 5 indicate stools, a table and corner bench in the dining room. The kitchen area is equipped with a cupboard (6), stove (7), sink (11), water tank (12). Also provided here: chimney (8), ventilation duct (9), window (10).
Kitchen-house with a terrace
The closed option can be organized as a detached house with a terrace. In the house you will cook, so it must be equipped accordingly, and on the terrace under a canopy you can organize dining area where the table and chairs will be located.
Such a project is quite labor-intensive, since it requires laying a monolithic foundation, building walls, installing windows and doors.

When equipping the walls, the strength of the wind in the area should be taken into account so that they can adequately withstand all possible load. For a closed summer kitchen, a gable roof is recommended, which reliably protects against rain and snow.

You can also consider the project of a kitchen-house with a cellar. Then, before starting the construction of the premises, you will need to dig a foundation pit, and the walls of the cellar will serve as the foundation for the upper part of the building.
How to build a summer kitchen with your own hands
There are several main stages in the process of implementing any kitchen project for a summer residence:
- Select the location of the building.
- Prepare the foundation.
- Raise the walls.
- Build a roof.
- Run interior decoration premises.

Choose a location
A well-placed kitchen should:
- Conveniently located relative to the entrance to the house. On the one hand, it is not desirable that the fumes from the stove fall into your main home. On the other hand, too much remoteness of the kitchen from the house will lead to the fact that in bad weather, it will be quite difficult to transfer ready-made food to the house.
- Stay away from places that publish unpleasant odors, for example, country toilet, pets, cesspools, etc.
- Be far enough away from traffic so that exhaust fumes and road noise do not interfere with your cooking and breathing fresh air.
- Be available for connection of communications: water supply, sewerage, heating, electricity.
- For an open summer kitchen, one should take into account the wind blowing, the warming up by the sun's rays, and the presence of greenery around.
- Attention should also be paid to the level of groundwater, as well as the terrain on which the cottage will be built.
Attention ! Country house and the premises of the summer kitchen should be at least 15 meters away from cesspools, toilets and livestock enclosures.
We are preparing the foundation
What kind of foundation you will lay depends on the chosen kitchen project for the cottage. A construction option is also possible without a foundation, for example, when you concrete a site of a suitable scale and reinforce it with a metal mesh. It will be appropriate for an open summer kitchen with a light canopy. For closed brick or stone summer kitchens, a strip foundation is usually prepared. Column supports are suitable for open kitchens or tree houses.
The foundation formation algorithm is as follows:
- Along the perimeter of the kitchen being created, select soil or dig small holes with a scale of 30x30 cm and a depth of 70-80 cm.
- Create a 20 cm thick cushion of crushed stone and sand and tamp it down carefully.
- Pour the foundation, platform or pillars. Concrete can harden from 7 days to a month.
- If it became necessary to fill the floor, after removing the layer of soil from the platform under the kitchen, pour sand 15 cm thick, crushed stone on top and pour the pillow with a cement solution. If you plan to lay tile floors, the surface must first be leveled using sanding or a cement screed option.

Attention ! For an open summer kitchen, the floor should be raised above the ground to a height of five to seven centimeters so that rainwater does not flood the room.
Building walls
Your kitchen design may or may not have walls, but supporting pillars, on which the roof or canopy will be held, will most likely have to be mounted. Materials for the construction of walls can serve:
- Stone, e.g. marble, limestone, granite, slate, concrete. The advantage of stone is its reliability and durability, but its prices are quite high. The thickness of the walls will depend on temperature regime environment in which it is intended to operate. One brick thickness may be enough for you. For use in the cold season, additional insulation may be required.
- Wood. This material is cheaper than stone and easier to use. Buildings made of it look elegant and are popular with summer residents. However, it should be noted that in order for the tree not to deteriorate over time, it must be subjected to special processing. outer skin can be made of boards or siding, for the inside - use lining, drywall. To create fasteners, metal corners or self-tapping screws are used.
Building a roof
You can choose from the following roof options:
- Flat or one-sided. This is an easy-to-build and inexpensive roof.

- Gable. More reliable, durable and popular.

Attention ! The long canopy will protect the walls in the rain and extend the life of your kitchen.
We do interior decoration
Often, flooring is performed using linoleum, parquet, laminate, decking or ceramic tiles.
In the case of wooden walls and ceilings, they can be covered with a protective layer of drying oil, which will prevent negative impact dampness and time for this material.
The interior of the kitchen should be pleasing to the eye, create coziness and comfort, so furnish the kitchen in such a way that it would be pleasant for you to be there and, of course, take into account your financial capabilities.

To complete the picture, do not forget about the aesthetics of the area where the kitchen will be located. You can surround it with flowers and shrubs, lay paths beautifully and even create a fountain.
In the warm season, especially during the conservation period, the presence of a summer kitchen greatly facilitates the cooking process and makes it more enjoyable. For construction, it is not necessary to hire specialists - all stages can be completed independently. If you choose the right materials, the summer kitchen will not cost too much, which is of great importance for the economical owner.

Summer kitchens can have a closed and open design. Both types are widely used in country and suburban areas. To decide which type to opt for, you should study all the advantages and disadvantages of such buildings.
Closed kitchen

This kitchen has windows, doors and a roof like a complete home. There are options combined with a bath or outdoor shower, cellar, workshop, with attached veranda for eating and relaxing. Usually, light materials are chosen for construction and they do not insulate the building, so the room is not used in winter. At the same time, there are kitchens made of bricks and foam blocks, which are more durable and can be insulated if necessary.

Advantages of closed structures:

- closed kitchen requires more materials, so it is more expensive;
- the project will require additional calculations;
- the construction process is more laborious and lengthy.
This option is more suitable for country houses where the owners live permanently. But in the country, which is empty in winter, the construction of a closed kitchen is not always justified.


Open kitchens are built according to the principle: a concrete or tiled base, supporting pillars along the perimeter, a canopy roof. An oven is installed under a canopy, kitchen table, shops. Sometimes the kitchen is made without a canopy if it is used exclusively for cooking on vacation on clear days. building material for an open kitchen, wood, brick, natural stone are most often used.

Summer kitchen- barbecue project
Advantages:

- do not use the room during the cold period;
- no protection from wind and insects;
- poor protection against rain and dampness;
- no food left.
- all the furniture that will be there must be hidden for the winter in closed, dry rooms, otherwise it will quickly rot.
Where to build

The location of the kitchen matters a lot. The utility yard and cesspools should be as far away as possible, but communications, on the contrary, are closer. You will have to supply water to the kitchen, connect electricity, so it is best if the building site is near the house. You can not choose a place in the lowland, otherwise the floor will be damp. A closed kitchen can be attached to the house, and it is better to place an open one in a garden or near a pond, away from the road.
Construction of an open kitchen

There are many options for building an open kitchen, but the main stages are always the same: marking and preparing the site, laying the foundation, installing load-bearing supports, installing the roof and interior design.

For work you will need:
- level;
- shovel;
- pegs and twine;
- tape measure; sand and gravel;
- cement mortar;
- pieces of reinforcement;
- timber 150x150 mm;
- Circular Saw;
- drill;
- screwdriver;
- hammer and nails;
- metal squares;
- self-tapping screws;
- boards 25 mm thick;
- primer.
Step 1. Markup
The selected area is cleared of all unnecessary and the sod is removed. One of the corners of the building is determined and a peg is driven into the ground, and then the width and length of the platform for the kitchen are measured from it. Beacons-pegs are placed in each of the corners and a twine is pulled between them. Check the correct markings on the diagonals - they must be the same length. After that, inside the markup, the soil is selected to a depth of 15-20 cm, leveled and rammed.
Step 2. Foundation pouring


The bottom of the pit is covered with an even layer of sand, leveled, well compacted. If necessary, communication pipes are laid along the bottom, crushed stone is poured from above. A reinforcing mesh is laid, metal rods 20 cm high are inserted at the corners of the site, formwork from boards is installed around the perimeter. The height of the formwork above the ground should be about 10 cm; using the level inside the formwork marks the pouring line of the mortar so that the site is flat. Knead and pour it into the formwork, guided by the markup. The communication pipes are closed with plugs, otherwise the solution may get inside. The surface is leveled with a rule, after which the foundation is left until it dries completely.
Also, the foundation for the kitchen can be made of a columnar type using bricks. Markup is done in the same way monolithic foundation, after which they are dug square shape pits up to 50 cm deep. The bottom of the pits is covered with sand and compacted, then a metal bar is inserted, around which brickwork is made. The height of the foundation columns is checked by level. If necessary, the columns are leveled with an additional layer of cement.


A lower trim made of timber will be attached to the reinforcement bars, which is joined using the “paw” method. The beam is laid on roofing material, previously glued with bitumen to each column. On the bottom harness subfloor logs are mounted from edged boards.
Step 3. Installation of bearing supports


In the lower ends of the timber, holes are drilled for reinforcing bars protruding from the foundation. The front racks are made 20 cm higher than the rear ones, so that it is more convenient to mount the canopy. The bars are installed at the corners of the site, leveled, and then fixed to the base with metal plates on anchor bolts. By top edge the poles are connected with a strapping of timber, and horizontal jumpers are mounted at a height of 70-80 cm from the floor.


Table. Roof slope depending on the coverage
| Roof material | Weight sq. m (without base), kg | Approximate durability, years | Roof pitch, deg. |
|---|---|---|---|
| Sheet black steel | 3-5 | 20-25 | 16-30 |
| Galvanized steel | 3,5-6 | 30-40 | 16-30 |
| Ruberoid | 4-13 | 13-15 | 4-27 |
| Roof tiles | 40-50 | 60 and over | 30-45 |
| asbestos cement | 14-20 | 40-45 | 27-50 |
Step 4. Mounting the canopy
To top harness the boards treated with a primer are nailed along the width of the structure every 50 cm. The internal joints must be reinforced with metal squares so that the canopy does not disperse in strong winds. A waterproofing material is laid on top of the boards, thin slats are stuffed and sheets of slate or

Step 5. Floor arrangement
by the most optimal solution will be tiled. It is not afraid of moisture, is easily cleaned of dirt, easily tolerates temperature changes. Wooden flooring in an open kitchen quickly becomes unusable under the influence of atmospheric moisture, cracks from the sun, is damaged by insects, and therefore requires regular maintenance. So, take the tile, tile adhesive, notched trowel and start laying the floor. Lay out the tiles from the corner: apply a little solution to the back surface, apply to the floor and level.

In the photo - porcelain tiles for the street
To make the seams as even as possible, special plastic crosses are used, which are inserted at the joints. Laying is constantly controlled by the level, otherwise the coating will be uneven. If installation or a barbecue is planned in the kitchen, it is not necessary to veneer the floor under them. After completion of work, the seams are cleaned of dust and residues of the solution, and then rubbed with a special mixture.
Step 6. Arrangement of the kitchen
For greater comfort, the space between the floor and horizontal lintels can be sheathed with boards or closed with wooden curly grates, leaving the doorway free. They install a stove, benches and a table, supply electricity and water. In conclusion, wooden surfaces are stained and varnished or painted, protecting the wood from environmental influences.

Construction of a closed kitchen
Closed kitchens are also very diverse, but the most convenient and easiest to implement is a frame structure made of timber on a columnar foundation. For sheathing, it is recommended to use clapboard or OSB boards.
In the process of work you will need:
- Circular Saw;
- jigsaw;
- drill and screwdriver;
- building level;
- shovel;
- a hammer;
- roulette;
- dry planed timber 100x100 mm;
- boards 25 mm thick;
- long cord and pegs for beacons;
- ruberoid;
- cement mortar;
- building studs;
- working out;
- nails and screws;
- sand.
Step 1. Marking the site

The selected site needs to be prepared: level the hills, remove tall grass, stones, debris. Now you need to determine where the facade line will be located, and put 2 beacons on it. The distance between the pegs is equal to the length of the facade. Perpendicular to this line, the length of the side walls is measured from each beacon and marks are also placed. A cord is pulled between the beacons, and diagonals are measured in the resulting rectangle. If they are equal, the markup is correct. In the center of each side of the future kitchen and at the intersection of the diagonals, it is also necessary to drive in pegs - these are marks for intermediate pillars.
Step 2. Foundation preparation

They dig holes with a shovel in places marked with pegs to a depth of 40 cm; the dimensions of the pit should correspond to two cinder blocks laid flat. The walls and bottom of the pits are leveled, a 10 cm layer of sand is covered and rammed. 2 lower cinder blocks are laid on the sand, covered with a solution, a construction pin is inserted in the center so that it rises about 25-30 cm above the soil surface. Then the second row of the cinder block is placed on top across the first, again the solution and the third row. Finished poles must have the same height and be located on the same level.
Step 3. Mounting the bottom trim

The lower harness consists of two rows of timber, knocked together. All bars are generously coated with used oil, paying special attention to cuts, and then dried. In the beams of the lower row, you need to make holes for the studs, and in the upper row, cut grooves for the floor beams. The depth of the grooves corresponds to half the thickness of the beam, and the width is equal to the thickness of the crossbar.
Pieces of roofing material are laid on top of the pillars, putting them directly on the studs. Lower bars applied to the poles, mark the location of the stud, drill holes of the appropriate diameter. Then they are laid on the foundation, the studs are threaded into the holes and the nuts are tightened. The ends of the studs should not protrude above the surface of the beam, on the contrary, it is better when they are slightly recessed into the tree. Check the strapping with a level around the entire perimeter to avoid distortions. Now you need to put top row beams, nail them, insert the floor beams into the grooves. For greater reliability internal joints it is better to strengthen with metal plates with screws.
Step 4. Summer kitchen - log house
This summer kitchen is wonderful appearance, environmentally friendly and retains heat well indoors. However, it is extremely important to treat the material with fire-retardant impregnation in order to exclude the possibility of wood damage by insects.
It is worth remembering that the log house will shrink for several years, so it is not recommended to additionally sheathe the walls of the summer kitchen.
In order for the walls to be even inside the room, each log is hewn along the entire length with a planer or grinder. At the ends of the logs, grooves are cut for joining (the "paw" method). This method was not chosen by chance. Firstly, the logs will be used without residue, and secondly, even if the corner joint has a small gap, this will not affect the functionality and convenience of the summer kitchen.


To build a mortgage crown, we lay two logs opposite each other. We put two more perpendicularly on them. We adjust this square to a single plane so that it clearly lies horizontally on the lower trim of the future summer kitchen. Next, the following logs are marked, cut down and laid, between which we lay a heater, for example, moss or felt.

The openings for the doors and windows of the summer kitchen will be cut down in the future. The double-glazed windows themselves Entrance door together with accessories will be installed after the completion of the roof installation process. We bring to your attention a photo report of the construction of a summer kitchen 7x3 m.

Video - Cutting "in the paw"


Step 5 Mounting the roof


Roof trusses are knocked down from boards with a section of 150x50 mm, reinforced inside with spacers and mounted to the upper trim. The ends should protrude beyond the perimeter of the walls by 10-15 cm. The distance between the trusses is approximately 1.5 m. The roof elements are fastened to the trim using metal plates and bolts. After installing the rafters, a ridge is stuffed along the trusses, and then the roof frame is sheathed with boards. A corrugated board, slate or other roofing material is laid on the crate.

The roof is covered with ondulin


How Wrong Windows Installed


| Summer kitchen 7x3 m | Project |
|---|---|
| Kitchen height | Height from floor to ceiling: 2.15 m. (+-5 cm). Skate height: 1.5 m (+-5 cm) |
| Support-columnar blocks (one bedside table 400x400x4000 mm in size consists of four cement blocks 200x200x400 in size, interconnected with a sand-cement mixture). | |
| Base binding | Unplaned timber with a section of 100x150mm. The harness is laid in 1 row on the edge. |
| Sexual lags | Unplaned timber 40x150 mm. with a laying step of 700 mm. |
| log cabin | Profiled timber with a section of 90x140 mm, natural humidity |
| Log house assembly | The log house is assembled on metal dowels (nails 200 mm). |
| Assembly of log corners | Assembling the corner into a "warm corner" |
| Mezhventsovye warming | A flax-jute cloth is laid between the crowns |
| Partitions | Partition timber 90x140 natural humidity. |
| Floor | Double floor: draft floor: edged board 20 mm; finished floor: grooved floorboard 36 mm. ( chamber drying). It is insulated with KNAUF mineral wool 50 mm., ONDUTIS insulation is laid in 2 layers. |
| Ceiling beams | Unplaned timber 40x100 mm. with a laying step of 700 mm. |
| Ceiling | The ceiling is lined with clapboard conifers(chamber drying). The ceiling is insulated with 50 mm KNAUF mineral wool, ONDUTIS insulation is laid. |
| truss structure | Bar 40x100 mm. with a laying step of 1000 mm. |
| roof lathing | The crate is made from a 20 mm edged board. (through the board). |
| Terrace | |
| According to the project of the kitchen - gable. | |
| Gables | Sheathed with clapboard of coniferous species (chamber drying). Installed in the gables of the kitchen ventilation grates(prevent condensation). |
| Celestials and cornices (roof overhangs) | They are sewn up with clapboard of coniferous species (chamber drying). Overhang width: 350 - 450 mm (4 linings). |
| roofing material | Ondulin, color to choose from: red, brown, green. |
| Window | Wooden with double glazing, installed according to the project. The size of window blocks is 1x1.2 m. Casing bars (swarms) are installed in the openings. |
| doors | Paneled. Casing bars (swarms) are installed in the openings. |
| Room decoration | All corners and joints in the kitchen are sealed with plinth; window, doorways are surrounded by a platband. |
| Terrace | Support poles are installed with compensation lifts (jacks) for shrinkage. Terrace finishing: railings - carved, balusters - chiseled. Steps are installed at the entrance. |
Step 6. Arrangement of the kitchen
When the basic processes are completed, you should come to grips with the internal arrangement of the kitchen. The walls can be sheathed with plastic or, since the frame sheathed with plywood does not look very aesthetically pleasing. Then they install a stove, a sink, connect electricity and water, and arrange kitchen furniture. On this, the construction of a closed kitchen can be considered completed.
Video - Do-it-yourself summer kitchen
Summer kitchen - required attribute any full-fledged dacha, because it is this place that is responsible for high-quality and spiritual rest. Agree, nothing distracts from the routine city everyday life like home gatherings and outdoor holidays. Do you want to have a cozy place for a pleasant pastime on your site? You are able to realize this idea with your own hands: determine the size, location, type, decor and other subtleties, prepare the material and start building. And so that you can realize the project not only in words, but also in deeds, we offer simple instructions"from" and "to" with a photo - it will serve as a great help in your work.
Project preparation: a kitchen with a stove and barbecue, with a terrace or a gazebo?
Before you start the actual construction process, you need to decide what exactly, how and where you will build. That is, it is necessary to prepare a project.
The first important question is the type of summer kitchen. There are a lot of options here, since the summer extension can have a different configuration:
- Open kitchen with barbecue or barbecue.
- Open kitchen attached to the veranda of the main house.
- Closed kitchen with fireplace or stove.
- Closed kitchen with separate outdoor gazebo.
- Closed kitchen with barbecue or barbecue area.

Open summer kitchen project
The second question is dimensions. Will your summer building be just a work area or a full-fledged kitchen-dining room? Based on the answer, calculate the size of the structure.
The third issue is communication. Think about how your kitchen will be organized sewerage, plumbing, gas and electricity.
The fourth question is the location of the summer kitchen. Here it is necessary to take into account the following factors:
- fire safety - a kitchen with any source of open fire, be it a barbecue, fireplace, stove or barbecue, should be located at least within a radius of 8-10 m from flammable structures and materials.
- remoteness from roads - you do not need to place the kitchen close to the road, as noise, gases and dust will create not the most pleasant conditions for relaxation.
- the presence of trees - it is desirable that around the kitchen grow tall trees, the crowns of which give coolness and shade.
- remoteness from cesspools and toilet buildings - the kitchen should be located no closer than 15 m to areas with unpleasant pungent odors.
Foundation laying
When the organizational issues are resolved, you can start building. In particular, to the formation of the foundation.
If you stopped at open lung a kitchen without a roof, a simple platform with a depth of 15 cm can act as an alternative to a full-fledged foundation. To equip it, remove a layer of earth from the site, fill the bottom of the resulting pit with sand and lay it on top metal mesh. Then lay bricks, tiles or boards on the grid.

Strip foundation preparation
If you are building a more solid kitchen with a full roof, stove or fireplace, you need to lay a strip or column foundation:
- Dig a pit 50-80 cm deep along the intended perimeter.
- Pour a 20 cm layer of sand on the bottom and tamp the resulting pillow.
- If you are equipping a strip foundation: fill the pit with rubble, lay a reinforcing mesh and install a formwork of wooden boards around the foundation perimeter; mix cement and fill it with formwork; align the resulting cement surface rule and leave to dry.
- If you are equipping a columnar foundation: build columns on the sand equidistant from each other (width - at least two bricks); glue roofing material to each post with bitumen; fasten a strapping from a bar on the roofing material; mount a draft floor from edged boards on the strapping.
Important! The draft floor of the summer kitchen should be raised 5-7 cm above the ground so that the extension does not flood after rains or snow melt.
Walling
If you have abandoned the classic foundation, you need to bury wooden posts in the corners of the site before building walls. Depth - no more than 50 cm. Then fill the columns with concrete. When the mortar dries, install the beam structures, connecting them metal corners. Further, from those sides where the walls are conceived, build wooden frames. To fasten the elements, use ordinary self-tapping screws. Now you just have to sheathe the frames with clapboard, board or plywood.
Advice. Sheathing material must be processed protective composition from decay.
The walls of an open kitchen with a full foundation are arranged a little differently. First, the frame is assembled from wooden beams: it is attached to the foundation with metal corners. And then, on this frame, a frame of wooden elements, which is subsequently sheathed.

Summer kitchen made of wood
And an even more complicated procedure is the erection of walls of a closed extension with a foundation. Here you can already use not only wood, but also brick and stone. First, supporting structures will need to be built at the corners of the site: for a wooden kitchen - from a log house, for brick or stone - from fittings or metal elements. And then the laying of the material itself is carried out. The optimal width of the walls is half a brick.
Do not forget to provide openings for doors and windows during the construction of walls.
Roofing and finishing
The easiest to implement and financially affordable roof option for a summer extension is a shed construction. Its frame is assembled from transverse and longitudinal beams, fixed to each other with self-tapping screws. As roofing material for the roof of a closed kitchen, you can use:
- slate;
- tiles: metal, bituminous, composite;
For an open kitchen, you need to choose light materials:
- polycarbonate;
- corrugated glass;
- only
Roof sheets must extend beyond the boundaries of the walls in order to ensure effective drainage of water.
Advice. If you want to use the kitchen in the cold seasons, you need to take care of high-quality thermal insulation. For example, you can layer mineral wool or polycarbonate.
After the construction of the roof, proceed to the installation of windows and doors. Joints between openings and established structures Be sure to seal with silicone.
The final stage is the finishing of the summer kitchen. On the floor, you can put parquet, tiles or wooden boards. Lining, drywall, plaster are perfect for wall cladding. If the kitchen is made of wood, the walls can be additionally not covered with finishing materials, but only treated with drying oil to protect from moisture.

Properly equip the drain
An important point is lighting. Here you can use all kinds of pendant lights and lanterns instead of traditional lamps. At the same time, it is desirable that the electrical accessories be equipped with additional protection against moisture. Especially if the extension is open.
As you can see, a cozy summer kitchen in the country is an absolutely realizable dream. To bring it to life, you just need to understand the features of each stage of construction and follow their sequence. You have already familiarized yourself with the main intricacies of building a summer kitchen, so now it remains to follow the instructions and implement your plan on your site.
Summer kitchen with barbecue and Russian stove: video
Summer kitchen: photo


summer kitchen, whether simple gazebo with a barbecue or a solid structure with a stove and communications - this is a building of essentials in any area. After all, country life is unimaginable without barbecues, outdoor gatherings, and also without seasonal preservation of products. In this article, we presented 11 tips, 70 photo ideas and several videos that will help you create your ideal summer kitchen.
What summer kitchens are there?
They can be roughly divided into three types:
- Open (for example, barbecue gazebo, terrace or patio)- simple frame building without insulation, often without walls (fully / partially) and even a roof. In fact, an open summer kitchen is a shed or gazebo with a barbecue / oven and a dining area that can only be used in summer. It is good because it is comfortable to cook and eat in it, and communicate with guests on fine summer days. An open kitchen is easier, faster and more economical to build than a closed one. In winter, a summer building with a canopy can be used as a warehouse for storing the household. The disadvantages of an open kitchen include the limited period of use of the structure, as well as the lack of protection of furniture, appliances and kitchen inhabitants from insects, rain, wind and sun. For the winter, all furniture and appliances will have to be cleaned in a dry room.
Classic summer kitchen with barbecue and stove in the yard country house in the Moscow region
- Closed (for example, a grill house or a veranda)- a capital covered structure / annex with insulation and glazing, sometimes even heated all year round. In fact, this is a real house, consisting of a kitchen and a dining room. The closed summer kitchen is good because you can cook and eat in it even in bad weather with rain and winds. Thanks to the walls and roof in such a house, you can equip a full-fledged kitchen with a refrigerator, microwave, gas /electric stove , dishwasher, TV and other equipment. True, on warm days, cook in closed kitchen it will be as hot as in the main house. Also keep in mind that its construction will cost you more than an open building.


- Combined- this type of building combines an open and covered space under one roof. Also, this category includes a summer kitchen combined with a bath. Such a kitchen is good for everyone and has only a couple of disadvantages - doubly complex design and increased budget.
Now let's look at the characteristics of freestanding and attached kitchens:
- Freestanding- are good because they allow you to place the hearth away from the house so that smells, smoke and noise do not penetrate the house. It makes sense to build a freestanding summer kitchen if you have enough space on the site, if it has, say, beautiful garden or a pond if you want to decorate the area with a nice new structure.
- Adjoining the house- a terrace or veranda can become an excellent summer kitchen, because it is much easier and cheaper to build (one wall has already been erected) or re-equip, and it is very convenient to move between the house and the annex. True, the minus of the summer kitchen on the veranda / terrace is that the smoke, heat, smell and fumes from the stove will enter the living quarters, and part of the kitchen will remain through.


11 tips for building, furnishing and designing a summer kitchen
No matter how thoughtful and beautiful your summer kitchen is, its unfortunate location on the site can complicate both construction and further operation. Therefore, the place is the first thing to think carefully about.
- From a practical point of view, it is more convenient when the summer kitchen is located close to home. So it is easier for the inhabitants of the dacha to move between objects, and holding engineering communications cheaper, faster and easier. However, from an aesthetic point of view, a place near the "sights" of the site that you can admire (for example, near a reservoir or garden) is better suited. The following factors are also bonuses: protection from the wind, privacy from the eyes of neighbors and proximity to trees that can shade the building and create coolness in it on hot days.

Summer kitchen at the cottage by the pond
- Unsuitable places for a summer kitchen: near the road, garage, toilet, cesspools / compost pits, chicken coop and other places where unpleasant smells, noises, exhaust gases, etc. can interfere with your rest.
Tip 2. Grill, barbecue, oven or oven complex? Solve this issue before developing / selecting a summer kitchen project
- If the stove is the heart of urban cuisine, then the grill, barbecue or oven can be called the heart. country kitchen. Before you start designing, think about what kind of hearth you need: a grill, a brazier, a stove, or even a stove complex? Should the grill be stationary or portable? Coal or gas? With or without chimney? What size and where will the fire source be located? A lot depends on your choice - from the type of foundation to the shape of the roof. So, for example, for the construction of a stove, you will have to take care not only of the foundation, chimney and cladding, but also provide a place for storing firewood in the project.
Understand the features different types outdoor hearth will help you.

Stationary gas grill built into a brick structure
Tip 3. Do you want to build a summer kitchen with your own hands quickly and on a budget? Build an open gazebo made of wood, with a light roof, without solid walls and a stove
In this case, instead of a monolithic or pile-strip foundation you can get by with a columnar foundation. The building itself will consist of 4 (or more) pillars and a one-/double-pitched roof with a light roof, for example, made of polycarbonate. This is a very simple design that you can actually build with your own hands in just a couple of days and with a minimal budget.
The following selection of photos presents design options for simple summer kitchens.

A simple summer kitchen in a country house in the suburbs

For the construction of a summer kitchen with your own hands, it is easiest to use wood. True, larch or teak should be preferred to pine, as they are stronger and, moreover, age beautifully

Simple summer kitchen from a bar with a shed roof
However, there is a way to make a summer kitchen with your own hands even faster and cheaper. Lay down a paving slab, set up one or two large garden umbrellas, arrange furniture, install a sink and a portable grill and start cooking!
On the one hand, the cellar in the summer kitchen is very useful, because it is so convenient to store food in it like in a refrigerator. On the other hand, its creation significantly increases the cost and complicates construction. Especially if we are talking about an open building, because then the cellar will have to be insulated and protected from leaks. Even in the main house, you can do without a cellar and a basement, let alone a summer kitchen.
Tip 5. The summer kitchen, the facade of the house and the landscape should be designed in the same way.
When choosing or developing a summer kitchen project, considering options for its decoration, keep in mind that it should be combined with the facade of the house and other buildings on the site. So you create a real summer cottage complex and achieve a sense of order. It doesn't have to be a 100% match. color scheme, decoration, architecture and style, but objects must have something in common. The photo below shows an example of a modern summer kitchen on the terrace. wooden house from a beam.


- The closer the summer kitchen is located to the house, the more similar both buildings should be.
- If there is an object on the site that is out of the “big picture”, say, a hastily built bathhouse, then the design of the summer kitchen can be planned in such a way that it combines the features of both the bathhouse and the house. So some randomness of the building will be corrected.
In an open kitchen, the floor can be sheathed:
- A wooden board covered with oil or wax for outdoor use (lacquer is less suitable, as it will begin to crack over time and require re-coating).

Outdoor kitchen in the country house with a floor finish made of larch deck boards coated with a matt azure based on alkyd resins
- Terrace board (made of wood-polymer composite).

- Stone or special street tiles. True, such a floor requires a strong foundation and a large budget.

- By the way, we recommend to refrain from too dark a floor, as crumbs, dirt and puddles of water will be especially noticeable on it.
- If the floor of the open kitchen has a slight slope (1-2 cm), the rainwater that has got inside will drain on its own.
Tip 7. Stick to the "working triangle" rule when planning your kitchen
In the arrangement of kitchens, there is a rule of the so-called. "working triangle", which consists in the fact that the three working areas (sink, stove and refrigerator) should be in reasonable proximity to each other, forming a triangle. Ideally, it should be equilateral. Thanks to this layout of zones, the kitchen is as convenient as possible.
- In the summer kitchen, this rule does not always apply in pure form, because she can be too small , narrow, elongated, irregular in shape, instead of a stove, it most often uses a stove, grill or barbecue, and there may not be a refrigerator at all. However, try to get as close to the ideal as possible and do not line up work areas in one line.
So, for example, if in your summer kitchen the source of fire is a barbecue and it is taken out of it, then the sink and food preparation area should be installed as close as possible to the exit.
- If the kitchen is small, then you can build the kitchen L-shaped. For a narrow kitchen (for example, on a veranda), a two-row layout may be suitable. AT square shaped kitchen U-shaped layout will fit best.

If only a single-row layout is possible in your summer kitchen, then a compact mobile island / peninsula will help make it more convenient.
Tip 8. The dining area should be at least 2 m away from the barbecue / stove
Ideally, the distance between the dining table and the barbecue / oven / grill should be approximately 3 m. In this case, smoke, heat and odors will not bother vacationers, and chips, ashes and sparks will not spoil the look of the dining area.
Tip 9. Use furniture that will withstand outdoor conditions
The kitchen set and dining furniture in the summer kitchen must withstand high humidity and temperature fluctuations, so luxurious wood furniture, furniture made of laminated chipboard / MDF, as well as furniture upholstered in fabric or leather should be avoided.
But for the summer kitchen, the following options are suitable:
- Veneered MDF furniture;
- Wooden garden furniture(folding structures are especially suitable, which at the end of the summer season can be easily transferred to the pantry);
- Wrought iron outdoor furniture;
- Furniture from of stainless steel(if you do not want to clean the kitchen set for the winter, choose stainless steel furniture);
- Wicker furniture made of natural wicker, rattan or plastic;
- Plastic furniture (eg, polycarbonate).
The photo below shows an example of the design of a summer kitchen-terrace with an all-season stainless steel set.

In this selection of photos you can see ideas for furnishing a summer dining room.

Often summer residents forget to pay enough attention to the lighting of the summer kitchen. But it is with its help that you can create real coziness and comfort.
- Ideally artificial light in the evening it should be soft, uniform and multi-level. To do this, the room should be illuminated not by one chandelier, but by several lamps: floor / pendant lights, wall sconces, dot spots, suspensions, table lamps, floor lamps and / and or garlands of light bulbs.
- With the help of light, you can divide the space into zones, for example, in the kitchen and dining room. So you will have the opportunity during evening meals to hide the work area in the dark and illuminate only a beautiful table.

- To make it comfortable for you to cook in the evenings, install the backlight directly above the work area. If you limit yourself to a lamp installed behind it, while cooking, your back will block the light.
- Metal, plastic, wooden and wicker lamps with additional water protection are suitable for lighting an open summer kitchen. Ideally, these should be garden lamps.

- Around the summer kitchen and along the path, you can install lights that work on solar panels. They store energy during the day and turn on automatically in the evening. True, they give little light, and on cloudy days they do not charge at all.
- With the help of hedges, pergolas or screens with climbing plants you can make the summer kitchen more secluded, close the view on the unsightly places of the site.
- Decorative plantings, flower beds and bushes can mark the boundaries of zones, hide the foundation and simply decorate the summer kitchen and general form territory.
For a summer residence, many plan to order or build a summer kitchen with their own hands: this is a very simple design that makes it possible to relax in the fresh air and cook food at the same time. The construction provides a stay on the plot with special comfort. It requires the arrangement of a special site using improvised materials.
Simple or complex kitchen design
If we supplement the idea of a simple summer kitchen, then only after making the appropriate changes to it:
- The place in the gazebo, reserved for the kitchen, can be made elongated to install a stove in it.
- Replace the hexagonal gazebo with an ordinary rectangular building.
- Transform the dining room of the summer building.
- Replace the canopy with a conventional closed structure.
- Leave the area in front of the entrance to the building open.
Similar schemes for the construction of simple summer dining buildings are a popular addition to small dachas located near water bodies. To assemble the frame of the structure, its roof and beams of glazing frames, it is ideal to use a block of wood. Floors indoors and outdoors can be laid out from terrace board, for the manufacture of which sawdust and a polypropylene binder are used.

Another option summer building a construction can become, where the kitchen is a frame structure, the walls of which are built of brick and wood, that is, they consist of 2 parts. back wall can be laid out using red brick.
The lined wall should be a continuation of the base of the stove and the working space of the kitchen.
Doors from boards of a conventional design, consisting of 2 wings, are hung on the end of the room. On the other side, you can lay out a fireplace with a chimney and hood. The front wall can be framed with a three-section double-glazed window. The dimensions of the structure are usually 4x3 m, which is quite enough for such a design.
Own summer cottage, which is not filled with outbuildings, can be equipped additional building. It can be a summer kitchen made of timber, which is universal design. If the project involves laying out a stone stove, then this task is the most difficult. An additional foundation will be required, so it is better to entrust the work professional craftsmen.
simple summer building
Projects of summer kitchens for a summer cottage are presented in large numbers on specialized sites. You can choose a glazed or open room on all sides with a fireplace and stove. It must be in the same style. For example, furniture can be made from improvised materials. Everything is determined by the needs of the family and the state of its budget. It is important not to miscalculate with the installation of the stove and the assembly of the design of the summer kitchen for giving with your own hands.
The advantages of a simple summer building can be realized not only in the warm season, but also in the cold. Features of the structure to be equipped should depend on how often it will be used: permanently or exclusively in the summer. Usually on the territory of personal plots there are no separate catering units with a barbecue.

It is hot in summer and there is no particular desire to spend time preparing food. In this case, arranging a summer kitchen with your own hands should make life easier for many summer residents. A summer kitchen under a covered shed is an ideal option for private households. The device of such a structure differs from the usual construction of a building, but the general idea is reminiscent of the construction of gazebos or verandas with a stove or a barbecue. The elements included in the design of the kitchen are as follows:
- stove for a summer kitchen with a hood;
- a canopy over the kitchen and a place for organizing a feast.
The structure has a rigid concrete pavement, usually it is a platform paved with tiles. It could be wood flooring. The summer kitchen in a private house usually looks like an extension, which makes it possible to create a structure that is easier to install, which reduces construction costs.
Options for a summer extension for cooking may be different. The kitchen of a simple design should be under a canopy or in a gazebo. The presence of one load-bearing wall is best option such a building that allows you to close the kitchen and the feast from any drafts.
Summer kitchen options
You can start resolving the issue by deciding on the budget of the future building and the place for its construction. You should first imagine the future design, draw up its scheme, taking into account your own needs. In most cases, summer kitchens for summer cottages are built in the following options:
- A simple kitchen design that takes up little space under a canopy.
- An area with a canopy of 10-15 m², with an additional place where you can cook on a barbecue or stone brazier.
- Closed space equipped with a ventilation and air heating system.
In the first case, the site should be removed from the main building or resting place. Often this type of kitchen design is 3 m². The option involves the installation of a stove, the presence kitchen utensils. The room must be closed from the weather. Usually it is located near an open terrace or veranda.
A 10-15 m² area for the kitchen is spacious, providing for a dining area and a regular partition, a bar counter and additional premises. In the summer kitchen, which has a ventilation system, there may be a basement room for food storage. The right choice of a place for installing a kitchen may involve the construction of a gazebo, which must be equipped with an oven and a refrigerator. Even the most simplest design kitchens with a barbecue must have a gutter to drain water, possibly the presence of running water.
How to set up a simple kitchen
Summer kitchen construction is the most successful. If such a project is preliminarily thought out, then it will not cause various problems during its implementation. The room is a conventional structure that can be built with your own hands.
Among the main difficulties that need to be solved in the process of arranging a summer kitchen may be the following:
- The problem of choosing a conventional stove with its installation inside the kitchen.
- However, it will be necessary to solve the problem of arranging the chimney through the roof covering.
The room itself should be comfortable and warm. It requires excellent ventilation without drafts. It is best to choose the usual corner placement of the building or the frame installation scheme with walls and window openings. The room must have a dining area, so the best option might be normal installation dining table along the countertop.

Simple Options summer kitchens are suitable for summer cottages large sizes, but also suitable for mansions. Installed on wood flooring a kitchen structure raised above the ground due to a light foundation can be covered with a sectional canopy. This will allow you to use the available space for safe cooking and recreation. For such a room, it is enough to provide a gas-balloon stove and an exhaust hood. As a result, a minimum of waste and pollution can be achieved when this option is compared with the use of firewood.
The design of the summer kitchen can be placed inside glazed gazebo hexagonal shape. The dining room is located under a canopy. Design closed type ensures compliance with sanitary and hygienic standards, involves the normal storage of product stocks.
Dinner table and the chairs are moved under the canopy, which does not interfere with free movement from the kitchen to the dining room. For the construction of a summer facility, a team of 3 people will be required. It can be done within 10 business days. The price of a conventional building is approximately 25 thousand rubles. From usual options this design is more convenient and comfortable, so summer residents often choose it for their plots.
Foundation preparation and building construction
Do-it-yourself summer kitchen can only be built on a separate base. The back wall is laid out half a brick wide from a red sample. A large stove and countertop can be attached to the back wall.
The initial stage of construction is associated with the arrangement of a conventional shallow foundation, reinforced with a grid of hot-rolled bar having transverse section in 10 mm. A tape 55 cm wide under the body is often poured along the contour in the form of the letter P. A foundation is required under the furnace.

Combining a stove with a fireplace
After pouring the base, columnar supports are mounted vertically; later, a gable type roof can be placed on them. In the far corner of the building, you can place a stove, possibly combined with a fireplace. This simple method allows you to connect the stove and fireplace under a common chimney. The fireplace itself is made according to the usual scheme. The furnace is built according to the technology of laying the furnace. For laying out the combustion chamber, fireclay bricks are used.
Arrangement of the roof structure
To tie vertical support pillars should be using a beam located horizontally. The following elements are installed on it:
- vertical supports;
- ridge run;
- truss system.
Waterproofing is installed on the rafters and a crate of battens is stuffed for laying tiles. The roof can be made of profiled sheet or shingles. The floor in the room is laid out from ordinary clinker tiles on a sand base.
For designs with wood burning or coal stove this option is safe if the floor in the building is made of wood. The front wall of the structure is reinforced with a horizontal crossbar, and then the entire surface is sewn up with clapboard. After that, you need to insert window frame.
Fasteners should be stuffed onto the facade frame and doors with 2 wings should be hung. The lumen comes out wide, which provides access to light and air, especially in the evening. The choice of any option for a summer kitchen must be compared with one's own capabilities, if there is a desire to implement the project with one's own hands.
Suitable options are not only modern technologies erection of gazebos, but also outdated methods. You can equip the roof and floor with the help of inexpensive materials. The duration of the operation of the structure depends on the quality of the work on its arrangement.