Closed summer kitchen in the garden. Projects of open and closed summer kitchen
Well, in what place else can you so fully gain strength and improve your health so well, if not in your own, albeit sometimes modest, but undoubtedly beloved suburban area? A special pride of summer residents is a summer kitchen, projects and photos of which can be found on various sites on this topic.
What could be better than organizing a barbecue or barbecue in the fresh air filled with the smell of herbs. Only a country house or cottage gives you the opportunity to enjoy eating in nature. If you approach this task on a large scale, then a pretty country kitchen will surely grow on the site. In this case, the preparation of country delicacies will become a real pleasure.
Purpose and benefits
The summer kitchen in the country is a cooking area in the heat, when you don’t want to be in the house, and even fill it with the aromas of boiled or fried food. The summer kitchen in the photo is a kind of platform where there is a space for cooking and eating. Stove, dining table, chairs, benches, cabinets, shelving and everything that is in an ordinary kitchen. If at your dacha you want to achieve maximum comfort and fully enjoy your family vacation, it makes sense to think over the kitchen object in your summer cottage well and comprehensively and then start construction. 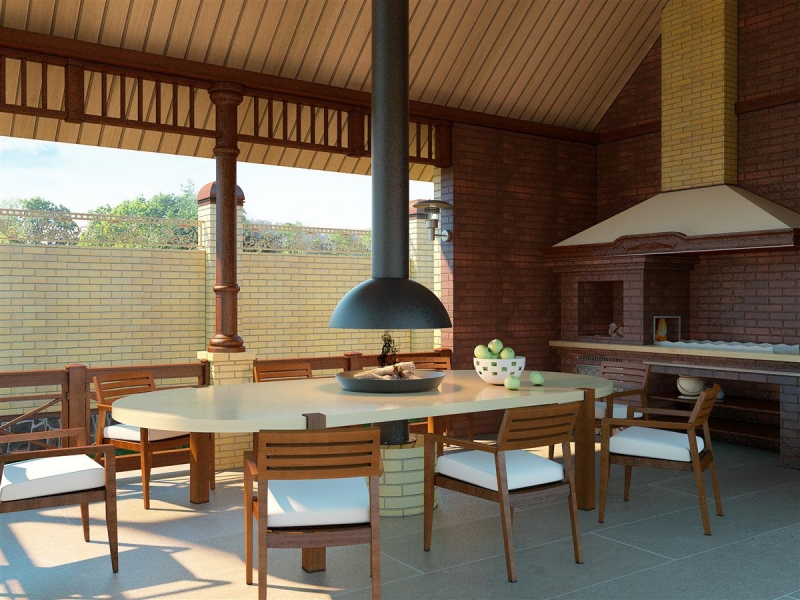
Varieties
Summer kitchens are open and closed.
open
A lightweight canopy or a solid roof will protect even from a heavy downpour, and replaceable bulkheads, roller blinds or sliding wall structures will save you from the wind. If a summer kitchen is being built with your own hands, then the easiest way is to cover a pitched roof. When the owner of the cottage entrusts this work to professionals, then there is no limit to the imagination. 
To build a summer kitchen in the country with your own hands, you will need a stone for the foundation and wood for wall cladding. For the construction of the roof use:
- metal tile;
- slate;
- corrugated board;
- polycarbonate;
- bituminous tiles.
Advantages:
- Low construction costs.
- An uncomplicated construction method and the least number of calculations.
- Cooking lunch in the open air is a pleasure.
- The very process of eating in nature can be a very pleasant experience.
- The open kitchen in the country house in the photo below is quite suitable for receiving guests.
- In the gazebo, crumbs that have fallen on the floor or spilled soup are not terrible.
Disadvantages:
- Unable to use the room in winter.
- No protection from winds and insects.
- Moisture gets in from the outside.
Closed
For those whose summer season is not limited to the warm season, you need to take care of a more solid structure that will be comfortable in all weather conditions. Summer kitchens in a closed-type cottage, the photos of which you will see below, can become a multifunctional object. It is sometimes not a sin to place guests in them for the night, if necessary. As for building materials, everything is subject to the budget of the owners and the life of the kitchen house. Of the materials, drywall, lining or plywood can be useful, and if the building is planned for many years, then it is better to use foam blocks, brick or stone. 
Advantages:
- Reliable shelter from rain and wind.
- Temporary accommodation for guests.
- Absolute safety of things and products.
Disadvantages:
- A closed outdoor kitchen in the country will cost more, as more material will be needed for construction.
- A summer kitchen project of this type will require additional calculations.
Choice places
Outdoor kitchen can take up space on the site, both large and small. Therefore, a place for it must be selected immediately along with the preparation of a construction plan. 
If you are thinking about how to make a summer kitchen, here is what you should focus on when designing:
- Consider the remoteness of the object relative to the house, garden, utility yard.
- It is allowed to build a kitchen in the shade of trees, but so that the garden kitchen is warmed by the sun for at least a few hours.
- It is necessary to investigate the terrain where you intend to build, the groundwater level in the country, vegetation, distance from neighbors and other landscape features.
- The proximity of communications should be taken into account, because it will be necessary to carry out water and lighting. Therefore, it is best if the summer kitchen in the country is not far from home.
- You can not choose a place for a veranda in a lowland - the floors here will be saturated with moisture.
Material selection
Natural materials - stone, wood - will organically fit into the design of the kitchen in the country. Lightweight and durable materials are also supplied to the markets, which have won the approval of consumers for their durability and practicality - PVC, aluminum, polycarbonate, polystyrene foam, etc. 
A rock
The floor and walls can be faced with stone - marble, slate, granite, limestone. A stone-covered (or stone-styled) authentic or decorative fireplace will look good. A tile is well suited, which perfectly withstands not only bad weather, but also the usual pollution for this room, rubbish. We offer you to see what a brick summer kitchen looks like, the photo of which is below. 
Wood
Wood is much more economical than stone. It is easier to process wood, and the buildings made of it look lightweight, beautiful, and have a pleasant smell. However, without specific treatment, it is subject to deterioration, deterioration, infection with a fungus. 
Other materials
It can be lining, plywood, drywall. Parquet, laminate, linoleum are used for flooring. The interior decoration of the summer kitchen is a tile, wallpaper of different types. Siding can be used for exterior finishes; corrugated board and metal tile - for roofing. 
Design Choice
The main rule is that the design of the summer kitchen must harmoniously fit into the concept of the entire site. In designing a stone veranda, details made of wood or compositions with other natural materials are applicable and even necessary. 
Often, verandas in the country look like fabulous houses or gazebos. It is very easy to organize such a summer kitchen design: you just need to hang lanterns, decorate with carvings and decorate with climbing plants.
Filling and furniture
Country furniture is now easy to buy in every furniture store. It is possible to purchase ready-made sets or order a kitchen interior from a professional designer. The furniture and the whole design of the summer kitchen in the country, the photos of which can be seen in the article, look extremely beautiful, your eyes run wide from ideas and projects, but you need to equip your own kitchen. 
When thinking about furniture, it is useful to come up with an image of your kitchen: capital or simple portable. In the first case, all furniture items are fixed at the right points and are not subject to movement around the perimeter. This version may be relevant for a completely open floor plan. 
The countertop should have such dimensions that it can comfortably accommodate the necessary appliances and food during cooking - this is at least 90x60 cm. Add ergonomics and a cabinet under the countertop. It is good to arrange pots, plates, pans and necessary cutlery in it.
Decor
Wood decor looks great on the veranda, but it must be treated with high-quality varnish that can protect the tree from rain and sun if the room is open. Summer kitchen in the country - projects, photos of which can be found in abundance on the Internet, will surprise you with a variety of decor and content. 
Do not forget about accessories in the interior. On hinged shelves, you can beautifully arrange decorative dishes, vases with bouquets of summer flowers, various containers with the necessary spices.
Popular Ideas
Let's move on to the main thing - the kitchen in the country: ideas and tips for their implementation.
Alcove
Arbors are convenient for barbecue, barbecue or oven. 
Frame racks are made of timber, brick, stone in the corners, and the whole structure is fixed with a roof made of simple roofing material (ondulin, bitumen sheets).
The gaps between the racks leave or sheathe one of the walls in order to hang shelves or kitchen cabinets. 
Openings can be decorated with curtains, openwork wooden panels, which can later braid weaving plants. To make the room comfortable in any weather, you need to put sliding removable fences or roller blinds.
small house
Country kitchen in the form of a house looks like a real home. But much more work will be required for its construction, whether it is laying the base (preferably monolithic) or installing windows and doors. 
The gable roof is the most functional. Powerful showers and snow caps will not be a problem with such a roof. A good cellar does not hurt at all, in this case the construction must begin with digging a pit. It is in the house that the summer kitchen with a veranda as a dining area will look beautiful.
Veranda
If you decide to equip a summer kitchen on the veranda, then remember that it should be in good harmony with the whole house. Construction begins with a foundation, the depth of which should be commensurate with the depth of the foundation of the house. 
It is better if the country house and the veranda have one common roofing. To make the room bright, put large swing windows or glaze the entire wall.
Annex
The summer kitchen project with a terrace is shown in our article. Support beams are placed along the walls of the house, covered with a roof under a roll. On a well-leveled area where water does not accumulate, the floor can be arranged simply on the ground. An excellent material for it will be paving slabs. 
Bathe in the summer in the house, if you can spend time outdoors? Not the best idea. And cooking or spinning is even worse. It is much more pleasant and useful to spend time under a canopy or in a light, ventilated building, which many call a “summer kitchen”. Do-it-yourself summer kitchen is easy to build, especially open options.
Open summer kitchen: views and photos
Open - it is rather an open gazebo or veranda. A very good option for the warm season. Not in all regions, even in summer, you can stay outside for a long time. Then they make closed summer kitchens - this is already a small house that can be built using any technology that seems most attractive to you.
Summer kitchen - annex
Let's start with open areas. If it is supposed to transfer the main activity to fresh air for the summer, it will be more convenient to attach the summer kitchen to the existing house. In this case, do . Most often, they open it first. The easiest way is to make a wooden extension. In a very open version, these may simply be pillars supporting the roof.
The easiest option is a few pillars supporting a light roof - a do-it-yourself summer kitchen is ready
This option is very good for the southern regions, where most of the year you can stay outside for as long as you like. For more northern regions, or if it is a house of permanent residence, it is usually decided to make the extension more closed. First they make railings, and then they often think about closing the spans with something else: they want to extend the “period of use”. As a result, the open summer kitchen becomes closed.

The most common material for this kind of extensions is wood. It is plastic, forgives many mistakes that can be subsequently corrected without disassembling the structure, therefore it is easy to work even without skills. It is also light, because the foundation for a summer kitchen made of wood can be made lightweight - columnar or
The second most popular material is brick or decorative stone. In the presence of "direct" hands and the observance of technology, amateur developers can work with this material. You should not take on the construction of a house without experience, but you can try to lay down pillars and partitions for a summer kitchen.

But since even a pillar made of brick or stone no longer weighs a hundred kilograms or more, a more solid foundation is required for it. Considering that it will still take the load from the roof, then you will have to make pillars or piles with good bearing capacity.

Takeaway from the side of the house - an open terrace with a stove and barbecue
If you are thinking about putting up brick walls later, it is better to immediately fill in the pile-strip foundation, and deepen the tape below the freezing depth. If this option is not suitable - the freezing depth is large or the soils do not allow, you will either have to make a monolithic slab, or abandon the brick walls, making them using a different technology, even though they are of the same tree or according to a self-built summer kitchen, which is good because knowing all design features to the smallest detail, you can subsequently upgrade the building.
Separate building
Someone does not really like the kitchen smells that can enter the house from the extension. Then they erect a small building at some distance from the house. The presence of summer kitchens is an almost obligatory attribute of private houses in the southern regions. Before the era of air conditioners, cooking in the heat of the room was a real torture: the high temperature "overboard", heated walls, and even the heat from the stove - the conditions are hellish, while the rest of the rooms are also heated. That's why they made at least small detached houses-arbors, in which they put a gas stove and a cylinder with liquefied gas in the cities, in the villages they put a small stove. Some even cooked on "kirogaz" or primus.

Modern climate technology can negate all these inconveniences, but free-standing summer kitchens are still being built. They are often still used as a guest house - having made them.
The cheapest option is poles that support the roof. They can be wooden, brick or combined - consisting of a stone plinth, and the top of a bar. This is the best option from the point of view of operation: the wood is protected from the effects of most of the precipitation, and at the same time the weight is not very large.


One of the easy options
What to make the floor
The floor in such a kitchen can be plank. It is easier to do, but many are confused that the wood will be located with little or no protection. There are two ways to solve the problem. The first is to use effective protective impregnations - such as oils or wood waxes intended for outdoor use. They do not create a shiny surface, but protect well from moisture and dirt. Using varnishes for summer kitchens is not the best idea. They begin to burst and crack, in order to renew the coating, the old one must be completely removed, while oils and wax require only thorough pre-cleaning, after drying, a fresh layer can be applied.

This terrace has been treated with Pinotex Terrace Oil
The second way is to use not wood, but a wood-polymer composite (WPC). These are boards that consist of a mixture of wood fibers and polymers. They look and feel very much like wood. The only difference is that they almost do not change size depending on humidity, however, thermal expansion is present. Such boards are called "decking" or "planken" depending on the profile of the board. There is also a "garden parquet". This is a coating made of the same material, only assembled into panels, like parquet. They can simply be laid on the ground, without any preparation.

The terrace and the floor in the summer kitchen are made of WPC - a wood-polymer composite
The advantages of WPC include a long period of operation without changing the original properties. It is calculated in tens of years, but varies greatly depending on the manufacturer. Minus - not the most democratic price. Perhaps this is due to the fact that the technology is relatively new, not yet particularly mastered, although there are Russian manufacturers of such products.
A stone or specialized tile is better tolerated by the weather, but the installation of such a floor is not an easy task. If you simply put it on a gravel-sand bedding, locking it up in the fall, the tile may crack or bounce in frost. We have to make an insulated monolithic slab, observing all the technology: with a sand and gravel layer, insulation, reinforcement, pouring concrete. The dimensions of this slab are 50-60 cm larger along the perimeter than the planned building. In general, the costs and work are serious, although it is convenient to operate.

One of the floor options is large concrete slabs made of high grade concrete.
After the time when the concrete gains strength (at least 2 weeks should pass, and this is at an average temperature of + 20 ° C), the coating can be laid. You can use flagstone - a stone sawn into layers, you can - porcelain stoneware, or frost-resistant tiles.
An easier option is to lay out the site with paving slabs. But this is only a summer option. But - without fuss with the foundation.

If a do-it-yourself summer kitchen is being built in the country, this is perhaps the best option. It turns out inexpensive and practical.
Closed summer kitchen
Those who want to have an all-season summer area for gatherings or cooking put up more permanent buildings. Most often, these are buildings using frame technology - quickly and relatively inexpensively, more expensive, but more thorough - from a log or timber.

Option "framework" - racks made of timber sheathed with clapboard
In the case of frame construction, everything is very simple: racks of timber are placed with a small step (you can even splice the boards), then they are sheathed on both sides with some kind of finishing material. What - at your choice, even clapboard - wooden or plastic, blockhouse, any other material. Inside, to save money, they often sheathe plywood, fiberboard, GVL, OSB, or something similar. If desired, it can be insulated. The frame is sheathed on one side, insulation is laid (usually mineral wool), the sheathing is mounted on the other side. You can insulate not only immediately, but after some time, you just have to remove the skin on one side.

What does the "skeleton" of the summer kitchen look like using frame technology
Another frame building is convenient in that it can be given any shape, and the foundation can be relatively light - depending on the soil - pile or tape. Such foundations are also needed for wooden buildings - from logs or timber. All the rules are the same here. It is important to find or order a project, and to assemble it is a matter of technology.

Naturally, you can build from any other materials - from foam blocks - to brick or even rubble. It's all about the amount that you plan or can spend on this building. The construction of foam concrete, aerated concrete, some building blocks, adobe will also be inexpensive. Cinder block, like adobe, can be made independently, so the choice of material is up to you, and then everything is built according to all the rules. With only one deviation: insulation for the summer kitchen is either not done at all, or it is made minimal. Another point - heating, as a rule, is absent, and this must also be taken into account when choosing materials for construction and decoration.
Photo report of the construction of a summer kitchen with an open veranda
A summer kitchen was built with the opportunity to “sit in the air”. Therefore, the option with an open veranda was chosen. The base of the house is assembled from a bar 200 * 200 mm, internal piers - from 150 * 100 mm. Outwardly, I like the carriage, but it is godlessly expensive, because the beam was hewn to create a similar relief.
The foundation is made columnar. Since the construction is light, the soils are normal, the posts were buried only 60 cm.

The strapping was assembled from a bar 200 * 200 mm. It was pre-soaked with an antiseptic. The corners were connected as usual - they made gashes. The crossbars were mounted on metal U-shaped plates. The beam was not rigidly fastened, since there will still be heaving, so that the building has the opportunity to “walk”.

Racks were made of timber 200 * 200 mm, internal filling of 150 * 100 mm.

The walls were assembled quite quickly and without problems: there were no cuttings, just pieces of timber of the required length were nailed to the posts. The roof is gable, with a slight slope. On the one hand, the extension of the rafter legs is greater - in order to make a canopy from the side of the veranda, which will also cover from oblique rain.

The ceiling lining is made of unedged board, which was then brought to perfection on our own machine.

Ceiling filing - board

Summer kitchen design: photo
After the construction of the summer kitchen, another problem arises: it is necessary to arrange it. Arrangement includes not only the choice of a table and chairs, it is also necessary to organize the working area in some way, to store somewhere for the oven, which is often placed here. 


In the country, you just need a room where in the warm season you could cook dinner or do conservation for the winter. And even if there is a large house on the site, every hostess simply dreams of a summer version of a closed-type kitchen.
But how inexpensively to make such a design with their own hands, users will learn by reading this article.
Features and types of buildings
The closed summer kitchen is a full-fledged detached building with plumbing and electricity. A great place for receiving guests in the warm season, family dinners and friendly gatherings in the evenings. This is the right solution for regions with rainy summers and early frosts. However, it is not worth using such a design in winter, unless the owners have worried about heating in advance.
Such a kitchen can be an independent building or an extension to the main house, a utility block or a bathhouse. It can be equipped with a fireplace, barbecue or oven.
An interesting layout option is a kitchen-house with a terrace or veranda. All the necessary kitchen appliances and equipment are compactly placed inside, and a dining area is formed under the canopy.
In the villages, preference is given to a variety of buildings with a cellar and a barbecue. But you need to take into account the fact that the walls of the basement will become the upper part of the foundation of the kitchen, so they must be made of the most durable material.
It is important to note that if it is not possible to conduct electricity on the territory of the site, then the right decision would be to purchase a generator that runs on diesel fuel, which will provide light for both the building and kitchen appliances.
The construction of a closed type structure is a laborious process that requires accurate calculations and drawings of every detail of the building. Designing a project with the correct dimensions will speed up construction and help avoid mistakes.
Site selection and structure design
The initial stage in the construction of a summer kitchen in a summer cottage is the choice of location, and then the design of all its components. And so that the result of the work does not disappoint, you need to remember a few features.
- When laying the foundation, carefully analyze the level and location of groundwater, take into account the typical relief features of the region.
- The design should be as far away from the highway as possible so that the noise of cars, the smell of fuel and exhaust gases do not spoil the stay and recreation of its residents.
- If the summer kitchen is an addition to a private house, it is worth considering in advance its remoteness from the main structure. It must be placed in such a way that the smoke from the barbecue or stove does not enter the house, and ready meals do not have to be carried too far.

- Do not forget about fire safety rules. When using open flames in the kitchen, nearby flammable buildings must be at least 10 m away from it.
- The location should be convenient for summing up communications (sewerage, water supply and electricity).
- Be as far away as possible from the barnyard, cesspool and outdoor toilet so that unpleasant odors do not enter the premises (minimum distance 15 m).
- Care must be taken that trees grow near the kitchen, which will provide coolness and shade to the room on hot summer days.

- Before proceeding with the construction of walls and roofs, it is necessary to clearly understand what wind force will be faced at different times of the year so that the kitchen can easily withstand any weather changes.

The best options for building materials
The choice of building materials directly depends not only on the service life, the preferences of the owners, but also on financial capabilities. But today there are many practical examples of successful combinations of cheap materials with more expensive ones.
During the construction of a summer building, the following are most in demand:
- brick;
- concrete;
- polycarbonate;
- natural stone;
- corrugated board;
- wood;
- lining;
- aluminum.
We must not forget that the summer cottage should emphasize the beauty of the future structure, so it would be appropriate to lay paths of gravel or tiles, plant flowers and perennial shrubs. And if there are financial opportunities to build an artificial pond.
If the site is fenced with a brick fence, it is good to make a kitchen from the same material or using natural stone. Such a structure is not afraid of the influence of the external environment and will stand for a single decade.
It is much easier to make a prefabricated indoor version of the kitchen from a bar. Such a project will be less expensive, but every detail of the building will require constant care and processing. In addition, wood wears out much faster than brick or stone.

For flooring use:
- laminate;
- parquet;
- linoleum;
- decorative tiles.
The roof can be covered with:
- corrugated board;
- soft roof;
- metal tiles.
Exterior decoration of the building with siding elements will give the kitchen a modern look.
Foundation laying
Having decided on the place and formed the design project, it is necessary to proceed with the construction of the foundation of the building.
When planning an open version of the summer kitchen, one could simply make a small depression in the ground over the entire area of \u200b\u200bthe future structure, fill it with sand. Give time to stand a little, and lay out a layer of bricks or boards. But the basis of a closed kitchen should be a durable and solid foundation that requires phased laying.

If the flooring will be made of decorative tiles, the work surface must first be sanded or a smooth cement screed must be made.
Photo: monolithic foundation ready for construction
wall construction
If the owners of the summer kitchen plan to use it in late autumn during the first frosts, you need to take care of strong walls so that the room inside does not freeze under the influence of low temperatures. Therefore, in such cases, it is better to build masonry half or a whole brick thick.
Photo: brickwork process using laces
Fans of wooden house structures will assemble the walls much faster. Their basis will be a frame made of timber. And as fastening elements it is better to use metal corners and self-tapping screws. The outer part of the walls can be sheathed with a thin layer of boards.
Interior decoration is carried out using drywall, plastic, lining or plastered.
Roofing installation
The roof of a closed kitchen should be durable and practical. Therefore, when purchasing materials for its installation, you can opt for:

The shape of the roof depends on the preferences of the owners.
Photo: log building with a gable roof
If the building is to be used in winter, it is recommended to insulate with mineral wool or other heat-insulating material.
It is better to make one roofing wing or canopy longer in order to create additional protection for the walls during rainfall, thereby extending the life of the entire building.
Interior decoration and interior design
Qualitatively executed interior decoration and well-chosen interior design will create a pleasant atmosphere of home comfort.
Getting to the arrangement, it is worth paying attention to such nuances.

When creating a closed summer kitchen, it is necessary to accurately calculate every detail of the structure and correctly combine the selected building materials with the general style of the room, then the resulting structure will become not only a source of pride, but also a favorite place for the family for many years.
Book a gazebo with professionals
Don't have time to build your own? Please contact the following organizations.
A beautiful, practical and cozy summer kitchen is needed in every country house. We will show step by step and in detail the construction of a summer kitchen with our own hands.
Do-it-yourself modern summer kitchen in the country house.
If you want to place a summer kitchen on a veranda or terrace that has already been built, then preparatory work will be kept to a minimum.

But if you are going to place the kitchen separately, then you need to make a foundation for it.


A drain for waste water should also be provided. If you have sandy or sandy soil, then a simple filtration well is enough to drain from the sink. And since this will not be the main sink, and the volume of wastewater will be small, an old barrel or other container is quite suitable for arranging such a well.

Holes are drilled in the bottom and walls of the barrel to make a sieve, and crushed stone is poured under and around it.


At the top, the formwork is being built again. We will pour concrete into it, and thus get the basis for the future work surface.

But first you need to separate communications.

We pour concrete and wait until it hardens.

You can proceed to the installation of equipment and decoration.

For surface finishing, we chose tiles - they are practical and durable. And we plastered and painted the walls of the blocks.

In our project, we decided to install a small canopy over the working area.

The canopy will protect us from the sun, in addition, lighting is mounted on it.

If you prefer to shelter from the weather, then you can modify this version of the summer kitchen by installing a more substantial canopy.

A modern summer kitchen made by yourself will become a favorite place for the whole family in your country house.
A simple DIY summer kitchen project
If the prospect of such capital construction scares you, then you can build a summer kitchen on a frame made of wood or a metal profile that is used to install drywall.

This method is much faster and easier, but it is desirable to place such kitchens under a canopy and on a prepared surface (on a terrace, on a tiled courtyard, etc.)

A wide range of built-in appliances allows you to equip such a kitchen with any fixtures you need.

The profile can be sheathed with drywall for further tiling.

Surely, every person who has given away in nature has noticed more than once how appetite is played out in the fresh air. Especially, this is true when there is with. But, unfortunately, it is impossible to use in the cold season. For this reason, people who are going to go to the dacha all year round need to insulate it in advance or build a kitchen that is suitable for all-season use.
A set for a country kitchen differs from a simple one, first of all, in that it is most often performed in
Ideally suited to the overall appearance of a country house. Before attempting this, there are a number of factors to consider:
- Yours should have free space for the construction of a winter kitchen, the area of \u200b\u200bwhich will be at least 25 m 2, including indents.
- Do not forget about - it is desirable that the kitchen sewer was combined with the common house. If it is separate, then you need to think in advance that your neighbors do not experience any inconvenience.
- Decide what time of year the kitchen will be used.
If there is no way to equip a full-fledged winter kitchen, you can solve this issue in other ways:

Construction technology directly depends on what time of the year your kitchen will be operated. Country kitchen for winter conditions should have good thermal insulation, insulated ceiling, walls, floor. In this case, the kitchen no longer becomes just a place for outdoor cooking, but turns into a full-fledged, separate room, the interior of which is complemented by a kitchen set (albeit not the same as in a city apartment).
For a winter kitchen, it will be an excellent solution. To do this, you need to put double-glazed windows of a dark shade, made under a tree, and able to keep heat well. It is advisable to give preference to such double-glazed windows that can be removed without much effort as soon as the summer weather comes.

During construction, you should pay attention to. It must be concreted as high quality as possible. At the same time, try not to lose sight of the fact that concrete laying must be done in accordance with all technical rules, with the presence of a foundation pit. It may not be too deep, but it must be present. Otherwise, after a few long autumn rains, your kitchen may “float”.
 Scheme for the construction of a columnar foundation for a country kitchen
 A great material for building a winter kitchen will be wood. When choosing a material, you should be very careful about the quality of the wood. The material must be thoroughly dried and treated with a special compound, which will prevent the development of mold fungi.
Insulation of the winter kitchen
Insulation of a winter kitchen is a difficult technical process, where there is no room for error. An improperly constructed structure can lead to quite a lot of damage, calling into question the very existence of a kitchen. In addition, it is necessary to carry out insulation work with high quality and accuracy, since at first minor flaws will not be too noticeable, but their further correction will be very time consuming and will take a lot of time.
The process of warming the internal walls in the kitchen can take place regardless of what material was originally used in the construction. The whole difference concerns the technology of the process. To date, the range of heaters is very large, which allows it to be used in a variety of ways. For insulation, as a rule, loose and non-flowing materials are used.
 The process of wall insulation with mineral wool
 The kitchen can be insulated with mineral wool, sedge or sawdust. If the walls are insulated with the help of bulk materials, then it is imperative that after laying the roofing material, the walls should be lined with a board.
In this video you can see the process of insulating a kitchen in a country house with Isover insulation based on fiberglass
In addition to processing the walls, it is necessary to insulate the ceiling and floor. The floor can be insulated with any insulating material. The heat insulator is laid on the subfloor on a layer of pre-laid roofing material. Then a layer of roofing material is also laid on the insulation itself. After that, the wood-fiber protective layer is laid. Upon completion of all the work done, a simple linoleum can be laid on the floor.

The ceiling is insulated in exactly the same way as the floor. In the process of insulating the internal walls, remember that during operation there should not be any gaps, otherwise cold air can enter the room through them.