How to assemble a gazebo. Wooden garden gazebo

There are so many options for building gazebos in the countryside that choosing the design that is ideal for you personal plot and it will not be difficult to meet the requirements for it. Below we describe how to make a gazebo-tent, a mushroom and a rotunda with your own hands. In addition, you can learn how to build beautiful gazebos of other designs.


If you do not want to install a durable stationary gazebo on your site, you can limit yourself to small things: build a light tent.


To build a gazebo-tent with your own hands, you need to place four concrete disks or slabs in the corners of the site you like, which will serve as the foundation of the structure. In each of them, install a metal rod or tube made of aluminum or durable plastic, which are connected together at the top using a clamp or wire. You form supporting arches for the canopy.


As you can see in the photo, for a gazebo-tent at the dacha, you can use thick colored fabric, oilcloth or thick film as a covering:


First secure the material in the center - put a new clamp over the connection of the arches or wind wire or twine, but through the roof fabric. Then stretch the awning and tie it to the supports, and to prevent the fabric from slipping along the pipes, tighten the clamps in place of the ties. When making such a gazebo with your own hands, a circle of two or three posts from the ground to the awning can be stretched mosquito net(as an option - a large mesh net through which to let climbing plants go), leaving space for the entrance.


Under this gazebo-tent at the dacha you can place a rocking chair, table, lungs plastic chairs, a folding bed for daytime sleep - everything you need to relax on fresh air. This design will successfully last the entire summer season, and it only needs to be dismantled with the onset of cold weather, and then only by removing the fabric awning.


How to build a beautiful mushroom gazebo for your dacha with your own hands (with photos and videos)


To protect from the sun and rain, you can make a mushroom summerhouse on your site with your own hands: the support of this small open building consists of two parts: the lower one - a metal pipe 0150 mm and 1.5 m long, and the upper one - a wooden post 2 m long.

Before you build such a gazebo in your country house, you need to install a pipe. To do this, dig a hole 50 cm deep in the intended location, install a pipe, fill it with crushed stone, compact it and concrete it. While the concrete hardens, you can make the mushroom itself.


The lower end of the wooden post is cut so that it fits tightly into the pipe to a depth of 50 cm. Then the roof frame is assembled at the upper end of the post. Having measured 70 cm from its top, bars 15 x 15 cm and 5 cm thick are nailed on four sides. To each of them, slats 80 x 15 cm of the same thickness are attached from below, thus obtaining a cross-shaped bottom part frame. When making a ramp, four similar slats are used. They are marked in place and filed down at the ends. At the joints, gussets are nailed to increase strength.


Look at the photo - such a self-made gazebo can be sheathed with any suitable material (plywood, oilcloth, plastic):

The finished rack with a mushroom roof is inserted into the pipe and a bench is installed around it. The iron posts of a wooden bench can also be concreted into the ground. If desired, a small table can be arranged around the central pillar of such a beautiful gazebo, built with your own hands. To do this, corners are welded to the post, on which a composite tabletop of two halves is placed with a cutout for the post in the center.
This video shows how to build a mushroom gazebo on a personal plot:
How to easily make a country rotunda gazebo with your own hands

It is very easy to make a cylindrical rotunda gazebo: as practice shows, it is best to use 0.8 mm pieces of reinforcing wire, the lower ends of which must be vertically fixed in the bricks of the ring base, and the upper ends, bent towards the center and connected together, should form a kind of dome . The strength of the structure is given by horizontal weaves from the same reinforcement. The entrance to the gazebo is through a vaulted opening.


To make such a simple gazebo with your own hands, you will need about 50 pcs. red solid brick and 310 linear meters of reinforcing wire with a diameter of 8 mm.


Before building a rotunda gazebo, you need to select a suitable site and lay out the base. In the center of the future gazebo, a peg is driven into the ground and, having tied twine or string to it, two concentric circles with radii of 1.75 m and 1.9 m are marked on the ground. Then they are removed from the resulting circular ditch upper layer soil to a depth of 15-20 cm, instead of which a layer of sand 10-15 cm thick is poured, watering it abundantly and compacting it.


By laying bricks on the prepared base at small intervals and pouring and compacting sand in the gaps between them, a foundation for the foundation of the future gazebo is obtained. The bricks should lie horizontally, and their top surfaces should be flush with the platform.
Look at the photo - to build such a gazebo with your own hands, to install reinforcing bars, drill an 8-10 mm hole in the center of each brick:


It is better to do this with an electric drill with a carbide drill. To prevent the bricks from splitting, first drill holes with a thinner drill (03-4 mm), and then drill them to the required diameter.


When installing rods for a gazebo built by yourself, do not forget to skip 4 bricks - the entrance to the gazebo will be located in this place. If you want to make the passage wider or narrower than 1 m, pass more or fewer bricks, based on the fact that each is 250 mm long.


Having sealed pieces of reinforcing wire approximately 4 m long each in cement mortar in the holes, they are bent towards the center of the gazebo at a height of 2-2.2 m. The shape of the dome of the gazebo will depend on the bending radius. The ends of the reinforcement brought together in the center are welded to the central ring 0200 mm.

Then, when making a gazebo for a summer house, they begin to form the central frame. Horizontal rows are spaced 275 mm apart. The intersections of the reinforcement bars are secured by welding, having previously been secured with clamps.
The finished garden gazebo, made by yourself, is coated with a metal primer, such as PF, and painted in a discreet color. Finally, you should plant climbing and climbing plants. By the end of the first summer season they will wrap around the frame and make it almost invisible and windproof, creating the impression of a weightless green dome. Even during the most intense summer heat, this gazebo will be cool and fresh, and a simple, hidden beautiful flowers and foliage, the gazebo design will delight guests.
Technology of construction and installation of a welded metal gazebo at the dacha (with photo)


Continuing the theme of metal buildings, learn how to build a gazebo with your own hands, the entire frame of which is welded from steel corners. Such a building may not look rich, but it is quite capable of decorating a modest plot of six acres and will allow you to fully relax after working in the garden.
For corner posts you will need a 75 x 75 mm corner, and for the remaining frame elements - a 50 x 50 mm corner. The fencing of the welded metal gazebo is finished with eurolining, the tabletop is made of tongue and groove boards.
Pay attention to the photo - the highlight of the folding gazebo is the original roof:


To make the frame, you first need to mark the position of the corner posts, two pillars of the doorway and the places where the table and benches will be installed.
To ensure the stability of a welded gazebo made by yourself, all posts should be concreted. To do this, use a mechanical drill with a diameter of 25 cm to make holes 75 cm deep. For concreting, use a mixture of cement, sand and crushed stone of a fraction of 20-40 mm in a ratio of 1: 2: 1.5.
Following the technology for constructing such a gazebo, when concreting, it is important to control the verticality of the posts, for which it is very convenient to use a level with magnets, which allow you to securely fix the tool on a stand made of steel angle, freeing your hands.
The door posts of a welded gazebo for a summer residence differ from the corner ones - they are thinner. You can, of course, make a doorway from a thick corner or immediately concrete different corners, but it is better in the places where the opening will be located to monolith sections of the corner 75 x 75 mm so that they protrude above the supports by about 50 mm. The opening posts themselves are then welded to these protruding ends from a 50 x 50 mm corner. Such an entrance to the gazebo will look more elegant.


When the concrete at the base of the corner posts has set, use a grinder or a hacksaw to cut the corners that will become elements of the upper, middle and lower frames. Weld together the steel corners top harness along the perimeter of the gazebo, trying to ensure the rectangularity of the resulting frame. After this you need to weld the corners of the middle and bottom trim. Perpendicular to the sides of the top trim, weld 50 x 50 mm corners crosswise, and in the center of the resulting crosshair - a vertical post, to the top of which 4 diagonal rafters are already attached. According to the technology for installing such a gazebo, the corners must be installed in such a way that the shelf of the corner faces upward.
For guard metal surfaces to prevent corrosion, they are coated in two layers of black oil paint (MA-115), allowing the first layer to dry thoroughly.


Making a roof. To attach sheathing elements and roof parts made of dense fiberboard to the metal elements of the gazebo frame, first attach wooden blocks with a cross-section of 40x40 mm. For fastening, use 03.5 x 35 mm screws, which are screwed from the inside through the holes in the metal corners.
Triangular blanks for roof slopes are marked according to a cardboard template. Using a saw with a straight, fine tooth, cut pieces of dense fiberboard. Attach the cut pieces to bars screwed to the metal inclined ribs (corners) of the roof.
As you can see in the photo, the roof of the gazebo at the dacha, built with your own hands from a welded structure, is made of bitumen tiles:


The basis for the flexible tiles on the roof of the gazebo is uncoated roofing felt, glued to the fiberboard using bitumen mastic. Flexible tiles are also glued to bitumen mastic, and in places of overlap they are nailed with small galvanized nails with a diameter of 0.5 x 20 mm with round heads. The tiles are glued starting from the bottom edge of the slope, overlapping top row glued bottom.
When building a gazebo at the dacha, the bars of the fencing sheathing are placed on the corners of the frame from the outside, drawing them to the corner with screws from the inside. For cladding, it is best to use lining, pre-painted with two layers of paint. Profiled boards are nailed to the sheathing with galvanized nails 01.0 x 20 mm with small heads. Handrails made of planed bars with a cross-section of 50 x 100 mm are nailed along the perimeter of the fence.
Handrails and fencing trim should be coated with durable clear furniture varnish in three layers.
At the top of the fence you can install green sliding trellises: cut them to the size of the openings and screw them to the slats on top of the handrails.
When preparing the base, you first need to select a layer of soil about 5 cm thick inside the gazebo, and then level the surface in a horizontal plane. Place crushed stone on top in a 3 cm layer and compact it thoroughly. After this, pour coarse river sand in a 3 cm layer. Instead of sand, it is better to use so-called flour (crushed industrial slag) with the addition of M400 cement (approximately 10% of the volume).
When building a gazebo in a dacha, you can use 300 x 300 mm paving slabs for paving the floor and making a blind area. This coating will go well with a tiled roof if you use tiles different colors and arrange them in a checkerboard pattern. To lay the tiles, use a rubber mallet and a 500 mm long building level.
After laying the paving slabs, they must be shed generously with water, and after drying, the remaining flour or sand must be removed.
On the outside, along the perimeter of the gazebo, tiles are laid with an outward slope - they serve as a blind area. The water flowing from them during rain falls into a nearby gutter and is drained away from the gazebo.
To build a welded gazebo in the country, follow the photos below:


A simple summer gazebo made of fabric for a summer cottage with your own hands (with photo)


As mentioned earlier, many materials are suitable for creating gazebos. But there are often problems with their delivery to a summer cottage, and construction work, as a rule, is not completed quickly.


Few people know that there is an easy, quick and simple way to erect structures such as gazebos, showers, verandas, and toilets. Moreover, the only building materials you will need are pieces of any fabric, epoxy resin and four metal pipes or wooden poles for supports. The technology for building a fabric gazebo for a summer residence is extremely simple.


Install four pillars (metal pipes, logs, etc.) in the chosen location at the corners of the future building.
On some horizontal, flat surface, for example on plywood board, apply parquet wax.


From any fabric, cut out a piece to the size of the future wall panel, lay the fabric on the panel and impregnate it with epoxy resin, adding dye if necessary. For greater durability of a summer gazebo made of fabric, you can form a panel of 2-4 layers of fabric. Make the required number of panels for the walls and ceiling - they will be ready in a day. Attach the panels to installed poles. Strong, durable, lightweight construction is ready!


Look at the photo - you can build such a simple gazebo with your own hands in oriental style. To do this, make not a flat roof, but an elegant dome: attach a panel of any fabric to the tops of four pipe-racks located in the corners of the building so that it sag, and apply epoxy resin to it (preferably by spraying). The next day, remove the panel, turn it over and secure it to the tops of the pipes.
Of course, if necessary, you can thicken the walls of the dome, making them two- or three-layer.
As you can see in the photo, building such a gazebo is not at all difficult:


Construction of a prefabricated garden gazebo for a summer residence with your own hands (with photo)

The proposed openwork gazebo has a prefabricated structure. This makes it easy to move it from one place on the site to another, and at the end of the summer season it is easy to disassemble and store it in the utility room. For such a prefabricated gazebo for a summer residence, neither a foundation nor a floor is needed. All you need is four walls and a light hipped roof made of four trapezoidal panels that are connected to the walls with hinges. Assembly is not difficult; It’s enough to lay out the parts on a flat area - and in a maximum of an hour the gazebo is ready. And after disassembling, the gazebo turns into four flat bags, convenient for storage.


The prefabricated garden gazebo has four walls that are completely identical in design. At the same time, there are also four entrances - each wall is formed by a light frame made of planks with a cross-section of 25 x 40 mm, vertical beam rack with a cross section of 40 x 40 mm, it divides the wall into two halves, one of which is barred, and the second is precisely the entrance opening.


The grid is assembled from 20 x 20 mm slats in a ready-made wall frame. In order for the lattice pitch to be the same, you need to mark the vertical strip of the wall and the middle beam into equal sections, setting them aside on the horizontal sections of the frame. First, one row of slats is nailed flush with the vertical bar and the middle beam, then along them - the second row, which will also be flush on the other side of the wall. Nails are driven not only at the ends of the slats, attracting them to the frame, but also into the crosshairs of the lattice, which will give the structure additional rigidity.

Additional mounting bars with a cross-section of 40 x 40 mm are nailed to the sides of two opposite frames. Through them, furniture bolts and nuts are used to connect to the other two frames when assembling the gazebo. Holes for bolts in these beams and the corresponding wall strips are drilled at strictly equal distances.


The easiest way to cut roof panels is from chipboard or MDF; In addition, their weight will give additional stability lightweight design. Beveled strips are attached to the horizontal sides of the panels with screws: the bottom - for connecting to card loops with the upper strips of the wall frames, the top - under the central square, made of the same material. To connect the panels to each other during assembly, use metal corners installed on their upper strips with holes for M5 fastening bolts and nuts.

Before assembling a summerhouse gazebo with your own hands, the prepared sets of walls and roof are thoroughly impregnated with drying oil and, after drying, painted with oil paint from the outside and inside. Both monochromatic structural elements and those painted in different colors (for example, color highlighting of the lattice part) will look good.


The gazebo must be assembled in packages: the finished wall is connected to the roof panel. Then, on a flat area, all four packages are laid crosswise, with their bases facing each other; the walls with the mounting bars should be on opposite sides.


If you now lift and join two adjacent walls, you get a corner of the gazebo; you can tighten it with furniture bolts, and fix the raised roof panels at the top with bolts through metal corners. The second corner of the gazebo is formed in a similar way, after which they are connected to each other, and a central square-shaped panel is installed on top.
The video “Do it yourself gazebo” shows how to install such a structure:


Lightweight gazebo for a summer cottage with your own hands (with photo)

Make it graceful light gazebo It’s not at all difficult to do it yourself. You will need boards for the floor and roof, bars for the frame, slats for trellises, carpentry tools and some free time. Such a light summerhouse can decorate any garden plot.
As you can see in the photo, they begin to build a light gazebo for a summer house with their own hands from the floor:


Put together a shield from boards and nail it to a frame of 10 x 15 cm beams - you will get a flooring. Now make two side walls- approximately the same as in the previous design, attaching lattices of thin slats to the vertical support bars. Immediately attach a rafter beam to the upper ends of the half-tree supports, completing the wall frame at the top. Screw the assembled frames for a lightweight gazebo with self-tapping screws to the sides of the deck.


The back wall of a light summerhouse can be made separately and added to the side walls and decking. Or you can do it even simpler - screw the middle and top purlins to the rear posts of the already installed sidewalls, and then sew up the wall with trellises.


There is also no point in making a separate façade. Screw the upper roof purlin to the front supports and decorate the facade with trellises in any style, forming a door or leaving almost its entire area free.
Lay the roof with boards and cover it with roofing felt, shingles or bitumen tiles. That's all the work.
Look at the options for light, hand-made gazebos:


DIY construction of a garden semicircular gazebo
What summer resident would not want to have a beautiful gazebo, even if the land in his possession is not enough? The proposed design of a semicircular garden gazebo will probably appeal to many. Such a gazebo can be done without special costs build with your own hands.


First you need to decide where to install the structure. Obviously, this depends not only on the orientation of the site to the cardinal points and its configuration, but also on what has already been built and planted on it. However, in any case, it is better if the gazebo is facing west. During the day, when the sun is shining from the south, the shade under the canopy will be quite enough for comfortable rest. And if on the south side of the gazebo you plant a spreading fruit tree, it will provide additional shade during the day. In the evening, it will be pleasant to enjoy the gentle evening rays of the setting sun.
The site for the future structure is prepared based on the dimensions of the gazebo, which can be adjusted if necessary. First, the turf is removed and board formwork is installed to fill the base of the gazebo - a monolithic concrete strip into which pieces of metal pipes with a diameter of 100 mm are embedded, used as nests for installing load-bearing posts. Such a small (about 10 cm high) wall will reliably protect the site from grass, prevent rotting of the posts and increase the strength of the structure. This does not require much cement, but the benefits are obvious.
The surface of the site, laid out, looks good concrete tiles, which can be purchased ready-made.
Making such tiles yourself is not at all difficult, and there are many ways to do this. For example, the simplest of them is to make them from boards 50 mm wide square shape into four cells with sides 300 mm. The finished frame is laid on a flat surface, and to prevent water from leaving the solution, the shield is covered with waterproofing, film, roofing felt or other similar material. The cells are then reinforced using pieces of mesh or wire, and concrete is poured into the mold.
As shown in the photo, a semicircular gazebo can be decorated with fragments of colored ceramic tiles, which are sunk into the solution until it sets:


But you can only use the floor for this ceramic tiles, since ordinary tiles do not withstand frost well and quickly crumble.
Finally, the site can simply be filled with concrete and then laid out with a beautiful pattern of ceramic tiles.
Calculating the amount of materials required to build such a gazebo with your own hands can only be done by deciding on the size and shape of the semi-gazebo. You can use the various ones you have on hand auxiliary materials. Without steel pipes under the racks you can get by by using rolled up sheet metal sleeves.

Otherwise, to build a semicircular gazebo with your own hands, you need to stock up the following materials(approximately):
- cement grade M500 - 100 kg;
- river sand - 300 kg;
- concrete tiles 30 x 30 cm - 40-45 pcs.;
- timber 150 x 150 mm, length 2.2 m - 7 pcs.;
- block 50 x 50 mm - 15-20 linear m.;
- block 40×40 mm with a selected quarter - 15-20 linear. m;
- tongue and groove floorboard 40 x 150 mm - 20 linear. m;
- edged board 25 x 150 mm - 10 linear m;
- lining - 10m2;
- rail for gratings - 70 linear m.
You will also need nails and screws of various lengths.
All this, in principle, is not difficult to bring to the dacha even in a passenger car, having previously cut the long material to size.
Gazebo design. The gazebo is essentially a semicircular wall with a canopy, equipped with benches with backs. The load-bearing basis of the structure is seven racks made of coniferous timber with a cross-section of 150 x 150 mm, installed in the nests of a concrete tape.
The lower part of the wall consists of solid panels made of lining, stuffed onto strapping bars, and the upper part consists of decorative grilles, which are an excellent basis for climbing plants. The trim bars are connected to the posts by a notch in such a way that the sheathing panel is flush with the load-bearing posts.
In this case, the armrests installed on top of the panels cover the ends of the sheathing boards, while remaining aligned with the posts.


Decorative grilles. They are not difficult to make. To do this, you will need to assemble the frame with the selected quarter of the frame, and then stuff thin slats into the folds. The optimal cross-section of the bar is from 40 x 40 mm to 50 x 50 mm. However, if you are confused by the operations of selecting a quarter, then you can make prefabricated bars by connecting them together - for example, bars 20 x 20 mm and slats 20 x 40 mm.
The frequency and location of the lattice slats for building a gazebo at the dacha with your own hands can be different. The simplest option is two central diagonals and four segments in each sector parallel to them.
The filling sequence is as follows. First, fix all the slats parallel to one diagonal, and then with a second layer - transverse to them. You can even use window glazing beads as slats - it will turn out beautifully.
The dimensions of the gratings depend, of course, on the dimensions of the structure. If their height is a matter of taste, then the width of the frames can be made slightly smaller (4-5 cm) than the size of the run between the posts. Using later (when installing frames to racks) small cylinders, cut, for example, from an ordinary shovel handle, you can get a very interesting decorative effect - the gratings seem to hang in the air.
There is also nothing unusual in the structure of the canopy. To ensure a slight slope of the canopy, the upper parts of the posts should be cut at an angle. It is better to do this before installing the stands, since working on the ground is undoubtedly easier.
Adjacent racks at the top are fastened with two boards, stuffed on the outside and inside of the structure. To do this, it is advisable to use thicker boards (at least 25 mm), which will allow you to equip a more durable and reliable canopy. Sections of lining are stuffed onto the ends of the boards of the top trim - and the simplest canopy is ready.
The completeness of the canopy will be given by cornice boards stuffed onto the ends of the roofing boards, which can be decorated with decorative carvings or highlighted with a color to your liking.
The most important element on which the convenience of the structure depends is benches. As seats, you can use any sufficiently thick boards at hand - ordinary planed or floor tongue-and-groove boards (“magpie”).
The optimal width of the seat is 30-34 cm. To do this, it is not at all necessary to look for whole wide boards, since the bench can be assembled from 2-3 pieces of narrow boards, located with a small gap, so that water does not stagnate in the joints, which can cause rotting of the wood.


The seats are mounted on two types of supports. Intermediate - traditional brackets made of 50 x 50 mm bars and embedded in racks. The two outer supports are decorative. Each of them is made of two pieces of floorboard, fastened at the ends with 50 x 50 mm bars, the top of which is also cut into the rack. Using a jigsaw, you can give the front faces of the supports any configuration and thereby further decorate the structure.
The seats of the benches can be made removable, which will allow them to be removed indoors at the end of the season, thereby extending their service life. To do this, when attaching elements, it is enough to use self-tapping screws instead of nails.
The backs are well-planed and sanded boards, mounted on supporting posts. A comfortable angle for the backrests can be easily achieved using small triangular brackets cut from scraps of the same board.
Wooden elements of the structure should be treated with decorative impregnation of one or several shades. In this case, the gazebo will be well preserved and will look elegant.
To make the relaxation area more comfortable, it can be additionally landscaped. To do this, dig a small ditch around the perimeter of the structure, fill it with fertile soil and plant various climbing plants there - for example, maiden grapes, hops, ivy and the like.
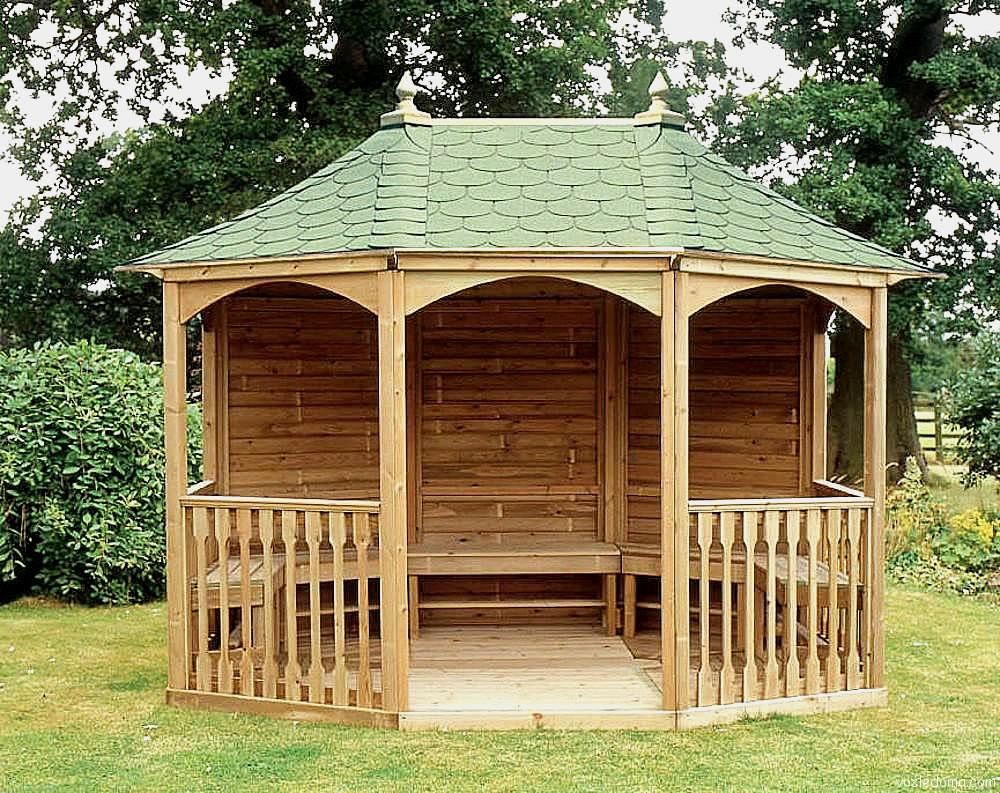
Making a gazebo with a hip roof for a summer house with your own hands


The prototype of this classic octagonal pavilion with semicircular arches, carved fencing and wooden roof tiles was the belvedere late XIX century. Such a tented gazebo for a summer house will protect you from scorching sun, and in bad weather - from rain. It is quite possible to implement it on suburban area, because the project is distinguished by thoughtfulness and noble simplicity.
Structurally, polygonal buildings, including octagonal ones, are more difficult to erect than rectangular ones. But the octagonal posts, cut from square timber, give the pavilion respectability. The material and its cross-section are chosen depending on the size of the structure and the taste of its creator.


Such a gazebo with hip roof It can be built on a concrete slab or brick paved area, or it can be built on a raised boardwalk, but in either case it must be installed on anchors embedded in concrete foundation posts.
Marking the octagonal area for the gazebo begins with marking a square with a side of 365 cm. Then eight corners are marked. The foundation columns for the racks are made square with a side of at least 40 cm and a depth of 30 cm. The holes under the foundation are filled with mortar and the bases of the racks are installed in them before the concrete sets. The exact location of the bases of the racks is of great importance, since the displaced thrust bearing will then haunt you throughout the entire construction. To avoid mistakes, make a cardboard template in the shape of the rack and mark the location of the racks using it, that is, mark the corners of the gazebo.
When making octagonal posts, cut lines are marked on all four sides of each beam. Then set the circular saw at an angle of 45° and cut off the excess wood, thus forming an octagon. Cut marks are removed with a plane or grinder. The length of the posts should be 2.30 m.
The parts of the upper trim are cut from a block with a cross-section of 50 x 70 mm.
If, in the manufacture of arches, a tongue-and-groove connection is used, then before starting to assemble the gazebo, you need to select the grooves in the uprights and in the bars of the top frame. After this, the racks are installed in place and temporarily tied with braces. Then the bars of the upper trim are nailed to them on top, and for greater strength the connections are fastened with metal tie plates or corners.


Eight arches, being decorative details, also serve as load-bearing elements that give the gazebo rigidity. The arches must be strong and securely connected to the posts and top trim.
The struts are assembled from two wooden arches (20 mm thick boards). They are glued and attached to a rectangle of 12mm plywood. The hypotenuse of a plywood square is cut to shape with a jigsaw wooden arch. The right angles of the plywood form a tongue and groove, which is inserted into the grooves selected in the racks and beams of the top frame.
To make an arch, first cut out one half of it from plywood and use it as a template for making the remaining 15 parts. Then the pattern parts with a cross section of 20 x 60 mm are marked and cut out. To do this, outline lines are drawn on a board with a cross-section of 25 x 200 mm using an arch template. Each semi-arch is made of two sections.


To assemble the arches, waterproof glue is used. First, the arches are assembled dry, adjusted and glued, after which all their parts are clamped with clamps. This “sandwich” is fastened on both sides with screws 50 mm long in increments of 15-20 cm and the clamps are removed. Remove excess glue with a damp cloth.
When installing arches, check how their halves fit with the openings and with each other. If necessary, adjustments are made.


Then the arches are nailed to the frame. Drive nails at an angle through the plywood into the grooves selected in the studs and beams. Then they fasten the arches with long screws through the wooden part of them to the posts and bars of the upper frame. If for some reason it is difficult to select grooves in the posts and beams, then wooden glazing beads are nailed to the posts and bars of the top frame in such a way that a groove is formed between them, into which the arch is installed. If necessary, adjust all wooden parts to each other.
When installing the roof, the rafters are made from boards with a section of 50 x 100 mm. This material is thick enough to hold the sheathing nails, and at the same time the boards are narrow enough for all the rafters to meet at the spire.
To make a spire, take a piece of timber with a cross-section of 100 x 100 mm and a length of 400 mm, excluding the head. It can be turned as part of a spire, but is easier to make separately.


The first rafter is cut out, and then used as a template to make the other seven. A small chamfer is removed from the upper end of the rafters so that they do not interfere with each other at the spire. The ends of the rafter legs at the overhang are rounded with a jigsaw and then cleaned with a rasp or coarse sandpaper.
When assembling the roof, first fasten two rafters on opposite sides of the spire with long screws, lift the structure onto the arbor, place the spire above the center of the arbor, and the cutouts in the rafters above the posts. Nail the first rafters to the top frame, then install the remaining rafters one by one. For strength, small corners are attached to both sides of each rafter.


Before laying, the sheathing boards are sawed down “on a mustache”. Install 3-4 boards at a time, nail them with two nails at each end and adjust the ends. As you approach the top, drill holes for nails so as not to split the short sheathing boards.
Then roll roofing waterproofing made of roofing felt or other suitable material is laid out and roofing tiles are laid. The ribs of the roof slope are covered with flashing boards with a section of 25 x 100 mm or special ridge tiles.
Under the railings in the racks, cut grooves 15 mm deep and insert the railings into them with outside. The fencing is simple, made of railings and boards. In the latter, a decorative pattern is cut out with a jigsaw. Nail the railings with finishing nails, driving them at an angle.
All open joints, nail heads and screws are puttied and the surfaces of the gazebo parts that were not treated during assembly are sanded. Then one layer of primer and two layers of enamel are applied to them.
Look at the selection of photos “Building a gazebo with your own hands,” which shows various options for these garden structures:


We don’t come to the dacha to sit within four walls. summer house. Only bad weather or extreme heat can force a city dweller to hide under a roof.
Is it possible to do so in order to stay under a roof and still breathe fresh air?
The answer to this question is clear - it is possible if you build a light gazebo.
This structure will not only decorate the landscape of a suburban area, but will also become a favorite place for relaxation and communication.
Today there are quite a few ready-made options light country shelters, but building a simple gazebo with your own hands is much more interesting for a home craftsman.
The family budget will only benefit from such a decision, because the cost of self-building is on average 40-50% lower than purchasing a finished structure.
Design and material options
Wood has been and remains the traditional material for summerhouses. It is easy to process, extremely decorative, and with high-quality antiseptic impregnation and varnishing, it is very durable. The cost of a wooden structure is minimal, and the time for its construction, even with leisurely work, does not exceed 2-3 days.
Another popular material for lightweight shelters is metal. If the frame is made of steel angle or profile pipe, then your gazebo will be used not only by your grandchildren, but also by your great-grandchildren.

There are an incredible variety of options for country shelters. We will not cover the vast, but will answer one question in detail - how to make the simplest gazebo quickly and inexpensively.
To do this, you can sacrifice a wooden floor and a supporting frame made of timber, which is placed under it. Concrete screed is a cheap and easy to implement base option for a gazebo.
Before starting work, you need to make a detailed drawing, and then select for construction appropriate place on a summer cottage. Then we will have to cut the vegetation layer to a depth of 10-15 cm, while simultaneously leveling the area for concreting.
Important point! We will not use metal for the frame. Our simple gazebo will be wooden. The roof of the structure will be supported by four wooden posts.
As practice shows, isolation wooden post roofing felt or bitumen in direct contact with concrete is ineffective. After 3-5 years, the base still rots, and the gazebo may turn over from strong wind. Therefore, during construction, it is necessary to immediately cut off the wood from the concrete.
To do this, at the stage of concreting the foundation slab, you need to bury sections of a round or square pipe of a suitable size strictly vertically into the ground so that 20-30 cm of metal comes out of the concrete. By drilling four holes in them for self-tapping screws, we will get “eternal supports” for wooden posts on which the roof will rest.

A lightweight summerhouse does not require the construction of brick fences to protect from strong winds. A simple fence made of eurolining 80-90 cm high, mounted on two longitudinal bars, will protect your back from blowing air and burning sun rays. Such a fence is fixed to wooden posts using ordinary wood screws.
Instead of eurolining, you can also use cellular polycarbonate for fencing. It transmits light well, is easily attached to the bars, and is not afraid of moisture and heat.

For the roof we use wooden beams with a section of 50x50 mm. A gable tent frame is assembled from it, which is mounted on a horizontal strapping beam. You can cover the roof with any sheet material(metal tiles, polycarbonate, ondulin or corrugated slate).
When drawing a gazebo, calculate its dimensions and make the roof width such that the roofing material does not have to be cut. To do this, measure dimensions sheet used and give a small overlap for the end and side overhangs of the roof.
For example, for 8-wave asbestos-cement slate, the length of the gazebo should be a multiple of 1 meter, and the length of the slope should be 1.75 meters. If several sheets of slate are laid along the slope, then the length of each is reduced by 10-15 cm to ensure overlap.

When considering other material options for the construction of lightweight shelters, polycarbonate should be especially noted. It can be used to make not only a fence, but also a roof. This lightweight and impact-resistant plastic combines optimally with the metal profile.
The result is an openwork translucent structure, especially appropriate in the shade of trees. You should not use slate or other light-proof materials here. The translucent roof and dense foliage will create pleasant partial shade.
It should be noted that a garden gazebo made of polycarbonate is also a simple-to-make structure. All it needs is several tens of meters of steel angle with a section of 50x50 mm, a steel strip, one standard polycarbonate sheet 2.1x6 meters and several planed boards for making a table and benches.

Having concreted 4 corner posts in the foundation, they need to be welded with a corner section of 25x25 mm. Two corner belts are welded or screwed onto self-tapping screws in the middle part of the racks and one is run along the top to create a supporting part of the roof.
Polycarbonate bends well, so you can make a beautiful arched roof for a gazebo without any problems. To do this, you need to weld two steel strips 50 mm wide, bent in the form of an arch, to the racks and attach three longitudinal strips of metal to them for attaching a polycarbonate sheet.

An interesting option for a wooden gazebo with a polycarbonate roof
The roof that covers the summer gazebo for the dacha can be made of bitumen shingles. In this case, you will have to buy several sheets of OSB, which will become the basis for this material.

Wood-oriented board, even with a thickness of 10-12 mm, is very strong and rigid. Therefore, you won’t have to make a spatial frame out of wood for it. It is enough just to attach it well to the strapping beam of the racks, and on the ridge to one of the sheets from below, attach a block with a cross-section of 5x5 cm to fix the end of the second OSB sheet.

As we have already noted, the simplest garden gazebo does not have a frame frame. The foundation and floor for it is concrete screed, reinforced with steel mesh. You can safely place a barbecue on such a surface without fear that falling coal will set the floor on fire. If the shelter is planned to be used in winter, then it is better to make the floor wooden and raise the foundation higher.
A columnar foundation for a gazebo is inexpensive and easy to construct. In order not to go beyond a modest budget, you can use ordinary red brick or natural flagstone. Having dug shallow (up to 40 cm) square holes around the perimeter of the gazebo, posts are placed in them on the mortar. You need to install anchor bolts 20 cm long with threads on the free end into the masonry.

A simple support frame made of wooden beams 50x100 mm is placed on the posts. By laying an antiseptic floorboard over it, we will get a warm floor, which will be protected from snow by a high foundation. Three walls of the winter gazebo can be made of cellular polycarbonate.
By making an open fireplace inside with an exhaust umbrella, we will get a comfortable room for a picnic. You can be in it even in slight frost without feeling discomfort.
What could be more comfortable than a warm family circle, when after a working day everyone has dinner at the same table or has tea on a day off, and even in the fresh air? What could be more carefree than a friendly party with wine and barbecue in the depths of the dacha, under the dense crowns of trees? Where can you be alone with yourself, relax in solitude and enjoy the silence? Nothing will create such a variety of scenarios for relaxation as a garden gazebo, the very name of which contains the most joyful moments of life - conversations - communication with family and friends, unity with nature. It will be especially pleasant to spend time in a place lovingly built with your own hands.
A gazebo made of stone with a reed roof seemed to have always stood in this place, organically merging with the pine forest
A colorful gazebo in the form of a pergola made of vines and roots goes perfectly with a slightly abandoned garden, located in the middle of a green lawn
If a gazebo located in the middle of the garden is naturally protected from the sun, precipitation and wind, then its other option, located in an open area of the garden plot, requires a more thoughtful approach. Here you need to make sure that there is a fence, a house wall or a planting in the form of bushes on the leeward side, and that there are paths to the structure itself and that nothing prevents people from freely entering there.
Stage #2 - building the foundation and frame
Despite the abundance of original solutions for arranging a gazebo in a country house or a plot of land adjacent to a private house, the construction of a foundation for such a building is the most important point.
Columnar foundation is the most best option base for a gazebo, which does not require site leveling and labor-intensive excavation work
For such small buildings, simplified types of foundations are used that are easily erected on our own- strip, columnar, pile, less often - monolithic.
The most simple design frame - made of wooden beams
The frame can be made of wooden beams, metal profile or fittings. The main condition for the configuration of the gazebo is its openness, airiness, combination with the natural environment, that is, the walls should not be completely blank, lined with brick or stone. Unless you are going to have a barbecue in it, then this option will be better.
Stage #3 - roof installation and roofing work
The easiest way is to cover the gazebo with bitumen shingles, as shown in this video example:
The technologies for constructing a pitched roof are also very well described - and gable roof - .
Extraordinary design ideas for garden gazebos
You may be interested in how to build a gazebo from the simplest materials that are literally lying under your feet. Take a closer look at ordinary plastic bottles, which, it would seem, cannot be used anywhere, but it’s a pity to throw them away - it always seems that they will come in handy somewhere. You can easily use plastic bottles as a building material, and you can build the structure yourself without much difficulty.
Here, of course, one cannot do without mandatory stages arrangement of the foundation, frame and roof, which will require both financial and labor costs. The walls of such a gazebo, made from plastic bottles, will not only cost free, but will also serve as a good option for protection from the sun and precipitation.
The contrasting combination of transparent and brown plastic bottles emphasizes the unusualness of the colorful country-style gazebo
The construction task will be simplified by creating a foundation from ready-made metal screw piles, which you can screw into the ground on your own, arranging the foundation for the gazebo literally within one day. The easiest way to make a frame is from a metal profile - a corner, a square or a pipe, welded using welding machine structural elements.
Plastic bottles are threaded onto metal rods, which are then placed between the lower and upper frame frames. An important condition for the formation of a harmonious structure is the selection of bottles of the same shape and size, but the color can be varied - this will give the gazebo a unique flavor.
The material on creating decorations and crafts for the garden from plastic bottles will also be useful:
Option #2 - gazebo made of glass bottles
In addition to plastic bottles, another unconventional material for construction can be glass containers, which can be purchased for almost nothing at recycling collection points.
Garden gazebo in the Art Nouveau style with fluid forms and an abundance of glass, vividly echoes the famous Gaudi gardens
So, let's build a gazebo out of glass bottles. The principle of constructing a building is the same as that of brick - bottles are laid in rows, which are fastened together with cement mortar.
Spilling out your imagination, combining different shapes and colors glass bottles, you can build an unusual gazebo both outside and inside
The bottles are positioned with their bottoms facing outward and their necks inside the structure. Considering that it is difficult to stack bottles at the corners of a building, you can use them to lay out individual fragments walls, giving the design an unusual sound - iridescent glass surfaces will sparkle in the sun like a crystal.
Option #3 - construction from old tree trunks
Interesting and enough economical option summerhouses can be built using trunks and branches of old trees.
There are always old trees in the garden that have stopped bearing fruit and require sawing. Removing logs can often be difficult and costly, but don't rush to get rid of fruitwood - it has beautiful curves and texture that make it an excellent building material.
The trunk and branches can be cleared of bark, which, when crushed, is also useful on the farm - it can be used to sprinkle bushes of plants prone to freezing in winter. The tree trunk will be used to create column supports, and large branches will be used for fencing, railings and balusters. Most likely, one tree will not be enough; two, or maybe three trunks will be needed to form four columns with a height of 2.5 m.
The twisted trunks of old trees with knots and untreated surfaces, used to build the gazebo, give it the appearance of a forest hut
To build this colorful gazebo, not only the tree trunk was used, but also the stumps used to create columnar foundation
Wooden columns are fixed at the corner points of the columnar foundation and are fixed with the help of lower and upper timber frames. It is advisable to treat old wood with moisture-resistant primers, and also to open it with varnish to give the desired color and protect it from further drying out. A logical continuation of the style solution of the forest “hut on chicken legs” will be a roof made of plant materials - shingles or reed mats.
Option #4 - from cement mortar
An unusual solution for a garden can be the construction of a gazebo using ordinary cement mortar. The most difficult thing in this arrangement is the creation of a rigid frame from reinforcement, chain-link mesh or ready-made reinforcement structures that need to be bent and welded. At the stage of preparing the frame, you can turn to specialized specialists, and then give free rein to your imagination.
An unusual tented gazebo made of stone and cement mortar resembles a bizarre piece of rock, organically blending into the forest landscape
Having prepared the solution closer to thick, you need to gradually, in small portions, throw it onto the reinforcement structure, and after drying, form it fancy shapes columns and walls of the gazebo. Using the solution, you can imitate the trunks of intertwined trees, vines, and fantastic plant forms, creating the image of an exotic plant, as if invented by nature itself.
On hot days summer days, a gazebo in the depths of the garden near a murmuring waterfall will give you long-awaited coolness and privacy
Such a design can also take on fantastic, unearthly forms, reminiscent of a spaceship, if metal parts are used or the reinforcement frame is exposed in fragments. In this case, the roof should be made of metal or plastic - corrugated sheeting or transparent polycarbonate will do.
Option #5 - made of reed mats and wicker
Garden structures made of reeds, reeds, and vines will be a wonderful decoration for a pond, lake or artificial swamp on your site.
An excellent solution for a gazebo is the use of natural materials such as reeds and vines
These plant materials can be used to make both walls in the form of wickerwork and a roof, which is a plane made of ready-made reed or reed mats. Such a building will naturally merge with the natural environment, especially with water, because reeds and reeds are the traditional inhabitants of this environment.
A gazebo on the shore of a pond with a reed roof is an example of a harmonious combination of landscape design with the environment
The use of such plants with a hollow stem for construction is the key to a comfortable microclimate in the gazebo - balanced humidity, protection from heat and effective ventilation.
Option #6 - “living” gazebo for the garden
Looking around your garden plot, you may ask yourself how to make a gazebo without introducing any other elements into the garden landscape other than plants. The most affordable, but at the same time, the most labor-intensive solution would be to create a structure only with the help of plants - trees or shrubs.
Specially shaped and trimmed tree crowns create original roofs for garden gazebos
Such an interesting design does not require complex construction preparation in the form of a foundation, frame and roof, since it consists only of specially grown dwarf, stunted or weeping species tree plants. Various types willows, mountain ash, willows are planted, most often, in a circle. The trunks and crowns of such plants are formed and directed, as they grow, in the right direction - towards the center, creating a vegetable roof for the gazebo.
Openwork frames of arbors in combination with climbing plants give garden landscapes completeness and harmony
Such a gazebo will naturally fit into the landscape design of the site and will be a shady place to relax on the sunny open lawn in front of the house. The only thing is that creating such a plant composition will require a lot of patience and time. More simple option A “living” structure can be served by planting grapes, ivy, roses along the outer perimeter of its frame, formed from wooden beams, metal profiles or trusses. In this case, it is important to achieve complete concealment of the structure in the thickets so that the impression of its absence is created.
A bright accent that decorates a garden gazebo on a special day can be “clusters” of balloons imitating grapes
Option #7 - from wooden pallets
An extraordinary solution is to use euro-pallets made of wood for arranging walls. Such wooden pallets, painted in bright colors, will not only create a unique flavor, but will also be a good solution for walls - environmentally friendly, promoting good air access to the interior. inner space gazebos.
So, before we start talking about how to make a gazebo, let's look at what exactly this structure is. First of all, such a dacha design is now an important element in any garden, yard and, in general, in any area surrounding the house. In particular, garden gazebos for barbecue will be a good option for a summer picnic.
All kinds of summerhouses and canopies, in fact, are created specifically for relaxation - in order to spend time with pleasure, without fear of rain and wind. Before you make such a cozy place in your dacha, you need to very carefully study all the construction technology, especially if you decide to do it yourself.
Here you can relax peacefully, enjoy the surrounding nature and birdsong. The construction will allow you to feel comfort while relaxing and fully provide the opportunity to be surrounded by nature.
With all this, a gazebo in the garden, created with your own hands, will delight you and your family even more for many years. The design is also important, because you need to distinguish that the construction of a hexagonal structure and the construction of, say, a wicker structure will be done differently.
Choice of material and design
You also need to take into account what you can use to make a gazebo in the garden - the material for its construction can be different. In addition, we should think about how to build it correctly, because the result depends on the correctness of our actions.

It should be remembered that serious attention must be paid to design. Even if we take into account the fact that today there is an infinite number of various options garden gazebos, yet the basic essence of their construction is the same. Even the size of the buildings standard form They are almost the same, so there is no need to worry too much about this.
Photo gallery


DIY gazebo in one day (video)
First stage of construction

Before starting work, you need to decide what kind of gazebo and where you want to create. Of course, it is best to build it in the garden - this option is the most acceptable and optimal at the same time. Now you can start construction.
So, at the initial stage, as with any construction, we pour the foundation. And although this process itself is quite simple, you should still treat it with caution. special attention.
When laying the foundation, you should definitely take into account such a factor as the presence of shade (preferably the presence of nearby shrubs and trees). A reinforced concrete slab is often used as a foundation, which is very practical and convenient.
After the site for construction has been chosen, we dig a ditch and tie it around the perimeter with iron reinforcement. Instead of reinforcement, metal rods or corners can be used. Only they will have to be fastened together by welding or binding.

Then various stones, fragments of bricks are laid out at the bottom of the pit, and simple construction garbage. After this, to ensure the strength of the foundation, the pit is filled with concrete or cement mortar. In three days the foundation will be completely ready.
Second stage of construction
 Now let's move on directly to the design of the garden gazebo. This moment can rightfully be called the most difficult in technological terms, because it requires a number of specific actions that require precision and accuracy. It is necessary to create a strong frame and install a roof.
Further progress of construction: depending on the specific, initially a certain shape are being built in the corners load-bearing beams, which, by the way, can be either four- or octagonal.
Then the roof and dome will be attached to these beams. It is necessary to fasten the wooden guides together - they are installed vertically using special crossbars made by.
After the frame is assembled, it must be sheathed with sheet metal. If a metal roof covering is preferred, you should definitely remember that if it rains, the noise of the drops will be very audible precisely because of this material.
If you want to build a gazebo at your dacha with more high level sound insulation, then its frame will need to be pre-sheathed with plywood, and then, as an addition, all this will be covered with soft roof. It is very important to pay attention to the various thermal insulation characteristics of the specific material being selected and, naturally, to its parameters, such as strength and durability.
You can also choose slate, wooden boards or metal tiles as the material from which the roof can be made.


Instead of a conclusion

As you can see, building a gazebo for a summer house is a fairly simple matter, which means that if you approach the issue rationally, correctly and purposefully, you can get a positive result in a relatively short time and with a minimal investment of funds.
We can say that today various kinds of open structures such as tents for a summer residence are an integral part of any yard or vegetable garden - this is a kind of “second home”, the presence of which makes it possible to experience a lot of pleasant little things. Near the building you can place flower beds, ridges, flower beds, plant various flowers - garden hydrangeas, anemones, asters and many others. For connoisseurs of Japanese style it will be interesting and useful.
Are you on by example you can see and learn how to build a summer gazebo with minimal costs and efforts, while creating an extraordinary image of the seemingly most ordinary outbuilding.
Gazebos on a country site (20 photos)


Reviews and comments
(12
ratings, average: 4,13
out of 5)
Elena 10/26/2012
We recently purchased our own house and have a plot. We want to plant a garden and, of course, build a gazebo. We will definitely take all the advice into account! Moreover, we want a gazebo that only we will have!
We continue the series of articles about self-construction gazebos It is clear that the structure on a summer cottage can be erected from various materials: wood, metal, stone, brick. The design, durability and functionality of the structure depend on its choice. This article will provide instructions that will help you build a gazebo in your country house with your own hands. In this case, it is enough to allocate only a few days, provided that you have the necessary set of tools and a little experience.
Making a gazebo from scrap materials (self-made drawing)
You can build a summer building for relaxation on a garden plot not only from standard materials, but also from available materials. For example, a beautiful and durable design is obtained from ordinary wooden pallets. Before construction work they must be thoroughly cleaned, repaired if necessary and further strengthened.
If you treat wooden elements with special protective equipment, then the gazebo will last for many years.
The pallet construction will be environmentally friendly and will also be in perfect harmony with overall design garden plot. Before constructing a structure, you need to decide on the type of material at hand.
Euro pallet

Finnish pallet
American pallet
They all differ in size, except for the height, which is 145 mm.
The design of the project depends only on your imagination. Some craftsmen build quite decent buildings from wooden pallets.

When you decide on the architecture of the future building, you need to draw up a project on paper or in a computer program. If possible, it is recommended to use the services of professionals and order a gazebo design for them. summer cottage. For example, you can take the drawing shown below:

If the project is ready, then construction of the foundation should begin. First of all, you need to decide on the type of foundation: it can be a light foundation, a complex one, or a pile structure.
Even under poor natural weather conditions and soil quality, it is recommended to install metal pipes around the perimeter. In this case, the work will last several days longer, since the cement mortar will have to harden completely. This will take about two weeks.

At the next stage we prepare the pallets. It is necessary to lay out a base of wooden beams, which are secured to the base with anchors.

It is recommended to use pallets good quality so that they can withstand the load of the roof. The rafter system can be fixed after installing all the walls or after installing the support beams. The roof can be made of flexible roofing, polycarbonate or slate. Floors must be treated with a special product to avoid rotting and fungus.
After this, all that remains is to install electricity and arrange the furniture. This construction can be completed within one day. The approach to the resting place in the garden plot can also be made from pallets, after first sprinkling the path with sand to drain the water. With a barbecue, the building will be not only a place of relaxation, but also a summer kitchen.
Gazebo at the dacha made of metal. Instructions on how to make (build) a gazebo with your own hands
Metal is good material, which will last a long time, give a good appearance to the structure, and also allows you to build a structure of any shape.
Important! To carry out the work, experience with a welding machine is required.
First you need to develop own drawing, or use ready-made solutions. If you have certain skills, you can create a project yourself. The main thing is to take into account all the dimensions and design of the future building.
An example of a metal gazebo project is below:


First you need to decide on the location of the future gazebo, and then begin work. The site should be in a place where there are no strong winds and sunlight. This is very important to note for a place to stay.
First of all, you need to prepare the foundation.
For the guides of the vertical posts, metal parts will also be needed.

After which, welding work begins and guide posts are installed. To strengthen it, it is necessary to weld intermediate metal profiles.


Drawings and photos of gazebos for a summer residence with your own hands
To make it clearer, let’s look at drawings and photographs of what you can do with your own hands.


But what can be made from these drawings, look below and comment.


These are the kind of designs that anyone can make, given their desire and ability.
Gazebo made from a profile pipe for a summer residence
First of all, you need to decide on the material.
The frame is complex design, so it is recommended to stick to the scheme. It also needs to include material consumption. Take about 10% more for defects and exceptions to the schedule.

The beginning of work begins with the vertical guides; they need to be checked using hangers or building level. The racks must be strong enough to withstand the load of the rafter system of the future roof.

Vertical posts must be securely fastened to the base; for this it is recommended to use anchors.
Installing a roof is a complex process. It all depends on the length of the racks. But if you decide to do pitched roof, then there shouldn't be any problems. It is better to entrust the calculation of the load to a professional, but you can do without it.

Important! All metal structures must be protected from corrosion. Therefore, the parts must be coated with special protective agents.
Metal gazebo with polycarbonate
Pros of polycarbonate
- Impact resistance.
- Lightproof.
- Withstands temperatures -40-+115 degrees.
- Easy processing.
- Minimum weight of the structure.

Attaching the sheets is quite simple, you just need to follow some tips:
- The metal must be placed in an arc if an arched shape is assumed.
- Before using self-tapping screws, you need to make a hole, about 4 centimeters from the edge.
- Remove debris from joints.
- To prevent the material from breaking, work must be carried out in calm weather.
Working with the sheets is not difficult, so anyone can do it.
Progress of work and drawing of a wooden gazebo for a summer residence. Inexpensive option
Wooden materials are environmentally friendly, which is why they are most often used. First of all, it is necessary to prepare the foundation for the structure.
There are several options for the base. It could be
- budget columnar foundation (for example, foam block or red brick),
- or pile foundation from pipes (and it is advisable to fill the voids of the pipe with concrete solution)
- or build a slab with a thickness of 12-20 cm over the entire area of the gazebo. Having previously prepared the perimeter and compacted the sand. In one of the previous articles, it was given
Example 1. Preparation of a columnar foundation made of foam block, 50 cm high.

Example 2. Installing pipes around the perimeter and filling them with a 10-centimeter layer of sand, then with concrete

Example 3. How to prepare a foundation slab (it immediately serves as a floor on which you can lay beautiful tiles)

Of course, there are precision technologies. But there is no need to complicate the design of the slab for the gazebo in this way. It is enough to prepare the site, fill it with crushed stone, then a layer of sand and a slab. It is far from necessary to make the sand thickness 300 mm. Depends on many factors - on the gazebo itself. It’s one thing if you make a closed version, in the form of a specific extension. And it’s completely different if your gazebo is light. For lightweight structures there is no need to make thick ones at all. concrete plates, and soil preparation as shown in the screenshot below. A simple, inexpensive option will do. From a slab 12 - 20 cm, reinforced in one layer. And if the concrete is of a good grade, there is no need to reinforce it at all. It all depends on the design. Individual approach everywhere! 
Then you can start on the floor.

The floor takes up a lot of space if the roof is rectangular in shape. The boards must be treated with special means and dried. Before fastening, it is recommended to drill holes to prevent the board from cracking.
Below is a drawing.


After this, the roof, which is previously prepared, is erected.


Following such simple tips, you can build a gazebo. In this case, it will take time from one to three days. If desired, the building can be erected within a few hours (for example, in 8 hours, you can build a simple wooden one).
I hope today's instructions help you!