Original handmade pillowcases. How to sew an original fancy-shaped pillow with your own hands
For children fun games, as well as for decorating the house, do-it-yourself patterns of pillow toys will come in handy. Such pillows will delight both children and adults, and besides, they can be a good gift, for example, for housewarming.
Most often, such pillows are sewn in the form of cats and cats. Cats are warm pets that give comfort and peace to the house. They know how to curl up and take a sweet nap on sofas or armchairs, and perhaps that is why soft pillows and associated with these pets.


Pillows in the form of owls and turtles are also popular, but there are other animals - dogs, hippos, whales, sheep, elephants, ladybugs and even frogs. You can figure out how to "fit" your favorite animal under the pillow and make a pattern yourself.


Sewing such pillows with your own hands is not difficult even for a beginner, and even skilled and knowledgeable craftswomen just need to “peep” the idea from a photo of finished pillows.


Getting Started
The master class on creating a pillow toy is basically the same for any model. The most important thing is to choose the pattern you like and purchase everything necessary materials. Usually the pillow is stuffed with padding polyester or holofiber.
Tools and materials you may need:
- the cloth;
- pattern;
- a pencil or bar of soap;
- pins;
- threads to match the tone of the fabric;
- needle;
- scissors;
- sewing machine;
- additional elements (inserts, shreds, stripes, beads).
The fabric can be of any color and texture, the main thing is that it fits the interior and the general mood. It is worth paying attention to its durability: satin and silk pillows are beautiful, but short-lived, especially when playing. Pillows made of cotton and fleece fabric - more durable and cozy.
You also need to consider how much the fabric collects pile and dust. This may be important for those who have a beloved pet in the house.
You can make a pattern yourself or use an existing one. Usually, a figure of the desired shape is drawn (the main part of the pillow) and, if desired, individual details (paws, tail, ears) are added.


A pattern is possible without additional details, the main thing is that the shape resembles the body of an animal. Here, for example, is a pillow of a slightly modified square shape, decorated to look like a fox:


Or a pattern in the shape of a bird:

A toy pillow can also be made according to simple patterns: a square pillow decorated to look like some kind of animal. You can “update” an existing pillow with fabric applications (muzzle, eyes, antennae) and additional elements(paws, tail), making it a toy.
These pillows have their standard square shape but look like dogs:


The muzzles of animals are simply sewn to these square pillows, and now they can already turn into toys (using buttons or Velcro):


Of course, you can't just limit yourself to animals. To really turn a pillow into an entertaining toy, it is enough to make it in the form of a puzzle. If you add up a few well suitable friend to a friend of pillows, you get a cozy and original mattress on which you can have fun lying or sitting on the floor.

Pattern and tailoring are quite simple.
It should be borne in mind that if you are walking a voluminous, high pillow, then you need to flash all the sides (strip) with a separate fabric. But you can also sew a simple double-sided pillow.


When constructing any pattern, of course, allowances for seams should be taken into account so that the pillow turns out to be the desired size.
How to sew:
- We make a pattern, taking into account all the details, and cut it out;

- We transfer the pattern to the fabric: we pin the details to the wrong side of the fabric and circle with a pencil or a bar of soap (depending on the color and texture of the fabric);

- We cut out the details from the fabric, taking into account the allowances (1-1.5 cm);
- We sweep the details along the edge and sew on a typewriter (you can manually), leaving a small unsewn place (usually from below);

- We turn the parts on the front side through a non-sewn place and evenly fill with filler (most often with padding polyester) to the desired volume;

- We sew the hole with a hidden seam;
- We sew necessary elements on top or embroider them (nose, eyes, mouth).
Pillow toy is ready!

It is worth paying attention to how to sew additional details to the pillow. There are two ways:
- on top of the finished pillow with a hidden or regular seam;
- sweep together with the main seam from the wrong side.
Here, for example, the legs of an owl are sewn on top:

But pillows with muzzles sewn into the extreme seam:

Additional details do not have to be stuffed like a pillow. You can leave them completely without stuffing or slightly add volume with a small amount of synthetic winterizer.
In order to make it more convenient to sew parts on top (appliqués), you can do this in advance - after cutting. Buttons, beads and sequins are best sewn last on the finished pillow.

Video on the topic of the article
A selection of videos on how to make pillow toys.
In our life there are things that at first glance are insignificant, but have a significant impact on it. Our mood, sometimes even well-being, depends on them, and with some of them we spend a significant part of our time, often more than with relatives and friends. One of these things is an ordinary pillow. Just think, we hug this item every day for at least eight hours! Perhaps these are the longest hugs in our lives, so how to sew a pillow so that it is not only comfortable, but pleasing to the eye and evokes positive emotions?
|

In fact, sewing a pillow is a rather simple matter, and any person can literally cope with it in five minutes, even those who have never held a needle in their hands, there would be a desire! How to sew a pillow, let's look at the example of a regular rectangular or square pillow.
1. You need to take two identical pieces of any fabric of the size you need and add one and a half centimeters to each side for the seams.
2. Fold the parts right sides inward, fasten with needles and sew, leaving a hole of about ten centimeters on one side.
3. We turn the cover inside out and through the hole we fill the pillow with synthetic winterizer or other available at hand suitable material. Sewing up the hole. The pillow is ready.
Pillow decoration
Now you know how to sew a pillow, and it's time to move on to a more exciting activity - decorating. Any person, even with a complete lack of tailoring skills, is able to turn an ordinary pillow into a real interior decoration. So, let's begin.
classic pillow cover
If the question of how to sew a pillow is irrelevant for you, and you know how to sew at least a little, making such a pillowcase will not be a problem for you. The easiest way to sew it from a single piece of fabric rectangular shape, but in our case, the pillowcase consists of several parts: the front, its size matches the size of the pillow and is sewn from bright fabric, and the back, consisting of two parts, overlapped. For her, they picked up a plain fabric. Don't forget to add an inch and a half seam allowance on all seams.
| First, we hem the sections that will form a hole in the pillowcase on both parts of a plain fabric, and fold all the parts of the pillowcase right side inward, chipping the edges with pins. |
| At a distance of one and a half centimeters from the edge, we lay a line along the entire perimeter of the pillowcase. Trim the corners and turn the pillowcase right side out. Putting a pillow in it |


|
|


For those who can't sew
Try to choose a fairly thin fabric, otherwise the product will look rough. The size of the piece should be 3.5 - 4 times the width of the pillow and 2.5 - 3 times the height. If the fabric frays, process the edges in a way that is available to you, you can simply apply PVA glue to them.
| Lay the fabric wrong side up and place the pillow in the center. |
| Fold the bottom of the fabric towards the center of the pillow. |
| We do the same with the top. |
| Wrap both ends of the fabric as shown in the photo. |


Helpful Hints
A handmade pillow will not only decorate your home, but also add to it individuality.
In addition, this is a good gift beloved person.
Just turn on your imagination and you can do not only all kinds of patterns on the pillows, but the pillows themselves whimsical (in good sense this word) forms and we will help you take the first step.
Pillow with your own hands. Master Class. Origami pillow.

1. Prepare any fabric you like and cut 2 squares out of it (2 halves of a pillowcase). In this case, the squares are 42 x 42 cm.
2. Now use a zipper to connect two squares on one side, and sew the remaining 3 sides with a sewing machine.
3. After stitching the remaining sides of the squares, screw already ready basis your pillowcase to put on your pillow.


4. Cooking decorative flower for a pillow. To do this, you need to cut out 2 identical circles from the fabric - in this case, the circles have a diameter of 17 cm.
4.1 On the front sides of each part, you need to mark the center points. After that, fold your blanks, sweep them and stitch them. In this case, you need to leave a small hole that will allow you to turn the workpiece.
4.2 Using scissors, make several cuts around the perimeter of the workpiece and turn it out.
4.3 Use a blind stitch when closing the hole, then iron the module.
4.4 Carefully review the images - the four segments of the module need to be bent inward, towards the center point. Using pins, fix the segments and iron the folds, but only through the fabric. The tops of the segments need to be sewn with neat stitches.


4.5 Now you need to turn out the edges that are next to the segments by 1.5 cm and smooth out the fold lines.
4.6 Turn the module over and fold the corners towards the center. As before, the tops need to be secured in the center of the module with a few stitches. After that, the workpiece must be ironed.
5. Attach the finished flower to the pillow using a hidden seam. You can add a cord to the decor.
Do-it-yourself decorative pillows. Pillow stone.

1. Prepare wool of any color and tightly wrap it around a regular plastic container. You should get such a "tangle".
* In order to keep the layers of wool from moving out while you are making blanks in the washing machine, you need to wrap the layers of wool with a knitting thread.
2. Pieces of wool gray color torn by hand from the strand, cover the inner layer basics. These pieces need to be fixed with a thread.
* You need to completely close the base.


3. Now the workpiece needs to be put into a tight stocking, and both ends are tied.
4. Now your blank needs to be placed in washing machine, in which you also need to add a handful of baby laundry detergent. Wash the workpiece at a temperature not exceeding 50 degrees Celsius.
5. After washing, remove the workpiece from the machine, remove the stocking from it and dry it at room temperature.
7. To hide the seam and gaps in the workpiece, use pieces of wool torn from the strand. Wool can be nailed with needles or a special tool for felting.


8. You can add even more realism to the pillow and add white wool nailed with needles.
9. If you make the surface of your artificial stone a little uneven, it will take on an even more natural look.
DIY sofa cushions
You can make several different applications.
Wood

1. Prepare some leftover fabrics. Schedule color scheme and texture of materials. It is also worth paying attention to the color design of the interior, so that the pillow fits not only according to the pattern, but also according to the color scheme.

2. First you need to cut out the stem from one piece of fabric. You can choose more dark color. From other pieces, you can cut leaves for the tree.

3. Use basting stitches when sewing pattern pieces to the front of the pillowcase. You can use a sewing machine for sewing.

4. Sew both sides of the pillowcase.


Dog

Draw a silhouette of your favorite dog breed on the fabric and cut it out. AT this example terrier silhouette is used.
Flower

1. Prepare white felt and cut out the "petals" of the poinsettia flower from it. You need both large and small petals. Large petals should have a length equal to half the length of the pillow.

2. Using a sewing machine, sew the petal in the middle and up to its middle. You need to sew 3-4 layers of petals.

3. You can sew a button into the middle of the flower.

How to sew a decorative pillow

To make such a decorative pillow with your own hands, prepare a few shreds of three colors, as well as scissors, threads, needles and an iron.
1. First you need to make a blank, namely a square of cardboard or plastic. In this case, the workpiece has a size of 8 x 8 cm.

2. Now you need to make one large piece from 9 small square pieces of fabric cut out using blanks. Lay out the squares however you like.

3. Start connecting the squares with a thread and a needle in lines of 3 squares.

4. Make sure the joints are neat, and that the alternation order is not violated.
5. To achieve the effect of a solid fabric, iron each seam.
This is how it should turn out if all three lines are put side by side.


6. Sew all 3 strips in turn.

7. Iron the seams.

8. You have one side of the pillow. Now repeat steps 1-7 to make the second half.
9. Connect both halves.
Here's what the back side should look like.

And here is the front side.

10. Prepare a suitable fabric and cut out 2 strips from it - in this example, the strips are about 10 cm wide, and their length is equal to the length of half of the pillow.

11. Sew stripes on the sides.

12. Now you need to cut out the flap - this is the back of the pillow.
13. Lay the seams on 3 sides from the wrong side.
14. You have a blank for the pillow. It remains to fill it with foam rubber or synthetic winterizer. When the pillow is filled, simply sew the remaining side with a blind stitch.
How to sew a pillow with your own hands from the remnants of fabric

1. Prepare the rest of the fabric and cut out circles with a diameter of about 10cm.

2. Sew along the edges, tighten and tie a knot on the thread.

3. Sew the resulting "pancakes" to the main piece of fabric.

4. Carefully sew the edges between the pancakes.

5. It remains only to iron on the wrong side and sew the edges of your pillowcase.
How to sew a pillow with an appliqué with your own hands

1. Prepare beige crepe satin and linen, and cut out of them 2 squares of the same size. These will be parts of the front side of the cover for your future pillow.
2. Fold the squares in the following way: The crepe satin square should be face up. Now sweep it around the edge.
3. Prepare scraps of colored crepe satin and cut out images of vegetables from them. It is necessary to sweep the first detail, not forgetting to bend the sections. At the end, leave a small hole to fill the part with padding polyester through it. After you need to stitch this detail along the edge with a "zigzag".


4. It is worth noting that the vegetables that are in the background need to be sewn first. Baste all the details, and wash them in the same way. Stuff with synthetic winterizer.


5. Using a needle-forward stitch, sew stitches that resemble the veins of a lettuce leaf. They will make the surface of the peppers voluminous. Use pieces of felt to cut out stalks from them, which then need to be sewn on.
6. From the crepe-satin of the main color, you need to cut out the back of the cover, which is composed of two parts, between which you need to sew a zipper.


7. All finished parts of the cover must be folded with the front sides to each other. Sweep them up and then stitch and turn them through the open zipper.
DIY pillow toys. Pencil pillow.

1. Prepare a fabric (in this case, light blue) and cut out a strip of 6 cm wide and 50 cm long from it.
2. Repeat step 1 11 more times to get enough strips for your pillow. You can use fabrics of different colors.
3. Use the sewing machine to connect all the strips to each other. You need to sew from the wrong side, then process the sections and iron the seams.
4. Sew the last two cuts so that you get a pipe. In order to fill the workpiece with padding polyester, leave a hole measuring 10 - 15 cm.


5. Now you need to cut out 2 circles from the fabric: one with a diameter of 22 cm and the other 9 cm.
6. Cut a hole in the center of a circle with a diameter of 22 cm suitable diameter and sew the second circle (with a diameter of 9cm). This is how you simulate the neck of a pencil. Next iron the seams.
7. The part made in step 6 must be sewn into the base of the future pencil.
8. Now you need to prepare another piece of fabric in order to make a part of a semicircular shape from it, with a diameter of 15 cm.


9. The side sections need to be sewn so that you have a cone - it will play the role of a sharpened pencil lead.
10. Make a circle with a diameter of 22 cm out of paper, and cut a hole with a diameter of 15 cm in its center. Now cut this pattern in half.


11. Using a pattern, cut a half ring out of the fabric. The side sections of this part must be connected, and a stylus part must be sewn into a hole of a smaller diameter. With reverse side sew in the blank of the pencil core.
12. Through the hole that you left in advance, unscrew the workpiece. After that, fill the product with padding polyester. Next, sew up the hole using a blind stitch.
How to make and decorate a decorative pillow yourself: instructions with a photo
If you think that decorating a room with decorative pillows- this is a manifestation of philistinism, you are deeply mistaken. There are many styles of decorating a room where "dumki" various forms, colors and sizes play an important accent or background role. Original handmade decorative pillows help to create coziness, moreover, they are very practical.
Without pillows, a beautifully decorated room will not look complete. They can be used to enhance the effect of a favorite color or to unify the tones and textures of an entire room.
For a relatively small investment of time and money, new DIY throw pillows can spice up decor or change the whole atmosphere of a room. bright flowers, for example, are able to bring a little bit of summer; a beautiful tartan in a box will remind you of the comfort of winter; red and green pillows will create a holiday atmosphere.
At your request, you can sew decorative pillows with your own hands in any size or shape. They can be strong enough to withstand children's battles, or made of fabrics so thin that they can only be shown. You can decorate them simply or elegantly, make them large or small, stuffed with foam rubber, fibers or feathers. But in order for you to turn all these possibilities into reality, there are a few things you need to know first.
Video, photo and step by step master classes on making decorative pillows with your own hands, as well as tips on their design are presented on this page.
How to fill a decorative pillow made by yourself
When you make pillows yourself, you not only decide how they look on the outside, but also choose the filling for them. There are many options for you to choose from. Below is a description of how you can fill a decorative pillow for decorating a room.
These photos show the options for filling do-it-yourself decorative pillows:

Goose down or feather.
goose down is perhaps the first (and still the most luxurious) pillow filler. It is valued for its elasticity and comfort. Because it is expensive, it is often mixed with (or even replaced with) feather. Feather is not as warm as down, but this quality is more appreciated in duvets than in pillows.
However, a feather, especially a rough and large one, tends to crawl out through the fabric. Feathers pop out between the threads of the fabric or along the seams. Besides the fact that such feathers create some sloppiness, they can prick unpleasantly with their sharp tips. Another disadvantage is that many people are allergic to feathers.
Fiberfill.
Fibrous filling, which consists of polyester fibers made like a feather, is the most practical option for home craftsmen. It is inexpensive, does not cause allergies and has a very pleasant and comfortable flexibility and resilience.
You can purchase pre-quilted cushion fiber in all basic shapes, or you can buy the fiber raw by weight and then cut it into the cushion shape you like.

Foam filler.
Polyurethane foam is the basis for several basic types of pillows. All these forms are easy to wash and dry. There are several options:
Foam blocks: filling suitable for seat cushions. Since such blocks are resilient, they are comfortable to sit on and always return to their original shape, and therefore have a good appearance when not in use. Before stuffing a decorative pillow made by oneself with foam blocks, they can be cut, giving the most intricate curves and angles.
Foam pieces: they can be used to fill pre-quilted, inexpensive pillowcases. However, due to the fact that the pieces of foam rubber are very springy, they are usually too elastic, which is not convenient. This type of filling also tends to have a lumpy appearance even when covered with a thick cloth.
Foam sheets: pre-formed and stitched, foam sheets give a much more attractive appearance than foam rubber pieces. However, these sheets are also distinguished by great elasticity, which is why they react to touch like a springboard. In fact, the muscles of the neck have to work hard to adapt to such foam rubber, and therefore some people feel tired after sleeping on such a pillow at night.
Sewing decorative pillows with a hidden seam with your own hands
Simple decorative pillows are two panels sewn together and then stuffed to shape with filler. This type of pillow is thicker in the center and flatter at the edges. Most decorative pillows, all bed cushions, and some types of chair cushions are so-called sharp-edged cushions.

Beautiful handmade decorative pillows can be square, rectangular, round or curly. The fabric you choose also has a wide range of decorative possibilities. You can make the top and bottom of the pillow in the same fabric, or in contrasting materials, or add your own. decorative ornaments. This article talks about several options for choosing fabric and making a decorative pillow.
The simplest technique in terms of tailoring is to make your own throw pillows with a blind stitch closed the unsewn area, and it is this method of closing that is used in most of the instructions.
However, this type of closure also has its drawbacks. If the pillow needs to be cleaned, you must either wash it or dry clean it as a whole, or you can remove the cover from it and clean everything separately, then reinsert the filling into the cover and close the cover with a blind seam.

This manufacturing method is used for decorative pillows filled with fibers that can be washed or for items that rarely need to be cleaned. However, if proper care is your top priority, then you might want to consider one of the following. alternative methods closing the opening: sew in a zipper or a strip with hook and eye fasteners, or make an opening in the form of an envelope. All this is suitable for decorative pillows.
Below you will learn how to sew a decorative pillow with a zipper.
How to sew a decorative pillow with a zipper: a step-by-step master class
To sew the throw pillow as described below, use a zipper that is about 2 inches shorter than the length of the opening (minus the seam allowance). For example, a 35cm square pillow would require a 30cm zipper.
A master class on how to sew a decorative pillow with a zipper with your own hands is as follows:

How to make a decorative pillow with a hook-and-loop closure
To make such a pillow, you need to use Velcro tape or another hook-and-loop fastener shorter than the length of the opening (minus seam allowances).
Instructions on how to make a decorative pillow with a hook-and-loop fastener with your own hands:

These photos show how to sew a decorative pillow with a hook-and-loop closure:


Making a decorative pillow with an envelope clasp
The "envelope" clasp is especially popular for pillowcases that are meant to be used regularly at night.
Step-by-step instructions on how to sew a decorative pillow with an envelope clasp:

Watch the video on how to sew a decorative pillow with an envelope clasp:
How you can beautifully arrange a decorative pillow with your own hands (with photo)
You can personalize any pillow by shaping its edges. Cord, pleats, factory ruffles, wavy and gathers, used alone or in combinations of matching or contrasting colors, are just a few of the decorative options.
When making decorative pillows with your own hands on products with a sharp edge or on modern thick pillow boxes, the edge is sewn along the seam line on right side front section before assembling the pillowcase. On ready-made thick pillow-boxes, such a trim is sewn along the front edge and the edge of the back side before attaching the strip.
To determine the amount of trim: for square or rectangular pillows with a sharp edge: base the length and width of the pillow shape, multiply by 2, and then add 2.5 cm to the connection.
For square or rectangular modern thick pillows: count in the same way as for pillows with a sharp edge.
And how to arrange round decorative pillows with a sharp edge? To do this, take a flexible measuring tape to measure the circumference of the pillow shape, then add 2.5 cm to the joint.
For round thick pillows: count as for pillows with a sharp edge.
For ready-made thick pillows: calculate as for pillows with a sharp edge, and then multiply by 2.
These photos show how to sew and decorate decorative pillows with your own hands:


How to make an original decoration of a decorative pillow with your own hands
There are many different types cushion finishes that you can do yourself. Below are some of the more popular ones.

Cord.
Used as the only finish, it will give any base cushion a professional, finished look. Cord can also be used in combination with gathered trims and finished ruffles. Baste the cord in place first, then sew a ruffle or frill over the cord.

Wavy braid.
Large wavy tape gives the main type of pillow a smart rural look. For additional effect weave or layer two colors of braid. To sew such a braid, center it over the seam line and bast in place. When the pillow is finished, the braid gives the edges a scalloped look.

Fringe.
A short dense fringe of the "caterpillar" type gives the product an elegant look. Long fringes or fringes with silver or gold threads are often made from shiny fibers such as rayon or silk and give a more formal look.

Frill.
To give your pillows softness, consider purchasing a ready-made, pre-assembled frill, or make your own frill that matches or contrasts in color with the fabric.
If you want the bedroom to look feminine, then sew two or three layers of frills with increasing width along the edges of the pillows.
Trim the edges with narrow, contrasting trim or a narrow, round hem and contrasting decorative thread to add drama to the frills.
Other trims, such as tight lace or ribbon stripes, can be paired with a homemade frill. Sew on this trim before gathering and basting the frill to the top of the pillow.
Ideas original finish DIY decorative pillows are demonstrated in this video:
Ideas for decorating decorative pillows
Quilting, appliqué, machine embroidery and fabric dyeing- here are some ways to decorate the top of the pillow. Once the pillow is cut, but before you assemble it, you can give it a personal touch.
To determine the footage of the finish, cut out the brown paper bag something like a pattern for the size and shape of your pillow. Sketch the trim with a pencil where you want it to be placed. Measure the drawn line.
Original ideas for decorating a pillow with your own hands:
- Apply ribbons and/or flat finishes by criss-crossing and weaving them to mimic the pattern.
- Antique lace, including napkin and handkerchief lace, can be remade into interesting appliqués.
- Consider using different fabrics for the front and lower parts pillows. Try to combine lace with satin, tapestry with velvet, drawings large sizes with small prints.
- Use ribbon to create a sort of border on square and rectangular cushions. The same effect can be obtained on a round pillow, if you take a flexible braid for decoration.
See how beautiful do-it-yourself decorative pillows are in these photos:


Use the tips below for decorating your living room with pillows:
- Pillows in a small or constantly used family room should promote comfort and be practical. To withstand daily use and rubbing, they should be made from wearable (and possibly washable) fabrics, have closures that make the pillowcase easy to remove and put on, and be soft enough to lie on in front of the TV. .
- Antique lace or other fine details should be reserved for pillows that are purely for show. Tassels and braid will look elegant in a formal living room.
- Think about the size of the sofa, chair, or bed that the pillows are on. Don't make the pillow so big that it hangs off the chair, or so small that it gets lost in a corner.
- Also take into account the colors of fabrics. Small patterns are suitable for pillows of almost all shapes and sizes. Many large drawings are not as adaptive; In order not to get the impression of a cropped pattern, use large prints on large pillows.
- Beautiful patterns and interesting textures can be left unadorned. However, simpler fabrics serve as the canvas for the most delightful design techniques. Appliqués, monograms, ribbons, trim collages and fabric designs are just a few of the decorative options available to you.
- Both simple and sophisticated fabrics can benefit from edging such as cord, ruffles, shirring and webbing. These finishes can enhance your choice of fabric and accentuate the pillow's shape.
- To decide whether you should mix square, round, heart-shaped and bolster pillows, or is it better to repeat the same shape in the same or in different sizes, fold several pieces of fabric in various shapes and sizes, put them on a bed or sofa and, stepping aside, evaluate the result.
- In photographs of professionally designed rooms, you can often see a lot of pillows. Resist the temptation to repeat this abundance, otherwise your guests will be surprised to find that all the seating is already taken - by pillows.
A universal selection of gift ideas for every occasion and occasion. Surprise your friends and loved ones! ;)
Step-by-step master classes and patterns or how to sew a pillow with your own hands
A lot of master classes are waiting for you now. Let's start with baby pillows.
Pillows - toys for adults and kids
Soft plush friends are always in the price of children. But what if we make them a little more practical, but no less original? In this section you will see a lot of children's pillows in the form of toys and just unusual and bright designs for a great holiday for your little one.
Children's pillow - toy "Rosalina"
With this shy beauty children's sleep will always be a joy. To sew a soft zaya for a child, you will need:
- velsoft (for the base of Rosalina, you can take faux fur and fleece);
- thin felt (for muzzle decoration);
- threads in the color of the fabric + black;
- lace 2 colors (for decoration);
- small rose (for the central part of the bow);
- synthetic winterizer (for stuffing);
- dry pastel (to give a gentle blush);
- cotton pad (optional)
- chalk or pencil (for transferring patterns to fabric);
- needle;
- pins (for chipping parts);
- scissors.
Here are the patterns for Rosalina (click to enlarge):


Cut them out carefully, velsoft is a capricious fabric. We start with the ears. Sew them as below. Turn the ears inside out and stuff with padding polyester.


Put the ears inside the head. Pin along the edge, baste and sew, leaving a hole at the bottom.


Turn the head inside out along with the ears. I got it like this:

Stuff Rosalina with padding polyester, sew the bottom hole with a blind seam.

Now we have to make Rosalina's face. To do this, take all the details of the face, pin them to the head with pins (so that they do not move out), and then sew them with a small hidden seam.
To apply blush, simply take a pastel chalk and rub the bunny's cheeks, rub with your finger. If the pile on the fabric is not very long, you can do this with a cotton pad, after applying a pastel on it.


Rosalina definitely needs to make a pretty headband! To do this, cut the lace so long that it is slightly longer than the distance between the ears.
Sew the ends of this piece to the ears, as if pulling it.

Now let's make a bow! To do this, take another piece of lace, fold it in half and sew the ends.

Now simply sew a line of running stitches down the center of the bow. And pull off.


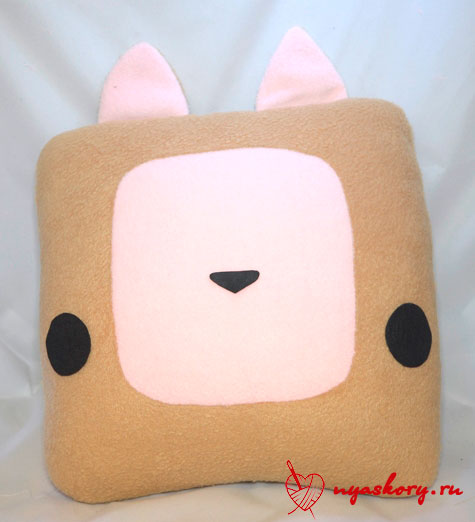
Quad cat
Necessary materials
What is useful to us for a pillow - a Quadrocat toy?

Here is the list:
- fleece of 2 colors (for muzzle and head);
- felt (for eyes and nose);
- threads in the color of the fabric;
- synthetic winterizer or synthetic winterizer (for stuffing);
- white acrylic paint for the pupil (or rhinestones)
- a glass of water (if you use paint);
- second glue (if you chose rhinestones);
- pencil or chalk for transferring patterns to fabric;
- sewing needle;
- paper for transferring patterns to fabric;
- scissors.
Before you start sewing, you will need the patterns that I have prepared for you (click):

First of all, I want to say: this is only a quarter of the pattern (for the head and muzzle), for the nose it is half. For felt parts, allowances are not needed. For everyone else, half a centimeter should be enough.
First of all, cut out and sew the ears together. Trim off excess seam allowances. Turn out the ears.


Ears while you can put aside, take the muzzle and head. Sew the muzzle into the head as shown below.
In order not to get lost, you can make small notes in the same places on the muzzle and border.

This is what the cat's face looks like:


Now put the ears inside the Quad Cat where you like and sew them on. Also sew the cat along the edge, leaving a small hole at the bottom.
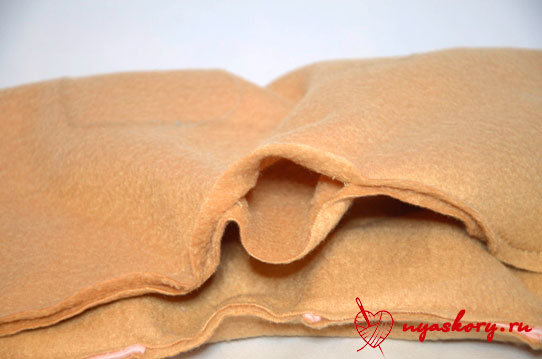
Turn out the pillow. While the Quadcat looks like this:

And now you need to fill the pillow with padding polyester as tightly as possible, since fleece is very sensitive to stretching and it can just turn out to be “orange peel” if the stuffing is not dense enough

And sew the bottom hole with a hidden seam. At the bottom you can see the already completely sewn hole.

Our cat is still without a face! Let's fix this. Take the eyes and nose and attach them where you would like to see the muzzle.
We will sew on the eyes and nose. To do this, bring the thread out, as below, and sew with a buttonhole, but VERY small. That is, there should be no distance at all between the stitches.

This process is quite painstaking, but it's worth it! Final photo:

Do-it-yourself letter pillows
Very common now sofa cushions. They are sewn quite simply, the main thing is to have the alphabet with the right language. And increase the letters to right size, certainly.
The most important thing is not to forget to cut right amount strips for the side jumper.

I found two such alphabets, but there are still very a large number of different fonts, each of which is applicable for letter art. 

Photo of children's pillows


There will also be many inspirational photos at the end of the article, so don't miss it.
DIY decorative pillows: photos and creation schemes
There will be rollers, and flower pillows, and just unusual, practical and easy-to-do ideas.
Soft heart dear
Now we will talk about how to make a gift to your loved one with your own hands. And then Valentine's Day is about to come, and somehow I rarely prepare you for this)
What gift am I talking about? We will sew a beautiful pink pillow in the shape of a heart with frills from a veil.
Necessary materials

- faux fur for the heart itself (the pillow is large enough, so the dimensions of the material are decent: 110 x 40 cm);
- veil, chiffon or organza for ruffles and flowers (dimensions: 300 x 30 cm);
- sintepuh or synthetic winterizer for stuffing;
- threads in the color of the fabric;
- satin ribbon for a bow;
- rhinestones;
- pattern paper;
- pencil for translating patterns;
- scissors;
- needle;
- pins for pinning patterns and frills.
You will need patterns (click to enlarge):


As you can see, this is only half of our heart. Therefore, when you cut it out, first translate one half, then the other. And so for both parts.
Cut out two pieces so that the direction of the pile on them is the same. Cut off a strip of the following sizes from the veil: 300 x 18 cm. Such a large length is needed so that, with further shirring of this strip, you can insert it into the edges of the pillow.

Now fold the strip in half lengthwise. Sew on sewing machine two lines at a distance from the edge and from each other by about 5 - 7 mm. But do not fasten the ends of the thread! And leave a larger supply of thread on all sides.

We haven't secured our stitches, so now we can tighten them. Just pull on both threads and slowly gather our frill to the desired state (the length of the finished frill should be equal to the length of the edge of the pillow itself).

After the threads are tightened, tie all the threads into knots at the ends and cut off the excess threads.


Now you need to put the frill inside the pillow, as shown below, and stick it in.
 And then sweep and sew, without sewing to the end. Leave a small hole. After everything is sewn, turn the future pillow inside out and stuff it with sintepuh.
Now sew together the ends of the frill, as in the bottom photo.

If you have a small reserve of frill left, then you can hide the seam slightly by laying a small fold. It remains to sew up the left hole.

Our pillow, of course, is good, but there are not enough decorative elements on it, so we will make roses with you To make roses, you will need 3 strips of veil with the following dimensions: 9 x 50 cm, 5 x 30 cm and 4 x 17 cm. Process them as well as a frill for a pillow.

It's time to wrap our rose! To do this, start folding the rosette, as below. But when wrapping the flower, bend the edges of the rose to make it look more natural. Make all 3 roses in this manner.


The roses came out great, didn't they? I hope everything worked out for you too. By the way, I wrote about creating similar roses in one of my previous posts.
It remains only to sew or glue the rose to the pillow. It comes out very nice:

Other sofa cushions
It seems that a few more detailed master classes will not hurt you)
butterflies

Lamb

Bear and dog


Frill

roses 
Roller “Princess Hotdog”(do not bother with the name, this is a character from one stoned cartoon)
I don’t have a detailed photo description, but I can say one thing: for the body you will need six elongated wedges and two parts (almost semicircles) for the muzzle.

Other fabric fantasies


It's nice to know that blog readers are inspired by my posts. The beautiful needlewoman Marina Grudzinskaya sewed pillows based on the works presented in this article. Come visit her (profile in In contact with and Instagram) and evaluate the products themselves:


I want to show you where to buy great materials to create super-soft and delicate pillows that are indistinguishable from store-bought ones. I bought this myself wonderful fleece- I'm not overjoyed, he's so glorious. The most important thing is - color palette on high.
On this, dear friends, I ask you. This time it turned out to be a very plump article on ideas (I personally counted about 50 ideas). I hope that you found exactly the option that you wanted. See you soon!
Sincerely, Anastasia Skoreva