DIY wooden garden house. Do-it-yourself country house - a simple step-by-step instruction for stylish summer houses (75 photos)
Where does the landscaping of a suburban area begin? We propose to consider the option of building a small house with amenities and a terrace, which, after the construction of a full-fledged housing, will become an excellent place to relax, store household equipment, or even a cozy guest house.
Inside the house there is a separate bathroom (4), a rest room with good natural light (3) and a small change house with an outside entrance (1) for storing any little things or setting up a mini-workshop. For a pleasant pastime in the fresh air, we will allocate a place in the plan for an attic (2), approximately 180x260 cm. The total dimensions of the house are 6x6 meters, just under the standard length of the scaffolding.


Foundation tricks
Our building is based on 16 concrete pillars, arranged in a 4x4 square with a gap of 2 meters. The marking of the site is carried out with a grid stretched on stakes, from each of the 16 intersections a mark is transferred to the ground by a plumb line. Four internal wells are dug strictly at intersections, twelve external wells are dug with an inward displacement of 7 cm.
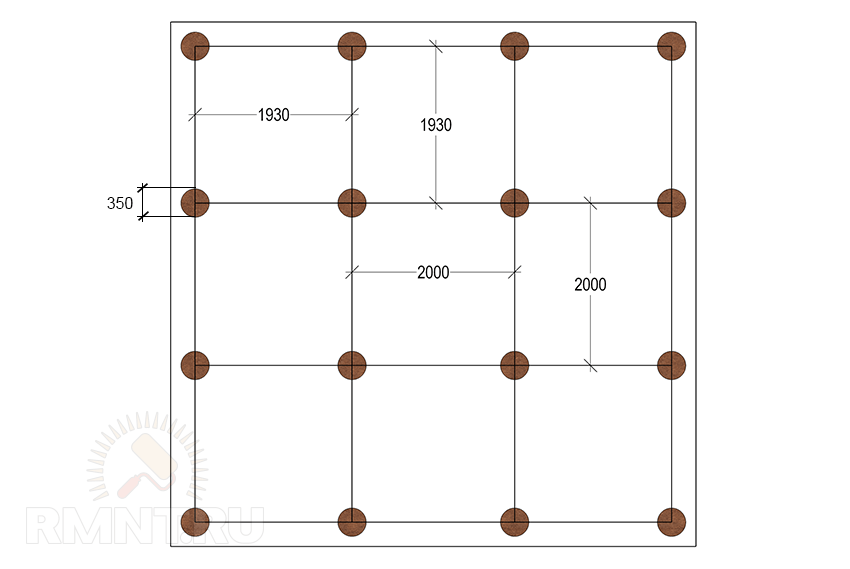
You can dig manually, drill with a power drill or use a crane drilling machine. We drill wells with a diameter of 350-400 mm to the depth of soil freezing plus an additional 50 cm. Pour a bucket of crushed stone or river pebbles onto the bottom of each well, then add two buckets (25 liters) of concrete grade 300 with filler fraction 5-8. We stick plastic 110 mm sewer pipes (gray PVC) into the solution that has not yet set. We orient them with sockets up; for long pillars, pipes can be made prefabricated. We align the pipes vertically, as well as at the intersections and the general level of lacing, pour 1-1.5 buckets of sand into the pits, and fill the rest with earth.

After the bases have set, we pour the same concrete into the pipes, it can be seated by vibration or pinning. The column is reinforced with a profile 14 mm rod in the full length of the pipe, an M12 stud 200 mm long is welded to the upper edge. Such a foundation does not react in any way to winter heaving of the soil: a smooth sleeve around the post does not allow the soil to freeze to concrete.
Grill and frame floor
A week is given for the drying of the pillars. On top you need to stretch a small (15 mm) chain-link mesh, painted or galvanized, two meters wide. We stretch it on the studs of the pillars, we sew the edges with wire.

Then, on the foundation, a grillage is assembled from a bar 150x150 mm:
- at the intersections we make a half-tree hem;
- we make holes for the studs with a brace of 20 mm;
- fold the inner grillage of the grillage;
- we horizontally start the outer bars, observing the dressing scheme;
- tighten the nuts over wide washers until the beam crushes the mesh;
- we finally derive the common horizontal plane with linings from roofing material;
- cut off excess studs.

We draw the mesh to the grillage either with wire, or we knock it out from below with galvanized nails. We put a windproof membrane into the cells, tuck it high at the edges. After the space between the bars is filled with a mixture of wood chips and slaked lime 5: 1 and covered with plastic wrap, the edges are shot with staples.

A crate is mounted on top of the film: a 50x150 mm board is placed on an edge in both directions to form cells of approximately 580x580 mm. Eleven boards go to each side, twenty-two in total. At the edges and at the intersections with grillages, the boards are drilled 70 mm with a 10 mm drill, then they are attracted to the base with self-tapping screws. The intersections of the lathing must be carried out as on the grillage - with pruning half a tree, we wet all the cracks and junctions and seal them with summer foam.

The floor frame, with the exception of cells completely located under the terrace, is filled with mineral wool and covered with a semi-permeable (150 g/m) diffusion membrane. The floor is laid with an edged tongue-and-groove board over the entire plane. We make ventilation holes in the cells under the terrace in the frame boards.

Walls, corners, openings and junctions
Further work begins with two walls opposite the corner attic. First, on a flat base of the house, we lay out and assemble on self-tapping screws a frame of boards on an edge with external dimensions of 570x240 cm. We add 2.4 m of racks of 24x150 mm boards with an interaxal pitch of 60 cm to the assembled frame. 60 cm. We will use these short boards as horizontal beams in the frame for joining the skin.
We raise the wall vertically, temporarily fasten it to the base with cuttings from the boards. The bottom board of the wall frame is fastened with 120 mm pins to the ribs of the floor system every 40 cm. The second wall is assembled in the same way and set perpendicular to the first, temporarily tightened with scarves.

Please note that the outer corner is thus "empty". We cover it with foam, put a beam of 60x60 mm, and fasten the extreme boards of two walls to it, having previously made holes for 100 mm self-tapping screws.

We assemble the rest of the walls in the same way, the inner corner is processed in the same way as the outer one. From the outside, we sheathe the house with 12 mm OSB sheets 2400 long, so the vertical seams fall exactly on the centers of the racks. Release the sheets 200 mm above the wall frame, below the sheathing falls at least to the middle of the grillage. At the corners, the edges are displayed along the frame of the adjacent wall.

When one side is sewn up, we scroll a 40x40 mm bar along the vertical edge from the inside and fill the remaining space with foam. From the same angle, we begin the sheathing of the next wall, fasten the edges of the sheets to the connecting bar.

To form doorways, choose a board 50x150 mm and knock down an installation box from it with internal dimensions of 100x210 cm for the front door and 80x210 for internal ones (with a canvas width of 70 cm). Before installation, the vertical rack of the wall is completely cut out (it can be divided into 4 crossbars), after installing the box, 35 cm of liners from the boards are added on top of its vertical racks.

Window blocks with an opening width of less than 60 cm are formed by adding horizontal bars. A block for a wide window is assembled from a 150x50 mm board and inserted into the frame in the same way as a door block, but in this case, fragments from at least two racks must be cut out under it, and T-shaped junctions should be strengthened with scarves.

Everything you need to know about roofing and attics
To save from cold and heat, the ceiling must have a layer of mineral wool insulation with a thickness of at least 200 mm. In this case, it is better to make the roof single-pitched ventilated. There may be an attic, but only as a room for storing materials with a useful height of 40-60 cm.

From a board of 150x50 mm we knock down trapezoidal single-pitched rafters with a height of 60 cm in the back and 110 cm in the front. Two six-meter trusses are being installed above the "full" part of the house and five more will be installed with a removal above the attic.
To obtain a sufficient width of the rib, a counter-lattice from a beam of 50x50 mm is screwed onto the lower boards of the rafters with self-tapping screws. The top board of the truss is longer than six meters due to overhangs of 40 cm at the front and back of the house. Therefore, you will either have to splice the existing forest with overlays, or import a longer one. One and a half meters from the low edge of the trusses, vertical jumpers are installed. The rafters are also strengthened in the front part with similar racks, but they are placed exactly above the walls under the direct lining of the terrace from the floor to the roof. The entrance to the attic is located in its widest part - in the inner corner of the terrace.

Fasten the rafters to the wall frame, adjusting the solution of the latter at the top. Then add intermediate floor beams between the rafters from a 150x50 mm board with a 50 mm counter-lattice. Hem the OSB ceiling with a thickness of 9 mm and screw the outer skin of the house to the ends of the ceiling. Fill all the gaps at the junction with summer foam, then lay a vapor barrier and mineral wool in the ceiling, nail a windproof vapor-permeable membrane on top. Cover the attic floor with 12 mm OSB sheets with cutting grooves for the rafters. On the vertical beams in the rafters, sew up the vertical walls of the attic with OSB boards, insulate them as desired. Cover the rafters with plastic wrap and lay a cold roof made of metal tiles or corrugated board.
Interior and exterior decoration
In conclusion, we will give recommendations for finishing work. Outside, you have a flat plane with hidden racks every 60 cm. Therefore, both plastic siding and the block house will fit perfectly.
For interior decoration, drywall suggests itself, but fastening directly to the racks will be a mistake: the wooden frame walks a lot, cracks will appear. The walls can be sheathed with OSB, followed by ennobling MDF panels or clapboard. If you still intend to use drywall - prepare the profile frame in accordance with all the rules.
Each of us dreams of a quiet and cozy country house, where you can escape from the bustle of the city and just relax. Modern building technologies make it possible to purchase a garden house ready-made or build it yourself. In this article, we will tell you how much it costs to build a garden house, what documents are needed to put it into operation, and whether it is possible to do without them.
Budget option for a country house made of plywood
Plywood garden house projects take less time to build than timber houses. Due to the use of large sheets of plywood for sheathing the structure, they are fastened much faster than wood. With knowledge of all the processes and the availability of the necessary materials, plywood garden houses are built in a week. In general, plywood is the simplest and most inexpensive material. In order to facilitate the construction process, experts offer the following stages of construction. So, how to build a plywood garden house:
- foundation support devices;
- the construction of the frame;
- erection of vertical rafters;
- top and bottom trim;
- creation of a subfloor using boards with a thickness of 20 cm or more;
- exterior sheathing of the house with plywood, ordinary self-tapping screws are used as fasteners;
- the interior cladding of the house involves the use of plywood, drywall, chipboard or fiberboard;
- for a comfortable stay inside the room, it should be insulated: a layer of mineral insulation is laid between the layers of the skin;
- installation of a finishing floor using a laminate board or linoleum;
- sheathing of rafters with plywood;
- sheathing of plywood with roofing material.
Important! It is possible to move along the frame only after the concrete has completely hardened.
To give an attractive appearance, you can use the outer skin of siding or wooden lining. Windows in the house can be installed from wood or from any other material. The video shows how you can build a garden house with your own hands
Building a house from a bar
The project of a garden house from a bar involves the use of a simple or profiled bar. Country houses from this material can be built both with the help of specialists and independently. The plan of the house from a bar allows you to build various structures. For example, you can make a log house with a veranda or terrace. Before building a house, you need to decide on the type of foundation. As a rule, for houses made of timber, a columnar or tape type of base is used. When designing a small cottage, the best option would be a columnar foundation; for large houses with an attic, it is better to use a strip foundation. The construction of the foundation begins with the laying of concrete slabs on a compacted layer of sand, and lowering it into the ground by 15 cm. When the foundation is ready, a roofing material waterproofing layer is laid on it. Next, the frame is constructed and laid on the base supports. Then install the vertical supports. The photo shows the frame of a garden house made of timber

If you like houses with a veranda, the lower logs are extended to the desired length and installed on additional supports. For flooring, you can use a thick board. When the floor is ready, the walls are laid from the timber. To fix the joints, dowels are used, a new crown is laid after a layer of insulation. Insulation is needed for each layer; jute or tow can be used as a material. Next, we equip the roof. To do this, we install rafters and braces. After everything is sheathed with roofing material, finishing work on the flooring is carried out. As a coating, as a rule, linoleum or board is used. The next stage of construction will be the installation of windows and doors. Outside, the house can be made more attractive with the help of siding or lining. A house built from a bar is quite cheap and warm.
The layout of the garden house and its cost
The construction of a summer house involves the presence of a small and simple building on a garden plot. As a rule, such houses are built in a small area, with one or two rooms, a kitchen, a bathroom, a stove (if any are provided for by the building project). The photo shows standard projects of suburban structures:
If you decide to build a garden house with your own hands, we advise you to choose a small house with dimensions of 4x6 or 6x6. The photo shows a 6x6 cottage

If you like space, you can take a 6x8 house project. The photo shows a project of a two-story garden house measuring 6x8

Such projects can rightfully be considered quite comfortable, cozy and roomy for temporary residence by the whole family. But how much it costs to build a garden house will depend on the materials chosen and the attraction of additional strength. The average cost of an ordinary country house will cost:
- building a foundation on your own will cost $ 150, and with the involvement of specialists - $ 250;
- interior decoration will cost $ 700;
- a house with a frame, ready-made partitions, windows and doors can cost from 3,000 to 4,000 thousand dollars;
Paperwork

When the construction is over, you need to think about the documents. Any building must legally stand on the land, regardless of who built it, the garden partnership or you yourself. To obtain the right to property, the following documents are required:
- obtain a construction passport for the development of a land plot. Such a document is issued by the local architecture;
- submit an application to the architectural and construction inspection with a notification of the start of construction;
- conduct a technical inventory of the building, such work is carried out by professional appraisers who have a special permit to perform such work;
- submit a declaration of commissioning of the property;
- assign the building its own postal address (addresses are assigned to residential and summer cottages);
- pay a contribution for the development of infrastructure, as a rule, such contributions are made either by the partnership or by the owner of the house individually;
- obtain a certificate of ownership of the building from the state registration service.
Of course, for a horticultural partnership, such documents are drawn up faster, here the number of participants in the horticultural society plays a role. In addition to the documents described above, there are also requirements for the building itself. The most expensive and difficult is to obtain a building passport, because. There are a fairly large number of norms and building regulations governing the conditions of development. Common building requirements include:
- the distance from your house to the next one should be 0.8 m;
- the distance to the border of your site should be 1 m;
- distance to the street - 3 m;
- the distance of the house to utilities and networks is 3 m.
Expert advice! Do not settle for “fake documents”, this will only complicate the situation and lead to unnecessary waste.
As you can see, the construction of country houses is considered simple and accessible to everyone. To fulfill your dream, you need to draw up documents and choose a building project.
How to build a garden house with your own hands, construction steps, how to insulate a house, tips on building a foundation, walls and roof. Internal and external finishing.
A large number of people, if they do not yet have, then at least in their thoughts want their own summer cottage and, of course, that a garden house be built on it. To save on construction, many create small structures with their own hands, but if opportunities allow, it can be built to a more impressive size.
This article will help you create the garden house of your dreams, after reading which you will learn - the design features of the garden house, what tools are used for this, how a reliable foundation is laid, the nuances of building a frame and the correct execution of the cladding. How to perform high-quality insulation, what is a foam coat and why a ventilated facade is needed.
How to create and take into account the project of a garden house, competent space planning, technology for building a garden house, the reliability of building walls, the formation of a high-quality floor and ceilings, how to install a roof, the nuances of creating a country house. How much does it cost to build a garden house.
Proper construction of the roof and attic, high-quality interior and exterior finishing of the structure, how to install ceiling lags.
What are economy class houses, disclosure of issues of building a shield structure, what materials are best used for this.
Design features
Today, building technologies offer the construction of garden houses not only from classic materials (log, cinder block, brick), but also to use plywood sheets, OSB, aerated concrete blocks, foam blocks, timber, etc. as the main building material.
But it is plywood garden houses that have excellent soundproofing and heat-insulating characteristics, along with ease of work and inexpensive construction costs.
Another advantage of this construction is the ability to make a house out of plywood with your own hands. This allows you to significantly reduce the cost of attracting professional teams. But at the same time, it must be borne in mind that garden houses made of timber and plywood have some drawbacks, for example, the vulnerability of the latter to aggressive actions of the external environment. Accordingly, it is necessary to take additional measures to protect this building material, and this, in turn, increases costs.
Also, plywood is an unsafe building material for the inhabitants of the house in terms of the penetration of intruders. Therefore, when building a garden house from timber and plywood, external finishing work is required, for example, sheathing with siding, which, in addition to decorating, also hides the main material used in construction from prying eyes.
Expert opinion
Filimonov Evgeny
Professional builder. 20 years of experience
Ask an expertCountry houses are being built using frame technology, which is gaining more and more popularity in many
Countries of the world.
This is due to its main advantages:
- no need to rent special construction equipment;
- a strong foundation is not required;
- the country house has excellent characteristics regarding energy saving;
- the ability to quickly complete construction work;
- due to the ease of construction and the materials used during construction, the walls do not shrink.
But the wood that is used to build the house (boards for the roof sheathing, bars for the frame of the walls) must be dry, and the plywood sheets must have a minimum of chips along the edges. In addition, all wood materials are additionally subject to processing with special compounds that can provide the required fire safety, as well as protect against moisture.
The construction of a frame plywood house can be divided into the following stages:
- foundation construction;
- construction of the wall frame and plywood cladding;
- roofing device;
- warming;
- finishing works (internal and external).
A suburban area is not only land with a garden and plantings. Many city dwellers come there for a good rest, so you need to have a house on the site. Not all summer residents have the opportunity to build a comfortable house on six acres. Many people get out of this situation by choosing the option of building an economy class house.
Inexperienced and novice summer residents are faced with the question of choosing cheap materials for construction. Below are examples of inexpensive and cozy country houses with visual photos.


Where to start building
Any construction begins with a plan on paper. The house outside the city is not intended for year-round use, but for the sake of comfort it requires familiarization with a typical project.

Among the projects of country houses in the lead with an attic or attic. This option allows you to abandon the construction on the site of the outbuildings. All inventory and working tools are stored in the attic. In addition to such a house, you can attach a veranda or terrace that acts as a dining room.


Strip foundation requires more time and cost. The positive side of it is that it allows you to use the room under the floor as a basement.

The next stage of preparation is the material of the "box" of the future building. There are several types of inexpensive and reliable building materials:


Frame-panel structures
The frame is mounted with a beam and sheathed with wooden boards of fiberboard or chipboard. Expanded polystyrene, glass wool or polystyrene are used as insulation. The result is a house with minimal costs, which can be operated all year round.

The house from a bar differs in the durability. Construction work will cost more. When using cheap timber, there is a chance of encountering the problem of shrinkage of the building. As a result, cracks and gaps appear. The log house will also have to be insulated.

A clay house is the cheapest and easiest construction option. Building materials are right under your feet. The construction technique is similar to clay modeling.

The downside is the building process that is too long in time. It will take several seasons to build a clay dwelling.

The trailer is common among newcomers to summer residents. The best option for living in the summer or during the construction of a comfortable home.

Construction of a frame structure
Frame construction belongs to the category of low-budget. It is not difficult to build a country house with your own hands without the help of specialists. If all the necessary materials are ready, the period of work will last several weeks.


To build a house you will need:
- bars for the frame;
- self-tapping screws and corners;
- wooden boards chipboard or fiberboard;
- insulation;
- piles for the foundation.

Stages of building a frame house
At the marked places, piles are driven in the corners. Mount concrete or brick supports under the joints of the walls. Then they cover them with waterproofing material and tie them with a channel.

A lattice of bars is laid around the entire perimeter. Wooden logs are placed on top of it at a distance of 50-60 cm from each other. All parts are fixed with corners and self-tapping screws.

Next, vertical racks are mounted, firmly resting on the bar grate. The finished frame is tied and attic logs are placed on top of it. Next comes the work on sheathing the frame with wooden slabs. At this stage, holes are left for windows and doors.


Now you need to decide on the choice of roof for a country house. Most summer residents choose gable and shed roofs. As an economy, the second option deserves more attention. When building a roof, do not forget about the vapor barrier. The roof will be inexpensive sheets of corrugated board or ondulin.


Facing the outside is done using siding. Before this, the outer walls are insulated with special materials. Instead of plastic windows, ordinary wooden ones without double-glazed windows are installed. This approach will significantly reduce the cost of construction.

With the help of simple and simple tips, a country house will be ready for use in less than a month. Those who do not have enough time for construction can contact a construction company, where they will offer to build a house for a turnkey summer house at an affordable price.

A few words about the interior
No matter how the house looks from the outside, inside the country house must meet all the requirements of our time. Gone are the days when a cottage in the country was used for cooking and lodging for the night.

Rest in the country - first of all, comfort and organization inside the house. There are many budget ways to satisfy the most desirable interior solutions.


Country - rustic style in the interior. Here you can not do without cabinets and shelves, curtained with curtains with embroidery. Crocheted napkins, tablecloths and rugs from old clothes will look good.

Permanent residence in a metropolis tires an ordinary resident - you want to leave the city to relax away from noise and dust. To do this, you need to get a garden house. When it appears, you will have the opportunity for a comfortable stay in the bosom of nature. However, many give up their dream, fearing that the implementation of such an idea will require large amounts of money. This is not so - even with a small budget, you can build a good house. The nuances of its construction will be discussed in this article.
Building materials and tools
A person who has decided to build an inexpensive garden house on his site wonders what material to build it from. The market today offers a large selection of raw materials. You need to focus on your financial capabilities and the characteristics of the materials.
Usually, dwellings outside the city are built of brick, foam blocks or aerated concrete. From the latest material the construction of the house will proceed at an accelerated pace. However, the most popular for the construction of structures in the country is a beam.
A bar with a section of 100 × 100 mm is usually used. In order for the structure to turn out to be reliable, it is necessary to dry the material in advance. In this case, the shrinkage of the country dwelling will be minimal, and deformations will not occur.
As for the tools, you will need:

House options
If your main goal is an inexpensive building, you can build a small house. Today the choice of options is quite large and frame structures is not limited. On your site you can build:
- bungalow house;
- skeleton;
- Finnish house;
- shield house.
Project documentation
 If you are planning to build a country house with your own hands, drawings and estimates are the first things you need to get. You need to decide on the following parameters:
- dimensions of the future building;
- house functions.
If before construction you will have a detailed project at your disposal, including a competent drawing of the structure, then you will save time and money.
First of all, it is necessary to draw a plan diagram of the base of the house, which is its foundation. It is also necessary to calculate the elements in places where the floors and ceiling are connected to the walls. Do not forget about floor supports and roofing. In any project, one of the important points is the list of communications that will be brought to the house. To ensure comfortable living conditions, you can provide plumbing, electricity and gas. All these moments need to be painted, including the allocation of places for connecting to highways.
Space planning
![]() When it is necessary to build a dwelling inexpensively and quickly, many owners of summer cottages make their choice in favor of panel structures. Their main advantage is that it is possible to build such a structure in a short time. Remember that budget garden houses are not recommended to be located in the lowlands. There, after the rains, a lot of moisture accumulates, which provokes the process of decay. Therefore, to place a dwelling, it is best to choose the highest place on your site. The best option is the northern or northwestern side of the site.
When it is necessary to build a dwelling inexpensively and quickly, many owners of summer cottages make their choice in favor of panel structures. Their main advantage is that it is possible to build such a structure in a short time. Remember that budget garden houses are not recommended to be located in the lowlands. There, after the rains, a lot of moisture accumulates, which provokes the process of decay. Therefore, to place a dwelling, it is best to choose the highest place on your site. The best option is the northern or northwestern side of the site.
So that the building site is not heavily shaded, it is important to locate the house not at the very border of the site, but at a distance of 3 m from the fence. If it is a single storey building, then an attic should be provided, which should be roomy enough, as well as a veranda that you can use to relax.
The attic in winter will become a storage for garden tools. There you can place other important things. If it is planned on two floors, then in this case a room on the ground floor is allocated for the kitchen. In this case, the room should be bright. For this, large windows are made in the kitchen. Next comes a heated room, where a staircase leading to the second floor is usually installed.
You should also think about the insulation of the bedroom. There should also be a guest room and a bathroom. An attic in a two-story building can be used for:
- summer bedroom;
- cabinet;
- billiard room.
 There you can arrange a place for growing seedlings.
Of course, the number of rooms and their purpose is largely determined by the preferences of the site owner. If you do not have enough of your own imagination, you can look on the Internet. Everyone can find inexpensive options.
The planned building in the country is best done with a veranda. This extension will bring you a lot of benefits. She is can be open or closed. The second option is more efficient. Thanks to the roof over your head, you will be well protected from rain, wind and sun. By installing mosquito nets on the windows, you can use the veranda as a summer bedroom.
Having planned a basement in your home, you should make sure that there are no surface groundwater in your area. In the spring, their level usually rises, they enter the basement, causing an unpleasant smell that will stand throughout the house. In addition, under the influence of moisture, the foundation will gradually collapse, and you will need to carry out repairs.
Beginning of work
If you want to save money, you can build a 3x4 garden house. In order for you to succeed, you need to prepare in advance high-quality materials and all the necessary tools. All this must be chosen, focusing on what what kind of house did you decide to build - panel or timber. Timber garden houses will last longer, but their construction will require the creation of a very powerful foundation, which should lie quite deep.
Panel buildings in a summer cottage are a choice for people who want to get an inexpensive home in a short time. Sheets of plywood are usually used for its sheathing. In four days, a solid house will appear on your site for living in comfortable conditions.
House building
 The panel house must be erected in accordance with the construction plan. The first operation should be the construction of the foundation. After that, you can proceed to the frame device. Then preparation of the upper and lower skins, rafters and vertical supports are erected. Additional bars are used to form a contour for doors and windows. Using self-tapping screws, the outer skin of the frame is fixed with plywood. When performing work on the interior lining, drywall, chipboard or fiberboard are used.
To insulate a dwelling, mineral wool or other modern insulation can be laid between two layers of sheathing. Or you can use improvised materials. For example, sawdust, which retains heat well. Thick boards can be used to create a subfloor, and linoleum or laminate can be used for finishing. Sheathing of rafters is performed using plywood, which is then covered with roofing material or drying oil.
In order for the erected house to look attractive, it is necessary to use high-quality and beautiful outdoor material. A lining or siding panels would be an excellent choice. In a finished country house, you can install both wooden and plastic windows. It all depends on the financial capabilities of the owner, as well as his personal preferences. However, it must be remembered that plastic lasts longer and also requires minimal maintenance compared to wood windows.
Garden houses made of timber, although they are built longer, however, in comparison with panel houses, they have a more aesthetic appearance. For them, you can use a simple or profiled timber.
Work begins with pouring the foundation. If you are building a small house, then a columnar base will be enough. If the structure is heavy, then there is no alternative here - you will have to fill in the strip foundation. Quite often, concrete slabs are used for the foundation, which are buried 20 cm into the ground. The finished base must be covered with a layer of waterproofing. To do this, the plate is covered with a layer of roofing material. Only after that you can do the work on installing the frame.
Logs and a crown should be laid on the foundation supports. For the device of the floor, boards of large thickness are used. After it's assembled, need to build walls. To fasten the beams together, you can use dowels. Each new layer must be laid with insulation - tow or jute. When the walls are erected, you can proceed to the installation of rafters and braces from the timber. Having completed this work, proceed to the installation of windows and doors. What will be the interior of the garden house, largely depends on the imagination of the owner of the summer cottage. The suburban area should be perceived as a place of rest. You decide what it will be.
As you can see, a 3 × 4 garden house with your own hands is not a dream, but a reality. Do not be afraid of independent construction of the building. Do-it-yourself mini-houses are quite simple to create, even if you have no experience. If you want to create houses as quickly and easily as possible, choose the panel option.