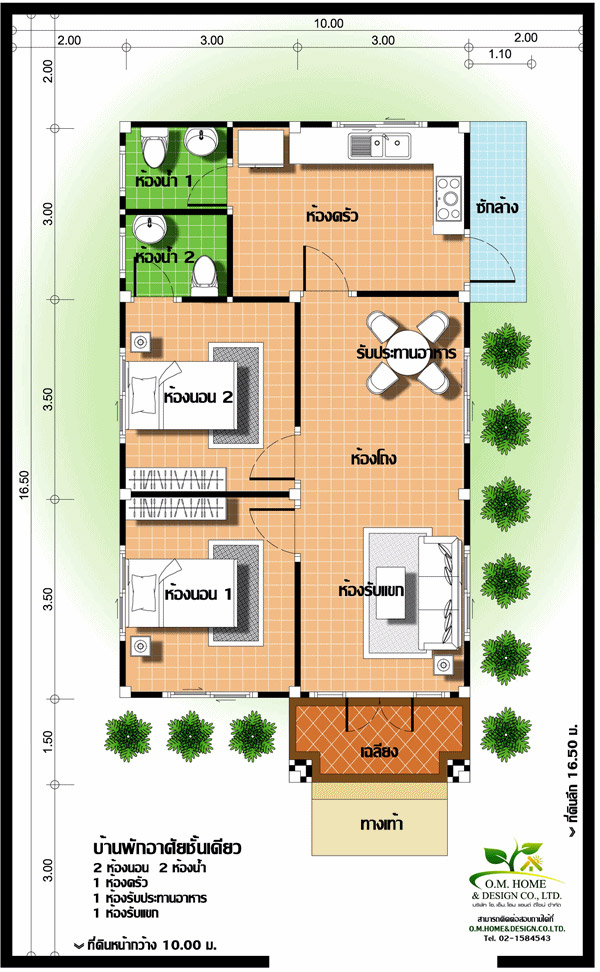
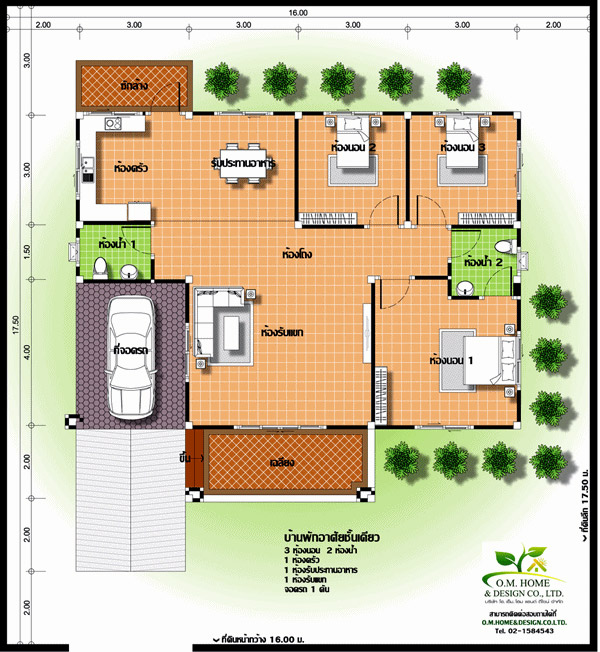
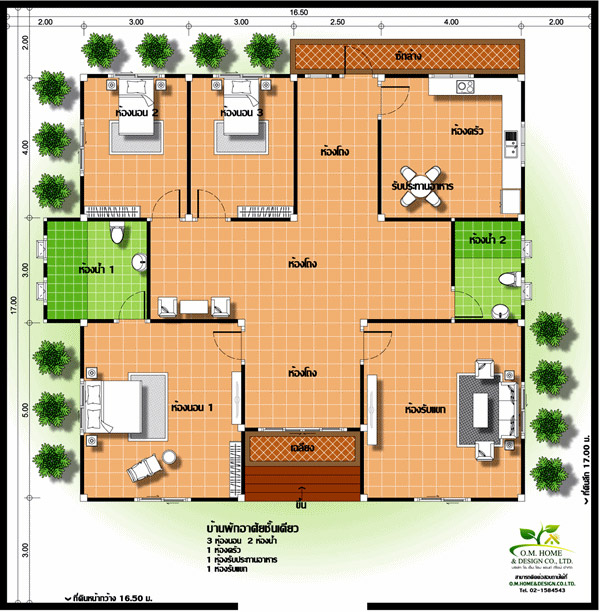
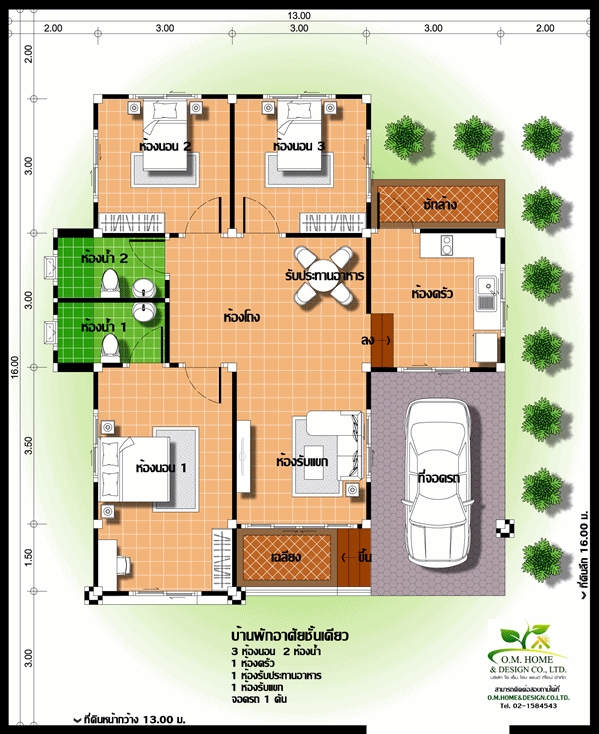
Project Z38, but with an attached capital greenhouse and utility block. Optimal greenhouse device: drawings and projects, diagrams and layout
We will send the material to you by e-mail
IN modern world not only summer residents put greenhouses on their plots, but glass or film versions of such premises grow next to private buildings. Many people think about building greenhouses for growing vegetables and flowers. all year round where additional heating is needed, someone only grows tomatoes and peppers in summer period. At the same time, it is important to choose the best do-it-yourself greenhouse projects that you can implement and receive. big harvest.
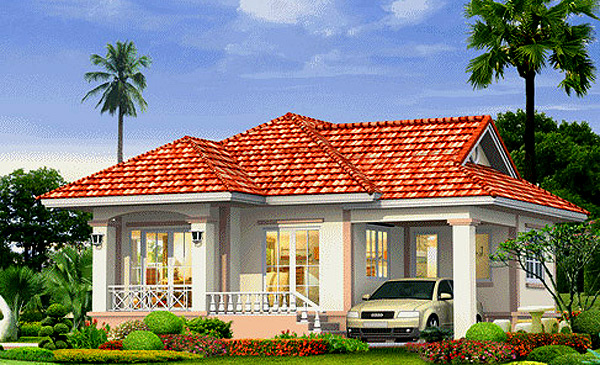
Modern warm option for winter
In order for plants to bring a big harvest, you should choose the best greenhouse projects with your own hands, because a lot depends on this choice. Among all the varieties, there are several basic structures that can be built independently:
- Arched. The roof is mounted in the form of an arc, more light penetrates through the structure, while the rays are scattered. This option is also good for winter, since snow does not linger on the surface.

- Shed. Usually located near another building, adjacent to it with one wall. This a budget option, which further saves the area of the site. In winter, you will have to remove snow from the roof of the greenhouse yourself.

- The triangular shape gives room for plants, and you can straighten up in it. In this embodiment, you can even equip a recreation area.

- "Khlebnitsa" greenhouse. A great place to protect plants in winter before transplanting into open ground.

Projects can be developed independently. For example, classic wooden gable option, which is easy to create yourself using glass or film.


The greenhouse "Khlebnitsa" is original and easy to create, in which you can plant seedlings in early spring waiting for good weather for landing in open ground.
Features of the greenhouse "Khlebnitsy"
This design does not require a foundation, as it is a temporary option for plants. Drawings with the dimensions of the "Khlebnitsy" greenhouse can be made independently or used ready-made options, for example, like this:

This design has a number of advantages:
- the opening cover facilitates access to seedlings and operation process;
- the entire surface of the earth under the shelter is used, since there is no need to equip paths;
- ease of construction allows each season to change the location if necessary;
- assembly and installation does not take much time and effort, so all the work can be done independently.
- you can vary the length of the structure according to the area of \u200b\u200bthe garden.
Thanks to all the advantages, such a design can be considered the best project for a greenhouse.
Related article:
Features of greenhouses for growing vegetables all year round
More and more garden lovers are coming to the conclusion that the best do-it-yourself greenhouse projects are found in models for any season, where you can harvest even in winter. For such structures, it is imperative to create a heating system that will be sufficient to maintain the optimum temperature at any time of the year.

Thinking about how to build a greenhouse for winter cultivation vegetables or flowers, first of all, you should decide on the material of manufacture.
Polycarbonate
This material has gained popularity among gardeners, as it has a number of advantages:
- good indicators of thermal insulation;
- the design is 16 times lighter than glass;
- material flexibility.
Note! The flexibility of polycarbonate allows you to create any shape of greenhouses.

Features of the assembly of the arched version:
Useful information! Open honeycomb planks can be sealed with sealant to reduce heat loss.

Can be carried out self-assembly and assembly of winter polycarbonate greenhouses with heating. You should follow the above recommendations, as well as prepare a drawing in advance, taking into account the dimensions of the greenhouse and summer cottage. The location is close to communications so that there are no problems with heating.
Related article:
Brick with gabled roof
Proven design for year-round harvest, great for areas with severe frosts. But such a design will require large financial costs. It consists of two rooms:
- a vestibule where a heating boiler is installed and inventory is located (2 by 2.5 m);
- greenhouse, place for plants.

Between them there is a partition, which is made of wood or other dense material. For the roof, corrugated board is used. There are several aspects that must be considered during the construction of the greenhouse.
Table 1. Aspects to consider when building a greenhouse
| Components | Recommendation | Photo example |
|---|---|---|
| Base | Applicable strip foundation with a depth of 0.5 m. |  |
| Walls | The masonry is 250 mm thick, and transoms should be immediately installed in the frames for ventilation in the summer. |  |
| window openings | The distance between the transoms should be 60 cm, and from the floor - 50 cm. |  |
| Roof | Maintain a slope of 30⁰. It is better to use rafter timber 70 by 100 mm. |  |
Do-it-yourself types of heating winter greenhouses with video
A year-round harvest is provided not only by a correctly selected and mounted greenhouse design, but also by the choice of a heating system. There are several varieties applicable for greenhouses:
- furnace;
- biological;
- water;
- gas.
Each option has its own characteristics, disadvantages and advantages.
Heating with a stove
This is one of the most simple ways heating. A furnace is mounted in the vestibule, and labor from it goes along the perimeter of the structure, during the furnace there is smoke that gives off heat.

Note! When choosing furnace heating check the ventilation system.
The advantages include ease of installation and availability of fuel, which can be any, as well as saving money. At the same time, there are also disadvantages - the lack of uniform heat and temperature changes, which adversely affects the yield.
biological option
In the process of decay, heat is released, bark, fertilizer or sawdust is applicable. At the same time, the air is moistened and the soil is fertilized. But this method is not suitable for winter, it is applicable only as an additional option.

Water
The most popular method, which requires a boiler, tank, pipes and a pump. According to the principle of operation, the system is similar to home heating, where the liquid is heated in the boiler and flows through pipes, heat is evenly distributed during circulation. The disadvantages include the complexity of installation and the cost of money, but temperature regime will always be normal.

Gas
This is an alternative electric heating, is much cheaper. Installed in the greenhouse gas-burners and heaters that produce enough heat. Most often, infrared versions of heating devices are mounted.

The climate of our country is such that it is possible to get a crop of some crops only when using greenhouses. Today we have the opportunity to consider a lot of projects, diagrams illustrating constructions of various types.
Stationary, collapsible, arched, one-, two-slope, tunnel ... but you still don’t need to miss the size. This article will help you decide on the greenhouse device, drawings and projects.


Choosing a greenhouse project
When choosing a structure, you will have to take into account many different factors, from the types of crops that you are going to grow, ending with the layout. inner space greenhouse.
Permanent or temporary?
Let's start with the fact that structures can be collapsible and stationary. The first is the most economical option, however, can only be used in summer. They are good for growing radishes, onions, dill, lettuce, etc. In addition, it is an outlet for garden plots for which there is no opportunity to look after all year round.
When choosing a prefabricated polycarbonate greenhouse project, it must be borne in mind that it is being built from metal profile or polypropylene pipe. This means that in the further drafting of the greenhouse project in the drawings, you will have to deal with different types connecting nodes. This painstaking work, requiring close attention, great precision.

Drawing with examples of connectors
A stationary structure is more expensive in construction; it is more difficult to develop a greenhouse project with or without heating. However, this scheme has many advantages:
- The greenhouse can have any size, scheme.
- Available equipment inside the heating systems, which provides the possibility of year-round operation.
- The irrigation scheme can be any - manual, semi-automatic, automatic. The same goes for ventilation.
- The project can be done independently or ordered from a specialized company.

A variant of the greenhouse project scheme, all structural elements are numbered in the drawing
Note:we stop on the scheme of a stationary greenhouse if its estimated area is more than 5 m 2. A smaller structure will not justify the cost of construction.Arched greenhouse project
Arched greenhouses differ from arc greenhouses in their structure. The scheme necessarily contains two vertical side walls, which make it possible to use the entire space even when growing tall crops. Such a structure is suitable for both summer and winter use- it all depends on the presence / absence of heating, the foundation and the frame material.
Design and construction of greenhouses arched structure very common. There are several reasons for this: ease of installation of covering material; a properly designed frame is able to withstand heavy snow loads; big square roof allows you to make convenient scheme placement under it infrared heaters, lighting lamps.

When considering project options for all-season greenhouses, it is necessary to take into account the resistance of frames to wind and snow loads.
For your information: Inconvenience can only be created by the moment of organization of the roof, as in the diagram above. To bend the profile, you will need a pipe bending machine, or some other device.Arc greenhouses
Arc or, in other words, tunnel greenhouses can be called the forerunners of arched schemes. Their design and, accordingly, the project will be primitive. In fact, these are several arcs set one after another at a certain distance, with or without jumpers. Most often, prefabricated structures of this type, as in the diagram, are used to cover greens, early berries, carrots, radishes ...
You can also choose a project for a heated tunnel-type greenhouse. However, it must be borne in mind that the required roof height is achieved here by increasing the distance between the sides. The height of the greenhouse is always half the width. For example, with a roof height of 1.7 meters, the side walls will be 3.4 meters apart. Consequently, you will have to face a choice: move inside bent over, or sacrifice the free space of the house adjoining area.

A simple greenhouse project, with your own hands made of polycarbonate and metal arcs, the structure is assembled very quickly
Projects of gable and single-slope structures
This option can be called a classic, since before the popularization of arched polycarbonate structures, the design of greenhouses with two slopes was used everywhere. The main advantages of a gable scheme:
- The height can be any, regardless of the width.
- Ventilation under the roof ridge is much better than under the vault of an arched greenhouse.
- Snow on a roof made according to this scheme lingers less, its descent is carried out independently.
- The structure can be erected from any materials, wood, metal profiles, old window frames etc.
You should not choose a project - a scheme of a gable structure only for summer greenhouses for greenery, up to 1 m high - they will be inconvenient to maintain.

Scheme of a gable frame
The following diagram of a polycarbonate greenhouse illustrates an example of a shed building. It has all the advantages of a gable, but we must remember that:
- When wall-mounted, the structure should be located on the south side of the house. Only in this way will the plants receive enough sunlight.
- A detached shed greenhouse is necessarily guided by the low side to where the wind blows more often. Otherwise wind loads on the frame will be very large.

Drawing - scheme of a shed greenhouse
Preferred Sizes
One of the stages of choosing a scheme - a greenhouse project from profile pipe- determination of the desired dimensions. Let's start by answering the following questions:
- What is the purpose of a greenhouse? Tomatoes, cucumbers will require a spacious, solid shelter, while for growing radishes, greens, a small greenhouse on arcs will be enough.
- What types of plants are you going to grow? The height of the building depends on the answer. If these are pumpkins, peppers, berries - we look only at our own convenience; cucumbers, tomatoes can reach a height of 1.5 - 1.7 m, plus the obligatory 30 cm of free space above the tops.
- How much space is available on the site?
- What kind perennials, the trees are in close proximity to the assembly site of the greenhouse, the project of which is being created. This, again, is a question of the height of the structure.

Figure - a diagram of a small greenhouse
Note:greenhouses by individual project can be of any size. However, when drawing up a diagram, it is worth adhering to the proportions developed by the experience of gardeners: the length of the building should be twice the width - 3x6, 4x8, etc. We also take into account the width of the beds (from 60 cm), aisles (from 80 cm).Greenhouse layout
Now about the layout of the greenhouse inside. When choosing a construction project with a foundation, you need to pay attention to the layout, because the convenience of plant maintenance depends on it. For narrow structures the best option with two beds along the entire length of the sides. If the width of the greenhouse allows, then it would be logical to choose a scheme for three or more rows. The main thing is that the middle rows do not reach the ends of the building to the full width of the passage. The diagram below shows two options for greenhouses of different widths.

Device winter greenhouse, the drawing and the project must include the layout of the internal space
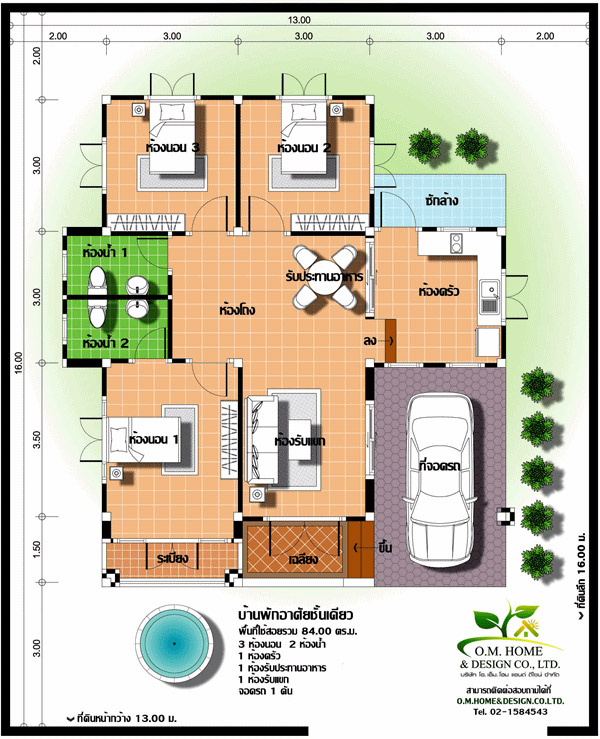
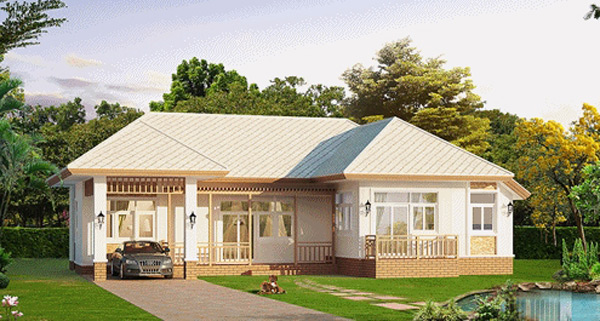
For those who are looking for projects of one-story residential buildings, this article can be very useful. I have collected here 24 projects with layout and dimensions, according to which you can already make a working draft and make an estimate. Here are houses of different sizes - from very small to spacious, designed for a large family.
Project No. 1
The first project is a house of 6 x 10 meters in plan - its overall dimensions are very modest. This small house with two bedrooms, a family of three can comfortably settle in such a house. At the entrance the house has a small terrace under the roof.
The house has a separate kitchen with its own bathroom and a large living-dining room measuring 21 square meters. The kitchen in this house measures 3 x 4.5 meters.

Project No. 2
The next house is larger than the previous one - with its length of 10 meters, it also has an overall width of 10 meters, although in terms of it it is not rectangular, but of more complex outlines.

The house has three bedrooms, it has two bathrooms, one of which is equipped with a bath. Living room in the center of the house 25 square meters from which there is access to the terrace. The kitchen has dimensions of 3 x 4 meters. The downside of this project is that the living room is a walk-through and from it is the entrance to the bedrooms. It can be improved by moving the wall between the kitchen and the living room, creating a single space of the kitchen-dining room-living room and highlighting the corridor from which there will be doors to the bedrooms.
Project No. 3
This is a project of a house 9 x 11 meters, spacious enough, but not huge. Moreover, a car parking with a canopy adjoins the wall of the house. If desired, the parking lot can be turned into a garage by laying the walls. The house has three bedrooms and two bathrooms. total area 70 meters without balcony, terrace and garage.
The disadvantage of this project is the same as the previous one. The plan can be ennobled by attaching a walk-through living room to one of the bedrooms. Thus, by sacrificing the latter, we get a large living room measuring 3.5 x 6 meters.
Project No. 4
This house is quite spacious, its dimensions in terms of 8.5 by 12 meters. The house has three bedrooms, and one of them is very large - 4 x 4.5 meters in size. The other two bedrooms are smaller, 9 square meters each.
The house has two entrances - from the street and from the courtyard. Each entrance has a covered porch. The layout of the house needs clarification, the living room can be combined with the kitchen, and the guest bathroom can be moved closer to the main entrance. Also on such large area can be shielded Technical buildings: laundry, ironing, etc.

Project No. 5
This is a large house for a large family. Dimensions in terms of 12 x 12.5 meters. On such a huge area, you can place three bedrooms, a kitchen-dining room, a living room, an office and a number of technical rooms.
The designers who created this project were, in my opinion, unreasonable with the distribution of space. I would remove the right bathroom and make a large kitchen-living room measuring 6.5 by 7 meters, I would correctly zone it, and allocate the rest of the premises for bedrooms and children's rooms. There would also be room for an office.

Project No. 6
One-story house measuring 15.5 by 10 meters. This project is very big house. The house is designed with a carport for two cars, which can be turned into a full-fledged built-in garage.

Such a large area can accommodate a large family in need of three bedrooms and two bathrooms.

Project No. 7
Nice house project 10 x 9 meters. The house compactly accommodates three bedrooms, a large living room measuring 6 x 3.5 meters and a separate kitchen with an area of 9 meters.
The living room has a beautiful bay window, which creates an interesting plasticity of the facade.

Project No. 8
Project one-story house 6 x 6 meters in overall dimensions. The house has two bedrooms and one large kitchen and living area.

When you enter small terrace with a canopy. The bathroom has an entrance from the kitchen area.

The house has access to the courtyard. Enough bedrooms modest size 3 x 3 meters. Sliding wardrobes and the presence of two windows in each of them save the situation.

Project No. 9
Nice project of a house with a high roof. Dimensions 8 x 9 meters, the walls in plan have a complex geometry. This is a chalet-style house that will look very picturesque.

The layout needs some work in my opinion.

Project No. 10
The project of a one-story house 9 x 8 meters with two bedrooms. The house has a large covered terrace.

One bedroom is large 5 x 3.5 meters, the second is smaller - 4 x 3 meters. The kitchen is enclosed in a separate room, the living-dining room is walkable. The layout can be adjusted to suit your needs.

Project No. 11
One-story house 9 x 9 meters with a measured plan. Inside the house there is a winter garden, two bedrooms and a kitchen-living room.

Good option for country house for a family of three. Instead of winter garden You can arrange an office or a small guest room.

Project No. 12
house project in modern style from flat roof. The dimensions of the house in terms of 8 x 8 meters. Carport installed. The house has one large bedroom of 16 square meters and a single kitchen-living room space.

Instead of a carport, it would be more correct to arrange another bedroom, in my opinion.

Project No. 13
Large house 9 x 13 meters. The plan has complex shape. Three bedrooms, kitchen, living room and dining room.

Immediately provided a place for a car, under a canopy roof.

Project No. 14
Large house with dimensions of 9 x 14 meters. The facade is very interesting, the house is one-story.

Beautiful stained glass at the entrance. First we get into the living-dining room, then into the corridor from which the entrance to the kitchen and three bedrooms is located.
Along the house there is a narrow terrace, which will be nice to use for relaxation.

Project No. 15
The project of a one-story house measuring 11 x 11 meters in plan.
It is possible to organize four bedrooms in the house, although three of them were made in the presented project. One bedroom is very large - almost 20 square meters. It can be divided into two bedrooms of 10 m2.

Project No. 16
The dimensions of the house are 6 x 9 meters. The house has three bedrooms and a small living room.

The kitchen, as it were, is separately attached to the house along with a terrace at the exit to the courtyard.
Project No. 17
An interesting project of a narrow house for a long section.

The house has three bedrooms and two bathrooms, one of which has a bath.

Thanks to the “canned” summer under a glass cap, it became possible to enjoy juicy greenery regardless of the season. miniature trees and the fragrance of heavenly flowers.
A winter garden in a private house, cottage or country house looks like a beautiful toy, a pleasant resting place, an object that emphasizes the status of the owners. In practice, this is a serious engineering solution, requiring compliance with the nuances of pre-project preparation, design and construction, and also needs constant care and protection.
The principle of arranging a winter garden with your own hands is both simple and complex, it all depends on the chosen design, frame material, glazing method and other factors.
What is the difference between a winter garden at home and a greenhouse or greenhouse?
When we talk about a winter garden, we first of all mean an intermediate zone between a living space and natural environment. Whereas the greenhouse (a more simplified version - greenhouses) is mainly focused on growing plants in special conditions. As a rule, the greenhouse is located separately from the house - in the garden or.
Like a greenhouse, a winter garden is designed to protect plants and flowers from freezing in autumn and winter. But the greenhouse is mainly aimed at growing certain varieties (for example, oranges, palm trees), maintaining special climatic conditions in which it is constantly physically difficult for a normal person to be. Whereas in a winter garden, a rationally selected microclimate positively affects both the well-being of people and the cultivation of plants with a complex (and not very) “character”.
Building a winter garden with your own hands
A professionally arranged zone of comfort and relaxation, among the impeccable forms of indoor landscaping, will allow you not to part with the summer even when everything around is covered with snow. You can choose a rational project and build a winter garden with your own hands, but in any case, this will require apartment owners and country houses certain monetary and time costs. Using the advice of experts and observing the required conditions, it is really possible to significantly save costs.

Which side to place the winter garden
- East. Best Choice, since the translucent design, oriented to the east, will not overheat;
- West. The advantage of this orientation is the ability to retain the heat accumulated during the day for a long time. However, in the summer, this advantage is very doubtful;
- South. This side of the house is the least suitable for arranging a winter garden. Because the plants will overheat, and this will increase the cost of ventilation and watering. Although, on the other hand, in winter time of the year, just in the garden located on the south side, it will remain warm for a long time;
- North. Such gardens do not accumulate heat well and quickly give it away. If the choice fell on this particular side of the world, you should take care of the good heating of the winter garden.
Winter garden structures - types, types and projects
Regardless of the location of the garden, the structural system must be translucent, illuminated, ethereal, beautiful, and also sufficiently reliable and resistant to all kinds of atmospheric (overheating and cooling) and mechanical phenomena.
The design of the winter garden can be:
- adjacent to the house;
- stand alone.
This or that option will make its own adjustments to the arrangement of various supporting systems.
The diagram shows the ways of constructive implementation of the shape of the winter garden
 Rectangular translucent construction in the form of an extension of the winter garden to the house. Universal option and the most common frame shape with pitched roof.
 Winter garden attached to the corner from the outside of the house.
  Design with combined roof- four-beam and two-slope.
  Winter garden attached to inner corner at home, the so-called "quarter polygon".
  Winter garden extension inside angle.
  Rectangular structure with single-pitched roof and extended roof section
 The configuration of the frame of the winter garden, the drawings are shown in the figure

Winter garden heating
The winter garden, hidden behind glass or polycarbonate, is able to accumulate a significant amount of heat. Its quantity will be enough in the warm season. But, in order to protect heat-loving plants in the cold season, you need to think over an effective heating system.
There are several types of heating, and each of them has its own advantages and disadvantages, as well as features of installation and operation. The main requirements for the heating system: low cost and optimum heat distribution.
What influences the choice of heating system:
- the size of the winter garden, the larger it is, the more heat is required for heating;
- plant species. Tropical plants develop well at temperatures above 20 ° C;
- frequency of use of the winter garden. If frost-resistant plants grow in such a garden, and you visit the garden only occasionally, it is enough to turn on the heater. But if you use the garden as an extension of the house, then a heating system is a must.

Types of winter garden heating systems
1. Electric heaters
- the ability to change the installation location of the heater depending on the needs;
- provides the ability to quickly adjust the amount of heat that comes in;
- ease of installation.
- an expensive pleasure in terms of paying for electricity, if you use it constantly and heat a large area;
- electric heaters dry the air, which negatively affects the "well-being" of plants.
2. Air conditioners (split systems) or UFOs
- allow you to regulate the temperature;
- do not dry out the air.
- The high cost of equipment and electricity bills.

3. Water (steam) heating
Connection of winter garden heating radiators to the central system.
Advantages:
- a constant temperature is maintained;
- relatively low cost of generated heat;
- there is no temperature difference between the garden and adjacent rooms of the house. Such a garden can be used as a dining room or a place of rest.
Disadvantages:
- you need skills and a special tool for cutting into the heating system.

4. Furnace heating
- the ability to use inexpensive firewood and coal;
- creates a certain color.
- the temperature is distributed unevenly - the plants can overheat;
- requires constant attention;
- high fire hazard.

5. Air heating
The principle of the device is to install a fan in the window that communicates with the garden window. Warm air distilled from the heated room to the garden. Another way: in the outbuilding attached to the winter garden, an air heater is installed and air is supplied through the ducts to the winter garden through a fan.
- relatively low set-up cost.
- required additional insulation winter garden
- requires the purchase of an air heater and air ducts;
- takes up a lot of space;
- spoils the appearance of the garden;
- dries out the air.

6. Electric heating according to the principle of "warm floor"
Advantages:
- the cable heats the soil, which allows the roots to receive enough heat;
- excellent heat distribution is achieved;
- the underfloor heating system mounted along the walls allows you to deal with the icing of the roof made of glass or polycarbonate;
- allows you to heat water in the pipes intended for irrigation.
Disadvantages:
- high costs for the construction of a system of warm water floors;
- the system is installed before the start of the functioning of the winter garden;
- difficult to carry out repairs.
Create optimal system heating is possible by combining several of their types. At the same time, please note that the type of heating system directly affects the choice of the method of air ventilation in the winter garden.

Winter garden ventilation
Let's make a reservation right away that the cooling system and the ventilation system of the winter garden are two different things. The air cooled by the air conditioner creates comfortable environment for a short stay. However, plants that are constantly in the garden require fresh air to be supplied on a regular basis. After all, the air conditioner does not contribute to the saturation of the air with oxygen.
Two ventilation systems can be used in a stand-alone, adjoining (extension) winter garden or a winter garden equipped on a balcony. Material prepared for the site site
natural ventilation
 Provides for the arrangement of vents or transoms. The total area of the glass doors in the window (transoms, vents) should occupy at least a quarter of the entire area of the garden walls. This is the only way to achieve the required level of oxygen supply. The vents can be opened/closed manually, or can be equipped with automation.
TO natural ventilation also applies to the arrangement of supply and exhaust ventilation. In this case, at the bottom, along the perimeter of the wall, holes are provided for inflow fresh air, and in its upper part or on the roof - vents for outflow. If double-glazed windows are used as glazing of the winter garden, then a good option – supply valve for plastic windows.
Pros:
- does not create noise during operation;
- does not create drafts.
Minuses:
- there must be a temperature difference;
- window sashes interfere with external and / or internal shading, and also occupy the internal volume (if they are not implemented according to the sliding principle);
- there is a possibility of damage to the window sashes under the influence of wind load;
- it is necessary to provide for mosquito nets to protect the garden from insects.
mechanical ventilation
Air inflow is carried out through the vents, but the outflow is carried out through various fans.
Advantages:
- the possibility of air exchange in the absence or, conversely, with a strong wind;
- does not interfere with shading;
- reduces the risk of intruders entering through open windows.
Disadvantages:
- creates noise, the level of which depends on the power of the fans;
- consumes a lot of electricity;
- needs maintenance;
- does not always harmoniously fit into the interior of the winter garden.

Plants in the winter garden in the winter and cloudy seasons experience a lack of lighting, which negatively affects their growth. Therefore, it is important to provide an acceptable level of additional lighting.
Lamps for the winter garden - the choice affects the growth of plants:
- incandescent lamps are not suitable, since their spectrum does not contain blue rays, without which photosynthesis does not occur. They also generate a lot of heat and tall plants can get burned;
- fluorescent lamps. Sensitive to voltage drops, frequent on-off greatly reduces their useful life;
- metal halide lamps are high pressure discharge lamps. Their emission spectrum is close to natural, but they have a short service life;
- sodium lamps high pressure. Their color rendering is unsatisfactory for internal use. In addition, they are very sensitive to voltage drops;
- phytolamps. Designed specifically for lighting plants. There are two types of them: energy-saving LED and fluorescent.
For example: for 5 sq.m. a winter garden with a height of 2.5 m needs 4 metal halide lamps (40 W) or 1 sodium lamp (250 W)

Protection of the winter garden from strong solar radiation
When planning garden lighting, you should consider the opposite effect of its overabundance. In summer, there is too much light, and in order to prevent its harmful effects from occurring, the garden must be protected. Measures to protect the winter garden can be divided into two types:
- internal protection - blocks up to 40% of light. These are curtains, blinds from various materials. Commonly used fabric, plastic, bamboo or aluminum. The latter should not be used, because the metal heats up quickly and gives off heat for a long time. This affects the overall temperature regime. In addition, they make noise and vibrate when the fan is running.
- external protection - blocks 70-90% of the light. These are awnings, awnings, for the production of which a special fabric with a reflective surface is used. External protection is preferable because the wall material does not heat up and the overall temperature in the garden does not rise.
Watering the winter garden
The habitual watering of plants in pots is unlikely to be effective in a winter garden, because it requires a lot of effort and time.
The construction market offers a variety of automatic irrigation systems that allow mechanized watering of plants. which can also be configured to various modes watering. Indeed, in warm weather, the need for moisture increases, and in cold weather, on the contrary, it decreases.
The system has become widespread drip irrigation for greenhouses and winter gardens. By appearance, this is a perforated hose, through its perforation (holes) water is dosed into the soil. Such a system is preferable in that it waters only the roots of plants and does not allow puddles to form. The advantage of an automated drip system is that it is connected to sensors that monitor the level of moisture in the soil.

It must be remembered that some types of plants need special watering - they draw water from the air, so the air needs to be humidified. To do this, they equip fountains that perform a moisturizing function and are an element of decor, use mist installations or ultrasonic humidifiers.
The irrigation system involves the installation of a drainage system through which excess water will leave.
Electricity in the winter garden
In order for all of the above components of the system to work, it is important to consider the method of power supply, the type of electrical wiring, as well as the number and location of sockets and switches.
The composition of the soil (land for the winter garden)
For the growth of plants, it is necessary to ensure not only the optimal microclimate in the winter garden, but also take care of the quality of the soil and the initial application of fertilizers and nutrients into the soil.
Plants for the winter garden
When choosing plants for your winter garden, in addition to your own preferences, you need to be guided by the types and varieties of plants.
Plant types:
- tropical. Optimum temperature for their growth + 22 o C;
- subtropical + 10 o C.
Wherein different types plants should not be mixed.
Design and care of the winter garden
In order for the winter oasis of greenery to please you for as long as possible, and for the plants and visitors to always feel comfortable, you need to constantly monitor the state of all systems that ensure the life of the garden. Concerning decorative design winter garden in different rooms of the house, then everyone is guided by their own vision of beauty. involves design in certain styles (modern, classic, hi-tech, country or Japanese style), from which you can choose the direction that suits your spirit.
Conclusion
Thus, it can be noted that the creation and full functioning of the winter garden requires considerable effort. And all engineering systems should be designed in a complex way, taking into account the mutual influence on each other. However, if you take into account all these requirements, you can create such a winter garden with your own hands, which will embody your ideas about beauty and comfort.
Winter Garden - photos with examples for implementing ideas


