Do-it-yourself well for water using a manual and shock-rope method. Manual drilling of wells for water
Unfortunately, not all areas have water supply. The owners of such real estate have to choose a life of little comfort "without amenities" or carry out manual drilling of wells for water. This method can be considered the cheapest and most common way to equip a source for autonomous water supply. Specialists are usually invited to carry out the work, but if desired, they can be done independently. Today we will analyze how to drill a well with our own hands and what methods exist.
Methods of self-drilling
screw method
A very common drilling method, most often used for arranging shallow wells. Its essence is that with the help of the auger blades, the soil is destroyed and brought to the surface. There are two technologies for such drilling. For the first, an auger is used, the blades of which are welded to the base at a right angle. During operation, the blades cut the soil at an angle of 90°, after which they are crushed and transported upward. The main disadvantage of the method: part of the soil falls into the well and needs to be removed to the surface.

The soil-breaking blades of the auger tool can be welded to the axle under different angles, this fact does not affect the drilling technology. Auger drilling in any case, it resembles the twisting of a "corkscrew" with the consistent rise of the destroyed rock
The second technology is more convenient. In this case, an auger with blades is used, which are welded to the pipe at an angle of 30-70 °. The device cuts the soil and, without crushing it, transports it to the surface.
The advantage of the method is that nothing gets inside the well. An industrial drilling rig necessarily uses the supply of flushing fluid, most often water, to the production. The jet injected by the pump into the casing pipes washes out the dump to the surface. In the process of manual drilling of wells, pump flushing is unlikely to be used. However, professionals recommend the use of flushing fluid, which greatly facilitates the drilling process.
core drilling
When using this method, drilling is carried out using a special tool, which is a pipe, at the end of which there is a core bit with sharp cutters made of durable metal. Super hard rocks first, they break it with a chisel, then they drill with a crown and raise the sludge that has clogged into the core pipe.
The crown, rotating together with the pipe, deepens into the ground, forming a well of the corresponding diameter. Sludge collects inside the projectile and rises with it to the surface. With blows of a heavy sledgehammer, the hollow "glass" is freed from the rock. In the process of drilling a well with one's own hands, water must be supplied inside the projectile, either clean or mixed with clay. This strengthens the walls of the well and prevents their collapse.

Core bits can be of various types, their choice depends on the physical and mechanical characteristics of the rock in which the well is to be drilled
In its upper part, the core barrel is equipped with fasteners, on which the rods are built up. This achieves the required drilling depth. The expansion takes place in stages. After the first section of the pipe has been buried, a new rod is attached to it, the length of which is from 1.2 to 1.5 m. Then the actions are repeated. Thus, from the projectile and rods is formed technological column. It is very important that the glass and pipes are connected to each other as firmly as possible. There should be no noticeable play and undesirable movements at the points of their attachment.
Shock-rope method
A heavy drilling tool rises to a height of 2 meters and falls with force onto the drilling site. He breaks the rock and captures it with a cutting and gripping device located on the lower edge of the pipe. It is called a bailer and may be the most different kind, depending on the type of soil.
To facilitate the drilling process, a clay mixture or water is poured into the well, which is later scooped out using a special device made in the form of a bucket.

Scheme of a bailer with a ball valve, one of the types of tools specifically designed to work with soft and loose soil
The shock-rope method involves the use of a tripod. It is built above the drilling site. The height of the device is about two meters. A block is mounted on the top of the equipment, through which the cable is thrown. A bailer is firmly fixed at its end. The tool is raised to the surface of the earth and lowered into the well with the help of a cable. The bailer is cleaned from sludge through a technological hole located half a meter from its lower edge.
Some craftsmen claim to know how to manually drill a well, which does not require the erection of a tripod at all. Long-term practice shows that this is possible only for depths of less than 10 m and will require excessive physical effort from the builders.
You can learn more about the technology of drilling aquifers from the following material:
Impact-rotational method
The method is very similar to the previous drilling method. The main difference: performs immediately rotational and shock movements. Thus, the forces applied to the projectile are increased and the drilling process is accelerated. The soil knocked out by the bailer is transported to the surface with the help of a special bucket. The method is considered the best for arranging a well in stony hard soils.

To facilitate the drilling process, a home-made tripod is used - a design with which it is much easier and easier to remove the drill from the well
It should be noted that the least effective of all methods is auger. However, it is the simplest, so it is he who is most often chosen when they are going to drill a well on their own. However, the choice of drilling method also depends on the composition of the soil on the site. The auger method is most often useless on hard soils, and the use of the shock-rotary method is impractical on soft soils. Thus, before starting drilling, it is imperative to find out the composition of the soil in the area.
The following material will help to rock the well after drilling:
Drilling a well with an ice drill
There is a drilling method that will require minimal financial investment. This is the drilling of wells by hand with the help of an ice drill. The tool is used as a drill, and self-made rods are used to build it.

The ice ax knife will serve as an auger, and steel pipes with a diameter of up to 25 mm can be taken as extension rods. To make the process go faster, reinforced cutters are welded to the winding edges of the improvised auger
Among other things, casing pipes will be required to form the wellbore, a shovel and a device for removing cuttings from the site.
Drilling with an auger made of an ice drill includes the following operations:
- Training. We dig a guide recess: a hole two bayonets deep.
- We lower the drill into the resulting recess and begin to screw it into the ground, using the screw tightening rule. It should be remembered that after every three or four revolutions, the tool is removed to the surface and cleaned.
- After the first meter has been passed in depth, we begin the formation of the trunk. To do this, a casing pipe is lowered into the well, its diameter should be slightly larger than the diameter of the drill. It is best to choose lightweight plastic parts equipped with threads for connection.
- When the drilling tool begins to descend into the face to its full height, we attach an extension rod to it. This can be done in two ways: screw the part if there is a thread, or extend it with a steel pin-rod if it is absent.
- In the course of work, we continue the formation of the casing string. As soon as about 10-15 cm of the pipe remains on the surface, we attach the next one to it. The connection must be strong. It is usually done by threading or soldering.
- Periodically check the verticality of the trunk. If the drill starts to beat against the walls of the casing, we level the structure with wooden wedges. They get stuck between the ground and the casing.
- After water appeared in the well and it was decided to stop work, we install a filter and carefully fill the gap between the soil and the casing with gravel.
The casing string can be installed even after completion of drilling operations. In this case plastic pipes injected into the well and connected in series after the previous part is lowered down. It's not the best rational way, since you will have to clean the bottomhole from sludge again.
In this article, I want to tell you, without expensive, bulky equipment, quickly, in the place where you want, even in an already built house. If you need to arrange autonomous water supply country house, then after reading this article and watching my video, you will know how to drill a well by hand independently without resorting to the services of numerous expensive specialists. Or maybe, having mastered this original method, you will be able to drill wells to your acquaintances, friends, relatives, and perhaps in the future it will become for you source of additional income.
A large number of wells have been drilled using this method. The method is quite simple to implement and I have never met life anywhere. On the Internet, I also did not meet the description of this method. My friend came up with the idea of drilling water wells in this way, he is a turner by profession.
For comfortable living Every home needs running water. Own well in the house, even if available central water supply, can be very useful. Firstly, you do not depend on utilities and interruptions in the supply of water do not threaten you. Secondly, you do not need to pay for water according to the meter, and when watering the garden or washing the car, water is required a lot. Thirdly, often water from wells happen best quality than the water that is supplied to our homes through the plumbing. Also, water from a well is better than water from a well, since it does not come into contact with air and various debris from the surface of the earth does not enter the well like a well. A well can be arranged in a built house, and then there will be no danger that it will freeze in winter time year, and you will be left without water supply.
You need to start drilling with a simple drill, to the maximum possible depth. Then we insert a galvanized pipe into the drilled hole, to which a cone-shaped tip with a hole in the center is welded.
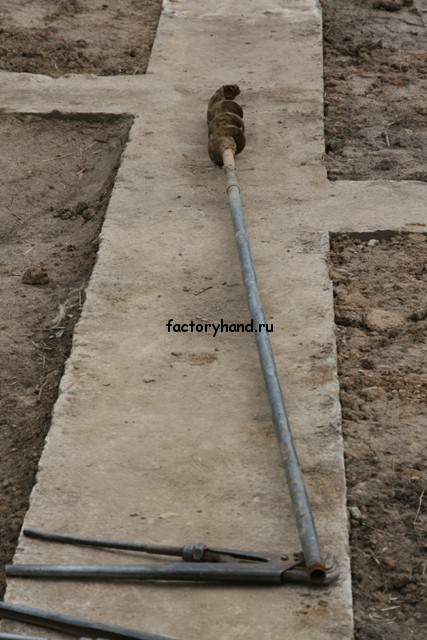
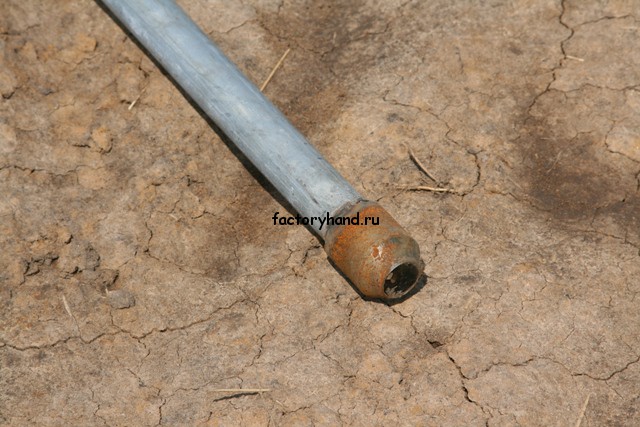
pipe tip
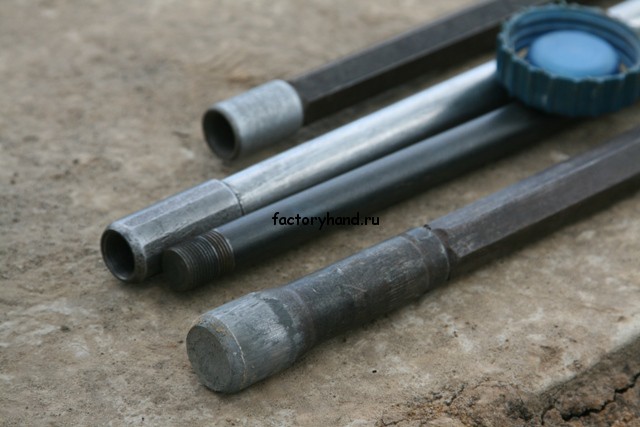
Rods with a tip
Then we lower the rod into the pipe, in which the tip is slightly larger in diameter than the hole in the pipe tip. And we begin to hammer the pipe into the ground with a barbell. In this case, blows are applied not to the pipe, but to the tip of the pipe (the photo of which is shown above), while the pipe and threads are not damaged. As the pipe sinks into the ground, we lengthen it and the rod by screwing additional extension elements. As soon as we reach the limestone (this will be understandable because the rod will start to bounce when hitting back up), we pull the rod out of the pipe and insert the drill into it (the drill is smaller than the size of the hole in the pipe tip). Now you need to drill a hole in the limestone, find an aquifer in it and hammer a pipe into the limestone. We check the presence of water in the well by pouring water from a watering can into the pipe. If the water does not leave the pipe, it means that you have not reached the aquifer. As soon as the water runs "fun" into the pipe, this indicates that all plumbing equipment will now work in your house. This is how the drilling process works for us. A pipe hammered into limestone works long years and she is not afraid of sand. After drilling a well, it must be thoroughly pumped to remove all the dirt that has accumulated in it during drilling. About,
An equipped water well is an autonomous and reliable source of water supply for a summer house or a private house.
The organization of individual water supply is not always caused by the lack of a centralized water supply, the reason may be low quality water in the main, interruptions in supply, depreciation of the water supply network, high price water, its shortage, and other factors.
Almost all owners of dachas or country cottages have an autonomous source of water. Another thing is that their choice may differ. Someone prefers a well, someone likes a well.
By the way, it will be useful to know comparative characteristics – .
This article is for those who opted for a well.
It should be noted that wells are divided into two types depending on the depth of drilling.
Types of wells for water

Since do-it-yourself drilling is supposed, we will consider in more detail the arrangement of wells for sand, as the most affordable in terms of independent implementation.
Drilling a well for water - step by step instructions
1. Depth determination
- shallow (up to 3 m) well breaks through if the aquifer is close to the ground surface, and the water is supposed to be used only for technical needs or irrigation. To drill such a well, a drill, a casing pipe and a hand pump are sufficient;
- medium deep (up to 7 m) well provide water suitable for human consumption. In order to drill a well on your own, in addition to the drill, you will need a shovel and time to build a pit. A pit (pit) with dimensions of 1.5x1.5x1.5 is designed to facilitate drilling to great depths. For convenience, it can be reinforced with plywood or boards. After completion of work, the pit falls asleep. Water is supplied by a pump;
- deep (more than 7 m) well, will completely close the need for water for all residents of a private house or cottage. At the same time, there will be enough water not only for individual consumption, but also for technical needs, sanitary requirements, irrigation, maintenance of a pool or pond (reservoir).
In general, the choice of the type of water intake is determined after a geological study of the location of the well organization. We propose to consider the last option - the device of a deep well with your own hands, as the most difficult of those presented.
2. Well drilling methods
The listed types of wells (this does not apply to artesian or lime wells) can be drilled using the following methods (technologies):
 Auger drilling using an auger drill.
 Core drilling (an annular drill is used).
  Percussion drilling. In this case, a drill bit is used, which is driven into the soil without excavation. The soil is simply compacted away from the axis of the bit. The chisel is hammered using a tripod with a winch.
  Percussion rotary drilling. The work of the drill is supplemented by washing out the soil with water. The method is laborious for individual use.
  Rotary drilling (provided by a mobile drilling rig).
 The photo shows a small-sized drilling rig MGB50P-02S with a movable hydraulic rotator manufactured by Horizontal.
3. Water well drilling project
In the event that the depth of the aquifer is known exactly, it can be drilled directly with the size of the drill for the casing. If not, you will first need to find out at what depth the aquifer lies.
Thus, any well is an individual project, which is influenced by the following parameters:
- geological structure of the soil;
- selected drilling method;
- requirements that are put forward to the quantity and quality of water;
- the requirement to maintain the necessary distances to the places of pollution (arrangement of the "sanitary zone");
- depth of the aquifer. Moreover, this does not mean the first vein to which the drill has reached, but the one that will meet the conditions of use in terms of ensuring the debit of the well.
4. Water well drilling tools
Since the shock-rope method of manual drilling is described, its advantages should be noted:
- preservation of most of the useful soil layer in its original state. Those. heavy equipment will not damage the plantings on the site;
- no restrictions on the place of drilling. A hand drill can be drilled in almost any part of the site;
- simplicity of equipment and minimum requirements to the qualification of the driller.
For work you will need:
- shovel;
- drill with a reinforced cutting part. Tip: you can strengthen the drill by welding cutters onto the screw, the role of which can be played by file elements or a metal shank. In addition, cutters can be sharpened using a grinder;
- trolley for the removal of excavated soil;
- pump type "baby" with a hose;
- container with water.
Suitable for furnishing:
- crushed stone or gravel for a pillow;
- steel wire for filter;
- pipes;
- wire for arranging a bottom filter.
5. Choice of location and arrangement of the pit
With the help of hired specialists or folk methods (dowsing, barometric method, using silica gel, by the amount of dew, exploratory drilling, etc.), we determine the place where the aquifer is closest to the surface.
 Next, we dig a hole. This is the development of soil of a certain depth, the purpose of which is to facilitate the process of drilling a well.
Pit arrangement milestone for two reasons.
Firstly, the depth of drilling with a drill is reduced.
Secondly, the possibility of soil collapse around the well is excluded.
The dimensions of the pit are determined by the driller, but usually they are 1.5x1.5 and 1.5-2.5m. in depth. So that the soil does not sprinkle, the pit is reinforced with plywood, boards or metal.
6. First method: tripod - drilling rig
 A tripod is a percussion-cable mechanism for drilling water wells. The support structure will be needed in order to facilitate the drilling process through the use of a drill glass.
 The tripod can be made of wood (knots are excluded) or metal pipe(or profile). The length of the beam or pipe should be 4-5 m. How to make a tripod for drilling can be seen in the diagram.
  Further, a mechanical winch with a cable is attached to the tripod, on which the drill glass is fixed.
 Such a drilling rig is compact and has a significant margin of safety. The principle of operation of the installation is simple: a glass falling into the ground absorbs the soil. Depending on the composition of the soil in one stroke, you can select from 20 cm to 1 m of soil. To facilitate the work, you can fill the drilling site with water. From time to time, the drill glass must be cleaned of soil stuffed into it.
Attention: The cable on which the drill is attached must be longer than the depth of the well. Otherwise, it will break off, and the drill will remain at the bottom.
The casing pipe can be installed simultaneously with the advance to the depth or after all the work has been completed.
7. The second method - casing and drill
During the drilling process, you can immediately install the casing. Then its diameter must be greater than the diameter of the drill, so that the drill can move freely in the pipe.
When performing work, you need to constantly monitor the moisture content of the soil being removed so as not to miss the aquifer (otherwise it can be closed with a pipe). The main features are below.

Material prepared for the site site
 After an aquifer is discovered, it is necessary to pump out dirty water in order to understand whether there is enough water in a given vein. For this, a submersible or hand pump is used.
 If after pumping out 2-3 buckets muddy water, clean still has not appeared, drilling should continue to a more capacious layer.
Important: the pump is not designed for such operating conditions, so after water treatment it may break. It is recommended to use only a high-quality pump.
8. Well casing
Steel or plastic pipes can be used for casing (service life up to 50 years). But the use of galvanized pipes is not recommended, due to the risk of water contamination with zinc impurities.
The meaning of the upset is as follows:
- prevention of shedding of the walls of the well;
- prevention of well silting;
- elimination of the possibility of getting into the well of perched water (water upper layers, melt or rain water);
- eliminating the risk of clogging the well.
The installation of the casing pipe is carried out immediately after the completion of work or directly during the drilling process.
Tip: if the pipes go "creaking" you need to attach a sledgehammer to them.
9. Flushing the well with water after drilling
The installation of a casing pipe does not end there. Now you need to flush the well. To do this, a pipe is lowered into it, through which water is supplied under pressure. Thanks to the pressure of water, a layer of clay and sand will be washed out of the well, which must be pumped out. After the appearance clean water it needs to be analyzed. Requirements for the quality of water from a well are regulated by SanPiN 2.1.4.1074-01 (Russia) or DSanPіN 2.2.4-171-10 (Ukraine). If the water quality is satisfactory, work can continue.
10. Bottom filter for sand well
The purpose of the filter is to protect the pipe from silting.
 How to make a filter for a well?
You can make a slotted filter with your own hands, for this you need to make notches (cuts) with a grinder at the end of the pipe.
Tip: for notches, you need to use a thin disk (0.8mm). Pay attention - many notches will weaken the pipe.
 Alternatively, you can drill holes in the pipe. Next, the place of notches / drilling must be wrapped with wire or mesh. Lay the filter obtained in this way on a crushed stone pillow, the filling of which will prevent the filter from silting up.
  Tip: the diameter of the filter pipe should be smaller than the diameter of the main pipes in order to be able to dive into the well without problems.
 by the most simple option there will be a purchase of a ready-made filter.
Important: without a filter, the well will not work for long. Its absence is justified only in deep water wells (more than 40 m)
11. Well debit for water
To get a complete picture of the capacity of the well for sand, you need to wait a day, and then check the level of incoming water. If the incoming water is sufficient for the needs of users, the distance between the soil and the casing can be filled. The pit is also buried.
12. The buildup of a well for water after drilling
This is mandatory step. To perform the buildup or simply the final cleaning of the well, you need to install centrifugal pump high power and periodically pump out water for 1.5-2 weeks.
Tip: You should decide in advance where the pumped water will be redirected.
13. Drilling a water well with your own hands - video
Manual technology using the shock-rope method of hole punching.
14. Installing a pump for a well for water
Please note that surface-type pumps are not intended for installation in a well. Due to the depth limitation of 8 m. For these purposes, only submersible pump- centrifugal or vibration. Each of the subspecies has its own advantages, and the final choice can be made by analyzing the influence of such factors as:
- well depth;
- water level in the well;
- casing diameter;
- well debit;
- water pressure in the well;
- well pump cost.
15. Putting the well into operation
If drilling a well under water was not carried out independently, but with the involvement of a third-party organization, then before accepting work, you need to require the following documents:
- hydrogeological conclusion on the possibility of implementing a water well project;
- well passport;
- permission of the sanitary and epidemiological station (checks the quality of water and the compliance of the sanitary zone with the requirements);
- certificate of completion.
If all the work will be done independently, then the main thing is not to rush, but to withstand the technology and comply with all key points water well drilling process. However, do not forget that only the use quality materials(in particular, pipes and a pump) will be the key to the long-term functioning of the well.
The lack of water in a private house is a problem that the organization of an individual water source will help to solve. Traditionally, a well is dug on the site. However, in accordance with GOST standards, the water in it is not considered drinking water. The best option for owners of real estate will be the drilling of a well, which will fully cover the needs of the economy in water.
Organization of work:
Since the organization of an artesian well is not affordable for everyone, many prefer more cheap option- drill manually the so-called " abyssinian well»or a sand well, the work on the organization of which does not require the use of a professional installation. This process, although physically difficult, is quite real if you study the technology and acquire the right tool.
First of all, it is necessary to explore land plot, fix the level at which the water-containing layer lies, the type of soil, required flow water. The type of water source will depend on these indicators.
Well types:
- "Abyssinian well" is very simple in its design. Its organization is possible if the water layer lies at a depth of up to 12 m. Since the well is not deep enough, Special attention should be given to its location - away from potential places of pollution;
- sand well organize if the depth ground water- up to 50 meters. It will serve its owners for about 15 years. Periodically it is required to check the quality of the contents of the well in the sanitary station, since such a depth cannot guarantee constant cleanliness water.
In the absence of hard rocks in the soil, it is possible to drill a well in the basement of a dwelling. It is advisable to equip it with a manual column, which will provide the household with water even in the absence of electricity.
Tools and materials:
For manual drilling work, a tripod is required, equipped with a winch that lowers and raises the drilling tool. You will also need a screw made of high-strength metal. Necessary materials: pipe of different type, cleaning filter, pump. To facilitate the workflow for various breeds recommended to use different types drills: spiral, chisel, bailer.
Drilling stages
The drilling process is carried out according to the following scheme:
- digging a pit 1.5x1.5 m;
- lining the walls of the pit;
- installation of a tripod made of wood or metal over the recess, fixing a winch on it;
- assembly of the structure that raises and lowers the equipment - fastening one and a half meter rods of the drill string into the pipe, fixing them with a clamp;
- lowering and raising equipment by turning the rod, marked to determine the time of cleaning the drill (performed every 0.5 meters);
- well construction: lowering the filter column, strengthening the pipe, washing the filter, buildup;
- lowering to the depth of the pump.
Popular services.
Majority country houses is too far from the general water networks, and the only option to get water is to arrange your own source. Autonomous water supply of a private cottage is solved by digging a well or creating a well. Both methods require significant expenditure of physical strength and Money. In order to guarantee a high-quality result, homeowners invite professionals with special equipment who have experience in the area to perform work, however, drilling water wells with your own hands is also possible.
First, you should decide on the very possibility of drilling a well for water manually. It is obvious that the great depth of the aquifer, as well as too hard layers in the soil, can be a serious obstacle and force you to abandon such an undertaking. It is easiest to preliminarily find out the geological situation on the site from the sources that your neighbors already have. It is necessary to figure out from what depth they pump water, how they had excavation. The overall picture will be clear, but as the work progresses, adjustments will have to be made later, because the soil layers do not lie absolutely evenly, and the error is greater, the further the control well or well is.
With horizons of 20 meters or more, many developers no longer dare to use hand tools, although there are examples when people cope with depths of 50-60 meters (the more savings are obtained, because the prices for sinking are set to the customer in running meters). At the same time, small drilling rigs driven by an electric motor are now on sale, the price of which is almost comparable to the cost of drilling an average well. Nobody bothers to rent the device later or to drill wells to order using the installation.
Source options for water supply of a private house
Well type selection
In this case, the most critical parameter is the level of the aquifer. For example, if the water is at a depth of up to 8 meters, then it is possible to make a driven well-needle (the so-called "Abyssinian well"), which is supplied with the usual surface pump. It is performed with pre-drilling or direct driving of a relatively thin (for example, inch) steel pipe into the ground.
If the aquifers are below, then pump equipment you will already need a submersible, which can raise water to the height necessary to power the house. Accordingly, in any case, you will have to drill a well manually, and the net diameter of the pipe passage must be at least 80 mm so that you can install submersible pump in 3 inches, or 100-110 mm - for a 4-inch unit. Given the thickness of the walls of the casing pipes (for plastic pipes it is about 5-8 mm) and some margin for the trouble-free installation of the column, you need to drill a diameter of 20-30 mm more. According to this indicator, the equipment is selected.
Sources of autonomous water supply are usually divided into wells for sand and artesian (for limestone). The first ones are operated up to 15 years and produce about 1.5 cubic meters of water per hour. Their depth is from 15 to 40 meters, which allows you to do the work yourself, but makes you carefully choose a place for them. In the deep artesian well the water is cleaner, the source can work without overhaul up to 50 years or more, its performance is much higher.

Screw drilling of a well with a motorized drill
The main stages of drilling a well with your own hands
Independent well construction almost always assumes that water will be extracted from a shallow sandy reservoir. Therefore, it is necessary to move as far as possible from sources of soil contamination, such as drainage drains or septic tanks. To reduce the depth of penetration, it makes sense to choose the lowest place on the site, especially if it is on a slope.
Before drilling a well manually, it is recommended to make a pit in the working area, thanks to which loose soil will not crumble into the face during work. Its dimensions in area should be approximately 2 X 2 meters and in depth - up to 1 meter. Sometimes a kind of formwork may be required to strengthen the slope.
To simplify the lifting of the auger or drilling tool along with the soil, a tripod (or other frame spatial structure) is assembled above the well from rolled metal or lumber. On tripods, in addition to blocks, a winch or winch is often installed to unwind the cable.

The use of a drill string with a spiral element allows you to increase efficiency in soft soils
well drilling
All known do-it-yourself well drilling technologies belong to one of two main methods:
- auger,
- shock-rope.
The first one is good soft rock, the second - on stony. In both cases, the work is usually done without the use of water supplied by the pump, although it sometimes makes sense to pour some liquid into the well during drilling. There are many factory and improvised designs drilling tools and coils, as one or another model will be more or less effective with a specific type of soil.
The auger method is used when it is planned to make a well of relatively shallow depth, and if the soil does not have extensive solid inclusions. As the main working equipment, a drill is used here - a metal auger with cutting edges at the end. Two people rotate the tool, the knives cut into the ground and loosen it. On spiral metal blades, the waste material is removed from working area. When the rod with handles is lowered to ground level, the drill is removed from the well and the coil is cleaned from the ground. Then the drill string is extended with an additional rod, and the drilling continues.
impact method is based on the use of a hollow drilling tool (bailer) with metal "fangs" at the end, which is lifted and dropped into the well by means of cables. After several blows, the bailer rises to the surface, where crushed rock is pushed out of it through a technological hole. Percussion-rope drilling allows you to get to great depths and drill a well with your own hands in rather dense soils, while in soft rock this method is not so practical.

Casing filter design using stainless steel or PVC mesh
Arrangement of water intake
When the aquifer is passed, and the equipment has reached the water-resistant layer, drilling stops. A casing pipe is inserted into the ground - as it sinks, it gradually builds up in sections with the help of a thread. At the same time, the first section is cut by about one meter with a grinder or holes are drilled in it with a drill in increments of 3-7 centimeters and a diameter of 5-25 mm (depending on what kind of rock is below: sand, clastic inclusions or clay). The perforated section of the pipe is wrapped with a mesh of stainless steel galloon weaving, which is fixed in place with wire or self-tapping screws. After installation of the casing pipe, the space between it and the well is filled with fine gravel. At the last stage, the pump is installed and the head is mounted.

Creation of a drainage gap between the pipe and the well
Many of those who decided to drill a well manually managed to cope with the task and were able to save a lot of money. However, it must be understood that under difficult geological conditions it is impossible to do without mechanization, therefore, in each specific case, it is necessary to soberly assess the chances of success.
Video: how to drill a well manually