Garden paths. Materials, designs and purpose
A well-groomed path ennobles the site and gives it a finished look. Therefore, it is so important not to leave untrodden paths overgrown with grass in the garden, but to create a network of neat and conveniently located paths.
Tired of laying paths in your garden? Perhaps it's time to draw a plot with solid paths? We tell you what you need to know before you get started.
1. How many paths should there be in the garden?
It all depends on the size of the site and its layout. In order to correctly arrange the paths in the garden, it is worth first drawing a plan of the backyard territory on paper, and then marking the paths on it: they should provide access to even the most inaccessible corners of the garden.
Usually, one wide main road is laid on the site, from which paths depart. The main path should follow the path that you most often travel on. The number of small tracks does not matter. The main thing is to place them in the garden correctly so that they help you get to the places you need on the site.
2. What material is the track made of?
Rigid coatings
The main road, which leads from the porch to the exit from the territory, is used most often, which means that it can become unusable faster than others. Therefore, for its arrangement, it is recommended to choose durable materials: stone (natural or artificial), brick, paving slabs or monolithic concrete.
Soft coverings
For paths that carry less load, you can use lighter materials: embankment or wood.
Combined tracks
Sometimes a combined coating can be used for garden paths. Such "arteries" of the site combine the qualities of both soft and hard materials. Often this is done in order to achieve a better visual effect. But sometimes such a combination can also serve a practical purpose. For example, loose materials can be excellent drainage.
Today on sale you can find an artificial stone that imitates a saw cut wood and looks just like a real tree. If you want a treadmill to look "light" but still be made of durable material, look into this material.
3. How to lay a "hard" track?
The principle of laying a track from a durable coating depends on the structure of the soil on the site. If the soil is dense and stable, you first need to dig a trench, compact the soil well at the bottom, lay a layer of geotextile, crushed stone for drainage on it, then again geotextile and sand, which again should be well compacted. If necessary, borders can be installed on the sides.
On unstable ground, the path is built according to a similar principle, first laying a sand cushion on the first layer of geotextile with a layer of 5 cm, and pouring crushed stone with a cement-sand mixture (can be reinforced with a metal mesh).
4. Why is geotextile laid on the track?
This material is placed at the bottom of the trench (future path) between layers of sand and gravel. It is needed in order to protect the track from subsidence. The material is good in that it does not rot and is not covered with mold or fungus, since it consists of polymer fibers. Also, the roots of plants cannot break through the geotextile.
5. What to make a bulk path?
To create a bulk path, coarse sand, stone chips, pebbles and even wood are suitable. The main advantage of these materials is their ease of use. But they also have a minus: over time, they are “blowed away” by the wind, so periodically you have to add backfill. As for wood bark and wood chips, these materials must be additionally treated with a special anti-rotting compound before use.
6. How to lay the bulk coating?
The bulk coating is laid in layers, each of which is compacted with a roller or vibrating plate. But before that, you need to dig a trench and lay a layer of a mixture of gravel and clay about 10 cm thick on the bottom, and pour the same layer of sand on top. Bulk material is recommended to be laid in parts, wetting each layer with water so that they are better compacted. It is not necessary to moisten only the covering of mulching materials. The top layer should consist of the smallest fractions. It is leveled with a rake.
7. Is it worth making paths out of wood?
The wooden path is not very durable, but it is a non-standard option. Of the minuses, one can name the fact that the tree is prone to rotting and becomes slippery during rain. On the other hand, walking on such a surface is very pleasant, it looks good among grass or stones and helps to create a natural style on the site. Therefore, each summer resident decides for himself whether it is worth laying a garden path from this material.
If you decide that a wooden path is exactly what you need, remember a few rules for arranging such a path. The base of the wooden path must be laid out with several layers of sand, then with a layer of gravel or crushed stone. On top of such a flooring, you can lay wooden saw cuts, hemp, boards and even special garden parquet.
Smooth garden paths will decorate any personal plot, but in order to extend the durability of the coating, it is necessary to choose the material for laying, based on the expected traffic and load on the path, and organize its reliable paving. The process of installing paving slabs is simple. The advantage of curly paving elements is the possibility of dismantling the material with subsequent laying, and the finished path requires minimal maintenance. Let's look at the main points that are worth knowing in order for backyard paving to be successful.
Choosing paving slabs
The material that will pave garden paths is clay, stone, and even treated wood, but most paving slabs are made from concrete. The geometric shape, patterns and sizes of tiles (from 10x10 to 50x50 cm) are varied.
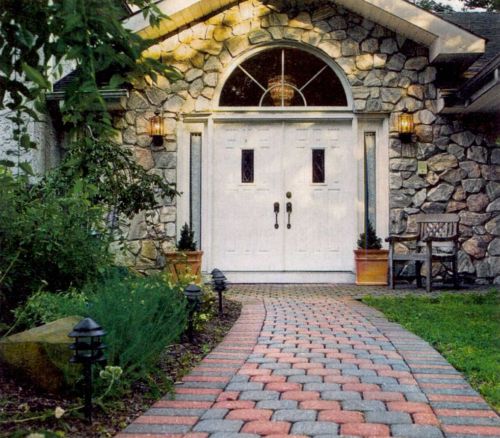
Remember that if the garden paths will be subject to heavy use, then small-block material will work better, although it will take more time to lay it. It is better to place a path from such paving slabs centrally, for example, a path from the gate to the house.

| paving slab type | Appearance | Service life, years |
| Vibro-pressed | simple shape and color | 15-20 |
| cast | Diverse shape, shiny and smooth surface, pattern is possible | 10-15 |
Vibropressed tiles are suitable not only for garden paths, but even under a parking place or car exit, because. this material is considered more durable and frost-resistant.
Ceramic pavers are more attractive than concrete blocks and retain a rich shade longer. The ceramic coating does not need special care.
Useful tips for choosing paving slabs:
- The brightness of the material indicates a significant proportion of dyes in the composition of the tile, due to which its quality decreases: garden paths will be cracked, and the tile will begin to crumble.
- Before buying a tile in a store, check its quality by tapping one tile against another. If the sound is sonorous, you have a high-quality product. If the sound is deaf, then the drying of the tile was not carried out in accordance with the technology, and the material is of dubious durability.
- The material should be without bright white or black stripes and with a uniform color.
- The minimum frost resistance value (number of freeze-thaw cycles) should be 150.
- The thickness of paving slabs directly depends on the expected mechanical load, namely:
- 4 cm - pedestrian traffic;
- 4-6 cm - people on bicycles or with wheelbarrows;
- 6-8 cm - near the entrance or parking of the car;
- 10 cm - the movement of trucks, but tiles of this thickness are used extremely rarely for a personal plot.

If a truck with wood or bricks drives into your site a couple of times a year, then it is enough to make garden paths from material 6-8 cm thick.
Preparing a site for laying tiles
The quality of the preparatory work affects the durability of the paving, reduces the risk of tile subsidence and prevents large-sized material from spreading.

"Dry" method
- Evenly remove the top layer of soil 30-40 cm thick. If the soil is clayey, then it is necessary to cover it with young slag of 5 cm or lay on top of needle-punched geotextile with a density of 300 g / sq.m. If there is sand on the site, then it does not need additional preparation, since it is quite resistant.
- Backfill the ditches in layers gravel or crushed stone, tamping the base every 15 cm, which will reduce the volume of procurement material by 20%. It is better to acquire a different fraction size and mix it during falling asleep - this will provide better adhesion of the material and increase the density of the preparatory layer.
- Do backfilling with sand with a fraction of 1-4 mm, layer thickness - 3-5 cm. Some recommend making a cement-sand mortar underlay, but this can cause difficulties when dismantling and then laying tiles. We recommend using this mortar in a place where water will penetrate into the garden paths, for example, near rainfall trays. To preserve the useful properties of the bedding, it is not recommended to walk on it.
- For an unobstructed stack of precipitation from paving slabs, we recommend laying the bedding with cross slope up to 3% from the center of the paving to the edges. In situations where this cannot be done for a number of reasons, a two percent bias in one direction is allowed.
- Recommended the slope of the infield is 10%, on a long area it is up to 14%. But if the cottage is located on a terrain with difficult terrain, we advise you to secure the movement of people and install a stepped path.
"Wet" base for garden paths
There is also a "wet" way to prepare the base for paving slabs, which will require more time and material. The peculiarity of performing a screed on a cement mortar is to limit the area to 0.5 sq.m, so the path should be poured in sections. It is possible to transgress to the next only after the complete hardening of the previous one.

Composition of the solution: mix M150 cement (1 part) with sand (3 parts) and water (1 part). The thickness of the solution is 2-3 cm, after which it must be compacted and cover all the cracks with a dry mixture of the solution. At the end of the "wet" method, the path is cleaned and it is ready for laying paving slabs.
Paving slabs
To lay the track you will need the following tools:
- tape measure with a level or theodolite;
- shovel and wheelbarrow;
- tamping machine with a vibrating plate, in which the working weight is from 90 kg;
- rubber mallet or wooden hammer in the absence of the previous one;
- trowel;
- great;
- Bulgarian.
Lay the first row of paving slabs on the prepared surface so that the level protrudes by 1 cm of the planned one (reserve for shrinkage during tamping). In order for the garden paths to have a uniform color, we advise you to take the paving stones alternately from two different pallets.

The gap on the tile joint for ordinary footpaths is 2-3 cm, for a place for exiting or parking a car, a distance of 3-5 cm should be left between the tiles. The quality of the seams can be checked after paving in 3 rows, and the presence of depressions or bumps in the surface is checked every 6 rows.
Grouting is done by pouring sifted dry sand with a fine fraction and rubbing it into the tile with a brush or broom. Sweep away excess sand with a broom.
There are two ways to tamp the surface of the track on a personal plot: using a rammer and a vibrating plate or a rubber mallet. Compaction should be done in 2-3 passes, each time pouring clean sand onto the surface, thereby densely filling all the gaps between the tiles. In the first month of operation of the track, it is also necessary to apply clean sand several times and sweep it away after a couple of days.
Curb device
Curb blocks - the final link in the paving. They have two functions: they separate garden paths from lawns and flower beds, preventing the destruction of paths. The evenness of the curbs is important, so they must be set according to the level.
Modern products that serve as boundaries for paths are made from a mixture of concrete and plasticizers by vibrocompression, so they are resistant to natural factors and durable. In addition, dyes are added to the blocks, thanks to which you diversify the landscape in your backyard.

To pave the curb, dig a trench a third of the height of the product and 5 cm wide more than the curb stone. The stock is useful when pouring the solution. Thoroughly compact the soil in the trench and pour a mixture of sand and cement (1: 3).
Place the blocks in the center of the trench to leave space on both sides for pouring the mortar, and also leave a gap between the curbs of 0.5 cm. Having paved all the elements of the fence, you can start preparing the cement-sand mortar (the proportion is similar, but plus 1 part of the water ). The mixture is aged for a day, after which proceed to the preparatory work for installing the tiles.
To make garden paths original, make blocks for the curb yourself. Knock down formwork from fiberboard or plywood sheets by connecting the parts with screw clamps. An alternative is to purchase ready-made forms.

To prepare a concrete solution, mix 1 part sand, 1 part cement, 2 parts gravel of a small fraction. The form must be lubricated with ordinary sunflower oil, pour the solution and wait until the concrete mixture is almost dry. The mass should not completely harden, because. when removing the formwork, the shape of the curb can easily be deformed. After a few days, the products will be completely ready.
Features of care
Pathways in your backyard need regular maintenance to keep your pavement in good condition and prolong its life. A few simple rules will help you with this:
- wash paving slabs with soapy water and a brush, and remove stains from machine oils with special solutions;
- break through the grass in time, which has grown in the gaps between the tiles, with a scraper;
- ice should be carefully removed with a plastic shovel, sprinkling the paths with sand, but not with salt, because it will damage the paving stones over time.

And do not forget about the planned repair of the track and immediately pay attention to the tiles that have sagged or lost their strength. It is enough to dismantle individual elements with a screwdriver, make a new layer of backfill and renew the surface by tamping the garden paths with a rubber mallet.
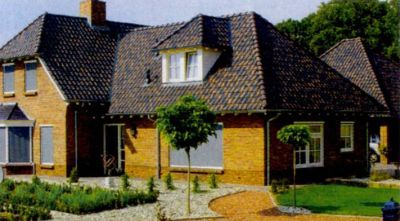
Materials for the design of paths should be combined with the style of the house and the surrounding landscape.
All functional areas of the site should be interconnected by a well-thought-out network of garden paths. This will allow you to quickly reach the desired location. When taking into account the composition of the soil, the relief, the landscape style of the garden and the architectural style of the house. Their optimal number depends on the financial capabilities of the owners of the site, laying technology and operating conditions. After placing all the main objects on the draft design, a track plan is applied, then markings are made.
The direction of movement along the garden paths is thought out so that they can easily get to all functional areas or to the focal point. The main garden path and walking paths are smooth or straight, depending on the style and size of the site. The angles of their intersection should be smooth or close to straight - for ease of maintenance and for comfortable movement.

The direction of movement is thought out in advance so that you can easily get to any focal point
Construction of garden paths
Starting with the preparation of the base, then laying the pavement and, if planned, installing curbs, the material for the paths must be durable, soft and resilient when walking. In addition, it must have a rough surface so that you can safely move around in rain or ice. To avoid stagnant water on the paths, the coating is made with a slope of 2% from the center to the edges. Watercourses are also placed at a distance of 40 - 50 cm from the main road and 15 - 30 cm from the paths. If the terrain does not allow on both sides of the tracks, you can make a slope in one direction. The standard width of the main road is 1.2 - 2 m, the paths are 40 to 70 cm wide.
borders
Necessary to strengthen the edges and give clarity to the boundaries of the tracks. They are made of brick, stone, wooden blocks or concrete, and the material used does not have to match the texture of the track itself. The border is deepened into the ground by 10 - 15 cm, leaving the surface of the soil about 10 cm deep. If there is a sandy pound on the site, you can make a border from natural stone. It is installed at a certain depth, covered with earth and rammed, while moistening with water. On other pounds, a sand or concrete base is made. Wooden borders are made from logs with a diameter of 8-11 cm. They are pre-treated against decay with a protective agent, and the upper cut is made oblique so that water does not stagnate on it.
garden path materials
Should be combined with the materials from which the house and small architectural forms are made, as well as with the plants on the site. When designing the road network, natural and artificial materials are used. Natural coatings are made from raw stone - sandstone, limestone, slate, granite, and processed - sawn or chipped basalt and pebbles. They make strong and wear-resistant slabs and paving stones. Porous materials and wooden saw cuts are treated with a special water-repellent agent before laying. Artificial turf has some advantages over natural material: it is cheaper and easier to install. In addition, due to the fact that the artificial material is easy to process, it can be used to implement various design solutions.
Paths made of buta, hewn or chipped cobblestone are durable and decorative. The base for them is calculated based on the operational load and the purpose of using the tracks. The sandy base under flat stones is deepened by 5 - 10 cm, under the but - depending on the size of the largest stones. The gaps are filled with small fraction stones and poured with mortar, and the jointing is done flush with the coating. Paths made of stone, intended for the passage of cars, are made on a concrete base. First, the soil is taken out to a depth of 20-30 cm, then crushed stone is covered with a layer of 10-15 cm, rammed and moistened with water. After that, concrete is poured with a thickness of 5 - 10 cm and the surface is leveled. The stone is placed on cement, the gaps are filled with mortar and embroidered, while the mortar must be flush or higher than the stones so that cracks do not form after winter. Before use, natural stone must be cleaned or washed.

To lay the paths in this way, the soil is first removed to a depth of 15 - 25 cm, then sand is poured, layer by layer it is shed with water and rammed. After that, wooden saw cuts 10–20 cm high are installed, and the gaps between them are covered with sand. In order for the tree to last longer, the underground parts must first be treated with a special antiseptic impregnation, tarred or charred. This will help protect the coating from moisture and decay.
Modern paving slabs often imitate natural material, and convenient connections allow you to combine its various elements. Such a coating is easy to maintain, durable, does not heat up and does not emit harmful fumes, and excess moisture seeps through the tile joints. If the need arises, the tile can be completely or partially dismantled and then re-laid. A base is prepared for such paths: for gravel-sand, 15 cm of gravel and 5 cm of sand are poured, and for concrete, depending on the purpose of the coating. Each layer is leveled and compacted. After laying, the seams are sprinkled with a dry mixture, the excess is removed and the plates are spilled with water.
When constructing a monolithic concrete pavement, the tracks are first laid out. Then the top layer of soil is removed, and the remaining earth is compacted. The formwork is set in such a way that the upper edge protrudes 5-6 cm above the soil, and only then is leveled with a cord. At the joints of boards or bars, pegs are driven into the ground. Also, slats are installed perpendicular to the formwork, at a distance of 1-1.5 m from each other, then a layer of sand and crushed stone is covered by 10 cm, tamped and poured with concrete.
Paths from concrete slabs are created in two ways. The sandy base is made 10-12 cm thick, the slabs are placed close to each other, with 0.5-0.7 cm seams. On the crushed stone base, the slabs are laid on the mortar, with 1-1.5 cm seams. cord and building level. The front surface of the slabs should rise 3-4 cm above the ground, as the path will sag over time. Paving can be decorated with pebbles or ceramic tiles.
Clinker brick paths are convenient and practical, as this material is wear-resistant and moisture resistant. The brick is laid on a layer of sand or gravel with a mortar. Sand and crushed stone are poured into the prepared soil trough with a layer of 10 cm and rammed. If the area is swampy, peaty, with loess or subsiding soils, a reinforced concrete cushion 8 cm thick is arranged on top of the rubble. Then the carving is laid and leveled. Next, they lay a brick and, leveling it strictly horizontally with the help of a building level, spill it with water. After setting, the masonry is covered with a layer of sand 2 cm thick, the excess is removed. Along the edges of the tracks, a curb of bricks is installed, located at an angle or on an edge.

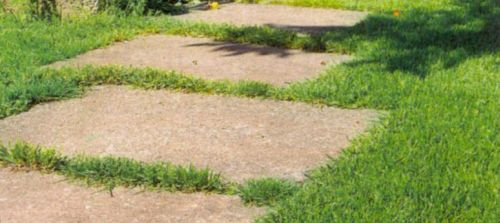
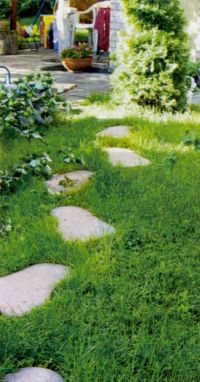
Step-by-step paths can be arranged on the lawn. On the site, in accordance with the size of the tile, cut the grass and install the material below the level of the grass on sand or gravel. This will make it easier to mow the lawn. It is possible to install tiles on a sand cushion. In this case, the seams are filled with earth and lawn grass is sown, while maintaining a distance between the centers of the tiles of about 60-65 cm.
Bulk paths are made of pebbles, stone chips, marble or granite screenings, bark or gravel. Gravel varies in size and color. It is desirable to enclose bulk paths with a curb, since, for example, tree bark can be blown up by the wind, and crushed stone and gravel can spread. Geotextiles are also laid on the base to protect the coating from root germination.
Bulk paths are made if they do not carry heavy loads, while using various materials. The main advantage of bulk coatings is that they do not stagnate with water and that they can be very decorative.
|
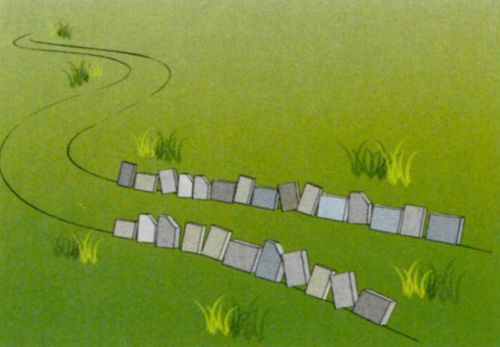
Step 1 It is convenient to use a hose to estimate the shape and curves of the track on the ground |
Step 2 Mark the final path boundaries by laying out paving slabs along its edges |
|
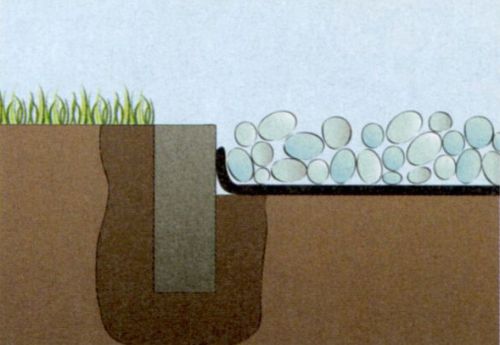
Step 3 Dig a bed for the path about 5 cm deep. Hammer the curb flush with the lawn along its edges with a rubber mallet |
Step 4 Place the spunbond on the bottom of the recess. It must be thick enough. Sprinkle a coating over the spunbond |


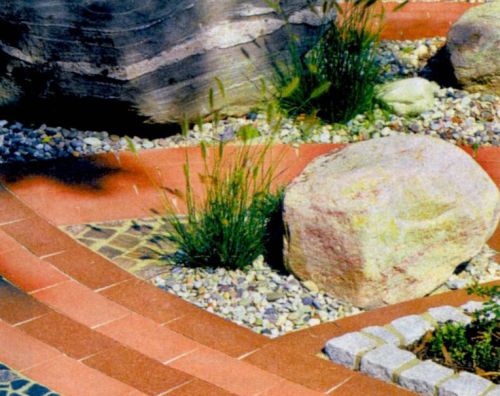
We combine materials of garden paths
Garden paths can be made from different materials, combining them in size, color and texture, or you can use one type of material, but in different colors. An interesting texture is obtained by grouping large or small rectangular slabs with round, small irregular shaped slabs, stones and wood.
Options for paving garden paths
In order for garden paths to serve for a long time, the coating material is chosen depending on their purpose. For example, for the entry zone and main roads, a concrete base reinforced with a road mesh is arranged. For secondary paths, a soft base is sufficient, since the load on them is minimal.
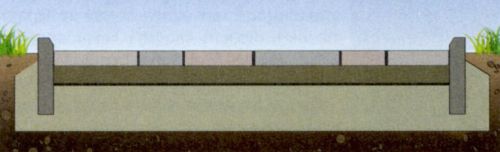
Laying hard materials on a crushed stone cushion
First, a layer of crushed stone with sand 12-15 cm thick is poured, then a layer of carving 7-10 cm thick. Each of them is carefully tamped, then the tiles are laid. The gaps between the tiles are filled with carving and watered.

Laying hard materials on a crushed stone cushion
Laying wooden saw cuts on a soft base
Crushed stone is poured into the prepared base with a depth of 20-25 cm, and a layer of sand 7-10 cm thick is placed on top. Each layer is rammed and saw cuts 3-5 cm thick are laid. The space between the saw cuts is covered with sand or earth.

Laying wooden saw cuts on a soft base
Laying soft rocks on a concrete base
For laying paths, flagstone made of dolomite, sandstone or limestone can be used. The gaps between the plates should be no more than 5 mm in size. The best binding material in this case is a cement screed with the addition of a special adhesive.
Laying soft rocks on a concrete base
Laying rigid materials on a concrete base
A slightly moistened carving is poured over the concrete base. Each tile is temporarily laid in place, then removed and a thin layer of cement is added. The elements are laid anew, tamped, and the seams are sprinkled with carving and watered.
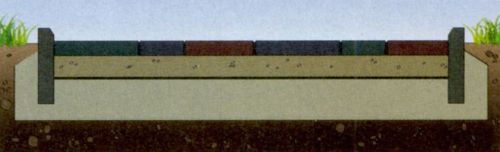
Laying rigid materials on a concrete base
December 27, 2010
When you arrive at an unfamiliar garden plot, the first thing you pay attention to is the paths. After all, you need to somehow get to the house, gazebo, patio or garden beds, without tearing your clothes and not soiling your shoes. And very often, at best, you see cracked concrete, warped tiles, and at worst, boards sunk in the mud or deep ruts. How to make comfortable and durable DIY garden paths? Let's start with three categories.
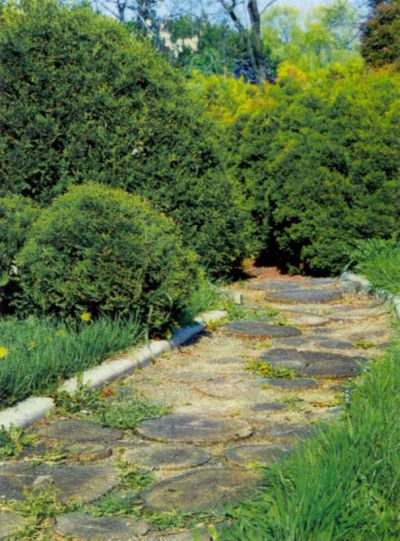
Third category. Trails.
The name itself indicates that such paths are trodden with feet, compacted by the wheels of a wheelbarrow or car. The ground on the path is dense and, as a rule, sagging. Therefore, trails are often the site of potential puddles. To turn the trail into a convenient path, first of all, it is necessary to ensure the removal of stagnant water from it. To do this, align the contour of the track: the pits fall asleep, and the bumps are cut off. Sand is brought into the path itself and driven into the ground. Sometimes crushed stone is added to the sand.

The next necessary step is planting the trail with soil-retaining plants (for example, low clover) or setting up a mixborder.
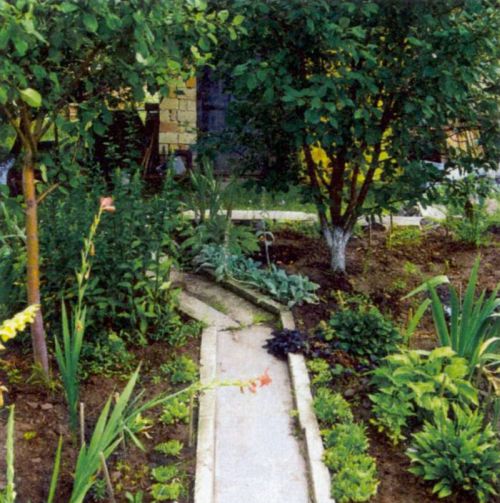
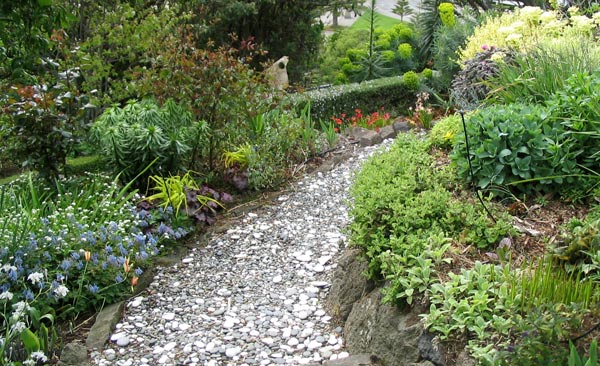
Second category. Tracks with a covered base.
These are traditional garden paths in cultivated garden plots. During their construction, they dig a bed to a depth of 10 cm. The bottom and sides of it are covered with geotextiles with a density of 150-200 g / sq.m as a barrier for the roots of herbaceous plants. The sides of the bed are also often fixed with a curb tape. The entire bed (up to the soil level) is covered with crushed stone, pebbles or screenings. To give the path a decorative effect, separate paving slabs or flagstone stones are laid on it. These elements are buried in the backfill layer so that they do not rise above the path and above the soil.
With another method of building garden paths of the second category, the decorative coating is tightly adjusted to each other. In this case, the depth of the bed is made 5-10 cm and a sand cushion is arranged. Paving slabs, paving stones, flagstone are laid above the soil level, and the edges are fixed with a curb. It is made from a garden board or cobblestone laid on a cement mortar. But usually they do without a curb, bringing the lawn close to the path, or break the mixborder. The seams between the coating elements are covered with sand and sown with dwarf lawn grass.
If they are building a "Swiss path" (1 step - 1 stone), then a sand cushion is prepared under each of the stones, laying them at the level of the soil.
First category. Walkways with a solid base.
Such capital tracks are made where a large load is provided for them. During their construction, a bed 15 cm deep is excavated. In places where rain or melt water is expected to accumulate, its removal is ensured. Sand is poured into the bed, leveled and rammed. The height of this drainage layer should be about 5 cm. The sides of the bed are framed with a border tape, and if it is not there, then with old linoleum or roofing felt cut into tapes.

Usually such a foundation is made at ground level. If they want to raise the path significantly, then strips of plywood or boards are used as formwork, respectively, securely fixed. The concrete base itself, in order to avoid rupture, is either reinforced or thermal seams are arranged every 1.5-2 m. The second solution is cheaper, but with the advent of spring there is a danger that improvised concrete slabs will rise or sag relative to each other.
This will not happen when reinforcing a concrete base. It is only necessary to remember that armored nets from beds, chain-link mesh, bicycle frames and other similar rubbish, which “zealous” owners “roll” into concrete, are completely unsuitable as reinforcement. It is necessary to reinforce with a bar with a diameter of 5-8 mm or with grids welded from a bar with dimensions of 0.5 × 2 m and with cells of 10 × 10 cm or 10 × 15 cm. The reinforcement is placed on stands for which fragments of bricks are suitable. They are necessary so that after pouring the reinforcement is in the thickness of the concrete.
Concrete is laid in a bed and moderately rammed. If there is not enough concrete for the entire track, a crossbar made of boards is installed at the end of the pouring, so that the concrete breaks off with an even “cut”, without sagging. When pouring a new batch of concrete, the crossbar is removed.
This is how the entire base is gradually made, and after the concrete has set, a decorative coating (paving stone, tile, natural stone) is laid on top (on the cement mortar) and, if necessary, a curb. Usually, in its final form, the track bed is 3-5 cm above the soil level, which provides protection from soil alluvium on it.
Video: do-it-yourself garden path in 1 day
If a few years after the installation of paving slabs, a separate part of the space begins to deform, this indicates violations of the laying technology of this type of coating. However, you should not worry and hastily calculate losses, since such a problem can be solved on your own. Of course, the ideal option would be to call would-be masters and force them to restore coverage. But it’s not always possible to find the culprits, since the cost of paving slabs has already included the cost of laying them. Therefore, it is more expedient to eliminate the sagging area with your own hands.
REASONS FOR PAVING SLABS
Before eliminating any problem, it is very important to identify the causes of its occurrence and subsidence of paving slabs is no exception. Experienced experts note that there may be several reasons for the failure of tiles, as a rule, they lie in non-compliance with the laying technology, and may also be the result of natural phenomena.
For example, tiles very often sag due to insufficient compaction of the base. This is especially pronounced if, before laying the tiles, earthworks were carried out on the site (sewerage device, etc.). After laying pipes in the ground, sometimes workers miss one very important point - soil compaction. And if this stage is omitted in a few years, the tile will certainly sag under the negative influence of natural phenomena. This is usually observed in early spring after thawing of frozen soil, which, under the influence of excessive moisture, shrinks.
Another reason that can cause subsidence of the pavement is an increase in the level of groundwater. This is largely due to the movement of layers of the earth in the process of planning the site. It can also be explained by a natural process of nature - a change in the direction of the flow of groundwater. As a result, in a site where groundwater has never been observed, it can suddenly appear and make changes to the existing design.
RESTORATION OF PROBLEM AREAS
 Work on the restoration of sagging tiles begins with the dismantling of the problem area. If during operation and due to subsidence of the base, the tile was deformed, you will also need to buy paving slabs individually in the required quantity. Next, soil is selected on the sagging area (the soil should be removed to a depth of no more than 50 - 60 cm) and the base is covered with sand, the layer of which should be 2 - 3 cm. Thus, the sagging soil is restored. These works also require a dense compaction of the new foundation.
Since the base is being redone, it will not be superfluous to use crushed stone instead of earth. Unlike soil, crushed stone has a high density, due to which it does not absorb moisture from the ground and excludes subsequent shrinkage of the base. As a result, all the moisture present in the soil and coming from outside will not accumulate in the base, but will flow down. It is also worth noting that crushed stone withstands temperature fluctuations very well, helping to maintain the integrity of the road surface.
If it is necessary to restore an oversized sagging area, a drainage system will be required. To do this, you need to install drainage at the bottom of the trench, which will be an excellent solution to the problem of groundwater. Once all the work to strengthen the base is completed, you can start laying the tiles. And finally, I would like to note the following: despite the fact that the cost of paving slabs is quite affordable compared to other materials, work to restore a sagging coating can take precious time. Therefore, it is necessary to carefully monitor the work on the device of such a coating.