How to install infrared underfloor heating. Heating foil connection
AT modern housing construction non-traditional heating systems began to be widely used. These include infrared floor heating. The energy consumption of an infrared warm floor is quite economical and the film installation technology is not difficult.
In addition, their small thickness allows them to be used under such floor coverings as laminate, carpet, ceramic tiles and linoleum. If you have been thinking about which one to choose, then we can say with confidence that modern IR (infrared) floors are made using the same technology and have almost no differences.
Below are the average infrared floors: specifications
- power consumption 1m.kv -45-67 W / m.h;
- thermal film width -50cm;
- the maximum allowable length of the thermal film strip is 8 m;
- melting temperature of the thermal film - 130 degrees C;
- power supply -220V / 50Hz;
- the share of infrared rays in the radiation spectrum - 95%;
- IR heating wavelength - 5-20 microns.
However, when choosing which infrared floor to use for linoleum or laminate, you need to know some of the features of its installation. So, for example, under carpet and linoleum, plywood is required to be laid on heating elements warm floor. To lay a warm floor under a laminate, you only need a waterproofing film.
Installing an infrared floor will require the following tool:
- pliers;
- screwdriver with indicator;
- grinder (angle grinder);
- electric drill SS with a drill for concrete 6 mm;
- measuring tape and pencil;
- scissors;
- stationery knife.

To complete the work, you will need the following materials:
- heating film ;
- a substrate foiled on one side for an infrared warm floor 3 mm thick;
- thermal insulation tape;
- polyethylene film 100 microns thick.
- wire with a cross section of at least 2.5mm.kv;
- bitumen insulation.
- thermostat for infrared floor heating.
Technique of laying a warm film floor under a laminate
The heating film is intended for laying under the panels of the laminated floor (laminate). The first step in laying underfloor heating is to draw up a plan for the placement of heating elements and measure the length of the film floor strips.
When drawing up the plan, it is important to remember that the heating elements must cover at least 70% of the surface of the subfloor. It is also important to know that underfloor heating strips cannot be placed in places where furniture will be located. Minimum distance between the wall and the heating film 20 cm.
The plan includes the placement of connecting contacts and sensors. The surface of the base floor is thoroughly cleaned of debris. Better to vacuum it.
Separate strips of heating elements are cut in accordance with the furniture placement plan. The film can be cut in the places indicated by the manufacturer or strictly between the heating tapes.

The cut edges of the film must be insulated. If you cut the tape in the place indicated by the manufacturer, then only the collector plates are insulated. In the event that the cut was made between the heating tapes, the entire width of the film is insulated.
Separate strips are laid out on the floor according to the plan. Between the plates, the distances for cutting through the strobe are indicated. The heating film is rolled up and a strobe is indicated for laying the floor temperature sensor.
To cut through the strobe, you can use an angle grinder (grinder) with a cutting wheel for concrete. You can also use an electric drill with a drill for concrete and swell.
The holes are drilled along the outlined line and connected with a chisel and a hammer. When the strobes are ready, the floor temperature sensor is laid. To avoid accidental damage to the wire, it is laid in a corrugated plastic pipe.
The base of the floor is again carefully swept and cleaned with a vacuum cleaner. The elements of the infrared floor are laid on a special heat-insulating substrate. It is made of foamed propylene and covered with aluminum foil on one side.
It will prevent heat loss, and will act as a vapor barrier. The substrate is laid with the foil up. The sheets of the substrate are joined and fixed with foil adhesive tape (thermal insulating tape).
A cut and insulated heating film is laid on the prepared thermal insulation in accordance with the plan. The connecting cables are insulated and clamped into contact.
Important! The conductor diameter must be 3 mm. If the core is thinner, it must be bent and then clamped into contact with pliers.
When clamping two conductive cores, their ends are connected by twisting. The laid heating strips are connected in parallel. Contacts are attached to the plates of the conductive collector (copper bus) by crimping with pliers.
First, they are clamped from the outside, and then from the opposite side of the clamp. After connecting all the strips, the contacts are insulated with special bituminous insulation, which is supplied with the warm infrared floor.

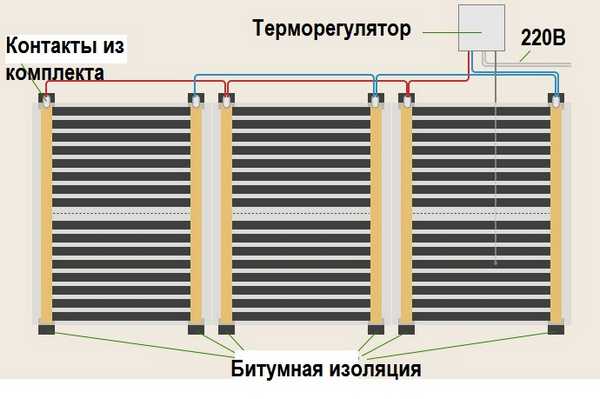
The thermostat is mounted on the wall next to the temperature probe. Connection of heating elements, temperature sensor and electrical network is carried out in accordance with the diagram, which is attached to the temperature controller.
Before connecting the infrared floor to the electrical network, check again that all contacts are well-insulated with bitumen-mastic insulation. The temperature sensor must be carefully placed under the heating film.
After that, the thermostat is connected to the network and the heating of each strip is checked. After making sure that all the strips are connected and heated, you can turn off the floor and move on to the laminate flooring.
Before laying the laminate on the surface of the heating elements, a 100 micron thick polyethylene film is covered. It will prevent water from entering the heating elements if it spills onto the laminate.
The film is laid with an overlap of 20 cm on the adjacent strip. In order to prevent the film from slipping when laying the laminate, it can be fixed with adhesive tape or other adhesive tape.
After laying the laminate, the infrared underfloor heating is ready for use. The peculiarity of such a heating system is that the infrared rays emitted by the heating elements heat the surrounding objects, and not the air, as traditional radiator heating systems do.
Remember! When laying the strips of heating elements, do not allow them to overlap. See an example in the figure below.
- When cutting a strip, do not cut it diagonally or make a rectangular cut. It is forbidden to cut the heating strips. An example in the figure.
- Minimum conductor diameter ( copper wire) must be at least 3 mm. If necessary, it can be bent with a loop and then clamped into contact. See the example below.
- It is possible to attach a contact to a conductive copper collector only after connecting a wire to the contact. Shown in the figure.
- The installed heating foil must not be damaged or overloaded.
Before you install an infrared underfloor heating, the video presented in this article will help you avoid mistakes and do the job well. Infrared floor heating has a positive effect on human health. This has been proven by scientific observations.
One of the main elements of a cozy home is a beautiful and warm floor. More recently, there was a cable and water type of heating system, now an infrared warm floor is gaining more and more popularity. It heats the room with infrared waves. This type of floor does not need to be filled. cement screed, can fit under any surface. The infrared warm floor is powered by electricity, but the heating comes from a film that warms up from copper conductors. Installing infrared underfloor heating with your own hands will not be difficult and will take several hours of your time.
Characteristics and principle of operation
The infrared film floor is a very thin, about half a millimeter material of a new generation. It is made from environmentally friendly clean materials, creates comfort in the house and a temperature distribution favorable for the human body. It can be applied:
- In living quarters.
- In medical institutions.
- In educational institutions.
- In greenhouses and conservatories.
Important! Such a warm floor can also be installed on walls, mirrors and ceilings.
Its principle of operation is quite simple:
- The basis of the infrared floor is carbon paste, which is embedded in a polyester film. Carbon is a material with high thermal conductivity, it needs less heat to heat up. electrical energy than for a heating cable. Such a system is very economical.
- Current is supplied to the emitters through copper conductors.
- The joints of the contacts are covered with a small layer of silver - this is done to protect them from overheating.
- The infrared warm floor is connected to the mains through a thermostat. With it, you can control the temperature in the room.
Important! Residual heat does not exceed 28 degrees, which prevents overheating of the floor covering above such a floor. Due to long-wave radiation, objects in the room are heated, and not the floor surface.
Floor power
Before you install an infrared warm floor, you need to calculate its power. First, measure the free space in the room. For example, if an infrared warm floor is installed on an area of 20 sq. m, then the power should be 220 W per m2. The specialist will help you calculate the required power and select the necessary thermostat.
Important! Such a warm floor does not fit under large equipment and furniture.
Advantages
Infrared underfloor heating in comparison with other methods of floor heating has the following advantages:
- The heating of the heating elements is based on the use of infrared rays, which are compatible with the human body both biologically and ecologically.
Important! Infrared radiation is used in medical methods.
- The thickness is much less than the dimensions of other designs - about 1 mm.
- Due to the small thickness of the film, it does not increase the thickness of the floor, it is suitable for any floor covering - laminate, linoleum, tile.
- Easily dismantled. It can be moved to any place and mounted again.
- The emitter can be installed both over the entire surface of the floor, and in a specific place.
- The power of infrared radiation can be made the same throughout the room and different in different areas.
- Installation of IR underfloor heating is very simple to do on your own and anyone can do it.
- When placing IR emitters in parallel, if one fails, it will not affect the operation of the other.
- The electricity consumption is very low.
- IR warm floor is harmless to people.
Installation of infrared underfloor heating
Installation of infrared heat-insulated floors occurs in several stages. First, prepare the tools and materials you need, namely:
- Drill.
- Pliers.
- Screwdriver.
- Wire cutters.
- Scissors.
- Level.
- Roulette.
- Paint brush.
- Scotch.
- Bituminous tape or bituminous mastic.
Preparatory work:
- First, prepare the channel for electrical wiring.
- Make a hole at a height convenient for you where the thermostat will be installed.
- Clean the surface from dirt and dust.
- Check the levelness of the base surface with a level.
Important! The difference can be no more than 3 mm. In case of deviation, level the surface.
- Dry the subfloor before applying the film.

Laying the insulating layer:
- Installation of IR underfloor heating, start with laying a layer of waterproofing - it will protect the entire system from moisture penetration.
- Apply insulation - it will reduce heat loss when emitting IR rays downwards, thereby reducing power consumption.
Important! Use heat-reflecting films as thermal insulation. Basically, such films are included with infrared underfloor heating. You can also use a substrate made of technical cork.
- Make holes for the wires in the thermal insulation layer.
- Fasten the ends of the film with construction tape.
Important! Overlapping of heat-insulating films is not allowed. Lay them end to end or with a small gap.
Work planning
First, determine the layout of the IR emitters. Consider these recommendations:
- Place the radiant film towards the wall where the power supply will be available.
- Install an infrared warm floor at a distance of 10-40 cm from the walls.
- If there is another heat source in the room, then the distance from it to the warm floor should be at least 1 m.
Important! If the IR floor heating is the only source of heat in the room, the stacking density of the elements should be 70-80% of the total floor surface. If it is used as an additional source, then 40-50% is enough.
- The maximum length of a piece of film is 8 m.
Important! In order not to damage the radiant filler, cut the film only in specially marked places.
Laying and connection
Installation of tape elements occurs according to the plan:
- Lay the film down with the copper contact strip.
- Attach heat sensors to bottom surface film and isolate the attachment point.
- Attach the terminal clips to the end of the copper strip.
- Lead and secure the wires to the clamps.
Important! Insulate the copper strip, the end of the film, the ends of the wires and the clamps with bitumen-coated tapes or bituminous mastic.
- Press into the heat-insulating layer of the substrate, fix the connection points of the electrically conductive parts with adhesive tape.
- Hide the wires in a heat-insulating substrate, pull up to the baseboard.
- Gather all the wires in bundles, pass them under the plinth to the channel made in the wall, pass them through it to the place where the thermostat is located. Secure them with tape.
- Install and secure the thermostat in the designated place.
- Connect the wires from the emitter to the thermostat.
Important! The connection includes two terminals for thermal sensors - general power supply and emitters.
- Test infrared floor heating. If there is no heating in places of electrical contacts and sparking, you did everything right.
Important! Floor heating must be within the specified temperature regime and occur evenly.

Installation of the outer layer
Laying finish coat occurs after checking the operation of the entire system. From type floor covering the design of this layer depends so that the underfloor heating film is not damaged:
- Cover the heating film with fiberboard or plywood if you plan to lay linoleum or carpet on the floor. Make markings for fasteners in advance so as not to damage the film during installation.
- Install a paint grid if you plan to lay on top of the tiles. Attach the mesh with dowels to concrete base, between the strips of heating elements. The tile is fixed on the grid with special glue.
- During installation wooden flooring put a layer of polyethylene film on top of the underfloor heating film to protect it.
After installing the finish coating, the installation of the IR underfloor heating is completed.
The warm floor creates a cosiness and comfort in the house. Infrared heat-insulated floors give the chance to solve many problems in the house, they are economic and effective.
The use of infrared radiation for heating is beneficial from every point of view. First of all, such radiation is better perceived by the body, because we also radiate part of our heat in this range. Therefore, when using IR waves to maintain comfortable temperature, on a thermometer, the indicators are usually lower by 2-3 ° C. And this leads to a decrease in heating costs. The second bonus is that you not only heat the room, but also heal. After all, infrared radiation ionizes the air, which contributes to the destruction of many viruses and bacteria, and also destroys unpleasant odors. This type of rays is used to treat many diseases, and also helps to relax and relieve nervous tension. Another positive moment: electromagnetic radiation is close to zero. The only disadvantage of this heating option is high price for heating materials. But the installation is much easier and faster than cable systems and water floor.
When using infrared radiation for heating, it is not the air that is heated, but the objects located in the room. First of all, the floor becomes warm, which feels very warm, even if the temperature is low. And from heated objects, by convection, the air is heated.
To date, infrared floor heating can be done using two types of heaters: film roll material and rod carbon mat. In both cases, carbon is used only in different states. Let's look at each of them in more detail.
Infrared film floor
IR film for the floor - roll material. It is a carbon fiber paste sealed in a polypropylene or polyester film. Along the edges are conductive tires (stripes) of silver and copper. Through these tires, an electric current is supplied to the carbon material (usually carbon is used). When passing electric current released through carbon a large number of heat. The strips are collected in sections of several pieces in one. They can be cut along the dividing strip between the sections, which is convenient for installation. Such a structure is also good in that if one or several strips are damaged, the rest of the tape remains operational. Since the distance between the strips is very small, even the failure of several elements in a row will not affect the sensations in any way: the floor will remain evenly warm. Roll width - from 50 cm to 100 cm, film thickness - from 0.2 mm to 2 mm.

Advantages
The film infrared floor is compatible with most floor coverings. When laying a hard surface - tiles, parquet and laminate, no additional protective layers. Manufacturers recommend rolling over polyethylene film, and then you can immediately lay the tiles on a special adhesive for underfloor heating or suitable laminate, parquet or floor board. For wood products, film infrared floors are good because they create a uniform heat flow, which is why no zones with different temperatures, they crack and warp less.

There is one nuance here. Some manufacturers say that the film can be hidden in a screed or under tile adhesive, others do not advise. Most of practitioners says that the film is destroyed in cement. Could it be the film itself? After all, she is also different, like different ways her connections.
For laying others soft coverings such as linoleum, carpet, etc. a solid base is required. To do this, plywood, OSB or any similar is laid on top of the same polyethylene film. sheet material. After fixing, roll out and fix the floor covering. That's all. Easier and several times faster than with the device cable underfloor heating.
disadvantages
The first is that films are afraid of overheating. And although they have a significant margin of safety in temperature (they melt at 200 ° C and above, depending on the material of the insulating film), they can still burn out. Therefore, in those places where there is or will be furniture, appliances large sizes, the film is not laid. The second drawback: the high price. On average one square meter film will cost $25. The high price of IR film is partially offset by the lack of a tie and long term operation: subject to all recommendations - more than 10 years. The third drawback is the need for painstaking and correct electrical connection of the film strips. The connection is made using terminal clamps and a set of electrical wiring, which are supplied with the film, but require correct application. It is also necessary to seal well with adhesive insulating plates those places of the contact busbars that are not used. Here, in fact, all the shortcomings.

The device and installation of an infrared floor from a film
The first good news is that no cement mortar or concrete is required when installing IR film underfloor heating. If your floor is flat, then no “wet” work. The second good news is that in one room you can make such a floor with your own hands in one day. Even without special skills.
Calculation
To properly make a warm floor, you need to draw a floor plan to scale. Select the areas in which the furniture / appliances will stand. Next you need. Power must be supplied to it and wires from the film heater and temperature sensor are connected to it. After that, on the area not occupied by furniture and appliances, you need to arrange the film strips so that they do not overlap each other and do not intersect, but fill the entire area as much as possible.

What does one of the options for the “pie” of infrared floor heating using carbon film look like?
The choice of heating intensity depends, firstly, on whether the warm floor is the main type of heating or additional. If floor heating is only a matter of comfort, and the main heating of the room is carried out by other systems, you can choose from low-power models from 150 W / m 2. If the room is heated only from the floor, choose products with a power above 250 W / m 2 (the maximum for today is 400 W / m 2).
The second factor that affects the choice of power is the type of flooring. Under the same operating conditions and the same requirements, it is necessary to lay a film of greater thickness under the tiles than under other types of flooring: it absorbs heat very intensively and at the same temperature it feels cold to the feet.
Mounting infrared film
The first thing to do is to reduce heat loss through the floor and adjacent walls. To prevent leakage through the walls, tape insulation or a strip of polystyrene foam 10 mm thick and about 10 cm high is laid around the perimeter. Then, a layer of heat insulator is laid on a flat and clean subfloor (on the entire surface of the floor, and not just under the foam). In order for the heating to be efficient, it is advisable to use a foil or metallized material: it reflects the heat directed downward. Since here cement mortars are used very rarely, then the foil will serve properly long years(in the screed, it quickly collapses). The use of such material increases the heating efficiency and reduces heating costs. The heat insulator can be rolled or in the form of mats and plates. Fasten the thermal insulation to the floor with glue, double-sided tape or staples from a mounting gun.

Then, on top of the plan, roll out the infrared thermal film with the copper strip down (matte surface on top, not shiny). Make sure that air does not accumulate under it. Where necessary, cut the roll according to the marked markings (dashed line and scissors image). It is more convenient if all heating elements are deployed with contacts to the wall where the thermostat will be installed. The distance between adjacent strips is a few centimeters. If you are planning an infrared floor under linoleum, it is better to lay the strips more densely so that the distance between the tires is 1 cm. But the tires should not touch and overlap under any circumstances.
IR floor connection
Now you need to connect all the strips with an electric cable, which is usually included. Make contact on a current-carrying copper strip. One part of it is located under the residential, the other - on top. Now crimp the contact with pliers. So install contacts on all tires deployed towards the thermostat. On the far side of the thermostat open areas copper conductor must be covered with insulating tape (included).

When installing a piece of insulation, cover the entire width of the busbar, including the silver mesh if present (see illustration). Having installed all the contacts and insulators, attach the IR film to the heat insulator with adhesive tape, and fasten the strips together with it.
A thermostat is installed on the wall. Lead to it wires from the heating strips. Under one of them you need to make a recess in heat-insulating material under the floor temperature sensor and wires to it. After laying and securing the sensor, run the wires from it to the thermostat as well.

The connection diagram of the infrared floor is shown in the figure. Now wires are connected to the contacts: they remove the insulation from small area, the bare conductor (conductors) is inserted into the contact connector, crimped with pliers. Check the strength of the connection and insulate with a piece of bituminous insulation that comes with the kit (two pieces, one on top, the other on the bottom, pressing them tightly against each other). Lead all the wires to the thermostat, connect according to the diagram that is on its reverse side.

The electrical connection to the thermostat must be carried out by a qualified person. After the power is on, you can test the system: set the temperature to 30 ° C, after a few minutes check whether the strips heat up well and whether the connections spark. If everything is OK, you can lay a hard floor finish or a base under soft materials.
Finishing coating of IR floor
If tiles, parquet or laminate are laid on the infrared film floor, all that is needed is to roll out a protective (polyethylene or special) film. It will prevent water from entering the current-carrying parts during operation and will protect against damage during installation. If you use a laminate, you can use a substrate instead of a film (or together with a film). There is, by the way, a special infrared film for tiles.
Under the tile, you need to lay a layer of glue 1-2 cm, and after it dries, proceed to finishing work(glue and grout for special joints - for underfloor heating). You can immediately lay the tiles on the glue, but the thickness of the glue and tiles must be at least 2 cm.

If a soft floor covering is to be used, it is necessary to make a solid base for it. It can be plywood sheets (10mm) or OSB, other similar material. It is attached to the floor with ordinary screws or dowels. Only when fixing a solid substrate, care must be taken not to get into the conductive strips (copper and silver). It is also desirable to destroy as few carbon strips as possible. Having completed the manufacture of a rigid base, you can lay the floor covering - linoleum, carpet, carpet, etc. The main thing is that the temperature sensor and thermostat work, which will protect the film from overheating.
This is the whole setup. You can turn on the infrared floor and warm up. By the way, the film does not have to be laid on the floor. You can make yourself an infrared wall or even a ceiling. There are even special IR films that are installed under suspended or stretch ceilings.
Mobile warm floor
One of the main advantages of the IR film is its elasticity and sufficiently high strength. We decided to use these qualities to the fullest and made a mobile warm floor. This is a small piece of heating material with a thermostat and an electrical plug that can be moved from place to place. It can be twisted and folded. You can put the rug anywhere and turn it on. A mobile warm floor can be made on the basis of an infrared carbon film, or on the basis of cable mat or resistive film. Naturally, IR mats are more expensive than resistive ones, but in addition to heating, they also have a healing effect.

Mobile infrared floor - mat with thermostat
If you have a piece left from the installation, you can make such a rug yourself by connecting a piece of IR film to the wires, carefully insulating the contacts. Then connect the wires to the standard plug. Get a portable infrared heater. You can put this rug under your feet, on a chair, etc. Such a mobile film warm floor will help out if the heating suddenly fails, or it simply cannot cope with abnormal cold. It takes a few minutes to connect. The only thing - you need to ensure that there is no overheating. thermostat then in homemade version no, although you can connect it in combination with a sensor, but then the mat will be too expensive.
Rod infrared warm floor
This infrared floor is called a rod floor because of the shape of the heating elements. Inside the insulating rod is composite material, which includes carbon, silver and graphite. This combination of materials added a very good bonus to the advantages of IR radiation: the system is self-regulating. That is, she herself can reduce / increase the amount of heat generated in each area.

Rod infrared floor looks like this
IR rods connect copper wires in isolation. The heating elements are connected in parallel, which means that if one or more elements are damaged, the rest of the system will work. But this applies to rods. If you interrupt the connecting wire located on the side, the performance will be lost.
Parallel connected carbon rods are rolled into rolls. Their width is 07-1.5 m, length is up to 25 meters. Rated power 110-250W/rm. On the maximum power the heater runs for a few minutes until the screed is warmed up, then the amount of heat and power consumption are significantly reduced. Therefore, such floors are much more economical in operation than analogues of another design.
Installation of an infrared floor from rods
This electric underfloor heating system is easy to install. The subfloor must be level. Maximum allowable difference heights - 1cm per 1m 2. As with film heaters, it is important to provide a good level of thermal insulation. Therefore, along the walls and on the floor we lay thermal insulation. As with other underfloor heating, the best way- metallized material that is attached to the base with double-sided tape, glue or staples.

Having laid the thermal insulation and gluing its joints with adhesive tape, roll out the mat from above without reaching the opposite wall 15-20 cm. At the turning point, cut one of the side connecting cables in the middle between the rods and turn the roll in the desired direction. Repeat this operation until you finish laying. When rolling out the roll, make sure that the wires do not touch or intersect. Attach the rods and conductors to the thermal insulation with adhesive tape and fasten them together. So far, the process has been the same as when laying IR film flooring. Next, the differences begin.
Now we cut out windows between the rods in the heat insulator in some places. They will "tie" the screed laid on the core IR floor with the subfloor. They are arranged in a checkerboard pattern. total area"holes" - 20-25% of the thermal insulation area. It is better to cut a lot of small pieces - so the heat loss through them will be less. Now it's the turn of the electrical part.
Rod connection
Using the wire and terminal clamps included in the kit, you need to connect the cut power wires to one system. We remove the insulation from the wire by about 1 cm in the place where it was cut when turning the mat. We take a clamp / contact and put it on a bare conductor, crimp it with tongs or pliers. We put a piece on the wire from the kit heat shrink tubing slightly larger diameter. We insert the stripped end of this wire on the other side into contact. We squeeze it too. After checking the strength of the connection (pull) with building hair dryer we achieve shrinkage of the tube on the contact. We got a well insulated contact. In some firms, bitumen is used instead of heat-shrinkable pipes for insulation. Strips of this material adhere very well to any surface and do not conduct current. In this case, they take a piece of bituminous insulation and, having laid the contact, crimp it well. So we connect all the contacts. The connection diagram is shown in the figure.

Having collected everything, we connect it to the thermostat installed on the wall. We also connect a temperature sensor to it, which we place in the middle between the rods (you can fix it with tape). After completing the connection, turn on the system, set 30 ° C and carefully observe. If there is no spark, no strange smell, all the strips are heated, then everything was done correctly and you can proceed to the final stage of installation.
Laying the flooring on the IR rod floor
This option is perfect choice for a warm floor under a tile. In this case, the installation is very simple. Just take tile adhesive and tile and lay. The only condition is that the thickness of the adhesive + tile must be more than 2 cm for uniform heating and a normal level of heat transfer. This is the best underfloor heating for tiles or porcelain tiles.

Under all other types of coating, a screed is required. Its thickness is at least 2 cm. Laying the floor covering only after the composition has completely dried. And keep in mind that you can’t categorically turn on the underfloor heating system to speed up drying: cracks will appear, and they lead to a decrease in heating efficiency.
Infrared radiation is not the only way to organize electric floor heating. Can be laid or made
Results
The device of infrared heat-insulated floors is several times simpler than similar cable systems. Their undoubted advantage is useful and pleasant radiation, high heating rate and lower energy consumption (carbon infrared floors are especially beneficial from this point of view). Disadvantage: high price and rather troublesome and painstaking electrical assembly.
Non-traditional heating systems in recent times very widely used in modern construction. They can significantly reduce energy consumption, which significantly affects the savings. family budget. Such innovative solutions include film infrared space heating. We will tell you how to do the installation correctly.
Warm infrared is a polyethylene heat-resistant film in which strips of carbon paste are packed. In turn, the paste is connected by copper bars, which are also soldered into the film.
Assembled, the whole structure is called IR thermal film. If a current of a certain strength and frequency is applied through the tires, then the carbon elements begin to emit infrared radiation with a wavelength of 5 to 20 microns.

It does not cause the surrounding air to heat up and dry out as traditional radiators and space heaters do. Infrared rays heat surrounding objects - flooring, walls, ceilings, furniture.
It is important to know! Not to be confused with electromagnetic radiation, which has a harmful effect on the human body, animals and plants.
Such a heating system has practically no side effects and environmentally friendly. Scientists different countries world proved the beneficial effect of infrared rays on living organisms and humans in general.

Infrared warm floor specifications are as follows:
- power consumption 1 sq.m. -45-67 W/m.h;
- thermal film width -50 cm;
- the maximum allowable length of the thermal film strip is 8 meters
- melting temperature of the thermal film - 130 degrees C;
- power supply -220V / 50 Hz;
- the share of infrared rays in the radiation spectrum - 95%;
- IR heating wavelength - 5-20 microns.
The energy consumption of an infrared warm floor directly depends on its area and mode of operation. On the modern market many manufacturers present their options for warm film floors. All of them have approximately the same characteristics. So which infrared warm floor is better for you to decide.

The thickness of the thermal film is 0.4 mm, which allows it to be installed under any floor covering - ceramic tiles, laminate, parquet board, linoleum and carpet. In addition, such a film can be installed on walls and ceilings. In this case, heating will occur throughout the volume of the room.
Of course, the installation of infrared one or another coating has its own characteristics. For example, for laying a film floor under carpet or linoleum, plywood should be laid on heating strips.

In order for a warm infrared floor to be laid under a laminate, it is enough to lay waterproofing film. Under the tile is laid directly on cement-sand screed and topped with a layer of tile adhesive and tiles.
How to lay the film floor under the laminate yourself
First of all, you need to learn two main rules:
- So that the infrared film for the warm floor does not overheat, it must be placed in an area that will not be occupied by furniture, TV and other large household items
- For efficient heating the film floor must cover the area of at least 70%

Armed with this knowledge, it is necessary to draw a plan for the placement of heating elements. On paper, it is necessary to reflect the location of the furniture and the heating film.
It is important to know! Laying the laminate is done on a pre-leveled surface.
The concrete screed should not have a drop exceeding 1 mm per 2 m running. In order for the heat from the thermal film not to go through the floor slabs to the neighbors, a thermal insulating substrate is laid on the floor. This is a foamed polypropylene with a thickness of 3-4 mm and having a foil coating on one side.

Strips of thermal insulation are laid butt-to-joint and fastened together with thermal insulation tape. The strips are carefully cut around the perimeter of the room. Thermal film strips are measured, cut and laid on the floor in accordance with the plan.
You can cut the heating film only in the places indicated on it. They are highlighted with a dotted line and a scissors symbol.

If you cut the film diagonally, it will be damaged. The cut points are located approximately every 18 cm. The heating film should not come closer to the wall than 10 cm.
The strips of the heating film are laid on the substrate one next to the other with a gap of at least 5 mm, but not more than 1 cm. It is impossible to bend the heating element at an angle of 90 degrees or more, as it will fail.
Places of thermal film cuts, where conductive busbars are cut, must be insulated with strips of bituminous insulation, which is supplied with the floor heating kit. To mount the contact, insert it exactly in the middle of the end of the conductor rail and press firmly with pliers.
Conductive wires are stripped by 5-10 mm sharp knife and clamp them with pliers in the contact terminal. After that, the entire contact is isolated with a piece of bituminous insulation.
The connection of an infrared warm floor (heating strips) is carried out in parallel with copper stranded wires with a cross section of at least 1.5 mm2. In order for the automation of the underfloor heating thermostat to work correctly, it is necessary to install the temperature sensor.

To do this, at a distance of 20-25 cm from the wall on which the thermostat will be installed, a strobe 1-2 cm deep is made with a perforator. A temperature sensor is placed in it under the heating film.
Note! The sensor must be laid on a heat-insulating substrate. Otherwise, it will not show the true temperature of the floor.
After that, the thermostat is installed and connected. When it is fully mounted and connected, the performance of the warm film IR floor is checked. All thermofilms should heat up when turned on. Only after checking the performance can you start laying the laminate on the heating elements. Video on the installation of infrared floor heating can be viewed in this article.
Infrared film underfloor heating is new material which has a high degree of energy saving. On the construction market This material appeared quite recently, but has already won a well-deserved authority.
His hallmark is, it can fit perfectly under any coating (laminate, tile, linoleum, etc.) and it does not require pouring a cement screed.
The infrared film floor has another significant plus. Its installation is not at all complicated and anyone can do it, as well as when moving to new apartment it is very easy to dismantle.
Specifications of infrared film floor
Infrared film floor has the following technical characteristics:
Its tension in electrical network from two hundred twenty to two hundred and thirty Volts and fifty Hz;
- Its power consumption depends mainly on the type of infrared film used (150 watts per square meter; 220 watts per square meter; 400 watts per square meter);
- Temperature working surface should be up to forty-five degrees Celsius at 150 watts; up to sixty degrees Celsius at 200 watts; up to eighty degrees Celsius at 400 watts;
- Wavelength from seven to twenty microns;
- There is no electromagnetic field.
Calculation of the infrared film floor

Do-it-yourself installation of an infrared film underfloor heating
1. First you need to prepare the floor surface. Then put on it thermal insulation material. If it is planned to put carpet or linoleum on the floor, then any type of insulation with a sheet thickness of three to five millimeters is suitable for you, and we glue all joints with adhesive tape.

And if it is planned to lay ceramic tiles on the floor, then thermal insulation made of technical cork with a thickness of two millimeters is suitable.

Do-it-yourself infrared film warm floor: diagram
2. Before installing a warm floor, you need to determine the place where you will place the thermostat. Then compose and write detailed diagram installation, no matter what is wrong in the process of laying the infrared film. Remember that the film is laid in places where open areas of the floor are located and furniture is not planned to be installed.

Then we proceed to cutting the film into strips of the sizes we need along special lines and lay them out copper strip down, but with contacts to the wall (a thermostat will be installed on it later) in accordance with the diagram you have drawn up.
4. Let's start connecting the film to the wiring. It is necessary to install contact clamps on the edge of the copper strip, and then connect the contact wires to the clamps.

6. Then you need to connect the floor temperature sensor. This is done with reverse side films. And then be sure to insulate.

7. After the film floor heating is completely laid, it is necessary to isolate all contacts suitable for it and connect it to the electrical network.
8. Before proceeding with laying the flooring, it is necessary to test the infrared floor heating. Pay Special attention to the fact that there was no heating at the joints and various sincere.
9. In order to ensure additional protection it is possible to lay a plastic film on top of the infrared film underfloor heating. And now you can start installing the finish coating of your floor.

Remember that when installing ceramic tiles you need to let the screed under it dry for about twenty days before you begin to fully use the warm floor.

Do-it-yourself installation of an infrared warm floor video
Therapeutic effects of infrared film underfloor heating
For many years, infrared rays have been used in medicine to treat many diseases. It has been proven that infrared light has a very beneficial effect on all damaged tissues.
Thanks to its influence, they gradually recover after surgery or serious injury. By infrared radiation, the film warm floor has a therapeutic effect on the entire human body.
Scientists have proven that our body itself produces a certain amount of infrared rays with a frequency of up to twenty microns, but the film warm floor gives our body infrared pulses with a frequency of seven to twenty microns.
They are very similar to the infrared pulses of the human body. So this species The warm floor contributes to the fact that fatigue and stress are reduced, blood microcirculation improves several times.