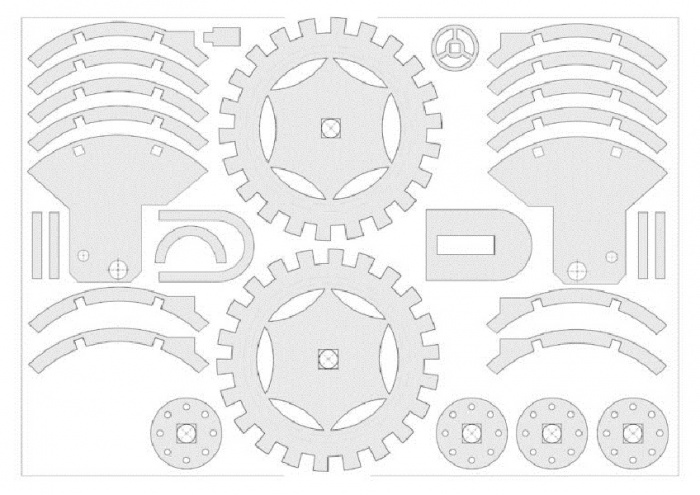
Vector drawings for cutting with a jigsaw. Cutting out plywood with a jigsaw: drawings, basic shape cutting skills and cutting out simple shapes
To start cutting with a jigsaw, diagrams and drawings are prepared in advance. When creating furniture, interior elements (shelves, doors) and performing finishing work, you may need the skill of sawing with a jigsaw. This process requires attentiveness, clarity of movements and accuracy.
Sawing with a jigsaw may be necessary when finishing works, but most often in the process of making furniture with your own hands, shelves and other things.
Preparatory work
First, the master transfers the drawing onto a sheet of plywood. During sawing, it is necessary to hold the tool correctly, observing safety precautions.
The quality of the product depends on how accurately the master performs the work at each stage.
To cut parts with a jigsaw you will need:

Usually, with experience, masters immediately apply drawings to the surface, but for beginners they will need special adhesive paper and tracing paper.
- tracing paper and adhesive paper (necessary for accurately applying the design to the wood);
- a sheet of plywood (moisture-resistant or regular, depending on what product is required);
- jigsaw manual or electric (the first is used for cutting carved elements, patterns, small parts, the second is used if you have to work with a large amount of wood, large parts);
- an awl or a drill (they are used to make holes for cuts; the diameter of the hole should allow a file to be inserted into it; the choice depends on which tool is more convenient for the master to work with);
- files (sold in stores special sets, with the help of which, if necessary, the ends and edges of the product are cleaned);
- stop board (necessary for fixing plywood and tools);
- pliers;
- compass;
- hammer;
- pencil;
- knife with sharp replaceable blades.
When assembling furniture and creating large parts, straight cuts are made without artistic wood cutting. In this case, experts recommend using an electric jigsaw. When cutting out small parts and shaped elements, hand tools are used.

When choosing a tool, care must be taken to ensure that it is suitable for the job being performed.
To cut a high-quality part with your own hands, high-quality raw materials are used. The electric jigsaw must be held vertically, without tilting or loosening, making smooth up and down movements while working.
In this case, the plywood moves towards the tool. The master must ensure that the jigsaw does not vibrate. Otherwise, the wood will split. Improper use of the tool may cause it to get stuck in the wood or cause the file to break.
In the first case, the product will be damaged, and in the second, the master may be injured. Before cutting out the internal contours, you need to make holes with an awl or drill. Then the tool is inserted into the holes and sawing begins. Experts recommend monitoring the position of the saw teeth and making turns without stopping cutting. The blade must be sharp, well tensioned, correctly positioned and firmly fixed to avoid injury.

A pattern carefully applied to the surface of the plywood is half the success when creating a high-quality part.
A pattern carefully applied to the surface of the plywood is half the success when creating a high-quality part. To do this, use pre-prepared sketches and tracing paper. The cost of tracing paper is low, but the process of transferring an image onto plywood will require high concentration and precision of movements.
Transferring patterns onto wood using tracing paper can be replaced by projecting an image. The required pattern is displayed on a sheet of plywood using a projector. The working surface must be firmly fixed so that the pattern does not move. The disadvantages of the method are the need to purchase a projector, the cost of which is an order of magnitude higher than tracing paper. This technique is used to transfer small images. The third way to transfer a picture to work surface– self-adhesive paper. The sheet with the image is glued to the plywood. Using this technique you can get precise lines.
Cutting out simple shapes

Cutting simple shapes from plywood is quite simple, you just need to strictly adhere to the drawn lines.
To cut simple shapes from plywood, it is recommended to correctly transfer the drawing to the surface, following the rules for working with hand tools(taking into account the lines marked on the wood).
Arcs and smooth lines are cut out without turning the tool, but by directing the teeth strictly along the line. You can make neat obtuse and acute angles if you know a few nuances. Obtuse corners are cut using the turning technique in place (the craftsman performs a straight cut and then turns plywood sheet).
Loop formation is suitable for creating sharp corners. To do this, you need to cut out one side of the corner, and then a loop is cut along the outer contour, allowing you to immediately create the 2nd side of a sharp outer corner. The following sequence of actions helps to make neat internal cuts:
- make holes for cutting;
- cut the sheet according to the pattern to the top of the corner;
- return the plywood to its original position;
- cut out the 2nd side of the corner.
For creating decorative elements using a jigsaw, the craftsman will need plywood, tools, good lighting, eye gauge. The work is done slowly and carefully. Haste can lead to uneven corners and oblique cuts.
Help for beginners step by step instructions, advice from professionals (to create artistic elements you need to know special techniques for working with a jigsaw) and regular practice. Sawing with a jigsaw requires patience and diligence. Decorative wooden products Made with your own hands, you can decorate the interior of your home and office.
If your new hobby is sawing out various decorative elements, burning or carving wood, then our advice would be to start with a material such as plywood.
There are several significant reasons for this:
Plywood is quite easy to work with.

If it's in your hands good tool, and you'll start with the figures small size, then making them will only take you a couple of hours.

The material is universal in use, so you can make literally anything you want from it: furniture, toys, small decorative elements.

All this can be a wonderful addition to the interior of your home.

Features of working with the material
What is a plywood sheet? It consists of several sheets of veneer, which are connected to each other using glue.
Important: plywood can be different types: based on beech, birch, pine.

Not only the quality of the finished product, but even its structure and color depends on which sheet you choose.

If you are going to cut out various figures using a jigsaw, then you need to choose the highest quality types of plywood.

They are particularly durable, which ensures that the plywood will not crack, ruining the entire appearance of the product at the most unpredictable moment.

If you are going to start working immediately, immediately on the day of purchase, then choose only dry sheets of wood.

They won't break the jigsaw blade every 10 minutes.

To work with plywood, you will need to acquire a number of tools.
In principle, they are always the same for all types of products, so you only need a one-time investment:
- Jigsaw
- Jigsaw files
- Hand or electric drill
- Ruler
- Grinding machine
- Burner.

Framework
If you want to beautifully decorate your home or give it to someone close to you original gift, make your own plywood frame.

The preparation process will not take you much time, because you just need to get the necessary materials.
Note!


They are standard for all cases, and we have already mentioned them before.

We will offer you master classes on light plywood crafts. You can make either a regular straight frame or plan various patterns and figures on it.
First you need to make a template, and after that you can cut it out, trace the contours with a pencil on the plywood and begin the manufacturing process.

This stage is not only the most responsible, but also the most exciting. If you put a piece of your soul into your work, everything will definitely work out. Ready design must be opened with varnish. Ready!

Doll furniture
This task will be a real test for parents.

Note!

The so-called test of acquired design skills.

Feature of creation doll furniture is that children do not tolerate falsehood at all.

If they see that the furniture is not worked out in detail, but instead kitchen stove for your favorite doll you brought an ordinary block rectangular shape, then you simply cannot avoid serious grievances and childhood disappointments.

The second feature of making such a craft from plywood using a jigsaw is that all this furniture must be carefully worked out with sandpaper or a grinding machine.

Your child will constantly come into contact with these self-made toys, and if the edges are poorly processed, they may get hurt.

Note!

Well, the last feature of crafts made from plywood and the house is that the materials for such furniture must be absolutely non-toxic and normal for constant contact with the child, because he can drag it into his mouth or take it to bed with him.
This is not a simple applique or paper craft, so you need to take the matter seriously, following a whole list of actions that need to be completed.

Carrying out work from plywood
How simple furniture is made in detail, and then assembled into one piece of furniture, so do-it-yourself plywood crafts should be done separately.

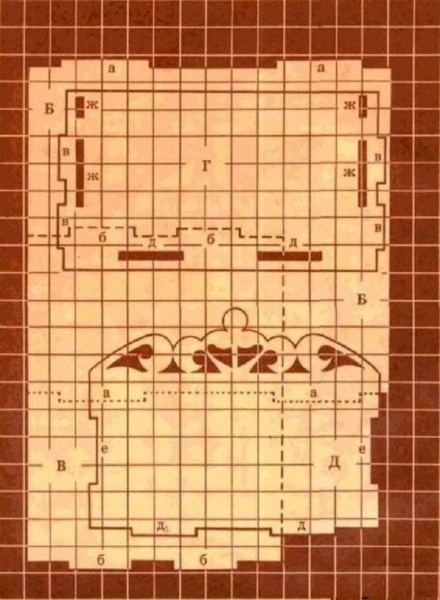
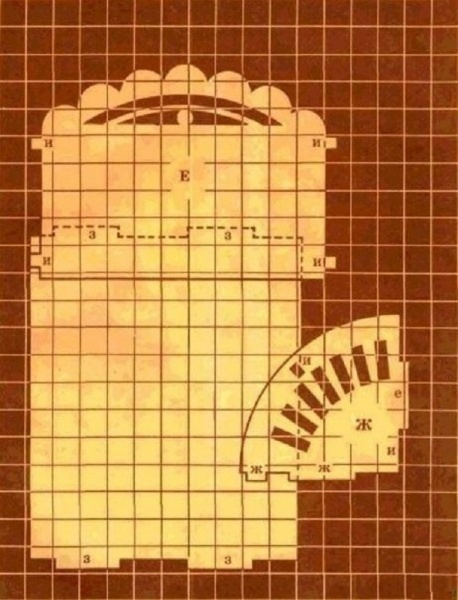
To do this, first of all, prepare special drawings of plywood crafts, on which you will specify the dimensions of all parts and their fastenings.

Take a ready-made plywood sheet and attach a paper part template to it.

Trace the part with a pencil and plan out the outline with a jigsaw.

After this, each part must be cleaned with sandpaper or a grinding machine and only then the piece of furniture must be assembled.

When you are done with the entire set, open it with varnish.

Below are provided different variants and photos of plywood crafts. Choose the one you like.

Photos of plywood crafts


Basic skills taught in class labor discipline, for the majority of people they remain just a couple of trinkets as keepsakes. But for some, working with metal or wood begins with the basics favorite hobby, which further brings pleasure from the opportunity to show imagination, apply skill and get the output of everyday life or simply decorative item. One of these directions folk art is sawing out of plywood, which is also popular among users of the FORUMHOUSE portal. We will dwell on it in more detail in our article, we will analyze what, with what and by what technology real carved masterpieces are created and in what cases stencils are used for cutting. Fortunately, our craftsmen are happy to share their experience.
- Characteristics of plywood
- Tools, templates, assembly


Characteristics of plywood
Plywood – multilayer, sheet construction material, made from hardwood veneer or coniferous species wood by gluing several layers into a single sheet. Due to the peculiarities of the arrangement of the fibers (at one angle), the sheet usually has an odd number of layers - three, five or more. If coniferous varieties There are several types of plywood (fir, spruce, pine), while deciduous ones are mainly birch. There is also a combination - a coniferous “filling” and birch cladding, in which case the plywood will still be birch. The best is entirely birch plywood, but it is also the most expensive.
The material is divided into grades and brands, depending on the decorative effect and used in production chemical substances. There are five grades, differing in the quality of veneer and appearance sheets:
- Elite grade (E) - no defects on the surface of the material, uniform, monochromatic, smooth texture without knots, cracks, wormholes or repair inserts.
- First grade (I) – there may be microcracks (up to 20 mm) and knots of small diameter on the sheets.
- Second grade (II) - even fused knots are acceptable if their number does not exceed ten pieces per 1 m² of sheet and their diameter does not exceed 25 mm. There may also be some wormholes and veneer repair inserts.
- Third grade (III) – fused knots without quantitative restrictions, voids in place of fallen knots, up to a dozen wormholes (up to 6 mm) per 1 m² of sheet.
- Fourth grade (IV) - the sheet must have a strong adhesive connection, peeling is unacceptable. The entire spectrum of appearance defects - in almost any quantity, but the diameter of wormholes, knots and voids - no more than 40 mm.

The grade concerns only the outer layers of the sheet and is indicated by two numbers, and the grade can be either common to both sides or vary, more often, within the same grade - I/I I/II E/I and so on. Except for the fourth, lowest grade, all other grades of plywood are sanded on both sides, and the elite grade can be additionally varnished.
Naturally, the higher the grade and decorativeness of the material, the more beautiful it will turn out. ready product. But considering that the cost of the elite, and even the first grade, is decent, and the parts cut out are most often small in size, you can use a lower grade if you actually cut a high-quality blank from the sheet. The plywood from which the workpiece will be cut should not have knots - they may fall out and other defects. They also pay attention to the ribs - you cannot cut out masterpieces using fragments with voids in the middle layers.
The grade of plywood and its main characteristics are determined by the chemical compositions used:
- FB – impregnation of veneer with bakelite varnish, which provides resistance to high humidity.
- BS – bakelite glue (alcohol-soluble), gives high performance characteristics, such plywood is stronger and more durable.
- BV – water-soluble bakelite mixtures; plywood is resistant to high humidity.
- FC – phenol-urea resin bonding, relative water resistance, for indoor use.
- FSF – phenol-formaldehyde resin bonding, moisture resistant material for external use.
Which plywood is suitable for sawing
For sawing products intended for home use(boxes, stands, shelves, utensils, decorative elements) best option– FK grade plywood.
Phenol-urea resin is safe for others and well tolerated high humidity, therefore products made from such plywood are not distinguished harmful substances and resistant to deformation.
FSF brand plywood is not suitable for household items due to aggressive formaldehyde, but can be used for outdoor decoration - carved frames, coffee tables For open verandas or gazebos, various benches.
For cutting, plywood with a thickness of 3–5 mm is most often used. If loads are expected (chairs, stools, benches, tables, etc.), the thickness is increased. It is more difficult to cut from a thick sheet (more than 10 mm), so lace openwork from such material is unlikely to be obtained. As an option, a main canvas made of thick sheets and carved inserts to increase decorativeness.
Portal member temernik, who opened a topic that is still active to this day back in 2011, uses sheets different thicknesses, depending on the purpose of the items.
temernik FORUMHOUSE Member
I cut it out for my father's anniversary carved frame made of 4 mm plywood, and on a stand under flower pot, on the bears, sheets 8 mm thick were used.

Tools, templates, assembly
Patterns on plywood are cut out using jigsaws - this can be done either manually or electric tool. For complex, openwork elements, a manual jigsaw with replaceable files is often used. They can accurately cut out the most intricate patterns, while a jigsaw is more likely to ruin the design if the skills are insufficient.
Even in labor lessons, they teach that the quality of the saw and ease of use largely depend on the tension of the file - with a loose set it is more difficult to make a cut exactly according to the template.
Temernik uses his son’s old jigsaw, left over from his school days. This simple tool is enough for him to create his plywood openwork.

To start cutting out a design, a puncture is made on the blank with a sharp awl, into which a file is then inserted; the second option is to drill with a drill with a thin drill bit. In both cases, it is not recommended to bring the hole directly to the contour line, if the motive allows. Puncture or drilling at a distance will help avoid possible cracks and "cuts". To process the edges of cuts (ribs), files or sandpaper with the appropriate grain are used; this grinding gives the pattern a finished look and removes minor flaws, leveling the edge. In addition to the basic tools, you may need pliers, a hammer, a drawing set (ruler, compass) and others.
Even the simplest design is cut out according to a template applied to plywood - if you have artistic talent, the patterns for sawing are drawn “out of your head”; if nature is not so generous, they are transferred from a stencil.
There are enough standard preparations on the Internet in free access, in thematic publications. In a thread on the forum, many craftsmen share their favorite templates with each other. Temernik The Internet and my wife’s drawing talent help.
temernik
I take drawings from the Internet, then I come up with a method of fastening and modify it; if something is wrong, then my other half completes the drawing, she does it well.
The design is transferred from the stencil to the plywood with a pencil or pen; for convenience, the base is secured to the sheet with buttons. Special attention is given to small contours; a few inaccuracies can spoil the entire appearance of the finished product.
To increase decorativeness, products cut from plywood are joined into a tongue-and-groove pattern and glued, most often with PVA glue for wood. First, dry “fitting” is carried out, and after adjustment and cleaning, the adhesive assembly is completed.
temernik
Everything is attached in the following way: in some parts grooves are cut out, in others, on the contrary, protrusions are cut, everything is first adjusted “dry”, and then assembled with PVA glue. The ends were sanded.
After assembly, the plywood is covered with protective and decorative compounds - varnishes, stains, paints, depending on the desired effect.


Examples of work by portal participants
Open temernik The topic received a lot of responses, many shared their creativity in it.
Bosun1955 I started with a similar technique.

And now he combines it with equally interesting, multi-layer cutting.

Boatswain1955 FORUMHOUSE Member
I finally understood the essence of sawing out plates various shapes– two drawings of the same size are made, the waves are drawn in opposition to each other. That is, where on the first there is a ridge, on the second there is a trough. After cutting, the parts are assembled one at a time. This makes two plates. Sawing with a hand jigsaw without any fancy, for a long time I could not figure out how such forms were made. So I took my soul away a little, sawed some plates and a basket.


56Vladimir1981 He is also a master at using a jigsaw.
Crafts made by craftsmen with a jigsaw look elegant and stylish. IN in capable hands an ordinary tool turns into a miracle jigsaw, with the help of which incredible masterpieces are created. Artistic sawing maybe just a hobby or professional activity, because products self made are always appreciated. About the features of the miracle jigsaw and the order of execution interesting crafts will be discussed further.
Characteristic features of a jigsaw
The miracle jigsaw provides convenient cutting of lines on wooden base, this is facilitated by a narrow cutting blade. More useful for woodworking band-saw, but cutting out plywood is a better miracle with a jigsaw. The main advantages of the tool are as follows:
- Accurate cutting of parts, the cut line comes out quite smooth and does not require grinding.
- Thanks to the narrow blade in the miracle jigsaw, cutting out sharp corners and small parts is possible.
- Processing of internal grooves begins with a hole prepared with drill number 3.
Relatively technical characteristics the miracle of a jigsaw, the following features are noted:
- Easy stretching and fixing of the fabric.
- The cutting process is much easier than with a band saw.
- Cutting out a miracle with a jigsaw creates virtually no risk of injury.
- The tool does not require frequent adjustment.

There are several parameters that you should focus on when choosing a miracle jigsaw for cutting:
- The main thing is capacity; this indicator indicates the size between the rear wall and the cutting blade. There are miracle jigsaws with sizes from 12 to 26 inches.
- The thickness of the material that the tool can process.
- Number of moves in 1 minute.
- Saw stroke height.
To cut complex elements from plywood using a miracle jigsaw, two types of saws made of steel are used.
Advice! For beginners, it is better to practice on a large-toothed blade designed for thick plywood. It is also used to make cutting boards. Small teeth on a thin file allow you to cut out filigree elements of crafts from thin plywood.
The result of the work of a top-class professional is presented in the photo:


Preparatory steps
Sawing out a miracle with a jigsaw requires painstaking work from the master and develops perseverance and patience. Initially, you should take care of organizing your workplace. Prerequisites for comfortable work - high-quality ventilation and lighting. A private house provides more possibilities choice utility room, in a city apartment a glazed balcony is suitable.
Second important stage is the purchase of material. High-quality plywood reduces the risk of part delamination or cracks appearing when cutting out a miracle with a jigsaw. The second reason for violating the integrity of the material is an incorrectly selected canvas or unprofessional actions. For cutting crafts, plywood with a thickness of 3-4 mm is intended. The following steps will help prevent delamination:
- Depending on the area of the surface to be treated, dilute the required volume of the mixture of water and PVA glue. For small areas, 2 tablespoons of water and a few drops of glue are enough.
- After thorough stirring, the solution is applied with a brush to back wall plywood blanks in 2-3 layers.
- The material is left until completely dry.
Comment! Glue solution will successfully replace furniture or parquet varnish.

Before cutting out the miracle with a jigsaw, the plywood needs to be cleaned. Chips, microscopic cracks, dark marks from knots are removed with sandpaper of various grain sizes. To give the surface maximum smoothness, stripping the plywood against the grain helps. First, work with medium-grain paper, finishing touches Apply with fine-grained sandpaper. The complete absence of burrs allows you to move on to the main stages of work.
A simple example of a craft for beginners is presented below:


The process of creating crafts
Preparing a drawing, cutting out a miracle with a jigsaw, assembling parts and decorative finishing- key steps to create original crafts.
Translation of the drawing
A well-executed drawing will ensure quick assembly ready-made elements into a single figure. Otherwise, after painstaking work with a jigsaw miracle, there is a risk of encountering the problem of misaligned grooves and the need to remake individual parts. You can take drawings of crafts from this article or try to create a unique sample for cutting. After printing or drawing on paper, the drawing is transferred to plywood using one of the convenient ways. In the first case, the drawing is secured with buttons on plywood and copied using a pen and ruler.


To cut out crafts with a miracle jigsaw, the technology of thermal transfer of toner from paper to plywood can be useful:
- Select a material with a low toner retention rate (like glossy paper).
- In the printer settings, high-quality printing is selected to hit more toner. In this case, the procedure for cutting out a miracle with a jigsaw is easier.
- The printed image is applied face down to the plywood and ironed. For A4 format one minute is enough. Instead of an iron, a hair dryer is suitable.
- After the paper has cooled, it is removed. If there are gaps in the outline of the sketch for cutting out a miracle with a jigsaw, they are completed with a pencil.


Making holes and sawing
Cutting out the internal grooves with a miracle jigsaw is preceded by the design of the holes. The process includes the following steps:
- Prepare a drill with a drill diameter of 3 mm or an awl of appropriate sizes.
- The tool is placed in the middle of the groove and a hole is made.
- It is recommended to first protect the desktop with a board.
- Having an assistant is welcome.
To make a miracle with a jigsaw into internal grooves, a nail file is inserted into the hole and secured in the upper part of the tool. After processing small area about 2 cm check the evenness of the cutting. If the cut is of poor quality, it is better to replace the blade with a more suitable specimen. If the cut is not smooth enough, try correcting the imperfections with a flat file.
Important! Follow safety standards and do not let your fingers get caught in the file.


Cleaning parts
Upon completion of cutting out the miracle with a jigsaw, small chips on back side parts are cleaned with sandpaper. Also, the prepared craft elements need polishing. Ribs and rear end parts are first processed with medium-grain paper, and at the final stage fine-grained sandpaper is used. It is convenient to clean the internal grooves cut using a miracle jigsaw with a rounded file. Strive for a complete absence of irregularities and burrs at the end of sawing.
Having reached desired result, proceed to assembling the parts of the craft, prepared with a miracle jigsaw. Interesting drawing for cutting and photos of the shelves are presented below:


The final stage
After assembling and adjusting all the parts, the crafts proceed to gluing using PVA or Titan glue. Depending on the design, it is recommended to tie multi-layer elements tightly with strong thread and leave to dry. The process lasts no more than 15 minutes. An example of a product that is difficult to cut out with a jigsaw is shown below in the photos and drawings:


You can add decorativeness by burning patterns onto individual elements crafts. First, the drawing is applied with a pencil, after which they work with an electric burner. An openwork vase for sweets will be a worthy table decoration:


Sawing out a miracle with a jigsaw is a painstaking task. For the product to last long time, it needs decorative processing. Preservation of pristine beauty natural material varnish on wood helps. For work you will need high-quality composition varnish and a convenient glue brush. Try to ensure that there are no scratches or visible marks on the craft. When cutting out animal figures or models of mechanisms with a miracle jigsaw, sometimes they resort to fragmentary coating of the product with paints. This technique brings the craft closer to the original.

Cutting plywood with a hand jigsaw requires attention and time. The result is beautiful, practical products.
A hand saw is used to process the material to create decorative elements. As a result of processing wood, plywood, and plastic, crafts are created that have practical use and aesthetic value.
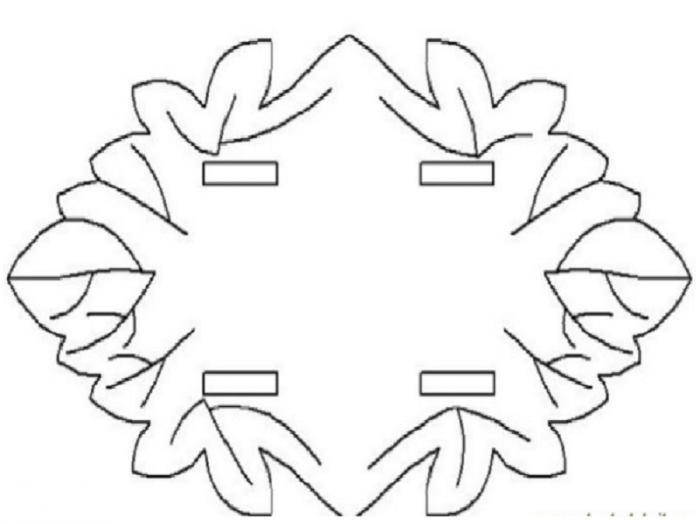
Figure sawing is a fascinating hobby that brings practical, moral and material benefits. From plywood and wooden blank you can do:
- a vase for sweets;
- basket;
- table stand for postcards;
- lamp;
- hanger in the hallway, living room;
- photo frame;
- pincushion;
- bread box;
- panel;
- candlestick;
- hot stand for eggs;
- box.
For beginners, you can choose light designs for carving, simple circuits, drawings of crafts, sketches that have a pleasant appearance. After mastering the cutting technique, you can try your hand at jewelry models with openwork fragments.
Using a jigsaw you can make platbands for home design. A variety of sketches allows you to create this element, which will provide decoration interior By figure cutting you can make crafts from wood.
You can cut beautiful decorative elements from plywood. Using jigsaw stencils, you can easily make photo frames, mirrors, and much more from blanks. Handmade will complement the design of the room and emphasize the chosen style.
Operating procedure
To obtain a high-quality product and minimize the formation of defects, you need to do the work slowly and focus on the process. Before starting work, it is recommended to make sure that the thickness of the plywood is equal to the height of the groove on the printed sketch.
Preparing the stencil
Schemes for sawing with a tool can be of different sizes. To create a drawing of an interior item, for example a shelf, you will need to use whatman paper in A1 or A0 format, and for toys you can use a standard sheet of cardboard.
The contour of the product is applied to the surface in compliance with the exact dimensions. Templates for cutting with a hand jigsaw can be found on special resources. But it’s easier to come up with your own compositions based on the type of workpiece. An individual approach to developing a product design will highlight the texture of the wood.
Transferring an image to the surface of plywood or boards
To accurately apply a contour to the surface of plywood or wood, print the template on thick paper. Transferring a drawing from an A4 drawing can cause a lot of trouble if you draw the ornament with a pencil.
In order to apply contours and complex patterns, you can use auxiliary methods. One method involves using carbon paper. To do this, the carbon copy is placed on the workpiece. Place a template on top and draw lines.
The drawing can be glued to the plywood with 2-sided tape. When using glue, you need to clean the surface with sandpaper. Affordable way involves the use of a stencil made using nail scissors. After preparation, the template is applied to the surface and each fragment is outlined with a pencil.
For convenience, the sheet is secured with tape or insulating tape. The drawing can be applied thermally. For this purpose it is used jet printer, with which the diagram is printed. After this, the design is applied to the surface with the front side and processed with a heated iron.
Sawing process technology
Sawing from plywood is carried out after applying the drawing to the workpiece. Processing begins with the internal elements of the product, and then the outer contour is cut out. This order of work allows you to get a straight line and provides convenient fastening of the workpiece.
Holes for the blade must be drilled in sharp places on the internal contour. This requires attention because back side Chips may occur. To avoid this, it is recommended not to make the holes completely.
You can limit the depth using insulating tape that is wrapped around the drill. After this, turn the workpiece over and process the hole with an awl. After finishing the work, the product is polished using a file or needle file.
Small elements require delicate handling, so it is recommended to be smart when handling. To do this, cut a thin strip of sandpaper and insert it into a jigsaw file instead of a blade.
Sawing with hand tools requires the equipment of a special machine with a clamp. This device is used as a base. During processing, the workpiece is fixed at chest level, which provides convenience and allows you to closely monitor the process.
For beginners, it is important to be careful when using a jigsaw in order to practice smooth movements. Jigsaw cutting blade fragile Therefore, it is recommended to avoid distortions, sudden movements, and overheating.
When processing a workpiece, the movements must be reciprocating, and the tool must be positioned vertically. Application electric jigsaw requires securing the workpiece to the workbench. When using this equipment, workpieces up to 5 cm thick can be processed.


Defects in work
If the workpiece processing technology is violated, the tool may shift. A jigsaw may cut crookedly if the tool is tilted or improperly fastened. If the blade gets stuck at the stage of forming the figured elements, then you will need to carefully draw a new line located parallel to the fragment with the defect.
A little about safety
The jigsaw for figured cutting is an arched frame. The tool is equipped with a handle and 2 attachments for a cutting blade, which allow you to cut patterns of varying complexity.
Depending on the type of work, different attachments are selected. Thick saws are used to cut out contours, and thin blades are used for openwork work. The workpiece processing process can be mechanized using electric tools. To speed up the process, some models are equipped with a pendulum mechanism.
A stationary electric tool, which is mounted on a static surface, is similar in principle to sewing machine. The use of this type of equipment eliminates perpendicular cutting errors.
Sawing with a jigsaw requires compliance with safety rules. Workplace must be properly equipped. When working, it is recommended to use products personal protection.