Cutting plywood with a jigsaw for beginners. How to cut wood with a manual and electric jigsaw: the sawing process, a step-by-step guide to creating a cutting board
Wood and sheets (plates) based on it are one of the cheapest and most pliable materials. For those who like to work with a jigsaw, plywood is primarily of interest.
It is her home craftsmen who most often choose to make various crafts. If you organize the work correctly, you can create real masterpieces.
Crafts from this material are made for various purposes, but basically they can be divided into two groups - for decorating rooms or territories (for example, fencing from the inside, a garden plot, and so on).
Kind of plywood
If you focus on the optimal combination of indicators such as quality and price, then PSF or FC products are selected. It is characterized by resistance to moisture and temperature fluctuations. This alone is enough to ensure the durability of the handmade crafts. But between these varieties of plywood there is a fundamental difference - in the composition of the adhesive, which holds the veneer layers together.
In the first case, it is toxic, so FSF sheets are used only for outdoor work. But for crafts intended for placement in the house, FC plywood is quite suitable. Its counterparts are much more expensive, and therefore are not considered as a material for simple, easy-to-perform crafts.

Type of sheet grinding
It is easy to understand: Ш1 and Ш2 - respectively, one- and two-sided; NSh - rough plywood. That is, the craft will still have to be “brought to mind”, polished. The choice for this parameter depends on how it is planned to be designed and placed in the future. A sample fixed on the wall and, for example, a figurine (stand, vase, toy or other), which can be viewed from all sides, are different things.

plywood texture
A lot depends on personal preference here. If it is planned to preserve the natural look of the tree when applying the protective coating of the craft, then under the varnish it is better to purchase plywood from birch veneer. But for subsequent coloring, it is desirable to choose pine.
For various plywood crafts, it is advisable to focus on oil or acrylic based. The explanation is simple - they are less prone to fading in the sun, and therefore do not have to frequently renew the outer coating; it will not change its original appearance for several years.
Plywood grade
When choosing a sheet for crafts, it must first be inspected for knotty and inclusions. Significant defects will not only complicate the cutting of the material, but also initiate the appearance of cracks or “pits” (as a result of the same knots falling out). Next - inspection of the end surfaces. During the cutting process, plywood is subjected to dynamic loads (vibrations). If at least signs of veneer peeling are visible on the side parts, such material should not be purchased, even if its price is too tempting.

In the future, in the process of making crafts, many problems will arise. As a result - rejection of plywood and its increased consumption. In total terms, this will come out approximately the same in terms of money compared to the acquisition of high-grade material, and in terms of the time spent and the quality of work - a big minus.
Sheet thickness
If crafts are cut out with an electric tool, then it is limited to 30 mm. For a manual jigsaw, it is advisable to use relatively thin plywood; maximum three layers. That is, no more than 9 mm thick.
What you need to work
jigsaw
This is a priori, since we are talking about making crafts using such a tool. The question is different - which one is better to work with. Electric models are much more expensive than manual counterparts, but have a lot of advantages. About in .

For example, high cutting speed and accuracy, edge cleanliness, the ability to change cutting parameters, and a number of others. If a plywood craft is not a one-time, short-term hobby, then it’s worth spending money on an electric / jigsaw. It is universal, and it will come in handy more than once on the farm, because, depending on the type of file, it can “work” not only with wood, but also with non-ferrous metals, plastics, and plexiglass.
A little more difficult with a manual jigsaw. Its design is quite simple - a frame with screw clamps and a handle + file.

The nuance is that the cutting blades break quite easily (from excessive pressure, changing the position of a hand tool), and therefore it is advisable to purchase them with a margin; well, they are cheap.
Hacksaw
It is needed only at one stage - when cutting the overall sheet into separate fragments. Doing this with a manual jigsaw is an unpromising and unprofitable occupation; a lot of time and files will be spent.
Stand
No one will lead cutting plywood on weight; This is clear. Cut out the details by laying the sheet on the countertop - the risk of damaging it. It is in order to ensure the "safety" of the latter that the stand is needed. With your own hands, it can be made from cutting boards. What such a device looks like (one of the options) can be seen in the figure.

The stand is fixed on the base with clamps (on a non-working table) or self-tapping screws (in case there is a carpentry workbench in the outbuilding, shed, garage). Although this is not the only mounting options. It is easy to understand how to proceed, in accordance with local conditions.

Skin
The ideal tool for fine woodworking -. But for plywood crafts that do not differ in large areas, it is not suitable. Therefore, only sandpaper; medium fraction - for primary grinding of workpieces and with fine grain - for finishing.
Additionally
- Files and files.
- Awl.
- A simple pencil and carbon paper.
- Glue, if the craft is created composite or multi-level, that is, with the fixation of two or more figured fragments in separate sections.
- Varnishes, paints, stains.
Examples of drawings and sketches of plywood crafts


Copying "one to one" in this case is hardly advisable. Any work done by one's own hands is a process with a creative component. That is why the dimensions should be determined independently, depending on where it is supposed to place (or how to use) the craft. For example, whether it will “look” in a particular place, whether it will organically fit into the interior of the room.
Even if you liked the drawing, it is not difficult to change the geometry of the figure by applying the scaling rules. Especially when it comes to drawing a contour on plywood with a simple pencil; correct any mistake, in some areas it is quite easy to correct something. It is not much more difficult to modify any sketch, bringing something original, original to the sample.


There is another solution - you can download from the Internet any picture that you like. Printing it in the right scale is not a problem. It remains only with the help of carbon paper to transfer it to plywood and shade the areas that need to be cut out. This is when it comes to curly crafts. With a contour sample it's even easier; cut exactly along the line - and that's it, you're done. It remains only to do the decoration of the product.


Basic rules for sawing with a jigsaw
- Laying under a sheet of rigid substrate. It is in order to ensure the hardness of the surface under the plywood that the stand is used. A sheet, even a small one, bends quite easily (under pressure), therefore, without this device, a high-quality cut, strictly along the line, will not work.
- The working body of the jigsaw (sawing) must be strictly perpendicular to the end of the sheet. And constantly, throughout the entire process of cutting the material.
- The tool is fed along the line in a translational motion, but without effort. Otherwise, the file will break immediately. As well as when it deviates from the "vertical".
- Sawing holes "deaf", that is, somewhere on a sheet of plywood, indented from its edge, is carried out as follows. At any point of the outlined contour, a "hole" is drilled with a slight offset to the center of the fragment. The diameter is chosen so that the file easily enters it. After attaching it to the tool frame, you can cut in any convenient direction.
- Figured drank in plywood involves sharp turns, smooth bends, and so on. First, at the point of change of direction with a jigsaw, without changing its position, it is necessary to make a small hole in the material. To do this, you need to continue the cut with a file, strictly maintaining the orientation of the tool, and at the same time turn a piece of plywood. As soon as the plane of the cutting part coincides with the required direction of further cutting, it can already be carried out along the intended line.
Having mastered the manufacture of fairly simple plywood crafts, you can take on more complex options. As an example - self-assembly of furniture (racks, whatnots, original hanging shelves). With a skillful approach to business, plywood makes excellent countertops, cutting boards, window trims, and so on. It is easy to make a folding chair from this material, and various modifications. Who is interested in this.
Plywood also makes excellent frames for paintings and photographs. Those who have a plot will be able to do the decoration of outbuildings; the same gazebo, a house over a well, or something else. Lots of options. The main thing is to want to learn.
In the process of preparing for sawing with a jigsaw, one should not forget that all drawings and drawings are nothing more than the basis for developing your project. A little imagination, time, effort, and you can make a really real masterpiece out of plywood.
All photos from the article
According to historical data, the mass production of plywood dates back to the beginning of the nineteenth century. And since this material at that time was produced exclusively for decorating and furniture production, almost at the same time such a type of handicraft as do-it-yourself appeared.
For more than 2 centuries, this art form has not lost its relevance. It is loved for its simplicity and the final product of decent quality.

By and large, anyone, regardless of gender and age, can engage in this type of art. A huge plus is the absence of serious financial investments.
In addition to your own great desire, you only need a sheet of plywood, the jigsaw itself and stencils, or, as the masters also call them, drawings for artistic sawing out of plywood with a jigsaw.
Preparation for work
Despite the seeming simplicity of this type of creativity, it should be taken seriously. Success here largely depends on how carefully you prepare. Namely, you will select and process a plywood sheet and select the drawings that are suitable specifically for your product, which can be cut out of plywood with a jigsaw.

Selecting a quality sheet
Now plywood is divided into many types, each of them was developed for specific purposes. And strange as it may sound, not every material is safe to work with.
Speaking of artistic cutting, it should be remembered that during work you will inevitably breathe in fine dust and fumes from plywood, and at the moment they are not always safe.
- Experienced craftsmen prefer to work with sheets made on the basis of urea-formaldehyde compounds, they can be easily recognized by the first letters of the "FK" marking. Such plywood may already come with a decorative coating such as varnish or have a clean “shirt”. In the latter case, it is more convenient to apply drawings to the sheet for cutting with a manual jigsaw from plywood;
- Sheets marked "FOF" are focused on furniture production and are often also quite safe. But they have another minus, they most often refer to and have a thickness of more than 12 mm;

- The FB brand was developed as plywood for the construction or decoration of various kinds of boats and yachts, so the price of such material is too far from democratic, although this plywood is also safe;
- What you definitely shouldn’t mess with is plywood like “FSF”. No matter how beautiful it looks, it should be clearly remembered that its production uses compounds with a high content of phenol, which in itself is considered one of the serious and rather toxic carcinogens.
Important: for artwork, especially for cutting with a jigsaw, it is highly recommended not to take sheets on which there are knots in the top shirt. When working, they will fall out.
Let's move on to the drawings
The easiest way to make, for example, drawings of animals for sawing with a manual jigsaw from plywood is to use improvised materials and a simple carbon paper. Everyone in the house has a lot of printed material such as old postcards with birds, fish and other living creatures.

A pre-prepared carbon paper is superimposed on the prepared and polished sheet, the image of your choice or a photo of your favorite little animal is superimposed on top of it, and fixed with pushpins (now you can use adhesive tape for this purpose). After that, you will have to clearly outline the outline of the image.
Important: do not worry that the carbon paper will stain a clean sheet while you are pushing your drawings for artistic sawing with a plywood jigsaw. After the workpiece is cut out, in any case it will need to be polished with emery, during such processing all impurities will be removed.

Do not immediately take on complex highly artistic products with thin fragments. For an inexperienced craftsman, it will be difficult to process small parts without damaging them with careless pressure.
If there are children near you, then it is better to use, for example, simple drawings for sawing a car out of plywood with a jigsaw or make a cutting board. Thus, you will not only get basic work skills, but also please the kids.
Important: do not forget that professional drawings of plywood boxes for sawing with a jigsaw necessarily contain fasteners that are part of a common plate. Therefore, it is better to start here by cutting out internal cavities and fragments.

If you do not have enough choice of images from your home archive, we advise you to turn to ready-made selections. Now such stencils are used not only for cutting on plywood, but a number of art crafts take them as a basis, so it will not be difficult for you to buy such sets in stationery stores, and sometimes even in underground passages.
Advanced users who have a good printer at home can download one of the most common graphics programs to their computer and use it to create professional authorings.

The cutting process
Particular attention should be paid to the preparation of the jigsaw. As already mentioned, it is better to start with the manual option. The price of such a tool and instructions for working with it are available to almost everyone. A couple of decades ago, such work was part of the mandatory labor training program for boys in schools.

Initially, you should correctly fix the cutting blade. Blade teeth should only point down towards the handle. First, one of the edges of the blade is securely clamped, after which the second end of the jigsaw is slightly compressed by 10 - 15 mm and the opposite edge of the blade is fixed. Do not stretch too much, the canvas may burst during operation.
Sawing plywood with a jigsaw according to drawings is an exciting activity for handmade lovers. Openwork products can be used to decorate furniture, interior items, make wall panels, caskets, etc.
The work is carried out both manually and with an electric jigsaw. You need to prepare a free place at the table or workbench, purchase the necessary materials and, most importantly, prepare a template, draw a drawing or make a drawing.
Let us consider in more detail in the article how they make cutting out of plywood with a jigsaw according to the drawings, how to correctly transfer the template to plywood, how to select a high-quality workpiece.
Work materials
- Plywood without knots of good quality with a thickness of 3 to 5 mm.
- Sandpaper of two types of grain size - fine and large. In order for the layers to be cleaned evenly, it is necessary to place a rectangular board during grinding.
- Jigsaw manual or electric. If, when cutting plywood with a jigsaw according to the drawings, the drawing turns out to be thin, with turns, with a radius of less than 2.5 cm, then it is better to use a hand tool so as not to spoil the template.
- Stain (optional).
- Varnish. It is best to use acrylic, it is odorless and dries quickly.
- Drill. It will be needed in order to make a hole for a jigsaw file.
How to make a template?
If you do not know how to draw, but there is a desire to start cutting plywood with a jigsaw, drawings can be taken from numerous Internet sites. You need to find the necessary ornament or pattern and print it in full size.
The template is transferred to plywood only after it has been carefully processed; a ballpoint pen or a simple pencil of medium hardness is used for application. Some people use carbon paper.
Then a drawing is carefully drawn on plywood, all irregularities are corrected.
Plywood preparation
Before starting work on cutting plywood with a manual jigsaw according to the drawings, you must first prepare the base. First, for convenience, they cut out the required size by attaching a template to a sheet of plywood.

After the desired size is prepared, sand the surfaces. First, a sheet of plywood needs to be processed with coarse sandpaper, No. 120 will do. Then wipe the surface with a dry cloth. Further, the material is polished with fine sandpaper, for example, No. 80. Wood dust is shaken off only with a dry cloth.
Beginning of work
After the surface of the plywood acquires an even structure, transfer the pattern according to the template. To start sawing with a jigsaw, you need to make a hole for the saw with a drill. After inserting the file, fasten it well on both sides of the manual jigsaw. If the tool is used electric, then the jigsaw must be fixed on a special stand so that it does not vibrate and does not spoil the straight lines.
The work is done slowly, carefully, observing safety precautions.
When the entire design is cut out, sand the inside side cuts.
Final stage
In order for a picture or piece of furniture to take on a finished look and last longer, you need to varnish it. If you want to give some other shade to the product, then first apply the stain, and after drying - varnish. After applying the first layer of varnish, you need to let it dry thoroughly, then sand the surface again with fine sandpaper, as the varnish can raise the pile on the plywood. The last final coat of varnish is applied after wiping the product with a dry cloth.

If sawing out various decorative elements, wood burning or carving has become your new hobby, then our advice would be to start with a material such as plywood.
There are several significant reasons for this:
Plywood is easy to work with.

If you have a good tool in your hands, and you start with small figurines, then making them will take you only a couple of hours.

The material is universal in use, so you can literally make anything you want from it: furniture, toys, small decorative elements.

All this can be a wonderful addition to the interior of your home.

Features of working with the material
What is a plywood sheet. It consists of several sheets of veneer at once, which are interconnected with glue.
Important: plywood can be of different types: based on beech, birch, pine.

Not only the quality of the finished product, but even its structure and color depends on which sheet you choose.

If you are going to cut out various figures with a jigsaw, then you need to choose the highest quality varieties of plywood.

They are distinguished by their special strength, which ensures that the plywood does not crack, spoiling the entire appearance of the product at the most unpredictable moment.

If you are going to start work immediately, immediately on the day of purchase, then choose only dry sheets of wood.

They will not break a jigsaw file every 10 minutes.

To work with plywood, you will need to acquire a number of tools.
In principle, they are always the same for all types of products, so only a one-time investment is required:
- jigsaw
- Jigsaw files
- Hand or electric drill
- Ruler
- grinding machine
- Burner.

Framework
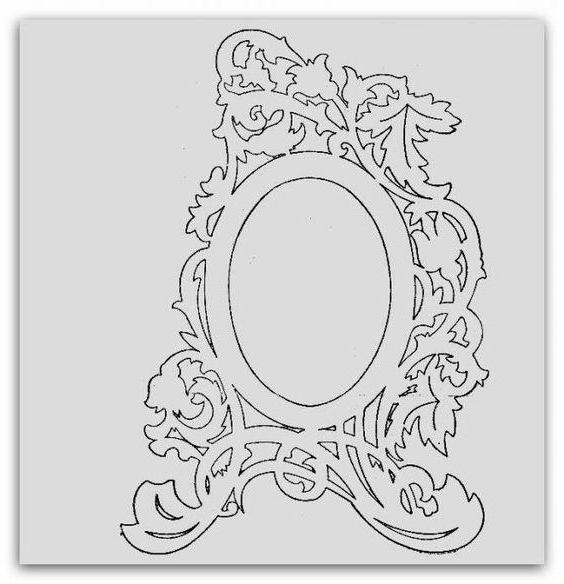
If you want to beautifully decorate your home or present an original gift to someone close, make a plywood frame with your own hands.

The preparation process will not take you much time, because you only need to get the necessary materials.
Note!


They are standard for all cases, and we have already mentioned them before.

We will offer you workshops on light plywood crafts. You can make both a regular straight frame and carve various patterns and figures on it.
First you need to make a template, and after that you can cut it out, trace the outlines with a pencil on plywood and start the manufacturing process.

This stage is not only the most responsible, but also the most exciting. If you put a piece of your soul into the work, everything will definitely work out. The finished structure must be varnished. Ready!

doll furniture
This task will be a real test for parents.

Note!

The so-called test of acquired design skills.

A feature of the creation of doll furniture is that children absolutely do not tolerate falsehood.

If they see that the furniture has not been worked out in detail, and instead of a stove for your favorite doll, you brought an ordinary rectangular bar, then you simply cannot avoid serious insults and childish disappointments.

The second feature of making such crafts from plywood using a jigsaw is that all this furniture must be carefully worked out with sandpaper or a grinder.

Your child will constantly be in contact with these self-made toys, and in the case of poorly finished edges, they may get hurt.

Note!

Well, the last feature of crafts from plywood and at home is that the materials for such furniture must be absolutely non-toxic and normal for constant contact with the child, because he can drag it into his mouth or take it to bed with him.
This is not a simple application or paper craft, so you need to take it seriously, following a whole list of actions that need to be completed.

Performing work from plywood
Just as simple furniture is made in detail, and then assembled into one piece of furniture, do-it-yourself plywood crafts should be done separately.

To do this, first of all, prepare special drawings of plywood crafts, on which you specify the dimensions of all parts and their fastenings.

Take the finished plywood sheet and attach the paper part template to it.

Circle the part with a pencil and cut along the contour with a jigsaw.

After that, each detail must be cleaned with sandpaper or a grinder, and only then must the piece of furniture be assembled.

When you're done with the whole set, open it up with varnish.

Below are different options and photos of plywood crafts. Choose the one you like.

Photo of plywood crafts


One of the interesting hobbies is artistic sawing with a jigsaw. Beginners look for drawings, drawings and descriptions for them on the pages of numerous printed and electronic sources. There are artists who realize their creative ideas on plywood by drawing a drawing on their own. This process is not too complicated, the main thing in the work is the accuracy of the actions.
Some use this type of handmade just for fun, creating wall art or photo frames. Others use artistic sawing with a jigsaw according to drawings, drawings and descriptions to decorate furniture or as additional income.
Skeptics may say that with the advent of the laser, this type of creativity is outdated. Yes, indeed, the developers of industrial lasers have made this task much easier by performing large volumes of thread quickly. But this is for an industrial scale, maybe a suitable option, and if you want to have an item in which the soul of a master, a real artist, is invested, then you will still get a unique thing, created in a single copy.
And besides, artistic sawing with a jigsaw according to drawings, drawings and descriptions will definitely captivate you, you only need to try it once.
Necessary materials
For such fine and accurate work, you need a good jigsaw. If you decide to speed up the process and use a jigsaw, then be prepared for the fact that he can cope with radii up to 2.5 cm. Small details will have to be completed with a hand tool. The saw must be fixed firmly so that there is no vibration, which will lead to uneven cuts.

It is better to do artistic sawing with a jigsaw according to drawings, drawings and descriptions on plywood from 3 mm to 5 mm. This is the best option. It will not bend during operation. It is better not to spare money and purchase good quality plywood, so as not to subsequently have problems with chips or knots found on it.

Think in advance how you will cover the product - with varnish or paint. You will also need sandpaper (large and small).
Beginning of work
Having prepared the necessary materials, you need to find or draw a drawing on paper yourself. A vector image will do. For the first time, try something simple with a little twist.
Then a large sandpaper is taken and the material is well processed. For convenience, use a wooden block. After removing the dust with a dry cloth, treat the surface again, but with fine sandpaper.
Then they transfer the drawing to plywood with a simple pencil. A sheet of paper can be attached with buttons or tape so that it does not move. Then the paper is removed. If necessary, correct the contours by eye.

To start artistic sawing with a jigsaw from plywood according to drawings, drawings and descriptions, you need to drill a hole for the file. Then carefully guide along the contours. Plywood must be well fixed.
Samples of artistic sawing with a jigsaw
Vector drawings, pictures and descriptions can be printed on a printer. If the diagram is large and divided into several A-4 sheets, then make sure that the scale is the same, then the individual details of the pattern will be comparable without drawing deformations.

If you like this kind of art, then your house will change beyond recognition over time. After all, with the help of a jigsaw, you can beautifully decorate the doors of cabinets, make carved shelves. And how original will look like a carved tabletop covered with glass! In private houses, craftsmen decorate shutters, window frames, roof ridges, gates, etc. And how happy your daughter will be if you make toy furniture or a whole castle for her! The list is endless, because there is no limit to human imagination.