High-quality ventilation in the bathroom and toilet. Options for the modernization and installation of ventilation systems in the bathroom Options for ventilation in the bathroom and toilet
In the bathroom and toilet, condensation forms more strongly than in other rooms, and unpleasant odors appear. Therefore, the arrangement of proper ventilation is essential here. A high-quality hood contributes to the normalization of the indoor microclimate, ensures its compliance with sanitary and hygienic standards and requirements.
Ventilation in the bathroom and toilet avoids the appearance of dampness and fungus. This contributes to the normal well-being of people living in the house. Finishing, plumbing, furniture, which is located in such premises, will last much longer. All work can be done independently. To do this, you need to familiarize yourself with the existing rules for creating ventilation in the toilet and bathroom.
Ventilation Requirements
Proper ventilation in the bathroom and toilet is one of the important factors that allow you to fully exploit the premises. It is as important as heating, lighting and water supply. The quality of the equipped ventilation depends on the compliance of the oxygen environment inside the dwelling with the existing requirements.
The bathroom and toilet are enclosed, poorly ventilated areas. Here there is an increased probability of reproduction of pathogenic bacteria and fungi. SNiP establishes air exchange indicators. Its intensity per hour should be 25 m³ for the bathroom. The air flow per hour for a combined bathroom should be 50 m³.
To check the operation of the hood, you need to bring a burning match to the ventilation grill. If the flame is not drawn in by the channel, then the ventilation in the bathroom and toilet is not functioning. In old-style multi-storey buildings, such a picture is observed due to clogging of the channel. If a similar problem is detected in a new house, then the system was designed incorrectly.
The best solution to the problem would be the arrangement of a new forced ventilation. Such a system has many advantages over passive exhaust. It is able to quickly solve the problem of dampness and the appearance of fungus, an unpleasant odor in such rooms.
Air exchange type
Ventilation in the bathroom and toilet, which options are offered to property owners today, can be natural and artificial. In ordinary multi-storey buildings built in the last century, the first type of system is used. From windows and doors, fresh air in this case enters the room. Then it exits through the ventilation ducts.

The movement of air masses during natural ventilation is achieved due to the pressure difference between indoors and outdoors. In modern apartments, windows and doors are characterized by high levels of tightness. This disrupts the natural circulation of air in the room. Therefore, when purchasing new plastic windows and sealed doors, it is necessary to provide for the presence of ventilation devices in them.
Forced or artificial ventilation requires special equipment. It is built into the air exchange system. There are a large number of different fans for forced ventilation. They relieve pressure inside the bathroom and toilet. Air is pulled out. This process leads to the flow of oxygen into these rooms from other rooms.
The arrangement of forced exhaust in the bathroom can solve the problem of inefficient natural ventilation. It requires more time and cost during installation. Over time, the effort spent is fully compensated. All interior items and decoration in such rooms last much longer than with a natural type of air exchange. Human health will not be threatened by various pathogenic microorganisms. Therefore, forced extraction is preferable today.
Types of ventilation
Sanitation and building codes state that forced ventilation in the bathroom and toilet is preferable. However, it should be noted that there are several other features by which such systems are distinguished.
According to the purpose, supply, exhaust and mixed ventilation are distinguished. In the first case, additional equipment provides fresh air into the room. This creates excess pressure. It forces the old air masses to leave the room through the outlet ventilation ducts.

The exhaust type of the system provides for the presence of a fan directly on the channel shaft. In some cases, a combined method is used. It assumes both types of arrangement of systems.
Ventilation also differs in design. There is a channel and channelless hood. The second option involves the movement of air masses through equipped holes in the walls between rooms. For example, it can be the ventilation of the bathroom through the toilet or vice versa. In one of these rooms there is an exit to the exhaust shaft common throughout the house. Air from the second room first enters the first room through a hole in the wall, and after that the mixed masses leave the apartment through the channel.
However, duct ventilation is more efficient. It involves bringing the exhaust shaft directly to rooms with high humidity. This ensures complete air exchange in the bathroom.
Fan type
Forced ventilation in the bathroom and toilet involves the use of additional equipment. It may vary in installation method and design. Fans provide sufficient air exchange rate for combined and separate bathrooms.
According to the installation method, equipment of radial and channel type is distinguished. In the first case, the fan is mounted at the shaft outlet. Its body has an aesthetic body. Channel varieties are installed directly in the mine itself.

According to the type of design, a diametrical, axial, centrifugal and centrifugal-axial fan is distinguished. In the first version, the product has a drum-type impeller. This design has a low efficiency. An axial fan pumps air through the blades. Such equipment is applicable for ductless ventilation.
The centrifugal fan has a spiral housing. This is the most productive, but also the noisiest equipment. The centrifugal axial fan has the highest performance. It is compact, efficient and has a low noise level. Today, equipment has appeared on sale in which humidity sensors are built in, a timer. This allows you to ventilate the room as efficiently as possible.
ventilation duct
There are certain requirements on how to make (ventilation in the bathroom and toilet with your own hands must be done with high accuracy) the right system. They must be considered before starting work.
The ventilation duct in a private house works simply. It is attached to special equipment or is displayed on the roof. This is an easy job. The creation of the project must be completed at the stage of preparation for the construction of the building.

The highest quality ventilation is obtained in houses made of natural wood. This is due to the ability of the material to "breathe". In this case, it will be enough to equip natural ventilation. The construction of logs and timber is considered not only beautiful, but also practical.
Owners of apartments in multi-storey buildings need to devote more time and attention to the arrangement of ventilation. All apartments in the entrance communicate with a common shaft, through which the air leaves the house to the street. If, for example, a bath and a toilet are one room (there is no forced ventilation), according to the norms of SNiP, air exchange per hour in the amount of 50 m³ is required. The higher the apartment is in the house, the more likely it is that this indicator will meet the established level.
Over time, the channels in apartment buildings become clogged. If they have not been cleaned for a long time, air exchange during natural ventilation is difficult. The lower the apartment is in the house, the worse the hood is. In this case, the installation of forced ventilation is simply necessary.
Fan power
To understand how to make (ventilation in the bathroom and forced-type toilet - one of the possible options in this case) an exhaust hood in the bathroom, you should consider the basic requirements for creating such a system. In this case, it is planned to install an electric small-sized fan. This device must be secure. It should not fail if steam or water enters the structural elements. You should also pay attention to the noise level of the fan. He should not annoy the owners of the house.
Particular attention is paid to the choice of equipment power. This indicator is influenced by the dimensions of the bathroom and the number of people permanently residing in the house. For calculations, it is necessary to calculate the area of \u200b\u200bthe bathroom and toilet. Further, the result is multiplied by 6 if the number of users does not exceed 3 people. If there are 4 or more people in the family, then the dimensions of the bathroom are multiplied by 8. The result obtained will be the optimal fan power.
Fan installation rules
Do-it-yourself ventilation in the bathroom and toilet requires the correct installation of all elements of the system. There are several requirements for the location of equipment in the room.

The ventilation duct should be at the maximum height, preferably under the ceiling. It should also be located as far as possible from the source of air inflow in the bathroom. If this requirement is not met, only part of the room will be ventilated.
For forced ventilation, it is important to install the fan away from the water source. This will prevent accidental splashes.
If there is no ventilation in the room, and the exhaust duct is located in an adjacent room, it will be necessary to provide for the installation of additional ducts and pipelines. There are rigid plastic and movable corrugated structures.
Mounting methods
Most often, ventilation in the bathroom and toilet does not require the construction of additional air ducts. It is enough to install the selected fan at the entrance to the mine. In this case, the common exhaust duct should be located immediately behind the wall of the bathroom or shared bathroom.
It happens that the ventilation duct shaft is located behind the wall in the toilet. If it is separated from the bathroom by a partition, a hole can be made through it. Ventilation grilles are installed on both sides of the wall. This will be quite enough to create the required air exchange.
If there is access to the shaft both in the toilet and in the bathroom, separate ventilation should be made for each room.

One of the most effective approaches is the installation of gratings with slots at the entrance to the mine for the installation of forced ventilation equipment. In this case, the natural and intensive systems are combined.
Preparing for installation
At the renovation planning stage, a project is created in which ventilation in the bathroom and toilet is thought out. The advice of experienced builders will allow you to prepare and install correctly. Planning will allow you to hide the wires under the walls, calculate the required characteristics of the equipment, as well as the location of all elements of the system.
If ventilation is created in a multi-storey apartment building, you should be responsible for cleaning the mine channel. If the property owners live on the upper floors, you can do this work yourself. On the roof is the exit of the exhaust shaft. You need to lower the weight into it. If the owners of the apartment live on the lower floors, it will not be possible to do without the help of representatives of the Housing Office or special services.
In a private house, it will be easier to clean the ventilation duct. Over time, dirt, cobwebs, debris from the roof, etc. also accumulate here. Having acquired all the necessary elements of the system, you can proceed with the installation.
Fan mounting
Do-it-yourself ventilation in the bathroom and toilet is easy to install. First, an electrical wire is connected to the equipment of the forced type of the system. It is selected in accordance with the selected fan power. Also, such conductors must have a high insulation class.
The fan is installed in a place prepared for it. It is attached with self-tapping screws. The grid is also installed using a special fastening material. This will eventually unscrew the grate and clean it from contamination.
If an additional ventilation duct is being arranged inside the room, it is possible to sew up the pipes under the ceiling with drywall. So the appearance of the room will be aesthetic.
Having considered what ventilation is in the bathroom and toilet, as well as the rules for its installation, each owner of an apartment or a private house will be able to create a complete system in the bathroom on their own.
A bathroom in an apartment or house is always a “wet place”. Even if you don't make puddles on the floor. Cold and hot water, steam, wet towels - everything evaporates moisture. And it's hot in the bathroom and you get a greenhouse effect.
Excess dampness and heat, ideally, should "leave" in the ventilation, but as you know, its efficiency in urban homes is far from the norm. Moreover, both in the old fund and in new buildings. The reason is that the ventilation is of a natural type everywhere, that is, without additional exhaust.
It is in America that there are huge fans on high-rise buildings, and in our country the air is removed by gravity due to the difference in pressure and temperature. As a result, it moves moderately, or even barely at all, if the houses are old and the canals are clogged.
And our “wet place”, the bathroom, is slowly acquiring all sorts of useless flora and fauna in the form of fungus, mold and even wood lice. To get rid of such a neighborhood or stop it in advance, you need to put an exhaust fan in the bathroom. He will pull all the dampness where it should be, and attack in the form of useless settlers will happily pass you by.
How to choose a bathroom and toilet fan
Everything seems to be simple, we decided that we need a fan, we go to the store and buy it. But soon only cats will be born. The store is waiting for a big surprise from a bunch of types and models. Where there are several tens, and where a couple of hundred will be typed. And you will “hover” over the question, “what kind of fan to put in the bathroom?”.
No wonder. Different types, power, models, installation methods, characteristics - the devil will break his leg in this variety of technical progress in the field of ventilation. Sellers and those understand with difficulty, if the range is huge.
That's why we've put together a "Guide to Bathroom Fans". To facilitate your task and help you quickly buy the right equipment. And first, let's deal with the general characteristics of bathroom fans
So let's go!
1. Axial, centrifugal - what does it mean
This is the kind or type of fan. He talks about the design of the equipment and how it works.
Axial fan- this is a paddle impeller in the body. The impeller turns the motor, on the rotor of which it is mounted. The blades are inclined inward relative to the placement plane, they draw in air well and move it along a straight axis. Therefore, this type is called an axial fan. It differs in good performance, it makes moderate noise, and, most often, it is taken for installation in the bathroom.
Centrifugal fan arranged differently. The air is sucked in by a turbine with blades. Inside the housing, the flow is twisted into a spiral and receives additional acceleration due to centrifugal force. The flow comes out not along a straight axis, but at an angle of 90 degrees into a special device - a snail. A centrifugal fan is also called a radial fan.
It has a lower performance compared to the axial one, but it can “drive the flow” under pressure of different strengths. The noise level is low or medium, depending on the direction of the bend of the rotor blades. With the front bend, it makes less noise, with the back - stronger, but it saves energy.
2. Overhead or channel
Ventilation equipment is for outdoor installation and for indoor. The outdoor type of installation is fastening to a wall or ceiling to the exit of a ventilation hole into a shaft or into a pipe system. A duct fan is a built-in equipment that is placed inside a ventilation duct (duct). Ventilation duct systems are constructed from metal or plastic. For the bathroom, plastic channel systems are more often used, for example, Vents companies.
Often the exit to the ventilation shaft is located in the toilet. To extract from the bathroom, they put an air duct with an intake grate. The ventilation sleeve is pulled up to the mine window. A duct fan with an additional grill is installed in the toilet. The hood simultaneously takes air from the entire bathroom and sends it to the ventilation shaft of the house. By design, external and duct fans are made both axial and centrifugal.
3. Choosing a fan in the bathroom by power
The power level or fan performance is one of the main characteristics. In fact, the hood is chosen according to it, paired with the design (axial / centrifugal). Performance "says" how many cubic meters of air the fan pumps per hour - 100, 200, 300.
To choose the right power, you need to calculate the volume of the bathroom and multiply it by 8. "Eight" indicates the sanitary requirement for the frequency of air changes in the room per hour. To put it simply, the fan has to pump through the volume of your eight bathrooms. Then there will be purity, beauty and no mold.
Example! For an urban standard bathroom with dimensions of 1.7x1.5x2.5m with an exchange rate of 8, productivity is needed from 51 cubic meters per hour. Axial fans are produced with a capacity of 80 cubic meters. Such a hood will cope with the task even with a margin. The centrifugal model usually "drives" from 42 to 100 cubic meters per hour.
4. Choosing a fan in the bathroom according to the noise level
It is clear that the hoods are noisy, but not very much. If you want a completely quiet one, take an axial model from the Silent line. In their design, the engine is mounted on silent blocks that “extinguish” noise and vibration. Among the "quiet" you can choose a model with a noise level of even 22 dB.
Centrifugal ones work louder because the turbine pumps air under pressure. But they also make moderate noise, approximately like a cooler in a computer. It does not prevent you from watching movies, listening to music or playing games. So the fan will be just a background if you are in the bathroom when it is turned on.
Attention! Noise is a secondary characteristic. The most important thing is that the hood “drives” the required amount of air for a good microclimate and fits the ventilation design.
5. Which bathroom or toilet fan is better - reviews on additional features
Modern technology can do a lot, and fans are produced with various additional functions. Their list includes:
- Additional sensors. They measure humidity or react to movement.
- Sleep timer. It sets the turn-off delay time, minimum 2 minutes - maximum 30.
- Light indicator. Lights up while the fan is running.
- Lanyard switch. You can turn the hood on and off at the right time. For example, when you take a shower or bath. That is, when the light in the bathroom comes on, the fan does not start automatically.
- Automatic blinds. They are used to close the ventilation grill after the duct fan is turned off.
- Check valve. Its main task is to prevent the penetration of foreign odors from the ventilation shaft.
According to the feedback of our customers, most often they take models with humidity sensors and a shutdown timer. The check valve, which blocks the flow of air from the shaft or duct back to the fan, has already become part of the design. Very rarely it is sold separately and is considered an additional option.
6. Degree of moisture protection
All bathroom fans have increased moisture protection within 4-5, dust protection can be either zero or 3-4. The equipment passport will indicate IP X4, 34, 44, 45.
We figured out the characteristics, now let's talk about the range.
Fans for the bathroom and toilet in the website catalog
Our store offers well-known and popular brands of domestic bathroom fans:
| Soler & Palau | Blauberg | Fresh | Era | Vents | MMotors JSC |
Let's divide them into groups and get to know each other better.
1. For a city bathroom or a bathroom with a standard area, the most popular type of exhaust fan is a model with a capacity of up to 100 m3 / h
The catalog contains:
Mounted axial fans
Soler & Palau
| SILENT-100 CZ SILVER DESIGN-3C | SILENT-100 CZ GOLD | SILENT-100 CHZ | SILENT-100CMZ |
| ECOAIR DESIGN 100H (with humidity sensor) | ECOAIR DESIGN 100M (with lace) | ECOAIR DESIGN 100S (base model) | EDM 80L |
| SILENT-100 CZ | |||
Power 65-95 m3, noise 26.5-33 dB, in the basic Silent model there is a check valve and quiet running bearings (CZ), in other models, optionally, a timer (R), a humidity sensor (H), a pull cord switch (M) can be added ). |
|||
Blauberg
MMotors JSC
Power 60 cubic meters, noise level 25 dB, ultra-thin models with a thickness of 4 cm.
Inline axial fans
For installation in a round duct, channel models are taken. From low-power we offer Bulgarian MMotors JSC
| B.O.90 | BO90T |
Power 50 m3, noise level 36 dB, operating temperature +100-150°С.
Centrifugal fans
Due to the design and the creation of additional traction, such hoods, even at low power, are more efficient than axial ones. They are more expensive, so they are taken less often. Although the "usefulness" of a centrifugal fan quickly pays for its cost.
The main operating mode is minimum speed and minimum power consumption. The hood perfectly “pulls” for a long time in the background, for “duty” cleaning. When the humidity rises, the maximum mode is activated and the air in the bathroom is quickly replaced.
From centrifugal fans we offer the company Era
| SOLO 4C era |
Three-speed, capacity 42/64/100 m3, noise level 25.8-30 dB, equipped with a check valve and a filter. Suitable for wall/ceiling mounting and air vent mounting.
2. In new houses, with large apartments, townhouses and cottages, bathrooms are more spacious and they are cleaned with exhaust hoods with a capacity of 100 to 400 m3 per hour
Models in the site catalog are:
Axial fans for wall or ceiling
Blauberg
| Aero Chrome 100 | Aero Still Vintage 125 | Aero Still Vintage 150 | Aero Still 125 |
| Aero Still 150 | Deco 100 (ceiling) |
Power 102, 154, 254m3, noise level 31-33-38dB, all models have a check valve, additional options are marked with letters, T - with a timer, ST - with a cord and a timer. Ceiling power from 105 cubic meters, noise 37 dB.
Soler & Polau
Productivity 175, 180, 280, 320m3, noise level in the SILENT series 35-36db, in other models 42-47db.
Productivity 140-183, 250-290m3, noise level 30-33, 36-38dB.
Productivity 110-132m3, noise 17-22dB. Fans of new generation. Equipped with a smart control system, speed switching mode, sensors. They can work automatically according to the built-in program or run in the selected mode via a smartphone or computer.
Duct hoods
Blauberg
| Tubo 100 | Tubo 125 | Tubo 150 | Turbo 100 |
| power 137, 245, 361 m3, noise level 38-39-40dB. | two-speed, power 170/220 m3 per hour, noise level - 27/32 dB, wall or ceiling mounting. | ||
Soler & Palau
intelligent, maximum power 106 m3, in quiet mode - 72. noise level 31dB (22 in quiet). Basic humidity control, timer, speed control additionally - work on a motion sensor. Suitable for non-stop ventilation up to 40 m3/h.
Exhaust fan in the bathroom - the best option
If we talk about the choice and answer the question, “which exhaust fan in the bathroom is better?” then there are several optimal options:
- for a regular bathroom with a separate vent;
- for general ventilation of the bathroom;
- for large bathrooms.
The bathroom has direct access to the shaft
The best option is a wall-mounted axial fan with a capacity of up to 100 cubic meters per hour. Take Blauberg or Soler & Palau. In most models there is a check valve, it will protect against the reverse flow of air from the mine when the hood is turned off. And during operation, it will quickly clean the air and do it very quietly (the sound background is within 25-33dB).
Models with a classic design from Blauberg
German hoods are quite a budget option, Spanish ones are both budget and expensive. Although their "high cost" is very conditional. You take equipment that will work for a dozen years, or even more. So, let's divide the price by the life of the fan, and we get the cost as for 10 lunches in a cafe, even for a hood for 6300 rubles.
If the apartment is rented, or you just bought it in an old fund and for now you plan to do without a major overhaul, take an inexpensive fan from Era:
| FAVORITE 4 | OPTIMA 4 |
The price is in the range of 400-500 rubles, they pull perfectly, of course they make a louder noise than imported ones, but they will work like clockwork for their 2-3 years.
General ventilation in the bathroom
If the exit to the shaft is in the toilet, an air duct and a duct fan must be installed to extract from the bathroom. The best option would be
| Tubo 100 by Blauberg | Silentub 100 by Soler&Palau | Silentub 200 by Soler&Palau |
They quickly clean the bathroom from moisture and steam. The air intake from the bathroom and toilet will go through the ceiling grids.
If you want to separate ventilation:
- Install a Deco 100 ceiling fan in the bathroom. Its performance is higher (105m3) than calculated for a standard bathroom (51m3), but it should be so. The hood will have to “drive” air through pipes with a bend, so you need a power reserve for fast air exchange.
- In pairs and for separate ventilation of the toilet, install a duct fan. The Vents iFan D100/125 model will be optimal. It can operate in turbo mode with a capacity of 106 m3 and 72 cubic meters. In addition, there is a mode for constant ventilation, at a minimum power of up to 40 cubic meters per hour.
| Deco 100 | Vents iFan D100/125 |
Ventilation for a large bathroom
If the bathroom is large, choose a powerful fan. The best options would be:
Axial outer
| Aero Still Vintage 125 | INTELLIVENT White | SILENT-300 CHZ |
ducted
| Tubo 100 | TDM100 | PRO 4 | iFan D100/125 |
Centrifugal
| SOLO 4C |
Take outdoor and duct axial fans with a power reserve, as they clean the air faster both directly into the exhaust shaft and through the sleeve. Centrifugal creates increased pressure and a large margin of performance is not needed.
To install a hood in the bathroom, you will have to perform three stages of work.
1. Lay the cable from the switch
A three-core cable is needed, for example, VVG 3X1.5 mm2. It is best to “throw” it in the corrugation under the tiles and in the wall if the bathroom is not yet finished. If the bathroom is finished, then we lay the cable in the corrugation along the main ceiling, you can additionally take the cable channel. We will hide all this “good” behind a suspended or stretch ceiling, after installing and connecting the hood.
2. Fix the fan
When the cable is laid, you need to install the fan in place. The outer one is fixed over the wall, the duct is inside the ventilation hole. Please note that the standard hole width is 10 cm, just for inserting fans with a size marking of 100 mm (diameter of the flange or the device itself). Such a clearance is designed for the passage of air with a volume of up to 100 cubic meters per hour. The power of the hoods connected to the hundredth pipe “fits” into this requirement or slightly exceeds it by 10-15 m3.
Fans with higher performance are connected to air ducts with a diameter of 125 mm or 150-160 mm, and the hole will have to be expanded. Otherwise, the hood or flange simply will not fit into the gap.
Information to think about! Is it possible to put an adapter from the diameter "larger to smaller" for an outdoor fan? You can, but you don't need to. You will get a decent gap between the hood body and the wall. The gap will prevent the fan from being properly fixed. In addition, the back panel, which does not press against the wall, will accumulate moisture and dust. And by "cutting" the width of the gap, you "cut" the bandwidth of the channel. The ratio "channel diameter - fan performance" was not chosen by chance. Your unfortunate hood will try to shove 150-200 cubic meters where only a hundred "crawl through".
Installing a fan in the bathroom - installation methods
The hood can be installed in different ways. Attach the invoice to the wall with self-tapping screws or glue it, insert the channel directly into the hole and fix it or first install the pipe in the gap, and “fix” the fan already in it.
To install an overhead hood, remove the front panel, which is fastened with a screw at the end or with plastic latches. To install on self-tapping screws, mark the holes on the wall with a pencil, then drill and insert dowels. Attach the fan and tighten the screws.
For fastening with glue or liquid nails, apply it along the edge of the case on the fan and on the wall. In order not to miss on the wall, circle the hood around the contour and coat with glue inside the rectangle, slightly stepping back from the edge. Press and fix with masking (mounting) tape so that the glue grabs.
Note! We do not recommend using regular tape because it can leave marks on the wall and the fan itself.
Bring the power cable before fastening to the outside through a special hole. If it is located inconveniently, you can drill your own, in the right place. The front panel is put in place after connecting the power cable.
To install a duct hood, use a piece of duct of equal diameter, into which a fan with a ledge is placed. The hood housing “fits” tightly in the round channel and is fixed without additional fasteners.

If the body is without protrusions, then it is fixed in the pipe with self-tapping screws through special grooves. For such fans, it is more convenient to first insert the hood into a piece of duct, fix it, pull out the cable, and then install the entire assembly into the vent and fix it with mounting foam.
For case-mounted models, the insert is not required. The fan is simply screwed to the hole wall.

3. Connect the fan in the bathroom to the switch
Connecting power to the hood is the most important step. A damp room requires mandatory laying of a cable with grounding. Therefore, use a three-core VVG for one and a half squares (3x1.5 mm2), as for lighting in the bathroom. The electrical power of the fans is not high, usually within 14 watts, and a cross section of 1.5 squares is enough to operate the hood without overheating the cable.
A ground wire is required to divide the working zero on the N bus and the ground zero on the PE. Even if you have an apartment in an old house and there is no ground loop, a PE bus is installed in the shield to connect the "ground". This increases the safety of your electrical wiring and protects against the trouble of electric shock.
How to connect a fan in the bathroom, choose for yourself. If you want to ventilate longer, put the switch on two keys and separate lighting and ventilation.
The connection diagram through a two-gang switch will look like this:

The one-button switch scheme is suitable for infrequent use of the bathroom, for example, in a one-room apartment with one occupant. The hood turns on with the light and turns off in the same way. For additional ventilation, you will have to leave the light burning. It won't generate many kilowatt-hours because of this, unless you fall asleep. But even there, the "lion's share" will be behind the fan, and not the light bulbs in the bathroom.
The connection diagram with a single-gang switch looks like this:

Both schemes are suitable for hoods without additional functions.
Connecting a fan with a timer and other sensors
We will tell you in more detail how to connect a fan with a timer and other sensors to the switch in the bathroom. The main difference in the circuit is that the timer has a separate power supply to start the hood on the signal of a triggered humidity sensor, movement, or the signal of the timer itself in models with a delayed start. Simply put, separate phase / neutral wires go to the fan to the motor and to the timer. The motor circuit is connected to the fan switch button, and the timer circuit is connected to the light switch, and "activates" as soon as the lights in the bathroom come on. If a two-button switch is used. You can turn on such a hood yourself with a button or it will work automatically from the built-in timer.

If the switch is common, then the circuit will be different. When the light is turned on, only the exhaust timer will receive power, and when it works, the fan motor circuit will be closed.

In models without a timer with a humidity sensor, the power is "started" on it.
As you can see, the connection diagrams are quite simple, but do not forget about the installation rules - we connect the wires at the terminals, without twists and protruding ends. We make connections in a junction box or recessed sockets. We put the front panel and insect net in the overhead fans in place correctly, without distortions.
Summing up
What if the "guide" helped, but there were doubts? Contact us!
Anton Tsugunov
Reading time: 4 minutes
Ventilation plays a huge role in creating a favorable microclimate in the apartment. Its incorrect design or malfunction can lead to very unpleasant consequences: the appearance of condensation, the spread of unpleasant odors, the formation of fungus or mold. This is especially true for rooms with excessive humidity. Therefore, ventilation in the bathroom and toilet requires special attention.
Types of ventilation
By its nature, ventilation can be natural or forced.
In the vast majority of old apartment buildings, it was planned to install natural ventilation at the design stage. In this case, the movement of air around the apartment is carried out only due to pressure drops in the room and outside it. Taking into account these factors, the dimensions of the exhaust vents and air ducts and their configuration were calculated. But such ventilation in the toilet and bathroom does not always cope with the task assigned to it. And the point here is not always in the wrong calculations of designers.
The fact is that for good circulation, a constant supply of fresh air is necessary. In the Soviet period, it was carried out due to the shortcomings of the materials used at that time: through cracks in wooden window frames, walls, and doors that did not close tightly. Improving their homes, people gradually eliminated these sources of fresh air. Thermal insulation of walls, installation of seals on doors, replacement of windows with plastic double-glazed windows - all this reduced air exchange with the environment to a minimum. Therefore, more and more often resort to the installation of forced ventilation, especially in the bathroom and toilet.
The operation of this type of ventilation is based on the use of fans to circulate air. It has become practically the norm in the construction of private houses, but even in apartments it is being used more and more often. Mechanical ventilation allows you to provide the necessary microclimate in the room without changing the parameters of existing air ducts.
With all the shortcomings, natural ventilation has one big plus: it always works. If, for example, there is a power outage for a long period, then this will not affect the operation of the system. The effectiveness of forced ventilation in this case will decrease very significantly.
What type of ventilation to choose for an apartment?
According to the principle of operation, the air exchange system can be divided into the following types:
- Exhaust ventilation is the most commonly used scheme. The air flow occurs naturally, and the fan captures and removes warm air from the apartment rising to the ceiling through the ventilation duct. It is this option that is most suitable for enhancing natural ventilation in cases where it does not cope with its task.
- - air is forced into the apartment, and its exhaust occurs only due to the pressure drop in the room and on the street.
- Supply and exhaust - fans provide both air supply and its exhaust from the room. Quite an expensive option, in the conditions of city apartments it is used extremely rarely. Its scope is premises with a large area, such as country cottages.
How to check and improve natural ventilation?
Before embarking on fundamental changes, you must first check the ventilation in the bathroom and toilet. It is possible that their work can be improved without resorting to major alterations. How to do it?
A piece of plain paper must be brought to the ventilation grill. With proper ventilation, it should stick to the grate, especially if you open the door to the bathroom. If he fell, then the air exchange system obviously can not cope.
On the Internet you can find a description of the method of checking with a burning match or candle. They work, but there is always the possibility of unpleasant surprises when using them. No one knows what gases can get into the common air duct of the house from neighboring apartments. The probability of their explosion or ignition is small, but it is. In addition, if you do not follow the flame a little, the debris present there, for example, cobwebs, can ignite. So the paper way is much safer.
How to try to improve the regular ventilation?
- The problem could be a clogged air line. It is not recommended for residents of apartment buildings to clean the ventilation duct on their own; it is better to call a specialist from a service company. But it happens that a simple cleaning of the ventilation grill helps.
- It is necessary to ensure the flow of air into the apartment. Special air intakes are installed on plastic windows, in some models they are present “by default”. There are ventilation devices that are mounted in the walls. They are recommended to be placed under the windows, not far from the heating radiators. So they will be less noticeable, besides, the air entering the apartment will immediately heat up.
- In the apartment itself, there should also be no obstacles for air circulation. It is for this that a gap of 1–2 cm is left between the door and the floor surface. If it is impossible to make it in the bathroom or toilet for some reason, then ventilation grills installed at the bottom of the door will come to the rescue. Some models of grates even have sound-absorbing valves, and proper ventilation will prevent the spread of smell from the toilet.
If all these measures did not lead to the expected result, then you will have to install a fan and force circulation.
What should I pay attention to when choosing a fan?
By design, fans are divided into axial and radial, according to the installation site - into duct and wall. In apartment buildings, it is most convenient to use axial overhead fans. The main part of this device is placed in the air duct channel, and only the air intake grille remains on the wall surface. Mounting holes are also located in it, which is quite convenient when mounting the fan.
There are several important points that you should definitely pay attention to when buying a forced ventilation device:
- The fan will operate in a room with high humidity, so it must have a certain degree of protection against moisture penetration. On the case of the device there is a mark showing the level of such protection. You should choose a fan with a marking of at least IP 44.
- Noise of the device should not exceed 35 dB. Usually this parameter is indicated in the technical data sheet. It should be noted that it is better to choose the fan power with a margin: when operating at maximum speed, not only the noise level increases, but also the service life of the device is significantly reduced.
- The power of the forced ventilation device can be calculated by knowing the air flow into the room. Such calculations are quite complicated, but they can be omitted: the vast majority of bathrooms require a fan with a capacity of at least 100 m3 per hour.
- Additional devices. You can start forced air circulation manually through a fan or automate the process. The easiest way - the device turns on simultaneously with the inclusion of lighting. But in this case, the ventilation system will not have time to remove steam from the bathroom. More expensive, but also more convenient options - regulating the shutdown delay, or humidity sensors.
HELPFUL INFORMATION: Installing a siphon on a bath (video): how to properly assemble a bath siphon
Forced ventilation installation
The order of work for the forced ventilation device will be as follows:
- Installation of ventilation in the bathroom begins with the installation of electrical wiring. Due to the high humidity in the room, you will have to clean it in a strobe. Another option is to remove it behind a suspended ceiling made of moisture-resistant materials. But even in this case, it is enclosed in a cable channel.
- Before installing the fan, the air duct should be cleaned, if possible, of debris and dust accumulated there.
- The grid is removed from the overhead axial fan, after which the device is attached to the wall. For this, dowel-nails, self-tapping screws or other types of fasteners can be used, depending on the surface material. The mount must be reliable, it will have to withstand considerable vibration loads.

The bathroom and toilet are rooms in the process of arranging which, first of all, you need to think about organizing intensive air exchange. This is due to the specifics of the operation of hygienic premises. Polluted and waterlogged air should be freely removed, and a fresh portion should be supplied to replace it.
We will tell you how ventilation should be arranged in the bathroom and toilet according to building codes and regulations. In the article presented by us, options for organizing ventilation that have been proven in practice are analyzed in detail. Independent home masters will find detailed installation manuals with us.
The opinion that the absence of a ventilation shaft in the bathroom and toilet will only lead to fogging of the mirrors is fundamentally wrong. The main problem is the appearance of fungus (most often it can be seen on the seams between the tiles) and rust on the surface of appliances and furniture.
Often, it is precisely because of an improperly designed ventilation system that corrosion affects the working parts of the washing machine, which is the reason for its breakdown. The list of problems that the lack of intensive air exchange leads to does not end there. As a result, poor ventilation will have a detrimental effect on the health of residents.
Sanitary requirements and norms
There are special rules that must be followed when organizing forced air exchange in rooms with high humidity levels. At a minimum, it is necessary to provide an influx of fresh air in the amount of 6-7 m 3 / hour for each cubic meter of the bathroom and about 8-10 m 3 / hour for a toilet or a combined bathroom.
The difference between natural ventilation and forced ventilation
There is natural and forced ventilation. In the first case, air exchange is provided by the circulation of air masses through door and window openings. About a century ago, natural ventilation was considered the most efficient way.
Today, it is unable to provide a sufficient level of air exchange, therefore it is used only for inflow. To fully ventilate the room, choose the option with coercion. After all, no one wants to open the window for a long time in winter and let out heat.
The organization of forced ventilation involves the installation of an exhaust fan. Thanks to this, you can save precious heat, remove excess moisture and fill the room with fresh and clean air in a matter of minutes.

The main reason why it is worth installing forced ventilation is precisely sized doorways and the tightness of modern double-glazed windows. Such perfectionism, keeping warm, makes it impossible for any natural air exchange.
Calculation of optimal performance
Before going to the store and buying equipment for installing forced ventilation in the toilet and bathroom, you need to make some calculations. To select the equipment that is optimal in terms of performance, you need to know the exact volume and type of room.
Each room has its own air exchange rate. This characteristic shows how many times the air in the room should be completely updated per unit of time (usually one hour is taken). Since the bathroom and toilet are considered one of the wettest places in any apartment or house, a maximum air exchange rate of 10 is recommended.

If the fan cannot be placed in an optimal place for organizing intensive air exchange, then its power must be multiplied by 2-3 times
And also should immediately provide holes for air flow. To do this, you can leave a gap of up to 2 cm between the floor and the door, install special gratings at the bottom of the doors to the bathroom and toilet, or drill holes yourself. But the last option does not look the most attractive way.
Exhaust fan classification
When planning the arrangement of the ventilation system, special attention should be paid to the principle of its operation and individual components. After all, the performance, the noise level of the equipment, the cost of installation and durability depend on it.
For forced evacuation of exhaust air from the room, three types of fans are used:
- diametric;
- axial;
- radial.
The first type of devices is designed to work in heat guns and air conditioning systems. Therefore, it is not suitable for organizing ventilation in the bathroom and toilet. It remains to choose from two other types.
The main difference between axial models and radial ones is their low cost and high power. But at the same time, the device will make quite a lot of noise. An axial fan is an impeller to which the blades are attached. The system is driven by an electric motor.
As for radial units, their functioning is based on the action of centrifugal force. Due to the rotation of the impeller, together with the blades, the movement of air masses is carried out.
At the same time, the inclination of the blades can be changed, thereby reducing the amount of energy consumed by the device and the level of noise emitted by it. The article recommended by us will acquaint you with popular models intended for installation in bathrooms.

To prevent the air from the ventilation shaft from returning back into the room, it is recommended to buy devices with a check valve. Such devices are indispensable in modern apartments.
The main criteria for choosing equipment
Manufacturers offer just a huge range. Therefore, it is not surprising that every unprepared buyer falls into a stupor and does not even suspect that it is better for him to order.
When buying an exhaust device for a bathroom and toilet, you need to pay attention to the following points:
- Duct diameter. Depending on this characteristic, the fan nozzle is selected. As a rule, standard models have a diameter of 150, 125 or 100 mm.
- Presence/absence of air ducts, as well as their location in the room. These criteria affect where the fan will be installed.
- Power. The characteristic is important when choosing, so that in the future the exhaust equipment can cope with the functions assigned to it.
- Moisture protection available. This indicator is marked in Latin letters IP. The minimum required value for a plumbing unit is IP30, but it is better to invest a little and order a device with IP44. In the latter case, it will be located in a special sealed casing, protected from moisture and splashes.
- Noise level. Few people pay due attention to this important characteristic, but in vain. After all, a silent exhaust system will make being in the bathroom and toilet more comfortable.
Given these subtleties, you can choose a model that will be inexpensive and satisfy all wishes.

Typically, the fan package includes the device itself and four dowels that will be needed for its installation. In most cases, a cardboard box is used to pack the device.
Additional equipment features
An excellent solution would be to order a fan with additional features. Most often, buyers prefer models with a built-in timer.
In this case, the user can leave the factory settings or program the operation of the device on their own, changing the operating time, turn-on delay, etc. Thanks to this, it is possible to automate the process of ventilation of the toilet and bathroom.
Devices with a built-in timer are quite expensive. Therefore, their choice should be treated with all responsibility. Maico's products are the best. This manufacturer offers a number of models that are equipped not only with a timer, but also with other additional features.
To save energy, fans will help you switch the base load. That is, the unit can operate in two modes: half of its power and at full capacity, when you need to update the air in the room in the shortest possible time. Thanks to this function, the noise of the ventilation system is significantly reduced and energy is saved.

A good solution would be to buy a device with a clock or backlight. These additional features will make showering or bathing more convenient and comfortable.
Any specialist will prefer a device with a built-in humidity sensor. Its peculiarity is that it turns on only at the signal of the built-in hygrometer. Thanks to this function, electricity is saved and there is no need to output a separate electrical outlet for the fan or connect the device to a light switch.
Components and materials of the system
To date, ventilation is assembled from a round or rectangular section. As a rule, they are made of metal or plastic. These elements are mounted behind a false ceiling.
If we are talking about bathrooms and a toilet in a small apartment, then in such housing the ventilation duct is a hole in the wall where a fan is inserted. In this case, there is no point and need to design a complex, branched system.
As for private houses, ventilation for them is constructed from the following elements:
- air ducts. It is much more convenient to install rectangular ducts. They are compactly placed under the ceiling and do not take up extra space. These are pipes, the length of which can be 2, 1 and 0.5 m.
- fan. An overhead or built-in device is used. The latter variety is best used in branched and complex systems. Overhead models are recommended for ventilation of one room.
- Swivel elbows. In the case of rectangular pipes, swivel elbows can be vertical and horizontal.
- Couplings. These elements are used to connect straight sections of the ventilation system.
- check valves. They are designed to prevent air and insects from entering the mine.
During installation, you will also need fasteners. It is much more convenient to use ready-made elements. They will greatly simplify the installation process and speed up the work.

But if you need to save money, then the fastening elements can be made independently.
In the event of a design error or insufficiently efficient operation of the ventilation system in the bathroom and toilet of a private house, the problem can be eliminated by installing it into the wall. Features of the choice of the specified device and installation rules are given in the article, the contents of which we advise you to read.
Installation of ventilation in the bathroom and toilet
Before starting installation work, it is necessary to carry out preparatory work. First of all, you need to compare the diameter of the exhaust device with the size of the shaft.
If the vent turned out to be large, then a plastic pipe or corrugation is inserted into it. In this case, the voids should be sealed with mounting foam. If the entrance to the ventilation shaft is smaller, then it can be expanded with a perforator.
Determination of the place for installation
For forced ventilation to be as effective as possible, it is not enough just to purchase powerful equipment. It is equally important to choose the right place for installation.
Since it is designed to remove hot, moist air, the best solution would be to install it in the upper part of the wall, which is located opposite the door.
It is also important to organize the flow into the room - you have to build a special grate into the lower part of the door or leave the usual slot under the door (a more economical way). Such options will allow fresh air to flow from the living room to the bathroom.
Diagnosis of the state of the ventilation duct
If you are thinking about remodeling a bathroom or toilet, then before starting any work, you should carry out the methods available to the owners.
First of all, the thrust is checked, for which a sheet of plain paper, a lit match or a lighter is leaned against the shaft. If the paper sticks to the ventilation grate, and the flame tilts towards the channel, then this is a good sign.

To improve draft, it is recommended to check if the ventilation duct is clogged with debris left after inept repairs or for any other reason. After cleaning, check the draft with the door open and closed
Choice of device connection scheme
If we consider a standard apartment in a new building, then in the vast majority of cases, natural ventilation is not enough to remove all excess moisture from the bathroom. The only exception is a private house, in the toilet of which there is a window.
But when arranging forced ventilation, the question is of interest: how long should the exhaust device work? Often apartment owners. This means that the device will be able to work exactly as long as the person will be in the bathroom. This may not be enough.
The second method is based on connecting the fan to a separate switch. But in this case, the user will forget to turn on / off the device. Therefore, a suitable solution would be to install a fan with a humidity sensor. Such devices work autonomously and without human intervention remove excess moisture from the bathroom.

Due to the convenience and energy savings, the most popular method is when the fan is connected to a light switch. But this method is not very efficient.
Fan installation subtleties
Before proceeding with the arrangement of the ventilation system, it is imperative that you read the instructions that come with the devices. In the vast majority of cases, the entire installation process is described in detail in the insert. This will greatly simplify and speed up the work.
The most time-consuming stage is the installation and connection of the fan.
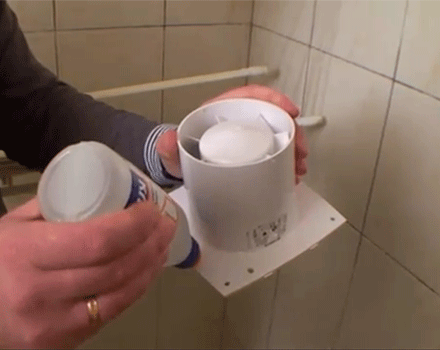
- Remove front cover.
- In those areas where the fan is adjacent to the wall, it is necessary to apply polymer glue, silicone or liquid nails. All of the above methods of fastening are perfect, since exhaust devices are most often made of plastic and, accordingly, are light in weight. Therefore, liquid nails will be enough.
- Insert the fan in such a way that its working part (electric motor and wheel with blades) are completely “drowned” in the wall.
- Press the body of the unit firmly so that the adhesive has time to grab.
- Install a mosquito net. This element will protect against the penetration of a variety of insects and debris from the ventilation duct into the room.
- Fasten the front cover with the screws or dowels that come with the kit.
The final stage is the laying of the cable and the connection of the ventilation system to the electrical network.

The whole installation process is quite simple, but if there are any problems or difficulties, it is better to entrust this work to professionals.
Forced ventilation significantly increases the amount of air removed from the room. But since the front cover covers a large part of the channel, when the device is turned off, the flow rate decreases several times. Because of this, its performance drops significantly.
The above problem is solved by installing an air intake grille. This will help restore normal performance. The second way is to leave a small gap (1-3 cm) between the front cover and the wall. Air will be sucked into the resulting gap and ventilation will work normally.

When connecting the ventilation system to the electrical network, safety rules must be observed. First of all, you need to make sure that the wires are de-energized. In addition, for their connection it is better to use not "twisting", but terminal blocks
Common installation errors
If an inexperienced master is engaged in the arrangement of the ventilation system, then situations often arise when, after the end of work, its performance does not satisfy the wishes of the residents or it is not efficient.
The reason for this lies in the assumption of errors during installation. To avoid the appearance of elementary problems, you need to know some of the nuances.
The most common errors in the installation of the ventilation system:
- the channel is designed incorrectly, which greatly complicates the movement of air;
- fans are very noisy during operation;
- the tightness of the shaft connection is broken;
- the ventilation system passes through the dwelling and its noise interferes with the normal life of the family.
If the design was done incorrectly, then the problems listed above will certainly appear. At the same time, it is often necessary to completely redo the ventilation system to correct them.

In some cases, a strong hum when the fan is running is a clear sign of incorrect installation and an error called “alignment”. This problem is solved by dismantling the device and re-installing it, but with strict adherence to technology
You can go the easy way. For example, noise absorbers are recommended to reduce noise. As for increasing the ventilation performance, for this you will have to install a new, more powerful exhaust device and check the quality of the air supply to the bathroom and toilet.
For people who are faced with the organization of ventilation in the bathroom and toilet for the first time, it will be useful to read the tips from experienced craftsmen. First of all, they recommend ensuring a normal flow of fresh air into the room. Indeed, otherwise the operation of the exhaust fan will be meaningless.
It is not necessary to buy expensive and bulky systems. Spending fabulous sums is not always the best solution. It is enough to correctly and correctly select the devices, then even cheap models will perfectly cope with the ventilation of the room.

When choosing a fan, in no case should you save on quality. After all, the health of each family member, as well as the life of the device, depends on it. It is better to spend money once, but order a device that will serve faithfully for decades.
If the house has an air conditioner, an ionizer, a cleaner, and similar devices, then it is still necessary to install ventilation. After all, none of the devices listed above provides an influx of fresh air into the living quarters.
Rules for operating the exhaust system
In order for the equipment to serve as long as possible, it is necessary to regularly carry out preventive maintenance. After all, dust and dirt accumulate on the fan blades over time. This does not allow the device to work at the maximum of its capabilities and provide decent air exchange. Moreover, if the cleaning is not carried out in a timely manner, the device may fail.
Installing a forced ventilation system allows you to solve the problem of airing rooms that is relevant for modern houses and apartments. Windows are rarely installed in bathrooms and toilets, so the only correct and reasonable solution would be to provide intensive air exchange artificially, by installing a fan in the system.
In each private residential building or apartment, ventilation is required in the bathroom and toilet. These two rooms, which have a sanitary and hygienic purpose, have a humid microclimate, burdened by sudden temperature changes and the presence of unpleasant odors.
In the absence of windows and a small area of rooms, the air inside them stagnates, leading to wear and tear of the finish, the formation of dampness, and the spread of fungus. These problems are solved by the installation of ventilation equipment, which will force the air to circulate forcibly. This article will tell you what a ventilation system is, what requirements are placed on it, and also how to make it yourself.
The need for ventilation
The bathroom and toilet in each apartment are problem areas, the microclimate of which often leads to intensive wear of the interior decoration. When taking a bath or using a shower, a large amount of hot steam saturated with moisture is generated inside the bathroom, which condenses on the surface of the ceiling, walls or furniture.

This situation leads to the formation of increased humidity inside the bathroom and toilet, which can only be eliminated by properly equipped ventilation. If the system exists and works correctly, the air flows from the room are led to the street through a channel or shaft. The ventilation device consists of the following elements:

Note! The ventilation scheme in the bathroom or bathroom can be natural or forced. If no additional devices are used to remove air, the ventilation system is called natural. It should provide effective ventilation of the room due to the draft in the channel, if this does not happen, you can install fans with your own hands, increasing the draft.
Kinds
Ventilation in the bathroom and toilet can be exhaust, supply and combined. The exhaust scheme provides for the presence of a channel that removes "exhaust" air with a high moisture content to the outside. The device of the supply system is different in that it takes in atmospheric air, which increases the pressure inside the room, displacing warm and humid steam.

The combined ventilation scheme combines the air intake from the street with the outlet ventilation duct. The standard ventilation system that apartments in typical high-rise buildings are equipped with is exhaust. It has the following varieties:

Experienced craftsmen say, no matter what scheme of ventilation of the room is used, you need to monitor its condition. To check the effectiveness, you need to do a simple test: bring a lit candle to the ventilation grill, if the flame does not deviate towards the channel, then there is no draft in the system. To increase traction, you can make forced ventilation with your own hands.
Requirements
Ventilation in the bathroom and toilet is a finely organized system, on the work of which the microclimate of these premises depends. The cause of problems in the functioning of equipment is most often errors in the design and installation of do-it-yourself. Experienced craftsmen advise to clean the ventilation duct before changing the device of the system. The following requirements are imposed on the design of ventilation in a sanitary room:

Requirements for the bathroom ventilation system are regulated by SNiP 41-01-2003. This regulation describes the maximum content of dust, carbon dioxide and the rate of air exchange. If the air in the sanitary rooms does not meet the requirements, it is necessary to clean the ventilation duct and assess whether additional equipment is required.
Video instruction