How to make your own stairs to the second floor. DIY stairs to the second floor in a private house: assembly and installation diagram
A staircase is an important functional element not only for multi-story buildings, but also for houses with attics and basements. In order for the structure to be comfortable and reliable, its dimensions must correspond to SNiPs, and the material and shape must correspond to the type of structure. How to assemble the structure with your own hands and what nuances should be taken into account - read below.
They are considered the most durable and strong metal stairs. But, firstly, in order to collect them you need to have experience working with welding machine. And, secondly, the metal frame does not always fit into the interior of the room (“bare” metal stairs would be appropriate in loft, hi-tech, minimalist interiors).

The easiest way to make a structure on a metal frame with your own hands is to purchase modular device with fasteners included, which is assembled like a construction set. The convenience and durability of this design is evidenced by numerous positive reviews online. In private wooden houses and cottages you can often find wooden stairs, which are distinguished by their spectacular appearance, reliability and lightness (which is important for wooden house). In addition, wood should also be chosen for stairs in new buildings made of timber (due to shrinkage of the material).
According to regulations fire safety, in houses with two or more storeys, metal stairs should be installed that can guarantee evacuation from the upper floors in the event of a fire.
Simple staircase shape
Both metal and wooden stairs can be anything: from straight structures to screw ones. Standard straight single-flight stairs are considered the easiest to assemble with your own hands. The disadvantages of the structures include the fact that due to the angle of inclination (if the staircase is designed taking into account all SNiP) they take up quite a lot of space on the lower floors.

Therefore, in a room of limited size, two-flight structures should be placed. The advantage of such stairs is that they can be used to save space in small space: for example, the intermediate platform can be used as a “box” for storing household equipment and tools, and under the flight itself you can place a closet or sanitary unit.
A simple staircase in the house: basic requirements
Regardless of the material of manufacture and shape (straight or rotary), the simplest stairs are divided into the following types: with one or two stringers; open (without risers) and closed. The most comfortable and reliable designs are those with two bowstrings and risers.

In addition, for maximum safety and convenience, the design must:
- It was designed for a load exceeding the weight of a person with an average build.
- It had handrails and balusters with a height of at least 900 mm, located at a distance of no more than 15 cm (if there are small children in the house, then you can fence the stairs on the sides using plexiglass or mesh).
- It was tilted at an angle of 35-45 degrees (for stairs in utility room the angle of inclination may be greater).
- It was equipped with steps with a width of 25-35 cm and a height of 15-20 cm.
In addition, a comfortable staircase should be well lit, have upper and lower frieze steps, and a passage height of at least two meters.
When designing a staircase, it should be taken into account that the height of the passage should be 50 mm greater than the height of the tallest family member.
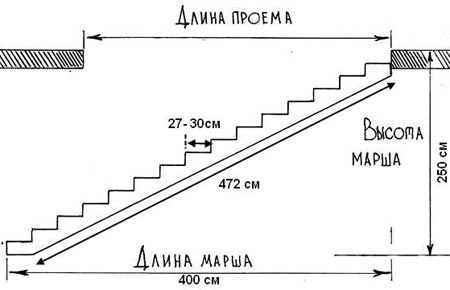
Dimensions of a simple staircase
The dimensions of the staircase determine the level of its convenience and safety. According to fire safety rules, structures with a march width of 1.25-1.50 m are considered the safest (for garden house this value can be reduced to 800 cm provided that a simple structure is located along the wall). The height of the stairs is calculated according to finished floors upper and lower floors. The number of steps in a flight is calculated by dividing the height of the stairs by the optimal riser height.

There are two ways to calculate the length of the stairs:
- Using the Pythagorean theorem (the length of the structure will be equal to the sum of the height of the room and the length of the projection of the stairs onto the floor in a square).
- By multiplying the number of treads by their depth.
Using the second method, you should remember that the last treads and steps in front of the winder are not taken into account.
DIY simple metal staircase to the second floor
An ordinary staircase on a metal frame is a strong and durable design that allows you to quickly and safely climb to the second floor.
![]()
Assembling a staircase on a metal frame with your own hands involves next order actions:
- Calculation of all components of the staircase: from parts of the metal frame to the height and width of the steps (made of wood, plasterboard, glass, etc.).
- Cutting metal and selected material for steps. You can do it yourself or in a hardware store.
- Manufacturing from metal corners fillies - elements on which the steps will be installed. The size of the fillies is calculated individually for each design. The elements are welded with the shelves down and inward.
- Installation of fillies on stringers using welding.
- Installation of metal crossbars across each pair of corners and holders for steps.
- Installation of stringers.
- Sanding irregularities and joints in welding areas.
- Priming the metal frame and painting it with waterproof paint.
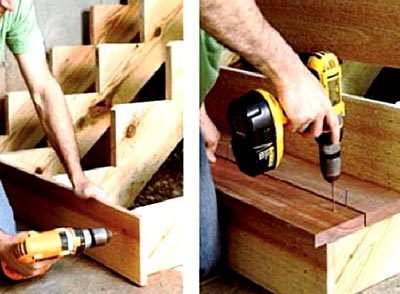
- Installation of steps from selected and prepared in advance material.
- Installation of balusters, railings.
Balusters can be installed on the base by welding or to the end of the step using bolts.
Do-it-yourself wooden ordinary staircase
It is easier to assemble a staircase made of wood: lumber can be cut to order at a hardware store, and to install the elements, most often, a regular screwdriver is used.
When choosing lumber for stairs, you should focus on hard types of wood: for example, pine board 4 cm wide for stringers. You can also make steps from pine, and risers from pine needles.

A wooden staircase is assembled from the installation of a winder platform (if the staircase has two flights): a frame is made from timber, reinforced in the middle with stiffening ribs, on which a wooden rectangular flooring is mounted. Simply put, the assembled platform should resemble a stool in appearance.
Next comes the assembly of the flight of stairs (first the bottom one - up to the landing): steps and risers are installed on the stringers using nails and self-tapping screws. There is another installation method - the steps cut into the bowstrings. Anchors or studs are used to install balusters and fence posts. Afterwards, handrails are installed.
To give the structure additional strength, after installing the steps, the stringers are tightened with metal ties installed on the threads at a distance of 2-3 steps.
Upon completion of assembly, the structure is sanded and puttied, painted desired color and covered with several layers of varnish.
Construction of a simple staircase (video)
A staircase is an important architectural component of any building, which allows you to move freely between the tiers of the building. The simplest design can be made both on wood and metal frame. Which option to choose depends on the wishes and skills of the master. The main thing is that the stairs are assembled taking into account building codes and rules. Then the device will be as convenient and safe as possible!
Sooner or later, they think about the issue of expanding the space and organizing the second floor in the building, be it or completing the construction of a full-fledged additional tier. In this case, you will definitely need steps leading to top floor, will help to install efficiently and safely this item necessary.
Details and names of elements of a wooden staircase to the second floor of the house
Become the choice of many. It is not surprising, because they have an aesthetically attractive appearance and are favorable in terms of pricing.
What are the advantages
Such structures have a number of advantages that open up wide opportunities for owners of private houses.
What are the disadvantages
It is worth considering the shortcomings of the material, which can be encountered due to negligence and insufficient preparation.
These are the most popular negative sides wood products. Nevertheless, knowing them, you can warn yourself and receive only benefits from the implementation of your plans.
How to draw a diagram of a staircase for your home yourself
If you want to draw a diagram with your own hands, you should know some features that you should definitely pay attention to. You need to have on hand:
- Roulette;
- A felt-tip pen or chalk, which will be used to make marks on the surface of the wall or floor;
- Pen or pencil;
- Paper;
- Ruler;
- Compass.
These accessories will be quite enough to make the necessary drawings for a wooden staircase in the house.
Step-by-step steps for drawing a drawing
When you get your hands on it and a person begins to draw drawings of wooden stairs to the second floor on a sheet of paper, you should proceed step by step:
Carrying out the steps step by step, adhering to the order, making a drawing of a wooden staircase will not be difficult.
What to pay attention to
When taking measurements, be sure to pay attention to the following factors:
Taking into account these details, there is a possibility of drawing up the most accurate drawing of the staircase leading to the upper floor.
Wooden outdoor stairs
Of course, to climb to the top tier of the building you can use ladders, fixed to the base of the house. But this is unsafe and inconvenient. Therefore, if the entrance to the second floor level is planned to be organized not inside the space, but outside, then you should choose the design that best suits your preferences street stairs made of wood.
In this case, you need to adhere to some rules, since being in an open space, a wooden staircase is very susceptible to influences natural factors. That is why:

Advantages
Those who have decided to place a wooden staircase outdoors can note a number of advantages:
In this case, small errors are allowed, because the fact that the staircase is a little wider or longer plays a role in the house, and not outside it. Therefore, it is, of course, worth taking measurements, but in some indicators there is no need. For example, for the street there is no need to measure the space from the step to the ceiling, which must be done in the house.
This is not a complete list of advantages; each home owner will note his own. However, along with positive aspects There are also negative sides.
 Project of a street staircase to the second floor
 Flaws
- Exposure to natural factors;
- A wooden staircase outdoors requires careful maintenance.
Knowing the pros and cons, each home owner will be able to independently determine for himself whether to rely on installing stairs on the street or not.
Private houses are becoming more and more popular every day. Few people are interested one-story houses. Much more common are two - three-story houses. Moreover, nowadays it is difficult to surprise anyone with a two-level apartment.
It is difficult to imagine a house with more than one floor without a staircase. This article will talk about how to make a staircase to the second floor with your own hands. This is not an easy task. It takes a lot of effort and time. The staircase should not only look good from an aesthetic point of view, but also be durable enough to be used for many years.
Most often, people prefer wooden stairs. They fit well into any interior and are good from a practical point of view. It is very important to really choose quality wood, the service life of your stairs will depend on this.

Wooden stairs are not available different types, shapes and sizes. Each person chooses based on the area of his home (on limited space Not every staircase can be installed) and your financial capabilities. How more complex design stairs, the more expensive it costs.
The most common types of stairs are:

- Screw. Such stairs are relevant for houses where every centimeter is valuable. It can be placed on an area of 1.5 meters. But, only one person at a time will be able to go up and down such stairs. It will not be possible to move any large loads on it, as it may not withstand the load. But building such a staircase is quite problematic. This requires skills and special tools. If you do not take into account the slightest detail, the staircase will not be stable. Therefore, it is better to hire professionals to install a spiral staircase.

- Marching. Stairs of this type can be of two varieties - straight and rotary. They can be located in different parts Houses. It depends on the interior and the amount of space. Some people allocate a place for it near the wall, others place it in the middle of the hall or room. It is much easier to make such a staircase yourself. Every man can cope with this task. If the staircase is high enough (more than 10 steps), then it is better to divide it into several parts. There will be a small separating element landing. This is much more convenient and attractive than an ordinary multi-stage staircase.

If you are faced with the need to install a staircase for the first time, and your budget is strictly limited, then a regular straight staircase - best option, you can calculate the cost of the stairs and make them yourself.
For this you will need:
- Wooden beams, 40 mm thick. We will make steps from them.
- Screws from of stainless steel. They will be needed to install the stairs.
- Beams for treading. Their thickness must be at least 30 mm.
- Beam for bowstring.
- Railings and handrails. You can make them from wood yourself, or purchase ready-made ones.
These are just the basic elements needed to create and self-installation wooden staircase to the second floor. This list can be supplemented depending on what type of stairs you choose.
Installing a staircase to the second floor requires a lot of attention. All elements must be carefully secured to each other. If you are in any doubt, seek advice from a professional. Be sure to treat the stairs by special means for wood. In this situation, a wooden staircase made by yourself will serve for several decades.
Photo

Photo - stairs to the second floor


The tree is always popular among owners of private houses. This pliable material is suitable for any construction work. The potential of wood is revealed especially clearly when constructing stairs to the second floor. We'll tell you how to competently draw up a project, calculate dimensions and select tools.

Exist the following types interfloor stairs:
Single march.
Single march with a platform.
Double march.
Screw.
Spiral.
Circular.
Combined.
The final choice depends on the dimensions and geometry of the room. Most simple option - one-march, and most difficult- combined.

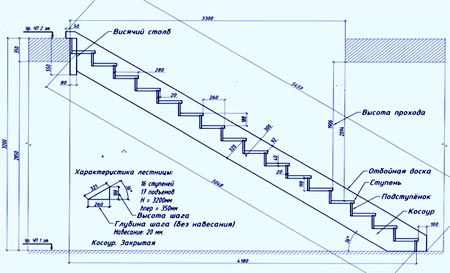
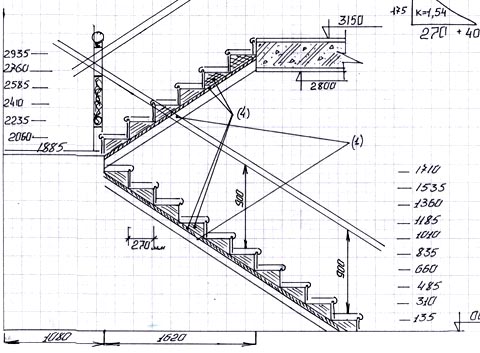
A detailed cross-sectional drawing of the staircase is shown in the picture below. Before manufacturing structural elements, you should determine its dimensions.
Since the staircase to the second floor will be constructed, the height is known in advance - this distance between floors.
Need to measure the distance from ceiling to floor taking into account the thickness of the overlap. In our case it is 2700 mm:

The step has a horizontal plane - tread and vertical (lifting height) - riser. There are stairs with and without risers.
Practice has proven that optimal height steps are calculated based on indicators 150-200 mm. For example, the size of our staircase steps is 200 mm. Then 2700 mm is divided by 200 mm, and it turns out 13 steps.
IN SNIP precisely defined dimensions:
For residential and public premises: riser height - 148 mm, tread width - 300 mm.
For basements and attic spaces : riser height - 171 mm, tread width - 260 mm.

Often steps rest on the cutouts in the bowstrings, are inserted or crash into in inner part their surfaces.
Further it is necessary project the design stairs to the floor of the room in order to determine how it will be placed in the room. The width of the stair tread is within 250-300 mm. We have it 250 mm, and after multiplying the value by 13 steps, the resulting projection size is equal to 3250 mm.
The last thing to do is calculate length stairs. It is determined according to the Pythagorean theorem. This value corresponds to the square root taken from the sum of the squares of the legs of a right triangle.
In our case, the hypotenuse is equal to 3260 mm. That's what it is required length.

Next stage- production of parts and elements of stairs. Need to take wooden beam cross section 140×60 mm, from which they will be made stringers.
Kosour - Basic structure flight of stairs, in the form of a beam (bar) with a comb along the top, on which steps are installed.


They are needed two pieces, and they are made from boards thick 30-40 mm - 13 steps, and from boards thick 25-30 mm it turns out 13 risers. The length of the step should be chosen based on the size of the room.
It should also be taken into account that when the width of the flight of stairs is less 1 meters certain inconvenience during the construction and operation of stairs.
When buying wood to build a staircase, pay attention to the quality of the material. It should be uniform in color, without grayish areas, deformations or cracks.
Humidity wood you cannot identify without special devices, but too much a large number of“water” is felt by weight - such a board will be much heavier than you expected.
Planed wood(and this is exactly the kind of wood you should buy) should be smooth, without roughness, without knots and other defects. Knots on stair stringers should be especially avoided.
On one linear meter lumber there should not be more than one knot.
If you cannot find boards of the required width, you can make steps from several narrow boards by connecting them furniture dowels on glue:

In order to connect the boards with dowels, side faces recesses equal to half the length of the dowel are drilled, and the wooden nail is driven in with a hammer until it stops. Then its ends are smeared with paint, and the boards are moved towards each other with their side edges.
In those places where a trace of paint remains, holes are drilled a little deeper than protruding dowels.
And boards and wooden nails in the places where they will dock, need to be lubricated with glue and assembled. To avoid leaving marks on the surface from hammer blows, you need to lay a wooden plank. Dowels need to be attached every 150-200 mm.
Such a step, assembled from several boards, will completely replace made from a single board. Flaw this stage - miniature gap, because the lumber cannot be aligned absolutely exactly, so the surface will need to be modified with a plane in order to finally level it.

Before assembling the stairs in single design need to try on all the details, and, if necessary, adjust them to size. After this, the elements should be cleaned with sandpaper. Special attention pay attention to the end surfaces.
Connect all the parts you need stainless steel screws with preliminary coating of surfaces with glue PVA, wood glue or Bustilate.

Then all the elements of the stairs covered with stain, and after it several layers of transparent waterproof varnish are applied. If there is no stain, then it is allowed to process wooden surfaces heated drying oil 2-3 times. It is better to apply the composition before assembly parts so that the screw heads do not get dirty.
To protect places, on which glue will be applied, from varnish and drying oil, their sealed with special masking tape.

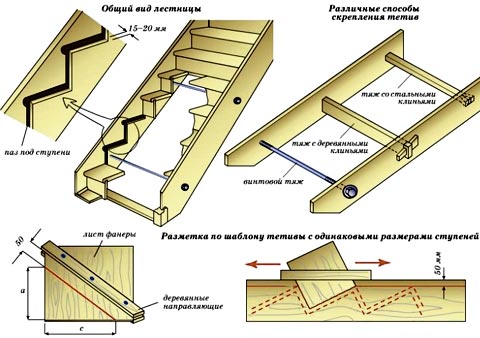
If you want your staircase to look sleeker and more elegant, you can use a scheme with mortise steps. The marking of all elements in this case is performed in the same way as before.
To cut grooves in stringers To firmly fix the steps, a chisel is used along with a hacksaw:

It is better to assemble this structure not with screws, and fasten the steps with bolts with a rounded head, which is equipped with a slot for a wide slotted screwdriver.
The connection is made like this:
After selecting the grooves for the steps in the stringer, you need to drill holes diameter 10 mm in the central part of the groove.
Step inserted into the groove, and through drilled hole a mark is made. Then a hole is drilled at this location so that the threaded insert can be screwed in.
Screwdrivers are best used for threaded bolts M8 length 40-50 mm.
Insertion required screw into the step, which is then inserted into the groove and tightened with a bolt. This installation method will provide excellent reliability and good strength. You can also fasten it with furniture screws.
Screw head needed recess into the drilled chamfer, which will then be closed with a decorative plastic plug.
All fasteners and wood drills buy in construction stores.
It is impossible to build a wooden staircase to the second floor without reliable fixation. But if the design small size: For country house V 5-6 steps, then additional fastenings for steps it is not necessary to arrange. A good frame will withstand the load.

Everything is clear with the drawings, design and process of assembling a wooden staircase with your own hands. A tools These are what you will need:
To drill holes, you will need a hand or electric drill, or in extreme cases, a brace.
To cut boards and others wooden parts, you need a hacksaw for wood. For small elements You can use a hacksaw with large teeth.
For fastening bolts, screws and screws, you will need screwdrivers with an appropriate set of tips or an electric (cordless) screwdriver. You can also use an electric drill, but it is too heavy.
To make grooves, you should stock up on a chisel. A light hammer will also come in handy. Masses in 200-250 grams will be enough.
When grinding and leveling lumber cannot be done without a plane and sandpaper all sizes: large, medium and small.
For marking and measuring you need to take with you a tape measure, a bench angle, a simple hard pencil and several rulers long 50-80 cm.
Fine grain paper definitely necessary clean all parts, otherwise, after the varnish dries, the wood fibers will begin to bristle, which will negatively affect the appearance the entire staircase.
Training video

At the end of the material, we suggest watching a video with the manufacture of a wooden two-flight staircase:
Single-story buildings in the private sector are erected only to provide economic activity, and are used as auxiliary buildings. A full-fledged residential building with at least 2 floors. Therefore, without such functional element, like the stairs to the second floor, is indispensable.
The problem of moving from one level to another can be solved simply - buy ready set and install it yourself.
Its cost starts from approximately 33,000 rubles (pine, 14 steps, turning staircase with two flights). Do-it-yourself installation is easy. The problem is different - how will it fit into the interior, will it be necessary to make adjustments? individual elements or partial reconstruction of the 1st floor?
Many companies provide services for the production of sets according to customer drawings, but as practice shows, such stairs are 1.5 times more expensive. That is why, most often, the most acceptable option is to make a wooden staircase with your own hands, from scratch.
How to do this, what to pay attention to - this is what this article is devoted to.
Terminology
Before we look at design features, it is necessary to “decipher” some specific definitions. The main elements are shown in the diagrams.
- Step. Its horizontal part is called the tread, the vertical part (it may not exist) is called the riser.
- Support beams. If the steps are adjacent to them with the end parts, then this is a bowstring. If they “overlap” the beam and their edges protrude beyond it, then it is called a stringer.
- Railing supports. They are more often called balusters or pillars. For a screw structure, the term rack is used.
- Fasteners. In some types of stairs, the steps are fixed directly to the adjacent wall using special bolts - bolts.

Types of staircase designs
For self-made the simplest ones are marching ones. For a private house they are installed in one or two bays. Spiral staircases for self-assembly much more complicated (discussed here). In addition, the production of the necessary calculations for them has its own specifics.
Features of calculating staircase parameters
The following are given general recommendations, which it is only advisable to focus on when designing an internal staircase. Since all houses (and premises) differ in architecture, dimensions, and layout, there cannot be any single template in principle.

Steepness
The optimal slope of the flights is in the range from 35 to 450. Steeper stairs are much more difficult to climb (especially for people with disabilities, the elderly or small children). And carrying large, heavy items from floor to floor will also become more difficult.
A flatter design is inconvenient because it will require more space for its installation, since the length of each span will increase. And what specific angle to choose is at the discretion of the owner.
Width
It is unlikely that anyone in a private house will move from floor to floor as part of a “group of comrades”, so when drawing up a diagram it is advisable to focus on the dimensions of one person. A staircase with a width of about 1.2 - 1.5 m for a private house is a completely acceptable option. And walking on it, and even carrying pieces of furniture will be quite convenient.

Step parameters
- Tread. It should completely fit a person’s foot (based on size 45), so optimal width steps - within 250 - 300 mm.
- Riser. In order to make it convenient for people of any height and age to move, its height is taken within the range of 150 - 200 mm. Quite sufficient, regardless of design.
On a note! All specified dimensions are absolutely the same for each step of one staircase. Otherwise, there is no need to talk about ease of movement.
Stair height
Defined as the distance from flooring ground floor to ceiling + floor thickness. For example, 270 + 40 - 310 (cm).
Number of steps
The height of the structure (310) is divided into the sum of the size of the riser and the thickness of the tread board, and then rounded up to a whole value (up). For example, if a “magpie” is used, then 20 + 4 = 24 cm.
Total - 310: 24 = 13 (steps).
Recommendation - for stairs with more than 18 steps and a steepness of 450, special platforms should be installed. Depending on their purpose, they are called differently - rotary, viewing, intermediate. Consequently, the staircase itself will already consist of separate flights (flights). They can be of the same type, or made according to various schemes, since the site is not necessarily located exactly in the center of the structure.
Stair length
It is not difficult to determine, knowing the number of steps and the size of each tread. These values are multiplied. If the steps have protrusions, they are not taken into account.
Sometimes calculations show that such a design “does not fit” in a particular room. In such cases, either the number of marches is increased, or so-called winder (turning) steps are installed.

Winder steps - top view
Span height relative to floor
It is necessary to focus on human height + a small margin. The optimal design is considered to be one in which the distance between the outer steps and the ceiling is at least 2 m. Otherwise, a tall person will have to bow his head at the end of the flight.
Materials
In most cases, the type of wood chosen is pine. It is inexpensive, but it is not characterized by durability. Larch is in many ways preferable. The presence of a special resin in its structure makes the material even stronger when absorbing moisture. And this is for home stairs, given the specifics of its operation, this is important. All other options, for example, oak, cedar, maple and a number of others cannot be called budget.
Before you start working with wood, it must be thoroughly dried. Further shrinkage of the material (including twisting) will lead to the ladder literally falling apart.
Work procedure for installing stairs
Let's take a closer look simple example- single-flight stairs. This option can be considered basic, since the algorithm of actions is the same, regardless of the number of spans.
Preparation of structural elements
- Stringers. The main requirement is that they must be absolutely identical. The board is only solid, without defects, no less than “forty”. Accordingly, cuts are made in advance for the steps.
- Steps. The edges must be rounded, as sharp edges increase the risk of injury. The board chosen is absolutely flat, carefully processed (polished). The length is calculated so that their edges protrude beyond the stringers by no more than 2 - 4 cm. Thickness - within 300 - 400 mm.
- Risers. They do not experience significant load, since it falls mainly on the support beams. In order not to increase total weight span, 15 boards are enough for them.
Advice - for a private house it is better not to install risers, since cleaning a staircase of this (closed) type is much more difficult.

- Handrails, balusters. It is unlikely to be possible to make them yourself so that the staircase becomes not only a means of transportation, but also a decoration of the house. Therefore, these structural elements should either be purchased in a store or ordered from a workshop.
Assembling the stairs
Wall marking
In accordance with the installation diagram and drawing.
Fastening support beams (stringers)
The upper part of the march is fixed in different ways (whatever is more convenient). Option No. 1 - cuts are made in the floor beam. Option No. 2 - metal stops are used, which are secured to the beam with anchors. In any case, the connection point structural elements should be as reliable as possible.
To secure the bottom of the stringers, a support beam is mounted on the floor. To the wall - fixation with anchor bolts.
Installation of risers
If they are mounted, they are screwed to the stringers.
Laying steps
They are fixed as support beams, and on the risers (at least at one point, in the center).
For ease of operation, the installation of steps begins from the bottom. The options are shown in the diagram.

Installation of balusters
First of all, the extreme ones are fixed - at the top and bottom of the march. A “string” is stretched between them, focusing on which, you can mount the remaining racks.
Installation of handrails
They are fixed on each of the racks, which are located on the march. They can be made from almost any material - metal, plastic, not just wood.
Treatment
The article outlines only general order actions and basic recommendations were given. Having decided on a specific staircase design, you should study all available material on this topic, since for different models there are some nuances of both installation and calculations of individual components. For example, turning steps, which can be either rectangular or segmented.
You can watch the video instructions for making a wooden staircase:
But the general operating regulations are described in detail, and the author hopes that this article will help the reader in the matter of independent construction. Good luck!
- Samples of finished stairs