Professional approach or how to lay tiles on the wall. Laying tiles on the floor
No matter how diverse the assortment of available finishing materials, ceramic tiles, although they belong to the venerable "veterans" construction market, not in a hurry to give up the leading positions in popularity. It occupies a very specific "niche" - this material, thanks to its unique performance characteristics, is used for external and outdoor work, for residential and technical premises, for finishing floors and walls, facades and hydraulic structures, adjoining buildings and even garden design elements.
The tile has practically no competitors in the field of interior decoration with a pronounced high level humidity - bathrooms, bathrooms, kitchens, etc. The strength of ceramics allows it to withstand high loads, therefore, when facing floors in such rooms, preference is most often given to it, since, with all its positive qualities, it is also very affordable. And one more important advantage is the relative ease of installation: if you thoroughly understand the intricacies of how to lay tiles on the floor, fill your hand a little, show diligence, then you can easily cope with such work on your own.
But before taking on the issues of laying tiles, it would be logical to consider the problems of its proper selection.
When going to the store to select and purchase the necessary material, the landlord should “arm himself” with basic knowledge about which tiles are usually on sale.
Choosing a floor tile based solely on its decorative qualities is an extremely frivolous approach. In a good salon-shop, trained sales assistants can be of great help, who will tell you which tile model is intended for which purpose. But it’s better to be able to navigate in icons and pictograms, which can tell a lot by themselves. Most common characters that may occur are shown in the table:
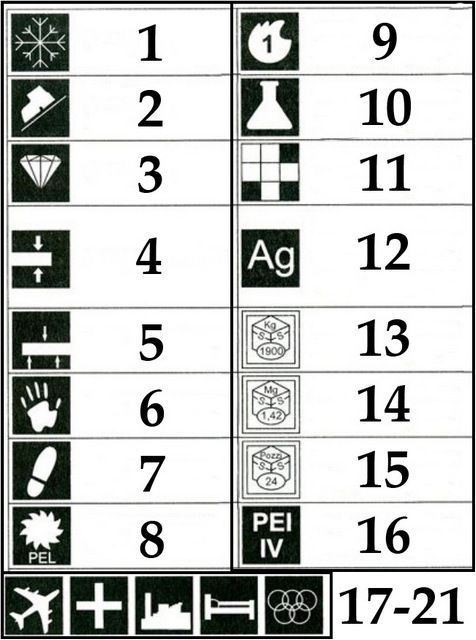
1 - This is a tile with pronounced frost-resistant qualities. It is suitable for the floor of the porch, veranda, balcony or loggia. It makes no sense to spend money on the purchase of such a tile for further flooring in a heated room.
2 - Foot on an inclined plane - a symbol of the anti-slip qualities of the tile. For rooms with high humidity(bathroom, kitchen) or for hallways, where moisture is often brought in from the street on shoes - a very important criterion. Often such an icon is accompanied by a digital indicator - this is the coefficient of friction. For these premises, the best choice would be slightly rough tiles with a specified coefficient of at least 0.75.
3 - A sign in the form of a diamond (sometimes found with the image of a drill) - the tile has increased characteristics of surface strength, resistance to accented impacts. Good quality for the floor in the kitchen - accidentally dropped dishes will not cause serious damage to the coating.
4 - Such a pictogram is always accompanied by a numerical value - this is the thickness of the ceramic tile. For laying on the floor, a material with a thickness of about 7 - 8 mm is usually purchased.
5 - Bending strength of a single tile. This parameter is determined based on bench tests, and the higher it is, the better the material (for example, for porcelain stoneware, this figure is much higher than for ordinary tiles). However, tiles on the floor should be laid so that the bending load is minimal - tightly and evenly to the surface, without air bubbles, shells, etc. .
6 - The palm-shaped icon indicates that this ceramic tile is intended exclusively for walls. No matter how beautiful and durable it may seem, it is impossible to purchase it for laying on the floor.
7 - But the image of the footprint from the boot speaks for itself - this tile is designed specifically for the floor.
8 or 16 are indicators of the resistance of ceramic tiles to abrasive, abrasive loads. According to the international standard PE1 (EN ISO 105645.7), there are 5 wear classes:
| Wear class according to PE1 (EN ISO 105645.7) | Application area |
|---|---|
| I | Such tiles are suitable for rooms with a minimum load, where there is never an intensive movement of people (for example, a bathroom, a bathroom). In such premises, street shoes are not worn, and they do not have close proximity to the exit to the street. |
| II | This tile is for rooms where people also wear slippers, but the traffic intensity is already somewhat higher. |
| III | The wear resistance of this class allows the use ceramic tiles hallways or kitchens. |
| IV | High-strength tiles for rooms and halls with intensive use - entrances, shops, public places, offices, etc. In the conditions of apartments or private houses, it makes no sense to apply |
| V | The highest class of abrasion resistance, applicable to coatings with extremely high intensity of movement of people and even some types of vehicles. Scope of application - stations, large supermarkets, warehouses, industrial premises, etc. |
9 - This pictogram indicates that the ceramic tile has undergone a double firing procedure. Such material usually has a glossy glazed surface, and is more suitable for laying on walls. In addition, the technology of double firing implies an increased porosity of ceramics - and this is a decrease in its mechanical strength and increased water absorption.
10 - The icon in the form of a chemical flask indicates the increased resistance of the tile surface to acids, alkalis, and other aggressive substances, including any type household chemicals. The letter indicator of this property of the material is "AA".
11 - If you come across such an icon, then you need to be careful in choosing a tile - in one box there can be tiles of various shades.
12 – Notwhich expensive types of ceramic tiles can be produced with the inclusion of precious metals in their composition: silver (Ag), gold (Au) or even platinum (Pt).
Pictograms 13 ÷ 15 inform about the parameters of the factory packaging of ceramic tiles. So, in the example above, symbol 13 indicates that the gross weight of the box is 19.00 kilograms, symbol 14 indicates that one package is enough for 1.42 m² of floor space, and symbol 16 indicates that 24 tiles are packed in a box.
The pictograms indicated in the table under numbers from 17 to 21 will tell you about some specific properties of the material. Such ceramic tiles are designed for special operating conditions. It could be train stations. and and airports, medical facilities, industrial enterprises, hotels, sports facilities. It makes no sense to purchase such tiles for flooring in a private house or apartment.
Other points not to be overlooked:
- If the tiles are planned to be laid on the floor of a bathroom, shower room, kitchen or other room with high humidity, then a material with a minimum (not higher than 3%) water absorption coefficient is required.
- The linear dimensions (length and width) of the tile also matter. Of course, the larger the tile, the faster it can be laid. However, for rooms with a small area and complex floor shapes, tiles that are too large will not work - there will be a lot of waste. Yes, and large tiles in such little rooms will look somewhat ridiculous. In addition, we must not forget that carefully laying large tiles is much more difficult.
- If you purchase several packs of ceramic tiles, you must definitely select the goods of one batch.

This is necessary for two reasons:
- Firstly, even a completely identical tile model, but from different batches, may have slight deviations in shade. In the conditions of the store, it is quite possible that it will not even be noticeable. However, after laying such a coating on the floor and under normal lighting, such a difference can greatly spoil the intended interior appearance of the room.

Different batches may also differ in calibration - the linear dimensions of the tile
- Secondly, fluctuations in the linear dimensions of the tiles are not excluded. It is clear that the cutting of material in production is carried out under the control of precise electronics. But still, ceramics remain ceramics, and there may be small errors, therefore, calibration of finished products is mandatory. There must always be tiles of the same size in one batch, and the difference between different batches can even be a few millimeters. When laying such a tile on the floor, especially in large areas, there may be inconsistencies noticeable to the naked eye.
- Be sure to check the packages for broken, cracked tiles or chips on the surface. Salespeople may argue that marriage is inevitable and must be accepted. No, you don't, you pay your money for a quality product.
- It is generally accepted that a certain reserve should be purchased, 10% more than the area of \u200b\u200bthe premises. This will be spent on “cuts” and in cases of compensation for some unfortunate misunderstandings. It must be remembered that it will not always be possible to buy additional tiles later to make up for the missing quantity - this has already been mentioned when talking about batches.

By the way, if laying is planned tiles diagonally, the reserve can even be slightly increased - up to 15%. With this technology, it is more difficult to fit the material along the walls, there is more waste and, in addition, the probability of making some mistakes, but inexperience, is much higher.
How to lay tiles on a concrete floor
The process of facing the floor with ceramic tiles can be divided into four main stages:
- Surface preparation for laying.
- Carrying out the necessary markup, drawing up a scheme of work.
- Laying ceramic tiles on adhesive mortar.
- Grouting and finishing work.
Preparing the floor surface for tiling
The requirements for the base for laying tiles, in principle, are simple - it must be strong, stable, provide good adhesion with adhesive. How is this achieved?
If we are talking about a concrete base, then first it is necessary to make a thorough revision of the old screed, on which it is planned to lay the tiles. No need to be lazy - you should tap every centimeter of the floor to make sure there are no unstable areas.
- First of all, its horizontalness is checked - if this condition is not met, then pouring a new screed simply cannot be avoided. If the evenness is satisfactory (differences are not more than 2-3 mm), then the old coating can still serve, provided, of course, it is stable.
- If, during the control inspection, places of screed peeling, concrete crumbling, deep oiling are revealed, they must be removed up to the “healthy” surface, both in width and in depth. Wide cracks and crevices need to be cut to a width of up to 10 - 15 mm.
- There should be no traces of paint, oil products, fats, remnants of the old coating on the surface - everything is scraped off to clean concrete.
- All protrusions are necessarily cut down - if you can sometimes look at a slight recess "through your fingers", since it will still be filled with glue during the masonry process, then even the smallest tubercle will make even laying simply impossible.
- After that, a thorough cleaning with dedusting of the surface is carried out. In order for the repair suction to lie well, it is necessary to prime all the places to be repaired and allow the primer to dry completely.
- A repair composition is being prepared - it can be a “classic” cement-sand mixture in a ratio of 1:3, but it will dry for a long time.
A good repair compound can be tile adhesive on cement base, but this approach is reasonable only if small defects- in vast or deep areas of very expensive glue, too much will go away.

- All potholes, dents, cut gaps and cracks must be filled with repair mortar and leveled with the general surface of the floor. The point is not in perfect smoothing, but in the most dense filling of voids.
- After the repair compound dries, the floor surface is completely primed with a special compound, which will strengthen the surface and provide excellent adhesion.

There are many soils on sale, and there is always the opportunity to purchase the best one in terms of price and quality. An excellent reputation, for example, is enjoyed by Serezit CN 94", "Betonokontakt", "Plitonite - primer-supercontact».

It is better to apply the primer in two layers, with the obligatory drying of the first. After the soil is completely absorbed and dried, the floor surface can be considered completely ready for laying tiles.
Any master involved in repairs will confirm that very often a situation occurs when, when repairing a seemingly small section of an old screed, an “avalanche process” begins - peeling spreads farther and farther. There is only one way out in this case - to remove all the old coating completely, to the floor slab. The work, of course, is not the most pleasant, but you can’t do without it - tiles on an unstable floor will not lie for a long time.

Quite often it becomes inevitable - removing the old screed
After the old coating is removed, it is necessary to fill in a new screed, at least 30 mm thick. (how to do it right -).
The finished and completely frozen screed is also primed twice, after which you can proceed to further work.
Floor marking for laying ceramic tiles
Ceramic tiles should become a decoration of the room, and this will be possible only if its location on the floor is planned correctly. Carelessly, obliquely laid tile can complete the interior
There are many methods and methods for placing ceramic tiles on the floor - it is impossible to consider all of them on the scale of this article - this is a topic for a separate publication. But even the simplest, "classic" method requires precision and accuracy.
Starting to plan laying from the wall is very risky, since the slightest flaw will grow with each successive row, and it will be very difficult to eliminate it. Therefore, the reference lines and the first rows of tiles are usually located approximately in the center of the room.

The first reference line is usually drawn along the room. To do this, in two places, at the beginning and at the end, the distance between opposite walls is carefully measured and midpoints are applied. They are connected straight (usually done with a coated cord), and receive a longitudinal baseline.
Now you need to draw the second, perpendicular to the first, also approximately in the middle of the room. It is very important that the strictest perpendicularity be observed. In order to avoid mistakes, and this is quite possible when using a square and a ruler, you should definitely check the right angle using the formula of the famous "Egyptian triangle": 3² + 4² = 5². According to the Pythagorean theorem, this is a triangle with legs that are multiples of 3 and 4, and a hypotenuse that is a multiple of 5.
For example, we measure from the point of intersection of the leg 900 and 1200 mm. We connect the marked points with a segment, and its length should be exactly 1500 mm - no more no less.
When the lines are drawn and their perpendicularity is checked, you can think about how to place the rows of tiles and where to start laying out. We remember that the drawn reference lines are not at all a “dogma” for the beginning of masonry - it will not be difficult for them to make a parallel transfer in any direction.

For example, if Entrance door in a spacious room is located exactly in the center, then you can lay out the first rows of tiles in this way - along the laid reference lines. The principle is as follows - so that when entering the room, a flat area is presented to the eye, without cuts and fitting. (see pos. "a" in the figure).
But in a small room, with a shift of the exit to the edge (pos. "b"), and even, perhaps, having complex shape or stationary obstacles, the beginning of laying can be smstyle to a free "patch" - from here it will be much more convenient to work in all directions, but it will be the entrance that will turn out to be the "front door".
In any case, you should never be lazy - you should carry out the control laying of the central longitudinal and transverse rows of ceramic tiles "dry", without using mortar, but leaving the planned gap between adjacent tiles.

Do not neglect the initial "dry" laying of tiles - this will allow you to evaluate the options for its location
Such a simple procedure will allow you to visually assess the future picture, measure the distances, and finally decide on the laying scheme, that is, stop at one of the principles:

1 - in not large room, for example, in the bathroom or in the kitchen, you can take two walls from the entrance (green arrows) as the “starting line”, provided that they are exactly perpendicular. In this case, the entire visible part of the room will be lined with whole tiles, and the cut edges will be hidden under furniture or plumbing fixtures.
2 - masonry is carried out from the center in such a way as to place the maximum possible number of whole tiles on the floor, leaving narrow sections for supplementing with fragments (brown arrows). Beneficial in terms of material savings. However, for reasons of masonry quality, it is advisable to leave sections not narrower than ⅓ of the tile width near the walls.
3 - the layout looks a little more impressive with a minimum number of whole tiles in a row, but with extended fragments along the walls (blue arrows). Such a coating looks more complete, and from an operational point of view, it is more reliable than No. 2.
4 - laying diagonally - will help hide the curvature of the room. Among the shortcomings is a more complex execution, especially in terms of preliminary marking and fitting of tile fragments, more material goes to waste.
If you have decided on this, then you should immediately outline what scheme will work is being done- from the far corner to the entrance, or by dividing the space into several areas in straight stacked rows, with their subsequent filling.

“Filling” the space can also be done in different ways. So, some masters are laying in order. Others prefer the "ladder" scheme with a consistent increase in the number of rows being laid at the same time.

"Filling" the space can be performed linearly, or, as shown in the figure, stepwise
By the way, there are supporters of laying ceramic tiles on the floor "in a run" or even randomly - sometimes this is part of the design plan for decorating the room. But under conditions ordinary house nevertheless, they prefer to be limited to a direct laying pattern, “seam to seam”.
Laying tiles on the floor
- So let's get ready to install. essential tool and materials.
- For work, you will need spatulas, ordinary, from 100 to 250 mm wide, and notched, with a furrow height of 8 - 10 mm. For grouting, it’s a good idea to get an elastic rubber spatula.
- You will need a construction mixer or a drill with a nozzle for mixing tile adhesive, an appropriate container for the same purpose.
- Always have a building level at hand.
- In some cases, it will be necessary to apply force to lay the tile in place. It is convenient to use a rubber mallet for this purpose.
- You should immediately think about how the tiles will be cut (more on this below).
- It is necessary to create a supply of calibration crosses of the required thickness, plastic wedges for height alignment.

- In order not to carry dirt, you need to have a supply of clean rags, a sponge for wiping the solution from the front surface of the tile.
- Probably, in our time, no one is already thinking about making tile adhesive on their own - you can always buy it in a store. When choosing, you need to control the purpose of the composition - in addition to the usual, intended for majority interior spaces, there are specialized mixtures, intended for rooms with high humidity conditions, for the street, especially resistant or for so-called "complex surfaces", for the "warm floor" system, etc.
The glue is diluted by gradually adding a dry mixture to the amount of water specified in the instructions, with constant stirring with the help of a mixer or drill. The composition should turn out to be absolutely homogeneous, without lumps, of a sufficiently dense consistency - so that the ridges created by a notched trowel do not spread.
After obtaining the consistency of the composition necessary for work, it is left to “ripen” for 5 minutes, then mixed again for 2 ÷ 3 minutes - and you can start laying.
Too much mortar should not be prepared at once, especially if there is no experience in laying ceramic tiles. The term of his "life" is limited - this must be indicated in his instructions. If the glue begins to noticeably thicken during operation, then you will have to throw it away - you cannot dilute it with water again - it will lose its qualities.
- Beginning masters, apparently having heard a lot of old, irrelevant advice or having read about it somewhere, soak the tile in water before laying it on the floor. In doing so, they are committing a grave mistake.
A similar approach is possible if the tile is laid on a conventional cement-sand mortar, and even then - not in all cases. And all modern building mixtures - adhesives for ceramic tiles, are designed for application precisely on a dry surface. Excess water will significantly reduce the performance of the adhesive, and the tile will begin to “dance” and fall off over time.
Therefore, before laying the first tile, carefully read the instructions for use of the purchased tile adhesive again - everything is probably indicated there.
- Where to apply glue - on the floor, or on the tiles? There is no unanimity of opinion on this issue. Someone likes to apply on the tile - the marking lines on the floor remain intact.

On the other hand, it is more convenient to immediately smear a significant area of the floor, and then concentrate on laying the tiles evenly (of course, if you have some experience, otherwise you may not have time).

Another option is to pre-glue the floor surface with glue.
There is a third tip - to coat both here and there, but lay the tiles in such a way that the direction of the ridges made with a notched trowel on the floor and on the tile is perpendicular - this way all cavities are guaranteed to be filled, maximum adhesion is ensured.
- After smearing with glue, the tile is laid on the surface in the right place, tightly pressed against the floor, its location relative to the reference lines is controlled, as well as the horizontalness of its upper plane in the longitudinal and transverse directions.
- Work continues in the same order, with the obligatory installation of calibration crosses - they will clearly maintain the required gap between the tiles.

When fitting each tile, its horizontalness must be checked using building level. The necessary adjustments are immediately made - adding or removing mortar, inserting a small wedge, etc.
- It is necessary to ensure that there is no excess glue left in the tile gap - this space will be needed to fill the joints. So it is better to remove the glue immediately, as it will be very difficult to do later. Together so, from the front surface of the tile, immediately remove stains of the solution with a rag or sponge, preventing them from drying out.
- Distance crosses are left between the tiles until the initial setting of the mortar. Then, when the tile has already acquired immobility, the crosses must be removed - it is impossible to leave them in the seams until the glue has completely solidified, since then there will be difficulties with extraction.
Video: a visual lesson on laying tiles on the floor
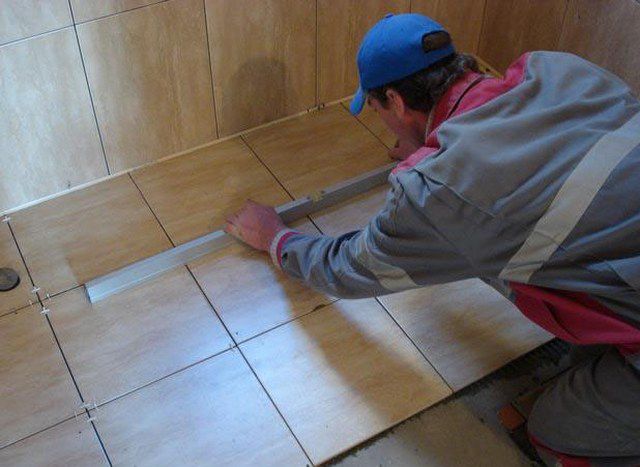
- Very comfortable to work modern fixtures for quick laying out tiles - the so-called leveling systems. The kit includes stand clamps (disposable elements) and wedges (can be reused).

- After the first tile is laid on the glue, well pressed and inserted in level, two clamps are installed on each of its sides, so that they go under the tile with their heel. The thickness of the leg of the clamp will determine the size of the seam. Clamps are installed at a distance of approximately 50 mm from the corner.

Clamps installed...
Then another tile is laid. The wide heel of the clip is also under it.

... then the next tile is laid ...
A wedge is inserted and threaded to the limit into the clamp, where it will be fixed by a ribbed surface on the hooks. Very important - the wedges are always inserted from the side of the previously laid and leveled tiles.

... wedges are inserted all the way and fully fixed.
- Thus, the lower, even edge of the wedge "pulls" the surface of the next tile ideally into the plane of the already laid one. True, no one cancels control with the help of a level.

- The wedges should remain in this position until the glue has completely dried. Then they are removed with light side impacts using a rubber mallet. The design of the polymer clamps is such that they can withstand tensile stress, but immediately break off when exposed to a fracture. Below, under the tiles, remain only broken heels.
- Wedges, as already mentioned, can be used further, and broken hooks are disposed of.
Video: laying tiles with a tile leveling system
Tile cutting
Previously, it was only about laying a whole tile, but in practice there are never cases where everything is limited to this. So, now it's time to consider the problem of cutting tiles.
- Installation of fragments is recommended not immediately, but a day after the main part of the floor. During this time, the glue will already grab well, and it will be possible to accurately measure the required dimensions.
- When marking the tile poses, cutting should not be forgotten about the spacing between the seams - it should definitely be corrected for.
- There are several ways to cut ceramic tiles:
1. The most convenient way is with a tile cutter, a desktop tool that gives a smooth and accurate cut. It is enough to lay the tile with a marking line along the central ledge, draw the roller away from you with force over the surface of the tile, and then, resting the paws on the surface of the tile on both sides of the drawn line, press the lever down.

Most handy tool- tile cutter
With even a small experience of the master, there is practically no marriage in such cutting.
2. Manual tile cutter- a fairly convenient tool, but already requiring more dexterity from the worker.

First, the roller is drawn along the intended line of risk. Then the tile is clamped so that the tile cutter is exactly on top along the axis of the line cutting. Hand movement - and the tile should be divided into two parts.
Similarly, cutting is carried out using a conventional glass cutter, with the only difference being that the breaking is carried out on the edge of the workbench, or with the help of a line placed on the bottom of the workbench. cutting metal rod (nail or wire).
With all the advantages of manual and desktop tile cutters, they allow cutting tiles exclusively in a straight line.
3. grinder with a diamond disc - this approach is especially good when cutting tiles at an angle or creating complex shapes is required. The main difficulty here is to ensure that the tile is securely fixed when working with a grinder so that it does not fly out or crack.

Tiles can be precisely cut to size with a diamond grinder
The tile can be cut right through - when details of a complex configuration are required. If straight long sections are cut off, then you can only violate the integrity of the upper enamel layer - then it will not be difficult to break the tile along the intended line.
Special attention precautions - be sure to cover your eyes and face with a mask, so how not excluded scattering of small hot fragments of ceramics.
4. Small areas of tiles can be removed with pliers.

In this case, on the area to be removed, it is advisable to apply frequent grid glass cutter roller. Then, with tongs, very small fragments are carefully broken out, gradually bringing the tile to the desired size.
If necessary, any minor unevenness remaining after cutting can be removed with a bar wrapped in coarse (80) sandpaper. With large teeth, they can be “corrected” with pliers. If a pronounced sharp edge remains, then it is better to process it with a round file first.

The process of laying cut fragments, in fact, is no different from what was described above.
When performing work on cutting tiles and when laying its fragments, special care should be taken. Ceramics can crack and not along the intended line, which means that there is a high probability of getting a cut hand injury when pressed. In addition, broken edges can have extremely sharp edges that can cause very deep cuts. All work should only be done with protective gloves.
Seam sealing
After the entire floor area is covered with ceramic tiles, you can proceed to grouting.
- First of all, it is necessary to check the condition of the seams again - they must be cleaned to the full depth and width.
- getting ready jointing solution - grout. It can be cement-based or a two-component epoxy.
1. In domestic conditions, cement grouts are more often used (the so-called class WithG 2 according to EN 13888).

Cement grout for joints
They are sold in stores in the form of hermetically packed dry mixes, they can have different colors - there is always the opportunity to choose the color that is most suitable for the overall design. They are closed to the desired consistency most often with water. But for rooms with high humidity or for floors with a high level of load, it is still recommended to use a special latex additive to dilute the composition - the floor surface will only benefit from this.

2. AT recent times Epoxy-based grouts (class RG according to EN 13888) are rapidly gaining popularity. These are two-component compounds that are prepared immediately before the start of work on filling the joints.

The “life” of such a composition is short, so it is prepared in small portions in order to be guaranteed to work out before hardening.
Epoxy grouts are more durable, resistant to chemicals, they are much more ductile and will not crack over time. These compositions have a much wider range of shades (including bright, saturated colors), and besides, a lot of similar grouts are sold with special effects - sparkles, fluorescent glow, etc.
The only significant drawback of epoxy grouts (except for a certain difficulty with proper preparation working staff) - this is still very high price, which greatly limits the scope of their use.
- The finished composition is typed on a rubber spatula or rubber grater and applied with force to the seam area, usually in the direction of 45 degrees from the seam line. Such a trajectory will provide the most complete and dense filling of the inter-seam space.

- After the joints are filled, it is necessary to immediately remove the excess mixture from the surface of the tile - later this will be much more difficult to do. Usually this is started when a white coating appeared on the grout remaining on the surface of the tile - it began to dry out (usually after 20 - 30 minutes).
To do this, take a foam sponge, well washed and wrung out, and remove the remains of the fugue with it. The movements are usually the same as when grouting - 45 degrees to the seam line. At the same time, one should try not to touch the seams so as not to wash the puffer out of there. The sponge should be thoroughly rinsed as often as possible, with a constant change of water. By the way, water plays a dual role here - it washes away impurities and participates in hydration. cement composition grouting material.
After 3 — 4 hours, you can rinse the surface again with a foam sponge. Then, when the floor dries after washing, the remaining light cement coating is easy to remove by wiping the tiles with a dry, clean, soft cloth.

After that, the ceramic tile will already take on its “ceremonial” appearance, and it will be possible to say that the process of laying it is completed.
Video: option for grouting on a tiled floor
However, if the cladding was carried out in a room with high humidity or with intense loads on the surface, then it is recommended to carry out one more simple operation - to coat the seams water repellent.

This is done very simply - the composition is abundantly applied to the seams with a thin brush. Such treatment will give the composition of the fugue water-repellent properties, which will significantly increase the service life of the ceramic coating, prevent dampness from accumulating in these places, and facilitate cleaning.
When the water repellent is absorbed and dries, you can restore the final order. It is necessary to thoroughly rinse the floor with clean water - and we can assume that the entire multi-stage process of laying tiles on the floor is over!
Wall and floor tiling has become practically obligatory element when furnishing a home. Particularly demanding in this respect are auxiliary premises such as bathroom, washroom, kitchen. And the point is not only in the ease of maintenance of surfaces, but also in the ability to arrange decorative trim using various patterns of paintings or mosaic panels. This design is always presentable and beautiful. In this article, we will tell you in detail how to lay tiles with your own hands.
Preparatory work
Even having thoroughly mastered the cladding technology, you can ruin any idea by choosing the wrong cladding material.
In this article, we will try to draw attention to a number of features of this process in order to avoid such a situation.
Like any construction operation, installation finish coat on walls and floors requires a certain sequence of actions, on the precise implementation of which the final result depends. A technology describing how to lay tiles might look like this:
Wall preparation
Before laying tiles on the wall, you must:
- remove the old wall covering, if it is the same material - it is alternately pry off with a spatula and torn off, the remnants of the old adhesive composition must be carefully removed. Old paint must be treated with a special solution, after a few hours it will swell and can be removed with a scraper. If the paint is still on the walls, you need to heat it up. building hair dryer(up to 600 degrees) and remove;
- make an audit of the quality of the coating, cut the cracks, cover them with putty, along with the slaughter. When the plaster mortar hardens, sand the repair areas with sandpaper;
- apply a layer of primer to the surface. It can be prepared from tile adhesive by diluting a glass of the mixture in 8 - 10 liters of water. Particular attention should be paid to removing oil and grease stains from the surface, if any;
- measure the deviations of the angles from the vertical, if possible, eliminate their curvature and deviations. To do this, you can use plaster, a popular way is to install a waterproof plasterboard.

Removing old tiles can be a serious problem due to the high labor intensity of the process. Therefore, many consider the question, is it possible to lay tiles on tiles? With regard to wall decoration, we can say unequivocally - this method of cladding is not used. The reason for this is the low adhesion of adhesives to the glossy front surface of the old coating. Of course, you can choose an adhesive for such a case, but there is no guarantee that the tightening forces of such adhesives will not break the old adhesive layer and both layers will not fall off.
It is possible to lay tiles on tiles on the floor, but at the same time, the requirement of SNiP must be observed, indicating that the floor level in the bathroom should be 10-15 mm lower than in the adjacent rooms. And the thickness of ceramic granite or tiled floors of the 4th category of strength tiles will be, together with the adhesive layer, about 20 mm.
Selection of tools and fixtures
For wall tiling you will need:
- container for glue;
- nozzle and drill for stirring it;
- glass cutter and grinder - cutting tiles;
- trowel - for applying glue to the wall, lining;
- notched spatulas - for leveling the composition on surfaces;
- construction level;
- a set of crosses and wedges for positioning tiles at the installation site;
- rubber mallet - for aligning parts along the plane;
- rubber spatula - for leveling and removing excess grout;
- foam rubber sponge - for cleaning tiles from adhesive residue, grouting in the course of work;
- roulette;
- ruler and marker for marking parts before cutting;
- file flat and round (semicircular) - for processing break surfaces and openings for communications;
- core drills for making holes.

Other tools may be needed, in particular, wire cutters or pliers to break off thin cuts.
Calculator of the required number of tiles
Ceramic tiles for many areas of the apartment - the most advantageous option. No matter how varied pampered today's hardware stores, showrooms, tiled flooring for, for example, a bathroom, kitchen, bathroom remains the most popular due to their specific operational features and, at the same time, a wide range of design options.
Before laying tiles on the floor, be sure to carefully read the characteristics of the material, the rules for its selection. Not all ceramic tiles can be suitable for these purposes, especially if it is intended to be laid in rooms with increased level humidity.
So, primarily choose floor tiles. It is better to consider this in the bathroom or kitchen as an example - it is in these rooms that the floor experiences the most extreme influences, both in the form of traffic intensity, and the influence of humidity and chemicals.
- No matter how attractive the tile may seem, you can only purchase one that has an icon in the form of a boot mark on a dark background on the marking - this is the type intended for floors.
- Both in the bathroom and in the kitchen, the floor can be both damp and slippery due to accidental spills of water, greasy substances or detergents. Therefore - special attention to the coefficient of friction of the surface (icon in the form of a foot on an inclined plane). It would be optimal to purchase a rough tile with a coefficient of at least 0.75.
- Water resistance of the material - for floors in a room with high humidity limit value should be no more than 3%.
- As already noted, quite active people can accidentally get on the floors. chemical compositions. In addition, cleaning of premises is also most often carried out using detergents with active ingredients. The tile must successfully withstand such an impact. The icon on the label is a chemical flask, and the letter indicator required for such conditions is AA.
- Frost resistance indicators (sign "snowflakes") and wear resistance a circular saw”) for enclosed spaces, apartments are not so significant. Although, for the hallway, especially in a private house, or for covered veranda– this is also very important.
- The thickness of a floor tile is always greater than that of a wall tile. Usually it is from 8 mm and above. This is also necessarily indicated on the packaging with a special pictogram.
- The linear dimensions of the tile are important. It is optimal that there are as few seams on the floor as possible. On the other hand, very large tiles are more difficult to lay and a lot of material will go into the notches.
In order to avoid problems directly when laying tiles, you should remember some more points:
- If complete uniformity of the floor covering is required, then you should not purchase a tile with an icon indicating possible deviations in the shades of the tiles in the box.
- Tiles should be purchased at once for the entire room and always one batch. You may encounter the fact that even slight differences in shade between two different batches, absolutely invisible upon purchase, will be revealed on the laid floor.
- The same applies to linear dimensions - calibration at production is carried out just by party. Yes, deviations in dimensions can be very insignificant, but on the scale of the entire floor in a sufficiently large room they will definitely make themselves felt.
Well, another important choice parameter is, of course, the design, in accordance with your own design project, so that the floor is in harmony with all other interior details.
Basic principles laying tiles on a concrete base
The base for laying tiles on the floor must undergo appropriate training; more about this is described in the sections of the site devoted to floors and arrangement. It can only be briefly noted:
- The concrete base should not have significant defects in the form of cracks, potholes, delaminations, unstable areas.
- The required levelness must be observed (or a slight slope if, for example, the bathroom or bath room is equipped with a drain).
- Before laying the tiles, the floor surface must be dedusted and primed deep penetration compounds that improve waterproofing and increase the adhesion of tile adhesive.
The process begins, of course, with the marking of the surface.
- Tiles can be laid various options(more on this -). But even with the simplest classic version it is very important to set the initially correct direction and laying pattern so that errors do not increase from row to row.
Particular attention - markup. It is better to try laying out 1-2 rows "dry"
- Masters recommend that beginners, before starting to lay tiles on glue, try to lay out at least a couple of rows “dry” in order to clearly see the emerging picture. To facilitate the laying of the most important, starting row, you can attach a temporary guide made of a metal profile or a wooden plank (glazing bead) to the floor surface.
- For purely aesthetic reasons, the laying should be planned in such a way that a row of whole tiles is laid in a conspicuous place along the wall, which emphasize the evenness of the lines. It is advisable to start from the entrance to the room with a whole tile - the cut fragments are “driven” into the far corners, under the future arrangement of furniture or plumbing fixtures.
It hardly makes any sense at present to experiment with self-production of tile adhesive - there are many varieties of it on sale for a wide variety of installation options - open or especially wet rooms, with or without underfloor heating, etc.
Beginners should immediately be warned against a common mistake. After listening to some advice, some of them soak the tiles in water before laying. This is completely unacceptable. And myself modern tile, and tile adhesive are adapted specifically to the installation of dry tiles, and a violation of the water balance will not give any advantages, but can significantly reduce the performance of the coating.
- When laying tiles on the floor, it is recommended to apply glue both to the surface of the base and to the tile itself. Both here and there, the layer of glue is leveled with a notched trowel, and the direction of the strips of the resulting ridges should be perpendicular - this is how reliability of adhesion will be achieved without any air cavities under the surface of the tile.
- A gap must be left between the laid tiles, the same width of which is maintained with the help of special crosses of the required thickness.
- The laying of each tile should be accompanied by careful control of the evenness of the surface, so that you can immediately make the required adjustments - add or subtract glue, put wedges, etc.
- cutting tiles in right size hold a special tile cutter. You can also use a manual glass cutter, but not everyone succeeds. Another option is a grinder - a grinder with a diamond or corundum disc. If holes are required, you will have to resort to using an electric drill with special drill- a crown or an adjustable ballerina.
- When laying tiles, do not allow the joints to be completely filled with adhesive. They must be cleaned immediately, while removing the remnants of glue from the front surface of the tile. You should not leave such stains - they will be quite difficult to remove after the composition has completely solidified.
- At the end of the laying and the removal of the spacer crosses, the floor is given time to solidify. The required period will be indicated in the instructions for use of tile adhesive. But approximately at least 2 days the floor should not experience mechanical stress.
- The final stage is the grouting of the joints between the tiles with a special composition - a fugue. It is selected taking into account the characteristics of the room (moisture resistance, frost resistance, etc.) and the correspondence of the shade to the overall “picture” of the floor. The grout is made with a rubber spatula, and the excess remaining on the surface is picked up with a rag.
Features of laying tiles on an old tiled floor
Is it possible to avoid the procedure of dismantling the old tile if there is a need to renew the tiled floor? Why not - it's doable.
- If the previously laid tile coating is durable, then it will already be a good reliable base with a high level of waterproofing.
- Sometimes such an approach is even seen as the only possible one, if any engineering or electrical communications, a heating system, etc. pass under a layer of old tiles. - all that can be damaged when dismantling the old coating.
However, it is necessary to take into account those factors that can make such installation impossible:
- When the old tile "plays", falls out of its place, traces of decomposition of the old cement are visible - nothing can be done, you will have to take on the dismantling. Laying tiles on an unstable base is just ruining it.
- In a room, for example, a bathroom, the floor level should be slightly lower than in other rooms. Thus, sometimes laying a new tile on an old one is not possible for this very reason. This situation should be assessed in advance.
- Houses old building often do not differ in strict horizontality of the floors. Quite often this is found in blocks "bathroom-bathroom". The so-called metlakh tiles once laid in them on a cement mortar usually sit very firmly, but the floor surface can have quite large deviations from the horizontal. In any case, this will require alignment with a screed.
How it's done
One desire to avoid tedious dismantling procedures is not enough. It is imperative to carefully check and prepare the old tiled surface.
- All old masonry tiles need to be tapped. If the sound causes suspicion of the presence of emptiness, or the tile “plays” even a little, it should simply be removed. The resulting opening is sealed with a repair concrete composition or tile adhesive compared with the total floor surface. Perhaps it would be superfluous to say that such a repair is possible, if it does not take on an extensive character.
- Old tiles can be covered with a thin greasy coatingaccumulated during operation. This means that the floor must be thoroughly degreased either with an organic solvent, or by repeated washing with hot water with diluted caustic.
- Mandatory cleaning of dirt during such cleaning is subject to tile joints. Particular attention is paid to the condition of the old grout (fugue). If it crumbles, it should be removed to the maximum, the seams should be washed, as indicated above, and after drying, sealed with diluted tile adhesive.
- Now - about covering the old tiles. Ideally, you would need to walk a grinder with a diamond wheel to remove the glazed layer and get to clean ceramics. However, you can limit yourself to applying frequent notches or even drilling holes.
- After performing all the "dirty" work, the entire floor surface is thoroughly cleaned of debris and dust with a vacuum cleaner.
- Surface Required primed special formulations. So, for these purposes, the Betonkontakt soil is widely used, and , Judging by reviews of some masters, sometimes this is even enough to prepare the surface, without notching. The compositions have similar qualities
Such a primer will give even a smooth tile the required roughness.
- To improve the effect, some experts also recommend applying a 2 mm layer of tile adhesive, the one that will be used later in the laying process. Only after it hardens, they move on to further work.
- A few words about optimal choice glue for just such cases. Again, it is worth listening to the recommendations of experienced finishing professionals. They speak very well of the Ivsil Profit composition, which was developed more for styling. porcelain stoneware tiles, but even more so with ordinary tiled. No less reliable is CerezitSM 17", excellent for the most difficult operating conditions and the most "problematic" floor surfaces. And the highest plasticity and ability to adhere to any base of Vetonit Renovation tile adhesive make it possible, according to the assurances of the masters, to do without even roughening the old tile coating.
The laying process itself is not particularly different from the usual work. concrete base. If you strictly follow all the recommended technological methods, the floor in terms of its strength will not lose in any way to any other type of tiled tile coating.
Video - Laying tiles on top of the old floor
Video - How to lay tiles on the floor yourself
Like all the others Finishing work, laying tiles begins with careful preparation of the base. First of all, you need to start by removing the old tile. To do this, we need a puncher with a lance. The sequence for dismantling the tiles is as follows:
Use a sponge to dampen the seams between the tiles.
Clean the joints of the grout mixture with a metal spatula.
Inserting the peak of the perforator into the seam between the tiles, remove the tiles from the wall. It is better to dismantle the tile from top to bottom.

The tile can be removed in another way - with a hammer and chisel. First, the seams, as in the previous method, are wetted and cleaned of grout. Then a chisel is inserted under the top tile and the tile is knocked down with hammer blows. However, this process is more labor intensive than using a puncher and will take longer.
How to put tiles on a wall
After you have removed old tiles, thoroughly cleaned the walls, leveled (if necessary) and primed them, you can lay tiles on the wall.
Surface marking
It's worth starting with the markup. Using a level, draw a line that marks the height of one tile from the floor, remembering to take into account the width of the joint. If you will glue the tiles, starting from the second row, then on this line is installed metallic profile or a bar so that the tile has support.


If you are laying tiles on the walls after laying the floor tiles, then you can start laying the tiles from the first row.
But if you lay the tiles initially on the walls, then you should lay them starting from the second row. The first row is left in the end so that it covers the floor tiles.
Laying tiles
So, you have marked the walls and prepared the glue according to the instructions on the package. We apply glue to the walls with a notched trowel. Glue should be applied on a small area, no more than 1 m², otherwise you will not have time to stick the tile 0150 glue quickly hardens. Next, apply glue to reverse side tiles and firmly press it against the wall.


Important! Tiles on the walls must be laid in horizontal rows, you can move to the next row only after you have finished the previous one. Check the horizontality of the rows with a level. To ensure that the seams between the tiles are the same, use distance crosses.
Approaching the edges of the walls, it often becomes necessary to cut the tiles. To find out how best to do this, read the article How to cut ceramic tiles.
Grouting
After the tile has hardened, you need to wipe the tile seams. To do this, the grout mixture is diluted, which is applied to the seams with a rubber spatula. For more information on this, read the article How to grout the seams on the tile.


After everything dries, wipe the tile with a damp sponge. Wall tiling completed.
Archaeologists claim that laying tiles on the floor and walls, decorating a dwelling or room, began in ancient Babylon. The beautiful tiles that were used to finish the surfaces of the hall for the kings of antiquity never cease to amaze the scientists who made these finds. Each tile had its own manufacturing technology. Each particle played a big role in the final pattern. Not a single generation will remain indifferent when they see this beauty, and the complexity of the work is admirable. Modernity makes this work easier, allowing you to purchase ready-made options. Making it is easier, the work is done faster, and the possibility of replacing a marriage is much higher. How not to make a mistake when choosing materials, what tools are used, the algorithm of work will be prompted by the material below.
Dear masters, I may not be useful when saving correct sequence preparation of the coating for laying the tiles yourself. The costs will be minimal. And if you calculate the price of tools and the material used, you can save a lot. If you still decide to lay ceramic tiles yourself, then you need to follow certain rules. They are designed to be able to maintain the attractiveness of the final work and its durability.

You need to lay the tile, following the sequence:
- Prepare the surface;
- Mark the position of the initial row and set the support limits;
- Run the first row;
- Fill the entire surface with solid tiles;
- Cut and lay the remaining pieces;
- After all, wipe the seams.
Preparation means: plastering the walls and getting rid of the remnants of the past coating. Remove all skirting boards, clean the wall from dust and dirt. If the floor is laid, then it is necessary to form a screed. If this is a room with high humidity, you need to add a layer of waterproofing.
Before laying tiles make markings.
A plastic corner is placed along the bottom of the wall, on which the first tiles are oriented. A line is needed to control the vertical stacking. The floor, unlike the wall, starts from the far corner. Lay out the full line at the door, so as not to lose the drawing later. Having completed all the work with solid tiles, it is worth starting cutting the missing pieces and laying them. It is better to put them after they are completely filled with whole pieces. After waiting until the adhesive solution dries, you can remove all the crosses and overwrite the seams. Any grout is chosen: with a base of cement, silicone or epoxy. Before grouting, it is necessary to thoroughly clean the laid tiles and the seams between them with a vacuum cleaner.
How to lay tiles correctly
For a competent choice of tiles, it is necessary to take into account its characteristics: moisture resistance, price, resistance to large temperature changes, composition.

The sequence of work on laying tiles:
- Starting point;
- Adhesive laying;
- Laying tiles on glue;
- pruning;
- Grout.
In order to start laying tiles, you need to decide on the pattern and the number of elements on the surface. After that, it is necessary to prepare the surface of the tile, and apply the required amount of adhesive. The adhesive composition is applied to the surface with a spatula and leveled until a uniform layer is formed. The tiles are laid on the glue.
Horizontalness is checked by a level.
In order to level the tile, use a rubber mallet: you need to knock on its plane. Crosses are laid between the tiles, affecting the thickness of the seam. If necessary, the tile can be adjusted to size by cutting it with a grinder or other tool. The final result can be seen in a couple of days, this time is necessary for the adhesive to harden.
Do-it-yourself high-quality tiling
The characteristics of the selected tile depend on the room in which it will be used. Therefore, it is necessary to choose a tile that will meet the criteria of the room where it will be used. Premises that are "friends" with tiles - bathroom, kitchen, sauna, hallway.

Tools needed for laying tiles:
- Cutter;
- Saw;
- Glue;
- Level;
- Gloves;
- Yardstick;
- Scraper;
- Primer;
- Liquid container.
For rooms with a high degree of humidity, it is worth choosing a tile that is more resistant to this criterion. If this is a room with the possibility of repeated use (entrance hall), you should choose a tile that will not show signs of wear. For a bath, it is better to use tiles that are resistant to high temperatures and with a matte finish to prevent falls. For the kitchen, it is necessary to choose a tile that has high resistance to shock and exposure to heat, as well as chemicals.
In order to properly lay tiles without screeds, it is necessary to prepare a solution. Do not use a special mixture of ceramic glue. It is better to use a cement-based mixture with the addition of sand and PVA glue.
It should be borne in mind that adding liquid and glue to this mixture, it must be made not liquid, but thick.

Mixing can be done on the floor. Laying is carried out on this mixture. Evenness is checked with a level. After that, the tile is removed and the surface on which it was glued is additionally moistened with water, bringing the solution to a more liquid consistency. Next, you should finally lay the tile in the place where it was before. After carrying out such manipulations, the solution is saturated with water and has all the necessary qualities. At the end of the laying, it is necessary to give a few days for the solution to dry.
Materials used:
- Ceramic tile;
- cement-based mortar;
- Alignment tools;
- Water.
This method is suitable for people who have experience in construction work. Before you lay out the tiles by this method, you should read the long instructions and the list of materials, the sequence of performing such work.
Do-it-yourself correct laying of tiles on the floor
The correct installation depends on several elements. Choosing tiles for the floor in our house, we are guided by its location in the apartment. If the tile is selected on the balcony or hallway, take into account its size. Large tiles are more suitable for these rooms. A bathroom or kitchen needs small tiles. There is a tendency to tile in the kitchen various types and drawings. The selection of tiles in the bathroom with an original ornament is relevant, which will competently fit the water theme and give the room its own zest.

To be able to properly lay tiles on the floor, the following sequence must be observed:
- Preparing the floor for laying;
- Applying the solution to the surface to be laid;
- Alignment of the solution on the surface;
- Installation of tiles on the surface;
- Checking and adjusting the horizontal position of the tile with tools and dismantling the marriage;
- Filling the joints after blowing them with a vacuum cleaner.
Regardless of the location of the tile and its properties, the laying is as close as possible to the sequence. Materials and tools are selected, depending on the budget and convenience. It is also worth paying attention to the class of the tile and its quality, because modern times are rich in materials and binders to them.
Too porous tiles are completely unsuitable for a bath, but it will be nice to serve in the hallway.
Professional answer: how to lay tiles (video)
If there are children in the house, then the cleanliness of the floor and walls will go by the wayside, since the tiles are wonderful to clean and dry for a short time. The fact is that tiles do not retain heat well. This is its disadvantage. Therefore, it is worth having floor heating or a nice rug. Over time, scuffs form on the tile, and it appearance fades. It is worth responsibly approaching the care of tiles. The steam cleaner takes good care of it. After exposure to steam on the tile, it is necessary to wipe it with a dry cloth. When buying a tile, it is worth taking it with a margin, in case of mechanical damage.