How to lay tiles on the floor and walls: step by step instructions. Wall cladding with ceramic tiles - types of materials
For the bathroom and toilet, a better finishing material has not yet been invented than ceramic tiles. It is resistant to moisture, mechanical damage, and aggressive cleaning agents. The range of modern ceramic tiles is so diverse that design options for a bathroom can be invented almost endlessly.
By figuring out how to lay tiles on a wall, even a beginner can finish the bathroom. However, this is a laborious task, requiring careful preparation and precise adherence to the technology of work.
Rules and subtleties of choosing tiles
First, you should think about the design of the bathroom. Ceramic tiles differ in a number of indicators:
- configuration;
- size;
- color;
- invoice;
- thickness, etc.
A very important point is the materials used for the manufacture of ceramics. In particular, those additives or the latest manufacturing technologies that give strength, surface texture quality, color, gloss or dullness, and other estimated indicators.
The table shows the main indicators of ceramic tiles produced by manufacturers
The easiest option is to finish with tiles of the same color and configuration. Even in this case, it is possible to vary the laying order of individual ceramic elements in order to achieve a certain pattern. But such a simple option is almost never used today.
Designers combine different elements in a variety of ways to give the room a unique style.

One of the options for spectacular decoration of bathroom walls using ceramic tiles, which also acts as a frame for a large mirror
There are almost no strict rules regarding the combination of individual tile elements, the main thing is that the design of the wall decoration is designed with taste. Often the walls are finished with light tiles at the top and dark ones at the bottom, separating the border of the color transition with a special border.
A non-trivial finish: large light elements separated by narrow stripes of bright rectangular tiles laid vertically.

This finish looks spectacular in small rooms. Pay attention to the different options for laying tiles in the bathroom
A monochromatic tile canvas looks attractive when elements of the same color, but of different sizes, form a geometric pattern. Usually, elements of two to four types with multiple sizes are used for this.
To decorate the bathroom, you can use ready-made mosaic panels or ceramic tile sets, which, when laid according to the scheme, form a specially designed image. When using tiles of different colors and sizes, it is recommended to choose elements of the same thickness, otherwise the laid tiles will look sloppy.
The order of laying individual elements in a single tiled canvas may be different. Among the most popular options are:
- classical, the so-called straight seam, in which the tiles are placed end to end to each other, forming long and straight tile seams;
- apart (with offset) when in even and odd rows the elements are displaced relative to each other, imitating the pattern of brickwork;
- rhombus, when using square elements rotated 90 degrees, the result is beautiful diagonal seams;
- at an angle or diagonally- diamond laying variations for square tiles.
Of course, every master has every right to realize any tile fantasy. Elements of the correct geometric shape can be combined in any way, as long as it is technically possible and does not go beyond the budget.
Preparation of premises, tools, materials
First you need to dismantle the layer of old finish, as well as remove all plumbing and furniture that may interfere with the laying of tiles. If furniture, a bathtub or other fixtures must be left in the bathroom during work, it should be covered with some kind of shock-absorbing material to prevent damage from accidentally falling tiles or tools.
The base for laying tiles must be perfectly flat and clean. First, it is recommended to eliminate all cracks, chips and other irregularities in need of repair. Then the walls are usually leveled with a layer of plaster, checking the result of the work with a building level.
However, if the difference in individual sections of the wall is more than 50 mm, it makes sense to use gypsum boards for the walls.

There is never too much primer (adhesive base)! This is the motto of the master tilers
Of course, only moisture-resistant drywall should be used for the bathroom. The surface of the plasterboard walls is also carefully leveled.
To calculate the number of tiles, you need to measure the length and width of the walls. One more square meter or a little more is added to the footage of the wall surface. It should be remembered that some of the elements may break, some elements will have to be cut. In the same way, other decorative elements are taken into account: borders, panels, mosaics, etc.
It is better to immediately buy the right number of tiles, making sure that all packages are from the same batch. There are cases when individual tiles from different batches with exactly the same characteristics, still differ slightly in color intensity. But the elements from the same batch are usually completely identical.
Tile adhesive can be purchased as needed. Before starting work, you should carefully study the instructions for use of the composition and strictly follow the manufacturer's recommendations. An important indicator is the lifetime of the finished composition. Do not prepare glue for future use, since it must be used in a fairly short period of time.
In addition to tiles and glue, you will need a number of other materials and tools:
- waterproofing and primer mixture;
- composition for grouting;
- drill with a special nozzle for kneading glue;
- a convenient bucket for the preparation of adhesive composition;
- building level;
- spatulas;
- sponge;
- tile cutter;
- corundum bar;
- roller for priming work;
- metallic profile;
- plastic cross clamps.

All tools and consumables can now be purchased in one specialized hardware store according to the list
Experienced tilers can cut tiles with a regular grinder, but beginners are still advised to use a tile cutter. For home use, there are inexpensive models of this tool. Might need a little practice.
The cut edge of the tile is ground with a corundum bar. If it is necessary to make round holes in the tile, it is recommended to use a drill with a special nozzle, which is called a “ballerina”.
In addition, holes in the tile can be cut with special tile tongs, which will gently break off unnecessary pieces. To properly lay the first row, a metal profile is sometimes used for support.

A tile cutter is a handy tool that allows you to accurately cut tiles along a straight line. To create round holes, use special tongs or a ballerina drill attachment.
Different spatulas are used for applying different compositions. Tile adhesive is usually applied with a special notched trowel, the size of the teeth depends on the size of the element. Such a spatula allows you to apply glue more evenly, reduce the consumption of the composition, and reduce the amount of excess.
Plastic crosses are irreplaceable for formation of ideally equal seam between tiles. Excess adhesive protruding between the seams should be removed immediately with a sponge, preventing it from drying out.

With the help of plastic cross clamps, you can easily ensure a uniform width of the tile joint when laying ceramic tiles.
The walls of the prepared room are treated with a primer, then a coating waterproofing is applied, usually in two layers. The primer layer and each waterproofing layer should be given the necessary drying time, taking into account the recommendations of the manufacturer. Failure to comply with this rule can significantly impair the adhesion of the tile to the wall.
Step-by-step technology of work
The process of laying tiles on the wall is simple and time-tested. Some instructions on how to properly lay tiles on a wall tell you to lay the elements from the top edge of the wall to the bottom. In practice, tiles are usually laid from below, as it is more convenient. An important condition: constantly check the location of the elements horizontally and vertically.
First, it is recommended to lay out the bottom row of tiles without glue, i.e. just put the tiles along the walls. It will immediately become obvious whether it is necessary to cut the tile and where exactly to place the incomplete elements so as not to spoil the pattern.

If a space of more than 25 mm appears between two adjacent tiles, a different laying pattern should be used.
Usually attempts to adjust the arrangement of elements to such a large gap do not bring success. It is easier to cut the tile with which the row begins.
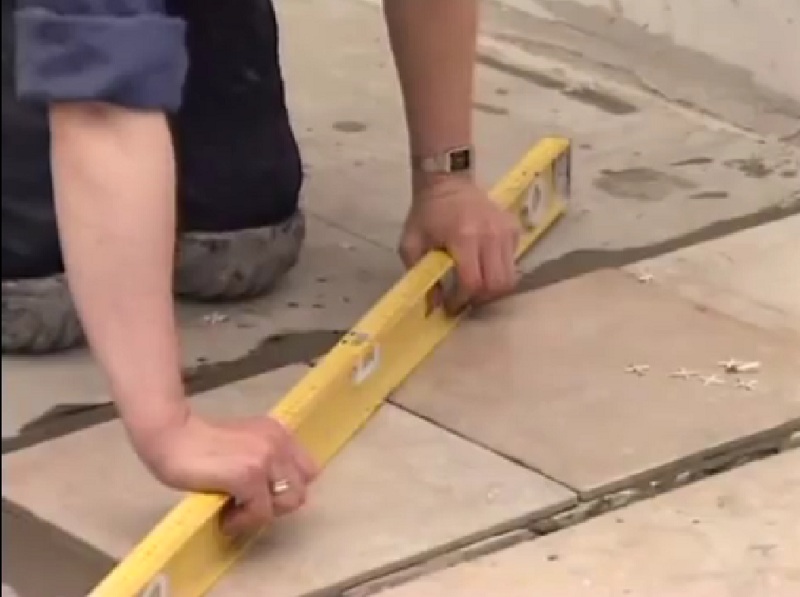
After that, on the wall with chalk or a pencil, the place of the beginning and end of the row should be marked, i.e. first and last tiles. Beat off the first row using a horizontal level. To do this, draw a horizontal line at the bottom of the wall across the entire width of the wall.
If you correctly draw such a line along the four walls of the room, its beginning and end should coincide. The absence of such a match means that the markup is incorrect, you need to redo it.

Before laying ceramic tiles on the wall, the necessary markings for work should be applied using chalk, pencil or marker
Then, using a plumb line, you need to draw vertical lines. During the laying process, the vertical and horizontal lines of the laid rows of tiles should be constantly monitored to avoid errors.
Even a small deviation unnoticed at the beginning can later lead to a noticeable bias, and all the work will have to be redone. Another important point when marking: the joints of the base plates. The tile seam should not coincide with them.

A laser builder's level can make quality control much easier during a tile installation job, but a regular level and plumb line will work too.
To facilitate the laying process, work is performed in small sections. It is recommended to mark with horizontal lines the junction of every four rows of tiles. Having chosen a small area, a pre-prepared tile adhesive is applied to it using a notched trowel, and tiles are laid on top. Then check the quality of work using a level and a plumb line.

Usually, tile adhesive is applied to a small section of the wall, and then the tiles are laid on it in accordance with the scheme drawn up in advance.
If distortions are found, the work is redone. After that, the next section is laid, checked, etc. To ensure that the distance between the tiles is the same, fixing crosses are installed at the corners of each element.
It is very important that the tile adhesive evenly fills the entire space under the tile. Voids can be identified by gently tapping.
The process of laying tiles on the wall is presented in detail in the following video:
Experienced craftsmen sometimes put glue not on the wall, but immediately on the tile. This method also has every right to exist. It is believed that the surface of the tile, in contact with the adhesive, can dry it out a little.
It is recommended to moisten the surface of the tile with water before laying to prevent the adhesive from drying out and to maintain the recommended humidity. If adhesive protrudes between the tile joints, it must be removed immediately with a damp cloth or sponge. Dried tile adhesive is more difficult to remove, you can spoil the whole work.
Instead of special tile adhesive, cement mortar can be used to save money, however, in this case, some problems may arise. For starters, it will be difficult for novice tilers to prepare the right grout. In addition, to work with such a composition requires a certain skill.

With modern technologies, it is quite possible to obtain a composition with desired properties: setting time, how firmly it adheres, particle size, how long it will last, etc.
Currently, even experienced craftsmen prefer reliable adhesives to cement mortar. When studying the manufacturer's instructions for tile adhesive, you should take into account the recommendations for the tools that need to be applied. The default is a notched trowel. Here are some more tips for working with tile adhesive:
- the consistency of tile adhesive for walls should not be too thick and not too liquid;
- for laying ceramic tiles on the wall, it is worth choosing an adhesive with a shorter setting time in order to avoid accidental deformation of the position of the already laid tiles;
- when pressing the element to the adhesive layer laid on the wall, moderate force should be applied so as not to damage the tile and not to squeeze out an excessively large amount of glue from under it;
- if part of the glue that has come out onto the surface is still dry, a plastic or wooden spatula is used to remove the excess, but not a metal one, which can scratch the tile.
If you need to make an even cut on the tile, it is best to use a tile cutter. Serifs should be made on the front side of the element, and then quickly held with the cutting edge of the tile cutter in the right place several times. After that, the tile easily disintegrates along the notch line.
The way to cut tiles without a tile cutter is presented in this video:
After the laying of the tiles is completed, the final stage of finishing work begins - grouting. For grouting, a special grouting compound is used, which must be correctly selected by color. You can choose a grout that completely matches the color of the tile or a composition of a darker / lighter shade.
If the grout of the desired color is not on sale, you can mix a darker grout with white to achieve the desired effect. Sometimes a grout of a contrasting color is used to make the tile seam stand out. To apply the grout, a special rubber trowel is used, which is moved not along or across the rows of tiles, but diagonally. At the end of the grouting work, the tiles can be washed immediately.

The grouting of ceramic tiles is carried out using a special compound and a rubber spatula, the movements of which should be directed at an angle to the seam.
Laying tiles is a time-consuming process that requires careful attention. However, the result is a durable finish that will last flawlessly for years to come.
It is difficult to imagine a modern renovation without the use of tiles. Ceramics has a lot of advantages that other finishing materials do not have. And when you need to complete the design of the bathroom, then you can’t do without tiles at all. And you need to remember that laying tiles is an expensive pleasure, but it is very interesting to do it.
Due to the combination of these factors, the ranks of tile fans are growing, so many people want to feel like a “tile master” and do the installation themselves.
Before you get down to business, it is advisable to take a theoretical course, so today we set out to acquaint everyone with how to lay tiles on a wall.
We will not talk about laying floor tiles, but be sure that if you manage to tile the wall, then you can handle the floors for sure. When laying tiles on vertical surfaces, you need to take into account gravity, take a course in complex geometry, and much more that you will encounter in the process. But, as they say, it is not holy pots that are burned, so let's get started.
Surface preparation
We recommend laying ceramics on an adhesive mixture or a cement-sand mortar. The base is prepared depending on the type of mixture chosen. If you chose glue (and this is not surprising), then the walls are leveled with plaster or drywall sheets on glue. The main thing is that the surface of the base is as flat as possible.
If you work on a cement-sand mortar, then the layer of the mixture will be large enough, but you will have to pre-level less. We will talk about how to lay tiles on a flat surface. This method is much simpler, more modern and much easier to learn. The "mortar" method is more suitable for professionals with many years of experience, although even some experienced tilers find it difficult to work with it.
Make sure that the base is at least approximately perfectly level. So that there are no pipes on the surface (there are special boxes for this), and the laying of ceramic tiles on the wall is continuous, without being distracted to the side due to various obstacles. If the surface is even, then the glue costs will be minimal, and the cladding will go at an accelerated pace. The prepared base must be primed, especially plastered.
If laying is planned on a painted surface, then you need to either remove the paint or notch the wall. It is important that nothing falls off the wall and does not peel off. A properly prepared base is a guarantee of beauty and durability of the installation.
Required tool
For wall cladding work, you will need a certain tool, so you should arm yourself in advance:
- trowel or spatula;
- notched trowel (comb);
- bubble level;
- water or laser level;
- wire cutters;
- tile cutter;
- rule 1.5m;
- grinder with a diamond disc;
- crosses and wedges for tiles;
- foam sponge;
- rubber spatula.
In addition, you will need a hammer and a tape measure, we hope that you won’t have to buy this - a good owner always has such a tool. To knead the glue, you will need a drill with a special nozzle, so try to get it too. You can prepare the glue by hand, but it is long and difficult, besides, lumps of unmixed glue will remain, which negatively affect the result of facing work.
We perform markup
The very first rule of proper installation is that important and visible places should be covered with a whole tile. Cut tiles are laid in less visible places. The calculation of the number of required tiles is carried out at the leveling stage.
There are cases when the base was covered with a large layer of mortar, if a piece of tile is too miniature in the corner. It is better to donate a small area than to admire the "stub" two centimeters in the corner for many years.
If the corners are of visual value, then reduce the trim to the edges of the row. The size of the cut in the corners should be the same. In this matter, you can be guided by certain rules, but the decision is still yours.
The main rule of vertical layout is a whole tile at the top. But there are no rules without exceptions, so decide for yourself, with your own taste and common sense. An important role is played by the height of the floor and ceiling, the size of the tile joints. Of course, they are small, but given the scale of the cladding, they can accumulate up to extra centimeters.
Markup is performed depending on the selected layout method, the most popular of which are:
- seam to seam;
- scatter;
- diagonally.
If you are a beginner, then you should not take on diagonal styling - it is the most difficult.
The “spread out” method is an imitation of brickwork, it is easy to perform, even for a novice tiler. The most common type of laying is seam-to-seam. When it is performed, the vertical and horizontal are exactly observed, because even the smallest deviation will become noticeable.
All about the correct layout in this video:
Laying starts not from the first, but from the second, sometimes even from the third row. It is necessary that the floor tiles be covered with wall tiles, because:
- much prettier view;
- water that flows down the walls will not linger in the contour seams;
- cutting wall tiles is easier than cutting floor tiles.
If the floor is already lined (wrong, of course, and in violation of technology, but it happens), then laying on the walls begins from the first row. But this option is not very welcome, because then trimming will turn out under the ceiling.
If you have already determined where the lighthouse row will be, then mark the top edge of the first row with a water level. Laser would have turned out faster and easier, but for the sake of one cladding it is not worth buying.
Make horizontal markings around the entire perimeter, see how the tiles lie around the pipes. You may need to shift the mark so as not to suffer with a difficult cut. Ready-made notes:
- the beacon cord is pulled;
- a solid line is drawn.
It is better to use the first option, you will be able to control the horizon and the plane. If you are cladding on a solution, then only the first option will do. Vertical control can be performed with plumb lines or the same line, but along the Y axis.
Facing on glue provides for the use of a support bar in the work - for fixing the beacon row. Most often they use an aluminum profile or a wooden lath.

Laying tiles
For cladding, we choose an adhesive mixture that will fully cope with the task. No need to try to knead the glue by hand, it is difficult to achieve a normal consistency and avoid lumps, so it is better to work with a mixer.
The glue is applied with a spatula - either on the base or on the tile, the excess is removed with a comb. After that, even grooves are obtained, forming a uniform layer.
The size of the comb teeth must match the size of the tile and the degree of readiness of the substrate. If the size of the tile is large and the surface is not very smooth, then the teeth of the comb should be larger.
We carry out the laying of the first tile, focusing on the horizontal and vertical marks. If you are working with a cord, then the cladding process must begin from the corner of the second row, then remove the thread and continue laying the rest of the tile.
For fixing, you need to use wedges that are inserted between the support bar and the tile. Lay only whole tiles for now, you will return to trimming closer to the end of work. Crosses are inserted between the tiles for even seams.
The most commonly used thickness is 2 mm.
The plane of the cladding can be controlled with a cord or a rule. The edge of the tile should lie on the lighthouse line. Checking each row for verticality can be done with a bubble level. It is in this order that the walls are tiled independently.
Pruning can be laid immediately, but most often it is done at the final stage. In work, adhere to the chosen scheme and carefully follow the pattern on the tile. Very often it is uncertain and it is not always clear which side to lay the tiles. This is not difficult, because on the back of each tile there are arrows showing the direction of the pattern, it is for them that you need to navigate and lay them in one direction.
Proper wall cladding in the bathroom in this video:
We cut tiles
With self-facing, it is absolutely not necessary to buy an expensive tool for. If there is a tile cutter, it’s good, if not, you can take a glass cutter or a scriber with a winning tip. Immediately you need to outline the line where you want to cut the tile, then the tile is fixed on any smooth surface.
We draw along the intended line several times with any tool, lay the tile on the corner and press - we get the finished trim. If you work with a tile cutter, then you need to cut along the cut line once, otherwise you can simply break the tile or get an uneven edge.
This is how straight lines are cut, but figuratively cut tiles are also needed for cladding. To get a round hole, you can use a grinder and a diamond disc. When you need to make a lot of holes, and there is no angle grinder, then they just take a cheap diamond-coated blade. The process will be long and laborious, but not expensive.

We overwrite the seams
After any laying of tiles, it is necessary to grout the joints using special compounds. The work is done with a rubber spatula, with which the mixture is densely distributed at the seams. The speed of grouting depends on the choice of material and skills in such work. Up to 4m2 of surface can be treated at the same time. A sponge is used to remove residue. It is also used to distribute along the seam and level the putty.
Independent wall cladding, which we talked about today, has some nuances that you need to remember:
- Before starting facing work, carefully examine your tile. First of all, you should be interested in geometry, calibration and quality. Sort all the tiles according to size, so there is every chance of getting the same seams.
- Pay special attention to surface preparation, do not skimp on the primer and make all corners square.
- Use for outer corners - not very aesthetically pleasing, but safe, especially if there are children who can slip and hit the corner painfully or even get seriously injured.
- A dry surface is required for laying tiles.
We calculate the costs
Let's calculate our expenses for laying tiles in a bathroom with an area of 3.5 m2:
- Guide profiles 27x28 mm - 2 pcs - 90 rubles.
- Glue for tiles Fix 3 shtx25 kg - 717 rubles.
- Strengthening primer Plitonit 1 l - 98 rubles.
- Plastic crosses 2 mm 300 pcs - 60 rubles.
- Grout Kiilto 3 kg -320 rub.
- Dowels and screws - 20 rubles.
In total, we spent 1305 rubles on laying, excluding the cost of tiles and work on preparing the foundation. If you decide to make the cladding yourself, then you will also need to buy all the necessary tools. If you invite a master, then laying tiles on the walls of the bathroom will cost you from 13 to 15 thousand rubles + grout.
Which option do you prefer - purchasing the right tool and tiling yourself or paying for the work of a master tiler and simply waiting for the work to be completed? This is up to you to decide.
Cladding walls and floors with tiles has become an almost indispensable element in home improvement. Ancillary facilities such as bathrooms, toilets and kitchens are especially demanding in this regard. And the point is not only in the ease of maintenance of surfaces, but also in the ability to arrange a decorative finish using various patterns of paintings or mosaic panels. This design is always presentable and beautiful. In this article, we will tell you in detail how to lay tiles with your own hands.
Preparatory work
Even having thoroughly mastered the cladding technology, you can ruin any idea by choosing the wrong cladding material.
In this article, we will try to draw attention to a number of features of this process in order to avoid such a situation.
Like any construction operation, the installation of a finishing coating on walls and floors requires a certain sequence of actions, the final result depends on the precise implementation of which. A technology describing how to lay tiles might look like this:
Wall preparation
Before laying tiles on the wall, you must:
- remove the old wall covering, if it is the same material - it is alternately pry with a spatula and torn off, the remnants of the old adhesive composition must be carefully removed. Old paint must be treated with a special solution, after a few hours it will swell and can be removed with a scraper. If the paint still remains on the walls, you need to heat it with a building hair dryer (up to 600 degrees) and remove it;
- make an audit of the quality of the coating, cut the cracks, cover them with putty, along with the slaughter. When the plaster mortar hardens, sand the repair areas with sandpaper;
- apply a layer of primer to the surface. It can be prepared from tile adhesive by diluting a glass of the mixture in 8 to 10 liters of water. Particular attention should be paid to removing oil and grease stains from the surface, if any;
- measure the deviations of the angles from the vertical, if possible, eliminate their curvature and deviations. To do this, you can use plaster, a popular way is to install a waterproof plasterboard.

Removing old tiles can be a serious problem due to the high labor intensity of the process. Therefore, many consider the question, is it possible to lay tiles on tiles? With regard to wall decoration, we can say unequivocally - this method of cladding is not used. The reason for this is the low adhesion of adhesives to the glossy front surface of the old coating. Of course, you can choose an adhesive for such a case, but there is no guarantee that the tightening forces of such adhesives will not break the old adhesive layer and both layers will not fall off.
It is possible to lay tiles on tiles on the floor, but at the same time, the requirement of SNiP must be observed, indicating that the floor level in the bathroom should be 10-15 mm lower than in the adjacent rooms. And the thickness of ceramic granite or tiled floors of the 4th category of strength tiles will be, together with the adhesive layer, about 20 mm.
Selection of tools and fixtures
For wall tiling you will need:
- container for glue;
- nozzle and drill for stirring it;
- glass cutter and grinder - cutting tiles;
- trowel - for applying glue to the wall, lining;
- notched spatulas - for leveling the composition on surfaces;
- construction level;
- a set of crosses and wedges for positioning tiles at the installation site;
- rubber mallet - for aligning parts along the plane;
- rubber spatula - for leveling and removing excess grout;
- foam rubber sponge - for cleaning tiles from adhesive residue, grouting in the course of work;
- roulette;
- ruler and marker for marking parts before cutting;
- file flat and round (semicircular) - for processing break surfaces and openings for communications;
- core drills for making holes.

Other tools may be needed, in particular, wire cutters or pliers to break off thin cuts.
If you decide to save money on apartment renovation and want to try laying tiles yourself, then I advise you to think again - this is a complicated, nervous and dirty business. Further you will understand why. And another important point, if you are redoing, then the old tile must be beaten off using a puncher and a special chisel nozzle. Be sure to wear a mask or goggles.
So, let's start with laying tiles on the floor
I want to warn you right away that before laying the tiles, a MORE OR LESS EQUAL SCREED (evenly poured cement) must be made throughout the apartment.
Necessary tools and materials
Primer, for example, the brand "Prospector"
Paint roller to prime the floor

paint tray (trough with a primer, where we will dip the roller)

Level, e.g. ERMAK rail, 1.2 meters long

A large metal bucket of 30 liters, and even better 40

Special needle roller for rolling out self-leveling floors

Powerful perforator (Energomash PE-25900)

Nozzle mixer on the perforator

Self-leveling floor "Found T-45" (the number of bags depends on the degree of slope and area)

A bucket of 10 liters for dosing water when mixing the self-leveling floor

Tile adhesive. I prefer LITOKOL LITOFLEX K80 eco (number of bags based on area)

Toothed trowel (toothed trowel) for spreading glue on the floor

A narrow spatula or scoop to scoop up tile adhesive from a bucket


Tile cutter, for example, Zubr Expert

Grout for jointsGERESIT

Bulgarian

Attention! Before laying tiles in the bathroom and in the kitchen, do not forget to coordinate the pipeline communications with the plumber, since, for example, piping must be carried out before laying the tiles:

A threshold (in the center), in which the bathroom drain pipe and a sanitary cabinet (left) pass.
Floor leveling
The first thing to do is to level the floors.. Now it is quite simple, since self-leveling self-leveling floors have appeared. Personally, I liked the Founding T-45 the most.
Take, for example, the kitchen. With the help of a level (preferably at least 1.2 meters long), we will see the general slope of the floor and determine the lowest place in the kitchen. Sweep the floor and prime it with a paint roller.
Let it dry for an hour, and then you can start pouring. Further, depending on what large bucket you have, you need to calculate the dosage for the self-leveling floor mixture. I had a bucket of 30 liters. I poured about 8 liters of water into it and one bag of self-leveling floor “Found T-45” (20 kg). Proportion is important! No more and no less than 7.5-7.7 liters of water per bag!
Recipe and mixing method: We measure about 8 liters of water into a small bucket and pour it into a large bucket. Next, pour out TWO THIRD bags of self-leveling floor, take a perforator with a mixer nozzle and mix (spray, of course, will fly). We interfere until a homogeneous solution is obtained (if at the same time we still drive in a circle with the perforator itself, it will turn out very quickly). Next, pour the remaining powder from the bag and mix again. Let the solution brew for 5 minutes and stir a little more, and SLOWLY pour it into this lowest place. Slightly roll out the puddle with a special needle roller for rolling.
The floor dries within an hour, after which it can be carefully stepped on. Again, check the “improvements of the floor” with a level and repeat the whole procedure - of course, the place where we will pour the second time must be determined again. In a small kitchen, I think that it will take 5 or 6 bags of self-leveling floor, but again it depends on the curvature and area. After leveling, it is recommended to wait three to four days before starting to lay the tiles.
Tile laying
So, we proceed directly to the masonry.
I advise you to lay the tiles with a rhombus, and it’s more beautiful to the eye and small irregularities are hidden very well, which will be in any way, since the tile itself is also slightly curved, and, for example, the geometry of a new house may be uneven due to shrinkage:
Diamond laying allows you to hide inaccuracies from the eye:

With rectangular masonry, irregularities are possible that the human eye will immediately notice when entering the room:
The first thing to do is to measure the center of the kitchen by drawing lines from the centers of opposite walls:

And, starting from the point of intersection of the lines, lay out ALL the tiles on the floor (estimate the big picture).
Thus, it will be seen whether the overall picture is even, and how many tiles will need to be cut and how:

Red shows those tiles that will have to be cut:
.jpg)
The most important thing here is the central 4 tiles, which are placed first.
Mark with a pencil the position of the central four tiles, then remove all the tiles:

In a small bucket, using a perforator ( PUNCH, OF COURSE, IN SIMPLE DRILLING MODE) and a mixer nozzle, knead a solution of tile adhesive. For proportions, read the instructions on the bag. From myself I can say that the glue should be, well, like thick sour cream. After the solution is ready, we spread it with a notched trowel (trowel) on the floor, in the place where these four tiles will lie. We take the part of the solution necessary in height from the bucket with a scoop or a narrow spatula and plop in the middle of the outlined square, then smear it with a trowel. It is not necessary to smear to the edges of the outlined square. The area of the adhesive solution must be at least 70% of the tile surface. But it’s better not to spare the glue and smear it completely over the surface with a layer of at least 5 mm, put it for yourself!

We glue the tiles according to our marks.

ALWAYS use crosses for seams!
Well, after the first four tiles were glued, the rest with glue, as it were, in a circle. You need to constantly monitor the level, because. surface curvature is always present.
I will add that after you have glued sixteen tiles, if everything is even for you, then everything else will be fine.

After the tile is glued, we wash it and clean the seams (I did this with an awl, it’s not necessary deep). Well, we cover them with grout - it's not a difficult matter, but read the instructions on how to dilute the grout on the package.
The most difficult (nervous) in this work is that the seams begin to diverge, as it were. Therefore, I advise you how to lay the main part at a time, because, while the tiles have not yet stuck, they can be trimmed. From myself I can say that, as it were, I learned to catch these seams only the third time, having spent a lot of strength and nerves.
Laying tiles on the wall
As a rule, tiles are laid on the walls in the bathroom. In general, it’s easier to put on the wall than on the floor, but the whole difficulty here is that we have a bathtub, and taps go to it, as well as a heated towel rail, a plumbing hatch, all this must be taken into account. Trying to describe the whole process of laying tiles in the bathroom is simply not possible, because. bathrooms and baths are different for everyone, but I will describe at least the general provisions.
The number of tiles will help you determine the store. Well, or you can do it yourself - take the width of the wall, multiply by the height and multiply by two. Then we measure the second wall and in the same way. But still, it’s better with the seller, who will deduct the door area for you and so on.
Please note that before laying tiles on the walls, the walls must be leveled, plastered!
On my own, I can add that laying on an uneven wall is fraught with crooked seams, one tile is deeper recessed than the other, and it’s just that the overall picture immediately deteriorates.
Also an important point - at the beginning, plan where and what you will have, consult with plumbers, since, for example, pipes must be laid before laying tiles!
So, laying tiles in the bathroom should start from the floor, which we already know how, but here the floor level should be perfect! In addition, before we started trimming it with a self-leveling floor, it is possible to treat the floors with waterproofing. An important point is that there will be no skirting board in the bathroom, that is, the gap between the walls (before the wall tiles are glued, so that later this gap can be closed with it) and the floor tiles should be no more than 1 cm. Then you need to cover the floor with something, so as not to chip the tiles on the floor during work - best of all, cardboard or hardboard, or some old unnecessary carpet.
A small digression - if you want to have a warm floor, then of course, first you need to choose the warm floor itself. According to the laying technology, warm floors differ: some are walled up in a screed (which, accordingly, requires the removal of the existing screed and the creation of a new one, but already with a warm floor), some in a layer of tile adhesive (of course, laying such floors is easier). I chose the one that is laid in a layer of brand glue.

The choice is due precisely to simplicity - there is no need to remove the old screed, lay a special heat-reflecting material, and most importantly - this floor heats up faster. Although after reading the reviews about warm floors in general, I realized that they break down very often and cannot be repaired (well, why not open the floor?!). So let's hope it lasts a long time.
Well, let's get back to laying tiles. I advise you to choose tiles with dimensions of at least 20x30 cm. You should start from the bottom from the middle of the wall, but you need to approximately see how the tiles will lie in the corners. That is, we will have to cut the extreme tiles, but we need them to be the same. It will be much prettier that way.

From the picture, we see how the tiles in the corner are cut off, and it is desirable that cut tiles of the same size be inserted into all corners! Also, cut tiles in the corner will help to hide small slopes of the walls - this is important! You will put, you will understand why!
So, we all measured and marked the position of the tiles and you can start gluing them.
We spread glue with a notched trowel - just like on the floor, only now on the wall.
And we begin to glue the tiles in horizontal rows.

From this photo you can see what determines the importance of the evenness of the walls.
During the laying process, you need to carefully monitor the level of EACH tile.

After gluing the tiles, an urgent question arises - we need holes for taps, a heated towel rail, for a toilet (mainly a drain), and for an exhaust hood.
And this is precisely the biggest difficulty in laying tiles in the bathroom, because in some cases, the tile needs to be drilled, or cut, before laying. Again, keep everything straight. You can see it well in the picture below.
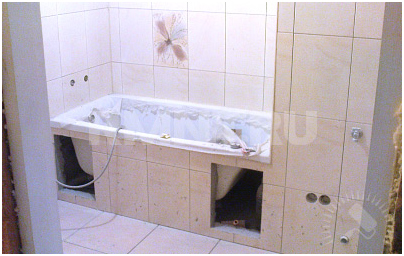
In order to cut a corner in the tile, as is done in the figure, where the hatches under the bathroom will stand, use a grinder with a special disc (INTERSKOL diamond cutting disc is solid on the tile).

To make holes in the tile, there are special crowns (or they are also called ballerinas) of different diameters, which are mounted on a drill.

The drill must necessarily have a sensitive pressing function, that is, the harder you pull the trigger, the more revolutions. I also advise you to practice on scraps first. And do not forget to cool it more often in water.
Conclusion
In the bathroom, bedside tables, a mirror, a corner, hooks, a toilet paper holder and more are hung. To do this, you need to drill the walls and screw in the dowels. But for those who do not know, there is a special drill for drilling in tiles (it is also used for drilling glass).

I highly recommend using this drill. And here's why: for convenience and accuracy, I use a screwdriver and these drills fit very well with it.

The advantages here are as follows: the screwdriver is light, the rotation speed is small, but residual in order to drill through the thickness of the tile itself (those who have already tried to drill on the smooth surface of the tile will understand me). Well, then, to go deeper, you need to use a drill and a regular drill bit.
Well, in general, everything.
And the main advice: compare the cost of tools, evaluate your nerves and time and think that maybe hiring a professional is not so expensive.
Ceramic tiles for many areas of the apartment - the most advantageous option. No matter how varied pampered today's hardware stores, showrooms, tiled flooring for, for example, a bathroom, kitchen, bathroom remains the most popular due to their specific operational features and, at the same time, a wide range of design options.
Before laying tiles on the floor, be sure to carefully read the characteristics of the material, the rules for its selection. Not all ceramic tiles can be suitable for these purposes, especially if they are supposed to be laid in rooms with a high level of humidity.
So, primarily choose floor tiles. It is better to consider this in the bathroom or kitchen as an example - it is in these rooms that the floor experiences the most extreme influences, both in the form of traffic intensity, and the influence of humidity and chemicals.
- No matter how attractive the tile may seem, you can only purchase one that has an icon in the form of a boot mark on a dark background on the marking - this is the type intended for floors.
- In both the bathroom and the kitchen, the floor can be both wet and slippery due to accidental spills of water, greasy substances or detergents. Therefore - special attention to the coefficient of friction of the surface (icon in the form of a foot on an inclined plane). It would be optimal to purchase a rough tile with a coefficient of at least 0.75.
- Water resistance of the material - for floors in a room with high humidity, the limit value should be no more than 3%.
- As already noted, rather active chemical compounds can get on the floors through negligence. In addition, cleaning of premises is also most often carried out using detergents with active ingredients. The tile must successfully withstand such an impact. The icon on the label is a chemical flask, and the letter indicator required for such conditions is AA.
- Frost resistance indicators (sign "snowflakes") and wear resistance ("circular saw") for indoor apartments are not so significant. Although, for a hallway, especially in a private house, or for a closed veranda, this can also be very important.
- The thickness of a floor tile is always greater than that of a wall tile. Usually it is from 8 mm and above. This is also necessarily indicated on the packaging with a special pictogram.
- The linear dimensions of the tile are important. It is optimal that there are as few seams on the floor as possible. On the other hand, very large tiles are more difficult to lay and a lot of material will go into the notches.
In order to avoid problems directly when laying tiles, you should remember some more points:
- If complete uniformity of the floor covering is required, then you should not purchase a tile with an icon indicating possible deviations in the shades of the tiles in the box.
- Tiles should be purchased at once for the entire room and always one batch. You may encounter the fact that even slight differences in shade between two different batches, absolutely invisible upon purchase, will be revealed on the laid floor.
- The same applies to linear dimensions - calibration at production is carried out just by party. Yes, deviations in dimensions can be very insignificant, but on the scale of the entire floor in a sufficiently large room they will definitely make themselves felt.
Well, another important choice parameter is, of course, the design, in accordance with your own design project, so that the floor is in harmony with all other interior details.
Basic principles laying tiles on a concrete base
The base for laying tiles on the floor must undergo appropriate training; more about this is described in the sections of the site on floors and arrangement. It can only be briefly noted:
- The concrete base should not have significant defects in the form of cracks, potholes, delaminations, unstable areas.
- The required levelness must be observed (or a slight slope if, for example, the bathroom or bath room is equipped with a drain).
- Before laying the tiles, the floor surface must be dedusted and primed deep penetration compounds that improve waterproofing and increase the adhesion of tile adhesive.
The process begins, of course, with the marking of the surface.
- Tiles can be laid in various ways (more on this -). But even with the simplest classic version, it is very important to set the initially correct direction and laying pattern so that errors do not increase from row to row.
Particular attention - markup. It is better to try laying out 1-2 rows "dry"
- Masters recommend that beginners, before starting to lay tiles on glue, try to lay out at least a couple of rows “dry” in order to clearly see the emerging picture. To facilitate the laying of the most important, starting row, you can attach a temporary guide made of a metal profile or a wooden plank (glazing bead) to the floor surface.
- For purely aesthetic reasons, the laying should be planned in such a way that a row of whole tiles is laid in a conspicuous place along the wall, which emphasize the evenness of the lines. It is advisable to start from the entrance to the room with a whole tile - the cut fragments are “driven” into the far corners, under the future location of furniture or plumbing fixtures.
It hardly makes any sense at present to experiment with self-production of tile adhesive - there are many varieties of it on sale for a wide variety of installation options - open or especially wet rooms, with or without underfloor heating, etc.
Beginners should immediately be warned against a common mistake. After listening to some advice, some of them soak the tiles in water before laying. This is completely unacceptable. Both the modern tile itself and the tile adhesive are adapted specifically to the installation of dry tiles, and a violation of the water balance will not give any advantages, but can significantly reduce the performance of the coating.
- When laying tiles on the floor, it is recommended to apply glue both to the surface of the base and to the tile itself. Both here and there, the layer of glue is leveled with a notched trowel, and the direction of the strips of the resulting ridges should be perpendicular - this is how reliability of adhesion will be achieved without any air cavities under the surface of the tile.
- A gap must be left between the laid tiles, the same width of which is maintained with the help of special crosses of the required thickness.
- The laying of each tile should be accompanied by careful control of the evenness of the surface, so that you can immediately make the required adjustments - add or subtract glue, put wedges, etc.
- Cutting tiles to the desired size is carried out with a special tile cutter. You can also use a manual glass cutter, but not everyone succeeds. Another option is a grinder - a grinder with a diamond or corundum disc. If holes are required, you will have to resort to using an electric drill with a special drill - a crown or an adjustable ballerina.
- When laying tiles, do not allow the joints to be completely filled with adhesive. They must be cleaned immediately, while removing the remnants of glue from the front surface of the tile. You should not leave such stains - they will be quite difficult to remove after the composition has completely solidified.
- At the end of the laying and the removal of the spacer crosses, the floor is given time to solidify. The required period will be indicated in the instructions for use of tile adhesive. But approximately at least 2 days the floor should not experience mechanical stress.
- The final stage is the grouting of the joints between the tiles with a special composition - a fugue. It is selected taking into account the characteristics of the room (moisture resistance, frost resistance, etc.) and the correspondence of the shade to the overall “picture” of the floor. The grout is made with a rubber spatula, and the excess remaining on the surface is picked up with a rag.
Features of laying tiles on an old tiled floor
Is it possible to avoid the procedure of dismantling the old tile if there is a need to renew the tiled floor? Why not - it's doable.
- If the previously laid tile coating is durable, then it will already be a good reliable base with a high level of waterproofing.
- Sometimes such an approach is even seen as the only possible one, if any engineering or electrical communications, a heating system, etc. pass under a layer of old tiles. - all that can be damaged when dismantling the old coating.
However, it is necessary to take into account those factors that can make such installation impossible:
- When the old tile "plays", falls out of its place, traces of decomposition of the old cement are visible - nothing can be done, you will have to take on the dismantling. Laying tiles on an unstable base is just ruining it.
- In a room, for example, a bathroom, the floor level should be slightly lower than in other rooms. Thus, sometimes laying a new tile on an old one is not possible for this very reason. This situation should be assessed in advance.
- Houses of old construction are often not distinguished by strict horizontal floors. Quite often this is found in blocks "bathroom-bathroom". The so-called metlakh tiles once laid in them on a cement mortar usually sit very firmly, but the floor surface can have quite large deviations from the horizontal. In any case, this will require alignment with a screed.
How it's done
One desire to avoid tedious dismantling procedures is not enough. It is imperative to carefully check and prepare the old tiled surface.
- All old masonry tiles need to be tapped. If the sound causes suspicion of the presence of emptiness, or the tile “plays” even a little, it should simply be removed. The resulting opening is sealed with a repair concrete compound or tile adhesive, compared with the total floor surface. Perhaps it would be superfluous to say that such a repair is possible, if it does not take on an extensive character.
- Old tiles can be covered with a thin greasy coatingaccumulated during operation. This means that the floor must be thoroughly degreased either with the help of an organic solvent, or by repeated washing with hot water with diluted caustic.
- Mandatory cleaning of dirt during such cleaning is subject to tile joints. Particular attention is paid to the condition of the old grout (fugue). If it crumbles, it should be removed to the maximum, the seams should be washed, as indicated above, and after drying, sealed with diluted tile adhesive.
- Now - about covering the old tiles. Ideally, you would need to walk a grinder with a diamond wheel to remove the glazed layer and get to clean ceramics. However, you can limit yourself to applying frequent notches or even drilling holes.
- After performing all the "dirty" work, the entire floor surface is thoroughly cleaned of debris and dust with a vacuum cleaner.
- Surface Required primed special formulations. So, for these purposes, the Betonkontakt soil is widely used, and , Judging by reviews of some masters, sometimes this is even enough to prepare the surface, without notching. The compositions have similar qualities
Such a primer will give even a smooth tile the required roughness.
- To improve the effect, some experts also recommend applying a 2 mm layer of tile adhesive, the one that will be used later in the laying process. Only after it hardens, they move on to further work.
- A few words about the optimal choice of glue for such cases. Again, it is worth listening to the recommendations of experienced finishing professionals. They speak very well of the Ivsil Profit composition, which was developed more for styling. porcelain stoneware tiles, but even more so with ordinary tiled. No less reliable is CerezitCM 17", excellent for the most difficult operating conditions and the most "problematic" floor surfaces. And the highest plasticity and ability to adhere to any base of Vetonit Renovation tile adhesive make it possible, according to the assurances of the masters, to do without even roughening the old tile coating.
The laying process itself is not particularly different from the work on a conventional concrete base. If you strictly follow all the recommended technological methods, the floor in terms of its strength will not lose in any way to any other type of tiled tile coating.
Video - Laying tiles on top of the old floor
Video - How to lay tiles on the floor yourself