Do-it-yourself chain-link fence without welding. Do-it-yourself sectional fence made of chain-link mesh
From a grid are widely used at a protection of seasonal dachas. Anyone can install a chain-link fence with a minimum of tools at hand. Subject to the installation technology and the choice of high-quality materials, such a fence will last 15-20 years. Before starting work, you need to study the types and characteristics of the grid, as well as study the instructions in detail in order to avoid mistakes.

The mesh is made of black and galvanized wire, so the quality of the chain-link varies. Black wire mesh is the cheapest and most short-lived. It becomes covered with rust after the first fog or rain, and after 3-4 years it becomes completely unusable. You can extend the life of a non-galvanized chain-link by using paint or liquid rubber, which should be applied to the mesh before it is installed, and then periodically update the protective layer.

Galvanized wire mesh is not afraid of corrosion, and therefore lasts longer. It costs a little more than black, but it does not need protective treatment at all. from a galvanized chain-link look neat and attractive.

The plasticized chain-link is becoming more and more popular. This metal mesh is covered with a dense layer of anti-corrosion polymer, due to which it has an increased resistance to weathering. In addition, the polymer is colored, the mesh looks very attractive and aesthetically pleasing. And although such a chain-link is quite expensive, the demand for it is constantly growing.

In addition to quality, the chain-link mesh differs in mesh size, wire thickness and roll height. Cells can have dimensions from 10 to 65 mm, wire diameter 1-5 mm. The height of the roll is from 0.8 to 2 m, but the most popular is 1.5 m. The standard length of the mesh in a roll is 10 m, rolls of 20 m are made to order. The smaller the cells, the more expensive the cost of the mesh, because this increases material consumption .
| Type of chain-link mesh | Wire diameter, mm | Mesh width, mm | Living section of the mesh, % | Estimated weight of 1m2 mesh, kg |
|---|---|---|---|---|
| 1,20 | 1000 | 55,0 | 4,52 | |
| woven mesh with rhombic mesh | 1,20 | 1000 | 61,0 | 33,73 |
| woven mesh with rhombic mesh | 1,20 | 1000 | 69,8 | 2,78 |
| woven mesh with rhombic mesh | 1,40 | 1000 | 65,5 | 3,8 |
| 1,20 | 1000,1500 | 75,3 (78,9) | 2,20 (1,94) | |
| woven mesh with rhombic or square mesh | 1,40 | 1000,1500 | 71,5 (76,2) | 3,00 (2,57) |
| woven mesh with rhombic or square mesh | 1,40 | 1000,1500 | 76,3 (77,0) | 3,24 (2,74) |
| woven mesh with rhombic or square mesh | 1,60 | 1000,1500 | 73,3 (77,0) | 3,24 (2,74) |
| woven mesh with rhombic or square mesh | 1,80 | 1000,1500 | 76,0 (78,9) | 3,25 (2,75) |
| woven mesh with rhombic or square mesh | 1,60 | 1000,1500 | 77,5 (80,9) | 2,57 (2,17) |
| 1,4 | 1000-2000 | 83,6 | 1,77 | |
| woven mesh for fencing | 1,4 | 1000-2000 | 87,0 | 1,33 |
| woven mesh for fencing | 1,6 | 1000-2000 | 85,7 | 1,74 |
| woven mesh for fencing | 1,6 | 1000-2000 | 88,0 | 1,39 |
| woven mesh for fencing | 1,8 | 1000-2000 | 87,0 | 1,76 |
| woven mesh for fencing | 1,8 | 1000-2000 | 89 | 1,46 |
| woven mesh for fencing | 2,0 | 1000-2000 | 87,9 | 1,81 |
| woven mesh for fencing | 1,8 | 1000-2000 | 91 | 1,1 |
| woven mesh for fencing | 2,0 | 1000-2000 | 90,7 | 1,36 |
| woven mesh for fencing | 2,0 | 1000-2000 | 91,7 | 1,23 |
| woven mesh for fencing | 2,5 | 1000-2000 | 90,7 | 1,70 |
| woven mesh for fencing | 3,0 | 1000-2000 | 89 | 2,44 |
| woven mesh for fencing | 2,5 | 1000-2000 | 92 | 1,41 |
| woven mesh for fencing | 3,0 | 1000-2000 | 92 | 1,74 |
| woven mesh for fencing | 2,5 | 1000-2000 | 94 | 1,10 |
| woven mesh for fencing | 3,0 | 1000-2000 | 93 | 1,53 |
Netting prices
Rabitz
Types of mesh fences

The protection from a chain-link grid happens sectional and tension. The first option involves the manufacture of rectangular metal sections, inside which the mesh is fixed. For sections, metal corners, profile and round pipes of small diameter are used. Connect them by welding or bolts, if not. Such a fence looks more aesthetically pleasing and attractive, the metal frame prevents the mesh from sagging.

The tension fence is faster and easier to install; its design consists only of supporting pillars and the grid itself. The mesh is fastened with steel wire, clamps or hung on hooks welded to the posts. Pipes of different diameters, concrete columns, wooden beams are suitable for pillars.
Installation of fence posts

For both sectional and tension fences, the marking, preparation and installation of poles is carried out using the same technology, only in the first case the poles should be stronger. This is due to the additional load from the metal sections; if the supports are too thin, the fence will definitely warp.
For work you will need:
- roulette;
- wooden pegs;
- a skein of thin rope;
- building level;
- manual drill;
- crushed stone and sand;
- solution;
- profile pipes 60x40 mm;
- Bulgarian;
- primer.
Step 1. Installing the corner posts
The area allotted for the site is cleared of vegetation, if necessary, leveled, the location of the extreme pillars is determined. Experienced builders recommend making corner posts from pipes of a larger cross section than intermediate ones, and digging them deeper. For example, if a 40x40 mm profile pipe is taken for intermediate supports, then for corner supports it is better to take 60x40 mm and 15-20 cm longer.
Proceed to the installation of pillars:

When the solution hardens a little, you can remove the spacers and start marking under the intermediate racks.
Step 2. Markup
A rope is pulled tightly between the corner supports at a height of 15 cm from the ground - this will be the fence line. The line must be divided into equal segments corresponding to the width of the span. The optimal span for a chain-link fence is 2-2.5 m; if you increase it, the grid will definitely sag. They retreat from the extreme pillar to the desired distance and drive a peg into the ground, and so on to the opposite corner. All pegs should be in contact with the stretched rope and be at an equal distance from each other.
Video - A new way to install support poles
Step 3. Installing intermediate supports

In place of the pegs, holes are drilled for the posts and the bottom is covered with sand. To make it more convenient to control the height of the supports, another rope is pulled along the upper edge of the corner posts. Now the pipes are inserted into the pits, leveled in height and vertical, sprinkled with crushed stone and soil and tightly tamped with crowbar. Concrete is poured from above and the surface is leveled.

If it is planned to install a tension fence, and the soil on the site is quite dense, intermediate supports can simply be hammered into the ground and not concreted. To do this, holes are drilled to half the required depth, pipes are inserted there and hammered with a sledgehammer. To protect the upper edge of the posts from deformation, take a larger piece of pipe, weld a steel plate on one side and put it on top of the post. After driving the supports, the pits are covered with gravel and sand, spilled with water for better compaction and well rammed.


Step 4. Welding hooks

After about a week, when the concrete has hardened sufficiently, installation can continue. You can fix the grid on the poles with wire or clamps, but it is more convenient to hook it on hooks. Profile pipes with hooks already welded are on sale, but if you have a welding machine, it is cheaper to make them yourself. For this, pieces of a steel bar, screws, nails, even thick wire are suitable - everything that can be welded to the pipe and bent. On a pole 2 m high, it is enough to make 3 hooks: at a distance of 15 cm from the ground, 10 cm from the top of the pipe and in the middle.
Video - Do-it-yourself chain-link fence

Step 1 Attaching the Mesh
A chain-link roll is placed near the corner post, unwound a little and the cells are put on hooks. To securely fix the edge of the mesh, you need to take a piece of reinforcement with a cross section of 8 mm and a length of 1.5 m and thread it into the cells of the first row. After that, the fittings are attached to the pipe and welded. Now, when the roll is tensioned, the mesh will not sag. Having fixed the end of the mesh, the roll is transferred to the next support, carefully unwinding it.

Stepping back from the junction of the chain-link with a pipe of 10-15 cm, a steel bar is again threaded into the cells. This time you do not need to weld it, it will just help to evenly stretch the mesh. When the mesh is put on hooks, the rod is taken out, the roll is unwound for another span, the reinforcement is inserted again, and so on until the very end of the fence. To connect two canvases, use a wire from the extreme vertical row of one of the rolls.

Step 2. Fixing the canvas from sagging
Even a well-stretched canvas sags a little over time, so at the installation stage, you need to take care of additional fixation of the chain-link between the posts. You will need a wire with a cross section of 6 mm and a welding machine. The wire is threaded into the second or third row of cells horizontally along the entire fence. In places where the grid fits to the posts, the wire is welded. Then, in the same way, the lower edge of the mesh is strengthened, and at the end, the hooks are bent. Now the fence canvas is securely fixed on the supports and will not bend or sag.

Step 3. The final stage
When the fence is installed, you need to complete the finishing touches:
- put plastic plugs on top of the pipes;
- paint the posts
- twist the upper antennae of the chain-link in pairs by 2 turns and bend down.
At this point, the installation of the tension fence is considered completed.

Video - Connecting the chain-link in one roll
Installation of a sectional fence
Section manufacturing
Step 2: Preparing the Racks
Rectangular plates 20x5 cm and 4-5 mm thick are cut from sheet steel. They take one plate, apply it perpendicular to the pole at a height of 20 cm from the ground and weld it. The second plate is welded at the top, stepping back from the edge of 15-20 cm. The plates are fixed on the remaining supports in the same way.
Step 3 Mounting sections

The first section is placed between the pillars, lifted and leveled. Then the sides are welded to the plates and proceed to the next span. It is very important to correctly align the sections in height so that the top rails of the frame form a single line. After installing all the sections, they clean the welding spots, prime and paint the fence frame.


Read step-by-step instructions on how to do it in our new article.
Video - How to make a chain-link fence
In some dacha cooperatives, a fence made of slate and other materials cannot be installed between the plots, because. they strongly obscure small areas. In this case, a chain-link fence would be a good way out - it does not prevent the sun from entering the site, does not impede the natural circulation of air. Chain-link is an inexpensive material that can last a very long time. Its additional plus is the possibility of using it as a support for climbing plants. The author of this successful invention was Karl Rabitz. The mesh began to be used already at the end of the 19th century, initially it was used during plastering work.
Chain-link is an affordable material that any owner of a summer cottage can afford to purchase. In order to create a chain-link fence with your own hands, in addition to the mesh, you will need thick wire, reinforcing bars, a cable and support poles.
A chain-link fence can be an excellent hedge, serve as a support for climbing plants. In this case, the site will be much more beautiful.
Today, manufacturers offer three types of chain-link mesh:
- non-galvanized mesh is one of the cheapest, it is better not to consider this option, because. after a few months it may become rusty;
- galvanized chain-link is most common - at a price it is slightly more expensive than non-galvanized, but it does not rust;
- plasticized chain-link - a metal mesh, which is coated on top with multi-colored polymers to protect against corrosion.
The latter option is very practical, and such a mesh looks much more aesthetically pleasing than a metal one. Therefore, the plasticized chain-link, although it has appeared recently, is already actively used by our gardeners.
When choosing a mesh, you should pay attention to the size of the cells, the smaller their size, the stronger and more expensive the mesh. A mesh with cells of 40-50 mm and a roll width of 1.5 m is quite suitable as a fence for a summer cottage.
Option # 1 - "stretch" chain-link fence
The device of the fence from the chain-link mesh can be different. The easiest way to make a fence is to stretch the net between the posts. Pillars can be used metal, wood or concrete.
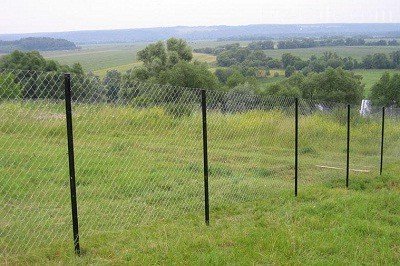
An easy way to make a chain-link fence without the use of rods is to stretch the mesh between the posts and hang it on hooks. Of course, over time, it can sag, but such a fence can last a long time.
The number of posts depends on the distance between them and the length of the fence. As practice shows, the best distance between metal mesh fence posts is 2.5 m. Second-hand pipes that are not affected by corrosion can be used as posts. Ready-made fence posts are now on sale, already painted, with hooks. Wooden poles must be treated with a protective compound along the entire length before installation. You can also use concrete poles and attach a mesh to them with wire or a clamp.
The height of the pillars is calculated as follows. With a gap between the ground and the fence, 5-10 cm must be added to the width of the grid, and then another meter and a half, taking into account the underground part. As a result, you will get the average post height required to install the future fence. The load on the corner posts will be a little more, they should be dug in deeper, therefore their length should also exceed the length of ordinary posts by about 20 cm.
The bases of all pillars for greater strength are best concreted. The posts are the frame of the fence, after you install them, you can begin to attach the grid. After the concrete has hardened, hooks are attached to the posts or welded (if the post is metal) to secure the net. As a material for fastenings, screws, rod, nails, wire are suitable - any material that bends into a hook. We straighten the roll with the mesh and install it at the corner post, hang the mesh on hooks.

To ensure good tension and strength of the structure, we vertically thread a rod or thick wire into the first row of mesh cells, attach the rod to a wooden pole or weld it to a metal one. The mesh fixed in this way will not bend or sag, as is often the case without such fastening.
Then the roll is unwound on the span, to the next post. A little further than the place where the mesh connects to the pole, we pass the rod in the same way. We hold on to the rod and pull the net, if you don’t use the rod and just pull it with your hands, you can pull the net unevenly. It is best to do this with two people - one person at the bottom edge, the other at the top.
Now reinforcement is threaded into the mesh horizontally at a distance of at least 5 cm along both edges, top and bottom. Horizontal rods are welded or attached to poles. If you stretch the mesh without rods, over time it will sag, and the rods will maintain its tension.
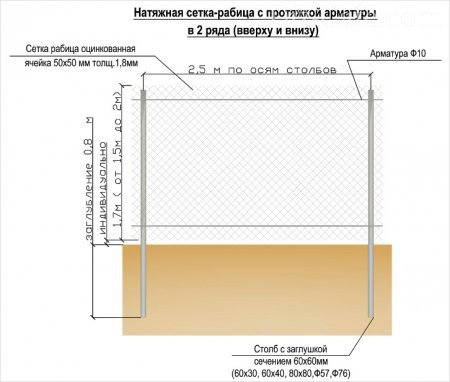
Scheme of a galvanized mesh fence device with reinforcement broach along the upper and lower sides. Such a fence is a stronger structure.
The fence is almost ready, now you need to bend the hooks on the poles and paint the poles. It is better to wrap the protruding wire "antennae" down so that no one is injured. It is convenient to thread the wire through the top row of cells and wrap the protruding edges around it.

Here, the “antennae” are neatly bent down to the rod, you can dry things on such a fence, there is no risk of injury

The "antennae" of the upper cells must be bent to avoid accidental injury. In this photo, they are slightly bent - there is a risk of injury or tearing clothes
If you do not want to use reinforcement and concrete pillars, you can use the simplest technique presented in this video:
Option # 2 - erecting a fence from sections
To make a fence of this type, sections are needed where the mesh will be mounted. First, similarly to the tension fence device, marking is made and poles are installed.

This scheme can be taken as a basis for determining the proportions of the dimensions of the future structure (click to enlarge)
You will need to buy a 40/5 mm corner to make the frame. We determine the length of the frame in this way: subtract about 10-15 cm from the distance between the pillars - this is its length. We subtract the same amount from the height of the column above the soil level - the resulting amount is the width of the frame. Corners are welded into rectangular structures. You can make the size of the sections based on the size of the mesh (1.5 -2 m), you can unwind the roll and, if necessary, reduce the size of the mesh to the desired grinder.
Then strips of metal are horizontally welded to the posts (length 15-25 cm, width 5 cm, cross section 5 mm). Along the edges of the post, you need to retreat 20 cm, install the section between the two posts and, using welding, attach it to the horizontal stripes. Now it remains only to paint the new fence.

Rods with a cross section of 4 mm are threaded through the mesh from 4 sides, first to the extreme row, then from above and below, the mesh must be well stretched and the rods welded to the corners of the section. (The rods are welded to the horizontal corners). It turns out a section from a corner with a mesh netting welded onto rods from the inside

On an inclined section, it will not work to make a tension fence; in an inclined position, the mesh cannot be stretched. For an inclined area, you can make a sectional fence by installing sections on both sides of the posts at different distances according to the soil level.
Every owner who is familiar with welding can make a fence from a chain-link mesh on their own. As a rule, 2-3 people cope with the work in a relatively short time. Dare!
Reading time ≈ 5 minutes
Today, with all the variety of fences, few types of construction could replace a hand-made chain-link fence.
Benefits of a chain link fence
- Very quick and easy to install with your own hands;
- Low cost;
- Ease of construction, does not require a reinforced foundation;
- Lets light through, will not create conflict situations with neighbors due to the shadow created;
- Strict and unobtrusive appearance that fits perfectly into any landscape.
Installation methods
Do-it-yourself chain-link fence can be installed in two ways:

1. Normal, as in the photo above, when the mesh is stretched between two support posts. This method is much cheaper and easier. It is recommended to use in cases where the goal is not to pursue an impeccable appearance, but you just need to quickly and cheaply install a fence.

2. Sectional, as in the photo above, when finished sections of the fence are produced, in which a fragment of the chain-link mesh is fixed. This method will cost a lot more, because you have to get metal corners, the price of which is higher than the mesh itself, but at the same time the fence itself will be much more attractive and practical (for example, you can hang a carpet on top of the fence, something to dry, etc.)
materials
For the installation of such a fence, we need the following materials:
- Metal poles 50x50x2x3000 mm;
- Chain-link mesh (not galvanized, galvanized or plasticized);
- Fasteners (nails, galvanized bolts);
- Concrete M200.
Step-by-step instructions for installing a chain-link fence
So, how to make a chain-link fence with your own hands?
I. Territory marking.

We begin work by driving in pegs in the corners of the site and pulling the laces between them. We measure the length of the lace - this is the length of the required chain-link mesh, you also need to take into account + 5-7% of the additional length "in reserve". Next, we mark the places of the supports, the optimal step is 2.5-3 m.
II. Pillar installation.

In the event that after the construction of the house there is a sufficient amount of wooden beams or other material left that you can use as future supporting fence posts; when the price of a "wood" in your region is several times cheaper than a metal profile, or you just need a temporary fence - then you should use wooden supports. The surface of the wooden beam must be cleaned of bark, and it is also desirable to treat it with antiseptics and waterproofing mastic, which will protect the material from decay and pests. The poles should be cut based on the desired height of the fence, as well as the depth of the base being dug in (the pit should be 100-150 mm larger from the depth of freezing of the soil, therefore, if you are counting on a two-meter fence, and the depth of freezing of the soil is 800 mm, then you should prepare poles with a height of 3 m). But such supports will not last long, so it is better to use metal poles!

If you decide to build a solid and durable fence - take care of buying metal poles. The installation of such supports requires concreting the base. The depth of the concreted pit should be 1/3 of the height of the fence. For example, if you planned to put up a fence 2 m high, the depth of the pit should be at least 1 m (you should also take into account the freezing depth and heaving of the soil).
III. Chain-link mesh stretch.
It is most convenient to nail the mesh to the wooden base of the fence.

Do-it-yourself sectional chain-link fence
The main difference between this method and the usual one is the presence of a frame.
To install a sectional fence from a chain-link mesh, we need the following: materials:
- Metal pillars 50x50x2x3000 mm;
- Grid chain-link galvanized or plasticized;
- Bent metal corner 40x40x3 mm
- Metal rod and strip for welding
- Concrete M200
The marking and installation of the posts of the sectional fencing from the chain-link is no different from its simpler counterpart, but you will have to sweat with the welding of the frames. If you do not have good welding skills, then it is better to contact a professional.
GOSTs normalize a lot, including how it is possible or impossible to delimit areas. So, for example, the regulations prescribe to delimit neighboring areas with transparent fences. Since the boundary is usually long, it is desirable that the fence be inexpensive. Actually, the choice is small - a chain-link fence or. Wattle, although cheap, is extremely short-lived, so that only a mesh fence remains. In general, it is correct to say “chain-link fence”, but for the ear it is more common to incline the name.
Popular and inexpensive - chain-link fence
Whatever this fence is called, it has a solid number of positive aspects. The first and important plus is cheapness. This applies to both the filling itself - the grid, and the rest of the structure. To stretch the grid, the foundation is not required. It is enough to drill holes for about a meter, insert a pole and, having fallen asleep rubble, compact it well. Everything, no concrete work. On most soils, this installation method for this filling works for "five".
Structures and installation methods
The fact is that the chain-link fence is light. Moreover, it is light both in terms of its own weight and in terms of perceived wind loads. No matter how strong the winds blow, the pressure transmitted by the mesh to the poles remains negligible. Due to the low weight, such a technology for installing pillars can be used: in a hole, under filling with sand or gravel, without concrete. Moreover, such a fence stands without problems even on heaving clay soils with a high level of groundwater, and even with a large freezing depth.
Without guides
Here's how it works. We are talking about the simplest design: just pillars, between which a grid is stretched. As you can see, the pillars are buried to a depth of less than a meter. What happens to such a fence on soils that normally drain water? All the water near the column goes down through the sand or gravel to the bottom of the hole. There it leaves in a natural way - it seeps into the underlying layers. Even if frost hits and the sand or gravel around the post freezes, the moisture content is not enough to have at least some significant effect on the post.

On clays and loams, you can use the same principle, only it is necessary to fill it with gravel. And be sure to pour 10-15 centimeters of gravel at the bottom of the hole, and only then install a pole. What happens in this case. Water still accumulates at the bottom, but it leaves very slowly. It may well happen that by the time of freezing, the rubble will still be wet, or even be in the water.
What will happen then? It will freeze and become hard. But since the soil also freezes, it puts pressure on the rubble. The forces are considerable, and the ice breaks, the rubble becomes mobile and compensates for most of the pressure created by the ground. As a result, if there are movements of the pillars, then they are quite small - from a few millimeters to several centimeters. Since the design is not rigid, the mesh will easily transfer it without any harm. After everything thaws, the poles will lower into place. But such a scenario is only if they are placed perfectly vertically. Otherwise, the poles may tilt and you will have to fix everything.
With guides (legs)
Sometimes, in order for the fence to be more solid and keep its shape better, two longitudinal guides are attached to the posts. They can be from a pipe, or they can be from a bar. Wood, as a plastic material, will tolerate soil movements remarkably, but a welded pipe will create additional difficulties.

The degree of rigidity of such a fence is higher, and when heaving, if the posts are squeezed out, it is quite possible that in some places the pipes may be torn off. To prevent this situation, you will have to dig below the freezing depth in your area. Everything else remains in effect: the hole is 15-20 cm deeper than required, there is rubble at the bottom, then a pipe is inserted, covered with well-packed rubble.
Sectional
There is another design of a chain-link fence. Frames are welded from the corner, on which the mesh is then stretched. Finished sections are welded to exposed poles.

As you can see from the description, the design is also quite rigid. This means that on heaving soils (clay, loam) it is necessary to bury the pillars 20-30 cm below the freezing depth of the soil, but it is also desirable to do without concreting. If you fill crushed stone with concrete, the probability that the pillar will “squeeze out” increases many times over.
Types of chain-link mesh for a fence
Even such a seemingly simple material as a chain-link mesh can be different. Moreover, the difference is solid both in price and in service life.


Plastic or polymer mesh - 100% polymer
In addition to different materials, the chain-link has a different cell size. It varies from 25 mm to 70 mm. The larger the cell, the cheaper the mesh, but the lower the bearing capacity it has. If you put a chain-link fence on the border with a neighbor, they take mainly the middle link - from 40 mm to 60 mm.
What to look for when choosing a grid
Carefully inspect each roll. Its edges should not be curved. The upper and lower cells should be with curved "tails". Moreover, it is desirable that the length of the folded part be more than half the length of the cell. This mesh is easier to pull.

Edges should be straight and folded
Pay attention to the thickness of the wire, how even the cells are, how ugly they lie. All deformations are a sign of low quality.
If the mesh netting is in a polymer coating, check the warranty period given by the manufacturer. The cheapest ones, not only do the wire often bend, they also use ordinary plastic, which, under the influence of ultraviolet radiation, becomes brittle after a couple of seasons and begins to crumble. A normal coating can last up to ten years or more. Therefore, in this case, it is not worth chasing cheapness.
Which poles to use
There are several options:

The most convenient option of all these is a profile pipe, and better - a rectangular section. It is easy to attach the mesh to it, and you can weld hooks or wire if necessary. If possible, put them on. The optimal section for the post is 25 * 40 mm or so. You should not take a larger section - the fence is light.
The order of installation of pillars
First, put up the pillars at the corners of the site. If only one side needs to be fenced, one pole is placed at the beginning, the second at the end. Their verticality in all planes is strictly checked, the height is adjusted. At the very top and 10 cm above ground level, two cords are pulled. The rest of the pillars are placed on them. The height is aligned along the upper lace, the lower one serves to facilitate orientation: by attaching a plumb line to a point on the upper thread, you can find the place where the hole will be drilled.

The installation step of the pillars is 2-3 meters. Less is too expensive, more is pointless, the mesh will sag. When installing mesh without a guide wire, it makes sense to put posts every 2 or 2.5 meters. This makes it easier to stretch the mesh without sagging. For other models - with wire, slides (guides) or sections - the step can be 3 m.

If the grid is stretched between the posts, the extreme ones have a considerable load. so that they are not "led", they put jibs. They are exposed, dug in, welded to the installed pole.
Netting net installation
It only seems at first that it is easy to put up a chain-link fence. As soon as you start to think about how to fix the net on the pole, how to stretch it, everything is not so obvious and simple ... First, about the general rules. The mesh is attached to one of the corner posts. Fasten in at least four places. In principle, you can simply fasten it with wire, passing it into the cell.

The method is simple, but not the most reliable. If the fence is in the country, during the absence of the owners, the grid can be easily removed and carried away.
You can at least fix it more securely on the first and last pillar. To do this, take a steel bar with a thickness of at least 4 mm, thread it through the cells, weld it to the pole, grabbing every 40-50 cm (in the photo on the left).
Another way: weld three or four rods with a diameter of 6 mm to each post. A mesh is put on them, they are bent.

If you are still paranoid about the fact that I will remove the grid, you can drill two through holes in the post, insert a rod bent in the form of a horseshoe - U, grabbing the grid with a “back”. On the side where the ends come out, twist them and rivet them, or weld them.
Stretch
There is another problem: how to stretch the grid. If the design is simple - without slegs (transverse guides that are fixed between the posts), you can simply stretch the grid from one post to another. Just note that it is necessary to fasten sequentially to each pole. Fastening first through one, and then intermediate ones is a bad idea: there will definitely be uneven tension and sagging.
How to stretch the chain-link mesh so that there is no sagging? Insert the rod, grab it and pull with all your weight. The stretch will be quite significant. It is necessary to work with an assistant: one pulls and holds, the second fastens.
with wire
This type of fence is good because it is put up quickly. But the top edge may sag. If someone climbs through it, the top will definitely jam. It's unlikely to straighten it out. So that the top does not sag and “wrinkle”, a wire is pulled through the first row, it can be steel, or it can be in a plastic sheath so that it does not rust.

If wire is used, the technology can be simple: make a loop at the end, throw it over the last post. They unwind the wire trying to pull it, after two or three pillars make another loop, wrapping the wire around the pillar. So until the end of the flight. With the use of muscle strength, it will not be possible to pull enough, and the wire will inevitably sag. This is easy to fix. Take a thick metal rod, and use it to twist, pulling the wire. Is one twist not enough? A little further you do another one. So you tighten all the "spans". After that, you can begin to “pull” the grid, tying it to a stretched wire.
If you weld “ears” at the top of the column - a metal bar with holes, the wire can be attached to them. Pulling a piece of 2-3 meters is easier, but the work is slower.

You can also use special wire tensioners. Then, having fixed the wire on one pole, on the second it is passed into such a device as in the photo. It is fastened in a clamp, and then with the help of a key, the excess is wound onto the drum.

You can use a cable and lanyards - hooks with tie-clamps (in the rigging store). On one side, a cable is twisted around the pole, secured with a clamp. On the other hand, a lanyard is placed. Its middle part is threaded, so you can pull the cable.

A lanyard with a cable is another option.
Since the cable is more flexible, it can be passed through the links. Each one will be too long, after two or three cells - it's normal. One more thing: take a cable with a polymer sheath: it will not rust.
With welded wire
A steel bar with a diameter of 6-8 mm is threaded into the upper cell, or slightly lower. It is cut into pieces equal to the distance from one pillar to another. The threaded rod is welded to the pole.

Pay attention to the top of this chain-link. In this photo, you can clearly see that it has already begun to bloom. This is exactly the reason why it is necessary to take a mesh with curved ends. It just doesn’t unravel, and even without a wire or a bar, it holds the edge well.
With slugs (guides)
In even more rigid structures, after the pillars are installed, slugs are welded to them. These are cross pipes or wooden planks attached between posts. There may be one guide, or there may be two or three.

As you can see in the photo, in this case, you can also fasten the mesh with a wire. Obviously, all methods described above can be used. The only difference is that the mesh is attached not only vertically, but also horizontally. The photo below shows another way - with plates bolted, the ends riveted. This method can also be used when attaching to poles.

Chain link fence decoration
No matter how pleased you are with the fence at first, after a while there is a desire to either decorate it, or make it less transparent in order to close from prying eyes.
The first way - the most obvious - is to plant plants. If the neighbors do not mind, bindweeds or any other annual or perennial plants can be used.

The most natural way is to plant plants
If you just want to decorate your fence, you can do "embroidery". The cells are the same size, so you can embroider like on a canvas. There are two materials for embroidery: wire and colored twine.

Colored twine is good because you can "embroider" color pictures. Any that seem appropriate to you.


Not a very aesthetic, but quite effective way is to stretch a camouflage or shading net. These methods are good because they require a minimum of effort: they pulled it, grabbed it in a couple of places.


The shading mesh is almost opaque and the wind load will hardly change
The same effect is achieved if twigs or reeds are woven into the cells. The disadvantage of this option is the high labor intensity. It will take a lot of time.

Ready-made reed mats can reduce manufacturing costs. They are sold in rolls. All you need to do is unroll and fasten. But the cost is much higher than the previous option.

Another way is to use artificial needles sold in rolls. It is used in the manufacture of baskets and wreaths, but it can also be adapted to the fence.

Green wall - chain-link mesh decorated with artificial needles
Not so long ago, another way of decorating and, at the same time, reducing the visibility of a fence from a chain-link mesh appeared - a photo grid. This is a pattern printed on a polymer mesh. Sold in rolls (for tension fence) or fragments (for sectional). It is fastened with the help of eyelets and wire or clamps built into the surface. You can see an example of the effect in the photo below.

From the chain-link mesh and decorate the fence, and close the area from prying eyes
A chain-link is a good option for arranging a fence, and in a short time and without using any special tools. The end result will not disappoint the owner of the site, as such a fence is simple, practical and quite reliable. In specialized stores, the mesh is offered to consumers in rolls, which are easy to deliver to the place of work.
How to do it and where is it in demand?
Undoubtedly, before any summer resident and the owner of a private courtyard, the question arose: how to make a fence from a chain-link with your own hands? This material is in demand in every subsidiary farm.

It is most appropriate to arrange such fences in summer cottages, with a net you can enclose ponds, poultry houses, cattle pens and other small areas that require a fence.

Tip: In order to extend the life of the mesh, try to purchase its galvanized version.
Types of chain-link fence
A fence from such a grid can be of 2 types:
- Stretch;
- Sectional.
Tension fence
The device of the first option does not present any difficulty, since complex tools are not needed here or welding is not required, the possibility of using wooden supports (pipes) is not excluded.
It is enough to dig pipes into the ground, and whether they are round or square is of no fundamental importance.
Sectional fencing
In this case, the situation is different, since it is supposed to install the mesh in metal frames, after which the sectional installation of the fence is carried out.
If you need to build a fence in a short time, then use the first option.
Tension fence installation
To begin with, we will tell you what actions will need to be taken to build a tension fence from a chain-link mesh.
Materials for work
- At the initial stage, it is necessary to determine the amount of material that will be required for the work;
- It is necessary to measure the perimeter of the fenced area, and for this purpose, four corner posts should be installed and a cord should be passed through them, the length of which will allow obtaining the necessary data.

Knowing the required amount of mesh, it is easier to calculate how to properly make a fence from a chain-link mesh, how many support posts and other auxiliary materials are needed, such as:
- Poles made of wood or metal;
- Fastening materials (cable, strong wire);
- The mesh itself.
In the construction market, such a grid is presented in several varieties.
Distinguish its shape of the cells and their size. But, if the first parameter does not play a special role, then in the second case, the large size of the cells will not work, for example, in the case when a yard is fenced in which poultry is kept. Since the chicks will be able to crawl through such cells.
The height of the future fence from the chain-link mesh is equal to the width of the roll.
Installing columns
As already mentioned, the posts can be wooden or metal, the second material is more durable in use due to its high strength.
But wooden posts are also a good material, because the chain-link mesh does not differ in windage, you only need to pre-treat one end of the wooden post (which will be dug into the ground) with a special mastic that has waterproofing properties.

A brief instruction will describe all the steps:
- To make recesses for installing posts, it is best to use a special drill, which can be either mechanical or gasoline.
- The height of the post depends on the width of the chain-link mesh roll, that is, if this parameter is 2m, then the post must be at least 2.95m.
- The poles should be installed at a distance of no more than 2.5 m, with a depth of digging into the ground from 70 cm to 1 m, so that the submerged part is 10-15 cm below the freezing level.
- As soon as the pits are prepared, their bottom should be covered with small stone and rubble to prevent the pillars from sinking.

Tip: If we are talking about metal poles, then it is also permissible to carry out concreting. For these purposes, you can prepare a mixture of concrete yourself. The standard option requires the combination of ingredients such as cement, sand, gravel, taken in a ratio of 1: 3: 5, or use a ready-made brand of mixture No. 150.
If concreting is carried out, then it takes time for the mixture to dry - it takes 2-3 days.
Netting net installation
After the posts have taken their place, you can safely proceed with the installation of the chain-link mesh.
If fastening to wooden poles is supposed, then in this case nails or special staples are used.
And the mesh is attached to the metal posts with the help of hooks, wire and welding.
It is necessary to stretch the chain-link in such a way that it does not sag later, that is, as tight as possible.
You can watch the video for all the details.
Tip: The tension of the mesh should be started from any corner post. To prevent it from sagging, you can pass strong wire or reinforcement through the top cells of the mesh and fasten them over the posts.
Sectional fence
In this case, almost the same materials are required as for the first option. You need to add corners for making fence sections and equipment such as a welding machine. In this regard, both the complexity of the installation work and the total cost of the fence increase.

Manufacturing technology
- A frame is welded from a steel corner;
- Inside the frame, the mesh is stretched and fixed;
- The prepared sections are attached to metal poles, since there is no talk of wooden options here, which requires welding.
In terms of its parameters, it is more durable, reliable and durable in comparison with tension.
In order to exclude the possibility of water and excessive moisture getting inside the columns, it is recommended to close them from above with special plugs. This can be done using self-made elements, or use industrial designs, which, in addition to protection, also play a decorative role.
If a chain-link with an anti-corrosion coating is chosen for the fence, then its service life can reach 20 years. An ordinary mesh without a protective coating can become unusable after five years, but this is one way to save money if you need to make a temporary fence.
Conclusion
The chain-link mesh as a fence allows you to quickly and reliably enclose the site with minimal cost and time. The price of such a fence is low, it protects the site well from outside penetration, perfectly transmits light without restricting the view, and is great for fencing adjacent borders between neighbors.