What is the best way to level the floor? Calculation of the cost of floor leveling work
Rocking, crooked furniture, bouncing washing machine- all this is a consequence of an unevenly laid floor. Its alignment should be the very first procedure when carrying out repairs.
Leveling the wooden base
The procedure for replacing a wooden floor is as follows:1. Using a crowbar and an ax, baseboards and old flooring are removed. Whole construction garbage below the floor is removed. Before laying new floors, be sure to seal cement mortar all cracks and crevices in concrete screed.
Old rotten floors are removed
2. Rotten old ones lags (wooden beams section from 110 mm, used as a base for flooring) and destroyed from time to time floorboards are thrown away.
3. To replace the lag is selected square bar. In this case, the height of the lag should be 1.5 times greater than their width. The size of the section of the bars depends on the width of the room in which they will be installed.

Calculation of the lag section
4. Before laying, the logs should be treated with an antiseptic and waterproofing: drying oil or bitumen. Impregnation would be a cheaper option. used engine oil.
5. Wood absorbs moisture very quickly, so you should not install logs directly on concrete. They are placed on waterproofing layer(roofing material, film or bituminous mastic).
6. To ensure ventilation, the logs must be laid at a distance of 5 cm to the concrete floor or floor beams. Bricks or wooden blocks are used as linings for logs.

Laying lag on bricks

Laying lag on wooden bars
Important! To prevent the logs from absorbing moisture from the walls, a gap of 2-3 cm must be left between them and the wall.
7. If necessary, a layer is laid between the lags heat or sound insulation. Styrofoam or expanded polystyrene are excellent heat insulators, but they will not protect against the penetration of extraneous sounds into the apartment. As soundproofing material it is better to use mineral wool.

Laying between the lags of mineral wool
8. To lay the logs perfectly evenly, apply along the walls along the water or laser level horizontal markings.

Drawing markings on the walls
9. When laying out the lag, you should also control their location building level. If necessary, the logs are trimmed to the required height. Distortions can also be corrected lining made of wood or fiberboard. To protect against their displacement during the operation of the floor, they must be attached to the base.
10. Floorboards are used as a subfloor. Their thickness depends on the distance between the lags.

Choice of floorboards
11. When laying the floor slats, the horizontal position of their location is also verified by the level.
Important! You should not buy uncured material. Board moisture prepared for flooring should be 12%. An overdried rail can crack, and a wet one will gradually dry out, and cracks will appear in the floor.
Leveling with concrete screed
Bulk mixes are quite an expensive material, so they are used only to even out small differences. With a significant difference in floor height, use concrete screed.1. If available in old screed large influxes they are removed with a jackhammer or sledgehammer. If they are left, the floor will have to be raised to a height, equal to the height influx.
2. Before starting the pouring of a new layer, the old floors are cleaned of dust and debris. To prevent moisture from the solution from being absorbed into the floor, lay before the screed layer: polyethylene film or roofing felt, which are placed with a slight overlap on the walls. If waterproofing is not provided, you can moisten old concrete a small amount water.

Waterproofing concrete screed
3. To get a smooth horizontal surface floors are leveled lighthouses: metal profiles laid out on the floor strictly horizontally. They are placed on stamps"(slapping a thick solution). The height of the imposition of "brands" is regulated by the level.

Arrangement of lighthouses
4. Since the mortar is leveled with a special tool - a construction rule, - the distance between two beacons (guides) should be equal to its length. (The rule is a strong 1-3-meter strip of metal, narrowed along its entire length).

Alignment by beacons by rule
5. To strengthen the screed when applying too much mortar, it is reinforced metal mesh.

Screed reinforcement
Leveling with bulk mixtures
For rough leveling of the floor, you will need a bulk mixture made on the basis of cement. Gypsum mix, capable of absorbing moisture, is used mainly for laying parquet. Expensive translucent or colored polymer solutions ("liquid linoleum") are used as fine finish and poured only on a previously leveled surface.
Subfloor leveling compound
1. The technology for applying a bulk mixture of any composition is approximately the same. "Liquid" floors are poured only on a carefully prepared surface, cleaned of debris and processed primer deep penetration. They can be placed on concrete plates or cement screed. It is allowed to pour the mixture on wooden floors or ceramic tiles.

Primer floor treatment
2. With an excess or lack of water, the distribution of the mixture over the surface will be uneven, so you should strictly observe breeding proportions indicated by the manufacturer on the package. Stir the solution as thoroughly as possible, until the lumps are completely dissolved. For these purposes, it is more convenient to use a drill with a nozzle or a construction mixer.

The solution should be thoroughly mixed
3. Acceptable temperature in the room where the mixture will be used is indicated by the manufacturer.
4. The mixture begins to be poured from the farthest wall, located opposite the entrance. In order to avoid height differences, its laying should be continuous.

Filling the mixture
5. For uniform distribution of self-leveling floors, use a wide spatula or rule attached to the handle. In order to remove air bubbles solution is further processed needle roller.

Leveling of self-leveling floors

Needle roller processing
Important! Rolling and leveling the floors must be done before the mortar sets. Otherwise, the drying mixture will warp.
6. Drying time for bulk mixtures - 2-3 days. In order for the floors to dry evenly, there should not be too large temperature differences and drafts in the room.
This article will describe in detail the process of how to level the floor in an apartment using a finishing leveler. This material will be primarily useful to novice builders who intend to build an apartment or a private house in a short time.
The time spent on leveling the floor in the way that we will consider below is about 2-3 hours and is the easiest and cheapest way to level the floor.
For alignment we need:

Step-by-step technology for leveling the floor in an apartment using a finishing leveler / self-leveling compound
- In order for the leveler to adhere well to the existing floor, we need to carefully sweep the floor with a broom, and then it would be great to vacuum the floor.
- After the floor is cleared, the next step comes − padding. For priming the floor, a primer is required - ceresit CN 17. The primer is applied to the floor surface in order to: strengthen the floor surface, reduce the absorbent surface of the base, absorb existing dust, strengthen the surface, increase spreadability finishing materials. The priming of the surface is carried out both with the help of a roller, and it is permissible with the help of a brush.

- After the floor is primed, it is necessary to let it dry for about 2-4 hours.

- The next step is the process of placing beacons to level the floor. Alignment guides will serve metal profiles. Fasteners of metal guides are made on plaster.


Mounting the beacon on plaster - photo
- Beacons are aligned using building level. At this step, it is necessary to check the angle of inclination of the beacons, both separately and relative to each other.


- When the leveler is already beginning to spread on the floor surface, we take an impromptu leveler and evenly distribute the mixture over the entire floor surface.

Video - leveling the floor in the apartment
Conclusion
Thus, as you can see, the apartment is not a difficult task that almost any owner can do.
An important point in the whole design is right choice finishing leveler. Usually the best levelers have more high price but also the best quality.
In addition, pay attention to the location of the beacons - this is the basis on which the floor is leveled, so do not neglect the help of the building level.
Equally relevant for owners of apartments in old houses, and for the inhabitants of new buildings. The first ones are looking for an answer because the basic coverage in their living quarters is in a deplorable state due to the already fairly long service life (yes, perhaps it has never been good, even in the years of its “youth”), but the second needs to know this by the reason is that, despite the use of new technologies, the quality of finishing even in newly commissioned buildings is still far from ideal. While modern floor coverings sometimes require almost flat surface. How to create acceptable conditions for them? What to do? How to level a concrete floor and how best to do it? You will find the answer to all these questions in our review.
We evaluate the existing surface and choose a new floor covering
It is worth noting that the alignment procedure can sometimes be quite expensive and quite lengthy. That is why, in order to reduce material and time costs, you need to be able to correctly assess the situation. That is, carefully examine the existing base and decide which flooring will be used. As for the first. The base surface after all can be different. Sometimes it is in quite good condition, with the exception of some places covered with cracks. Or there are only small protrusions and depressions on it. In such cases, you can get by with little bloodshed by leveling the floor locally, as they say, according to indications. If there are significant defects on the base coat, as well as huge height differences, you will naturally have to level from corner to corner. Now as regards finishing materials. Some floor coverings are very demanding on the base. Take the same laminate. Even a slight difference of some five millimeters can negate all the finishing work. A laminate laid on such a basis in a year can simply deform and crack at the seams. While linoleum is not afraid of such minor defects. So what exactly from the choice of finishing floor covering and directly the very state of the base base and you need to build on, being in search of an answer to the question of how and with what to level the concrete floor.

Variants of irregularities that require elimination
So, which concrete floor is to be leveled? It is imperative to put in order a foundation that has:
- Roughness, chips, various cracks.
- All kinds of protrusions or pits that are visible during visual inspection.
- Slope or height difference.
Depending on the existing defects, the alignment method and the material required for the work are selected.
Types of alignment
If the floor does not have any special differences in height, but has some defects such as cracks, then they are repaired using a self-made composition or epoxy concrete, while doing some preliminary work to prepare the base. Local protrusions and pits close up in the same way. Elevation differences are eliminated by dry screed, alignment with beacons or using a bulk composition.

Getting rid of cracks
Such defects can appear both on the old foundation and on the newly poured one, if the steps or requirements have been violated. technological process. Therefore, to know how to get rid of cracks on concrete floor, every master needs. So, you can’t just cover them from above. Firstly, you need to carefully tap the entire surface of the crack, and in a very peculiar way - you need to drive the chisel into the defect as deeply as possible with a hammer. Thanks to this procedure, you, firstly, will be able to detect chips hidden under the defect, and secondly, create the desired gap for the mixture. After preparatory work will be carried out, you need to carefully remove all pieces of concrete, clean the cavities from dirt and dust, fill with water. After drying, the entire surface must be primed. Grund composition is ideal for these purposes. Then you need to mix cement grade M400 with water. The solution should have the consistency of liquid sour cream. And then you should add to it liquid glass or PVA glue. The amount of additional ingredient should be equal to the volume of the prepared mixture. After that, you need to fill the cracks with the resulting solution, wait for it to dry and grind the surface. Very small cracks can not be expanded, but simply repaired tile adhesive any brand, without forgetting to prime.
We close up the pits
If the floor surface is sufficiently even, then it is not necessary to carry out the screed completely. It is enough just to get rid of the holes. To do this, their walls and bottom must be treated with a grinder to remove chips and fragile layers. After that, the pit must be cleaned of pieces of concrete, dirt and dust, filled with water, primed after drying. At the bottom you need to pour dry fine-grained crushed stone enough thin layer and then seal the defect with epoxy concrete. The domestic Claypol composition is perfect for these purposes. We fill them with a hole so that the solution does not reach the top of a centimeter by two. After drying (approximately after an hour), we compare the surface with a special putty for concrete. Experts recommend paying attention to the Elakor-ED brand.

As for the bumps, it’s enough to cut them off grinder, clean, prime, and then level the surface using the same Elakor.
Dry screed
How and with what can a concrete floor be leveled if there is little time at your disposal and you don’t really want to mess around with mortars? Make a dry screed. This procedure is quite simple, so almost anyone can handle it. House master. The principle is the following. The base base is thoroughly cleaned of dirt and dust. Then a waterproofing film is laid on it (you can use ordinary thick polyethylene). Then, a dry leveling mixture is poured over the entire surface with a layer five centimeters thick. It can be made of expanded clay, granulate, quartz sand or even polystyrene foam. And from above they are already laid on the logs and fastened with screws either plywood, or fiberboard sheets, or moisture resistant drywall. But it is best to use a special sheet material called "Superpol". After a dry screed, you can almost immediately lay the finishing floor covering. It is for home masters that experts recommend first of all to consider this way, since you can level the concrete floor with your own hands using this method without any problems.

Screed on lighthouses
Since it is sometimes almost impossible to level the floor using less expensive methods, you will have to consider such a method as pouring a new floor using beacons. Concerning financial side question, then it is not so terrible, but the procedure will require significant time costs. In addition, in this case, you need to have at least minimal skills in working with beacons and cement mortar. What should be done? First of all, clean and prime the base. Then markup, preferably using laser level, and stretch between the walls in the direction from the window to the door the guide threads for the beacons. And after that, install perforated guides along them on the floor, using cement (you can use gypsum) mortar for fixing. The step between each beacon should not be more than one meter. After that, you need to prepare a cement mortar M400 (the amount of water will be indicated on the package), pour it between the installed profiles and level it with the rule, moving backwards in the direction from the window to the door. Such a screed dries for a long time, in addition, for the first three days it must be moistened with water. However, it is this method that is quite budgetary and allows you to get a really smooth and durable coating. Therefore, if you have enough time and do not know, for example, how to level a concrete floor under a laminate, take this method into service.

As for lighthouses, some masters leave them inside. However, experts recommend that you still get the profile, and seal the voids with tile adhesive. The budget, but no less durable Lux composition is perfect for these purposes.
Self leveling floor
If the height difference is no more than five centimeters, and free funds are available, a leveling mix for a concrete floor is perfect for arranging the base surface. It is quite expensive, but easy to work with, in addition, the alignment procedure does not take much time. As for technology, you need to start, as always, with preparation. The base substrate needs to be cleaned and primed. Then you need to markup using a laser level, drawing lines on the walls along which the upper boundaries of the new floor will pass. After that, you need to mix the solution according to the instructions on the package. Best Blends for leveling, according to experts, these are self-leveling Ceresit CN 69 and Ceresit CN 68, Vetonit 3000, EK FT03 FINISH. Many masters also praise more budgetary domestic mixtures produced under the Prospectors brand. So, we start leveling from the far corner, pouring the solution onto the floor and leveling the coating (according to the markings) first with the rule, and then with a special roller with needles.

How to level a concrete floor under a laminate
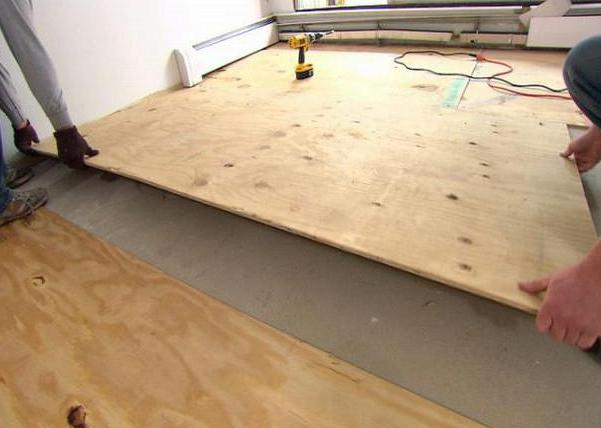
Laminate is perhaps the most capricious flooring that requires an almost perfectly even base. What is the best way to level the concrete floor under it? By and large, in this case any will do of the three methods described above. However, there is another option. You can try leveling the concrete floor with plywood. Unlike the same tiles, the laminate does not require the use of mortar during installation, so the presence under this coating wooden sheets will not affect the quality of the base in any way. But the alignment method itself is quite simple and fast. concrete base it is cleaned of dirt, primed, after which sheets of moisture-resistant plywood are laid on it without any fasteners (a thickness of 10 mm will be enough), and according to the same principle as the laminate (so that the seams of the elements do not match, but are staggered). After that, another layer is laid, but so that its joints do not coincide with those of the lower layer. This plywood is already attached to the bottom sheets with self-tapping screws. After laying, you need to go through the seams with a grinder in order to final alignment rough floor.
A few words about the loggia
On the loggia, you can also apply all the methods described above. However, many experts consider it very attractive to level the concrete floor in this room using the same plywood, but on logs. What do they base their choice on? The fact that thanks to this method it is possible to additionally insulate the floor of the loggia by laying the appropriate material between the lags. Let's say styrofoam, mineral wool. Or a professional, but more expensive TechnoNIKOL insulation.
… about the garage
It is quite clear that no one is laying laminate or parquet in this room. The floor here is usually made of concrete. The main requirements for the base are that it be even. And, of course, durable. How to level It is best to do and then cover it with a special layer of hardener - the so-called topping - which will protect the surface from destruction. The best lineups mixtures of Caparol-Disbon, Neodur (Korodur), MasterTop (BASF) and domestic "Herkulit" and "Reflor" are considered.
… and about ceramics
If you plan to lay ceramic tiles on concrete and the subfloor itself is not particularly curved, you can level the floor in the process by adding more or less tile adhesive under level control. True, this method is applicable only if the differences are no more than three centimeters. In addition, if you decide to resort to this method, you need to buy only high-quality, with improved characteristics, for example, designed for Ceresit. Ideal for these purposes.
Conclusion
We tried to talk in sufficient detail about how and what is better to level the concrete floor in a particular case. In addition, they also touched upon the issues of alignment technology, named brands the best materials used in this type of work. We hope you can now easily find suitable option for your specific case. After all, you already know as well as any professional how and with what to level the concrete floor.
Over time, the surface of any wooden floors inevitably crack, bend and become uneven.

You can hide such defects with the help of various floor coverings, such as laminate or linoleum.
You can hide such defects with the help of various floor coverings, for example or . Before laying any finishing materials, it is necessary to competently and efficiently process the surface and make it as even as possible.
There are several ways to make the floor surface even. For selection right way should assess the state wooden surface.
Choice of method

Basic alignment methods
- Cyclovka
- PVA glue and putty
- Self-levelling compound or "self-leveling floor"
- Plywood
Mechanical sanding of wooden floors

For mechanical scraping, a scraping machine is required, with which you can quickly and accurately make the floor surface as smooth as possible.
Cyclovka is one of the most simple and common ways to level a wooden floor. The complexity of the process pays off high quality result. Most often, sanding is performed for painting (read about wall putty for painting in this one) or varnishing. The manual scraping method is impractical due to the high labor intensity and significant time costs. For mechanical scraping, a scraping machine is required, with which you can quickly and accurately make the floor surface as smooth as possible. With minimal skills, for scraping a room of 20 sq. meters takes no more than one day.
Stages of mechanical scraping:
- Cleaning the room from furniture and interior items. Stationary items should be covered to avoid excessive dusting.
- Floor surface preparation. Remove all nails and tacks that could damage the scraper. Thoroughly clean the floor of debris.
- Checking the operability of the scraping machine and preparing overalls, a respirator, headphones, thick gloves.
- Direct scraping of the floor. Work should begin from the corner of the room. The first layer is removed when moving the snake.
- Eliminate all cracks, chips and holes with putty. The color of the putty must be chosen as close as possible to the color of the wooden surface.
- Processing all hard-to-reach places floors using manual sanding. After the putty dries, it is necessary to carry out a secondary sanding.
Leveling the floor with PVA glue and putty

It is based on the use of a mixture of wetted sawdust and PVA glue, which, after hardening, forms a fairly durable surface, vaguely resembling a particle board.
So innovative and unusual way wood floor leveling is very budgetary, and in recent times gaining momentum in popularity. It is based on the use of a mixture of wetted sawdust and PVA glue, which, after hardening, forms a fairly durable surface, vaguely resembling a particle board. The process is quite lengthy. For leveling the surface, an area of 20 sq. meters may take about 8 hours.
Stages of leveling with an adhesive mixture:
- Remove furniture and clean floors.
- Execution according to the marking level and the imposition of rails.
- Filling the space between the slats and the prepared floor adhesive mixture. A thick leveling layer is performed in several steps. Each subsequent layer is poured after the previous one has completely dried.
- Checking the resulting coverage using a level. All defects and errors must be eliminated with putty.
- Complete drying depends on the thickness and takes at least a day. Additional strength can be given with a chipboard sheet or plywood.
Wait for complete drying (usually it takes a couple of days) and lay the flooring.
Leveling with self leveling compound

Walls should be covered with insulating material.
This method is quite simple, and the produced self-leveling compounds, designed specifically for wooden floors, make the whole process as easy as possible. The thickness of a perfectly flat surface will be from 0.5 to 2 cm.
Surface preparation consists in fixing all movable boards and removing protruding parts fasteners. Then it is necessary polish surface to remove paint or varnish residue. Noticeable gaps and gaps are leveled with a thick self-leveling mixture. The walls should be covered with insulating material, and in doorway set a wooden plank according to the height of the upcoming pour. The duration of work in the room is 20 sq. meters with a layer of 3 mm. does not exceed 8 hours, and after 6 hours it is already possible to move on the flooded surface.
Leveling steps:

Plywood leveling
A very popular and common method of alignment. Demanded for styling various kinds floor covering. Are used plywood sheets class 4 and above. The thickness of the sheet should not be less than 1.2 cm. Optimal Thickness the lag is 70 mm. good option is the 2nd grade from the array conifers: spruce, fir or pine. Humidity level - no more than 18-20%. With a competent approach and some skills, a floor area of 20 square meters. meters can be adjusted for one day.
Leveling steps:

Cost of material and labor in 2015
Most often, construction and repair companies offer floor leveling services. "pouring method". The cost of leveling with a "self-leveling floor" up to 20 mm is 270 rubles. per sq. m. Alignment with a "self-leveling floor" from 20 mm to 50 mm will cost 310 rubles. per sq. m., leveling with a “self-leveling floor” using a leveling compound costs 350 rubles. sq. m. If a floor primer is required with a universal composition, then such work is estimated at 75 rubles. per sq. m.
If the self-leveling floor option is selected, then the consumption of high-quality German mixture Uzin NC 175 with a layer thickness of 3 mm. equal to 4 kg per 1 sq. meter; 6 mm - 8 kg; 9 mm - 12 kg. Accordingly, a standard package of 25 kg is enough for 6, 3 or 2 square meters. meters of the base of the wooden floor. A paper bag of this mixture weighing 25 kg. costs around 3 thousand rubles.
Price professional work for leveling a wooden floor using plywood costs between 140 - 160 rubles. per sq. m. Sheet waterproof plywood FSF 12 mm format 2500 x 1250 costs 1300 rubles. Required amount easy to calculate on your own.
Of course, the most budgetary is the leveling method using PVA glue and putty.
The final cost of the material depends on the footage of the room and the thickness of the applied layer. For example: PVA glue Polymax Extra M, 5 kg. costs 230.96 rubles. Sawdust, which is a waste of woodworking production, is completely “penny”, and even free material. With an average filling thickness of 1-1.5 cm with such a mixture, the consumption of glue per 1 sq. m. will be about 0.8 kg. The proportions of glue and sawdust depend on the type of wood waste.
As a rule, a strong connection gives a ratio of sawdust to glue of 2:1.
The range of prices for scraping floors is very large and depends on the equipment chosen. The price of scraping a wooden floor starts from 119 rubles. per sq. m. For example, scraping work on german technology will cost the customer 500 rubles. per sq. m. Warranty for work - at least 2 years. The price of independent scraping works depends entirely on the cost of the tool used. Renting a scraping machine costs 1000 rubles per day. Buy such a tool for one-time use impractical.
Video instruction
If it turns out that the floor covering is worn out, it becomes necessary to replace it. After removing the old coating, it may turn out that the base has begun to collapse in some places. The coating needs to be laid new, however, it is clear that you cannot lay it on an uneven base. The question arises: how to level the floor in the apartment?
Usually the floor was leveled with cement-sand mortar, based on Portland cement as a binder, and sand and gravel of different fractions as a filler. The strength of the screed made from such a solution depends on the water-cement ratio. The smaller the proportion of water, the stronger the solution. The more - the less durable it is, it dries longer and shrinks more. The thickness of the screed should be about 50 mm, at least 30 mm. A thinner screed will flake off from the base, which is fraught with destruction of the coating - reeling of the parquet, cracks in the tile.
well align cement-sand screed can only experienced professionals(admissible discrepancy in the level of heights - 2 mm per 1 sq. m). The complexity of this type of work is the fact that the CPU solution dries for a long time - top coat can be laid on the 28th day, when all moisture has evaporated from the screed, and this greatly slows down the progress of work.
Modern materials that do not have two main disadvantages of cement-sand mortar: the difficulty of leveling and the slow gaining strength are self-leveling mixtures (self-leveling floors, self-leveling mixtures). These are fluid, plastic, fast-hardening compositions, which have received these properties due to polymer additives - modifiers and plasticizers and mineral fillers, in a new way answer the question "how to level the floor in an apartment."
The resulting coating has low shrinkage, high wear resistance and hardness. Special additives that retain water and mineral reinforcing fibers prevent the screed from cracking.
Such a solution dries twice as fast as its predecessor and has thinner(15 mm, min - 5 mm). You can walk on it after 6 hours, and install the finishing layer after 12 hours.
The cost of self-leveling mixtures is much higher than the cement-sand mortar.
This is explained at a great cost polymer additives themselves: plasticizers, hardening and setting regulators, etc. In order to save money, you can first arrange a cp-screed with a layer needed to level large irregularities, and then a self-leveling floor - 5 mm thick, achieving a perfectly even coating.
Also among the mixtures for self-leveling floors, there are rough leveling compounds for very uneven bases and for fine finishing before laying a decorative coating.
Self-leveling compounds are based on cement or gypsum as a binder.
The first is used for leveling floors in public and residential buildings for outdoor and internal works, and the second - only indoors. Gypsum - eco-friendly, natural material, a good heat insulator and, importantly, it is able to regulate the humidity in the room. That is, absorb excess moisture and evaporate its lack. Thanks to this quality, the screed on plaster base used for laying parquet, because it does not dry out on it.
The most common mixtures are HENKEL BAUTECHNIK (Ceresit companies), KNAUF (KNAUF companies), both - Germany, ATLAS (Atlas brands, Poland), MASTEROK (MasterOK companies, Russia), etc.
What is the technology of working with a mixture of self-leveling floor?

First, the temperature in the room must be at least 5 degrees Celsius. Secondly, it is necessary that windows and doors are closed, since drafts are unacceptable during pouring and during the drying period of the mixture.
Before you start pouring, you need to examine the base that needs to be leveled. All weak spots should be embroidered and cleaned of debris, remove all dust with a vacuum cleaner. To enhance the strength of the base and adhesion with the new leveling layer, you need to cover it with a primer.
The mixture in the required proportion is poured into water and stirred with a drill with a special nozzle until smooth and left for 3-5 minutes. Then the floor should be filled in 15-20 minutes. Filling is carried out in strips of 30-50 cm; the entire room is poured in one step to get a flat surface.