Instructions for installing a plasterboard partition with a door. Drywall doorway: make doors with your own hands, profile installation and photo how to sheathe, video and frame Opening in a drywall wall
During repairs, it often becomes necessary to construct a drywall doorway. Even a beginner can do this work correctly with his own hands, but only on condition that he is well versed in the essence of the issue. To do this, it is necessary to carefully study the features of each type of structure and the building material itself.
Drywall allows you to quickly and easily make a doorway
Material Features
First of all, you should familiarize yourself with the properties of drywall. GKL is a fairly popular building material, it is used in almost any field, it allows you to build both small decorative extensions and quite massive elements. With the help of drywall, you can quickly level the surface of the wall or build partitions, both solid and curly, including a doorway.
Advantages of drywall:
- Ease. The plates vary in thickness, but in general their weight is negligible. There are lightweight options for finishing the ceiling, which has a positive effect on the condition of the supporting structures.
- Availability. You can buy GKL in any construction department at a price that is quite affordable for most of the population.
- Wide scope. It is used almost everywhere, and not only in the field of rough construction, but also for decoration.
- Strength. Despite its visual fragility and small thickness, drywall is able to withstand a huge load. With proper finishing and operation, it does not collapse and retains its properties for decades.
- Ease of processing. The material is quite malleable and very easy to work with. With your own hands, you can give it almost any shape.
- Fast installation. The plates are attached to the frame with glue or self-tapping screws; this can be done even alone in the shortest possible time.
- Additional properties. Some types of drywall have additional distinctive characteristics. For example, blue GKL is moisture resistant, red is fireproof. There are also plasterboard sandwich panels with insulation.

The main advantages of drywall are ease and quick installation.
Change the dimensions of the opening
In order to make a solid doorway from a drywall sheet with your own hands, it is necessary to distinguish several types of structures. Most often, it becomes necessary to change the dimensions of the opening, namely, to reduce its height or width.
In order to complete this task, you will need an additional metal profile of two types: starting and rack. They differ, first of all, in the specifics of placement and the functions performed.

For the construction of the frame will require two types of aluminum profile
In order to increase the rigidity of the drywall construction in the rack profile, it is necessary to additionally lay wooden beams.
First you need to determine the required dimensions. If you decide to slightly move the doorway, the wall is cut out with a grinder. Next, fix the profile at the top and bottom. It is also recommended to install an additional rack on the side of the wall. A vertical element is fixed along the edges and twisted with self-tapping screws. For greater rigidity, several more crossbars are attached.
If you need to reduce the height, wall profiles will serve as the main supports. After their installation, drywall is cut into sheets so that its edges are in the middle of the profile. They are also fastened with self-tapping screws.

Reducing the height of the doorway with plasterboard
Straight frame construction
More time-consuming is the construction of a partition from scratch. Such a wall of drywall sheets with a doorway must be pre-designed. The plan outlines the exact position of the door and the necessary parameters for the opening. At the same time, it is important to take into account the fact that it is necessary to build a structure that is somewhat smaller in size, since after finishing part of the area is hidden.
In order to do everything with your own hands, you will need more profiles than for the previous type of work. First of all, mark up directly on the floor and walls. Here you need to outline the position of the vertical racks and.

Scheme of the frame device for an aluminum profile partition
After that, you need to install horizontal profiles on the floor and ceiling, rack-mount strips will be driven into them. Additionally, the structure can be strengthened with horizontal profiles in places where it is planned to hang a cabinet, TV or other interior items. Sheets are screwed in the way already described earlier. Insulation is laid inside the partition. A protective corner is additionally put on the corners.

Drywall sheets are attached to the frame with self-tapping screws.
Arch
You can make not only standard drywall doorways, but also more decorative designs. It's about arches. In order to make them with your own hands, you need to give building materials a specific shape.
With the help of drywall, you can create an arched structure of almost any configuration:
- direct portal;
- ellipse;
- round expanded;
- non-standard asymmetric;
- etc.

Interesting options for arched openings
The frame is erected in a standard way with one difference: the profiles are bent to a given project. To do this, they are cut with scissors for metal. In order to bend the drywall, you need to walk on it with a spiked roller, then lightly wet it with water to make it more pliable and fix it in the desired position. Make sure that the cardboard does not soften, otherwise the gypsum will crumble and crumble in the future.

Installation steps for a simple arched plasterboard structure
Drywall finishing
Sometimes it is only necessary to slightly correct the contours of the doorway. In this case, the wall is often covered with a layer of plaster. Some irregularities require a significant consumption of materials, and therefore it would be more appropriate to use GKL to correct irregularities.
To do this with your own hands, you need to measure the required dimensions for drywall and fix it on the slopes and inside the opening itself. Minor defects and seams will later be hidden by plaster. The corners are aligned with a special profile made of aluminum or plastic.
Drywall can be glued to a special compound or you can use ordinary putty.

Finishing the door slope with plasterboard
Final finishing
After the wall is displayed along with the doorway, you can proceed to the final stage of finishing. For this purpose, putty and paint mesh are used. If you plan to do everything yourself, you can break the work into several stages:
- Padding. A primer is applied to the entire surface and completely dried.
- Defect removal. The seams are sealed with sickle, it is also necessary to process the places where the screws are screwed in and the corners, it is important to hide the transition from the wall to the plasterboard structure.
- Alignment. The putty applied locally, after complete drying, is rubbed off, a new layer is applied on top, this time over the entire area of the material.
- Mashing. The surface is polished again, if there are no irregularities, you can start decorative finishing, otherwise you need to repeat the previous procedure and wipe the surface again.

It is possible to hide the seams of drywall with putty
Subject to the design standards and rules, a doorway made of gypsum plasterboard will be able to withstand a significant load. At the same time, it will look even better than the standard options.
A doorway in a plasterboard partition, for the subsequent installation of an interior door, is made according to existing standards at the stage of partition installation. The door opening should be made in such a way that the installation of the door is simple and secure, and the closing of the door does not violate the structure of the partition.
About frame and door
As you know, frames for plasterboard partitions are usually made of metal profiles called rack-mount (PS) or wooden beams. If installing a door into a drywall frame from a bar does not cause problematic issues, then firmly fixing the door frame on a thin metal profile is simply not possible if you do not make preliminary preparations and properly arrange the doorway.
Working conditions
The task of the described work is to make and prepare a doorway in a plasterboard partition for the subsequent installation of the door. From professional construction practice, it is worth remembering that the frame and installation of doors are made by different teams of workers, often spaced apart in time of work. In such a situation, it is important for partition installers to properly prepare the doorway so as not to put the joiners in an uncomfortable position.
Instruments
To carry out work in your home and with your own hands, you will need a standard electric and manual drywall tool, which you need to add: Wood saw.
Stages of work include
I believe that drywall work can be divided into two technological approaches.
- First approach, professional. It complies with all technological maps developed by drywall manufacturers. The most famous technological sheets of the company Knauf.
- The second approach, amateur. It is possible due to the versatility of drywall profiles.
For example, the correct drywall box must be made from rack profiles PS. In an amateur approach to installation, the rack profile can be replaced with any other PN or PP profile, the main thing is that the structure is durable.
- Professional doorway in a drywall partition on a metal and wood frame according to the Knauf technological map;
- Doorway in a partition made of HA in apartments, private houses, small volumes.
Stages of work execution
We will divide the work into the following stages:
- opening marking;
- Installation of a frame with an opening;
- Strengthening the opening;
- Sheathing the frame with sheets of civil code.
- Features of painting work in the opening with the door.
Execution of work in stages
Doorway markings
The marking of the opening is done when marking the partition, applying the width of the opening to the floor of the room. The width of the opening for an interior door should be the sum of the width of the assembled door frame and two 10 mm gaps that must be left between the frame and the frame. Similarly, the height of the opening is considered.
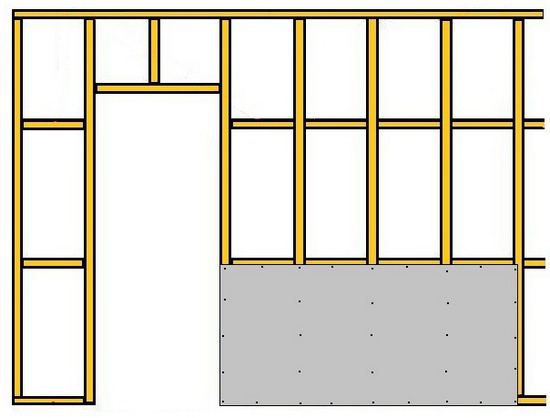
Installation of a frame with an opening Knauf technology
- The partition frame is mounted from rack-mount (PS) and guide (PN) profiles. PN profiles are mounted horizontally; PS profiles are mounted vertically.
- When installing the guide profiles of the partition frame along the floor, they are interrupted at the border of the opening.
- Along the border of the opening, two vertical rack profiles (PS) are installed. Them be sure to fix with additional steel corners from the floor and ceiling in order to strengthen the structure in this particular place.
- Particular attention is paid to the vertical threshold of the doorway. It is made from a guide profile (PN), having previously bent its edges, as shown in the figure. You can bend the edges of the profile not up, but down.

Strengthening the opening
I want to note. What is in the Knauf technological maps, there is no additional strengthening of the opening, except for installing the corners at the top and bottom on the vertical guides of the opening.

Let me explain what's the matter. According to Knauf technology, the door is not placed on the metal frame of the partition, but on a beam (board), which is attached to the frame with self-tapping screws or anchor bolts, and the door is fixed to this wooden lining of the opening. That is why, the size of the opening for such technology should be increased by the width of the beam under the box.


class="eliadunit">
In everyday construction practice, the frame of the doorway is reinforced with a bar, but the bar is not placed outside the frame, but inserted inside the profiles of the opening. That is, a frame is made with an opening with a width and height equal to the size of the door frame plus 20 mm gaps. And in the vertical racks of the opening, wooden bars are inserted inside, which are fixed to the racks with self-tapping screws.


Note. If you do not have steel corners to strengthen the vertical racks of the opening to the floor and ceiling, they are made from two PS racks, connecting them like a box (put one into the other).

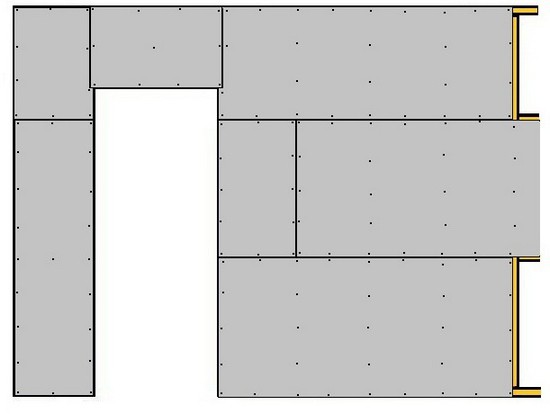
Sheathing the frame with sheets of GK
Sheathing the frame with sheets in the area of \u200b\u200bthe doorway has several features.
- First, the seam between the sheets of the Civil Code should not be allowed to fall on the border of the doorway. This will lead to cracks in the future.
- Second, you do not need to horizontally join the sheets along the height of the doorway. Sheathing should be carried out in a single sheet.


Features of painting work in the opening with a door
The door constantly opens and closes, exerting a shock load on the partition and frame. No matter how you strengthen it, the main partition will still oscillate, and the main sheets will move, forming cracks. To strengthen the paint layer of the partition, it is necessary not only to glue the seams with paper masking tape, but also to glue the surface of the partition with a masking mesh 1-1.5 meters from the door border.
Opening in a wooden frame
In a wooden frame for drywall, the doorway is made in the same way: vertical bars are reinforced with corners to the floor and ceiling. The box is attached to a wooden beam.

Drywall has appeared on the building materials market relatively recently. Even 15 years ago, partitions and piers of structures were built from foam blocks or bricks. Today, drywall is gaining more and more popularity.
The main advantages of drywall, compared with other finishing materials, include:
- ease of installation, since any owner can handle the installation of drywall;
- the ability to make a variety of shapes;
- maintaining optimal humidity in the room. Due to its porous structure, the material allows steam and moisture to pass through, the costs of which it retains;
- thanks to some types of impregnation, drywall can be used in rooms and structures with a high level of humidity;
- the material has a very light weight, due to which it does not overload the structure on which it is attached;
- drywall is much cheaper than similar materials;
- The material is environmentally friendly and does not harm health.
Drywall doorways are installed using a profile with a width of 50 to 100 mm. At the same time, it is cut with your own hands to the desired size.
Required Tool
To make a drywall doorway with your own hands, you must have the following tool:

- building level;
- screwdriver or drill with nozzles;
- roulette;
- perforator;
- mounting foam;
- a plumb line to carry out the installation of guide profiles;
- pencil;
- cutter.
Even with a minimal set of tools, you can quickly and efficiently make a doorway with your own hands.
Installation of a doorway
Before proceeding with the installation of the doorway, it is necessary to prepare a frame for it.

The installation of the frame for the opening is carried out as follows:
- to the profiles of the ceiling and floor, the rack of the doorway is mounted;
- at a distance of about 50 cm from each other, intermediate racks are mounted to each wall;
- a p-shaped segment is formed from drywall, after which it is attached to a horizontal crossbar above the door;
- the structure is fastened with self-tapping screws;
- in case the structure needs to be given additional rigidity, a wooden beam can be inserted into the doorway.
After the frame is ready, proceed to laying solid sheets of drywall. It is very easy to do this if you follow these rules:
- the gap from the installation site of the self-tapping screw to the edge of the sheet should be about 1 cm;
- the optimal distance from one fastener to another is 15 cm;
- sheets placed in the neighborhood should be located on the same profile;
- the fastener head is recessed into the sheet by no more than 0.8 mm;
- the length of the self-tapping screws used should be within 2 cm;
- then you need to close up all the joints and carry out the rest of the cosmetic work.
Thus, by fixing drywall sheets on the prepared frame, you will get an aesthetic and beautiful doorway.
How to shrink a doorway with drywall
During the redevelopment of the home, the owners are sometimes faced with a situation where the size of the doorway needs to be reduced. It is very easy to do this with your own hands, but before you sew up the doorway with drywall, you need to apply a layer of plaster on the wall near the door, corresponding to the thickness of the drywall sheet.
With the help of drywall, the doorway can be reduced in this way:
- plaster is removed 10 cm from the edge of the doorway;
- markings are applied to the walls and floor;
- according to a pre-prepared marking, a starting profile is attached to the floor and ceiling;
- point profiles are placed on the finished starting profile, which are then connected with self-tapping screws;
- after the frame is fully installed, it is necessary to reduce the initial dimensions and cut out drywall fragments for future construction;
- on sections of the wall that were previously cleaned of plaster, a special glue is applied (it is better to do this with gloves). Gypsum plasterboard sheets are attached to the applied glue and, after its polymerization, the edges of the sheets are fixed with self-tapping screws;
- the slopes of the doorway must also be reduced in size, after which they are sewn up with a strip of drywall, and all joints must be repaired with your own hands.
The doorway, especially when it comes to the front door, can not only be reduced, but also insulated or isolated from extraneous sounds. Do this before plasterboarding, after the frame is installed.
As a heater, it is better to choose expanded polystyrene or mineral wool boards.
Installation of a door in a plasterboard opening
To install a door in a plasterboard partition, it is necessary to install the door frame, and then hang the canvas.
In order for the do-it-yourself box to hold tightly, it is fixed with special wedges made of wood. After finishing fastening, the wedges can be easily removed.

All parts of the box are checked for correct installation by a building level. If all the parameters are in order, you can use self-tapping screws to fasten the door frame into the opening.
The gap between the box and the rack must be sealed with special mounting foam. In order for the shape of the opening to be completely preserved, it is necessary to insert spacers during installation.
A do-it-yourself plasterboard partition built indoors with a door is an excellent solution for zoning space. The design may contain built-in shelves or recesses. They house various items: books, decorative figurines, photographs. The configuration of the partition may be different. Curved lines, non-standard shapes are very popular. However, many novice craftsmen believe that it is quite difficult to build such a structure. Let's see if this is the case next.
General information

Drywall partition with a door: organizing a doorway
Work begins with the installation of racks. They will form They are attached to the guides laid on the floor and ceiling. Further, intermediate racks are installed from each wall with a step of about 60 cm. Then a small section of the profile will be needed. Its length should correspond to the width of the future opening plus 2 racks of 10 cm each. The letter "P" is formed from this segment and attached to the place of fixation of the upper crossbar of the future box upside down. To give greater strength, 1-2 small racks are installed, the size of which is equal to the distance from the cross member to the upper (ceiling) guide profile. This creates a kind of frame over the future box.

Drywall partition with a door: installation features
The frame for the future box must be assembled so that later it is possible to correctly place and fix the sheets. In case of errors in assembly, subsequently, when opening or closing the door, cracks may appear on the partition at the joints of the GVL directly near the opening. To avoid these problems, it is necessary to strengthen which will be located on both sides of the box. To do this, a beam (40x40 or 50x40) is inserted inside the racks. Such reinforcement will not only give strength to the structure, but also facilitate its installation. In the absence of a beam or unwillingness to use it as additional stiffeners, you can install another rack profile in the immediate vicinity or close to the extreme rack. All parts are fastened with self-tapping screws. As an option, you can immediately install a reinforced profile with additional ones. The more there are, the higher the load that the wall with a plasterboard door in the apartment can withstand. This completes the frame assembly. If necessary, wiring should be connected before the GVL sheathing (if the backlight for the plasterboard partition is installed with your own hands). How to make an original design design? As a backlight, you can use spotlights or LED strips.

Fastening GVL
Sheathing of the frame begins with solid sheets from the wall. Fastening GVL is carried out in the same way as when finishing walls and ceilings. In the course of work, you need to ensure that:
- The distance from the edge of the sheet to the place where the screw was screwed in was in the region of 1.0–0.5 cm.
- Between the fasteners, a step of 10-15 cm was observed.
- Docking of adjacent sheets was carried out on one profile.
- The head of the self-tapping screw was recessed into the GVL sheet by 0.5-0.8 mm.
When constructing a wall with a single-layer plasterboard sheathing, the length of the fastener should be no more than 2.5 cm. When finishing with two in two layers of GVL, the self-tapping screw should be at least 4.0 cm.
Using jumpers
Often a single sheet for sheathing any area is not enough. In this regard, it is necessary to increase the GVL. In this case, it is necessary to install additional jumpers at the transverse joints of the sheets. Segments of rails or profile CD-60 are used as additional racks. When installing the jumper, do not put strong pressure on it. You need to fix the sheet with a short step, using at least 5-6 self-tapping screws for each side.
Final stage
After the GVL is fixed on one side, proceed to sheathing the other part of the frame. You can first lay inside the insulating material - insulation (mineral wool or polystyrene). Its width should be slightly larger than the inter-profile space. Then the material will be installed between the uprights end-to-end, which, in turn, will eliminate the formation of gaps. After that, the second side is closed with sheets of drywall. After the fastening is completed, the joints are glued with a reinforced mesh and puttied. The caps of self-tapping screws are also masked.
Finally
In general, even an inexperienced, novice master can cope with the installation. All work can be done independently, without attracting anyone to help. The most important thing is to observe verticality and horizontality when installing frame elements. The position is controlled by the building level. The advantage of drywall is that when it is laid, a perfectly flat surface is created. Various materials can be used as a finish coating. Wallpapering and painting are very popular. Also often the surface is covered with decorative plaster. You can use heavier materials - stone, wood panels. But in this case, a reinforced profile is needed for the frame, and thick drywall for sheathing. Otherwise, the structure may not withstand the load and collapse.
Redevelopment of premises, their zoning are quite often implemented methods that allow you to increase comfort on the same “squares”. A drywall partition with a door is the most common home renovation option. If you delve into the nuances of such work, then it is quite possible to do without outside help, especially the services of a professional.
Preparatory stage
Drafting
Development of a partition scheme. There are some points to be taken into account here. Since not just a plasterboard partition is being arranged, but with a doorway, you need to choose a place for it in the “new” wall. In this regard, one should proceed from the specifics of the further use of adjacent premises, their filling with household appliances, furniture, and so on.
 Is it supposed to mount something on the cladding of the GKL. The sheets themselves do not differ in strength; they acquire it only with additional amplification. And if it’s just not possible to attach a shelf, a lamp, hang a massive picture or something similar to a plasterboard wall, then it is necessary to provide for installation in the crate of load-bearing elements. The practice of building partitions from GKL shows that the installation of single vertical racks from profiles is impractical for a number of reasons. One of them - a relatively thin metal "plays" with strong pressure on it.

A simple solution is to install a second, additional guide. If a significant strengthening of the structure is necessary, it is advisable to place wooden blocks (thick slats) in the required places.

If the partition scheme is drawn up correctly, it is not difficult to find these elements after sheathing the frame. Alternatively, leave marks on the floor with a pencil or felt-tip pen.
When planning the manufacture of a plasterboard partition, it is worth immediately determining which door it will be with - swing or sliding. In the latter case, when calculating the insulating material, the volume of its purchase is significantly reduced. And if the opening is significant, and the width of the room is small, then the cavities between the GKL are generally left unfilled; otherwise, the sashes simply will not part.
Vertical racks require reinforcement. And therefore, jumpers from the PN profile are installed between them. The scheme of their location is developed independently.

Taking measurements
The dimensions of the room at the location of the partition are determined. It must be understood that floor slabs do not lie in a strictly horizontal plane. Therefore, the height should be measured at opposite walls. What for? If its difference is significant, then you will have to think about how to level this disadvantage. The prospect of cutting a sheet of drywall at an angle, besides cutting off a small fragment from it, is not the best. Most likely, 1 - 2 samples will be hopelessly damaged.
The distances from the walls to the vertical posts that form the doorway are measured. This is necessary to calculate the required length of the lower guide profiles, since the threshold is not made. Therefore, two PN rails will have to be attached to the floor (before the passage).

Calculations
The partition from the GKL is done on its own, including due to reasonable savings on paying for the services of third-party specialists. The same applies to the purchase of materials. A certain supply of them is necessary, but surpluses in large quantities are not needed; the prospect of early use is illusory, which means a waste of money.
You should not immediately buy drywall sheets and profiles at the first outlet that comes across. Although they are standard dimensions, not all manufacturers strictly adhere to standard sizes. The task is to select samples in such a way that there is as little cutting as possible. This will facilitate the work and save on waste optimization.
On the other hand, in some areas it will be necessary to mount small fragments of plasterboard, put jumpers (to strengthen the frame) from profiles. Therefore, materials should be selected according to linear parameters with the expectation that after cutting them, finished “details” are obtained.
The connection of drywall sheets is done on vertical racks. The recommended interval between them is within 55 ± 5 cm. If the GKL are overall, then one additional rack is mounted approximately in the middle to prevent punching through the wall.

Selection of materials
Guides
Without installing a supporting frame, it will not work to make a plasterboard partition, especially with a door. For all its advantages, GKL has a number of disadvantages, one of which is the fragility of the sheets. Therefore, during the installation process, they must be fixed on a solid base.
When arranging partitions, two types of profiles are used. What is the difference?
- UW (or PN, in Russian markings). The last letter in the abbreviation "suggests" that these metal rails are used as guides. That is, they form the outer contour of the crate. Therefore, they are mounted on the floor, ceiling, and walls, but only if they are load-bearing.

- CW (PS). These profiles provide the necessary "rigidity" of the structure and are installed vertically, according to the developed mounting scheme. They are called rack-mount (this is indicated by the letter C).

- PU - corner profile. It is used to strengthen (strengthen) joints.

Advice. When choosing rails in width (and it can be from 50 to 100 mm), you should take into account the dimensions of the room, and hence the linear parameters of the partition from the HL. The more spacious the room, the higher the ceilings, the more massive the profile needs to be fixed, constructing the frame.
Drywall
Its sheets are produced in a large assortment, and each type of product has certain characteristics. When choosing a GCR, you need to take into account the specifics of the room and the layout of the partition. For example, if it is mounted in a room with high humidity, then drywall is also used in the “moisture resistant” category (GKLV). It is also worth taking into account whether it is necessary to bend the sheets during the work; based on this, the thickness of the facing material is selected.

Insulator
You can make a plasterboard partition only inside the building. Accordingly, from one room it turns out two. The choice of insulating material depends on how it is planned to use the "new" premises. In other words, what its properties should be in priority. If the main criterion is to reduce heat loss, then it is optimal to insulate with mineral wool. If it is necessary to improve such a characteristic of the interior structure as sound insulation, it is better to purchase polystyrene foam. Or sheet, roll products based on cork, but they are somewhat more expensive.
Additionally
- Dowel-nails.
- Self-tapping screws (for metal).
- Screws for fastening GKL (commercially available).
- Damper tape. It is placed under the guide profiles to isolate them from the base and compensate for thermal deformation.
- Sickle tape.
- Primer + putty for drywall.

Instruments
- Scissors (for metal) - for cutting profiles.
- Construction knife - for cutting plasterboard.
- Plumb and level.
- Perforator.
- Screwdriver.
This is the main thing you need. Other accessories, if required, can be found in any home.
The procedure for erecting a partition
markup
- Determining the line of attachment of the lower guide (this is easy to do with the help of a "chopping" cord).
- Projecting it onto the ceiling and walls (to help - a rail, a building or laser level, a plumb line).
- Marking the floor at the location of the opening. If the door is hinged, then about 25 cm must be added to the width of the block.

Lathing construction
- Cutting PN-profiles.
- Sticker on their sides adjacent to the surfaces, damper tape.
- Mounting guides. It is recommended to first fix the top rail on the ceiling. This will allow using the plumb line to check the symmetry of the line below.
- Installation of wall (vertical) racks.

- Opening formation. Already noted - either double profiles, or single + wooden slats. For swing doors, you can use a square tube with the appropriate diagonal. There are several options for strengthening the structure, and it is advisable to study this issue in advance.
- Fastening of PS-profiles along the entire width of the partition, in accordance with the diagram.
- Installation of jumpers and embedded bars. To the latter it will be possible to attach wall cabinets and the like.
- Laying electric / wiring, internet - everything that is provided.

Frame cladding
- Finishing GKL battens on one side, leaving a gap between them and surfaces of the order of 5 mm. When tightening self-tapping screws, their hats must be recessed into chamfers.
- Laying the insulation material.
- Facing the second side of the frame.
- Reinforcement of the partition with corner profiles.

Block installation
It is necessary to check that the frame does not protrude beyond the plane of the wall. After fixing the door, the gaps are sealed with mounting foam.

Exterior finish
- Puttying the joints of the plasterboard and the locations of the caps of the hardware.
- Their reinforcement with sickle tape.
- Soil treatment.
- Surface grinding as a stage of preparation for finishing.
There are many ways to independently decorate a plasterboard partition - painting, pasting with wallpaper or decorative film, applying textured plaster. GKL are popular in the construction industry due to the ease of working with them and the variety of surface design options. If the meaning of all technological operations is clear, then the services of a master are not needed to build such a partition.