How to paint food grade plastic. Paint for plastic
They wear out and lose their original appearance. But wear affects not only external, but also internal elements, including door cards, console and dashboard. Of course, you can buy a new element. However, its cost is often inadequate. You can also take a part from disassembly in a more or less “alive” state. But, as practice shows, the best and most economical way to refresh parts of the interior is to paint the plastic of the car yourself. How is this done and what to pay attention to when working? About all this and more - further in our article.
Dismantling
The first stage is the dismantling of all elements that will be painted. This is the most difficult operation. Each make and model of car has its own options for installing dashboards, trims, maps and handles. Even if it's the same car, but different configurations, there will be several dismantling options. On some vehicles, the instrument panel can only be removed using a puller pin from the windshield side.
For convenience, it is better to buy a set of tools for working with the car interior in advance. Such kits are universal and suitable for most modern cars. With such pullers, you will significantly save effort and time spent on dismantling.
When disassembling plastic parts, never use steel screwdrivers. There are special polyurethane blades for this. At the slightest contact, the hard metal will bend the edges of the soft plastic. And it will be very difficult to return to its previous form.
Also, to avoid confusion, place all bolts and nuts in separate boxes, or better yet, label them. This way you won’t get lost when assembling elements, when one bolt won’t screw in due to a different thread pitch, although they are externally the same in size. Sometimes car owners take periodic photographs, recording where each element was previously attached.
Surface preparation
After successful dismantling, the interior elements are placed on a soft, non-abrasive surface. This can be a sheet of chipboard, OSB or any other sheet made of wood, or large pieces of cardboard.

If you place an element on asphalt, even with the most careful handling, the plastic will be scratched. To prevent the adhesion of dust and other small particles, when painting plastic with a spray can, the surface is pre-treated with an antistatic agent. Even a small lint can spoil the final result of the work.

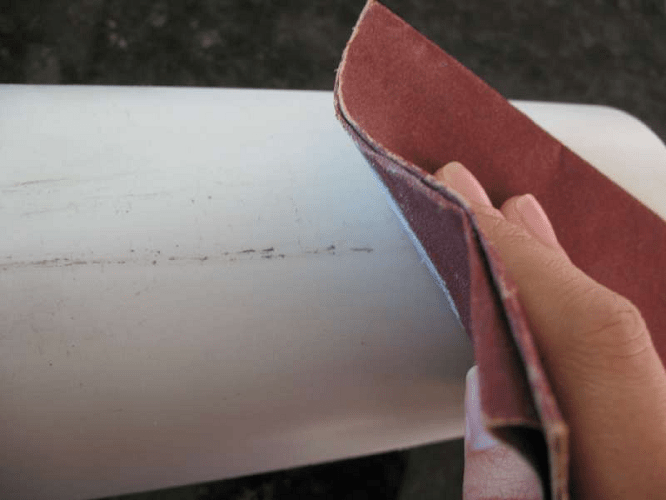
If this is a crack in a critical component (for example, a door handle that is constantly subject to stress), for greater reliability it is treated with a thick sealant from the inside. To avoid scratching the surface, wet it periodically. sandpaper in water.
After this, the coating is thoroughly degreased. For this purpose, white spirit, gasoline, or antisilicone is used. The latter corrodes perfectly greasy spots and gives good foundation for the plastic to adhere to the new paint.
Then applied under painting. It must be applied in 3 thin salts from a distance of at least 20 centimeters. Otherwise, drips will form. And it is extremely difficult to remove traces of such an aerosol, since it reacts with plastic and promotes better adhesion of nitro enamels.
Next, the final painting of the car's plastic is carried out - using a spray gun or spray can, a new layer is applied to the surface. If it is metallic, it requires a special application technology. After drying (about 20 minutes), the surface is treated with a layer of varnish. The distance from the can to the plastic remains the same - from 20 centimeters.
The slightest smudge will indicate that a “touch-up” was done, and of poor quality. It is better to treat one area in several layers than to pour a bunch of paint at once over the entire perimeter. Next, the coating is thoroughly polished using wax paste.
Brush
Using this tool instead of spray cans is an extremely risky business. After all, with the slightest carelessness there is a risk of drips forming. In addition, the layer from the brush is quite thick and it takes about a day to dry. In this regard, aerosols are several times superior this method coloring. If you have no previous experience with painting and want to spend less time drying the element, definitely choose a spray can.
To carry out the work, you will need the cleanest and most well-ventilated room possible. You shouldn't do this outside - the slightest dust will ruin all your efforts. Also remember to take precautions. In our case, if this is painting the plastic of a car interior, you need to protect your respiratory tract with a respirator and your eyes with safety glasses.
The car itself should be kept far from the painting area - the slightest speck of paint dust will fly through the air at a distance of up to 5 meters. Once it dries on the body paint, it will be very difficult to remove. If these are small parts, an old newspaper will do instead of cardboard and planks.

As for the choice of color, painting the plastic interior of a car is done for one purpose - to refresh the interior. There is no need to buy bright colors with the idea of preparing a car “for sports”. This way you will only spoil the interior, and when sold, such a car will be valued less than the factory one.
Therefore, we choose the most “stock” shade. When disassembling the interior, try to remember or take photographs of the places where the part was located. Place various small items such as door buttons, handle trims and air duct controls in a separate niche.

When working with a spray can, do not forget that the paint inside is very reactive. When there is a large amount of it, it easily “undermines” the previous layers on the plastic, forming pimples. Plastic painting with such components is carried out from a long distance. It is advisable to use a “torch” cap for this - for a more uniform application of the composition to the surface.
Alternative to painting
By the way, small scratches can simply be removed using an abrasive polish. Painting the plastic is not necessary here. For this, it is important to prepare a drill attachment and a special paste containing an abrasive - diamond chips.

But when performing such operations, you need to monitor the temperature of the plastic. It easily overheats due to high speeds and polish - it is important to catch the right moment when the plastic begins to “press in”, erasing the edges of the scratch. For larger deformations, such as cracks, this repair method is useless.
Is it necessary to prime?
Automakers use several types of interior plastic. One of them requires a primer, the other does not. It is better to consult with specialists in advance or conduct several tests.
How to check this yourself?
The first way is to check for flammability. If that piece of plastic produces soot when it burns, it needs a primer. But since we need to restore, and not completely burn it, we use alternative method. Place the plastic part in a container of water. If it has sunk in water, no primer is required. If it floats, painting the plastic must be accompanied by priming.

When processing with “sandpaper”, observe the transition of grain size - from coarser at the beginning to fine “zero” at the end. This way you will not have any scratches left and the paint will completely fill the existing pores on the surface. To add more shine, use several coats of varnish.
Conclusion
So, we found out how the plastic interior of a car is painted. As you can see, the work can be done with your own hands. The main thing is to follow technology and not forget about safety measures. After all, paint vapors have a strong effect on the human respiratory tract, liver and other organs.
The need to restore or repaint the decorative coating on plastic parts and PVC cladding arises much more often than it might seem at first glance. This could be the surface metal-plastic windows verandas, housings for home appliances, soft inflatable boat, plastic elements car body kits and even protective fabric covers. Painting PVC plastic is not particularly difficult, but on one condition, if you have special paint for PVC.
Difficulties in painting, how to paint polyvinyl chloride correctly
To paint plastic, acrylic or acrylic urethane paint is used for PVC profiles. As a rule, due to the high gloss or the specific “greasy”, waxy texture of the PVC surface, ordinary acrylic paint on plastic applies very poorly and rolls off in drops. Even the classic technique of increasing paint adhesion by applying artificial roughness does not improve adhesion to the base.
Therefore, before attempting to apply paint to window frames or plastic hanging parts, you will need to thoroughly prepare the PVC surface:
- Before using the paint, the PVC surface is cleaned of dust and dirt with soapy water and washed with clean water so that no traces remain. Ideally, a detergent for PVC parts is best, but you can also use water solution isopropyl alcohol;
- The surface is treated with a special solvent-activator, which improves the adhesion of paint to a smooth PVC profile;
- If acrylic paint is used for painting water based, PVC plastic can be slightly moistened with a hand sprayer, after which the painting material can be applied with a brush or using a spray gun.
Important! It should be borne in mind that the quality of the surface to be painted depends, first of all, on the temperature and humidity of the air. The higher the temperature environment, the better the adhesion, and the higher the drying speed.
After about a couple of hours, the paint applied to PVC at a temperature of 20-23 o C will stop sticking to your hands, and after 26-40 hours the drying process of the painted surface will be complete.
Water-soluble acrylic paints make it possible to obtain a painted PVC surface of a wide variety of colors and shades. According to paint manufacturers, the tinting unit, which is used for tinting and color correction, can produce more than 2 thousand color compositions.
Technology for painting household items made of PVC
High quality of the painted surface can be obtained only if specially developed products are used for painting surfaces made of polyvinyl chloride of any modification. Simpler materials, such as frames and cladding of metal-plastic windows, can even be painted acrylic materials, but to obtain an exemplary glossy surface, you will need paint containing modifiers and polyurethane varnish.

Therefore, to obtain a high-quality, perfectly smooth texture from PVC, the following is most often used:
- Polyurethane paints and varnish compositions from Feyco AG, Switzerland;
- Acrylic urethane paints "PaliPlast RP Base" used for industrial painting PVC plastic.
For your information! Painting compositions "PaliPlast" are produced both on a water and varnish basis.
Despite the fact that after drying, water-borne PaliPlast compounds are not washed off with water and can withstand repeated washing of windows and frames, they must be periodically restored protective layer using varnish, for example, “PaliPlast RP 022 Varnish”.
Painting PVC plastic surfaces at home
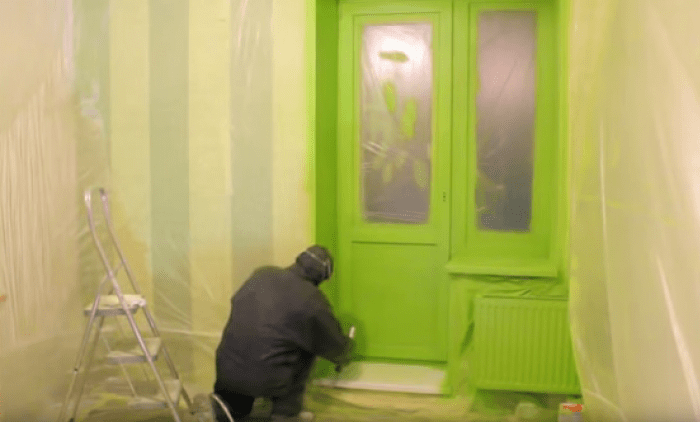
The most popular procedure for painting PVC plastics is painting the frames of metal-plastic windows. Not everyone likes it White color standard PVC cladding, or owners want to make the windows of their store or salon more expressive, in any case, painting windows does not present any particular difficulties if you use PaliPlast RP Base PVC materials.
You only need to seal the window, slopes, glass and rubber compressor frames with plastic film and masking tape, and you can begin painting according to the method described above. The easiest way to apply paint is to PVC profile with a brush or roller, but best quality obtained by using a spray gun low pressure. The viscosity of the paint is low, but the presence of mineral fillers can sometimes lead to clogging of the nozzle or poor atomization, so the paint solution must be cleared of films and mixed thoroughly before use.
More difficult is painting decorative and protective elements made of PVC plastic on a car. Most often these are moldings and linings inside the car interior. The parts are small in size, so it is best to use aerosol cans for painting PVC plastic. The composition includes an activator and a solvent, which ensure good adhesion to the plastic and rapid drying of the applied layer.
Do not paint large details made of PVC can be either with preliminary dismantling from the car interior or directly inside the car. In the latter case, you will need to install a fan to remove the flow of aerosol from the cabin and make an apron from polyethylene film, which will cover the space around the PVC part to be painted.
Full-size parts made of polyvinyl chloride must be dismantled, cleaned of dust with alcohol or window cleaner, and then painted with an aerosol in thin layers, 50-70 microns thick.
Complex options for painting PVC plastic
On large body parts or spoilers, paint can be applied using a spray gun or spray gun. Initially, you will need to matte the surface using thick paper and micron-sized abrasive powder. Next, the plastic is thoroughly washed and dried.
Before applying paint, the surface will need to be wiped with a PVC cloth moistened with P646 solvent, and it can be painted. If the item is very thin and soft, then the first layer is best done with Feyco polyurethane varnish, after which you can apply the required number of layers of paint.
In a similar way, you can paint PVC pipes, structural frames, even glass and furniture. To enhance the adhesion of paint to an absolutely smooth and inert glass surface, the Feyco company suggests adding a special reagent “Fey (N) Vetro Zusatz 501” to the paint. Polyurethane and epoxy compounds can be used to paint metal, stone, plastic, and wooden surfaces quite easily, while the quality of adhesion to the base is much higher than that of acrylic and water-dispersed materials.
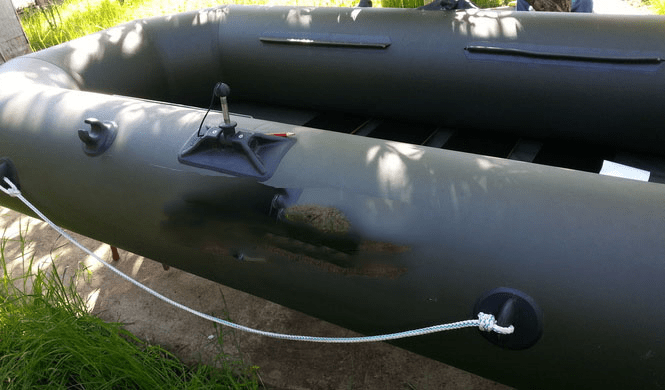
Special mention should be made of painting soft PVC fabrics, for example, covers or housings inflatable boat. Most polyurethane paints can be used on thick PVC fabrics under one condition. Painting is carried out using a barrier sublayer of FEYCO Universalprimer 2159 primer diluted in a solvent in a ratio of 1:3, with the addition of Fey (N) Vetro Zusatz 501. The sublayer is applied using a spray gun in a thin layer of 20-25 microns. Subsequent painting is carried out with conventional polyurethane paints.
If there is no particular desire to look for optimal recipes for painting soft tissues, the barrier layer can be made using aerosol paint for cars.
Conclusion
Painting polyvinyl chloride is not a difficult task if you use the right materials. Considering the high durability of PVC plastic, the demand for special paints for decoration or repair is only increasing, so the painting technology is constantly being improved, and, apparently, in the near future the problem with painting PVC plastic will be finally solved.
A common thing: you need to paint your bumper. Painted. And it seemed like they did everything according to technology: they applied and sanded the filler primer, then the base, varnish... They didn’t forget anything, they even degreased it conscientiously. But despite all the efforts, after some time the paint begins to “slip” off the bumper, like skin after excessive tanning. Who's to blame? Manufacturer of coatings? But no. We forgot that we are dealing with plastic, and not everything is so simple with it.
Today you will find out
Is it easy to paint plastic?
The first requirement for a paint layer applied to a plastic surface is high adhesion to this surface.
But the fact is that initially, after casting, the surface properties of the plastic do not at all contribute to strong adhesion to the future. paint coating.
The greatest difficulties when painting are created by the surfaces of non-polar plastics. They have a chemically inert, non-porous surface with low surface tension - and the lower the surface energy of the plastic, the worse its “adhesion” to the applied paints and varnishes.
Among all plastics, polypropylene and polyethylene have the lowest surface energy - these plastics and their modifications are considered the most difficult to paint.
When painting other types of plastics, problems associated with adhesion are not so pronounced, but this does not make it any easier for car repair workers, since polypropylene is the most popular type of plastic used in the automotive industry. Almost all bumpers (and these are the main paintable plastic body parts) are made from various modifications of polypropylene - usually a dark gray material that can be soldered and is inert to solvents.
Try to take a polypropylene bumper and immediately apply paint on it - what will happen? Knowledgeable person will answer right away: nothing good... And indeed, the adhesive properties of the coating will be very weak. What should I do?
In the automotive industry for preliminary preparation plastic before applying paintwork materials, three main methods are most often used: treatment with corona discharge, low-temperature plasma or gas flame.
These operations are strikingly different from traditionally accepted surface preparation methods. For example, corona discharge treatment is the effect of an electric discharge on the surface being treated, generating “jet” of plasma. Plasma processing is carried out by exposing the plastic to a plasma flow generated by a plasma torch, and flame processing is carried out by the flame of gas burners.

The purpose of this treatment is to increase the wettability of the plastic surface, thereby improving its ability to form bonds with paints. In order for the surface to be well wetted by a liquid, the surface energy of the plastic must be higher than the surface tension of this liquid. If the surface tension of the liquid (paint) is greater, it will bead up instead of uniformly wetting the surface. Therefore, all processing methods are aimed primarily at increasing the surface energy of the polymer.

Wettability. On the left is the treated surface, on the right is the untreated surface.
As a result of this treatment, changes occur in the surface layer of the plastic: polar molecules are formed in the previously non-polar polymer, increasing the surface energy of the material. The surface at the micro level becomes rough, and its effective adhesion area to the paint increases.

There is no need to explain how complex and expensive the equipment is used for these processing methods. Its operation is justified only in large factories, in mass production, but for car service conditions all this is too expensive and complicated. Because of this, polypropylene was considered unpaintable for a long time.
Having put their brains to work, chemists have developed alternative, simpler methods for preparing polymer surfaces—the so-called “wet” chemical methods. The most convenient and used of them is priming the surface of the plastic. A special adhesive primer applied to the surface of the plastic serves as an effective intermediary between the polymer and subsequent coatings, and in some cases adhesion can even exceed the factory level!
Now let’s leave aside the complex chemical formulations and get down to business.
Preparing plastic parts for painting
When starting to repair a plastic part, the first step is to determine what part we had to deal with. It could be:
- new part;
- old defective coating.
New plastic elements, in turn, can be supplied with factory primer already applied or in a “pure” form.
If you can't tell whether a part is primed or not, rub a small area of the part with some rough sandpaper such as P500. If there is sanding dust, then the part is primed.
There are minimal problems with primed parts, but we'll talk about that later. Now we are interested in the procedure for working with “clean”, unprimed plastic elements.
New unprimed part

Plastic parts are made by injection molding, and special lubricants are used during the production process to ensure that the part can be correctly separated from the mold after casting. Naturally, remaining on the surface of the plastic, they do not contribute to the adhesion of the paintwork.
There are two types of such lubricants:
- external,
- internal.
External lubricants are used in diluted form and sprayed into the mold before each new production cycle. They are not always applied, but every 3-4 times, so some parts have more lubricant, others have less. All these greases can be removed in a workshop environment with a suitable degreaser.
Internal lubricants are introduced into the composition of the plastic itself, so there is no need for separate spraying into the mold. Such plastics are more difficult to paint, since they themselves are “greasy”. The same polypropylene belongs to representatives of fatty plastics. Internal lubricants do not dissolve and are not removed by water, and they can be completely removed from plastic only by heating.
But one way or another, the first step to remove dirt from the surface of the plastic should be washing.
Washing
The ideal solution in this case would be a high-pressure washer, but in the absence of one, a bucket will do just fine hot water with any active detergent (liquid soap, car shampoo) and some kind of brush or hard paint brush.
The part must be washed both outside and inside, and then rinsed big amount clean, warm water.
Evaporation
To be one hundred percent sure that no lubricants or dirt will interfere with the creation of strong adhesion with the future paint coating, according to the technology, the unprimed part must be heated in a chamber at a temperature of +60°C for 30-40 minutes. During this time, the lubricants located in the pores of the plastic part will rise to the surface, where we will remove them with a cloth moistened with a degreaser. This must be done promptly, while the part has not yet cooled down.
If the part has rough structural surface or is very dirty (for example, an old bumper), then it is advisable to repeat the evaporation process. And then - repeat the procedure with a napkin and degreaser. For better cleaning When degreasing such parts, you can use Scotch Brite (gray).
In addition to removing lubricants, heating helps reduce internal stress in the plastic, which can subsequently cause unexpected cracking of the paintwork material. Heat treatment also helps to identify shrinkage cavities (air inclusions) and then remove them by puttying.
To save time and energy resources of the camera, you can load several plastic parts and warm them up at the same time.
In garages, it can be quite difficult to do the warm-up trick, so in such cases it is better to work with already primed parts.
Degreasing
Before the first grinding operation on plastic elements, be it preparation for priming or puttying, the surface of the part must be degreased.
In addition to the obvious goals of this operation, degreasing also helps to remove a significant portion of the static charge from the part. This is important because when applying the primer, the dust, which usually flies off the surface, will quickly stick to the “charged” plastic, as a result of which the primer will not be placed on a dry, cleaned substrate, but on an already dusty one.
For degreasing, it is advisable to use only branded degreasers, preferably special antistatic degreasers for plastics. They are not aggressive to plastic and perfectly remove static charges.
It is recommended to degrease a new plastic element both from the outside and from the inside.
Matting
To prepare a new, undamaged plastic element for priming, it is enough to matte it with Scotch Brite or a similar material. Recommended for hard plastics red(Veryfine) scotch-brite, and for soft/elastic - grey(Ultrafine).
Matting can be done both dry and with water. If a matting paste is used, after it you need to thoroughly rinse the part with plenty of warm water - the remaining paste can interfere with normal adhesion to the paintwork material, which we have so far successfully combated.
If the surface has minor damage received during transportation (for example, shallow scratches), then they are sanded using a grinder and abrasive wheels P320-P400-P500, after which the rest of the surface is treated with Scotch Brite.
After grinding, the part is degreased again.
Padding

One simple rule will help you get rid of problems with the adhesion of paints and varnishes on plastic surfaces once and for all. As a primary primer on clean (unprimed) plastic, a special adhesive primer for plastic should be used (also known as a primer, adhesion activator).
As a rule, such soil is very liquid material, made on the basis of polyolefin resins, often transparent with small additions of metallic particles - to control application. The layer thickness is minimal - only a few microns. For the most part, these materials are one-component, although 2K primers are also available.
Such primers have been developed primarily for use on plastics of the polypropylene group (PP/EPDM, PPC, PPE, PPO, etc.), but most of them can also be used on other types of plastics: ABS, PA, PC, PVC, PRO, PUR, fiberglass (GFK, BMC, SMC), etc. Modern primers have virtually no restrictions on the chemical composition of plastics, with the possible exception of pure polyethylene (PE).
To improve properties and guarantee paintability, plastic body parts (fenders, hoods, bumpers, etc.) are produced in a modified form, which means they can be painted, despite the fact that they are sometimes labeled as PP and PE. In fact, unmodified polyethylenes (PE) and polypropylenes (PP) can only be dyed after activation by a gas flame or corona discharge. Otherwise, adhesion will be very weak! Various tanks and other expansion tanks are made from “pure” PP or PE, disposable tableware etc.
Primers are available in both cans and aerosol cans. Aerosol primer is very convenient for minor repairs, such as when sanding a bumper small areas They turned out to be sanded down to plastic. The release form in a can allows you to avoid wasting time on preparing the soil for spraying from a spray gun and on its subsequent washing. Just remember to shake the can vigorously before use.
The primer is applied in one or two thin, even layers with a wide spray over the entire surface of the part. Be careful when applying! Since the material is very liquid, one should be wary of the possible excess of the applied layer and runoff of soil (this is most possible at the ends and stiffeners, along the perimeter of the part). A significant excess of the layer thickness can cause deterioration in the adhesion of the entire coating and “compression” of subsequent applied layers.
It is also worth considering that after application the primer changes the chemical state of the substrate only for a while, during which it should be applied next material. Therefore, to achieve the best adhesion, you need to start applying subsequent layers of the system after 15-20 minutes.
Most primers can be immediately coated directly with the top enamel, but to increase protection against chipping, it is recommended to additionally apply a layer of acrylic leveling primer to the surface, not forgetting to add the required amount of plasticizer to it, depending on the hardness of the plastic.
You just need to remember that such thick layers of primer-filler, as when repairing metal parts, cannot be applied. Plastic is an elastic material, and an excessively thick layer may simply not withstand mechanical stress and the consequences of deformation.
After applying the filler - painting. Either " ", if the soil allows it, or with .
By the way, in addition to classic primers, many lines also contain universal primers for plastics, combining the properties of both a primer and a filler with a plasticizer. They have good adhesion to plastic and at the same time allow you to level out minor irregularities (for example, small marks from abrasive grinding). Such primers do not require the preliminary use of an adhesion activator, and thus allow, in some cases, to save an entire layer and operation.
About epoxy primer
So, drawing an analogy with anti-corrosion primers applied to metal, which act as an effective intermediary between the surface and subsequent coatings, appropriate adhesive primers are used for this purpose on plastic.
Since we mentioned primers for metal, I would like to talk a little more about this and remember.
Those who have worked with this material know what excellent adhesive properties it has. And despite its direct purpose for application to metal, epoxy-based primer could well be used as a primary material on many types of plastics. However, there are still limitations in this not entirely logical action. The fact is that epoxy primer does not have sufficient elasticity, and no plasticizer is used with it.
However, if you have to deal with repairing hard plastics, such as fiberglass or carbon fiber, using epoxy on these types of plastics is not only acceptable, but recommended. You can rest assured: its adhesion to the surface will be excellent!
New primed part
Practice shows that the quality of the factory primer coating applied to plastic parts can vary greatly from case to case. There are usually no problems with original parts, but the primer on parts of dubious origin can easily have poor adhesion or increased sensitivity to solvents. It’s easy to check: take a napkin or rag soaked in solvent and apply it to the part for a minute or two.
If the coating has softened, it must either be completely removed mechanically (P150-P240-P320), or a layer of insulating primer must be applied, having previously treated the part with gray Scotch-Brite, and then painted.
If a satisfactory test result is obtained, conventional technology is used. The part is degreased, matted, degreased again and painted. For matting you can use:
- gray scotch-brite (ultrafine);
- abrasive material gradation P400-P500 (when working with a dry grinder);
- material graded P800-P1000 (when working manually “on wet”);
Before starting any work, the part must be thoroughly washed and dried, and before the matting operation, as well as after it, it must be degreased.
Damaged plastic element

By repairing a damaged plastic part we mean repairing various scratches, dents, chips and similar damage to the paint layer. Oh more difficult cases We will discuss restoration of plastic parts such as cracks or significant deformations in a separate article.
Before starting work, carry out standard set procedures: the part is washed, dried and degreased. The next step is to prepare the damaged areas for puttying.
Grinding
Before you start filling damage on a plastic part, the paintwork from the surface of the defective areas should be removed - this will avoid defects such as peeling and sagging of the putty.
An eccentric sander and a P180 abrasive wheel are suitable for sanding damaged areas.
When sanding, try to avoid excessive pressure and high speed. Remember that thermoplastics begin to melt when heated.
Puttying
Hard-to-reach areas are treated with an abrasive sponge (P600-P800) and/or gray scotch-brite (Ultrafine).
Painting plastic parts

There is no point in going into detail at this stage, since the primed surfaces of plastic and metal are absolutely identical. Just don’t forget about adding the required amount of plasticizer to 2K paint or clear varnish.
But it’s worth taking a closer look at plasticizers and some other additives.
Plasticizers
It is necessary to add a plasticizer to standard 2K acrylic primers, enamels and varnishes for two reasons. Firstly, the additive makes the material elastic, which means the coating will not crack when the plastic is deformed.
Secondly, when the temperature of the plastic surface changes, the paintwork will expand and contract at the same rate as it.
Have you often seen microcracks on the surface of bumper paint in places that seemed completely unaffected by deformation? This is a consequence of the thermal expansion of the material and the absence of plasticizer in repair materials.
The coefficient of thermal expansion of plastics is much higher than that of metal. Cover enamels and especially primers, whose coefficient of expansion is extremely low, simply cannot withstand large temperature changes without a plasticizer and crack.
An important role is played by the amount of added plasticizer, which is always indicated in technical documentation to the product. This amount depends on the hardness of the plastic - the harder the plastic, the less plasticizer is added. Conversely, the softer/flexible the plastic, the more.
For example, for painting an elastic bumper this amount can be 30%, for a soft polyurethane lining - 50%. When painting fiberglass, adding a plasticizer is usually not required.
No plasticizer is added to base enamels!
Mixing sequence
When adding a plasticizer, it is recommended to prepare the material in a certain sequence: first, a plasticizer is added to the base material, be it primer, enamel or varnish, and then a standard amount of hardener and, if necessary, a thinner are added to the total volume of the resulting mixture.
This sequence is due to the fact that the plasticizer also contains a binder that requires polymerization. And if a hardener is first added to the material, and then a plasticizer, this can negatively affect the drying, strength and performance characteristics of the coating.
Matting and structure additives
A well-polished varnish or top enamel has a smooth surface and excellent gloss. This is very good.
However, these qualities are not always in demand. The fact is that on some cars, plastic elements may not have such a shiny appearance as the rest of the body. Moreover, they may have some texture. Often painted this way plastic bumpers SUVs, many plastic linings of Mercedes have such a granular, as if “rough” surface.
Such a surface can be imitated by special structural additives to 2K top coat enamels and clear varnishes. As a rule, they are available in two types: rude(grob) and thin(fein). As a result of using a structural additive, the paint surface becomes matte and acquires the desired degree of roughness.
When adding structural additives, additional plasticizer addition is usually not required.
There are also additives that do not change the structure of the surface, but are intended solely to reduce the gloss level of the coating. Depending on the amount added, the degree of gloss can be changed within very wide limits, allowing you to achieve different effect matte - from silky to completely matte.
Drying
To dry painted plastic, it is often recommended to use natural drying or a temperature not higher than 40-45°C. It is worth recognizing that such “reinsurance” is not without meaning. It is better to dry plastic longer than metal, but at a lower temperature. It should also be taken into account that the introduced plasticizers and other additives increase the drying time.
But still, with the right approach to repair, which we discussed in detail above, more intense heating at 60°C will not cause any problems. And the quality of the coating will only benefit from this.
Be careful with IR drying as the temperature of the surface plastic parts you won't be able to control.
About adhesion after painting
Another feature of plastic is that adhesion on it does not reach its normal parameters immediately, but after a certain time. Therefore, do not be surprised if an accidental scratch on a freshly painted bumper leads to further peeling of the coating. A few days will pass and adhesion will return to normal.
For the same reasons, try not to expose a freshly painted plastic element to a washing machine. high pressure within 3-4 weeks after repair.
Utilities
Full-size versions of the images will open in a new window when you click on the image!
Procedure for repairing plastic parts

Designations of the most common plastics

Classification of plastics depending on hardness

Main modifications of polypropylene and their areas of application in automobiles

Even on premium cars, plastic elements are not particularly reliable, so cases of repair and painting are much more common here than with metal elements. Who is already familiar with the procedure , he need not worry - the technology is almost the same, with the exception of some features related to chemical composition plastics In general, the appearance of both interior components and plastic exterior elements can be easily restored at home, without visiting specialized car services.
Choosing materials or how to paint plastic on your car and not regret it
If you decide to restore the appearance of plastic products, it is important to first find out the type of material. There are two types of plastics used in the automotive industry. We will not consider their chemical components here; we are only interested in their features pre-treatment and subsequent application of paintwork.
Any do-it-yourself painting of car plastic looks like a simple operation in the video. In practice, the type of plastic is first determined by the following two criteria:
- Combustion– take a small piece from the component being repaired and set it on fire, but there should be no paint residue or dirt on it. If the flame is accompanied by black smoke and soot, then there is no need for preliminary priming (only treatment with fine abrasive sandpaper). If the plastic burns with a clean flame, then primer for the plastic is necessary.
- Buoyancy– complete immersion of a plastic part indicates that there is no need for priming; if the part remains on the surface of the water, then applying primer is indispensable.
Basic materials
Before you paint the plastic on your car, you need to take care of purchasing Supplies, which include:
- Acetone or white spirit.
- Primer for plastic (if necessary).
- Moisture-resistant sandpaper (P300 - P800).
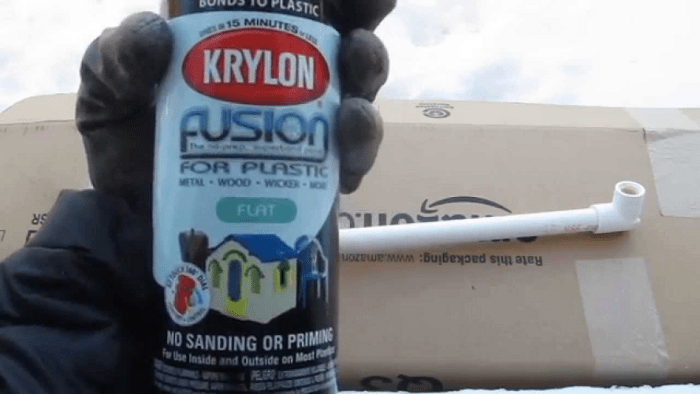
- Paint for plastic products.
- Transparent acrylic varnish.

Practice has already shown that when restoring paintwork on separate areas it is rational to make a body with spray paint. This approach is also rational in our case, because the areas to be treated are small, and purchasing a spray gun and compressor is expensive. In addition, we cannot rule out options when you cannot do without a regular paint brush.
How to dismantle plastic parts?
One of the important preliminary procedures is the careful removal of the necessary components from the interior and the outer plane of the body. The difficulty is that the options for attaching them are individual for each model, and in some cases a special tool may be needed. For example, in order to remove the dashboard on some cars, you cannot do without a pin of a special configuration.
Availability of a set universal tools will greatly simplify the painting procedure. It is important to prevent breakage of latches and loss of small parts during dismantling. For this purpose, steel forks are used, as well as polyurethane spatulas and keys for dismantling car radios and climate systems. In order not to forget the location of all elements in the future, it is recommended to take intermediate photographs of the disassembly process.
Technology for painting plastic car with your own hands at home and video of work processes
Consistency and thorough implementation of the technology for painting plastic elements guarantees the quality and durability of the paintwork. If you wish, you can familiarize yourself with the technique using the available video materials provided by the masters. Briefly, the list of works consists of the following items:
- Degreasing the surface using solvent or white spirit.
- Treat the plastic part with an antistatic agent (for example, Plak or Liqui Moly) so that when painting it does not attract dust to the surface.
- Before painting old plastic on a car, you need to eliminate defects using a special putty, which is more elastic than standard polyester.
- After drying, remove all irregularities using sandpaper. P300 – P400, and the process must be carried out using water.
- Dry the part thoroughly and degrease its surface again.
- Prime the surface in 2-3 layers, avoiding the appearance of drips.
- The dried primer should be cleaned before painting using abrasive sandpaper. P400 – P500.
- Apply 2-3 layers to the cleaned surface acrylic paint with plasticizing additives, each layer needs to dry for 15-25 minutes.
- After final drying, a layer of varnish is applied.
- Polish the finished surface of the paintwork with polishing pastes.
Methodology has already been worked out for a long time, to perform it it is advisable to have a grinder and appropriate accessories. But if necessary, small areas can be processed manually.
Using a brush when painting plastic car parts
It happens that painting with a brush looks more convenient and profitable than using a can of aerosol paint. You won’t see this method of painting the standard plastic of a car with your own hands in the video. However, this does not mean that you should not pay attention to it; on the contrary, it guarantees high-quality adhesion and good coverage small fragments. However, when working, a number of features should be taken into account:
- Paint applied with a brush takes longer to dry, so the drying time should be increased by 15-20 minutes.
- When painting, you should try to ensure minimum thickness layer. To do this, during the process, the brush should be pressed well to the surface and work quickly.
- Carefully wipe off excess paint on the edge of the can.
- When working, maintain the same painting angle.
On a note
Do not forget that nitro enamel from cans contains an aggressive solvent. If you apply a thick layer of such paint, the plastic may dissolve, not the entire part, of course, but the surface - very likely.
To prevent this result, it is better to use a special primer. In addition, you should not allow a subsequent layer of paint to be applied without the previous one completely drying.
What do you need to color plastic at home?
How to paint plastic at home?
Step-by-step instructions for painting plastic
Step_1 Clean the plastic surface from dirt using a sponge (brush) and soapy water. If dust and dirt remain on the product, the paint will not apply evenly and the product will have to be repainted. Heavy soiling, mold and erosion can be cleaned with bleach. Before starting work, dry the plastic product thoroughly.
|
Step_2 To degrease the surface, wipe it with solvent or white spirit, then rinse off the applied composition and dry the product thoroughly. Step_3 To create a porous structure, sand the surface with fine sandpaper or a special grinding machine. Sanding will allow the paint to lie perfectly flat, due to the bonding of the paint and the porosity of the surface. After sanding, the surface will become matte. Correctly selected sandpaper will not give the product unwanted roughness, so it is better to choose sandpaper with a grit of no more than 180. Be sure to remove dust from sanding. |
 |
Step_4 Before painting the plastic at home, cover the areas that are not to be painted with construction tape and remove it immediately after finishing the work.
Step_5 Now you can start painting the plastic with spray paint. Shake the spray in the can for at least 30 seconds, spray the aerosol paint from a distance of 20-30 cm from the surface. You need to apply the paint with smooth, even movements. After the first layer has dried, which will take 15-20 minutes, apply subsequent layers of paint. When painting plastic, it is recommended to apply at least 2 - 3 layers of paint.
Step_6 After the spray paint has dried, apply the varnish in the same way and wait for it to dry. Complete (final) drying takes no less than 2 - 2.5 hours. The product is ready to use!
What to pay attention to when painting plastic?
As we already said, plastic can be different types, so it is recommended to carefully choose paint. Ideally, you need to use special paint for plastic.
5 In addition, please note that for aerosol paints in cans there are special tips for convenient regulation of the amount of paint sprayed and its uniform distribution
We talked about the simplest and effective way painting plastic at home using aerosol paints, however, this procedure can also be carried out with a regular brush using canned paint.
How to paint plastic at home with a brush?
Painting plastic objects with a brush is somewhat different from the method described above and has its own advantages and disadvantages. One of the features is considered to be a long drying time, which means that the product must be completely isolated from dust on the newly painted surface, which is not so easy at home. This is why the brush painting method is used to paint objects that do not require special attention. The technology for painting plastic with a brush at home is quite simple and essentially repeats the process of working with aerosol paint:
Step_5 This is an optional step. If you want to further protect the painted surface, you can apply acrylic varnish. Apply varnish ONLY to completely dry paint. In the case of aerosols, we know that the paint dries in 15-20 minutes, but here everything will depend on what kind of paint you use. Varnish drying time 2 - 2.5 hours
What should you pay attention to when applying paint to plastic with a brush?
1 Apply paint in a thin layer, constantly pressing the brush to the surface
2 When taking paint onto a brush, do not immerse the brush completely in the paint.
3 Take into account the painting angle - it should be the same.
4 For even coverage, apply paint material wide stripes so that the paint fills the pores, and then carefully shade the applied layer.
So, we talked in detail about how and with what to paint plastic at home. You can safely start painting and make sure from experience that it is not at all difficult, and the result is worth the time and effort!
If you found this article useful, please rate it (at the top of the page). Thank you!
Visitors to this page most often choose from the online store: