Original benches made of wood. How to make a comfortable and beautiful bench yourself
Benches and benches in the garden summer cottage is a popular holiday destination. Sometimes putting up an ordinary bench is not interesting and banal.
After all, it is possible to build a whole corner for relaxation and comfort, so that you can not just sit on a bench, but already enjoy nature, your garden, and the fruits you planted with your own hands. There are many different ideas here.

The construction of benches is usually lightweight and does not require special skills. Anyone can create a relaxation corner with a bench, if they wish.

Options for ideas
Everyone has seen the photo of an ordinary bench. But the most a simple bench I don’t want it for my garden, I want something more original and beautiful.
If everything in your garden is already decorated and the whole area is in order, then a bench will never become superfluous. And, if you are just starting to equip your site, then it’s time to start with equipping a bench.


Wooden bench
A DIY wooden bench will harmonize well in the garden with all sorts of flower beds of beautiful flowers.

The simplest construction option garden bench- these are two wooden boxes in which inflorescences grow, and between them a couple of sanded boards. If necessary, this bench can be placed near the wall, if possible.

Many people don’t like material like wood, because it gets wet quickly and is very difficult to care for. Instead of wooden material stone and concrete come to the rescue.
In order to make a bench with a back, you need to try a little. For the backrest, they most often buy already treated wood. The easiest way to secure the seat is with metal corners.

TO concrete material they can be attached using dowels, and to wooden material using self-tapping screws from the bottom or through bolts.

Many summer residents are wondering how to make a bench on their own for their home and garden. And every year this question is gaining popularity.

Many people give preference to shop benches that are already ready, but by doing the work yourself, you can completely surrender to the process and use your imagination completely.

Metal bench
Metal benches are installed by a minority, since they, of course, are aesthetic and original products, but in the summer they are a material that heats up to crazy temperatures, and if it gets even a little colder, the material becomes icy, and it is impossible to sit on it.

If you really want to use metal in the process of creating a bench, then you should combine two materials in the work: metal and wood. At the same time, the seats and backrests are made of wooden material, and the designs of the legs and additional elements are created on the basis of metal.

There are many different original options benches in this style.

Pay attention!

Great popularity in lately We got benches from pipes. From profile pipe using boiling, rectangles are made, and jumpers are attached to the side walls, on which the bench seats will rest. This is a very reliable and safe option for creating a bench with your own hands.

If this option is slightly improved, then armrests are used for greater convenience and comfort. A bench in the garden with a wide seat, like a sofa, will also look elegant and original. This is comfort, convenience and luxury!

For complete comfort, you can put decorated pillows on such benches so that you can not only sit, but also take a nap in nature.

Benches made of boards
Simple bench made from boards will also look aesthetically pleasing, the main thing is to know how to do it. There are the simplest designs, like ordinary benches, and there are more complicated ones in the form of a sofa or an elongated chair.

IN modern style It’s easy to assemble such a bench; you just need to connect rectangles with partitions made of thin boards together.
The main thing is to turn on your imagination. Even the most simple work can become the source of a masterpiece.
Pay attention!


On the basis of thin boards you can make various shapes benches. For example, in the shape of the letter P. The main thing here is to fix the seats and legs well and securely. This bench is easy to make, but will last a long time.

DIY bench photo


Pay attention!


Items garden furniture are necessary to arrange a place to relax at your own discretion on your summer cottage. Photos of benches in the garden look attractive. Any craftsman can make such furniture himself.
First, you will need to decide on the choice of material for the future product and select a suitable design solution.

Materials for work
A garden bench can be made from various materials. Each of them has its own advantages.

Plastic bench
This piece of furniture has many advantages. Plastic products affordable, they do not require special care, they are easy to disassemble and assemble. Today plastic is presented in a rich range of colors.

However, there are also disadvantages. A plastic item looks cheaper than wooden product. When exposed to direct sunlight, it quickly fades and its surface can become deformed.
Wood for garden furniture
To make original benches for a summer residence, craftsmen often use wood. Wood is easy to process, the material looks noble, and installation does not take much time.

The main requirements are the absence of defects and good drying.

Stone products
The naturalness of the material - its undeniable dignity, he attracts with his natural beauty. IN finished products it looks luxurious and stylish.

Items from natural stone easy to make with your own hands. However, the material has not only advantages, but also disadvantages:

- Sitting on a cold stone is harmful to your health.
- Installation of the bench is carried out exclusively permanently.
What about metal?
Metal benches are an excellent decoration for a recreation area. Way cold forging, like the hot forging method, allows you to create beautiful designs.

In addition, metal combines perfectly with glass or wood.
What should the ideal shop be like?
Among all the requirements, the main ones can be identified:

- Comfort. It is necessary that the bench is ergonomic. A bench with a back is a good option.
- The product must cope with serious loads. The master needs to choose exclusively quality materials and accessories.

Structural features of the bench
A summer resident who wants to improve the landscape around the house should know how to make a bench with his own hands. You must first determine the dimensions.

Dimensions – 1.5 mx0.4 m, height – 0.45 m (seat) and 900 m (back). The back is made at an angle of 18 or 20 degrees. It is important to complete the drawings of the bench correctly, then the work will not be a problem.

The master will need to prepare the following:

- Primer, varnish;
- Special sandpaper for wood;
- Screwdriver;
- Electric planer;
- Jigsaw;
- Self-tapping screws 40X40;
- Blanks for front and rear legs, as well as for backrest holders;
- Wooden boards with dimensions 1500X150 and thickness from 35 mm to 40 mm.
Making a wooden structure with your own hands
It’s good when you can find boards with the required dimensions on the market.

When suitable option on construction market It didn’t turn out that the craftsman would have to arm himself with a jigsaw to cut the material himself. A miter saw will help speed up the process.
Pay attention!

Finished workpieces must be processed. The surface of the boards for the backrest and seat needs to be sanded. The ends are processed using an electric planer, best option– make them with a rounded shape.

The next step is to give the required angle of inclination, in this case we are talking about the rear legs of the bench. These elements serve as a frame. Markings are applied to the prepared parts.

We measure the height - 0.4 m. It is necessary to make a cut equal to 20 degrees to form an angle of inclination. The distance between the legs of the bench in front and behind should be 0.28 m. A beam with a size of 0.5 m connects the legs. It is better when the strapping is done not only from above, but also from below.

The sides are connected as soon as the assembly of the main parts is completed. The boards are fastened with self-tapping screws to the strapping bars, which are located on top. Gaps are left between the workpieces to drain moisture.

When installing the backrest, the board that goes first is attached at a distance of 0.2 m from the seat, and the second - 0.38 m.
Pay attention!

You can begin finishing the product. For this purpose, impregnation with varnish for external use is used. Such funds will help ensure reliable protection from any harmful actions from the outside.
How to create a metal structure?
The craftsman can create a comfortable place for a relaxation area using cold forging techniques. It is better to start with models that have angular shapes; they are easier to manufacture.

Detailed instructions
We decide on the dimensions (length - 1.5 m, height - 0.8 or 0.9 m, width - 0.4 or 0.5 m).

We make blanks for the frame from cut pipes. You will need to prepare 2 pieces with dimensions of 0.4 m and 2 more fragments of 1.5 m each. We connect these parts into a rectangle and weld them. To make the structure more durable, we weld 2 stiffeners.

To make blanks for the legs, metal pipe cut into 4 parts, the length of each should be 0.4 m. The blanks are attached to the corners of the bench. To strengthen the legs, additional stiffening ribs are installed.

Pay attention!
To make the back you will need 2 blanks. The length of one should be 1.5 m, and the other – 0.44 mm. We weld the blanks for the back together and weld them to the seat. We must not forget about the angle of inclination. For rest to be comfortable, it must be at least 15 or 20 degrees.

The back can also be strengthened with stiffening ribs.

At the last stage, the seams are cleaned. The surface of the frame is coated with a primer.

If you plan to make a product with shaped elements, then completing such a task will require more time.
DIY bench photo


The bench is functional and allows you to complement the garden arrangement. It is usually not used for classical types of vegetable gardens, since there is no need for it.
In this area you can only see beds and growing potatoes, tomatoes, cucumbers and others useful crops. And when it comes to a garden, even if it is not particularly extensive, then it becomes clear that it is difficult to organize it well without the use of benches.
Since the garden is created for other purposes, it is necessary for relaxation and merging with the natural atmosphere.

Modern designers have learned to create different versions structures for such purposes. However, wooden and metal benches are considered the most popular.
Types of benches for use in the garden
Any chosen design option for a bench or its size should serve one purpose - creating a place for a person to rest. Its shape allows for comfortable placement for a long time.
Classification of such products can be based on a number of characteristics. They are usually associated with the type of material used to assemble the bench.

What materials are most often used?
In fact, there are a lot of them, however, you can focus on the most popular of them. Most often used:

Plastic, since benches created on its basis are resistant to impact environment. They offer reduced weight and an attractive price. The market offers folding structures made from these materials; they are very convenient for moments in the country;
Wood is most often used to create homemade species benches. It fits perfectly into the interior of any garden plot. Designers classify this material as a classic type that remains in fashion;
Important: Wood is less resistant to moisture and insects compared to plastic, stone products or metal modifications. Because of this, the lifespan of a wooden bench will be the shortest among other options.
Metal allows you to create benches with your own hands using profile pipelines. However, forged versions based on this material are more often used.
Creating such variations on your own is virtually impossible, since for this you need to have blacksmithing skills. Because of this, it is possible to use only purchased forged parts of the sidewalls for self-assembly benches from them;

The stone differs in its level of durability. Other materials cannot compare with them in terms of durability. A bench can be formed from several large boulders or purchased marble and side parts. In this case, it is necessary to start from the price of the product and its combination with general style summer cottage plot.

How to create a bench for long-term use?
For this you can use a combination various elements or fundamental material. There are several options to achieve this goal:

Concrete will help to pour durable side parts, and for the seat you can use a slab formed on its basis;
The combination of materials is considered a good option, and it is often used to create a bench in the garden. It is created using a combination of a metal frame and wood slats to create the back and seat respectively. And it is also permissible to combine options for benches made of stone and wooden elements.

Using a custom design to create a bench
Usually only this direction gives birth to true works of art; it is already difficult to consider them a classic place to relax. For the most part, wood is used for this. Well-known variations of author's works can be distinguished:

- The ring version of the form is created in the form of a conventional structure, however, framing a living tree;
- A bench created in the space between two flower beds;
- A bench designed based on the mouth space of a large animal;
- With the addition of stone statues on either side of the bench;
- A bench based on a bamboo joint with a seating cutout in its central part.
It is worth recalling that the process of creating a garden bench will allow you to go into a creative flight of fancy. This shouldn't be prevented anymore existing structures, because you can still come up with something original.

The information obtained through this article helps you become familiar with various options and will present several non-standard approaches.

Photo of a garden bench


DIY bench: drawings with dimensions, photos. How to make a bench with a wooden backrest with your own hands.
A light garden bench will be useful for you to relax in the country; on the bench you can sit in the garden and relax in the shade of the trees. Wooden benches will harmoniously decorate your relaxation area in your summer cottage, and if the bench is also made by yourself, it will become a source of pride for the owner.
Materials for making a bench:
- Boards with a section of 20 x 100 mm or similar size.
- Screws.
- Varnish or paint.
Tools:
- Hacksaw.
- Plane.
- Tape measure, square, pencil.
- Screwdriver or shaped screwdriver.
- Drill with a drill with a diameter of 2 mm (the diameter of the drill should be less than the diameter of the screws).
Bench assembly diagram.

- - legs.
- - frame.
- - back supports.
- - seat slats.
- - backrest strips.
How to make a bench with a back.
The pictures provide detailed drawings with dimensions for making a garden bench.
Let's start making a garden bench, and start with making the legs for the bench.

Mark the cut lines on the board and use a hacksaw to cut off the leg blanks. Smooth the ends of the legs sandpaper.
Assembling the sides of the bench.

We attach the upper support to the front and rear legs. Align the legs with the support, drill holes and secure them with screws. Let's make two sidewalls.
Assembling the bench seat frame.

We saw off the blanks for the seat frame. We combine the frame blanks, drill holes and screw in the screws.
Assembling the frame and sides.
Now you need to connect the sides of the bench and the seat frame.

The back of the bench.
We saw off 3 supports for the back.

We install and secure the seat back supports as shown in the figure.

Install the slats to the seat frame, making sure you place them at equal distances, drill holes and secure the slats with screws.

Now secure the slats to the backrest supports.

Attaching armrests.

Place the armrests on the sides of the bench, drill holes in the armrests and secure them with screws.
The screw heads can be hidden by covering them with wood putty and then allowing the putty to dry for several hours. Sand the hardened putty with sandpaper, then apply several coats of paint or varnish to the bench to improve it. appearance benches.
How to make a bench photo.


To garden plot was quite comfortable, it should be properly equipped. An important component are garden benches. You can make them yourself in different ways and from various materials.
Bench made of concrete slabs and boards with backrest
By looking at the drawings of the bench, you can find out the features of its structure. You can make such a design with your own hands relatively easily, quickly and without high financial costs.
Making a bench with a backrest with your own hands is described in great detail in step-by-step instructions.

Assembly: initial stage
After preparatory work The time for wood processing is approaching. In order for a hand-made bench with a back to serve for a long time and decorate the area, the materials must be pre-treated.
The tree is covered antiseptic compounds and let it dry. After this you can start collecting backrests

On one of the two-meter boards, fifty centimeters are measured from the edges. At this level the edges of the beton slabs. From this mark another fifteen centimeters are measured towards the center of the board. This is where the first boards will be attached. From the resulting marks we measure seventeen and a half centimeters - the gap between the back boards. Next, we measure fifteen centimeters for two more boards. There should be a gap of five centimeters between them. All this can be seen in the drawing.

Wood glue is applied to fifteen centimeter sections. They are attached to boards, the length of which is sixty-five centimeters. Additionally, they are secured with self-tapping screws.

On top, between the boards of the back, pieces of seventeen and a half centimeters are glued. To ensure that the parts stick together well, they are clamped and held until the glue sets. After gluing is completed, the back is covered with an antiseptic.

All wooden parts can be covered varnish. This will give them additional stability and attractiveness.
Assembly of the main part

It is better to assemble the main part of the bench from both sides. Placed between the boards concrete slabs, and in drilled holes insert M16 threaded rods fifty-five centimeters long. You will need four of them.

The rods are fastened with M16 nuts and washers. They are twisted simultaneously from different sides to make the bench level.


Simple DIY bench
You can make benches for your garden with your own hands quite quickly if you follow the instructions. Let's consider four options for such garden structures.

On drawings benches, all its features are indicated in detail. Making such a bench with your own hands is quite simple. The only difficult element is the concave seat.


The number of parts and their dimensions are indicated in the table.

We begin making a bench with our own hands from wood with blanks necessary details. Boards and beams are cut into pieces of the required length.

Making seat supports will be somewhat more difficult. You will need to mark the blanks. Two points are marked along the edges at a distance of seven and a half centimeters from the bottom side, and in the center a point at a distance of four and a half centimeters. They are connected using a flexible plastic ruler and cut out jigsaw. The sections are processed with sandpaper.


The seat supports are attached to the two upper drawers. One on each edge and one in the middle. Next, screw in the supports, spaced from the outer ones by the width of the leg. All connections are made with self-tapping screws.

Boards are attached to the resulting base seats. It is advisable to deepen the screw caps.

Then attach legs. They are attached to the seat supports. The lower drawers help secure the legs.


The finished product is coated antiseptic and varnish.
Simple bench No. 2
To make such a garden bench with your own hands, you will need concrete flower girls and boards. Flower girls are required to create the base of the bench. Use two s rectangular base and two cubic ones.

To make the base stable, the flower boxes must be glued or connected from the inside with staples secured with self-tapping screws. The container is filled with a layer of drainage and soil. This increases their stability.
The seat for the bench is made of boards. To do this, they are cut into pieces of the required length. These blanks are laid so that there is a distance of half a centimeter between them. Then they are connected using transverse strips. The planks are placed in three places: at the edges and in the middle. Corners are attached to the slats. With their help, the seat will be secured to the flower girls.


DIY bench with backrest

Prepare the bench parts shown in the figure. They are being processed antiseptics before connecting.


Then the parts are assembled into supports. The corners are first rounded and chamfered. First, parts A and B are connected with a bolt, and then B, C and D are also connected using a bolt.

The inclination of the backrest is determined by part D, after which it is connected to part A. Similarly, but in a mirror image, another support is made.

After this, the back and seat are assembled. To do this, the supports are placed so that there is a distance of one meter and twenty centimeters between them. First, the front and rear strips are screwed to the supports, then all the rest, and finally the stops are screwed in.

At the last stage, the back of this bench is screwed on.

Bench No. 4Another option for a simple DIY bench. Its length is one hundred twenty centimeters. The height from the ground to the seat is fifty centimeters, the height of the backrest is also fifty centimeters.

The base is made from boards, the thickness of which is five centimeters and the width from ten to twelve. One of the legs continues and serves as a support for the back. The supports are connected using the “half-tree” method and secured with bolts.

The basis for the seat is a block secured with self-tapping screws. The short supports on the back of the bench are connected with a collet to increase stability. The seat and back are covered with boards with less thick. The surface is painted or varnished.
A simple bench with a back for a summer cottage

The dimensions of the structure and wooden parts can be seen on drawings benches. If we consider how to make a bench with our own hands, then this option will be the most optimal in terms of the simplicity of the process and the result obtained.


It is better to purchase materials already cut to size. If this is not an option, then you need to cut them yourself.
The resulting blanks polished. The ends of the boards are processed with an electric planer.

The back legs of this simple DIY bench also support the backrest. To create the desired level of inclination, the workpieces are marked.
At a height of forty centimeters, mark the attachment point seats. Above, the board is cut at an angle of twenty degrees. The cuts on the two workpieces must be identical.
First they collect legs benches: the front ones are connected to the back ones using a beam. It is better to do this from above and below.

When the side parts are assembled, they can be connected to each other with seat boards. Screw the boards with self-tapping screws, leaving a distance of one or two centimeters.

To strengthen the structure and increase its stability, make the lower harness timber along the legs. Two boards are attached for the back.
Finish the work with finishing coated which will protect the product from moisture and adverse conditions.

DIY pallet bench
Make a bench with your own hands from pallets It’s not difficult if you use your imagination. To do this you will need three or four of these wooden structures. Some will need to be sawed to obtain additional parts. The most simple design DIY benches made from pallets, when two pallets are attached perpendicular to each other, creating a back and seat.


To prevent the design from becoming too bulky, it is better to cut the pallets according the right sizes. The elements are fastened with self-tapping screws. Add side parts to enhance strength and make legs. All this can be seen in the photo.


Since the material of the pallets is untreated and rough, it will be required first polish. This will allow you to avoid splinters.
The manufacture of a bench with your own hands from pallets is completed by coating it with varnish or paint.


Bench puzzle
You can make such a bench with your own hands if you have a wide board and cuttings for shovels. Curly seats are cut out of the board in the form of puzzle pieces. Legs made from cuttings for shovels are attached to them. The result is separate stools that quickly assemble into one long bench. All manufacturing stages are discussed in detail in step-by-step photos.


Benches from unnecessary chairs: two DIY options
First option

To create such a bench for your dacha with your own hands, you will need four old chair.

From the first two chairs remove parts from the front of the seat.

The remaining sawed off the front legs are slightly lower than the seat structure.

From the resulting parts you need take off old varnish or paint. To do this, apply to the parts special remedy, dissolving paint coatings. Then the softened layer can be removed with a spatula.

The racks should drill holes for dowels. Holes are required on the front and end sides.


The dowels are lubricated with glue and inserted into the drilled holes.

When the dowels are glued, you can assemble base benches. To make the structure durable, the parts are fastened with self-tapping screws. Surface of the structure sanded.


For seats benches choose a board that is suitable in size, saw off the excess.

If several narrower boards are used, they are glued together with wood glue. For a tight connection, they are clamped with clamps and wait for the glue to dry.

The finished seat is also glued to the base with wood glue. Heavy objects are placed on the board and clamped together with the base with clamps.

When the glue has dried, cover the seat with masking tape and paint paint the remaining structural elements for wood.

The tape is removed and the seat is treated stain. Finally, the entire bench is varnished.

Second option

To make a second garden bench with your own hands from old furniture you will need two chairs. It is better if the back and hind legs are not separated.

Two identical chairs clean up all parts of the structure except the rear legs with the back.
They take bars five centimeters wide and three centimeters thick. Cut two parts equal in length to the width of the chairs, and two pieces of the same length as the finished bench. A rectangle is assembled from these four parts. It is secured to the backs of chairs with self-tapping screws.

Another frame is assembled in the same way. Several transverse strips are attached to it. This design is attached under the seat, makes the bench more reliable and acts as a shelf.

If the chairs have old covering, then remove it with sandpaper. After this, the surface is puttied special composition or coated with a primer. When the layer has dried, it must be sanded with fine-grained sandpaper. Finally, the structure is coated with paint.

The seat for the garden bench is made by hand from Chipboard or plywood. A rectangle is cut out of the selected material, which is half a centimeter larger than the base on each side. Then cut out a piece foam rubber with the same dimensions. A rectangle is cut out from upholstery fabric. It should be five centimeters larger than the seat on each side.

Foam rubber is placed on a sheet of plywood and covered with fabric on top. The fabric is attached from the inside out to the furniture stapler.
The seat is attached to the base with a piano hinge.
Bench-swing

To make such a bench for your dacha with your own hands, you should prepare necessary materials. Manufacturing begins with creation basics designs. The seat bars are attached to the back bars at the selected angle.


Additional ones are installed along the seat ribs, providing rigidity.


Attached to the seat planks, drilling holes for fastening in the base bars. The same goes for the back.


Armrests are installed on both sides of the seat. They can be secured with bolts.


The resulting bench cover wood protection products and varnish. It is very important to paint everything as carefully as possible.

The bottom of the bench is reinforced with metal profile. Chains are attached to the profile on which the swing bench will be suspended. It is imperative to check the reliability of the beams on which the bench will be suspended.


Log bench
To make such a bench with your own hands from wood you will need chainsaw. The main material is a thick log one meter long.

Log mark, so that you get two slightly unequal parts. The back will be made from the smaller one, and the seat from the larger one.

Chainsaw log sawed along the mark. The resulting irregularities are immediately cut off with the same saw.


The cut triangular piece is cut into pieces and inserted into the holes in the seat. The back is secured on top. The bench is almost ready. All that remains is to give it a more decorative look.


Can the seat be placed on legs. To do this, recesses are made in the lower part to install a pair of logs as legs.


Transformable bench
The design features of the transformer can be seen in the drawings of the bench. A transformer bench is made with your own hands from planed boards, which is sawn to the specified dimensions.


Sliced timber parts holes for fasteners are drilled.


At the table top, the boards located on the edge can be made wavy.

In material intended for countertops, drill holes with a diameter of twenty-two millimeters and a depth of three centimeters. Cuttings of the same diameter will be inserted into them.

The edges of parts and edges are processed and rounded. 

All elements are assembled using screws and screws. Screws are needed with dimensions 6x70 and 6x90, screws - 8x80.


Wooden parts are painted stain.

The structural parts that will move are connected by hinges.

Parts of a round shape are placed between the boards of the tabletop. cuttings

Install a stop for backrests

A hand-made transformer bench is covered varnish.


Rocking bench
Do original bench making a backrest with your own hands is not difficult if you have the tools and materials. First you need to consider the drawings of the bench, which contain small quantity details.

The side parts according to the pattern are transferred to Europlywood three centimeters thick. They are cut out using a jigsaw and the ends are processed with a grinder.

To attach the connecting strips, markings are made. Then the holes are drilled. After assembling the frame, the slats are attached using self-tapping screws. The fastening points are sprayed, and the entire product is varnished.

Bench around a tree
The simplest version of such a bench is hexagonal The size depends on the size of the tree. Measurements are taken at the seat height. A margin of fifteen to twenty centimeters is added to the result obtained. If you divide the result by 1.75, you will get the length of the inner side.

To cut boards ten centimeters wide, they are laid in four rows with intervals of one centimeter.

The cutting location is marked immediately for all rows with an angle of thirty degrees. So cut out six sets of blanks.

Legs are used with a height of sixty to seventy centimeters. They are connected by cross members by drilling holes and using bolts and nuts.

The seat is installed so that the joints are located in the center of the ribs of the legs. The outer parts are screwed on first, and then the inner ones. In this way, the entire hexagonal structure around the tree is assembled.


Finally, the back is made and the apron is installed. The result is a DIY circular bench with a backrest.

The finished product is processed oil impregnation.

Bench made of curved branches

A bench made of curved branches will look original. It will require branches for the front part, two legs, a horizontal top and a pair of transverse branches.

Sawing branches so that they fit each other as accurately as possible. Next they are connected by metal corners.


Manufactured in the same way back and connect it to the front.


The finished product is placed on a flat surface and the seat is assembled.

Bench options
- Log bench, which blends well with the surrounding nature. It consists of half a log, used for a seat, and two short round logs, which are legs.

- Beautiful wooden bench
with a back and armrests, reminiscent of a sofa. Curved and cut elements make it more attractive, while leaving knots and irregularities gives the structure a natural look.

- Bench made of wood and metal. The base of the structure is metal. The wooden parts of the seat and back are attached to it. Thanks to the small thickness metal parts she looks light.

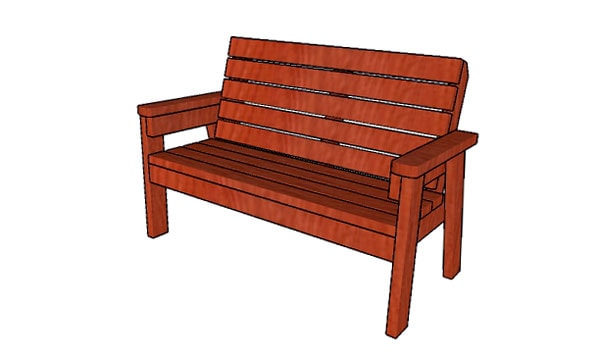
- The bench has a simple, classic shape. It is made of wooden, rather wide boards. This width allows you to sit comfortably on the bench. Armrests make the design more complete.

- Original bench made of wood with figured details. This option is well suited for a site with a natural, rural design. Carved legs and armrests, a figured back - all this gives the product originality.

- Bench with an interestingly shaped back. The curved parts gradually bend back, creating a unique design. The seat is slightly curved but has a more traditional appearance.

- Wooden complex- a table with two benches. The design looks traditional due to the material used. An original solution is the fastening of all components into a single structure.

- The bench is made of solid log
. A single piece is cut out of it, combining the back and seat. The legs are attached to the bottom. The log required is quite large.

- Bench with storage box for toys. Outwardly it looks like an ordinary wooden bench-sofa, but under the seat there is a drawer in which you can put various things.

- A comfortable bench made of wood with a simple shape. The base is made in the form of a rectangular box. The back is also simple with a straight shape. Placed on the seat soft pillows, providing additional comfort.

- Wooden bench located around a tree. It is made as if it consists of four benches, each of which has one armrest. The composition looks attractive and comfortable.

- A simple bench made of wide boards. It looks solid, but its dimensions are somewhat concealed due to the gaps between the boards and the light blue, in which it is painted.
